


 Loading...
HP Prime Graphing Calculator
Quick Start Guide
Edition 1
HP Part Number: NW280-1001
Keyboard Legend
The table and photo on the following page illustrate a few of the many features available on the HP Prime Graphing Calculator. These features, as well as other features of the calculator, are discussed in this quick start guide. For a complete list of features, refer to the HP Prime Graphing Calculator User’s Guide available on the HP website: http://www.hp.com/support.
Legal Notices
This guide and any examples contained herein are provided “as is” and are subject to change without notice. Hewlett-Packard Company makes no warranty of any kind with regard to this guide, including, but not limited to, the implied warranties of merchantability, non-infringement and fitness for a particular purpose.
Hewlett-Packard Company shall not be liable for any errors or for incidental or consequential damages in connection with the furnishing, performance, or use of this guide or the examples contained herein.
Product Regulatory & Environment Information
Product Regulatory and Environment Information is provided on the CD shipped with this product.
Copyright © 2013 Hewlett-Packard Development Company, L.P.
Reproduction, adaptation, or translation of this guide is prohibited without prior written permission of Hewlett-Packard Company, except as allowed under the copyright laws.
Printing History
Edition 1, May 2013
ii

HP Prime: Keyboard Legend
Number |
Feature |
1LCD and touch-screen: 320 × 240 pixels
2Context-sensitive touch-button menu
3HP Apps keys
4Home view and Home preference settings
5Common math and science functions
6Alpha and Shift keys
7On, Cancel and Off key
8List, matrix, program, and note catalogs
9Last Answer key (Ans)
10 Enter key
11Backspace and Delete key
12Menu (and Paste) key
13CAS view and CAS preference settings
14View (and Copy) key
15Escape (and Clear) key
16Help key
17Rocker wheel (for cursor movement)
1 |
|
|
|
|
|
|
|
|
|
|
|
|
|
|
|
|
|
|
|
|
|
|
|
|
|
|
|
|
|
|
|
|
|
|
|
|
|
|
|
|
|
|
|
|
|
|
|
|
|
|
|
|
|
|
|
|
|
|
|
|
|
|
|
||
2 |
|
|
|
|
|
|
|
|
|
|
|
17 |
||||||||||||||||||||
3 |
|
|
|
|
|
|
|
|
|
|
16 |
|||||||||||||||||||||
|
|
|
|
|
|
|
|
|
|
|
|
|
|
|
|
|
|
|
|
|
|
|
|
|
|
|
|
|
|
|
15 |
|
4 |
|
|
|
|
|
|
|
|
|
|
|
|
|
|
|
|
|
|
|
|
|
|
|
14 |
||||||||
|
|
|
|
|
|
|
|
|
|
|
|
|
|
|
|
|
|
|
|
|
|
|
|
13 |
||||||||
|
|
|
|
|
|
|
|
|
|
|
|
|
|
|
|
|
|
|
|
|
|
|
|
|
|
|
|
|
|
|
||
|
|
|
|
|
|
|
|
|
|
|
|
|
|
|
|
|
|
|
|
|
|
12 |
||||||||||
|
|
|
|
|
|
|
|
|
|
|
|
|
|
|||||||||||||||||||
5 |
|
|
|
|
|
|
|
|
|
|
|
|
|
|
|
|
11 |
|||||||||||||||
|
|
|
|
|
|
|
||||||||||||||||||||||||||
|
|
|
|
|
|
|
|
|
|
|
|
|
|
|
|
|
|
|
|
|
|
|
|
|
|
|
|
|
|
10 |
||
|
|
|
|
|
|
|
|
|
|
|
|
|
|
|
|
|
|
|
|
|
|
|
|
|
|
|
|
|
|
|||
|
|
|
|
|
|
|
|
|
|
|
|
|
|
|
|
|
|
|
|
|
|
|
|
|
|
|
|
|
|
|||
6 |
|
|
|
|
|
|
|
|
|
|
|
|
|
|||||||||||||||||||
|
|
|
|
|
|
|
|
|
|
|
|
|
|
|
|
|
|
|||||||||||||||
|
|
|
|
|
|
|
|
|
|
|
|
|
|
|
|
|
|
|
|
|
|
|
|
|
|
|
|
|
|
|
|
|
|
|
|
|
|
|
|
|
|
|
|
|
|
|
|
|
|
|
|
|
|
|
|
|
|
|
|
|
|
|
|
|
|
|
|
|
|
|
|
|
|
|
|
|
|
|
|
|
|
|
|
|
|
|
|
|
|
|
|
|
|
|
|
|
|
|
|
|
|
|
|
|
|
|
|
|
|
|
|
|
|
|
|
|
|
|
|
|
|
|
|
|
|
|
|
|
|
|
|
|
|
|
|
|
|
|
|
|
|
|
|
|
|
|
|
|
|
|
|
|
|
|
|
|
|
|
|
|
|
|
|
|
7 |
|
|
|
|
|
|
|
|
|
|
|
|
|
|
|
|
|
|
|
|
|
|
|
|
9 |
|||||||
|
|
|
|
|
|
|
|
|
|
|
|
|
|
|
|
|
|
|
|
|
|
|||||||||||
|
|
|
|
|
||||||||||||||||||||||||||||
|
|
|
|
|
|
|
|
|
|
|
|
|
|
|
|
|
|
|
|
|
||||||||||||
8 |
|
|
|
|
|
|
|
|
|
|
|
|
|
|
|
|
|
|
|
|
|
|
|
|
|
|
|
|
|
|
|
|
|
|
|
|
|
|
|
|
|
|
|
|
|
|
|
|
|
|
|
|
|
|
|
|
|
|
|
|
|
|
|
|
|
|
|
|
|
|
|
|
|
|
|
|
|
|
|
|
|
|
|
|
|
|
|
|
|
|
|
|
|
|
|
|
|
|
iii
 NW280-1001 User Manual")
w graphsdazzling
Create
ith the Advanced Graphing app
|
Contents |
|
1. |
Getting Started......................................................................................................... |
1 |
|
Charging the Battery .................................................................................................................. |
2 |
|
Turning On and Off.................................................................................................................... |
3 |
|
Home View ............................................................................................................................... |
3 |
|
Navigation................................................................................................................................ |
4 |
|
Home Settings ........................................................................................................................... |
4 |
|
Entering and Editing Expressions.................................................................................................. |
5 |
|
Entering Text.............................................................................................................................. |
6 |
|
Editing, Deleting, and Clearing.................................................................................................... |
7 |
|
Last Answer............................................................................................................................... |
7 |
|
Storing Values in Variables ......................................................................................................... |
7 |
|
Copy and Paste ......................................................................................................................... |
8 |
|
Understanding the User Interface ................................................................................................. |
9 |
|
Computer Algebra System (CAS) ............................................................................................... |
10 |
2. HP Apps and their Views ......................................................................................... |
13 |
|
|
HP Apps ................................................................................................................................. |
13 |
|
App Views .............................................................................................................................. |
15 |
|
Graphing Methods................................................................................................................... |
17 |
3. |
Primary Apps ......................................................................................................... |
18 |
|
The Function, Advanced Graphing, Parametric, Polar, and Sequence Apps .................................... |
18 |
|
Geometry App......................................................................................................................... |
27 |
|
Spreadsheet App ..................................................................................................................... |
31 |
|
Statistics 1Var App................................................................................................................... |
35 |
v
|
Statistics 2Var App................................................................................................................... |
37 |
|
Inference App .......................................................................................................................... |
39 |
|
DataStreamer App ................................................................................................................... |
40 |
|
Solve App ............................................................................................................................... |
42 |
4. |
Solver Apps........................................................................................................... |
43 |
|
Finance App............................................................................................................................ |
43 |
|
Linear Solver App..................................................................................................................... |
46 |
|
Triangle Solver App.................................................................................................................. |
47 |
5. |
Explorer Apps........................................................................................................ |
48 |
|
Linear Explorer and Quadratic Explorer Apps .............................................................................. |
48 |
|
Trig Explorer App..................................................................................................................... |
50 |
6. |
Creating Customized Apps...................................................................................... |
52 |
7. |
The Toolbox Menus ................................................................................................ |
53 |
|
Math Menu ............................................................................................................................. |
53 |
|
CAS Menu .............................................................................................................................. |
54 |
|
App Menu............................................................................................................................... |
54 |
|
User Menu .............................................................................................................................. |
55 |
|
Catalog Menu (Catlg) ............................................................................................................... |
55 |
8. |
Catalogs and Editors .............................................................................................. |
56 |
|
List Catalog and Editor.............................................................................................................. |
56 |
|
Matrix Catalog and Editor......................................................................................................... |
57 |
|
Program Catalog and Editor ...................................................................................................... |
58 |
|
Note Catalog and Editor........................................................................................................... |
60 |
vi
1 Getting Started
The HP Prime Graphing Calculator is an easy-to-use yet powerful graphing calculator designed for secondary mathematics education and beyond. It offers hundreds of functions, and includes a computer algebra system (CAS) for symbolic calculations. This quick start guide covers basic tasks, such as entering and editing expressions, plotting their graphs, and creating tables of values generated by expressions. It also serves as an introduction to HP apps. HP apps are special applications designed for the study and exploration of a branch of mathematics or to solve problems of one or more special types. Advanced topics—such as the CAS, geometry, lists, matrices, programs, and the spreadsheet—are also briefly described. For detailed information, refer to the HP Prime Graphing Calculator User Guide. There is also online help available on the calculator. Press Wto display information about the current screen, and for access to calculator-wide information.
The calculator’s keypad provides access to unshifted functions and shifted functions. An unshifted function is one that you initiate by pressing a single key. For example, pressing aopens the Variables menu. A shifted function is initiated with a key combination. For example, to select the natural exponential function, you press Sh. Notice that the name or symbol of a shifted function is printed in blue or orange on the second line on the key. Certain operators and characters can also be entered by key combinations.
In order to help you differentiate between keypresses and on-screen display options, this guide uses the following conventions:
•A key that initiates an unshifted function is represented by an image of that key: for example, Y.
•A key combination that initiates a shifted function (or inserts a character) is represented by the appropriate shift key (Sor A) followed by the key for that function or character. For example, Shinitiates the natural exponential function and Azinserts the pound character (#). The name of the shifted function may also be given after the key combination, as in SJ(Clear).
•A key pressed to insert a digit is represented by that digit: for example, 7.
•All fixed on-screen text—such as screen and field names—appears in bold: for example, X Step.
•Items you can select from a menu, and characters on the entry line, are set in a mono-spaced font: for example, Function,
Integrate, euler, Ans, etc.
•A menu item selected by tapping the screen is represented by an image of that item: for example,  .
.
1
•Bread-crumb notation is used to represent a selection from sub-menus or sub-sub-menus. For example, “Select Polynomial > Algebra > Quotient” means first select Polynomial, then select Algebra, and finally select Quotient.
•Cursor keys are represented by =, \, >, and <. You use these keys to move from field to field on a screen, from one option to another in a menu, or from one plot to another when you have a number of functions plotted.
Charging the Battery
Charge the battery fully before using the calculator for the first time. To charge the battery, either:
•Connect the calculator to a computer using the USB cable that came in the package with your HP Prime. (The PC needs to be on for charging to occur.)
•Connect the calculator to a wall outlet using the HP-provided wall adapter.
When the calculator is on, a battery symbol appears in the title bar of the screen. Its appearance will indicate how much power the battery has. A flat battery will take approximately 4 hours to become fully charged.
 Battery Warning
•To reduce the risk of fire or burns, do not disassemble, crush or puncture the battery; do not short the external contacts; and do not dispose of the battery in fire or water.
•To reduce potential safety risks, only use the battery provided with the calculator, a replacement battery provided by HP, or a compatible battery recommended by HP. There is a risk of explosion if the battery is replaced with one of an incompatible type.
•Dispose of a battery according to the instructions.
•Keep the battery away from children.
•If you encounter problems when charging the calculator, stop charging and contact HP immediately.
2

 Adapter Warning
•To reduce the risk of electric shock or damage to equipment, only plug the wall adapter into an AC outlet that is easily accessible at all times.
•To reduce other potential safety risks, only use the wall adapter provided with the calculator, a replacement wall adapter provided by HP, or a wall adapter purchased as an accessory from HP.
Turning On and Off
To turn the calculator on, press O. To turn it off, press SO(Off).
To adjust the brightness of the screen, press and hold Oand then press either +or wrepeatedly. Pressing +increases the brightness; pressing wdecreases it.
Home View
Home view is the starting point for many calculations. Press Hto display it. Home view has four sections (shown at the right). The title bar shows either the screen name or the name of the app that is currently selected—Function in the example at the right. It also shows the time, a battery power indicator, and a number of symbols that indicate various calculator settings. These are explained in the User Guide. The history displays a record of your past calculations. The entry line displays the object you are currently entering or modifying. The object could be a parameter, expression, list, matrix, line of programming code, etc. The menu buttons are options that are relevant to the current display. These options are
selected by tapping the corresponding menu button. (Only a labeled button has a function.) Some menu buttons open a further menu. You close such a menu without making a selection from it by pressing J.
3

Navigation
The HP Prime offers two modes of navigation: by touch and by keypress. In many cases, you can tap on an icon, field, menu, or object to select (or deselect) it. For example, you can open the Function app by tapping once on its icon in the Application Library. However, to open the Application Library, you will need to press a key: I. Selections can often be made either by tapping or by using the keys. For instance, as well as tapping an icon in the Application Library, you can press the cursor keys until the app you want to open is highlighted, and then press E. Sometimes both a touch and a key–touch combination is available. For example, you can deselect a toggle option either by tapping on it, or by using the cursor keys to move to the field and then tapping a touch button along the bottom of the screen (in this case  ). Note that
  and Ework identically, as do
  and J.
You must use your finger to select an item by touch. Using a stylus or something similar will not work.
Touch gestures: In addition to selection by tapping, there are other touch-related operations available to you. How these gestures are interpreted varies from app to app, and from view to view within an app. For example, swiping the screen (by placing a finger on the screen and dragging it in the desired direction: right or left; up or down) will quickly move from page to page in a multi-page view like Plot Setup. But in the Plot view of most apps, swiping will scroll the view. Likewise, pinching (by placing a thumb and finger on the screen and moving them together or apart) will be interpreted differently by different apps. For example, in the Spreadsheet app, a horizontal pinch can be used to change the width of a column. In the Trig Explorer app, a vertical pinch can be used to change the amplitude of the sinusoid.
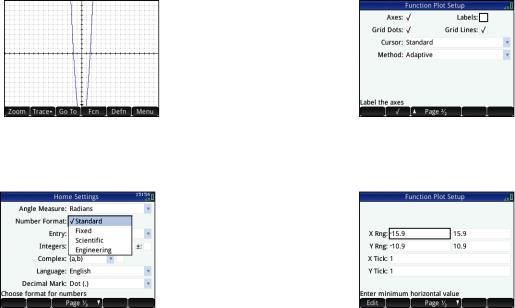
Home Settings
Many calculator settings are user-configurable, such as angle measure, number format, entry format, decimal mark etc. To view or change a setting, press SH(Settings). The Home Settings window appears. This window is an input form, that is, a window that provides one or more fields for you to enter data or select an option. You can use the cursor keys to move to a field you want to change, make your change, and press E.
4
Alternatively, you can just tap the field or field label, and:
•if the field allows you to enter data of your choice, tap it, enter your data, and tap  .
.
•if the field allows you to choose an item from a menu, tap on it twice and select the item you want.
•if the field is a toggle field—one that is either selected or not selected—tap once to select it and tap again to set the option to its alternate value.
Note that there are three pages of home settings. Tap  to display the second page. This page has settings for font size, calculator name, output display format, menu item format, time, date, color theme, and shading color.
The third page of settings will primarily be of interest to the supervisors of examinations who need to ensure that the calculator is used appropriately by students during an examination. Supervisors can disable certain functions of a student’s calculator for a set period of time, with the disabling controlled by a password. This functionality is explained in detail in the User Guide.
To reset a field to its default value, move the cursor to that field and press C. To reset all fields to their default values, press SJ(Clear).
Note that the reset options are available on all screens that show settings (not just the Home
Settings screen). If settings are spread over more than one page, pressing SJ(Clear) resets only the settings on the page that is currently displayed.
To return to Home view, press H. Note that the CAS has its own settings (see page 10).
Entering and Editing Expressions
Methods
The home settings enable you to choose one of three entry methods:
•Algebraic: entry is on a single line (as in x^2)
•Textbook: entry can be on several lines, as in a textbook (for example, x2)
•RPN (that is, Reverse Polish Notation): inputs precede operators. Thus uEt+yields 9.
5
The examples in this guide will illustrate the textbook mode of entry. The order in which items are entered in textbook mode is the same in algebraic mode. Only the appearance of the entry is different. However, the order of entry in RPN mode is different. If you prefer to use RPN, consult the User Guide.
Example
To calculate 
 , enter SjSzE
Notice that both √ and are entered as a key-combination. They are shifted characters.
By default all results are displayed with 12 digits of accuracy. You can also evaluate expressions using the computer algebra system (CAS) directly, or by calling a CAS command from Home view. This provides symbolic rather than numeric results (see page 10).
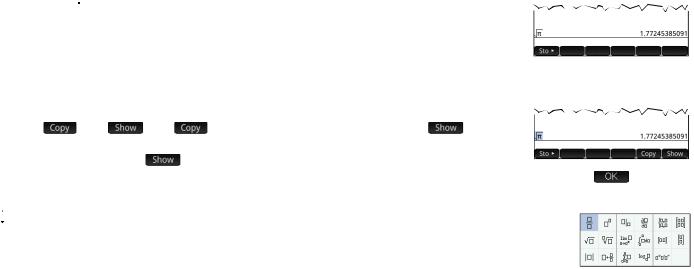
Press =twice to highlight the expression you entered. Note that two additional menu items |
|
||||
appear: |
and |
. The |
command is described on page 7. The |
command |
|
is useful if a result is too tall to be seen in its entirety (for example, a many-rowed matrix). If you |
|
||||
highlight the result and tap |
|
, it is displayed in textbook format in full-screen view. In full- |
|
||
screen view you can press =and \(as well as >and <) to bring hidden parts of the result into view. Tap |
to return to |
||||
the previous view. |
|
|
|
|
|


 Tip: a quick way to enter many types of mathematical expressions is to press F. A palette of templates appears (shown at the right). You choose a template by tapping on it and then add the necessary parameters.
Entering Text
The common alphabetic characters (a–z and A–Z) can be entered from the keyboard. To enter an uppercase alphabetic character, first press Aand then the key that has that character printed on it in orange. Thus to print F, enter Ak. To enter a lowercase character, first press ASand then the key that has that character printed on it in orange. Thus to print f, enter ASk. There is a way to lock the keyboard so that all subsequent characters are uppercase without needing to be preceded by A. The keyboard can also be locked so that every subsequent alphabetic character is lowercase. This is explained in the User Guide.
6

Editing, Deleting, and Clearing
With an expression highlighted in history, tap  . The expression is copied to the entry line (as shown at the right). If you had meant to enter
 3 , you can edit the current expression by
moving the cursor to the right of the , pressing C, and then typing 3.
To clear the entire entry line, press J. To execute a new calculation, press E.
The history section of Home view keeps a record of all your work. You can delete an item from history by selecting it and pressing C. You can delete the entire history by pressing SJ, but be careful as there is no undo for this action.
Last Answer
Press S+(Ans) to retrieve your last answer for use in another calculation. Ans appears on the entry line. This is a shorthand for your last answer and it can be part of a new expression. You
could now enter other components of a calculation—such as operators, number, variables, etc.— and create a new calculation.


 Tip: you don’t always need to first select Ans before it can be part of a new calculation. If you
press any binary operator key to begin a new calculation, Ans is automatically added to the entry line as the first component of the new calculation. For example, to multiply the last answer by 13, you could enter S+s13E. But the first two keystrokes are unnecessary. All you need to enter is s13E.
Storing Values in Variables
You can store a value in a variable (that is, assign a value to a variable). Then when you want to use that value in a calculation, you can refer to it by the variable’s name. You can create your own variables, or you can take advantage of the built-in variables in Home view (named A to Z and ) and in the CAS (named a to z, and a few others). CAS variables can be used in calculations in Home view, and Home variables can be used in calculations in the CAS. There are also built-in app variables and geometry variables. These can also be used in calculations. Consult the User Guide for details.
7

To store your last answer in Home variable A:
 AaE
AaE
Your stored value appears as shown to the right. If you then wanted to multiply your stored value by 5, you could enter: Aas5E.
You can also create your own variables (both in Home view and in CAS view). For example, entering 101 AQAcEassigns 101 to the variable ME, and a subsequent calculation such as ME*3 will yield 303.
Variables can also be created by adopting the following syntax: [variable name]:=[object]. For example, entering AxAoAtAwS.55Eassigns 55 to the variable YOU. A subsequent calculation such as YOU+ME would yield 156.
The HP Prime keeps a list of all the variables you create. You can see this list by pressing a, tapping  and choosing User Variables. A list of user-defined variables appears. To use a listed variable in a current calculation, just select it from the list. To delete a listed variable, use the cursor keys to highlight it and then press C.
Copy and Paste
Copy-and-paste functionality is available. The copy options vary depending on where you are in the calculator. For example, if you are creating a matrix in the Matrix Editor, choosing copy (SV) simply copies the value of the highlighted cell to the clipboard. You navigate to the target cell, press SZto display the clipboard, and choose the entry you want to paste.
If you are working in the Program Editor or Note Editor, pressing SVgives a number of copy options. The illustration at the right shows the menu items you see when you are in the Program
Editor: mark where to begin a selection, mark where to end the selection, select the current line, select everything, cut what is selected, and copy what is selected.
In the Spreadsheet app, the paste functionality gives you a choice of what to paste: the copied value, the underlying formula, the format of what was copied, or the formula and its associated formatting.
8
Understanding the User Interface
Menu Items
The bottom of the display contains a menu of up to six items. You choose an item by tapping it once with your finger.
The menu items change depending on what screen is showing, or what item you last chose.
Choose Boxes
A choose box displays one item from a menu of items. To select an item other than the one showing, tap the box and then tap the item.
Pressing +(or w) will cycle forward (or backward) through the options.
You can also use the cursor keys to highlight a choose box, tap
 , use the cursor keys to select an item, and then press
E.
Check Boxes
A check box enables you select or deselect a single option. To change a current selection, tap on it once to select it, and tap again to switch the value to its alternate setting.
You can also use the cursor keys to scroll to the check box and tap  .
.
Input Fields
To enter data into an empty input field, tap on the field and begin entering the data. What you enter appears on the entry line. If the input field already has data in it, tapping on it twice places the data on the entry line with the cursor at the
end, ready for you to make your changes.
When you have finished entering or changing the data, tap  or press E. You can also tap
  to reject the
addition or alteration you have made.
9
Computer Algebra System (CAS)
The computer algebra system (CAS) enables you to perform symbolic calculations. By default, the CAS works in exact mode. On the other hand, non-CAS calculations, such as those performed in Home view or by an app, are numerical calculations and often
approximations limited by the precision of the calculator (to 10 |
|
in the case of the HP Prime). For example, |
----- |
+ ----- yields the |
||
|
–12 |
|
|
|
1 |
2 |
approximate answer .619047619047 in Home view (with Standard numerical format), but |
13 |
in the CAS. |
3 |
7 |
||
----------- |
|
|
||||
|
|
|
21 |
|
|
|
To open the CAS, press K. The CAS view that appears is similar to the Home view. Previous CAS calculations are recorded in history and you can re-use an expression or result in exactly the same way: by selecting it and tapping  . Other general operations are exactly the same. For example, pressing Jclears the entry line, and pressing SJclears the entire history.
The menu buttons in CAS view are:
• : assigns an object to a variable (see page 7)
• : applies common simplification rules to reduce an expression to its simplest form. For example, simplify(ea + LN(b*ec)) yields b * EXP(a)* EXP(c).
• and
and  work as they do in Home view (see pages 7 and 6 respectively)
The CAS offers many hundreds of functions, covering algebra, calculus, equation solving, polynomials, and more. You select a function from the CAS menu, one of the Toolbox menus (discussed in chapter 7).
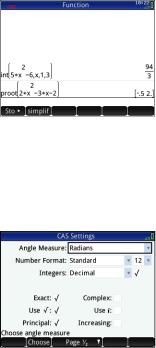
CAS settings
Various settings allow you to configure how you would like the CAS to work. To display the CAS Settings screen, where these settings can be changed, press SK. There are two pages of settings. The settings are explained in detail in the User Guide.
10
CAS calculations: Some examples
Suppose you want to find the quotient when x3 + 2x2 + 3x +4 is divided by –x + 2.
1.Press Kto open the CAS.
2.Press Dto display the Toolbox menus.
3.If the CAS menu is not open, tap  .
.
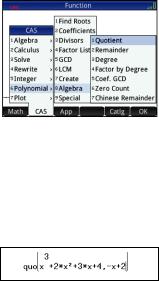
Note that the CAS functions are grouped by category. When you select a category, the functions in that category appear in a sub-menu. Some items on that sub-menu may open a further sub-menu. In this example, we are dealing with polynomial division. Thus, at the top level, the Polynomial category is the one to open to find the appropriate CAS function. But division is also an algebraic operation. Thus you will find the quotient function on the Algebra sub-menu (as shown at the right).
4.Select Polynomial > Algebra > Quotient. The function quo() appears on the entry line.
You can also select a CAS function using the hot-key numbers assigned to each item on the CAS menus. Notice in the illustration above that Polynomial is item 6 on the top level menu, Algebra is item 8 on the first sub-menu, and Quotient is item 1 on the next sub-menu. To quickly select Quotient once the CAS menu is open, you could simply press 681 on the keyboard.
You can also select a CAS function directly from the Catlg menu.
5.Enter the dividend and the divisor, separated by a comma. (Note that the User Guide and online help give the required syntax for each CAS function. Note too that variables must be entered in lowercase in the CAS.)
ASsk3>+2ASsj+3ASs+4oQASs+2
11
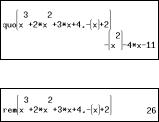
6.Press Eto see the result: –x2– 4x –11.
Note that the input and result appear in history, where you can select them for re-use. We will now re-use the function to determine the remainder of the division.
7.Tap on the function and then tap  . The expression is copied to the entry line.
8.Using the cursor keys and the Ckey, change quo to rem.
9.Press Eto see the result: 26
CAS menu
By default, a CAS function is presented on a CAS menu using its descriptive name, not its command name. Thus the command name gbasis is presented as Groebner Basis and proot is presented as Find Roots. If you prefer the CAS menus to show the command names instead, deselect the Menu Display option on page 2 of the Home Settings screen (see page 4 above).
Using CAS in Home view
You can use a CAS function in Home view. Just select the function from the CAS menu while you are entering your expression. The CAS. prefix is added to your CAS function to remind you that this component of your expression will be evaluated by the CAS. You can also copy an item from CAS history to an expression you are entering in Home view. Press Zand select Get from CAS. The CAS view opens. Tap the item you want and it is copied directly to the cursor position in Home view. Likewise you can insert an item from Home view history into an expression you are entering in CAS view. Just press Zand select Get from Home. Home view opens. Tap the item you want and it is copied directly to the cursor position in CAS view.
12
2 HP Apps and their Views
HP Apps
Much of the functionality of the HP Prime is provided in packages called HP apps. The HP Prime comes with 18 HP apps: 12 dedicated to mathematical topics or tasks, three specialized Solvers, and three function Explorers. You launch an app by first pressing I(which displays the Application Library screen) and tapping on the icon of the app you want. The apps are outlined in tables 1, 2, and 3 below, and described in detail in chapters 3, 4, and 5 respectively.
Table 1: Primary apps
HP App Name |
Purpose |
|
|
Function |
Define functions and explore graphs and tables of values |
Advanced Graphing |
Define and explore the graphs of symbolic open sentences in x and y |
Geometry |
Interact dynamically with geometric representations, change their magnitude, position, and orientation, and |
|
observe the resultant changes in their numerical properties |
Spreadsheet |
Create a spreadsheet using any of the calculator’s functions |
Statistics 1Var |
Enter columns of data, conduct 1-variable statistical analyses, compute summary statistics, and explore statis- |
|
tical plots |
Statistics 2Var |
Enter columns of data, conduct 2-variable statistical analyses, compute summary statistics, and explore statis- |
|
tical plots |
Inference |
Compute and explore hypothesis tests and confidence intervals |
Datastreamer |
Collect real-world data using sensors and the HP StreamSmart 410 |
Solve |
Solve an equation for one of its variables or solve a system of linear or non-linear equations |
Parametric |
Define parametric equations and explore their graphs and tables of values |
Polar |
Define polar equations and explore their graphs and tables of values |
Sequence |
Define sequences and explore graphs and tables of values |
|
|
13
The three specialized Solvers—outlined in Table 2—are designed to help you solve problems of a specific type.
Table 2: HP Solver Apps
Solver App Name |
Purpose |
|
|
Finance |
Solve time-value-of-money (TVM) and amortization problems |
Linear Solver |
Solve 2×2 and 3×3 systems of linear equations |
Triangle Solver |
Solve problems involving the lengths of sides, and the measures of angles, in triangles |
|
|
Three apps are specifically designed to help you explore the relationships between the values of the parameters in a function and the shape of the graph of the function. See Table 3 below.
Table 3: HP Explorer Apps
Explorer App Name |
Purpose |
|
|
Linear Explorer |
Explore the relationship between the shape of the graph and values of the parameters in linear functions |
Quadratic Explorer |
Explore the relationship between the shape of the graph and values of the parameters in quadratic functions |
Trig Explorer |
Explore the relationship between the shape of the graph and values of the parameters in sinusoidal functions |
|
|
Data persistence
When you work with an app you enter data of one sort or another, such as definitions of functions, window settings, and preferences. The app records all this data and automatically saves it for you. If you leave the app and come back to it later, all that data is still there. In fact, you can save an instance of the app with a new name and keep the original version for another purpose. The new version, under the new name, contains all the data from the source app. (This is explained in chapter 6, “Creating Customized Apps” on page 52.)
If you don’t want to retain the data stored with an app when you next open the app, you can reset the app to its default values and settings. With the Application Library displayed (I), use the cursor keys to highlight the app you want to reset, and then tap  . Confirm your intention to reset the app by tapping
  or pressing E.
14
Data sharing
Using the supplied USB cable, you can send an app from one HP Prime to another. It can be a built-in app or one you’ve customized. In fact, you can share with other HP Prime users many of the objects you create using your HP Prime, such as programs, notes, lists, and matrices.
Note that the connectors on the ends of the USB cable are slightly different. The micro-A connector has a rectangular end and the micro-B connector has a trapezoidal end. To share objects with another HP Prime, the micro-A connector must be inserted into the USB port on the sending calculator, with the micro-B connector inserted into the USB port on the receiving calculator.
Micro-A: sender |
Micro-B: receiver |
App Views
Most HP apps have the same structure, based on the symbolic, graphic, and numeric representations of mathematical objects. These representations are called views, and they can be displayed by pressing Y, P, and Mrespectively. Each main view can be configured from an associated setup view. For example, pressing SPdisplays the Plot Setup view, where you can specify the range of values to be plotted, axis intervals, cursor appearance, etc.
Note that an app remains selected until you select another one. Thus if you leave an app, do other work with the calculator and then press Y, P, or M, the previous data shown in these views are redisplayed. This includes expressions, plots, and values.
15
Loading...