


 Loading...
Copyright and License
© Copyright 2019 HP Development Company,
L.P.
Reproduction, adaptation, or translation without prior written permission is prohibited, except as allowed under the copyright laws.
The information contained herein is subject to change without notice.
The only warranties for HP products and services are set forth in the express warranty statements accompanying such products and services. Nothing herein should be construed as constituting an additional warranty. HP shall not be liable for technical or editorial errors or omissions contained herein.
Trademark Credits
Apple and the Apple logo are trademarks of Apple Inc., registered in the U.S. and other countries.
OS X is a trademark of Apple Inc., registered in the U.S. and other countries.
AirPrint is a trademark of Apple Inc., registered in the U.S. and other countries.
iPhone is a trademark of Apple Inc., registered in the U.S. and other countries.
Microsoft® and Windows® are U.S. registered trademarks of Microsoft Corporation.
Amazon, Kindle, and all related logos are trademarks of Amazon.com, Inc. or its affiliates.
Wi-Fi and Wi-Fi Direct are registered trademarks of the Wi-Fi Alliance. (See
https //www.wi-fi.org/who-we-are/our-brands for more details.)

Table of contents
1 Get started .................................................................................................................................................... |
1 |
Printer views .......................................................................................................................................................... |
2 |
Printer front view ................................................................................................................................ |
2 |
Printer back view ................................................................................................................................. |
2 |
Control panel features ........................................................................................................................................... |
3 |
Base models ........................................................................................................................................ |
3 |
Wireless models .................................................................................................................................. |
4 |
Use the HP Smart app to print, copy, scan, and troubleshoot .............................................................................. |
6 |
2 Connect your printer ...................................................................................................................................... |
7 |
Connect to a wireless network with a router ......................................................................................................... |
8 |
Connect your printer to a wireless network using Wi-Fi Protected Setup (WPS) ............................... |
8 |
Connect your printer to a wireless network using HP printer software ............................................. |
8 |
Connect wirelessly without a router .................................................................................................................... |
10 |
Wireless settings ................................................................................................................................................. |
13 |
3 onfi ure your printer .................................................................................................................................. |
15 |
onfigure the printer using the HP Embedded Web Server (EWS) and HP Device Toolbox (Windows) .............. |
16 |
Accessing and Using the Embedded Web Server (EWS) ................................................................... |
16 |
Opening the HP Embedded Web Server (EWS) from the software (Windows 7) ........... |
16 |
Opening the HP Embedded Web Server (EWS) from a web browser ............................. |
16 |
Opening the HP Embedded Web Server (EWS) when using a Wi-Fi Direct connection .. |
17 |
Navigating the HP Embedded Web Server ..................................................................... |
17 |
onfigure IP network settings ........................................................................................................... |
19 |
View or change network settings ................................................................................... |
19 |
Rename the printer on a network ................................................................................... |
19 |
Manually configure IPv4 TCP/IP parameters .................................................................. |
19 |
Assign or change the system password using the HP Embedded Web Server ................................ |
19 |
Change energy-conservation settings ............................................................................................. |
20 |
Set the Sleep/Auto ff After Inactivity setting ............................................................... |
20 |
Set the Shut Down After Inactivity delay and configure the printer to use 1 watt or |
|
less of power ................................................................................................................... |
20 |
ENWW |
iii |
Set the Delay Shut Down setting .................................................................................... |
21 |
Update the firmware ............................................................................................................................................ |
22 |
Update the firmware using the Firmware Update Utility .................................................................. |
22 |
Change the printer connection type (Windows 7) ............................................................................................... |
23 |
4 Load media ................................................................................................................................................. |
25 |
onfigure the input tray for different paper sizes ............................................................................................... |
25 |
Load paper ........................................................................................................................................................... |
27 |
Load and print envelopes .................................................................................................................................... |
30 |
Load and print labels ........................................................................................................................................... |
32 |
5 Print ........................................................................................................................................................... |
35 |
Print using a Windows computer ......................................................................................................................... |
36 |
Select the paper type (Windows) ...................................................................................................... |
36 |
Manually print on both sides (Windows) ........................................................................................... |
37 |
Print multiple pages per sheet (Windows) ........................................................................................ |
37 |
Print using a Mac computer ................................................................................................................................. |
38 |
Print with mobile devices .................................................................................................................................... |
39 |
6 Manage toner, media, and parts .................................................................................................................... |
41 |
Check the toner level ........................................................................................................................................... |
42 |
Reload toner ........................................................................................................................................................ |
43 |
Replace the imaging drum ................................................................................................................................... |
46 |
Order supplies, media, and parts ........................................................................................................................ |
48 |
7 Solve problems ............................................................................................................................................ |
49 |
HP support ........................................................................................................................................................... |
50 |
Contact HP ......................................................................................................................................... |
50 |
Register printer ................................................................................................................................. |
50 |
Additional warranty options ............................................................................................................. |
50 |
Additional information ...................................................................................................................... |
51 |
Interpret control-panel light patterns ................................................................................................................. |
52 |
Restore the factory-set defaults ......................................................................................................................... |
55 |
Printer does not pick up paper or misfeeds ........................................................................................................ |
56 |
Introduction ....................................................................................................................................... |
56 |
The product does not pick up paper ................................................................................................. |
56 |
The product picks up multiple sheets of paper ................................................................................ |
56 |
Clear paper jams .................................................................................................................................................. |
57 |
Introduction ....................................................................................................................................... |
57 |
Jam locations ..................................................................................................................................... |
57 |
iv |
ENWW |
Frequent or recurring paper jams ..................................................................................................... |
58 |
Clear jams from the input tray .......................................................................................................... |
59 |
Clear jams from inside the product ................................................................................................... |
61 |
Clear jams from the output areas ..................................................................................................... |
62 |
Improve print quality ........................................................................................................................................... |
63 |
Introduction ....................................................................................................................................... |
63 |
Reprint the document ....................................................................................................................... |
63 |
Check the toner level ......................................................................................................................... |
63 |
Update the printer firmware ............................................................................................................. |
63 |
Print from a different software program .......................................................................................... |
63 |
Check the paper type and print quality settings for the print job .................................................... |
63 |
Check the paper type loaded in the printer .................................................................... |
64 |
Check the paper type and print quality settings (Windows) .......................................... |
64 |
Check the paper type and print quality settings (OS X) ................................................. |
64 |
Visually inspect the imaging drum .................................................................................................... |
65 |
Check paper and the printing environment ...................................................................................... |
65 |
Step one: Use paper that meets HP specifications ........................................................ |
65 |
Step two: Check the environment .................................................................................. |
65 |
Adjust Print Density ........................................................................................................................... |
66 |
Resolving print quality problems ........................................................................................................................ |
67 |
Solve wireless network problems ....................................................................................................................... |
72 |
Introduction ....................................................................................................................................... |
72 |
Wireless connectivity checklist ......................................................................................................... |
72 |
Perform a wireless network diagnostic test ..................................................................................... |
73 |
The printer does not print after the wireless configuration completes ........................................... |
73 |
The printer does not print, and the computer has a third-party firewall installed .......................... |
74 |
The wireless connection does not work after moving the wireless router or printer ...................... |
74 |
Cannot connect more devices to the wireless printer (Wi-Fi Direct) ................................................ |
74 |
The wireless printer loses communication when connected to a VPN ............................................. |
75 |
The network does not appear in the wireless networks list ............................................................ |
75 |
The wireless network is not functioning ........................................................................................... |
75 |
Reduce interference on a wireless network ...................................................................................... |
75 |
Appendix A Printer spec fic t ons .................................................................................................................... |
77 |
Technical specifications ....................................................................................................................................... |
77 |
Supported operating systems ............................................................................................................................. |
77 |
Printer dimensions .............................................................................................................................................. |
79 |
Power consumption, electrical specifications, and acoustic emissions ............................................................. |
79 |
Operating-environment range ............................................................................................................................ |
79 |
Warning icons ....................................................................................................................................................... |
80 |
Laser Warning ...................................................................................................................................................... |
81 |
ENWW |
v |
Index ............................................................................................................................................................. |
83 |
vi |
ENWW |

1Get started
●Printer views
●Control panel features
●Use the HP Smart app to print, copy, scan, and troubleshoot
ENWW |
1 |

Printer views
●Printer front view
●Printer back view
Printer front view
1Control panel
2Output bin
3Reload port
4Reload Status light
5Toner level indicator
6Input tray
7Output bin extension
8Finger recess
Printer back view
1Power connection
2USB port
2 Chapter 1 Get started |
ENWW |

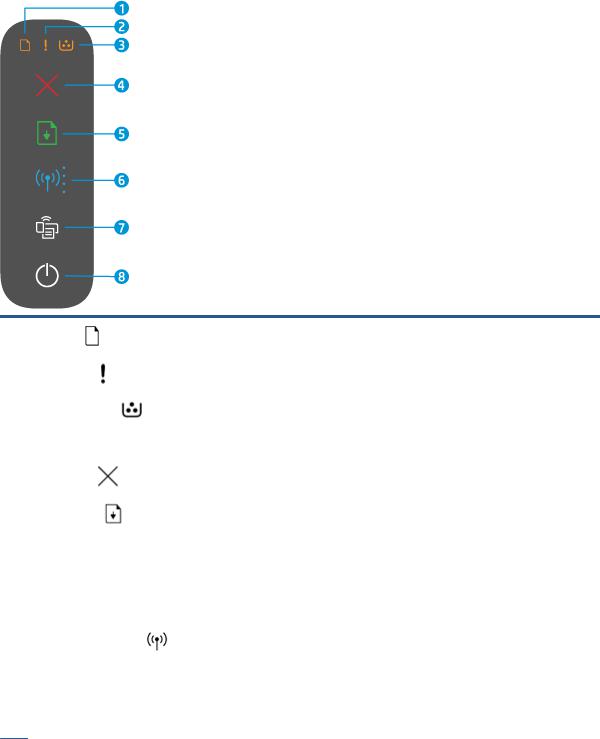
Control panel features
Base models
1 |
Paper light |
The Paper light blinks when the input tray is out of paper, and is on (solid) when there is |
|
|
a paper error. |
||
|
|
||
|
|
|
|
2 |
Attention light |
The Attention light blinks when the printer requires user attention. If the Attention light |
|
|
is on solid, there is a service error. |
||
|
|
||
|
|
|
|
3 |
Imaging Drum light |
When this light is on (solid), it indicates that the imaging drum is nearing the end of its |
|
|
useful life, or, if the Attention light is blinking at the same time, that there is a problem |
||
|
|
||
|
|
with the imaging drum. If the Imaging Drum light blinks, you must replace the imaging |
|
|
|
drum to continue printing. |
|
|
|
|
|
4 |
Cancel button |
Press this button to cancel a job. |
|
|
|
|
|
|
|
|
|
5 |
Resume button |
Press this button for the following actions: |
|
|
|
|
|
|
|
● |
If the printer is in a error or prompt state, with the Resume light on, press the |
|
|
|
button to clear the error and resume printing. |
|
|
● |
In manual duplex mode, press this button to print the second side of the |
|
|
|
document. |
|
|
● |
Press and hold this button for 3 seconds to print a configuration page. |
|
|
|
|
6 |
Power button/Ready light |
Use this button to turn the printer on or off. |
|
|
|
|
|
The Ready light is on when the printer is ready to print. It blinks when the printer is receiving print data and dims when the printer is in a low-power state.
ENWW |
Control panel features 3 |
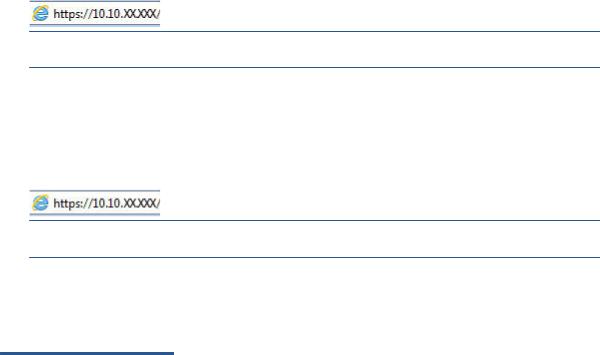
Wireless models
1 |
Paper light |
The Paper light blinks when the input tray is out of paper, and is on (solid) when there is |
|
|
a paper error. |
||
|
|
||
|
|
|
|
2 |
Attention light |
The Attention light blinks when the printer requires user attention. If the Attention light |
|
|
is on solid, there is a service error. |
||
|
|
||
|
|
|
|
3 |
Imaging Drum light |
When this light is on (solid), it indicates that the imaging drum is nearing the end of its |
|
|
useful life, or, if the Attention light is blinking at the same time, that there is a problem |
||
|
|
||
|
|
with the imaging drum. If the Imaging Drum light blinks, you must replace the imaging |
|
|
|
drum to continue printing. |
|
|
|
|
|
4 |
Cancel button |
Press this button to cancel a job. |
|
|
|
|
|
|
|
|
|
5 |
Resume button |
Press this button for the following actions: |
|
|
|
|
|
|
|
● |
If the printer is in a error or prompt state, with the Resume light on, press the |
|
|
|
button to clear the error and resume printing. |
|
|
● |
In manual duplex mode, press this button to print the second side of the |
|
|
|
document. |
|
|
● |
Press and hold this button for 3 seconds to print a configuration page. |
|
|
|
|
6 |
Wireless button and light |
Press this button to turn the wireless feature on or off. |
|
|
|
|
|
Press and hold this button to configure a WPS connection.
If the Wireless button light glows steady blue, there is a stable wireless connection. If it is blinking blue, the printer is in wireless connection setup mode or WPS configuration is in progress. If the light glows amber, the printer cannot connect to the wireless network, or there is a WPS error.
4 Chapter 1 Get started |
ENWW |
7 |
Wi-Fi Direct button |
Press this button to turn Wi-Fi Direct on or off. Press this button to complete a Wi-Fi |
|
Direct connection if it is blinking. |
|
|
|
|
8 |
Power button/Ready light |
Use this button to turn the printer on or off. |
|
|
The Ready light is on when the printer is ready to print. It blinks when the printer is receiving print data and dims when the printer is in a low-power state.
ENWW |
Control panel features 5 |

Use the HP Smart app to print, copy, scan, and troubleshoot
HP Smart helps you to set up, copy, scan, print, share, and manage your HP printer. You can share documents and images through email, text messages, and popular cloud and social media services (such as iCloud, Google Drive, Dropbox, and Facebook). You can also set up new HP printers, as well as monitor and order supplies.
The HP Smart app is compatible with the following mobile device and computer operating systems:
●iOS
●Android
●Windows 10
●Mac OS X 10.11 and later
 NOTE: The HP Smart app might not be available in all languages. Some features might not be available with all printer models.
To install the HP Smart app
▲To install the app on your device, go to 123.hp.com and follow the onscreen instructions to access your device’s app store.
To open the HP Smart app on a Windows 10 computer
▲After installing the HP Smart app, from the device desktop, click Start, and then select HP Smart from the app list.
Connect to your printer
▲Make sure that your device is connected to the same network as the printer. Then HP Smart will automatically detect the printer.
Get more information about the HP Smart app
For more information about using HP Smart for printing, accessing printer features, and troubleshooting issues, go to:
●iOS/Android: www.hp.com/go/hpsmart-help
●Windows 10: www.hp.com/go/hpsmartwin-help
●Mac: http://www.hp.com/go/hpsmartmac-help
6 Chapter 1 Get started |
ENWW |

2Connect your printer
The most up-to-date information for connecting your printer, and troubleshooting connection issues is available online from the HP Support sites. For example, the following topics can be found there:
●Learn more about configuring your network and the printer for wireless printing. Click here to go online for more information.
●Learn how to find your network security settings. Click here to go online for more information.
●Learn about the HP Print and Scan Doctor. Click here to go online for more information.
 NOTE: This utility is only available for Windows operating system.
●Learn how to work with your firewall and antivirus programs during printer setup. Click here to go online for more information.
ENWW |
7 |

Connect to a wireless network with a router
 NOTE: This section is applicable to wireless printer models only.
Connect your printer to a wireless network using Wi-Fi Protected Setup (WPS)
Before you can connect your printer to a wireless network using WPS, make sure you have the following:
●A wireless 802.11b/g/n network that includes a WPS-enabled wireless router or access point.
 NOTE: The printer only supports connections using 2.4 GHz.
●A computer connected to the wireless network that you intend to connect the printer to. Be sure you have installed the HP printer software on the computer.
If you have a WPS router with a WPS push button, follow the Push Button method.
To use the Push Button onfi ur t on (PBC) method
1.Press and hold the Wireless button  for at least three seconds to start WPS Push Button method.
2.Press the WPS button on your router.
 NOTE: The product begins a timer for approximately two minutes while a wireless connection is established.
Connect your printer to a wireless network using HP printer software
To connect the printer to an integrated wireless WLAN 802.11 network, you will need the following:
●A wireless 802.11b/g/n network that includes a wireless router or access point.
 NOTE: The printer only supports connections using 2.4 GHz.
●A computer connected to the wireless network that you intend to connect the printer to.
●Network name (SSID).
●WEP key or WPA Passphrase (if needed).
To connect your printer using HP printer software
1.Depending on whether you have installed the HP printer software or not, do one of the following:
If you have not installed the HP printer software on your computer
a.Visit www.support.hp.com to download and install the printer software.
b.Follow the onscreen instructions.
If you have the HP printer software installed on your computer
a.Open the printer software.
b.In the printer software, click Tools.
8 Chapter 2 Connect your printer |
ENWW |
c.Click Device Setup & Software.
d.Click Connect a new device, and then follow the onscreen instructions.
2.After the printer connects successfully, the Wireless button  glows blue.
ENWW |
Connect to a wireless network with a router |
9 |

Connect wirelessly without a router
 NOTE: This section is applicable to wireless printer models only.
With Wi-Fi Direct, you can print wirelessly from a computer, smart phone, tablet, or other wireless-capable device—without connecting to an existing wireless network.
Guidelines for using Wi-Fi Direct
●Make sure your computer or mobile device has the necessary software.
–If you are using a computer, make sure you have installed the HP printer software.
If you have not installed the HP printer software on the computer, connect to Wi-Fi Direct first and then install the printer software. Select Wireless when prompted by the printer software for a connection type.
–If you are using a mobile device, make sure you have installed a compatible printing app. For more information, visit the HP Mobile Printing website at www.hp.com/go/mobileprinting. If a local version of this website is not available in your country/region or language, you might be directed to the HP Mobile Printing website in another country/region or language.
●Make sure Wi-Fi Direct for your printer is turned on.
●Up to five computers and mobile devices can use the same Wi-Fi Direct connection.
●Wi-Fi Direct can be used regardless of whether the printer is connected to a network using a wireless connection or not.
●Wi-Fi Direct cannot be used to connect a computer, mobile device, or printer to the Internet.
●To learn more about setting up a Wi-Fi Direct connection, visit www.hp.com/go/wifidirectprinting.
To turn Wi-Fi Direct on or off from the control panel
▲On the printer control panel, press the Wi-Fi Direct button  .
.
When Wi-Fi Direct is turned on, the Wi-Fi Direct button  glows steady white.
Wi-Fi Direct connection security setting
●If the Wi-Fi Direct connection security for the printer is Automatic, the Wi-Fi Direct password is set to 12345678 and cannot be changed.
●If the Wi-Fi Direct connection security for the printer is set to Manual, you need to do one of the following to connect to the printer on your mobile device or compter.
–If the Wi-Fi Direct button  is blinking, press it.
–If the printer prints out a page with a PIN code, use the PIN to complete the connection to the device.
10 Chapter 2 Connect your printer |
ENWW |

TIP:
●You can also turn on Wi-Fi Direct or change the Wi-Fi Direct connection security setting from the EWS.
●To find the Wi-Fi Direct name and password, press and hold the Resume button  on the printer for 3 seconds to print a onfiguration Report.
To print from a wireless-capable mobile device that supports Wi-Fi Direct
 NOTE: Available wireless connection methods vary depending on the operating system of your mobile device. For more information, visit www.hp.com/go/wifidirectprinting.
Make sure you have installed the latest version of HP Print Service Plugin on your mobile device (if using an Android device). You can download this plugin from the Google Play application store.
1.Make sure you have turned on Wi-Fi Direct on the printer.
2.Turn on Wi-Fi Direct on your mobile device. For more information, see the documentation provided with the mobile device.
3.From your mobile device, select a document from a print enabled application, and then select the option to print the document.
The list of available printers appears.
4.From the list of available printers, choose the Wi-Fi Direct name.
5.Print your document.
To print from a wireless-capable mobile device that does not support Wi-Fi Direct
 NOTE: Available wireless connection methods vary depending on the operating system of your mobile device. For more information, visit www.hp.com/go/wifidirectprinting.
Make sure you have installed a compatible printing app on your mobile device. For more information, visit the HP Mobile Printing website at www.hp.com/go/mobileprinting. If a local version of this website is not available in your country/region or language, you might be directed to the HP Mobile Printing website in another country/region or language.
1.Make sure you have turned on Wi-Fi Direct on the printer.
2.Turn on the Wi-Fi connection on your mobile device. For more information, see the documentation provided with the mobile device.
 NOTE: If your mobile device does not support Wi-Fi, you are not able to use Wi-Fi Direct.
3.From the mobile device, connect to a new network. Use the process you normally use to connect to a new wireless network or hotspot. Choose the Wi-Fi Direct name from the list of wireless networks shown. The network name is based on the name of your printer.
Enter the Wi-Fi Direct password when prompted.
4.Print your document.
ENWW |
Connect wirelessly without a router 11 |

To print from a wireless-capable computer
1.Make sure you have turned on Wi-Fi Direct on the printer.
2.Turn on the computer's Wi-Fi connection. For more information, see the documentation provided with the computer.
 NOTE: If your computer does not support Wi-Fi, you are not able to use Wi-Fi Direct.
3.From the computer, connect to a new network. Use the process you normally use to connect to a new wireless network or hotspot. Choose the Wi-Fi Direct name from the list of wireless networks shown. The network name is based on the name of your printer.
Enter the Wi-Fi Direct password when prompted.
4.Print your document.
12 Chapter 2 Connect your printer |
ENWW |
Wireless settings
You can set up and manage your printer wireless connection. This includes printing information about network settings, turning the wireless function on or off, and restoring wireless settings.
To turn on or off the wireless capability of the printer
Press the Wireless button  to turn on or off the printer wireless capabilities.
●If the printer has an active connection to a wireless network, the Wireless button  is blue.
●If wireless is turned off, the Wireless button  will not be lit.
To restore network settings to default settings
●Press and hold the Wireless button  and the Cancel button
  at the same time for at least three
seconds. The printer restarts and then the Wireless light  starts blinking blue, indicating the printer is in Auto Wireless Connect (AWC) setup mode. You can now set up a wireless connection between the printer and your device.
ENWW |
Wireless settings 13 |
14 Chapter 2 Connect your printer |
ENWW |
3 onfi ure your printer
●onfigure the printer using the HP Embedded Web Server (EWS) and HP Device Toolbox (Windows)
●Update the firmware
●Change the printer connection type (Windows 7)
ENWW |
15 |

onfi ure the printer using the HP Embedded Web Server (EWS) and HP Device Toolbox (Windows)
Use the HP Embedded Web Server to manage printing functions from your computer.
●View printer status information
●Determine the remaining life for all supplies and order new ones
●Receive notification of printer and supplies events
●View and change network configuration
The HP Embedded Web Server works when the printer is connected to your computer via an IP-based network or USB. The HP Embedded Web Server does not support IPX-based printer connections. You do not have to have Internet access to open and use the HP Embedded Web Server.
When the printer is connected to the network, you can connect to the HP Embedded Web Server directly, and it is automatically available.
When the printer is connected via USB (not connected to the network) you use the HP Device Toolbox software to connect to the HP Embedded Web Server.
 NOTE: If the printer is connected to a Windows computer via USB, you must use the HP Device Toolbox software application to connect to the HP Embedded Web Server (EWS). HP Device Toolbox is available only if you installed the full printer software. Depending on how the printer is connected, some features might not be available. If the printer is connected to a Windows computer via a network, or to a Mac computer, additional software is not needed to connect to the EWS.
 NOTE: The HP Embedded Web Server is not accessible beyond the network firewall.
Accessing and Using the Embedded Web Server (EWS)
The following sections provide instructions for accessing and navigating the HP Embedded Web Server.
Opening the HP Embedded Web Server (EWS) from the software (Windows 7)
 NOTE: HP Printer Assistant is part of the HP printer software for Windows 7 operating systems. Visit the product support site to find the software available for your printer and operating system.
1.Open the HP Printer Assistant.
From the computer desktop, click Start, select All Programs, click HP, click the folder for the printer, and then select the printer name.
2.In the HP Printer Assistant, select Print, and then select HP Device Toolbox.
Opening the HP Embedded Web Server (EWS) from a web browser
The following requires a network connection.
1.Print a configuration page to determine the IP address or host name.
a.Press and hold the Resume button  for three seconds.
b.Release the Resume button  .
.
16 Chapter 3 onfigure your printer |
ENWW |
2.Open a web browser, and in the address line, type the IP address or host name exactly as it displays on the printer configuration page. Press the Enter key on the computer keyboard. The EWS opens.
 NOTE: If the web browser displays a message indicating that accessing the website might not be safe, select the option to continue to the website. Accessing this website will not harm the computer.
Opening the HP Embedded Web Server (EWS) when using a Wi-Fi Direct connection
1.Set up a Wi-Fi Direct connection between your device and the printer.
2.Open a web browser, type the IP address 192.168.223.1 in the address line, and press the Enter key. The EWS opens.
 NOTE: If the web browser displays a message indicating that accessing the website might not be safe, select the option to continue to the website. Accessing this website will not harm the computer.
Navigating the HP Embedded Web Server
The table below provides a summary of the features available through the HP Embedded Web Server.
Table 3-1 HP Embedded Web Server Options
Tab or section |
Description |
|
|
|
|
Home tab |
● |
Device Status: Shows the printer status and shows the approximate percent life |
Provides printer, status, and |
|
remaining of HP supplies. |
● |
|
|
configuration information. |
Supplies Status: Shows the approximate percent life remaining of HP supplies. Actual |
|
|
|
supply life remaining can vary. Consider having a replacement supply available to install |
|
|
when print quality is no longer acceptable. The supply does not need to be replaced |
|
|
unless the print quality is no longer acceptable. |
|
● |
Device onfi ur t on: Shows the information found on the printer configuration page |
|
|
and other device configuration settings. |
|
● |
Network Summary: Shows the information found on the printer network configuration |
|
|
page and other network configuration settings. |
|
● |
Event Log: Shows a list of all printer events and errors. |
|
● |
Open Source Licenses: Shows a summary of the licenses for open source software |
|
|
programs that can be used with the printer. |
|
|
|
ENWW |
onfigure the printer using the HP Embedded Web Server (EWS) and HP Device Toolbox (Windows) 17 |

Table 3-1 HP Embedded Web Server Options (continued)
Tab or section |
Description |
|
|
|
|
System tab |
● |
Device Information: Provides basic printer and company information. |
Provides the ability to configure the |
● |
Paper Setup: Change the default paper-handling settings for the printer. |
printer from your computer. |
● |
Energy Settings: Change the default times for entering Sleep/Auto ff mode or |
|
||
|
|
automatic shut down. |
|
● |
System Setup: Change the system defaults for the printer. |
|
● |
Service: Make adjustments for environmental factors such as humidity and altitude, |
|
|
control archive print mode, change the USB speed, and restore factory default settings. |
|
● |
Administration: Set or change the printer password, enable or disable PJL device access |
|
|
commands, specify signature check preference for firmware updates. |
|
NOTE: The System tab can be password-protected. If this printer is on a network, always |
|
|
consult with the administrator before changing settings on this tab. |
|
|
|
|
Networking tab |
Network administrators can use this tab to control network-related settings for the printer |
|
(Wireless models only) |
when it is connected to an IP-based network. It also allows the network administrator to set up |
|
Wireless Direct and Google Cloud Print functionality. |
||
Provides the ability to change |
NOTE: The Network tab can be password-protected. If this printer is on a network, always |
|
network settings from your |
consult with the administrator before changing settings on this tab. |
|
computer or mobile device. |
|
|
|
|
|
18 Chapter 3 onfigure your printer |
ENWW |

onfi ure IP network settings
Use the following sections to configure the printer network settings.
View or change network settings
Use the HP Embedded Web Server to view or change IP configuration settings.
1.Open the HP Embedded Web Server (EWS).
2.Click the Networking tab to obtain network information. Change settings as needed.
Rename the printer on a network
To rename the printer on a network so that it can be uniquely identified, use the HP Embedded Web Server.
1.Open the HP Embedded Web Server (EWS).
2.Open the System tab.
3.On the Device Information page, the default printer name is in the Device Description field. You can change this name to uniquely identify this printer.
 NOTE: Completing the other fields on this page is optional.
4.Click the Apply button to save the changes.
Manually confi ure IPv4 TCP/IP parameters
Use the EWS to manually set an IPv4 address, subnet mask, and default gateway.
1.Open the HP Embedded Web Server (EWS).
2. On the Networking tab, click IPv4 onfi ur t on in the left navigation pane.
3.From the IP Preferred Address Method drop-down, select Manual, and then edit the IPv4 configuration settings.
4.Click the Apply button.
Assign or change the system password using the HP Embedded Web Server
Assign an administrator password for access to the printer and the HP Embedded Web Server so that unauthorized users cannot change the printer settings.
1.Open the HP Embedded Web Server (EWS).
2.On the System tab, click the Administration link in the left navigation pane.
3.In the area labeled Product Security, enter the password in the Password field.
4. Re-enter the password in the onfirm Password field.
5.Click the Apply button.


 NOTE: Make note of the password and store it in a safe place.
ENWW |
onfigure the printer using the HP Embedded Web Server (EWS) and HP Device Toolbox (Windows) 19 |
Change energy-conservation settings
The printer includes several economy features to conserve energy and supplies.
Set the Sleep/Auto ff After Inactivity setting
Use the EWS to set the amount of idle time before the printer enters sleep mode.
Complete the following procedure to change the Sleep/Auto ff After Inactivity setting:
1.Open the HP Embedded Web Server (EWS).
●Use the HP Smart app to access the EWS, if available.
●Use the HP Printer Assistant for Windows 7 systems.
●Press and hold the Resume button  to print a configuration page, then navigate to the IP address shown on the printer configuration page.
 NOTE: If you receive a message indicating that accessing the website might not be safe, select the option to continue to the website. Accessing this website will not harm the computer.
2.Click the System tab, and then select Energy Settings.
3. From the Sleep/Auto ff After Inactivity drop-down, select the time for the delay.
4.Click the Apply button.
Set the Shut Down After Inactivity delay and confi ure the printer to use 1 watt or less of power
Use the EWS to set the amount of time before the printer shuts down.
 NOTE: After the printer shuts down, the power consumption is 1 watt or less.
Complete the following procedure to change the Shut Down After Inactivity setting:
1.Open the HP Embedded Web Server (EWS).
●Use the HP Smart app to access the EWS, if available.
●Use the HP Printer Assistant for Windows 7 systems.
●Press and hold the Resume button  to print a configuration page, then navigate to the IP address shown on the printer configuration page.
 NOTE: If you receive a message indicating that accessing the website might not be safe, select the option to continue to the website. Accessing this website will not harm the computer.
2.Click the System tab, and then select Energy Settings.
3.From the Shut Down After Inactivity drop-down, select the time for the delay.
20 Chapter 3 onfigure your printer |
ENWW |

 NOTE: The default value is 4 hours.
4.Click the Apply button.
Set the Delay Shut Down setting
Use the EWS to select whether or not the printer delays shutting down after the Power button  is pressed. Complete the following procedure to change the Delay Shut Down setting:
1.Open the HP Embedded Web Server (EWS).
●Use the HP Smart app to access the EWS, if available.
●Use the HP Printer Assistant for Windows 7 systems.
●Press and hold the Resume button  to print a configuration page, then navigate to the IP address shown on the printer configuration page.
 NOTE: If you receive a message indicating that accessing the website might not be safe, select the option to continue to the website. Accessing this website will not harm the computer.
2.Click the System tab, and then select Energy Settings.
3.Select or clear the Delay when ports are active option.
 NOTE: When this option is selected the printer will not shut down unless all ports are inactive. An active network link will prevent the printer from shutting down.
ENWW |
onfigure the printer using the HP Embedded Web Server (EWS) and HP Device Toolbox (Windows) 21 |
Loading...