


 Loading...
........... .........................................................................................
HP OfficeJet Series 500
User’s
Guide
.............................................................................................

.......................................................................................................................
© Copyright Hewlett-
Packard Company 1997
All rights are reserved. No part of the document may be photocopied, reproduced, or translated to another language without the prior written consent of HewlettPackard Company.
OmniPage® Limited Edition V5.0 is a U.S. registered trademark of Caere Corporation. Microsoft® is a U.S. registered trademark of Microsoft Corporation. Windows® is a U.S. registered trademark of Microsoft Corporation.
Publication number: C3801-90001
First Edition,
February 1997
Printed in USA.
This product is approved for use in the United States Only.
Local country laws may prohibit the use of this product outside of United States. It is strictly forbidden by law in virtually every country to connect nonapproved telecommunications equipment (fax machines) to public telephone networks.
Safety Information
Always follow basic safety precautions when using this product to reduce risk of injury from fire or electric shock.
1.Read and understand all instructions in the
User’s Guide .
WARNING:
Potential Shock Hazard
2.Use only a grounded electrical outlet when connecting the HP OfficeJet to a power source. If you don’t know whether the outlet is grounded, check with a qualified electrician.
3.Telephone lines can develop hazardous voltages. To avoid electrical shock, do not touch the contacts on the end of the cord, or any of the sockets on the HP OfficeJet. Replace damaged cords immediately.
4.Never install telephone wiring during a lightning storm.
5.Observe all warnings and instructions marked on the product.
6.Unplug this product
from wall outlets and telephone jacks before cleaning.
7.Do not install or use this product near water or when you are wet.
8.Install the product securely on a stable surface.
9.Install the product in a protected location where no one can step on or trip over line cord, and the line cord will not be damaged.
10.If the product does not operate normally, see Troubleshooting.
11.No operatorserviceable parts inside. Refer servicing to qualified service personnel.
Notice
The information contained in this document is subject to change without notice.
Hewlett-Packard shall not be liable for errors contained herein or for consequential damages in connection with the furnishing, performance, or use of this material.
Information regarding FCC Class B, Parts 15 and 68 requirements can be found in the back of the
User’s Guide.
This product may contain remanufactered parts that have been fully tested to meet 100% of original performance specifications.
Complete the following information. You’ll need it if you contact your dealer or Hewlett-Packard Company:
Date of Purchase:
Serial Number:
- -
(Located on the back of the machine.)
.......................................................................................................................

.......................................................................................................................
© Copyright Hewlett-
Packard Company 1997
All rights are reserved. No part of the document may be photocopied, reproduced, or translated to another language without the prior written consent of HewlettPackard Company.
OmniPage® Limited Edition V5.0 is a U.S. registered trademark of Caere Corporation. Microsoft® is a U.S. registered trademark of Microsoft Corporation. Windows® is a U.S. registered trademark of Microsoft Corporation.
Publication number: C3801-90001
First Edition,
February 1997
Printed in USA.
This product is approved for use in the United States Only.
Local country laws may prohibit the use of this product outside of United States. It is strictly forbidden by law in virtually every country to connect nonapproved telecommunications equipment (fax machines) to public telephone networks.
Safety Information
Always follow basic safety precautions when using this product to reduce risk of injury from fire or electric shock.
1.Read and understand all instructions in the
User’s Guide .
WARNING:
Potential Shock Hazard
2.Use only a grounded electrical outlet when connecting the HP OfficeJet to a power source. If you don’t know whether the outlet is grounded, check with a qualified electrician.
3.Telephone lines can develop hazardous voltages. To avoid electrical shock, do not touch the contacts on the end of the cord, or any of the sockets on the HP OfficeJet. Replace damaged cords immediately.
4.Never install telephone wiring during a lightning storm.
5.Observe all warnings and instructions marked on the product.
6.Unplug this product
from wall outlets and telephone jacks before cleaning.
7.Do not install or use this product near water or when you are wet.
8.Install the product securely on a stable surface.
9.Install the product in a protected location where no one can step on or trip over line cord, and the line cord will not be damaged.
10.If the product does not operate normally, see Troubleshooting.
11.No operatorserviceable parts inside. Refer servicing to qualified service personnel.
Notice
The information contained in this document is subject to change without notice.
Hewlett-Packard shall not be liable for errors contained herein or for consequential damages in connection with the furnishing, performance, or use of this material.
Information regarding FCC Class B, Parts 15 and 68 requirements can be found in the back of the
User’s Guide.
This product may contain remanufactered parts that have been fully tested to meet 100% of original performance specifications.
Complete the following information. You’ll need it if you contact your dealer or Hewlett-Packard Company:
Date of Purchase:
Serial Number:
- -
(Located on the back of the machine.)
.......................................................................................................................

Table of Contents
Setting Up the HP OfficeJet for Your Office |
.......1-1 |
||
1 |
Make Sure Everything Is in the Box ......................................... |
1-2 |
|
|
|
If you don’t have a CD-ROM disc drive ............................ |
1-2 |
|
1. |
Load the Tray ........................................................................ |
1-3 |
|
2. |
Plug in the Line Connector ................................................... |
1-3 |
|
3. |
Connect the Cables................................................................ |
1-4 |
|
4. |
Insert the Print Cartridges ..................................................... |
1-4 |
|
5. |
Load the Paper Supply .......................................................... |
1-6 |
|
6. Connect Your Office Equipment - REQUIRED! ................. |
1-7 |
|
|
|
What should you connect?.................................................. |
1-7 |
|
|
How to tell if you have a modem................................. |
1-9 |
|
|
How tell if your modem is inside |
|
|
|
your computer or an external box ................................ |
1-9 |
|
|
How should you connect? .................................................. |
1-9 |
|
|
Dedicated line ............................................................ |
1-10 |
|
|
Dedicated line with a PC-modem .............................. |
1-10 |
|
|
Dedicated line with external modem ......................... |
1-11 |
|
|
Shared line ................................................................. |
1-12 |
|
|
Shared line with a PC-modem ................................... |
1-13 |
|
|
Shared line with an external modem.......................... |
1-14 |
|
|
Shared line with answering machine ......................... |
1-15 |
|
|
Shared line with computer voicemail ........................ |
1-16 |
|
|
Shared line with PC-modem & |
|
|
|
answering machine..................................................... |
1-17 |
|
|
Shared line, PCmodem & |
|
|
|
computer voicemail.................................................... |
1-18 |
|
|
Shared line with external modem and |
|
|
|
answering machine..................................................... |
1-19 |
|
|
Shared line with external modem and |
|
|
|
computer voicemail.................................................... |
1-20 |
|
|
Shared line with distinctive ring ................................ |
1-22 |
|
7. |
Install the Software - REQUIRED! .................................... |
1-23 |
|
8. |
Make Sure Everything Works Properly .............................. |
1-24 |
...............................................................................................................
ii

Setting Up the HP OfficeJet for |
|
1Your Office (continued) |
|
Receive a fax .................................................................... |
1-24 |
Print a report ..................................................................... |
1-24 |
Make a copy ..................................................................... |
1-25 |
Scan a page to your computer .......................................... |
1-25 |
What’s Next ............................................................................ |
1-26 |
2A Quick Tour of How to Do Everything .............. |
2-1 |
Sending Faxes ........................................................................... |
2-2 |
Sending paper documents................................................... |
2-2 |
From the HP OfficeJet’s keypad.................................. |
2-2 |
From the Document Assistant screen .......................... |
2-2 |
Sending a fax directly from your software program .......... |
2-3 |
Copying ..................................................................................... |
2-4 |
Basic copying from the HP OfficeJet’s keypad ................. |
2-4 |
Using advanced copy settings in the |
|
HP OfficeJet’s software...................................................... |
2-5 |
Scanning.................................................................................... |
2-6 |
Scanning images ................................................................. |
2-6 |
Scanning text for editing (OCR)......................................... |
2-7 |
Printing...................................................................................... |
2-7 |
Using the Help System.............................................................. |
2-8 |
Other ways to get help .............................................................. |
2-9 |
3Faxing ...................................................................... |
3-1 |
Sending a Paper Document ....................................................... |
3-2 |
Using a document carrier to protect your original.............. |
3-2 |
Sending from the keypad.................................................... |
3-3 |
Dialing in real time ...................................................... |
3-3 |
Dialing from a telephone that’s |
|
connected directly to the HP OfficeJet ........................ |
3-4 |
Speed dialing................................................................ |
3-5 |
Sending from the HP OfficeJet Document Assistant ......... |
3-6 |
Sending a Fax Directly from Your Software Program ............. |
3-7 |
Receiving Printed Faxes............................................................ |
3-8 |
...............................................................................................................
iii

3Faxing (continued)
Loading the paper supply ................................................... |
3-8 |
Answering settings ............................................................. |
3-9 |
Manually receiving faxes ................................................... |
3-9 |
Receiving Faxes to Your PC ............................................ |
3-10 |
Using Advanced Fax Features and Settings............................ |
3-11 |
Advanced fax send settings .............................................. |
3-11 |
Controlling how your faxed documents will look ..... |
3-11 |
Changing the Resolution ..................................... |
3-11 |
Changing the Contrast ......................................... |
3-14 |
Redialing a fax number .............................................. |
3-15 |
Redialing manually with the |
|
Redial/Pause button ............................................. |
3-15 |
Changing the Automatic Redial |
|
setting in the software.......................................... |
3-15 |
Entering a pause during keypad dialing..................... |
3-15 |
Assigning Speed Dial codes....................................... |
3-16 |
Assigning a speed dial code to a |
|
single fax number ................................................ |
3-16 |
Assigning a speed dial code to a |
|
group of fax numbers .......................................... |
3-17 |
Faxing to a group of fax numbers .............................. |
3-18 |
Changing the information printed |
|
at the top of the faxes you send.................................. |
3-19 |
Setting Tone or Pulse dialing type ............................. |
3-19 |
Other advanced features for sending faxes ................ |
3-19 |
Advanced fax receive settings .......................................... |
3-21 |
Phone Answering: Automatic or Manual .................. |
3-21 |
Changing the number of rings before answering ....... |
3-22 |
Using Distinctive Ring............................................... |
3-23 |
Updating your fax receive setup ................................ |
3-24 |
Changing the paper size setting ................................. |
3-25 |
Other advanced features for receiving faxes.............. |
3-25 |
Viewing Lists of All Sent and Received Faxes ................ |
3-25 |
Printing the Fax Reports ................................................... |
3-26 |
Adjusting sound volumes ................................................. |
3-26 |
Changing the time and date .............................................. |
3-27 |
...............................................................................................................
iv

Copying ................................................................... |
4-1 |
|
4 |
Loading the Paper Supply for Copying..................................... |
4-2 |
|
Using a Document Carrier to Protect Your Original ................ |
4-3 |
|
Copying from the Keypad......................................................... |
4-3 |
|
Controlling how your copies will look ............................... |
4-4 |
|
Optimizing the quality (Resolution setting) ....................... |
4-4 |
|
Darkening and lightening (Contrast setting) ...................... |
4-5 |
|
Automatic collating ............................................................ |
4-5 |
|
Copying from the Document Assistant ..................................... |
4-6 |
|
Controlling how your copies will look ............................... |
4-7 |
|
Optimizing the quality ........................................................ |
4-7 |
|
Darkening and lightening (Contrast setting) ...................... |
4-7 |
|
Reducing and enlarging ...................................................... |
4-7 |
|
Collating: On or Off ........................................................... |
4-8 |
5 |
Scanning.................................................................. |
5-1 |
Using a Document Carrier to Protect Your Original ................ |
5-2 |
|
|
Scanning Your Document As an Image.................................... |
5-2 |
|
Scanning from the Document Assistant ............................. |
5-2 |
|
Scanning directly into your |
|
|
TWAIN-compliant software program ................................ |
5-5 |
|
How to tell if your software program |
|
|
supports TWAIN.......................................................... |
5-5 |
|
How to scan with TWAIN ........................................... |
5-5 |
|
Scanning Your Document to Edit the Words (OCR)................ |
5-7 |
6 |
Printing ................................................................... |
6-1 |
Using Paper and Other Media Types ........................................ |
6-2 |
|
|
Selecting paper/media types and sizes ............................... |
6-2 |
|
Loading tips for paper and other media.............................. |
6-2 |
|
Loading plain and special papers ................................. |
6-3 |
|
Loading letterhead paper.............................................. |
6-3 |
|
Loading the single-envelope slot ................................. |
6-3 |
|
Loading multiple envelopes ......................................... |
6-4 |
|
Loading transparencies ................................................ |
6-4 |
...............................................................................................................
v

6 |
Printing (continued) |
|
|
|
Using the Print Settings............................................................. |
6-5 |
|
|
|
Locating the print settings .................................................. |
6-5 |
|
|
Using the Paper tab settings ............................................... |
6-5 |
|
|
Using the Setup tab settings ............................................... |
6-6 |
|
|
Print quality and speed................................................. |
6-6 |
|
|
Printing in color ........................................................... |
6-6 |
|
|
Printing in grayscale .................................................... |
6-7 |
|
|
Using the Advanced tab settings ........................................ |
6-7 |
|
|
Printing from Your Windows Software Program ..................... |
6-8 |
|
|
Printing from the HP OfficeJet Manager .................................. |
6-8 |
|
Getting Help............................................................ |
7-1 |
|
7 |
Sources of Information and Help .............................................. |
7-2 |
|
|
|
Using the HP OfficeJet’s Help System ..................................... |
7-5 |
|
|
Understanding the Messages Displayed on the Keypad ........... |
7-6 |
8 |
Specifications .......................................................... |
8-1 |
|
|
Product Specifications............................................................... |
8-2 |
|
|
|
Overall Specifications ........................................................ |
8-2 |
|
|
Printing Specifications........................................................ |
8-2 |
|
|
Faxing Specifications ......................................................... |
8-3 |
|
|
Copying Specifications....................................................... |
8-4 |
|
|
Scanning Specifications...................................................... |
8-5 |
|
|
Ordering Information ................................................................ |
8-5 |
|
|
Obtaining a Material Safety Data Sheet (MSDS) ..................... |
8-6 |
|
|
Regulatory Information............................................................. |
8-6 |
|
|
Notice to Users of the U.S. Telephone Network: |
|
|
|
FCC Requirements ............................................................. |
8-6 |
|
|
Electromagnetic or Radio Frequency Interference: |
|
|
|
FCC Requirements ............................................................. |
8-7 |
|
|
Declaration of Conformity ................................................. |
8-8 |
...............................................................................................................
vi

Setting Up
1the HP OfficeJet
for Your Office
.................................................................................................................
Refer to this chapter for more details about setting up the
HP OfficeJet in your office than are provided in the
Ready, Setup, Go card. Perform each step in sequence.
Make Sure Everything Is in the Box ...................... |
1-2 |
|
|
• If you don’t have a CD-ROM disc drive .................. |
1-2 |
1. |
Load the Paper/Document Tray ......................... |
1-3 |
2. |
Plug in the Fax/Phone Line Connector ............. |
1-3 |
3. |
Connect the Cables.............................................. |
1-4 |
4. |
Insert the Print Cartridges .................................. |
1-4 |
5. |
Load the Paper Supply ........................................ |
1-5 |
6. |
Connect Your |
|
|
Office Equipment - REQUIRED! .................... |
1-7 |
|
• What should you connect?......................................... |
1-7 |
|
• How should you connect? ........................................ |
1-10 |
7. |
Install the Software - REQUIRED! ................. |
1-23 |
8. |
Make Sure Everything Works Properly ........... |
1-24 |
|
• Receive a fax ............................................................. |
1-25 |
|
• Print a report ............................................................ |
1-25 |
|
• Make a copy .............................................................. |
1-25 |
|
• Scan a page to your computer ................................. |
1-25 |
What’s Next? ......................................................... |
1-26 |
|
Up Setting .1
.............................................................................................
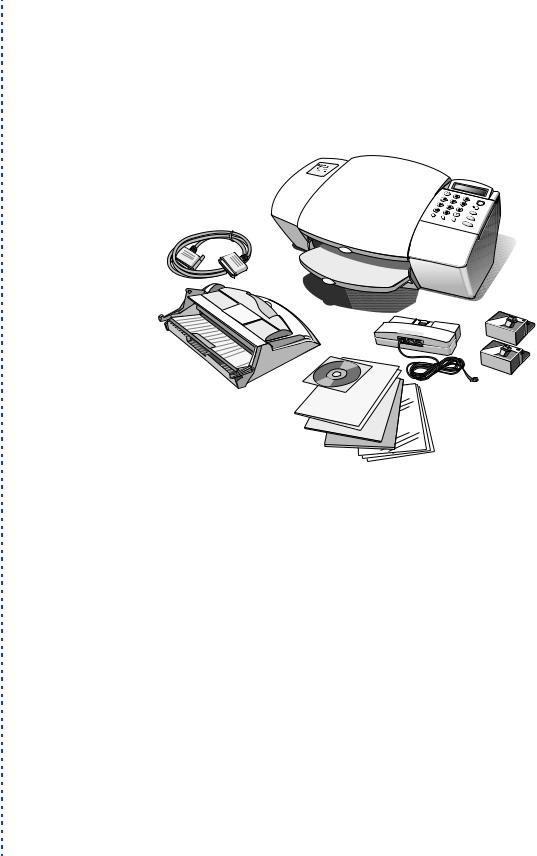
Make Sure Everything
Is in the Box
Check to make sure you have everything that’s shown and listed below.
a
b
 OfficeJet
j
i


c 


 d
d
e
f
g
a)HP OfficeJet Series 500
b)Bidirectional parallel cable
c)Paper/Document loading tray
d)HP OfficeJet Series 500 software on compact disk (CDROM)
e)HP OfficeJet Series 500 Ready, Setup, Go Card
f)Warranty statement
h
g)OmniPage LE Optical Charater Recognition (OCR) documentation
h)Carrier Sheets
(for faxing, copying, and scanning smaller-than-standard- sized documents and for protecting photos)
i)Fax/Phone line connector with attached phone cord
j)Black and color print cartridges
If you don’t have a CD-ROM disc drive
Please call the HP OfficeJet Fulfillment Center at 1-888-HPDISKS (1-888-473-4757) to receive the software on 3.5-inch floppy diskettes by overnight mail.
...............................................................................................................
1-2

Perform each step in sequence:
All steps are required!
1. Load the Tray
This is easiest to do when you are standing directly over the HP
OfficeJet with the front facing you. The tray fits into the back of the
HP OfficeJet near the top as shown.
Paper/Document |
Tray |
Up Setting .1
After proper tray placement
Bottom tab
Guide
●Hold the sides of the paper/document tray and insert the bottom tabs into the guides as shown.
●The tray should click into place. Refer to the above inset drawing for how it should look after proper placement.
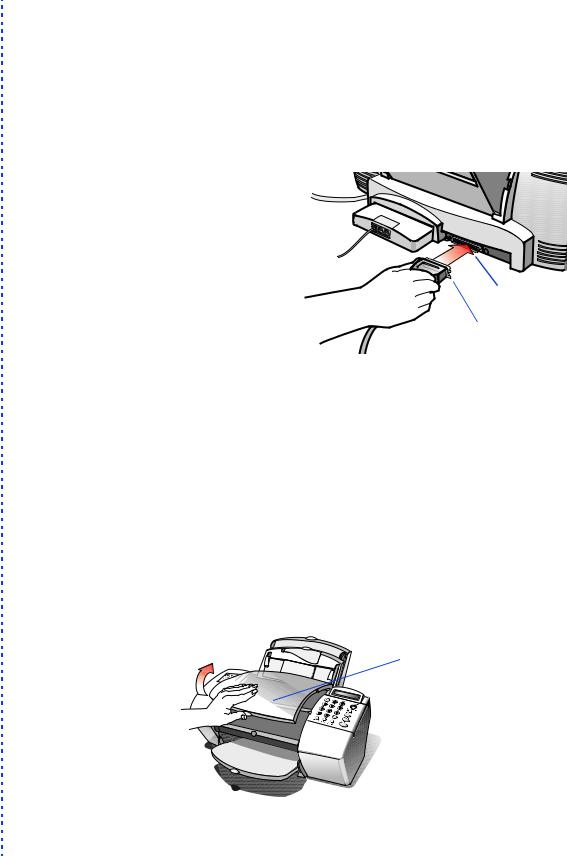
2.Plug in the Line Connector
This is easiest to do when you’re facing the back of the HP OfficeJet.
● Insert the fax/phone line connector into its housing area on the back of the HP OfficeJet. Press it firmly into place. (Once in place, it’s difficult to remove.)
OJ-3insliu
● Plug the loose end of the phone cord into the telephone wall jack you’ll be using for your fax number.
...............................................................................................................
1-3
3. Connect the Cables
Important: You must attach the enclosed bidirectional parallel cable from the HP OfficeJet to your computer. If you don’t, the OfficeJet won’t work.
● For safety, turn off your computer before connecting the cables.
●Connect the notched end of the bidirectional parallel cable firmly to the cable port on the back of the HP OfficeJet. Snap both metal clips into the notches on the connector.
OJ-5insbidi
●Plug the other end
of the cable into the parallel (LPT1) port on the back of your computer. Tighten the connector’s screws.
●Plug the HP OfficeJet’s power cable into a grounded outlet.
4.Insert the Print Cartridges
●After you plugged in the power, the HP OfficeJet powered up automatically. Note that the display on the keypad will read, “See instructions to print demo” until after you install the software in Step 7.
●Wait until the HP OfficeJet finishes making start-up noises (about 10 seconds), then open the cover of the HP OfficeJet. The empty print cartridge holder will move into view.
Cover
OJ-7ocover
...............................................................................................................
1-4
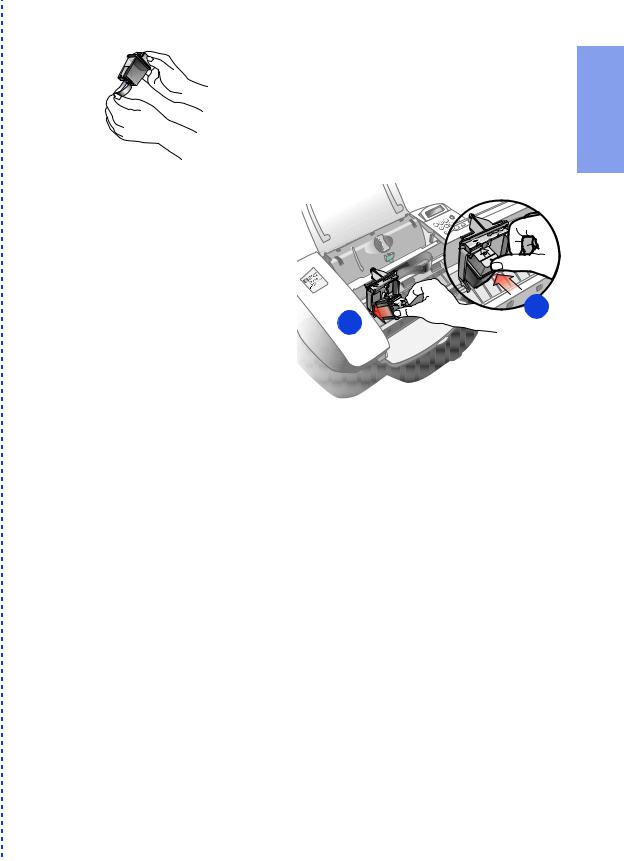
● Remove the black print cartridge from its packaging. Holding the blue top of the cartridge, gently remove
OJ-8btpblck both pieces of tape - clear blue and solid white - covering the ink nozzles and vent hole. (If you don’t remove the white tape, the ink cartridge will be depleted prematurely.)
Be careful not to touch the ink nozzles or the copper contacts; fingerprints may damage them.
● Next, place the black print cartridge into the left cartridge holder as shown:
1) First slide in the |
|
bottom until it |
|
clicks into place. |
2 |
|
1 |
2) Then push the top forward until the cartridge snaps into place.
●Remove the color print cartridge box from its packaging. Peel off the clear blue tape covering the ink nozzles, then place the color print cartridge into the right cartridge holder and push it forward until it snaps into place. Again, try not to touch the ink nozzles or copper contacts.
●Close the HP OfficeJet’s cover.
Note: If the print cartridge holder moves out of sight before you finish inserting both print cartridges, close the cover all the way, then open it again; the holder will come back into view. To prevent ink drying and clogging the nozzles, the holder will return to the parked position after a few minutes.
Up Setting .1
...............................................................................................................
1-5

5. Load the Paper Supply
Now it’s time to load blank paper into the paper supply tray. First, a quick description of the three parts of the paper/document tray:
 Paper supply tray - Use this tray to load blank paper or a stack of
envelopes.
Single-envelope tray - Use this tray to print on a single envelope.
Document loading tray - Use this tray to load your original documents printside away from you and top-down for faxing, copying, and
scanning.
● Pull the front document loading tray forward all the way.
Document |
Paper supply tray |
loading tray |
Paper guide |
|
OJ-13puldoc
●The paper supply tray is factory set for letterand legal-size paper. If necessary, adjust the paper guides by pinching and sliding them.
●Load up to 150 sheets
of 20-lb paper (about a 1/2-inch-thick stack) into the paper supply tray. Make sure the stack of paper fits behind the stack guides on the lower part of the tray as shown. Load sheets with the print side facing toward you.
OJ-14loadpa
Stack guides
●Push the front document loading tray backward until it rests against the paper tray.
Note: Refer to Chapter 6 for detailed instructions on loading envelopes and other special paper/media types.
...............................................................................................................
1-6
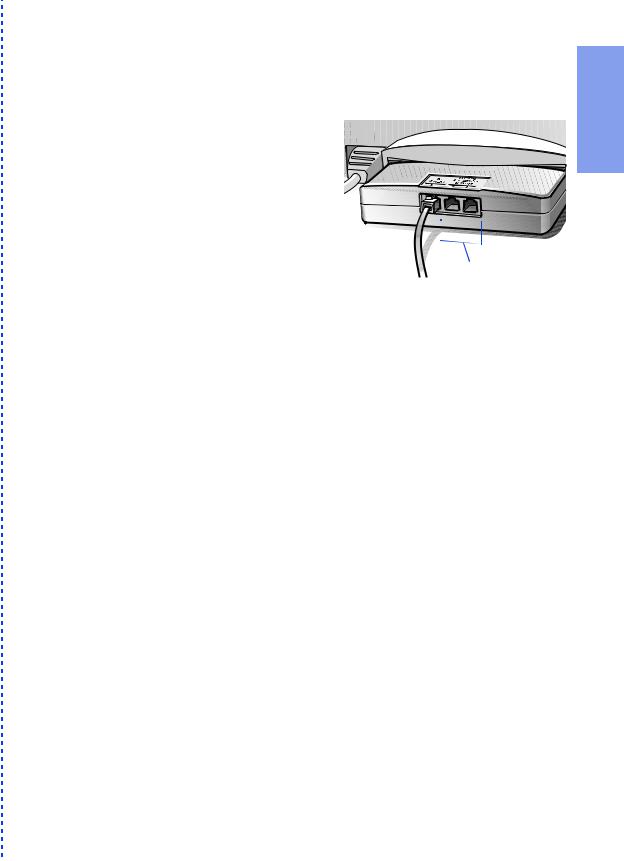
6.Connect Your Office Equipment - REQUIRED!
When you were installing the fax/phone line connector in Step 2, you may have noticed that two of the ports on the back of the connector were labelled, “To Phone, Answering Machine, or Modem.”
That means that either one of these ports can be used to connect any of these three types of devices you have in your office; the two ports are interchangeable.
 Connect other equipment to either of these two ports.
Remove the plugs from the two ports. (If they’re stuck, use the tip of your pen to pry them out.) Then refer to the following instructions to connect your other equipment.
What should you connect?
Based on your particular office equipment and the number of telephone lines you have, there’s only ONE optimum way to connect.
Please answer the questions in the following table, circle your answers, then look up the appropriate setup scenario in the following “How should you connect?” section.
...............................................................................................................
Up Setting .1
1-7

Read these questions: |
Circle your answers: |
|
|
|
|
|
|
|
1 Do you subscribe to a distinctive ring |
Circle A or B below, then read |
|
what to do next. |
||
service through your telephone company on |
||
the same phone line to which you connected |
A. No, I don’t have a distinctive |
|
your HP OfficeJet (in Step 3)? |
ring service. |
|
Continue with question 2. |
||
(This telephone service, which is unavailable |
||
B. Yes, I have a distinctive ring |
||
in many areas, allows you to have 2 or 3 |
service. |
|
phone numbers on the same phone line. Each |
||
number has a ring with a different pattern so |
You don’t need to answer any |
|
you can tell the difference between incoming |
more questions; skip directly to |
|
calls.) |
“Shared line with distinctive |
|
ring” later in this chapter for |
||
|
||
|
connection instructions. |
|
|
|
|
2 Is the HP OfficeJet connected to a |
Circle C or D below, then read |
|
what to do next. |
||
separate phone line that’s dedicated to send- |
||
ing and receiving your fax calls (no voice |
C. Yes, the OfficeJet will be |
|
calls received)? |
connected to a dedicated line. |
|
|
Skip to question 4. |
|
|
D. No, the OfficeJet will be |
|
|
connected to a shared phone line |
|
|
that receives both fax and voice |
|
|
calls. |
|
|
Continue with question 3. |
|
|
|
|
3 Do you use an answering machine or a |
Circle E, F, or G below, then |
|
continue with question 4. |
||
voicemail feature in your computer to answer |
||
voice calls on your shared phone line? |
E. I use an answering machine. |
|
|
F. I use a voicemail feature in my |
|
|
computer. |
|
|
G. I neither use an answering |
|
|
machine nor a voicemail |
|
|
feature in my computer. |
|
|
|
|
4 Do you have a modem - either internal to |
Circle H, I, or J below. Then |
|
your computer or an external box - on the |
refer to “How should you |
|
connect?” to match all of your |
||
same phone line you’ll be using for the HP |
||
responses in this column to the |
||
OfficeJet? |
||
right setup scenario. |
||
(If you’re not sure if you have a modem, refer |
||
H. Yes, I have a modem inside |
||
to the following section, “How to tell if you |
my computer. |
|
have a modem,” before answering this ques- |
||
tion.) |
I. Yes, I have a modem that’s an |
|
|
external box. |
|
|
J. No, I don’t have any kind of |
|
|
modem. |
|
|
|
...............................................................................................................
1-8

How to tell if you have a modem
If you answer “Yes” to any of the following questions, then you have a modem. Do you:
a.Send/receive faxes directly to/from your computer programs?
b.Use electronic mail (e-mail) on your computer?
c.Access the Internet or the World Wide Web from your computer?
d.Transfer data from/to other computers?
How tell if your modem is inside your computer or an external box
If your modem is inside your computer, then you’ll have a phone cord connected to the back of your computer and going to a wall jack.
If your modem is an external box, one phone cord will be connected from the back of your computer to the box, and another phone cord will go from the box to a wall jack.
How should you connect?
Write down all of your responses to the questions in “What should you connect?,” then refer to the appropriate setup case indicated below. For example, if you answered “A” to question 1, “D” to question 2, “E” to question 3, and “H” to question 4, look up “ADEH.”
For responses: |
Refer to this section for connection instructions: |
|
|
|
|
ACJ |
“Dedicated line” |
|
|
ACH |
“Dedicated line with a PC-modem” |
|
|
ACI |
“Dedicated line with external modem” |
|
|
ADGJ |
“Shared line” |
|
|
ADGH |
“Shared line with a PC-modem” |
|
|
ADGI |
“Shared line with an external modem” |
|
|
ADEJ |
“Shared line with answering machine” |
|
|
ADFJ |
“Shared line with computer voicemail” |
|
|
ADEH |
“Shared line with PC-modem & answering machine” |
|
|
ADFH |
“Shared line, PC-modem, computer voicemail” |
|
|
ADEI |
“Shared line with external modem and answering machine” |
|
|
ADFI |
“Shared line with external modem and computer voicemail” |
|
|
B |
“Shared line with distinctive ring” |
|
|
...............................................................................................................
Up Setting .1
1-9

Dedicated line (Case ACJ)
If in Step 2 you connected the HP OfficeJet to a dedicated phone line (no voice calls received) that has no other office equipment connected to it, then use this connection diagram.
Phone optional,
OJ-phconfig
but recommended
Telephone wall jack
●Connect your phone to the HP OfficeJet. Connect the cord from your phone to either of the two ports on the back of the HP OfficeJet labelled, “To Phone, Answering Machine, or Modem.”
The benefits of connecting a phone in this situation are 1) For the convenience of having a phone close by to make outgoing voice calls, and 2) In case you need to send a fax (press START) after calling someone who must receive their faxes manually.
●After you install the software in Step 7, and answer the Setup Wizard questions for this connection case, here’s how you’ll automatically receive faxes with the HP OfficeJet: Your fax line will ring once, then the HP OfficeJet will answer and begin emitting fax tones to the sending machine.
●Continue with Step 7, “Install the Software - REQUIRED!”
Dedicated line with a PC-modem (Case ACH)
If in Step 2 you connected the HP OfficeJet to a dedicated phone line (no voice calls received) that also has a PC-modem connected to it, then use this connection diagram.
Phone optional, |
PC with |
|
|
but recommended |
|||
internal modem |
|||
|
|||
Telephone
OJ-phpcmodm
wall jack
...............................................................................................................
1-10

●Connect your PC-modem to the HP OfficeJet. Find the phone cord that goes from the back of your computer (your PC-modem) to a wall jack. Disconnect the cord from the wall jack and plug it into either of the two ports on the back of the HP OfficeJet labelled, “To Phone, Answering Machine, or Modem.”
Important: If your PC-modem’s software is set to automatically receive faxes to your computer, turn off that setting; if you don’t, your HP OfficeJet will not be able to receive faxes properly.
●Connect your phone to the HP OfficeJet. Connect the cord from your phone to either of the two ports on the back of the HP OfficeJet labelled, “To Phone, Answering Machine, or Modem.”
The benefits of connecting a phone in this situation are 1) For the convenience of having a phone close by to make outgoing voice calls, and 2) In case you need to send a fax (press START) after calling someone who must receive their faxes manually.
●After you install the software in Step 7, and answer the Setup Wizard questions for this connection case, here’s how you’ll automatically receive faxes with the HP OfficeJet: Your fax line will ring once, then the HP OfficeJet will answer and begin emitting fax tones to the sending machine.
●Continue with Step 7, “Install the Software - REQUIRED!”
Dedicated line with external modem (ACI)
If in Step 2 you connected the HP OfficeJet to a dedicated phone line (no voice calls received) that also has an external modem connected to it, then use this connection diagram.
Up Setting .1
Phone optional, |
External |
but recommended |
modem |
OJ-phxmo
Telephone wall jack
●Connect your external modem to the HP OfficeJet. Find the phone cord that goes from the back of your external modem to a wall jack. Disconnect the cord from the wall jack and plug it into either of the two ports on the back of the HP OfficeJet labelled, “To Phone, Answering Machine, or Modem.”
...............................................................................................................
1-11

Important: If your external modem’s software is set to automatically receive faxes to your computer, turn off that setting; if you don’t, your HP OfficeJet will not be able to receive faxes properly.
●Connect your phone to the HP OfficeJet. Connect the cord from your phone to either of the two ports on the back of the HP OfficeJet labelled, “To Phone, Answering Machine, or Modem.”
The benefits of connecting a phone in this situation are 1) For the convenience of having a phone close by to make outgoing voice calls, and 2) In case you need to send a fax (press START) after calling someone who must receive their faxes manually.
●After you install the software in Step 7, and answer the Setup Wizard questions for this connection case, here’s how you’ll automatically receive faxes with the HP OfficeJet: Your fax line will ring once, then the HP OfficeJet will answer and begin emitting fax tones to the sending machine.
●Continue with Step 7, “Install the Software - REQUIRED!”
Shared line (Case ADGJ)
If in Step 2 you connected the HP OfficeJet to a shared phone line (receives both voice and fax calls) that has no other office equipment connected to it, then use this connection diagram.
Phone optional, but recommended
OJ-phconfig
Telephone wall jack
●Connect your phone to the HP OfficeJet. Connect the cord from your phone to either of the two ports on the back of the HP OfficeJet labelled, “To Phone, Answering Machine, or Modem.”
The main benefits of connecting a phone in this situation are 1) For the convenience of having a phone close to the HP OfficeJet so that you can reach the START button when you receive faxes manually, and 2) In case you need to send a fax (press START) while having a conversation with someone who must receive their faxes manually.
●Because you don’t have an answering machine or computer voicemail on this phone line, you’ll need to receive faxes manually;
...............................................................................................................
1-12
the HP OfficeJet will NOT answer incoming calls automatically.
To receive a fax manually: When the phone rings, pick it up and listen for fax tones; if your hear fax tones, press the START button on the HP OfficeJet, then hang up the phone. Refer to “Manually receiving faxes” in Chapter 3 for more information.
● Continue with Step 7, “Install the Software - REQUIRED!”
Shared line with a PC-modem (Case ADGH)
If in Step 2 you connected the HP OfficeJet to a shared phone line (receives both voice and fax calls) that also has a PC-modem connected to it, then use this connection diagram.
Up Setting .1
Phone optional, |
PC with |
|
but recommended |
||
internal modem |
||
|
OJ-phpcmodm
Telephone wall jack
●Connect your PC-modem to the HP OfficeJet. Find the phone cord that goes from the back of your computer (your PC-modem) to a wall jack. Disconnect the cord from the wall jack and plug it into either of the two ports on the back of the HP OfficeJet labelled, “To Phone, Answering Machine, or Modem.”
Important: If your PC-modem’s software is set to automatically receive faxes to your computer, turn off that setting; if you don’t, your HP OfficeJet will not be able to receive faxes properly.
●Connect your phone to the HP OfficeJet. Connect the cord from your phone to either of the two ports on the back of the HP OfficeJet labelled, “To Phone, Answering Machine, or Modem.”
The main benefits of connecting a phone in this situation are 1) For the convenience of having a phone close to the HP OfficeJet so that you can reach the START button when you receive faxes manually, and 2) In case you need to send a fax (press START) while having a conversation with someone who must receive their faxes manually.
●Because you don’t have an answering machine or computer voicemail on this phone line, you’ll need to receive faxes manually; the HP OfficeJet will NOT answer incoming calls automatically.
To receive a fax manually: When the phone rings, pick it up and listen for fax tones; if your hear fax tones, press the START button on the HP OfficeJet, then hang up the phone. Refer to “Manually
...............................................................................................................
1-13

Receiving Faxes” in Chapter 3 for more information.
● Continue with Step 7, “Install the Software - REQUIRED!”
Shared line with an external modem (Case ADGI)
If in Step 2 you connected the HP OfficeJet to a shared phone line (receives both voice and fax calls) that also has an external modem connected to it, then use this connection diagram.
Phone optional, |
External |
Telephone |
but recommended |
modem |
OJ-phxmo |
wall jack |
●Connect your external modem to the HP OfficeJet. Find the phone cord that goes from the back of your external modem to a wall jack. Disconnect the cord from the wall jack and plug it into either of the two ports on the back of the HP OfficeJet labelled, “To Phone, Answering Machine, or Modem.”
Important: If your external modem’s software is set to automatically receive faxes to your computer, turn off that setting; if you don’t, your HP OfficeJet will not be able to receive faxes properly.
●Connect your phone to the HP OfficeJet. Connect the cord from your phone to either of the two ports on the back of the HP OfficeJet labelled, “To Phone, Answering Machine, or Modem.”
The main benefits of connecting a phone in this situation are 1) For the convenience of having a phone close to the HP OfficeJet so that you can reach the START button when you receive faxes manually, and 2) In case you need to send a fax (press START) while having a conversation with someone who must receive their faxes manually.
●Because you don’t have an answering machine or computer voicemail on this phone line, you’ll need to receive faxes manually; the HP OfficeJet will NOT answer incoming calls automatically.
To receive a fax manually: When the phone rings, pick it up and listen for fax tones; if your hear fax tones, press the START button on the HP OfficeJet, then hang up the phone. Refer to “Manually Receiving Faxes” in Chapter 3 for more information.
●Continue with Step 7, “Install the Software - REQUIRED!”
...............................................................................................................
1-14
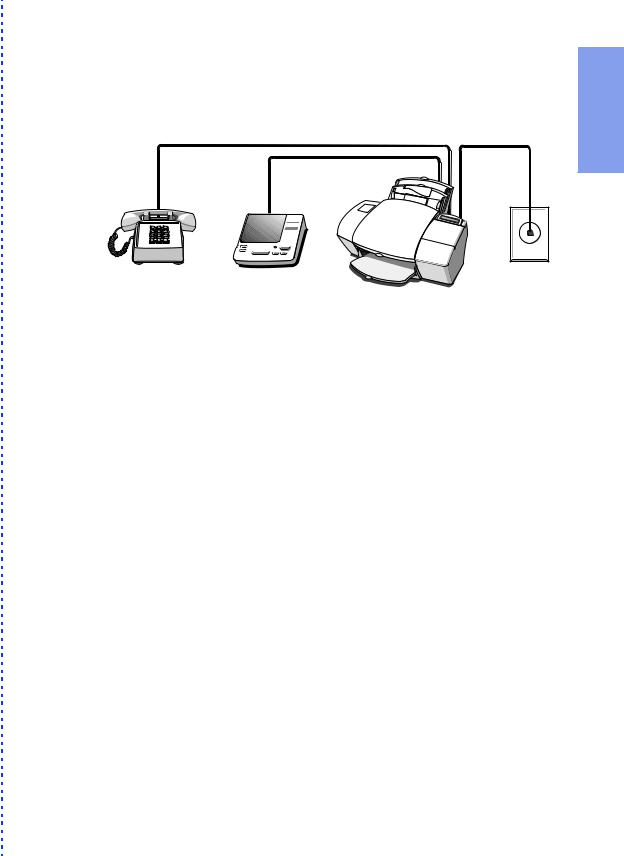
Shared line with answering machine (Case ADEJ)
If in Step 2 you connected the HP OfficeJet to a shared phone line (receives both voice and fax calls) that also has an answering machine connected to it, use this connection diagram.
Up Setting .1
Phone optional, |
Answering |
|
but recommended |
||
machine |
||
if there’s no phone |
||
|
||
handset on your |
|
|
answering machine |
|
OJ-phoneans
Telephone wall jack
●Connect your answering machine to the HP OfficeJet. Plug the phone line from your answering machine to either of the ports labelled, “To Phone, Answering Machine, or Modem” on the back of the HP OfficeJet.
Important: Set your answering machine to answer calls after 4 or fewer rings, and make sure your outgoing greeting message is no longer than 30 seconds. If you don’t, you may not receive faxes properly.
●Connect your phone to the HP OfficeJet. If your answering machine doesn’t have an attached phone handset, connect the cord from your phone to either of the two ports on the back of the HP OfficeJet labelled, “To Phone, Answering Machine, or Modem.”
The main benefits of connecting a phone in this situation are 1) In case you need to send a fax (press START) while having a conversation with someone who must receive their faxes manually, and 2) For the convenience of having a phone close by to make and receive voice calls.
●After you install the software in Step 7, and answer the Setup Wizard questions for this connection case, here’s how you’ll automatically receive faxes with the HP OfficeJet: Your answering machine will pick up the call after the number of rings you’ve set, then the HP OfficeJet will “listen” while the answering machine plays its greeting. If the HP OfficeJet detects fax tones, it will cut off the answering machine and receive the fax. If you don’t connect your answering machine directly to the HP OfficeJet as described here, you may not receive your faxes properly.
...............................................................................................................
1-15

● Continue with Step 7, “Install the Software - REQUIRED!”
...............................................................................................................
1-16

Shared line with computer voicemail (Case ADFJ)
If in Step 2 you connected the HP OfficeJet to a shared phone line (receives both voice and fax calls) that also has computer voicemail to answer voice calls, use this connection diagram.
Up Setting .1
Phone optional,  but recommended Computer with
voicemail feature
OJ-phpcmodm
Telephone wall jack
●Connect your computer voicemail phone cord to the HP OfficeJet. Locate the phone cord that goes from the back of your computer to a wall jack. Disconnect the cord from the wall jack and plug it into either of the two ports on the back of the HP OfficeJet labelled, “To Phone, Answering Machine, or Modem.”
Important: Set your voicemail software to answer calls after 4 or fewer rings, and make sure your outgoing greeting message is no longer than 30 seconds. If you don’t, you may not receive faxes properly.
●Connect your phone to the HP OfficeJet. Connect the cord from your phone to either of the two ports on the back of the HP OfficeJet labelled, “To Phone, Answering Machine, or Modem.”
The main benefits of connecting a phone in this situation are 1) In case you need to send a fax (press START) while having a conversation with someone who must receive their faxes manually, and 2) For the convenience of having a phone close by to make and receive voice calls.
●After you install the software in Step 7, and answer the Setup Wizard questions for this connection case, here’s how you’ll automatically receive faxes with the HP OfficeJet: Your computer voicemail will pick up the call after the number of rings you’ve set, then the HP OfficeJet will “listen” while voicemail plays its greeting. If the HP OfficeJet detects fax tones, it will cut off the voicemail and receive the fax. If you don’t connect your computer voicemail phone cord directly to the HP OfficeJet as described here, you may not receive your faxes properly.
●Continue with Step 7, “Install the Software - REQUIRED!”
...............................................................................................................
1-17

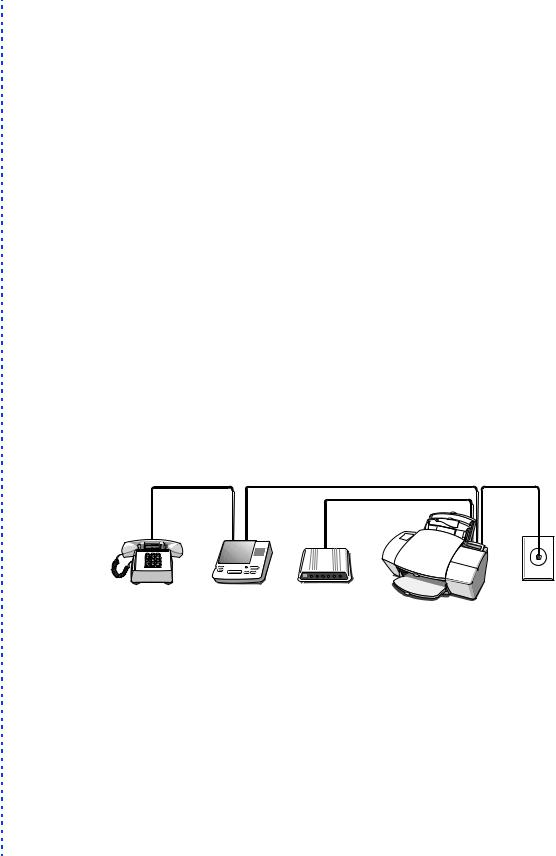
Shared line with PC-modem & answering machine (Case ADEH)
If in Step 2 you connected the HP OfficeJet to a shared phone line (receives both voice and fax calls) that also has a PC-modem and an answering machine connected to it, use this connection diagram.
Phone optional, |
Answering |
Computer with |
Telephone |
but recommended |
machine |
wall jack |
|
if there’s no phone |
|
PC-modem |
|
|
|
|
|
handset on your |
|
|
|
answering machine |
|
|
|
●Connect your PC-modem to the HP OfficeJet. Find the phone cord that goes from the back of your computer (your PC-modem) to a wall jack. Disconnect the cord from the wall jack and plug it into either of the two ports on the back of the HP OfficeJet labelled, “To Phone, Answering Machine, or Modem.”
Important: If your PC-modem’s software is set to automatically receive faxes to your computer, turn off that setting; if you don’t, your HP OfficeJet will not be able to receive faxes properly.
●Connect your answering machine to the HP OfficeJet. Plug the phone line from your answering machine to either of the ports labelled, “To Phone, Answering Machine, or Modem” on the back of the HP OfficeJet.
Important: Set your answering machine to answer calls after 4 or fewer rings, and make sure your outgoing greeting message is no longer than 30 seconds. If you don’t, you may not receive faxes properly.
●Connect your phone to your answering machine. If your answering machine doesn’t have an attached phone handset, connect the cord from your phone to the back of your answering machine.
The main benefits of connecting a phone in this situation are 1) In case you need to send a fax (press START) while having a conversation with someone who must receive their faxes manually, and 2) For the convenience of having a phone close by to make and receive voice calls.
...............................................................................................................
1-18

●After you install the software in Step 7, and answer the Setup Wizard questions for this connection case, here’s how you’ll automatically receive faxes with the HP OfficeJet: Your answering machine will pick up the call after the number of rings you’ve set, then the HP OfficeJet will “listen” while the answering machine plays its greeting. If the HP OfficeJet detects fax tones, it will cut off the answering machine and receive the fax. If you don’t connect your answering machine directly to the HP OfficeJet as described here, you may not receive your faxes properly.
●Continue with Step 7, “Install the Software - REQUIRED!”
Shared line, PCmodem & computer voicemail (Case ADFH)
If in Step 2 you connected the HP OfficeJet to a shared phone line (receives both voice and fax calls) that also has a PC-modem connected to it and computer voicemail to answer voice calls, use this connection diagram.
Up Setting .1
Phone optional,
but recommended Computer with PC-modem and
voicemail feature
OJ-phpcmodm
Telephone wall jack
●Connect your PC-modem and voicemail phone cord to the HP OfficeJet. Find the phone cord that goes from the back of your computer (for your PC-modem and voicemail) to a wall jack. Disconnect the cord from the wall jack and plug it into either of the two ports on the back of the HP OfficeJet labelled, “To Phone, Answering Machine, or Modem.”
Important: Set your voicemail software to answer calls after 4 or fewer rings, and make sure your outgoing greeting message is no longer than 30 seconds. If you don’t, you may not receive faxes properly.
Important: If your PC-modem’s software is set to automatically receive faxes to your computer, turn off that setting; if you don’t, your HP OfficeJet will not be able to receive faxes properly.
...............................................................................................................
1-19
●Connect your phone to the HP OfficeJet. Connect the cord from your phone to either of the two ports on the back of the HP OfficeJet labelled, “To Phone, Answering Machine, or Modem.”
The main benefits of connecting a phone in this situation are 1) In case you need to send a fax (press START) while having a conversation with someone who must receive their faxes manually, and 2) For the convenience of having a phone close by to make and receive voice calls.
●After you install the software in Step 7, and answer the Setup Wizard questions for this connection case, here’s how you’ll automatically receive faxes with the HP OfficeJet: Your computer voicemail will pick up the call after the number of rings you’ve set, then the HP OfficeJet will “listen” while voicemail plays its greeting. If the HP OfficeJet detects fax tones, it will cut off the voicemail and receive the fax. If you don’t connect your computer voicemail phone cord directly to the HP OfficeJet as described here, you may not receive your faxes properly.
●Continue with Step 7, “Install the Software - REQUIRED!”
Shared line with external modem and answering machine (Case ADEI)
If in Step 2 you connected the HP OfficeJet to a shared phone line (receives both voice and fax calls) that also has an external modem and an answering machine connected to it, then use this connection diagram.
Phone optional, |
Answering |
External |
|
but recommended |
|||
machine |
modem |
||
if there’s no phone |
|||
|
|
||
handset on your |
|
|
|
answering machine |
|
|
OJ-phansxmo
Telephone wall jack
●Connect your external modem to the HP OfficeJet. Find the phone cord that goes from the back of your external modem to a wall jack. Disconnect the cord from the wall jack and plug it into either of the two ports on the back of the HP OfficeJet labelled, “To Phone, Answering Machine, or Modem.”
Important: If your external modem’s software is set to automatically receive faxes to your computer, turn off that setting; if you don’t, your HP OfficeJet will not be able to receive faxes prop-
...............................................................................................................
1-20

erly.
●Connect your answering machine to the HP OfficeJet. Plug the phone line from your answering machine to either of the ports labelled, “To Phone, Answering Machine, or Modem” on the back of the HP OfficeJet.
Important: Set your answering machine to answer calls after 4 or fewer rings, and make sure your outgoing greeting message is no longer than 30 seconds. If you don’t, you may not receive faxes properly.
●Connect your phone to your answering machine. If your answering machine doesn’t have an attached phone handset, connect the cord from your phone to the back of your answering machine.
The main benefits of connecting a phone in this situation are 1) In case you need to send a fax (press START) while having a conversation with someone who must receive their faxes manually, and 2) For the convenience of having a phone close by to make and receive voice calls.
●After you install the software in Step 7, and answer the Setup Wizard questions for this connection case, here’s how you’ll automatically receive faxes with the HP OfficeJet: Your answering machine will pick up the call after the number of rings you’ve set, then the HP OfficeJet will “listen” while the answering machine plays its greeting. If the HP OfficeJet detects fax tones, it will cut off the answering machine and receive the fax. If you don’t connect your answering machine directly to the HP OfficeJet as described here, you may not receive your faxes properly.
●Continue with Step 7, “Install the Software - REQUIRED!”
Shared line with external modem and computer voicemail (Case ADFI)
If in Step 2 you connected the HP OfficeJet to a shared phone line (receives both voice and fax calls) that also has an external modem connected to it and computer voicemail to answer voice calls, then use this connection diagram.
...............................................................................................................
Up Setting .1
1-21

Phone optional, |
|
|
Telephone |
but recommended |
Computer with |
External |
wall jack |
if there’s no phone |
voicemail feature |
modem |
|
handset on your |
|
|
|
answering machine |
|
|
|
●Connect your external modem to the HP OfficeJet. Find the phone cord that goes from the back of your external modem to a wall jack. Disconnect the cord from the wall jack and plug it into either of the two ports on the back of the HP OfficeJet labelled, “To Phone, Answering Machine, or Modem.”
Important: If your external modem’s software is set to automatically receive faxes to your computer, turn off that setting; if you don’t, your HP OfficeJet will not be able to receive faxes properly.
●Connect your computer voicemail phone cord to the HP OfficeJet. Locate the phone cord that goes from the back of your computer to a wall jack. Disconnect the cord from the wall jack and plug it into either of the two ports on the back of the HP OfficeJet labelled, “To Phone, Answering Machine, or Modem.”
Important: Set your voicemail software to answer calls after 4 or fewer rings, and make sure your outgoing greeting message is no longer than 30 seconds. If you don’t, you may not receive faxes properly.
●Connect your phone to your answering machine. Connect the cord from your phone to the back of your answering machine.
The main benefits of connecting a phone in this situation are 1) In case you need to send a fax (press START) while having a conversation with someone who must receive their faxes manually, and 2) For the convenience of having a phone close by to make and receive voice calls.
●After you install the software in Step 7, and answer the Setup Wizard questions for this connection case, here’s how you’ll automatically receive faxes with the HP OfficeJet: Your computer voicemail will pick up the call after the number of rings you’ve set, then the HP OfficeJet will “listen” while voicemail plays its greeting. If the HP OfficeJet detects fax tones, it will cut off the voicemail and receive the fax. If you don’t connect your computer voicemail phone cord directly to the HP OfficeJet as described here, you may not receive your faxes properly.
...............................................................................................................
1-22
Loading...