


Netserver L Server series

HP NetServer LC 3
User Guide

Notice
The information contained in this document is subject to change without notice.
Hewlett-Packard makes no warranty of any kind with regard to this
material, including, but not limited to, the implied warranties of
merchantability and fitness for a particular purpose. Hewlett-Packard shall
not be liable for errors contained herein or for incidental or consequential
damages in connection with the furnishing, performance, or use of this material.
Hewlett-Packard assumes no responsibility for the use or reliability of its software
on equipment that is not furnished by Hewlett-Packard.
This document contains proprietary information that is protected by copyright.
All rights are reserved. No part of this document may be photocopied,
reproduced, or translated to another language without the prior written consent of
Hewlett-Packard Company.
Windows® is a registered trademark of Microsoft in the U.S. and other countries.
CompuServe™ is a U.S. trademark of CompuServe, Inc.
NetWare® and IntranetWare®are registered trademarks of Novell, Inc.
SCO™ is a trademark of The Santa Cruz Operation, Inc.
SCSISelect™ is a trademark of Adaptec, Inc.
Hewlett-Packard Company
Network Server Division
Technical Marketing / MS 49EU-FQ
5301 Stevens Creek Blvd.
P.O. Box 58059
Santa Clara, CA 95052-8059 USA
© Copyright 1998, Hewlett-Packard Company.
Audience Assumptions
The user guide is for the person who installs, administers, and troubleshoots
LAN servers. Hewlett-Packard Company assumes you are qualified in the
servicing of computer equipment and trained in recognizing hazards in products
with hazardous energy levels.
ii

Contents
1 Installation Overview ...................................................................................1
Verify Contents..............................................................................................1
View the Readme File....................................................................................1
Test the System Hardware (Optional).............................................................2
Snap on the Anti-Tip Pedestal........................................................................2
Remove the Covers.......................................................................................2
Install Additional Memory...............................................................................5
Remove the System Board........................................................................6
Reinsert the System Board ........................................................................8
Install All Accessory Boards...........................................................................8
Raise the System Board ............................................................................8
Install Accessory Boards............................................................................9
Install Additional Mass Storage Devices.......................................................11
Replace All Covers and Connect All Cables.................................................11
Configure the HP NetServer ........................................................................13
Run SCSISelect Utility.............................................................................13
Reserve Resources for ISA Non-Plug-and-Play Board.............................14
Run Configuration Assistant and Installation Assistant .............................14
Install HP TopTools..................................................................................15
2 HP Navigator ..............................................................................................17
Contents of the HP NetServer Navigator CD-ROM ......................................17
Readme File................................................................................................17
Configuration Assistant and Installation Assistant.........................................17
Express Configuration..............................................................................18
Custom Configuration..............................................................................20
Replicate Configuration............................................................................22
HP Management Solutions...........................................................................22
TopTools for Servers...............................................................................23
Integrated Remote Assistant....................................................................24
pcANYWHERE........................................................................................24
Information Assistant ...................................................................................25
HP NetServer Utilities..................................................................................25
User Preferences.........................................................................................25
iii

Contents
3 HP Information Assistant...........................................................................27
Overview.....................................................................................................27
Audience Assumptions.................................................................................27
Using Information Assistant..........................................................................27
Getting Help.............................................................................................28
Finding Information..................................................................................28
Copying and Printing Information.............................................................29
Installing HP Information Assistant Software................................................29
Installing from the CD-ROM.....................................................................30
4 Accessories................................................................................................31
Installing Accessories...................................................................................31
Configuring ISA Non-Plug-and-Play Board...............................................32
Upgrade Video Memory...........................................................................34
5 Installation in Rack (Optional)...................................................................35
Rack Installation Overview...........................................................................35
Pedestal Removal........................................................................................36
Remove Covers.......................................................................................36
Remove Pedestal ....................................................................................36
Rack Installation Instructions for the HP NetServer LC 3..............................38
PDU Placement and Power Cabling.............................................................43
Creating the Cable Management Loop for the LC 3......................................4 3
6 Troubleshooting ........................................................................................45
Precautions..................................................................................................45
Troubleshooting Tools..................................................................................45
Common Installation Problems ....................................................................46
If the System Will Not Power On..............................................................46
Troubleshooting Sequence.......................................................................47
Error Message Is Displayed .....................................................................48
No Error Messages Displayed..................................................................49
Clearing the System Configuration...........................................................51
Hardware Problems .....................................................................................53
The Display Does Not Work.....................................................................53
The Keyboard or Mouse Does Not Work..................................................54
The CD-ROM Drive Does Not Work.........................................................55
The Hard Disk Drive Does Not Work........................................................55
Password Problems .....................................................................................55
iv

Contents
Battery Problems.........................................................................................56
To Install a Replacement Battery.............................................................56
A Specifications............................................................................................59
Environment................................................................................................59
Weight and Dimensions...............................................................................60
Power Supply...............................................................................................60
Acoustic Emissions......................................................................................61
B Regulatory Information.............................................................................63
Regulatory Notices - Electromagnetic Compliance.......................................63
Notice for United States (Federal Communications Commission)............63
Notice for Canada (Industry Canada).......................................................64
Notice for Japan.......................................................................................65
Notice for Korea.......................................................................................66
Notice for European Union.......................................................................67
Notice for the United Kingdom: General Approval...................................67
Declaration of Conformity (US, EU, Australia)..........................................68
Regulatory Notices - Product Safety.............................................................69
CD-ROM Electrical Safety Statement......................................................69
Laser Safety Statements..........................................................................69
Batteries..................................................................................................71
Noise Declaration and Ergonomics ..........................................................72
C Warranty and Software License................................................................73
Hardware Product Limited Warranty ............................................................7 3
Software Product Limited Warranty..............................................................73
Hewlett-Packard Utility Software..............................................................73
Third-Party Software Products.................................................................74
Hardware Accessories Limited Warranty......................................................74
Hewlett-Packard Hardware Accessories...................................................74
Third-Party Hardware Products................................................................74
Pre-Failure Warranty ...................................................................................75
Limitation of Warranty..............................................................................75
Limitation of Liability and Remedies.........................................................76
Customer Responsibilities............................................................................77
Obtaining Warranty Service.........................................................................78
Customer Replacement Part....................................................................78
Return to HP/Reseller..............................................................................78
v

Contents
On-site.....................................................................................................78
HP NetServer Limited Warranty Coverage...................................................80
Technical Support........................................................................................80
U.S. and Canada .....................................................................................81
Europe.....................................................................................................81
Other Countries .......................................................................................82
Self-Help Tools............................................................................................82
Supplemental Warranty Service and Support...............................................83
Notice for Consumers in Australia:...............................................................83
Notice For Consumers In New Zealand:.......................................................83
Notice for Mexico: Hardware Warranty Statement.......................................83
Póliza de Garantía...................................................................................84
Condiciones.............................................................................................84
Notas.......................................................................................................85
Software Product Limited Warranty..............................................................86
HP Software Product License Agreement.....................................................87
HP NetServer Warranty Frequently-Asked Questions..................................89
D Service and Support..................................................................................95
System Design, Integration, and Support.....................................................95
Information and Support When You Need It.................................................95
HP Navigator Release History and Status Report.........................................96
HP Navigator CD-ROM Subscription Service...............................................97
HP Navigator CD-ROM................................................................................98
CompuServe Discussion Forum and Library ................................................98
World Wide Web and Internet FTP..............................................................99
Automated Fax............................................................................................99
Proactive Notification for HP NetServer Products ......................................100
Telephone Support.....................................................................................100
Before Telephoning for Technical Support.............................................101
Obtaining HP Repair and Telephone Support.........................................102
Ordering HP Cables, Drive Trays, and Technical Publications ...................104
Telephone Ordering Information ............................................................104
Contacting HP Regional Headquarters.......................................................105
Joining CompuServe..................................................................................105
Index.............................................................................................................107
vi

1 Installation Overview
This chapter contains simplified setup information about your HP NetServer
LC 3. For more detailed setup instructions, consult the HP NetServer LC 3
Installation Road Map. You may also want to consult HP Information Assistant,
located on the HP NetServer Online Documentation CD-ROM. See Chapter 3 of
this guide for a description.
Verify Contents
Unpack and verify the contents of the shipping box against the Contents
Checklist included with your HP NetServer. If anything is missing or damaged,
contact your reseller.
• If you do not plan to install the HP NetServer in a rack assembly, mount it
on the anti-tip pedestal now, as instructed in the HP NetServer LC 3
Installation Road Map.
• If you do plan to install the HP NetServer in a rack assembly, do not
mount it on the anti-tip pedestal. Install it in the rack assembly after all
options are installed and the system is configured.
To remove the pedestal at a later time, refer to "Pedestal Removal" in Chapter 5,
"Installation in Rack (Optional)."
View the Readme File
1. Connect the HP NetServer to a power source. Press the power-on button.
Press the CD-ROM drive eject button. Place the HP NetServer Online
Documentation CD-ROM CD-ROM in the drive, and press the eject
button again to close the drive. Turn the power off, wait 10 seconds, and
turn the power on again. If the system fails to boot, follow the diagnostic
instructions on the screen.
2. Go to the Main Menu. If the language needs to be changed, select User
Preferences and the language you want.
3. Select Readme File. The Readme file contains the latest information to
help you install your HP NetServer. Read it carefully before beginning
your installation.
1

Chapter 1 Installation Overview
Test the Sy stem Hardware (Optional)
If you want to verify the system hardware as shipped, you can now run HP
Diagnostic Assistant from the HP Navigator CD-ROM, as follows:
1. If you are not already running HP Navigator on the HP NetServer LC 3,
boot the HP NetServer LC 3 from the HP Navigator CD-ROM:
a. Press the power-on button. Press the CD-ROM drive eject button.
Place the HP Navigator CD-ROM in the drive, and press the eject
button again to close the drive. Turn the power off, wait 10 seconds,
and turn the power on again. If the system fails to start, follow the
diagnostic instructions on the screen.
b. Go to the HP Navigator Main Menu. If the language needs to be
changed, select User Preferences and the language you want.
2. From the HP Navigator Main Menu, select NetServer Utilities.
3. From the NetServer Utilities menu, select Diagnostic Assistant.
4. To understand Diagnostic Assistant and the hardware it can test, view the
Readme text, as follows:
a. From the Diagnostic Assistant Main Menu, select either Quick Tests
or Continuous Tests.
b. From the next menu displayed, select On-Line Manual.
c. When you have finished viewing the Readme text, press ESC twice to
return to the Diagnostic Assistant Main Menu.
Snap on the Anti-Tip Pedestal
In order to ensure stability, mount the server on its accompanying anti-tip
pedestal. See the illustration on the top side of the pedestal for guidance.
Remove the Covers
If you are not installing additional hardware (or only hot-swap disk drive
modules), you do not need to remove any covers. Go to the heading,
"Configure the HP NetServer."
If you are installing any hardware options (other than hot-swap disk drive
modules), you must remove the front bezel and top cover.
• If you are installing accessory boards or additional mass storage devices
(other than hot-swap disk drive modules), you must also remove the side
cover farthest from the system board. Refer to Figure 1-1.
• If you are only installing additional memory, do not remove the side
cover.
2

Chapter 1 Installation Overview
To install options, you will need a flat 1/4-inch screwdriver and T15 TORX
driver.
®
Figure 1-1. Remove the Front Bezel (A), Top Cover (B & C)
and Side Cover (D)
F
3

Chapter 1 Installation Overview
To remove the covers, refer to Figure 1-1 and do the following:
1. Turn off the HP NetServer and disconnect the power cord.
WARNING Before removing the cover, always disconnect the power cord
and unplug telephone cables. This action helps avoid
exposure to high energy levels that may cause burns when
parts are short-circuited by metal objects such as tools or
jewelry, as well as exposure to shock hazard from telephone
ringing voltages.
Note that the power switch does NOT turn off the standby
power. Disconnect the power cord from the HP NetServer to
turn off the standby power before handling components.
CAUTION Wear a wrist strap and use a static-dissipating work surface
connected to the chassis when handling components.
2. Unlock the front bezel with the key in the key bag located on the rear of
the HP NetServer.
3. Remove the front bezel (See Figure 1-1, Step A.):
a. Pull on the pocket on the side of the front bezel to swing that side of
the bezel outward.
b. Pull the front bezel off the HP NetServer. This exposes the
thumbscrews on the top cover.
4. Remove the top cover:
a. Loosen both thumbscrews on the front of the HP NetServer. (See
Figure 1-1, Step B.)
b. Pull the front of the top cover forward 1/16 inch (1.5 mm), and then
lift the front up only far enough to create a gap of 1 inch (3 cm)
between the top cover and the chassis.
CAUTION Only lift the front of the top cover high enough to create a
gap of 1 inch (3 cm) between the top cover and the chassis.
Lifting the top cover higher can damage it and the chassis.
(See Figure 1-1, Step C.)
4

Chapter 1 Installation Overview
c. Push the top cover back, and lift it off. The Technical Reference Label
is inside the top cover.
5. If you are installing any accessory boards or additional mass storage
devices (other than hot-swap disk drive modules), also remove the side
cover farthest from the system board (See Figure 1-1, Step D.):
a. Grasp the two tabs at the top of the side cover.
b. Pull upward and outward to lift the side cover off.
CAUTION Handle the side cover only by its top and bottom edges to
avoid damaging the EMI spring fingers inside its side edges.
Install Additiona l Memory
CAUTION The LC 3 uses 100 MHz SDRAM DIMMs, which are
electrically different from the EDO memory modules used
with earlier models. (Even though the EDO DIMM from
earlier models does fit in the DIMM sockets, it does not
function.) Do not install EDO DIMMs from previous models
in the LC 3.
CAUTION Use only DIMMs acquired from HP. Refer to the following
for a list of qualified DIMMs:
• Technical Reference Label inside the HP NetServer top
cover
• HP Order Assistant on the HP Web Site at
http://www.hp.com/go/netserver
• Information Assistant on the HP Navigator CD-ROM
• HP Customer Service
When handling DIMMs, observe antistatic precautions to
avoid damage.
5
Chapter 1 Installation Overview
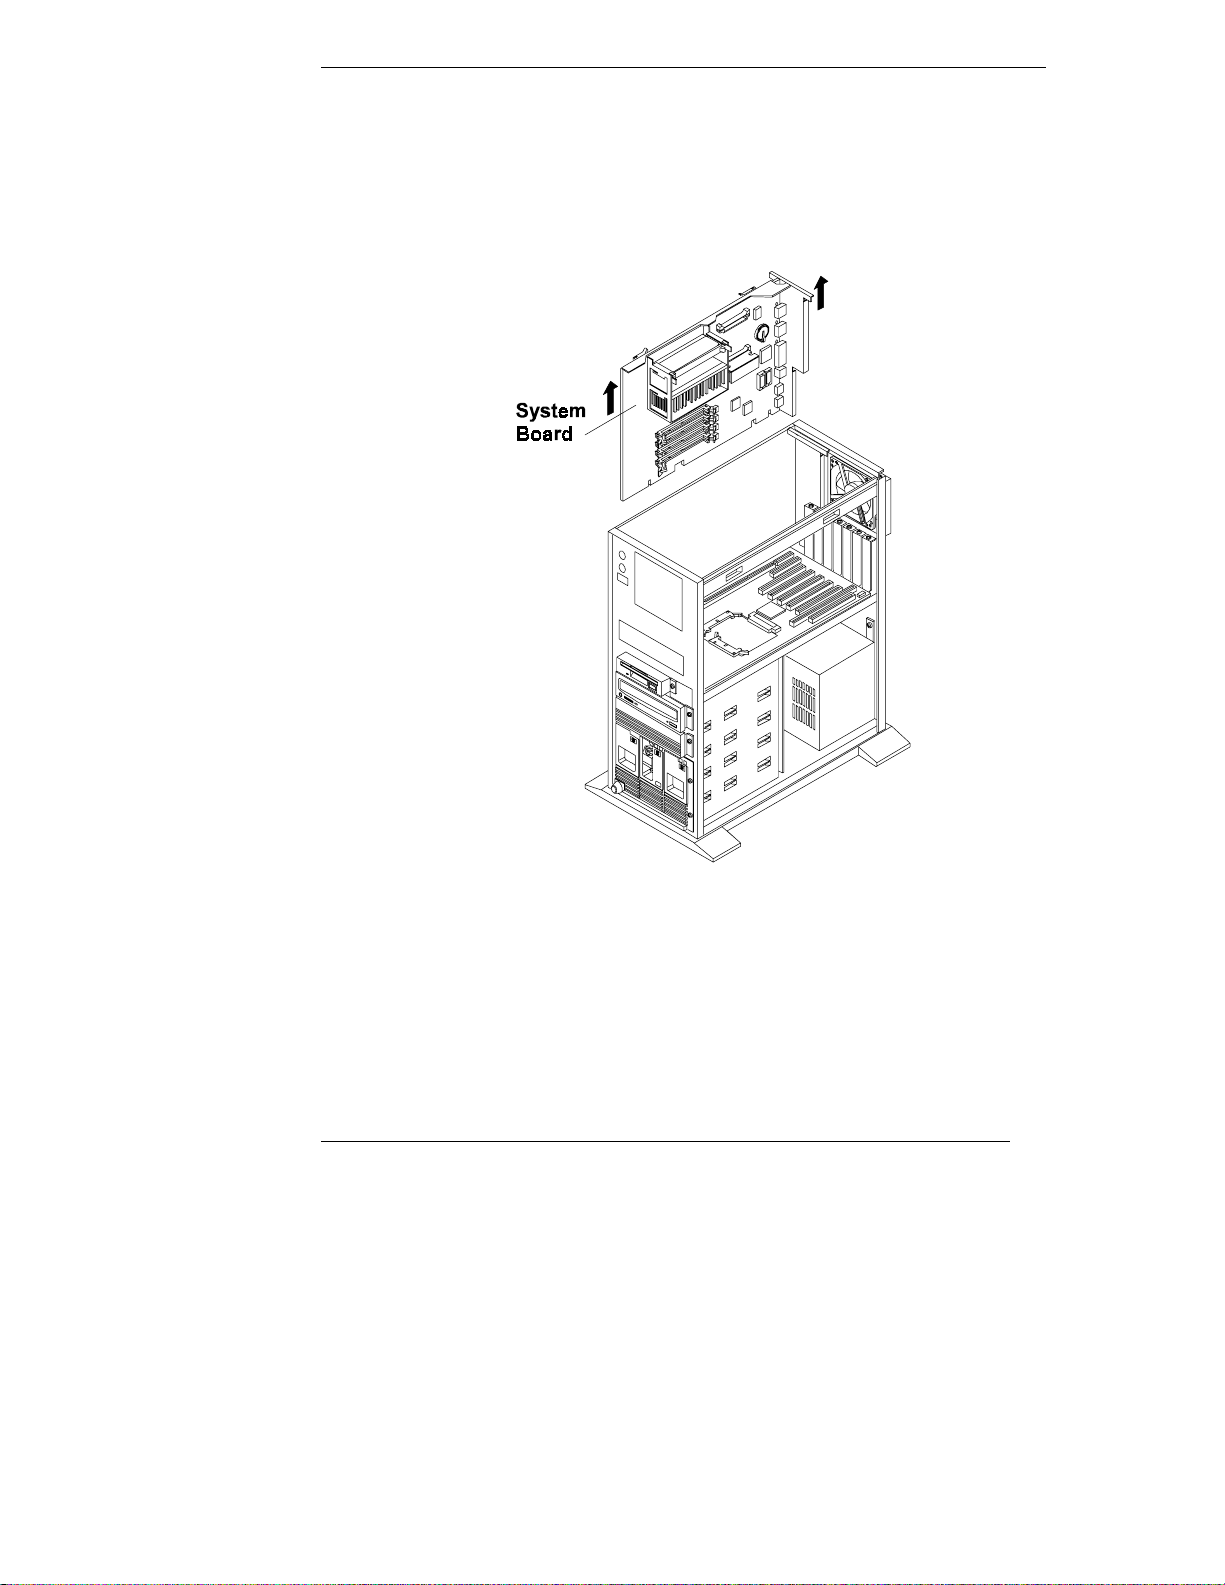
Remove the S ystem B oard
If you are adding additional memory, remove the system board first. Use the
retaining latches to start lifting the system board. Grasp the metal bracket at the
top of the system board, and lift the system board straight up and out of the HP
NetServer, as shown in Figure 1-2.
Figure 1-2. Remove the System Board
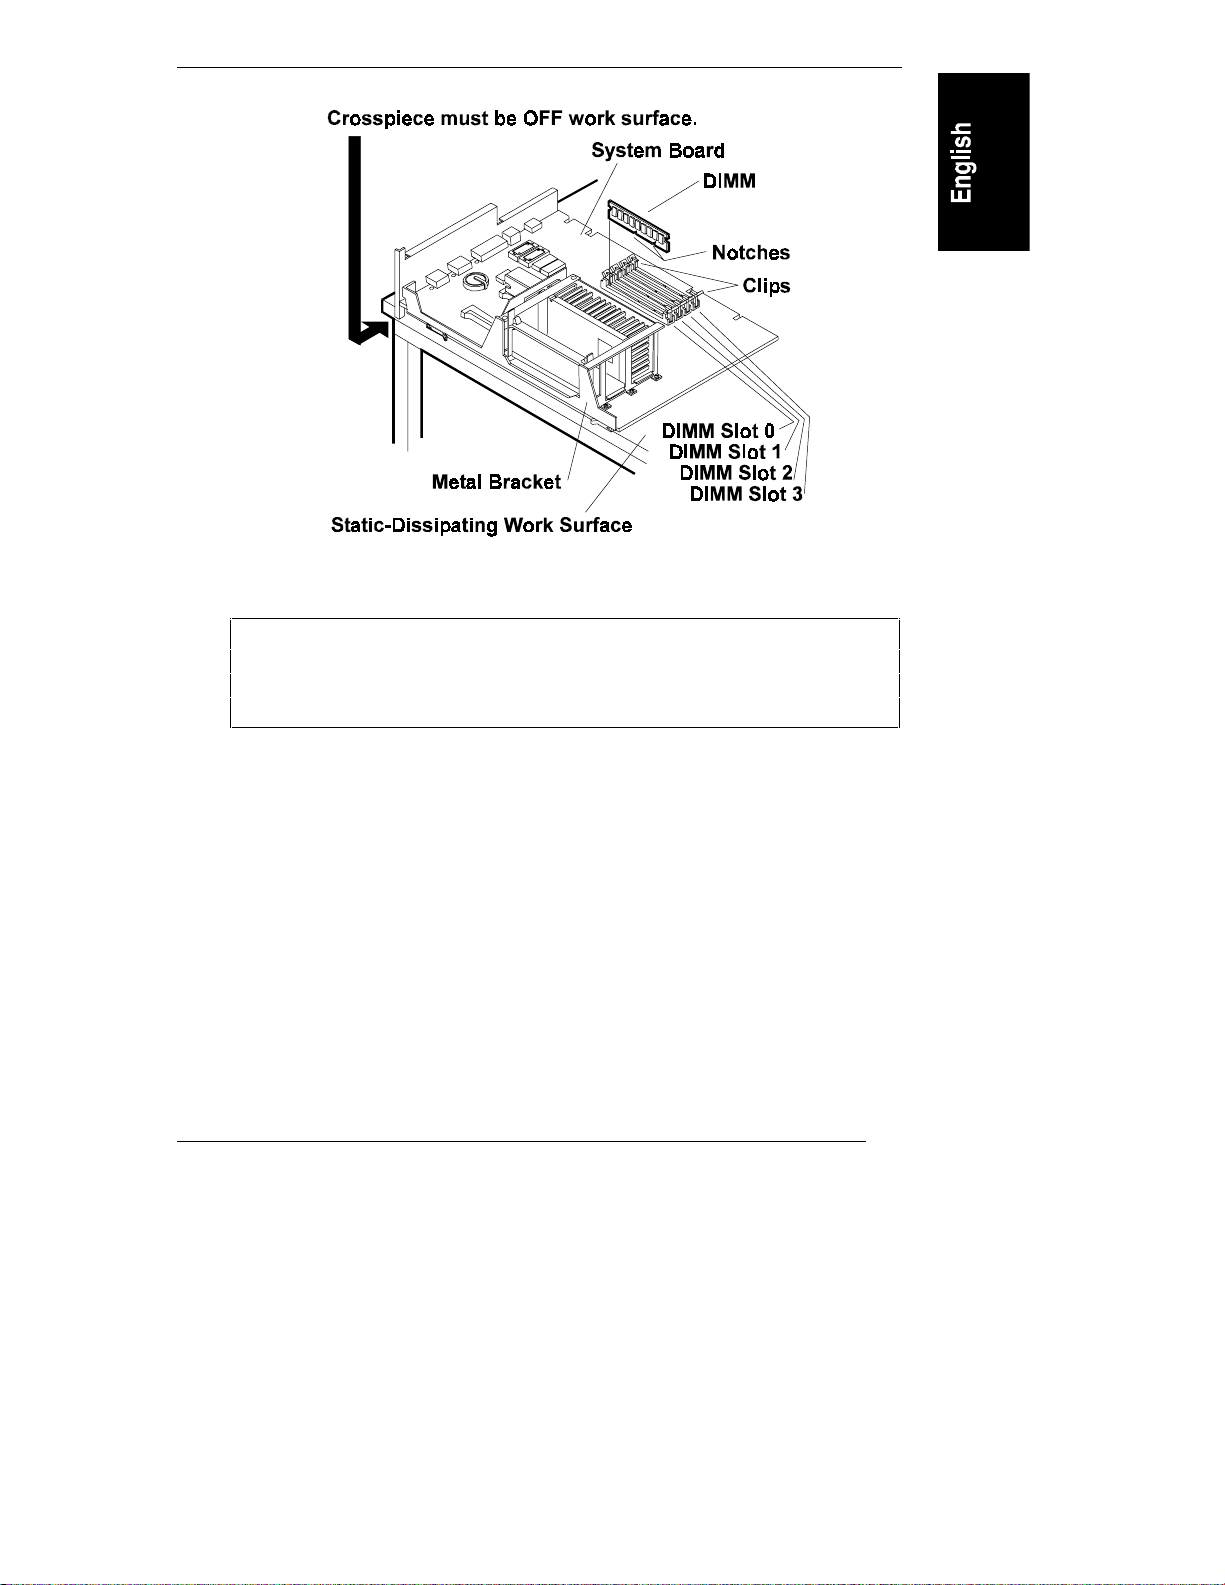
Lay the system board component-side up on a static-dissipating work surface
with the metal cross piece on the top rear corner of the system board extending
off the work surface, as shown in Figure 1-3.
6
Chapter 1 Installation Overview
Figure 1-3. Insert the DIMM
CAUTION Only install DIMMs on a system board lying flat on a static-
dissipating work surface. The metal crosspiece indicated by
the arrow in Figure 1-3 must be OFF the work surface.
Otherwise, flexing can damage the system board.
Follow these steps to install each DIMM in a DIMM socket on the system board.
DIMMs can be 64 MB, 128 MB or 256 MB in any combination. They can be
installed in any order in any of the DIMM sockets on the system board.
1. Remove an HP DIMM from its container, handling the module by its
edges. If you must set it down, place it on an antistatic mat.
2. Locate the socket where you will install the DIMM, and spread outward
the two retaining clips shown in Figure 1-3.
3. Align the notches on the DIMM with the keys on the socket, and hold the
DIMM at a 90° angle to the system board.
7

Chapter 1 Installation Overview
4. Insert the DIMM fully the into the socket. The retaining clips will grasp
the DIMM automatically if it is inserted properly. If the clips do not close,
the DIMM is not inserted correctly.
CAUTION Do not rock the DIMM into place, but apply firm and even
pressure (significantly more than you would when installing
SIMMs). If the retaining clips do not close, remove the
DIMM and repeat Steps 2-4.
Reinsert the S ystem B oard
Insert the plastic rails on the back side of the system board into the metal guides
on the side of the chassis, and push the system board downward, as follows:
• If you will install any accessory boards into slot 5 or 6, leave the system
board in its raised position, extending about 5 inches (about 12 cm) above
the chassis.
• If not, hold the handles of the retaining latches vertical, and push the
system board down to seat it firmly in its slot. Then, lower the retaining
latches simultaneously to secure the board.
NOTE Lower both retaining latches at the same time to avoid
jamming the system board.
Install All A ccessory Boards
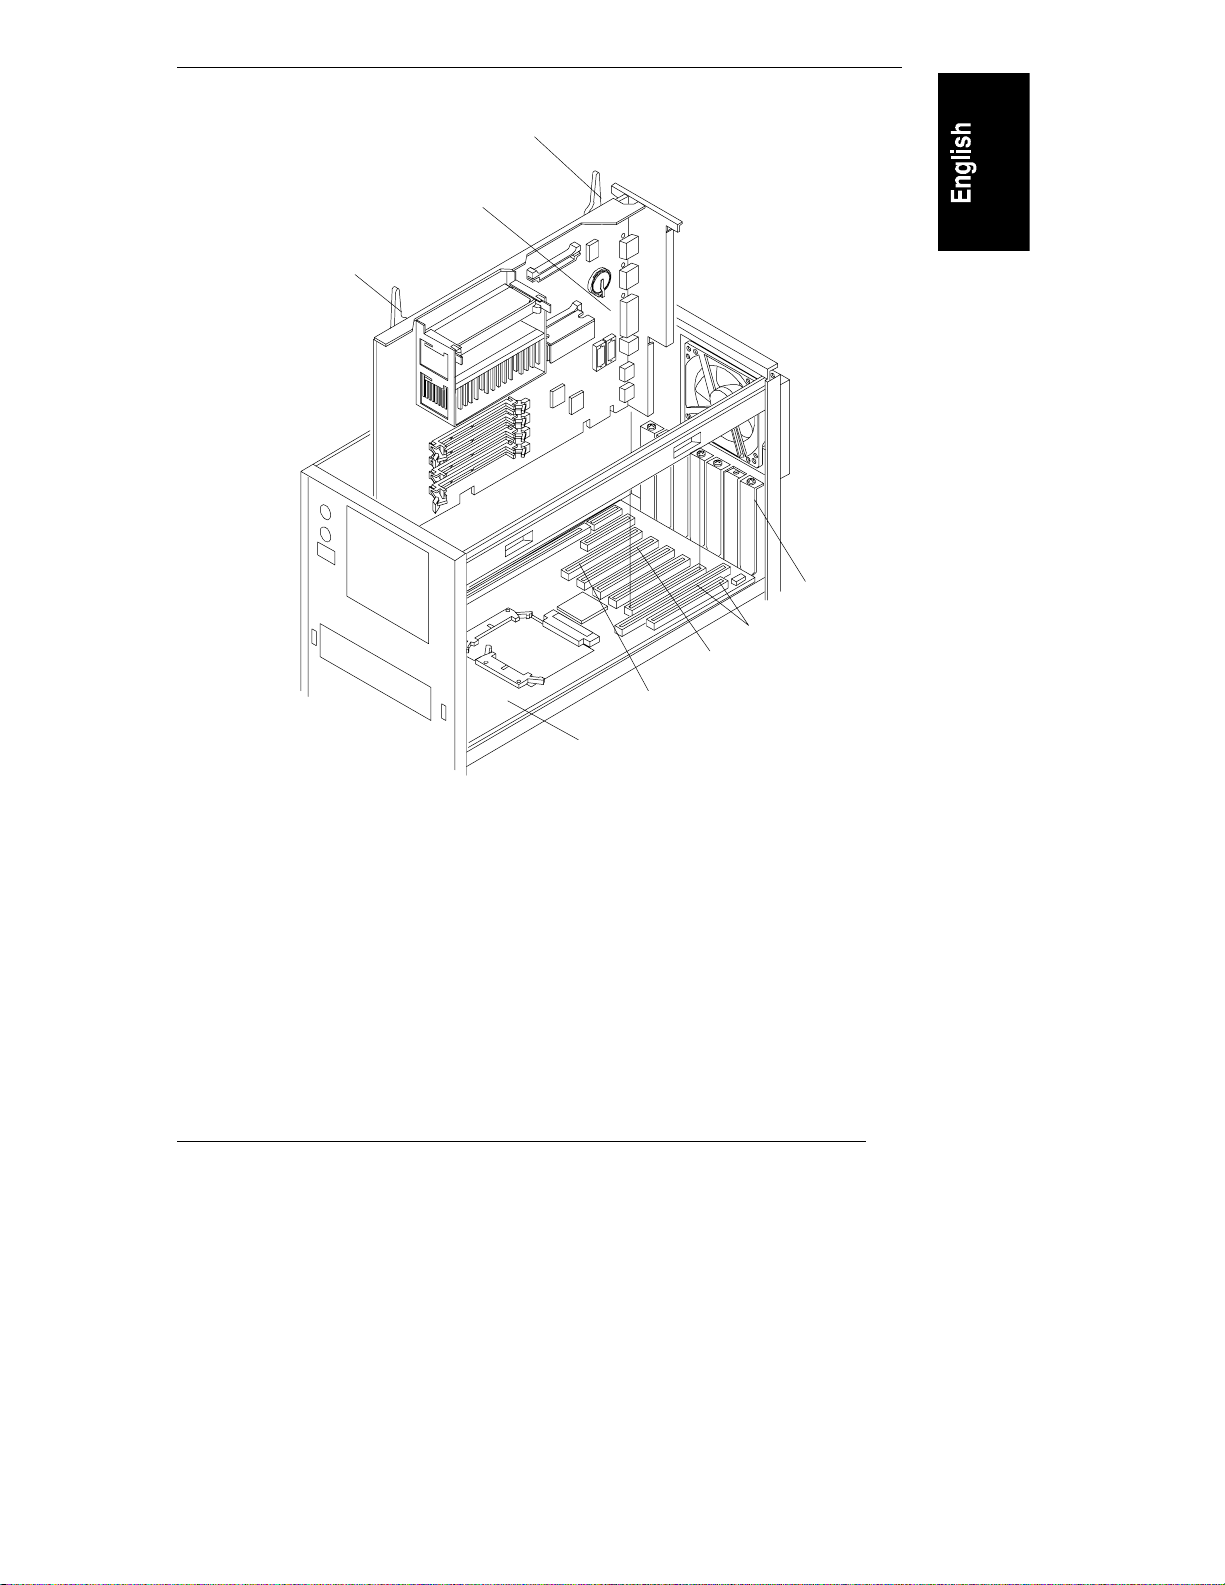
Raise the System Board
If you are installing accessory boards in slot 5 or 6, raise the system board (if it is
not already raised) to provide easier access to those accessory board slots. To
raise the system board, use the retaining latches to start lifting the system board.
Grasp the metal bracket at the top of the system board, and lift the system board
straight up until its top extends about 5 inches (about 12 cm) above the top of the
chassis, as shown in Figure 1-4. Friction stops automatically hold it in this
position.
8
Chapter 1 Installation Overview
Retaining Latch
System Board in
Raised Position
Retaining Latch
Slot
Cover
Slot 1
Slot 5
Slot 6
Backplane
Figure 1-4. System Board in Raised Position
Install A ccessory Boards
Install all accessory boards at this point. The backplane in the HP NetServer has
five PCI-only slots (numbered 2 through 6) and one combined PCI/ISA slot
(number 1).
Boards can be identified by the shape of their connectors, as shown in
Figure 1-5.
9

Chapter 1 Installation Overview
Figure 1-5. PCI/ISA Board Identification
For a list of boards HP has tested, view the Tested Products List located in the
following:
• HP Order Assistant on the HP Web Site at
http://www.hp.com/go/netserver
Click the hot spot "search" and enter the words "tested products list."
Browse through the search results list to find the topic you want.
• Help topic "Tested Products List" on the HP Navigator CD-ROM
For tips on configuring accessory boards, refer to the following:
• The Readme file on the Navigator CD-ROM
• Configuration advisories in Configuration Advisor. To read them, do the
following:
a. From the HP Navigator Main Menu, select Configuration Assistant
and Installation Advisor.
b. From the Configuration Assistant menu, select Custom.
c. Select the NOS (network operating system) you plan to install later,
and the version, if necessary.
d. To the question, "Would you like to use HP's automated mode of NOS
installation?" select No.
10

Chapter 1 Installation Overview
e. Configuration Advisor displays the Configuration Advisories. You can
print them out by saving them to disk (diskette) and later printing out
from the diskette.
Read the documentation supplied with the accessory boards. If you are installing
an ISA non-plug-and-play board, write down the switch and jumper settings and
all system resource requirements (such as memory range, I/O port range, DMA
channel, and IRQ level). Refer to these notes when you allocate system resources
to the ISA non-plug-and-play board when you configure the HP NetServer.
Install Additional Mass Storage Devices
Certain mass storage configurations may require additional cables or adapters.
For part numbers for HP cables, adapters, and trays, and configuration
information, see Information Assistant on the HP Navigator CD-ROM. For new
products, you can use Order Assistant on the HP Web Site at
http://www.hp.com/go/netserver. Click the hot spot "Ordering NetServers" and
choose your desired option.
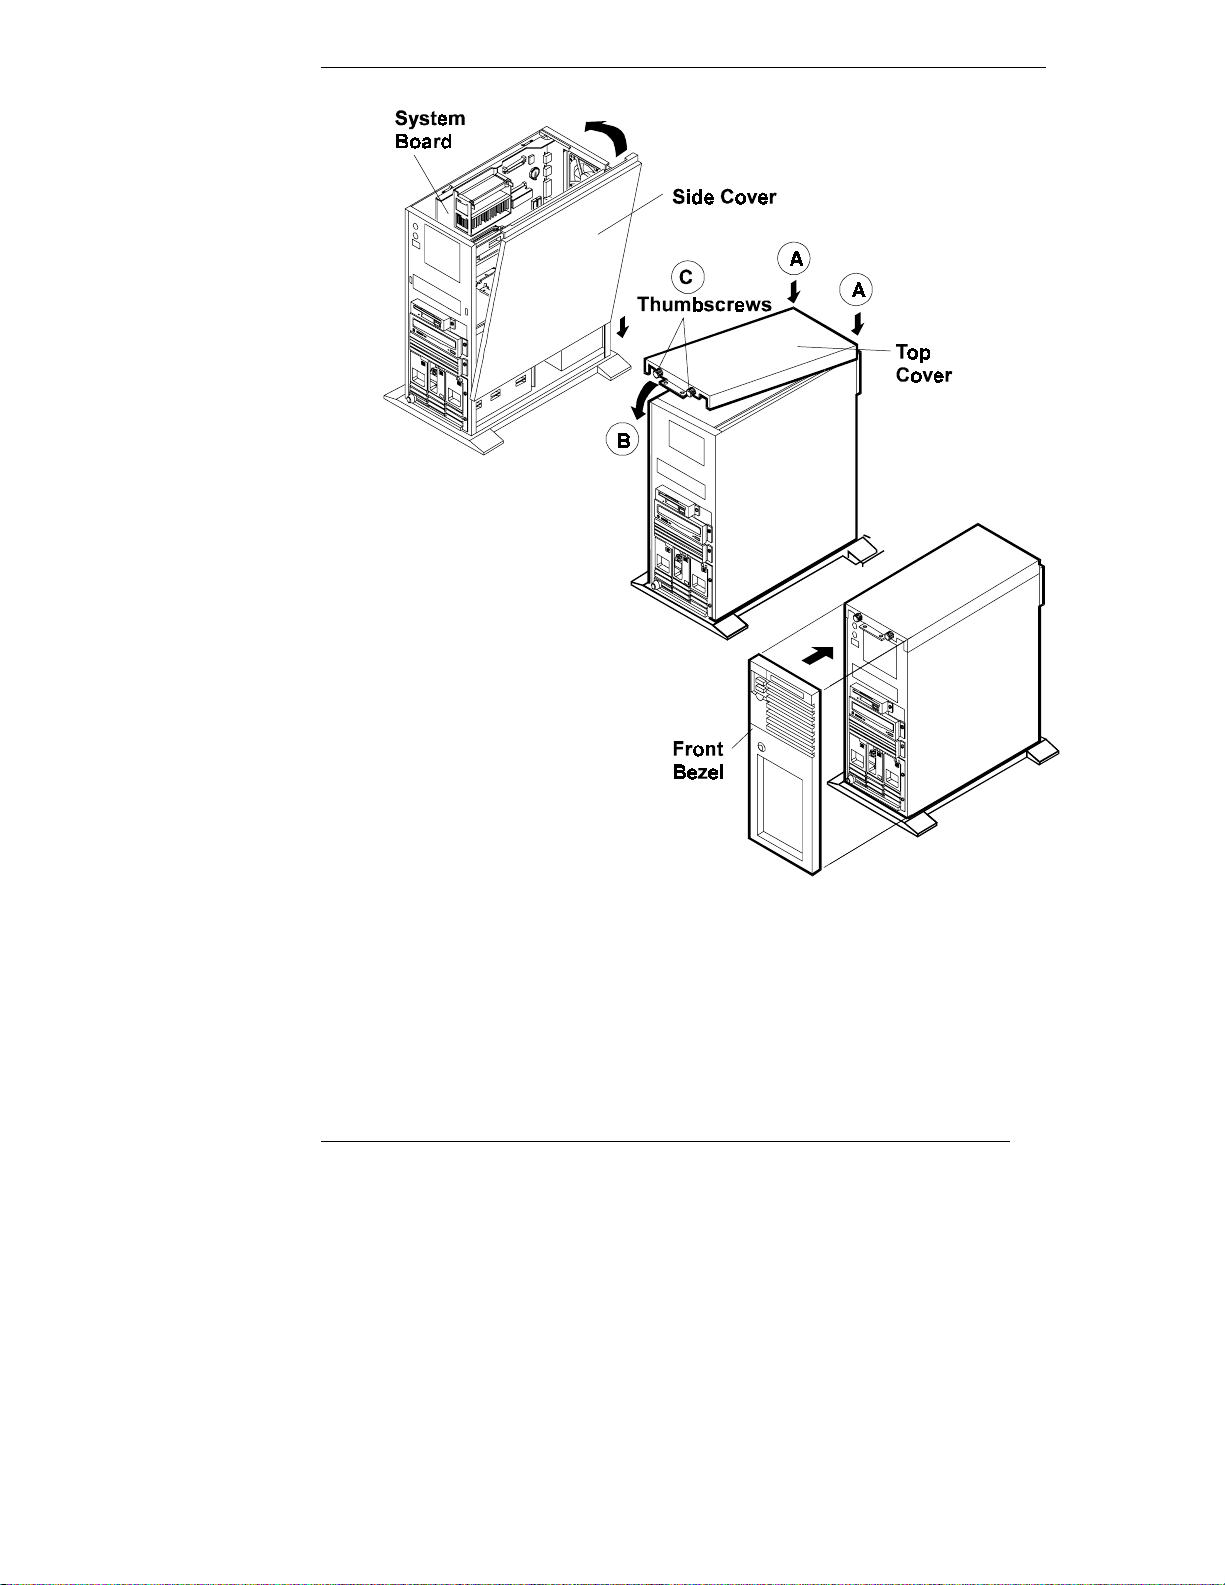
Replace All Covers and Connect All Cables
Refer to Figure 1-6 and replace all covers.
CAUTION Covers are necessary for proper air flow through the system.
Please replace ALL covers before operating the HP
NetServer, even for a short time. Otherwise, overheating can
damage processors, boards, and mass storage devices.
11
Chapter 1 Installation Overview
12
Figure 1-6. Replace All Covers

Chapter 1 Installation Overview
1. If the system board is in the raised position, lift the handles of its retaining
latches to vertical, and push the system board down to seat it firmly in its
slot. Lower the retaining latches simultaneously to secure the board.
NOTE Lower both retaining latches at the same time to avoid
jamming the system board.
2. If a side cover was removed, insert the channel on its lower edge onto the
lip at the bottom of the chassis. Press the top of the side cover against the
chassis to snap it into place.
3. To replace the top cover, see the illustration in Figure 1-6, Steps A, B, and
C, and do the following:
A. Align both of its rear corners against the similar metal on the rear of
the HP NetServer.
B. Lower the front of the top cover, and pull it forward slightly to catch
on the rear of the HP NetServer and to clear the front edge of the HP
NetServer.
C. With the top cover in place, tighten both thumbscrews.
4. Align the front bezel against the front of the HP NetServer, and press it
firmly into place.
5. Lock the front bezel with the key.
6. Connect the power cord and all other cables.
Configure the HP NetServer
Run SCSI Select Utility
If you need to verify or modify SCSI host adapter settings, or if you need to
low-level format SCSI disks or verify SCSI disk media, run the SCSISelect
utility, as follows:
1. Turn on or reboot your system.
During system start-up or reset, when the message
Press <Ctrl> <A> for SCSISelect(TM) Utility
appears, press the CTRL and A keys at the same time.
13

Chapter 1 Installation Overview
2. From the Options menu, select one of the following:
◊ Configure/View Host Adapter Settings: Select this option to
configure or view SCSI bus interface definitions, boot device options,
SCSI configurations, and advanced configuration options.
◊ SCSI Disk Utilities: Select this option to format disks or verify disk
media.
3. Use the arrow keys to move the cursor, press ENTER to select an option,
and press ESC to exit.
Reserve Resou rces for ISA Non -Plug-an d-Play B oard
If you have installed an ISA non-plug-and play accessory board, you must reserve
system resources for it. Turn on the monitor and the HP NetServer, and start the
Setup utility by pressing the F2 key when
Press <F2> to enter SETUP
appears on the boot screen.
NOTE Pressing the F2 key when prompted should start the Setup
utility. For some ISA boards, the Setup utility will not start,
and you must remove the ISA board, use the Setup utility to
reserve system resources for the ISA board, and then replace
the ISA board.
Use the Setup utility to allocate system resources to the ISA non-plug-and-play
accessory board. Refer to the "Installing ISA Non-Plug-and-Play Boards" in
Chapter 4, "Accessories," for instructions.
Run Con figuration Assistan t and I nstallation Assistan t
Turn on the monitor and the HP NetServer, and insert the HP Navigator
CD-ROM into the drive. Turn the power off, wait 10 seconds, and turn the power
on again. If the system fails to start, follow the instructions on the screen.
1. When HP Navigator starts, you may need to set the language and the time
and date. Follow the onscreen instructions. You can also change the
language of the BIOS when prompted.
2. Go to the HP Navigator Main Menu and select "Configuration and
Installation Assistant."
14

Chapter 1 Installation Overview
3. Follow the onscreen instructions in Configuration Assistant to continue
your HP NetServer installation. For details, refer to the HP NetServer
LC 3 Installation Road Map, to Chapter 2, "HP Navigator," in this guide,
or to Information Assistant.
Install HP TopTools
HP TopTools is browser-based management software that provides remote
administration and monitoring of critical server components. You must install
TopTools before technical support can be provided. Refer to the HP NetServer
Management Reference Guide, and install TopTools.
15


2HP Navigator
Contents of the HP NetServer Navigator CD-ROM
Before the HP Navigator Main Menu is displayed, you may be prompted to set
the language and the time and date. You can also set the language that the BIOS
displays.
The Main Menu of HP Navigator directs you to modules where you can perform
configuration tasks. The menu buttons for these modules are as follows:
• Readme File
• Configuration Assistant and Installation Assistant
• HP Management Solutions
• NetServer Utilities
• User Preferences
Another CD-ROM entitled HP NetServer Online Documentation gives you
access to relevant system documentation. See the chapter of this guide entitled
"Information Assistant."
The following is a description of the contents of HP Navigator, as accessed from
the Main Menu.
Readme File
This file includes the most recent information that was not available at the time
that the installation documentation was printed. It is important to check this file
before proceeding with the installation.
Configuration Assistant and Installation Assistant
HP Configuration Assistant guides you through the steps necessary to configure
the HP NetServer. Three methods of configuration are available: Express,
Custom, and Replicate.
Before you run Configuration Assistant and Installation Assistant, run the
SCSISelect utility and the Setup utility, if necessary:
17

Chapter 2 HP Navigator
• If you need to verify or modify SCSI host adapter settings, or if you need
to low-level format SCSI disks or verify SCSI disk media, run the
SCSISelect utility. Refer to "Run SCSISelect Utility" in Chapter 1,
"Installation Overview."
• If you have installed an ISA non-plug-and play accessory board, you must
reserve system resources for it. Refer to the "Installing ISA Non-Plugand-Play Boards" in Chapter 4, "Accessories," for instructions.
After you run Configuration Assistant and Installation Assistant, remember to
install TopTools. Refer to the HP NetServer Management Reference Guide.
Express Configu ration
Express configuration is the preferred method to configure your HP NetServer,
since it leads you through the configuration process in sequence and offers you
default selections. Express configuration includes the following steps:
• Update System BIOS: This step appears if Configuration Assistant
detects that a newer version of the BIOS is available on the HP Navigator
CD-ROM. You must update your BIOS to the new version if you want to
continue in Express mode. You can also update the language that the
BIOS displays.
• Configure ISA Non-Plug-and-Play Board: If you have installed an ISA
non-plug-and-play board, and you have not reserved system resources for
it, select Configure Non-PnP board on the information window that pops
up.
• Select NOS: You will be asked to select the NOS and version that you
plan to install.
• Select NOS Installation Mode: For certain versions of Novell NetWare /
IntranetWare and Microsoft Windows NT Server, you will be asked,
Would you like to use HP's automated mode of NOS
installation?
◊ Select Yes for automated NOS installation, which will guide you
through the NOS installation, set up the hard disk drive, and configure
your NOS with appropriate drivers for HP-bundled configurations.
Perform an automated NOS installation for first-time installation of
Novell NetWare / IntranetWare or Microsoft Windows NT Server on a
factory-configured HP NetServer.
18

Chapter 2 HP Navigator
◊ Select No for manual NOS installation. Perform a manual NOS
installation if you are installing a NOS other than certain versions of
Novell NetWare / IntranetWare or Microsoft Windows NT Server, or
if you have replaced any HP components.
• View Configuration Advisories: Read the configuration advisories, and
print them out if necessary. You can change your hardware at this time to
conform to the advisories.
• Configure Remote Management: This utility configures the Integrated
Remote Assistant device for improved remote management. It enables
remote, dial-up server management. To configure Integrated Remote
Assistant, select Configure Remote Management on the Configure
Remote Management screen.
• Show System Information: Use this screen to display information about
standard and accessory boards and devices in the system, as well as the
used and available system resources.
◊ Select View System Information on the Show System Information
screen to display information about standard and accessory boards and
devices in the system.
◊ Select View Resources on the Show System Information screen to
display used and available system resources, such as memory ranges,
I/O port ranges, DMA channels, and interrupt (IRQ) levels.
• Configure Disk Array: If you have an HP disk array, you must configure
it with the disk array utility. Select Execute on the Configure Disk Array
screen to start the disk array utility.
• Install Utility Partition: This step creates a utility partition on the server
hard disk where HP Navigator will copy Diagnostic Assistant, the BIOS
update utility, the event log report utility, the disk array utility, the
Network Interface Card (NIC) configuration utility, the Remote Assistant
utilities, troubleshooting utilities, and other utilities. It is not available for
SCO UNIX. Select Execute on the Install Utility Partition screen.
• Execute Card Utilities: When Configuration Assistant detects installed
boards for which there are additional configuration utilities on the HP
Navigator CD-ROM, you can execute these utilities to complete the
configuration of the boards by selecting Execute on the Execute Card
Utilities screen.
19

Chapter 2 HP Navigator
• For Manual NOS Installation Only: Before you perform a manual NOS
installation, you must print out instructions and manually create
NOS-specific drivers diskettes, as follows:
◊ Create Drivers Diskette(s): On the Create Drivers Diskette(s) screen,
select Create Drivers Diskette(s) to create one or more customized
diskettes containing HP drivers and configuration files to use when
you install the NOS.
◊ Print and Read Instructions: On the Show NOS Installation
Instructions screen, select Save to Disk to copy the Network Operating
System Installation Instructions to disk. Then print them out from the
disk. Read the instructions first, and then follow them to manually
install the NOS.
• Install NOS:
◊ Automated NOS Installation: For certain versions of Novell
NetWare / IntranetWare or Microsoft Windows NT Server,
Configuration Assistant partitions and formats the hard drive, and
Installation Assistant guides you through the NOS installation and
configures the NOS with the appropriate drivers for the HP-bundled
configuration.
◊ Manual NOS Installation: Follow the instructions on the screen and
the Network Operating System Installation Instructions that you
printed out.
Custom Configuration
In Custom configuration mode, you perform the same configuration steps as for
Express configuration mode, but you can do them in any order. Select Custom
on the Configuration Assistant menu if you are experienced in HP NetServer
configuration and have a preferred sequence of steps, or if you prefer to
configure your system one component at a time.
After you have selected the NOS, version, and NOS installation mode
(automated or manual), and after you have viewed the Configuration
Advisories, the Custom Configuration screen displays the following menu:
• Essential Steps:
◊ Configure Remote Management: This utility configures the
Integrated Remote Assistant device for improved remote management.
It enables remote, dial-up server management. To configure Integrated
20

Chapter 2 HP Navigator
Remote Assistant, select Configure Remote Management on the
Configure Remote Management screen.
◊ Configure Disk Array: If you have an HP disk array, you must
configure it with the disk array utility. Select Execute on the
Configure Disk Array screen.
◊ Execute Card Utilities: When HP Navigator finds installed boards for
which there are additional configuration utilities on the CD-ROM, this
option becomes available to complete the configuration of the boards.
Select Execute on the Execute Card Utilities screen.
◊ Install NOS (in automated NOS installation mode), or
Create Drivers Diskette(s) (in manual NOS installation mode).
• Recommended Steps:
◊ Update System BIOS: Use this to update the system BIOS to the
newer version on the HP Navigator CD-ROM.
◊ Install Utility Partition: This step creates an 8 MB utility partition on
the server hard disk where HP Navigator will copy Diagnostic
Assistant, the BIOS update utility, the event log report utility, the disk
array utility, the NIC configuration utility, the Remote Assistant
utilities, troubleshooting utilities, and other utilities. It is not available
for SCO UNIX. Select Execute on the Install Utility Partition screen.
◊ Show System Information:
∗ Select View System Information on the Show System Information
screen to display information about standard and accessory boards
and devices in the system.
∗ Select View Resources on the Show System Information screen to
display used and available system resources, such as memory
ranges, I/O port ranges, DMA channels, and interrupt (IRQ)
levels.
◊ Show NOS Installation Instructions: Select this option and Save to
Disk to copy the Network Operating System Installation Instructions
to disk. Then print them out from the disk. Read the instructions first,
and then follow them to manually install the NOS.
The NOS installation process, whether automated or manual, is the same as in
Express configuration mode:
21

Chapter 2 HP Navigator
• For Manual NOS Installation Only: Before you perform a manual NOS
installation, you must print out instructions and manually create
NOS-specific drivers diskettes, as follows:
◊ Create Drivers Diskette(s): On the Create Drivers Diskette(s) screen,
select Create Drivers Diskette(s) to create one or more customized
diskettes containing HP drivers and configuration files to use when
you install the NOS.
◊ Print and Read Instructions: You may already have done this
directly from the Custom Configuration menu option Show NOS
Instructions. If not, on the Show NOS Installation Instructions
screen, select Save to Disk to copy the Network Operating System
Installation Instructions to disk. Then print them out from the disk.
Read the instructions first, and then follow them to manually install
the NOS.
• Install NOS:
◊ Automated NOS Installation: For certain versions of Novell
NetWare / IntranetWare or Microsoft Windows NT Server,
Configuration Assistant partitions and formats the hard drive, and
Installation Assistant guides you through the NOS installation and
configures the NOS with the appropriate drivers for the HP-bundled
configuration.
◊ Manual NOS Installation: Follow the instructions on the screen and
the Network Operating System Installation Instructions that you
printed out.
Replicate Configuration
In Replicate configuration mode, you can save a copy of your current system
configuration or load a previously saved configuration. This method saves time
when configuring multiple, identical systems. Select Replicate on the
Configuration Assistant menu.
HP Management Solutions
HP Management Solutions is a comprehensive suite of utilities, applications, and
built-in features to manage multiple servers locally or from remote locations. If
you are unfamiliar with these products or concepts,
22

Chapter 2 HP Navigator
• View the information about TopTools for Servers on the HP Web Site at
http://www.hp.com/go/netserver_mgmt.
• View information about HP Remote Assistant. On the HP Navigator
CD-ROM, select HP Management Solutions on the Main Menu, and
then select the desired option to learn more.
TopTools for Servers
HP TopTools for Servers is a browser-based management application that
provides remote administration and monitoring of critical server components.
TopTools provides vital information for quick and efficient troubleshooting and
proactive management of HP NetServers. Processors, memory, storage, and NICs
are a few examples of the components managed by TopTools.
Some of the features of TopTools include:
• Notification of system operators about problems with key hardware
components, including memory, disk drives, SCSI controllers, NIC, and
power supply, as well as environmental problems with temperature and
voltage
• Unified event log to enable the system operator to review a complete
history of server activity in one place
• Predictive disk problem warning backed by HP pre-failure warranty
replacement.
• Disk capacity threshold alert and usage tracking
• View of critical server inventory information, such as BIOS version,
driver and firmware versions, ISA and PCI slot contents, and serial and
parallel ports
• Remote management capabilities enhanced with pcANYWHERE,
providing full remote control of Microsoft Windows NT servers across the
network or over a modem connection
• Easy linkage with leading management platforms
• Support for DMI 2.0, which provides the same Desktop Management
Interface inventory information for HP NetServers as for desktop PCs
TopTools is included with every HP NetServer L series server and should be
installed to help your service provider troubleshoot your system. TopTools is
located on HP Navigator CD-ROM versions L.11.00 and beyond.
23

Chapter 2 HP Navigator
• If your system came with this version of the CD-ROM, then TopTools is
located on the CD-ROM. See the TopTools Administrator Guide for
detailed installation instructions.
• If you would like the latest version, please download the TopTools
software and documentation from the HP NetServer Web Site at
http://www.hp.com/go/netserver_mgmt
See the TopTools Administrator Guide on the HP Web Site for detailed
installation instructions.
Integrated R emote A ssistant
Integrated Remote Assistant is a separate management controller built into your
HP NetServer LC 3. It enables remote modem-based server management and
alerting through a pager for improved remote administration of your HP
NetServer. Integrated Remote Assistant provides:
• Console redirection, independent of server state
• Access regardless of system state for troubleshooting and problem
resolution
• Pager notification of critical server events to alert you earlier to problems
• Access to the server event log
• Server reset and power control
• Remote BIOS update
• Password and dial-back security
See the HP NetServer Remote Administrator Guide for details.
pcANYWHERE
pcANYWHERE is remote-control graphics-redirection software that can manage
Microsoft Windows NT servers across the network or over a modem. Refer to
Information Assistant in the HP Navigator CD-ROM for details.
24
 Loading...