


Startup and Reference Guide
HP Notebook Series
Document Part Number: 345561-001
September 2003
Part 1: Startup
The Startup part of this guide explains how to set up your notebook for the first time.
Part 2: Reference
The Reference part of this guide explains how to identify and use the hardware and software features on your notebook.
Enhanced for accessibility.
Contents
1Startup
2Hardware
3Keyboard
4Power
5Drives and Drive Media
6Multimedia
7Communications
8Hardware Options and Upgrades
9Software Updates, Restorations and Utilities
A Specifications
Index

Part 1
Startup
This Startup and Reference Guide provides information about setting up and using your notebook.
To set up your notebook hardware and software for the first time, follow the procedures in this “Startup” part.
To learn more about using your notebook, refer to the remaining “Reference” part of this book. To find information about a specific topic:
Refer to the chapter Contents on the first page of each chapter, or
Refer to the Index
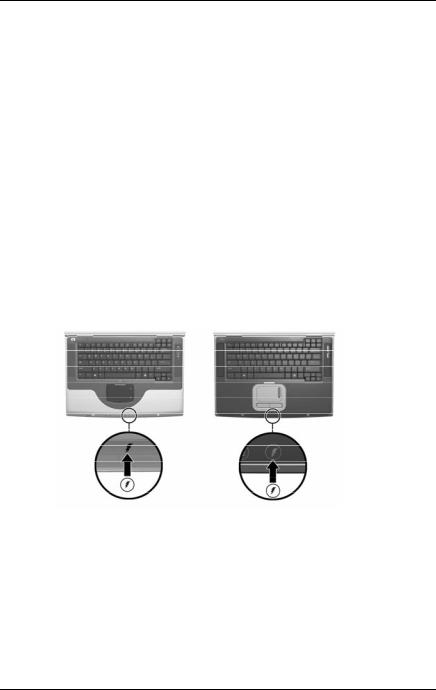
The illustrations throughout this book show the features and procedures for several notebook models. Whenever more than one notebook is illustrated, refer only to the illustration(s) for your notebook model.
Startup and Reference Guide––Part 1 |
1-1 |
Startup
Setting Up the Hardware
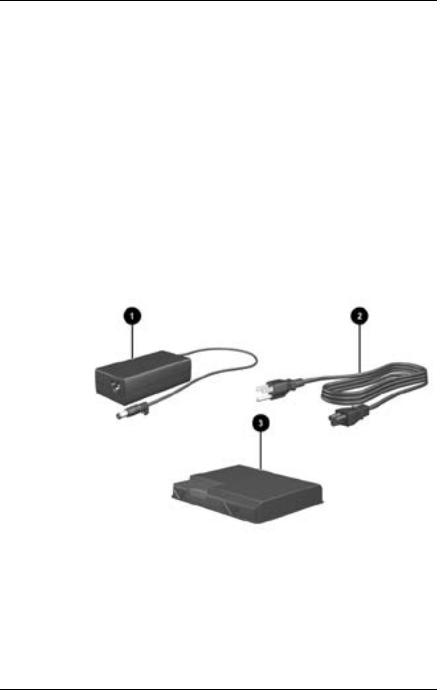
To set up the notebook for the first time, you need the notebook, the AC adapter 1, the power cord 2, and the battery pack 3.
During hardware setup, you will:
Insert the battery pack into the notebook, so the battery can begin to charge as soon as the notebook is connected to external power.
Open the notebook.
Connect the notebook to external power and turn on the notebook.
You will then proceed to software setup.
Identifying the AC adapter, the power cord, and the battery pack (Power cords vary by region and country.)
1-2 |
Startup and Reference Guide—Part 1 |
Startup
Inserting a Battery Pack
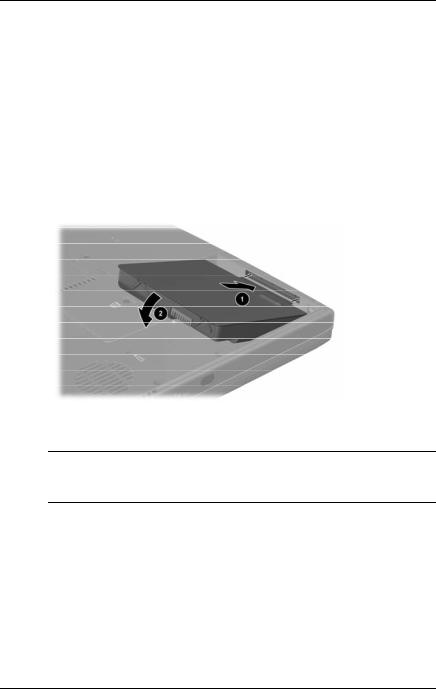
To insert the battery pack into the battery bay:
1.Turn the notebook underside up on a flat surface.
2.Insert the alignment tab on the battery pack into the alignment slot on the notebook 1.
3.Tilt the battery pack downward until it snaps into place 2.
Inserting a battery pack
CAUTION: To ensure that the correct drivers load and to prevent file corruption or damage to components , do not remove the battery pack until the notebook has been connected to external AC power.
Startup and Reference Guide--Part 1 |
1-3 |
Startup
Opening the Notebook
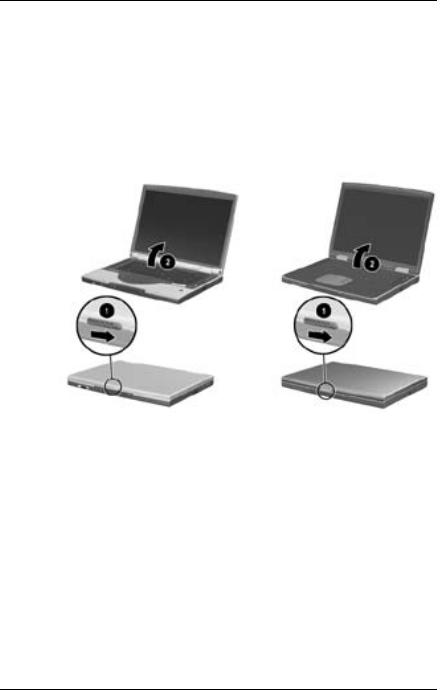
To open the notebook:
1.Place the notebook display side up on a flat surface near an electrical outlet.
2.Slide the display release latch 1 as you raise the display 2.
Opening the notebook
1-4 |
Startup and Reference Guide—Part 1 |
Startup
Connecting the Notebook to External Power
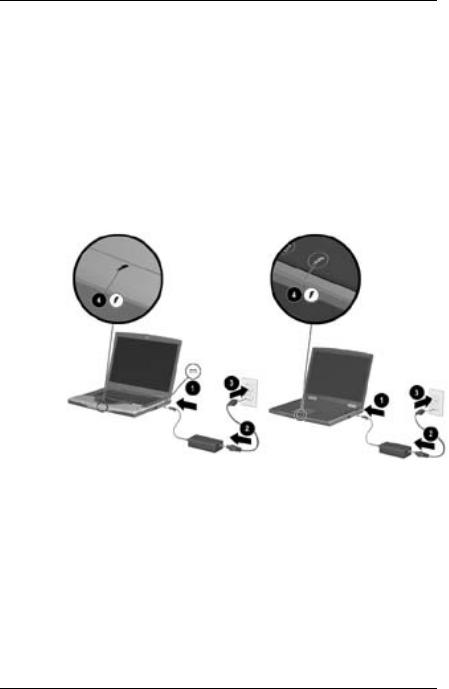
To connect the notebook to external AC power:
1.Plug the AC adapter cable into the power connector 1.
2.Plug the power cord into the AC adapter 2, then into an electrical outlet 3.
When the notebook is receiving external power, the battery light 4 turns on.
Connecting the notebook to external power (Power cords and outlets vary by region and country.)
Startup and Reference Guide--Part 1 |
1-5 |
Startup
Charging a New Battery Pack
The battery pack you inserted earlier begins to charge as soon as the notebook is connected to external power. Charge status is indicated by the battery light.
The battery light is on and orange while a battery pack inserted into the notebook is charging.
The battery light is on and green when a battery pack inserted into the notebook is fully charged.
HP recommends that you leave the notebook connected to external power until the battery pack is fully charged and the battery light turns green. (A partially charged new battery pack can run the notebook after initial software setup is complete, but battery charge displays will not be accurate until the new battery pack has been fully charged.)
Identifying the battery light
1-6 |
Startup and Reference Guide—Part 1 |

Startup
Turning On the Notebook
To turn on the notebook, press the power button 1. When the notebook turns on, the power/standby light 2 turns on, and you are prompted to begin software setup.
Turning on the notebook
If the notebook does not turn on:
Make sure that the AC adapter is securely plugged into an electrical outlet.
Make sure that the outlet is providing power. (To confirm that the outlet is providing power, plug another device into the outlet.)
If you have installed a battery pack, make sure that the battery pack is firmly seated.
Refer to the Worldwide Telephone Numbers booklet (English only) included with the notebook to contact
Startup and Reference Guide--Part 1 |
1-7 |

Startup
Setting Up the Software
CAUTION: To prevent file corruption and ensure that the correct drivers are installed, install software only when the notebook is connected to external power through the AC adapter. During the installation:
Do not plug the notebook from external.
Do not shut down the notebook or initiate Standby or Hibernation. Do not insert, remove, connect, or disconnect any device, cable, or cord.
Installing Basic Software
When the notebook is connected to external power and turned on for the first time, a prompt to set up the operating system and other basic software is displayed on the screen.
Before responding to the prompt and proceeding through the onscreen instructions, read the following caution and other installation information.
After beginning the software setup, you must complete the entire process without interruption. Setup time varies.
If you are not prompted to select a language, choose carefully. On some models, the languages that you do not choose are deleted from the system and cannot be restored during the installation.
Regional settings and most other preferences that you may select as you set up the basic software can be selected or changed later, after the operating system is installed.
When you are prompted to accept the End User License Agreement, you must choose Accept to continue the software setup.
During setup, it is normal for some notebook models to pause occasionally for up to 2 minutes and to restart several times. These pauses and restarts occur only during initial software setup. They will not occur during standard Windows startups.
1-8 |
Startup and Reference Guide—Part 1 |
Startup
Installing Optional Software
Step-by-step instructions for installing and using many of the applications and utilities included with the notebook are provided later in this guide. If you prefer to install optional software now, the following information may be helpful.
To install an application or a utility from a CD, refer to the instructions included with the CD. If printed instructions are not included in the CD package, they may be displayed on the screen when the CD is inserted.
To view or install preloaded utilities or applications, select Start > All Programs> Software Setup. Then:
To display the descriptions and space requirements of a preloaded item without installing it, select the Next button, then select an item. After viewing the information that is displayed, select the Cancel button.
To install a preloaded item, select the check box for the item slect the Next button, then follow the instructions on the screen.
Startup and Reference Guide--Part 1 |
1-9 |

Startup
Setting Regional and Display Preferences
Keyboard language and other regional preferences, such as time, date, and currency format, are set in the Regional Options window of the operating system. To access the Regional Options window, select Start > Control Panel > Date, Time, Language and Regional Options icon.
Screen appearance settings are accessed from the operating system Appearance and Themes window. To access the Appearance and Themes window, select Start > Control Panel>Appearance and Themes icon. To access the settings that control the size of the items displayed on the screen, select the Change Resolution task.
Turning Off the Notebook
Turn off the notebook by using the Windows shutdown procedure: Select Start > Turn Off Computer > Turn Off.
If the notebook does not respond, try the following emergency shutdown procedures in the sequence provided:
If the notebook is running Microsoft Windows XP Professional: press ctrl+alt+delete. Select the Shut Down button, then select Shut down from the drop down list.
Press and hold down the power button for at least 4 seconds.
Unplug the notebook from external power and remove the battery pack. For instructions see “Replacing the Battery Pack” in Chapter 4.
1-10 |
Startup and Reference Guide—Part 1 |
Startup
Setting Up a Wireless Device
Your notebook model may have a Bluetooth device, a wireless LAN device, or no wireless devices.
To display the names of any preinstalled wireless LAN devices in Device Manager: Select Start > My Computer. Right-click on the My Computer window, then select Properties > Hardware tab > Device Manager > Network Adapters.
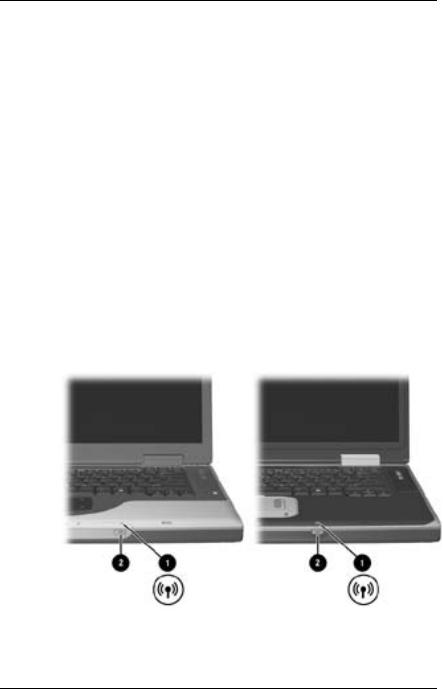
Using the Wireless Device Light and Button
The wireless device light 1 available on select models indicates whether integrated wireless devices have been turned on or off with the wireless device button 2. The integrated wireless devices may include a Bluetooth device, another wireless device, or both wireless devices. An integrated wireless device must be turned on with the wireless device button before the wireless device can be set up.
Identifying the wireless device light and button
Startup and Reference Guide--Part 1 |
1-11 |

Startup
When the wireless device button is turned on, the wireless device light turns on and the integrated wireless devices are hardware enabled.
When the wireless device button is turned off, the wireless device light turns off and the integrated wireless devices are hardware disabled.
The light remains on if either or both wireless devices are turned off by using the device software rather than by using the wireless device button.
Setting Up a Bluetooth Device
To set up a Bluetooth device, install the Bluetooth software preloaded on your notebook:
1.To enable the Bluetooth device and the software setup, press the wireless device button. (The wireless device light turns on.)
2.Select Start > All Programs > Software Setup. Select the Bluetooth software, then follow the setup instructions on the screen.
For more configuration information and usage instructions, refer on the Documentation Library—Bluetooth CD included with your notebook to the Bluetooth Getting Started guide and to the
Bluetooth User’s Guide.
Setting Up a Wireless Device
To set up an Integrated Wireless LAN 54g Network Adapter, follow the instructions at the HP Web site at http://www.hp.com for downloading and installing the SoftPaq for the Integrated Wireless LAN 54g Network Adapter. For general information about accessing, downloading, and installing a SoftPaq, see Chapter 9, in section “Updating Software.”
To set up any other wireless device, you may use the HP setup and configuration utility preloaded on your notebook or the default Windows XP wireless network connection utility.
1-12 |
Startup and Reference Guide—Part 1 |

Startup
The HP setup and configuration utility supports legacy operating systems and Cisco Compatible Extension program features. The Cisco Compatible Extensions program for WLAN devices assures compatibility between Cisco Aironet WLAN products and certain notebook models through extensive independent testing. Because a Cisco Compatible wireless device is IEEE 802.11 compliant and WiFi certified, it is fully compatible with other WiFi certified products.
For optimal wireless device functionality, HP recommends that you set up the device using the HP setup and configuration utility.
To set up a wireless LAN device using the default Windows XP wireless network connection utility:
1.Press the wireless device button. (The wireless device light turns on.)
2.Follow the instructions available through Start > Windows Help and Support.
To set up a wireless LAN device using the HP setup and configuration utility, you must first disable the Windows XP wireless network connection utility, then install the HP setup and configuration utility.
1.To disable the Windows XP wireless network connection utility:
a.Select Start > Control Panel > Network and Internet Connections > Network Connections.
b.Right-click Wireless Network Connection, then select Properties.
c.On the Wireless Networks tab, clear the Use Windows to configure my wireless network settings check box.
d.Select OK.
The Windows XP wireless network connection utility remains disabled until you enable it again.
Startup and Reference Guide--Part 1 |
1-13 |

Startup
2.Press the wireless device button. (The wireless device light turns on.)
3.To install the HP setup and configuration utility: Select Start > All Programs > Software Setup > WLAN Utility Installer, then select OK.
4.To install and configure your wireless device, follow the installation and configuration instructions on the screen.
Accessing Instructions for Using a Wireless Device
Instructions for installing and using an Integrated Wireless LAN 54g Network Adapter are included with the Integrated Wireless LAN 54g Network Adapter SoftPaq available at the HP Web site at http://www.hp.com.
Instructions for any other integrated wireless device included with your model are provided with your notebook. Depending on the wireless device, the instructions may be provided in a Help file within the device software or in documentation included with your notebook.
Protecting the Notebook from Power Surges
To protect the notebook from the power surges that may be caused by an uncertain power supply or an electrical storm:
Plug the notebook power cord into an optional, high-quality Provide surge protection on the cable that connects a modem to surge protector. Surge protectors are available from most computer or electronics retailers.
the an telephone line.
During electrical storm, run the notebook on battery power or shut down the notebook and disconnect the power cord.
1-14 |
Startup and Reference Guide—Part 1 |

Startup
Protecting the Notebook Against
Viruses
When you use the notebook for email, network, or Internet access, you expose the notebook to computer viruses. Computer viruses can disable the operating system, your applications, or your utilities or cause them to function abnormally.
Antivirus software can detect most viruses, destroy them, and, in most cases, repair damage they have caused. To provide protection against newly discovered viruses, antivirus software must be updated.
The Norton AntiVirus 2003 software installed on your notebook provides 60 days of free virus updates.
For Norton AntiVirus 2003 instructions and more information about virus updates, refer to the Help file within the application or select Start > Help and Support.
Startup and Reference Guide--Part 1 |
1-15 |

Startup
Using the Notebook Safely
This equipment has been tested and found to comply with the limits for a Class B digital device, pursuant to part 15 of the FCC Rules.
For more safety and regulatory information refer to the
Regulatory and Safety Notices guide on the Documentation Library CD and to the printed Wireless Device Regulatory Notices document included with your notebook. The Regulatory and Safety Notices guide also includes information about protecting the notebook against electrostatic discharge.
WARNING: To reduce the risk of electric shock or damage to your equipment:
Plug the power cord into an electrical outlet that is easily accessible at all times.
Disconnect power from the product by unplugging the power cord from the electrical outlet.
If provided with a three conductor power cord with a three pin attachment plug, plug the cord into a grounded (earthed) outlet. Do not disable power cord grounding pin. The grounding pin is an important safety feature.
WARNING: To reduce the risk of serious injury, read the Safety & Comfort Guide. It describes proper workstation setup and proper posture, health, and work habits for computer users. The Safety & Comfort Guide also provides important electrical and mechanical safety information. This guide is available on the Web at http://www.hp.com/ergo, on the hard drive, or on the Documentation Library CD that is included with the product.
WARNING: This notebook is designed to run demanding applications at full power. As a result of increased power consumption, it is normal for the notebook to feel warm or hot when used continuously. To avoid potential discomfort or burns, do not block the air vents or use the notebook on your lap for extended periods. The notebook complies with the user-accessible surface temperature limits defined by the International Standard for Safety of Information Technology Equipment (IEC 60950).
1-16 |
Startup and Reference Guide—Part 1 |

Part 2
Reference
Startup and Reference Guide––Part 2

Startup and Reference Guide––Part 2
2
Hardware
Contents
Display ................................................................……… 2–2 Top ……………………………………………….…. .. 2-3 TouchPad ………………………………………….2–3
Keys and Antenna ……………………………… . 2–4 Power Controls ……………………………………2–5
Lights …………………………………………… . 2–6 Audio Buttons and Speakers ………………….…. 2–7 Front Panel …………………………………………… 2–8 Rear Panel …………………………………………….. 2–9 Connectors and Jacks ……………………………. 2–9 Vent………………………………………………2–10 Left Side …………………………………………….. 2–11 Right Side …………………………………………… 2–12 Underside …………………………………………… 2–13 Bays and Memory Compartment ……………… 2–13 Docking Connector and Vents …………………. 2–14 Labels ……………………………………………2–15
Additional Standard Components ……………………2–16
Cables and Cord ……………………………………… 2–16
Adapters and Battery Pack ……………………………2–17
Restoration and Documentation CDs …………………2–18
Startup and Reference Guide––Part 2 |
2-1 |

Hardware
Display
Display
Display release latch |
Opens the notebook. |
2-2 |
Startup and Reference Guide––Part 2 |

Hardware
Top
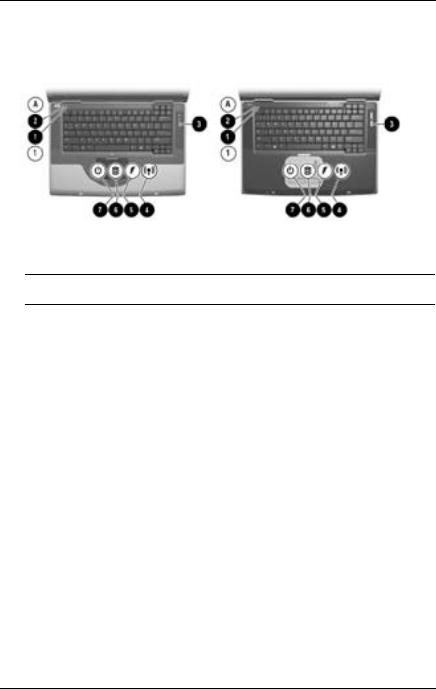
TouchPad
Top: TouchPad
1 |
TouchPad on/off button |
Enables/disables the TouchPad. |
|
|
|
|
|
|
2 |
TouchPad* |
Moves the pointer and selects or |
|
|
activatesitems on the screen. |
|
|
|
3 |
TouchPad light |
On: TouchPad is enabled. |
|
|
|
4 |
TouchPad scroll zones (2)* |
Scroll upward or downward. |
|
|
|
5 |
Left and right TouchPad |
Function like the left and right buttons on |
|
buttons* |
an external mouse. |
*This table describes default settings. For information about changing the functions of TouchPad features, see “Setting TouchPad Preferences”in Chapter 3.
Startup and Reference Guide––Part 2 |
2-3 |
Hardware
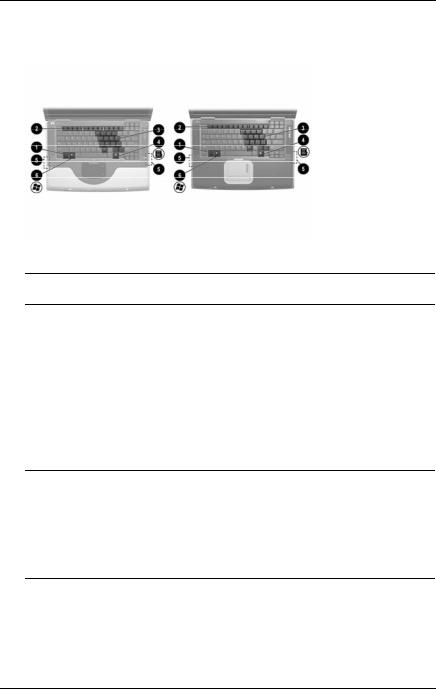
Keys and Antenna
Top: Keys and Antenna
1 |
Fn key |
Combines with other keys to perform |
|
system tasks. For example, pressing |
|
|
|
|
|
|
Fn+F7 increases screen brightness. |
|
|
|
2 |
Function keys (12) |
Perform system and application tasks. |
|
|
When combined with the Fnkey, the |
|
|
function keys F1 and F3 through F12 |
|
|
perform additional tasks as hotkeys. |
|
|
|
3 |
Keypad keys (15) |
Can be used like the keys on an |
|
|
external numeric keypad. |
|
|
|
4 |
Applications key |
Displays a shortcut menu for items |
|
|
beneath the pointer. |
5Antenna (available on select Sends and receives wireless device
|
models and not visible from |
signals. |
|
outside the notebook)* |
|
|
|
|
6 |
Windows logo key |
Displays the Windows Start menu. |
|
|
|
*The notebook has 2 antennas. The second is on the right side of the notebook. For optimal transmissions, keep the areas immediately over theantennas free from obstructions.
2-4 |
Startup and Reference Guide––Part 2 |
Hardware
Power Controls
Top: Power Controls
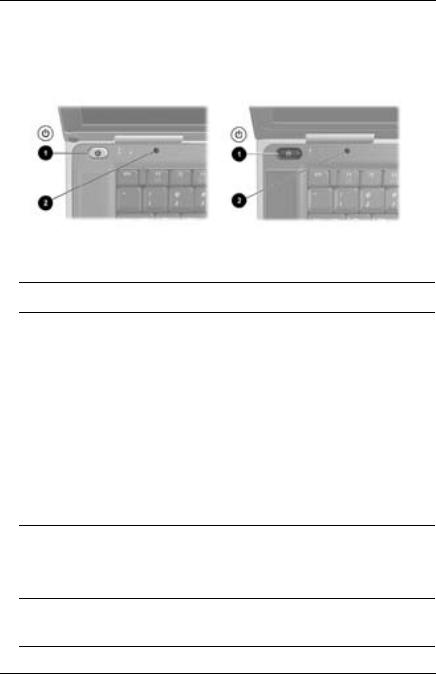
1 |
Power button* |
When the notebook is: |
|
|
Off, pres to turn on the notebook. |
|
|
On, briefly press to initiate |
|
|
Hibernation. |
|
|
In Standby, briefly press to resume |
|
|
from Standby. |
|
|
In Hibernation, briefly press to |
|
|
restore from Hibernation. |
|
|
If the system has stopped |
|
|
responding and Windows shutdown |
|
|
procedures cannot be used, press |
|
|
and hold for at least 4 seconds to |
|
|
turn off the notebook. |
2 |
Display switch* |
If the notebook is closed while on, turns off |
|
the display.
If the notenook is open while in Standby, turns on the notebook (resumes Standby).
*This table describes default settings. For information about changing the function of the power button or display switch, see “Setting Power Control Preferences” in Chapter 4.
Startup and Reference Guide––Part 2 |
2-5 |
Hardware
Lights
Top: Lights
1 |
Num lock light |
On (green): Num lock or the internal |
|
|
keypad is on. |
||
|
|
||
|
|
|
|
2 |
Caps lock light |
On (green): Caps lock is on. |
|
|
|
|
|
3 |
Mute light |
On (orange): Volume is muted. |
|
|
|
|
|
4 |
Wireless device light |
On: The wireless device button is turned |
|
|
(available on select models) |
on and an integrated wireless device is |
|
|
|
hardware enabled. |
|
|
|
|
|
5 |
Battery light |
On: The notebook is receiving adequate |
|
|
|
external power. |
|
|
|
On Orange: A battery pack is |
|
|
|
charging. |
|
|
|
On green: A battery pack is fully |
|
|
|
charged. |
|
|
|
Flashing: A battery pack is |
|
|
|
malfunctioning and may need to be |
|
|
|
replaced. |
|
6 |
IDE (Integrated Drive |
On: The internal hard drive or optical |
|
Electronics) drive light |
drive is being accessed. |
||
|
|||
|
|
|
|
7 |
Power/standby light |
On: Notebook is turned on. |
|
|
|
Flashing: Notebook is in Standby. |
|
|
|
|
2-6 |
Startup and Reference Guide––Part 2 |
Hardware
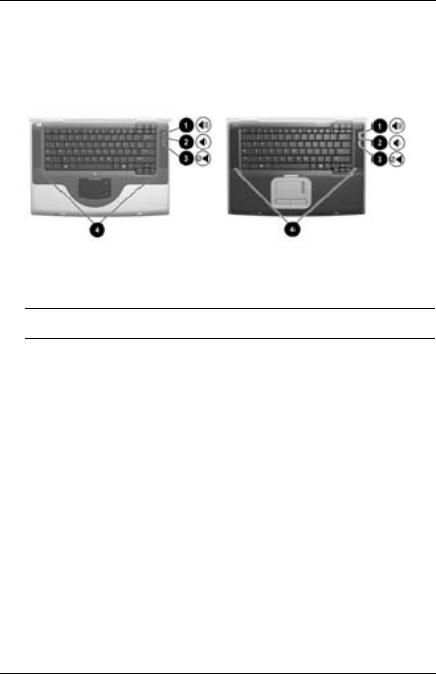
Audio Buttons and Speakers
Top: Audio Buttons and Speakers
1 |
Increase volume button |
Increases system volume. |
|
|
|
2 |
Decrease volume button |
Decreases system volume. |
|
|
|
3 |
Mute button |
Mutes or restores volume. |
|
|
|
4 |
Stereo speakers (2) |
Produce stereo sound. |
|
|
|
Startup and Reference Guide––Part 2 |
2-7 |
Hardware
Front Panel
Front Panel
1 |
SD (Secure Digital) Card |
On: An SD Card or MMC is being |
|
light |
accessed. |
||
|
|||
|
|
|
|
2 |
SD Cardslot |
Supports SD Cards and MMCs |
|
|
|
(multimedia cards). |
|
|
|
|
|
3 |
Microphone jack |
Connects an optional monaural or stereo |
|
|
|
microphone. |
|
|
|
|
|
4 |
Audio-out jack |
Connects optional headphones or |
|
|
|
powered stereo speakers. Also connects |
|
|
|
the audio function of an audio/video |
|
|
|
device such as a television orVCR. |
|
|
|
|
|
5 |
Wireless device button |
On: The wireless device light is on and |
|
|
(available on select |
an integrated wireless device is |
|
|
models) |
hardware enabled. |
|
|
|
|
2-8 |
Startup and Reference Guide––Part 2 |
Hardware
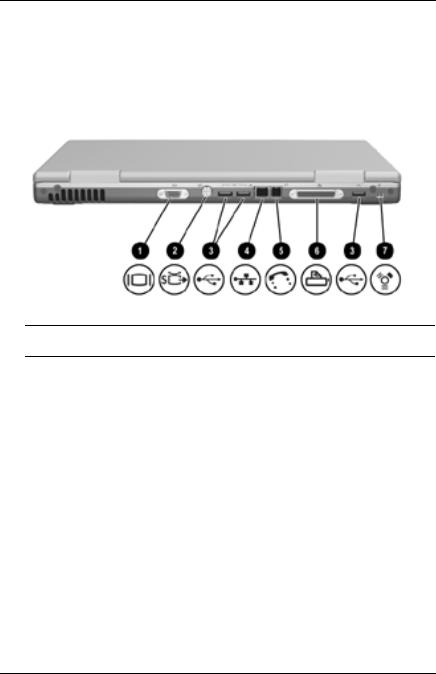
Rear Panel
Connectors and Jacks
Rear Panel: Connectors and Jacks
1 |
External monitor connector |
Connects an optional VGA external |
|
monitor or projector. |
|
|
|
|
|
|
|
2 |
S-Video jack |
Connects an optional S-Video device, |
|
|
such as a television, VCR, camcorder, |
|
|
projector, or video capture card. |
|
|
|
3 |
USB connectors (3) |
Connect optional 2.0-compliant USB |
|
|
devices. |
|
|
|
4 |
RJ-45 network jack |
Connects an Ethernet network cable. |
|
|
(An Ethernet network cable is included |
|
|
with select models.) |
|
|
|
5 |
RJ-11 telephone jack |
Connects a modem cable. (A modem |
|
|
cable is included with select models.) |
|
|
|
6 |
Parallel connector (available |
Connects an optional parallel device |
|
on select models) |
such as a printer. |
|
|
|
7 |
1394 connector |
Connects an optional 1394 device |
|
|
such as a camcorder. |
|
|
|
Startup and Reference Guide––Part 2 |
2-9 |
Hardware
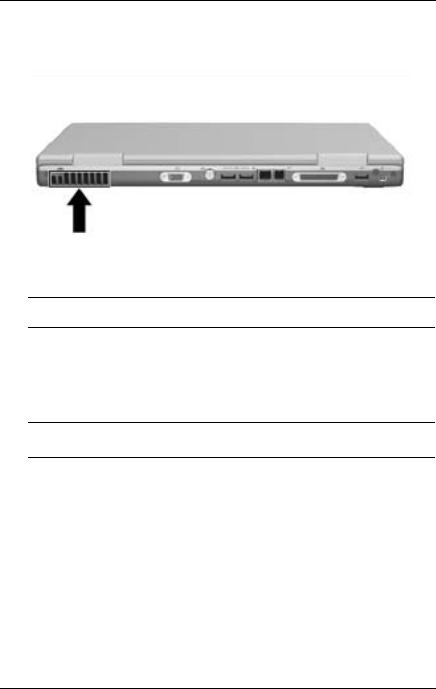
Vent
Rear Panel: Vent
Exhaust vent* |
Provides airflow to cool internal components. |
To preven overheating, do not obstruct vents. Do not allow a hard surface, such as a printer, or a soft surface, such as pillows or thick rugs or clothing to block airflow.
*The notebook has 3 vents. The other vents are on the underside of the notebook.
2-10 |
Startup and Reference Guide––Part 2 |
 Loading...