


NetStorage 6000
Table of contents
 Loading...
HP SureStore
NetStorage
6000
User’s Guide

© 2000 - 2001 Hewlett-Packard Company.
The information contained in this document is subject to change without notice.
This document contains proprietary information which is protected by copyright. All rights are
reserved. No part of this document may be photocopied, reproduced or translated to another
language without the prior written consent of Hewlett-Packard Company.
Hewlett-Packard shall not be liable for errors contained herein or for incidental or consequential
damages (including lost profits) in connection with the furnishing, performance, or use of this
material whether based on warranty, contract, or other legal theory.
Part Number C4475-90102

Table of Contents
Chapter 1: Overview
Network Attached Storage . . . . . . . . . . . . . . . . . . . . . . . . . . . . . 1-1
Getting Started. . . . . . . . . . . . . . . . . . . . . . . . . . . . . . . . . . . . . . . 1-1
HP NetStorage 6000 Hardware. . . . . . . . . . . . . . . . . . . . . . . . . . . 1-3
The HP NetStorage 6000 Web Interface. . . . . . . . . . . . . . . . . . . . 1-9
Integrating with Network Management Applications. . . . . . . . . . 1-11
Backing up the HP NetStorage 6000. . . . . . . . . . . . . . . . . . . . . . . 1-12
Locating Information . . . . . . . . . . . . . . . . . . . . . . . . . . . . . . . . . 1-13
Using Help While You Work . . . . . . . . . . . . . . . . . . . . . . . . . . . . 1-14
Printing Documents. . . . . . . . . . . . . . . . . . . . . . . . . . . . . . . . . . . 1-14
Chapter 2: The Identity Tab
Chapter 3: Configuring Your System and Network
The Configuration Tab . . . . . . . . . . . . . . . . . . . . . . . . . . . . . . . . 3-1
Network Settings. . . . . . . . . . . . . . . . . . . . . . . . . . . . . . . . . . . . . 3-2
Alert Settings. . . . . . . . . . . . . . . . . . . . . . . . . . . . . . . . . . . . . . . . 3-7
System Settings. . . . . . . . . . . . . . . . . . . . . . . . . . . . . . . . . . . . . . 3-10
User Mapping . . . . . . . . . . . . . . . . . . . . . . . . . . . . . . . . . . . . . . . 3-14
Shutting Down and Restarting . . . . . . . . . . . . . . . . . . . . . . . . . . . 3-21
Français
Chapter 4: Managing Storage
The Storage Tab . . . . . . . . . . . . . . . . . . . . . . . . . . . . . . . . . . . . . 4-1
Managing Physical and Logical Drives . . . . . . . . . . . . . . . . . . . . 4-2
Managing File Volumes and Directories. . . . . . . . . . . . . . . . . . . . 4-8
Allowing Access to Data. . . . . . . . . . . . . . . . . . . . . . . . . . . . . . . 4-14
Table of C ontents-1

Chapter 5: Backing Up and Restoring Files
The Backup and Restore Tab . . . . . . . . . . . . . . . . . . . . . . . . . . . . 5-1
Using the HP SureStore 818 or 1/9 DLT Autoloader . . . . . . . . . . 5-1
Local and Remote Backups. . . . . . . . . . . . . . . . . . . . . . . . . . . . . 5-4
Disk Checkpoints . . . . . . . . . . . . . . . . . . . . . . . . . . . . . . . . . . . . 5-7
Checking the Current Tape Drive Status. . . . . . . . . . . . . . . . . . . . 5-11
Backing Up . . . . . . . . . . . . . . . . . . . . . . . . . . . . . . . . . . . . . . . . . 5-14
Restoring Volumes, Files, and Directories . . . . . . . . . . . . . . . . . . 5-18
Checking Settings and Features . . . . . . . . . . . . . . . . . . . . . . . . . . 5-21
Chapter 6: Monitoring the System
The Status Tab. . . . . . . . . . . . . . . . . . . . . . . . . . . . . . . . . . . . . . . 6-1
Monitoring Hardware Information . . . . . . . . . . . . . . . . . . . . . . . . 6-1
Viewing System Activity . . . . . . . . . . . . . . . . . . . . . . . . . . . . . . 6-6
Chapter 7: Reporting
The Report Tab . . . . . . . . . . . . . . . . . . . . . . . . . . . . . . . . . . . . . . 7-1
Chapter 8: Securing Data
About HP NetStorage 6000 Security . . . . . . . . . . . . . . . . . . . . . . 8-1
HP NetStorage 6000 Security in a UNIX-only Envir onment . . . . 8-1
HP NetStorage 6000 Security in an NT-only Environment . . . . . 8-4
Security Mapping in a Heterogeneous Environment . . . . . . . . . . 8-9
UNIX Files Accessed by NT Clients . . . . . . . . . . . . . . . . . . . . . . 8-10
NT Files Accessed by UNIX Clients . . . . . . . . . . . . . . . . . . . . . . 8-11
Mapping NT and UNIX Users . . . . . . . . . . . . . . . . . . . . . . . . . . . 8-12
Modifying Map Files. . . . . . . . . . . . . . . . . . . . . . . . . . . . . . . . . . 8-13
Chapter 9: Contacting Support and Upgrading
Table of Contents-2
The Support Tab . . . . . . . . . . . . . . . . . . . . . . . . . . . . . . . . . . . . . 9-1
Upgrading the HP NetStorage 6000 . . . . . . . . . . . . . . . . . . . . . . . 9-3

Chapter 10: Integrating with Management Applications
Management Applications Overview . . . . . . . . . . . . . . . . . . . . . . 10-1
HP Top Tools Integration . . . . . . . . . . . . . . . . . . . . . . . . . . . . . . 10-3
HP OpenView Network Node Manager Integration. . . . . . . . . . . 10-4
CA Unicenter TNG Framework Integration. . . . . . . . . . . . . . . . . 10-7
ManageX Integration . . . . . . . . . . . . . . . . . . . . . . . . . . . . . . . . . 10-10
Chapter 11: Integrating with Remote Backup Applications
Remote Backup Applications Overview. . . . . . . . . . . . . . . . . . . . 11-1
Using ARCserveIT . . . . . . . . . . . . . . . . . . . . . . . . . . . . . . . . . . . 11-2
Using Backup Exec. . . . . . . . . . . . . . . . . . . . . . . . . . . . . . . . . . . 11-4
Using HP OpenView OmniBack II. . . . . . . . . . . . . . . . . . . . . . . . 11-5
Appendix A: Legal Information
Statements. . . . . . . . . . . . . . . . . . . . . . . . . . . . . . . . . . . . . . . . . . A-1
Software License Agreement . . . . . . . . . . . . . . . . . . . . . . . . . . . . A-2
Appendix B: NetStorage 6000 Warranty Information
Planning for Support. . . . . . . . . . . . . . . . . . . . . . . . . . . . . . . . . . B-1
Obtaining Warranty Support . . . . . . . . . . . . . . . . . . . . . . . . . . . . B-3
Obtaining Out-of-Warranty Support. . . . . . . . . . . . . . . . . . . . . . . B-5
Hewlett-Packard Limited Warranty Statement. . . . . . . . . . . . . . . B-6
Appendix C: System Specifications
Central Processing Unit (CPU). . . . . . . . . . . . . . . . . . . . . . . . . . . C-1
Uninterruptible Power Supply (UPS). . . . . . . . . . . . . . . . . . . . . . C-2
Hardware Specifications. . . . . . . . . . . . . . . . . . . . . . . . . . . . . . . C-3
Features. . . . . . . . . . . . . . . . . . . . . . . . . . . . . . . . . . . . . . . . . . . . C-5
Upgrade Options. . . . . . . . . . . . . . . . . . . . . . . . . . . . . . . . . . . . . C-6
Security and Safety. . . . . . . . . . . . . . . . . . . . . . . . . . . . . . . . . . . C-6
Regulatory Compliance . . . . . . . . . . . . . . . . . . . . . . . . . . . . . . . C-7
Environmental Specifications. . . . . . . . . . . . . . . . . . . . . . . . . . . . C-8
Power Specifications. . . . . . . . . . . . . . . . . . . . . . . . . . . . . . . . . . C-10
Replacements and Upgrades . . . . . . . . . . . . . . . . . . . . . . . . . . . . C-11
Table of Contents-3

Appendix D: Telnet Information
Appendix E: Troubleshooting and Error Codes
General Issues . . . . . . . . . . . . . . . . . . . . . . . . . . . . . . . . . . . . . . . E-1
Browser Issues . . . . . . . . . . . . . . . . . . . . . . . . . . . . . . . . . . . . . . E-4
Determining Component Failure. . . . . . . . . . . . . . . . . . . . . . . . . . E-6
UPS Troubleshooting . . . . . . . . . . . . . . . . . . . . . . . . . . . . . . . . . E-8
Hardware Error Codes. . . . . . . . . . . . . . . . . . . . . . . . . . . . . . . . . E-10
Glossary
Table of Contents-4

Table of Contents-5

Overview
Network Attached Storage
Network Attached Storage
The HP NetStorage 6000 is a network attached storage (NAS) device used
to store data on your network. NAS devices provide a simpler, more
reliable, and cost-effective way to add storage to your network.
The HP NetStorage 6000:
n Requires minimal setup and is easily maintained
n Does not impact the productivity of existing general-purpose server
operations
n Frees up the general-purpose server so that applications operate more
efficiently
n Contains SCSI hard drives in a pre-configured RAID 5 array
n Provides SNMP notification of critical events
n Provides SMTP/E-mail for critical evens
Chapter 1
Overview
Getting Started
Before proceeding, make sure that you have installed and configured the
HP NetStorage 6000 device by entering the IP, gateway, subnet, and
broadcast addresses via the front panel of the HP NetStorage 6000. For
more information, refer to Installing the HP NetStorage 6000.
Once the front panel information has been entered, you must use the
HP NetStorage web interface to finish configuring your device:
1 Open the HP NetStorage web interface. (Once the web interface is open,
1-1
you can access help online.) See “The HP NetStorage 6000 Web
Interface” on page 1-9.

Overview
Getting Started
2 Go directly to the Configuration Tab and manually enter:
• System name, see “DNS Settings” on page 3-3
• Administrative password, see “Administrative Password Settings” on
page 3-12
• DNS domain name, see “DNS Settings” on page 3-3
• Primary and secondary DNS server IP addresses , see “DNS Settings”
on page 3-3
• NIC parameters, see “TCP/IP Settings” on page 3-2
• Address for event log data, see “System Log” on page 3-9
• UNIX settings, see “UNIX Settings” on page 3-4
• WINS settings, see “Windows Settings” on page 3-6
• SMTP server information, see “SMTP/Email” on page 3-7
• SNMP settings/Traps, see “SNMP/Network Management Settings”
on page 3-8
• Contact and asset information, see “Informational Settings” on
page 3-10
• System time and date, see “Date and Time Settings” on page 3-11
• User mapping information, see “Mapping Strategy” on page 3-14
3 Go to the Storage Tab and manually:
• Group your physical drives into logical drives (RAID sets) if
required, see “Create a Logical Drive” on page 4-4
• Create volumes for data storage, see “Create a New File Volume” on
page 4-9
• Create directories and sub-directories beneath your volumes, see
“Create a Directory” on page 4-12
• Make volumes or directories available to users by sharing or
exporting them, see “Create or Edit Windows Shares” on page 4-14
1-2
Overview
HP NetStorage 6000 Hardware
HP NetStorage 6000 Hard ware
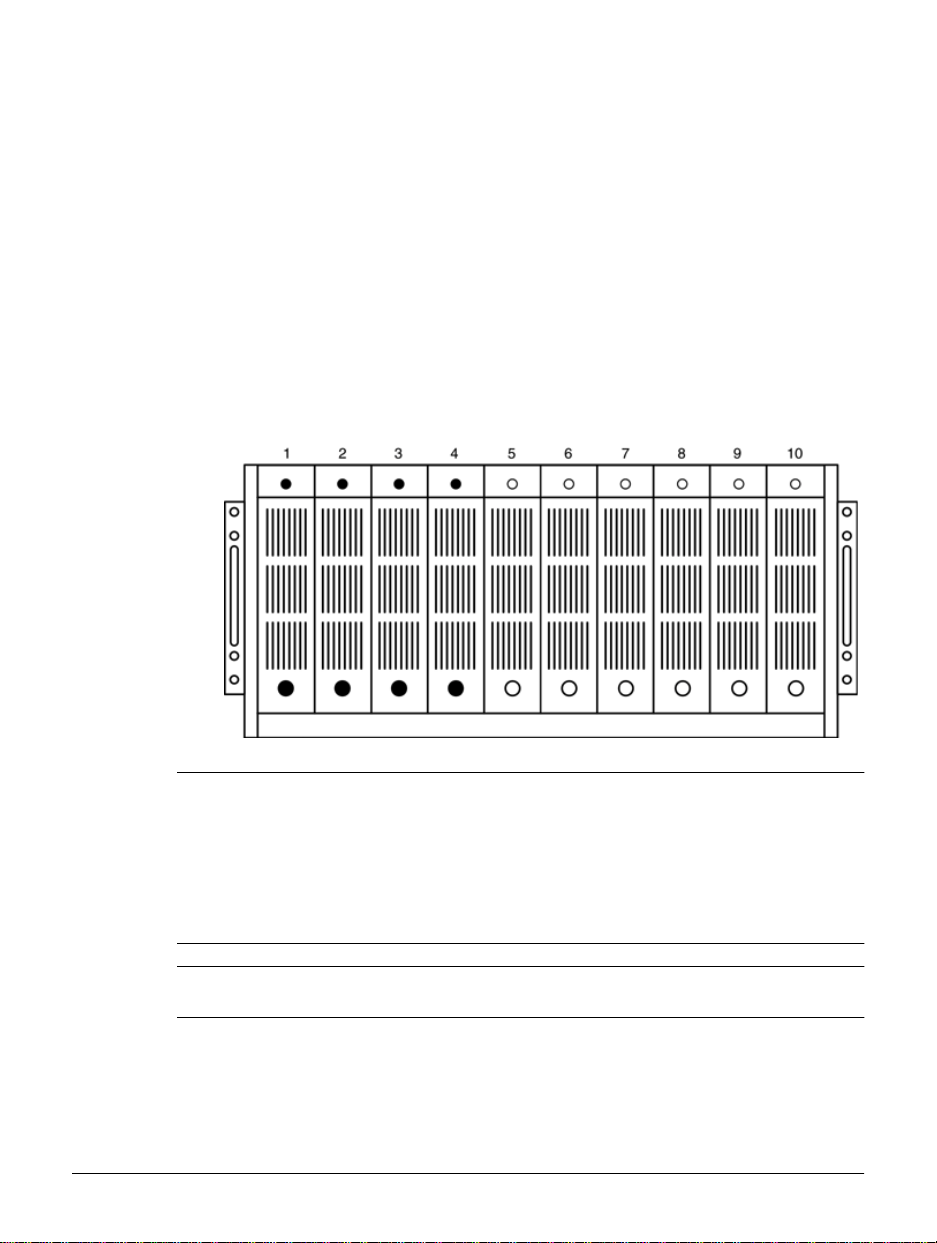
Physical Drives
The HP NetStorage 6000 contains between four and ten physical hard
drives, depending on your company’s storage needs. Each physical drive
can have up to 73GB of storage capacity.
Figure 1.1 P hysical Driv es
1-3
Note Use only HP Hard Drives approved for your NetStorage 6000. For an up-
to-date list of approved hard disk drives, please visit our web site at
www.hp.com/support /ns6000. Drives on the appr oved list have custom
firmware for use in your NetStorage 6000. Do not attempt to install any
hard disk drives other than the approved drives listed at this web site as
doing so may resu lt i n system failure or loss of dat a. U s i ng non -s upported
hard drives may also void your warrant y.
Note All drives in the HP NetStorage 6000 must have the same capacity. Any
other configuration is not supported.
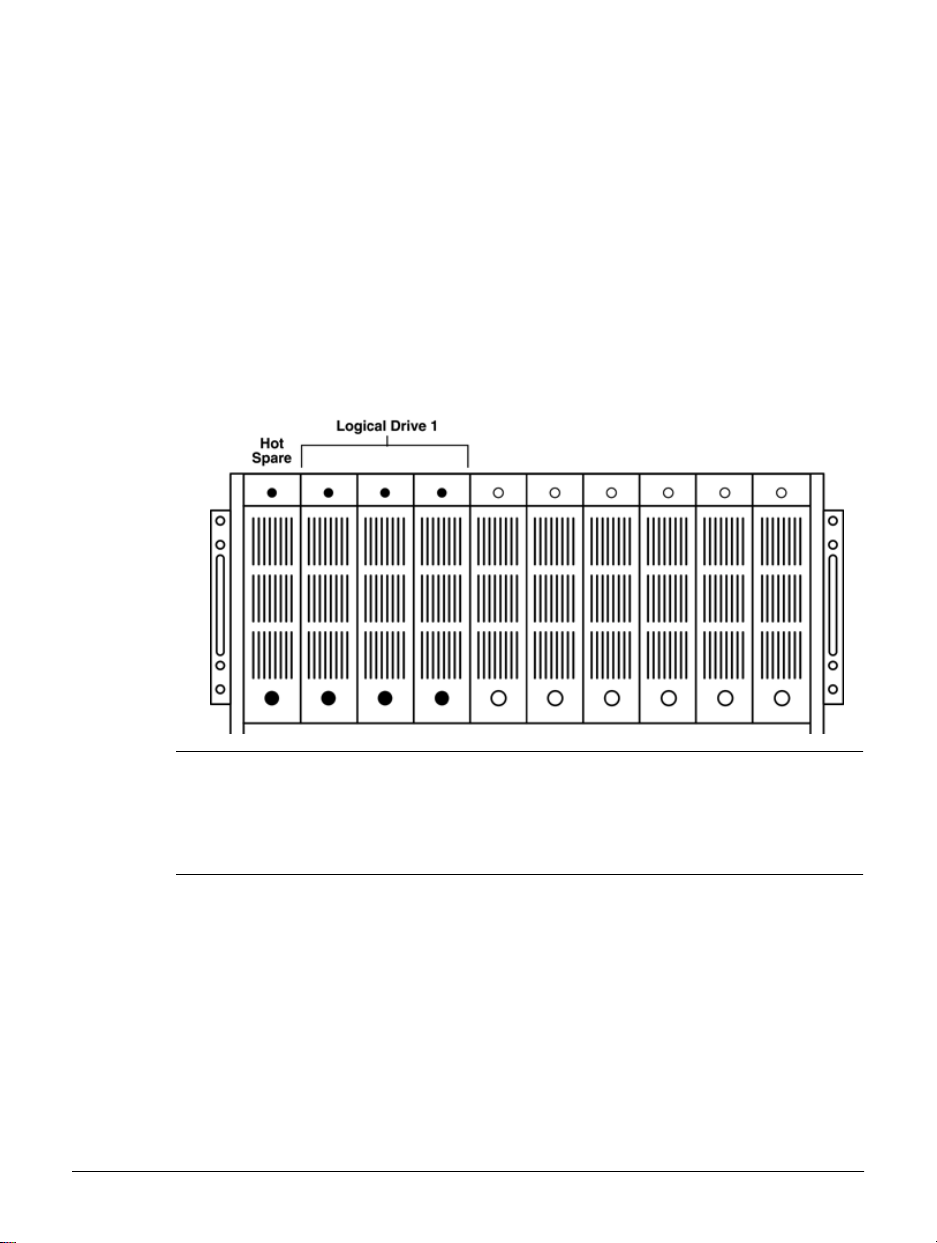
Logical Drives
Figure 1.2 Logical Drives
Overview
HP NetStorage 6000 Hardware
Physical drives are grouped together to form one or more logical drives,
which are also known as RAID sets. Physical drives are also used
individually as hot spares. Logical drives and hot spares are configured at
the factory. The illustration in figure 1.2 shows a typical configuration.
Note The HP NetStorage 6000 supports only RAID level 5 for the creation of
logical drives. Because RAID level 5 requires a minimum of 3 physical
drives for a RAID set, the HP NetStorage 6000 requires at least 3 drives to
be grouped together to create a logical drive, though you can create a
logical drive that uses as many as eight physical drives.
1-4
Overview
HP NetStorage 6000 Hardware
Partitions and File Volumes
Logical drives are further broken down into as many as four partitions with
each partition consisting of 256GB of drive space or less. Once you have
partitioned your logical drive, you can create file volumes for storing your
data.
File volumes are the basic unit of logical stora ge for a file system on the HP
NetStorage 6000. When you create a file volume, it uses one partition on
one logical drive. Because you are limited to fou r partitions, the max imum
number of file volumes that can be created on a logical drive is four.
Note The HP NetStorage 6000 has a limit of 256GB (262144 MB) per partition.
The user interface does not warn you of this limitation. If you attempt to
create a partition greater than 256GB, the operation fails.
Initially, each partition is assigned to a file volume. However , file volumes
can expand to span several partitions if extra storage space becomes
necessary.
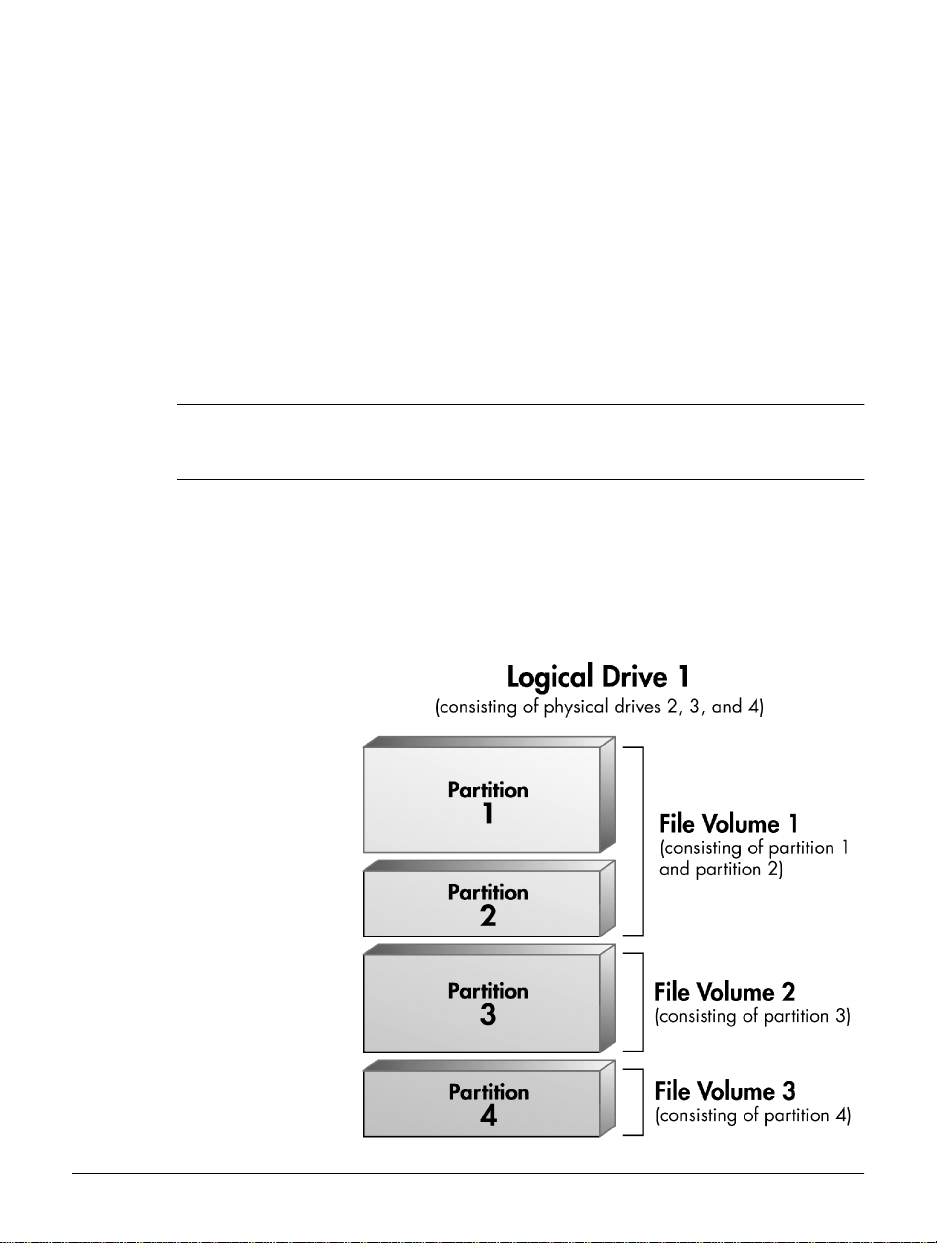
Figure 1.3 File Volume and Partition Example
1-5

The illustration in figure 1.3 on page 1-5 shows a logical drive that consists
of three physical drives. This logi cal drive has b een broken down i nto four
partitions (the maximum number). Typically , you create partitions such that
each one becomes a file volume. However, at some point you may r e quire
more storage space for a file volume.
Increasing Storage Capacity
An important aspect of ma naging file vo lumes is the con cept of expan ding
volumes. If, at a later date, a file volume becomes full of data, you can
expand the file volume, thus alleviating the lack of space on the volume.
Just like creating new file volumes, expanding file volumes need storage
space from a logical drive, and a free partition. However, this free space
and free partition do not have to be on the same logical drive as the file
volume that is being expanded. Thus, it is possible to create file volumes
that span across logical drives. This gives you the option of expanding
existing volumes by installing another logical drive on the system.
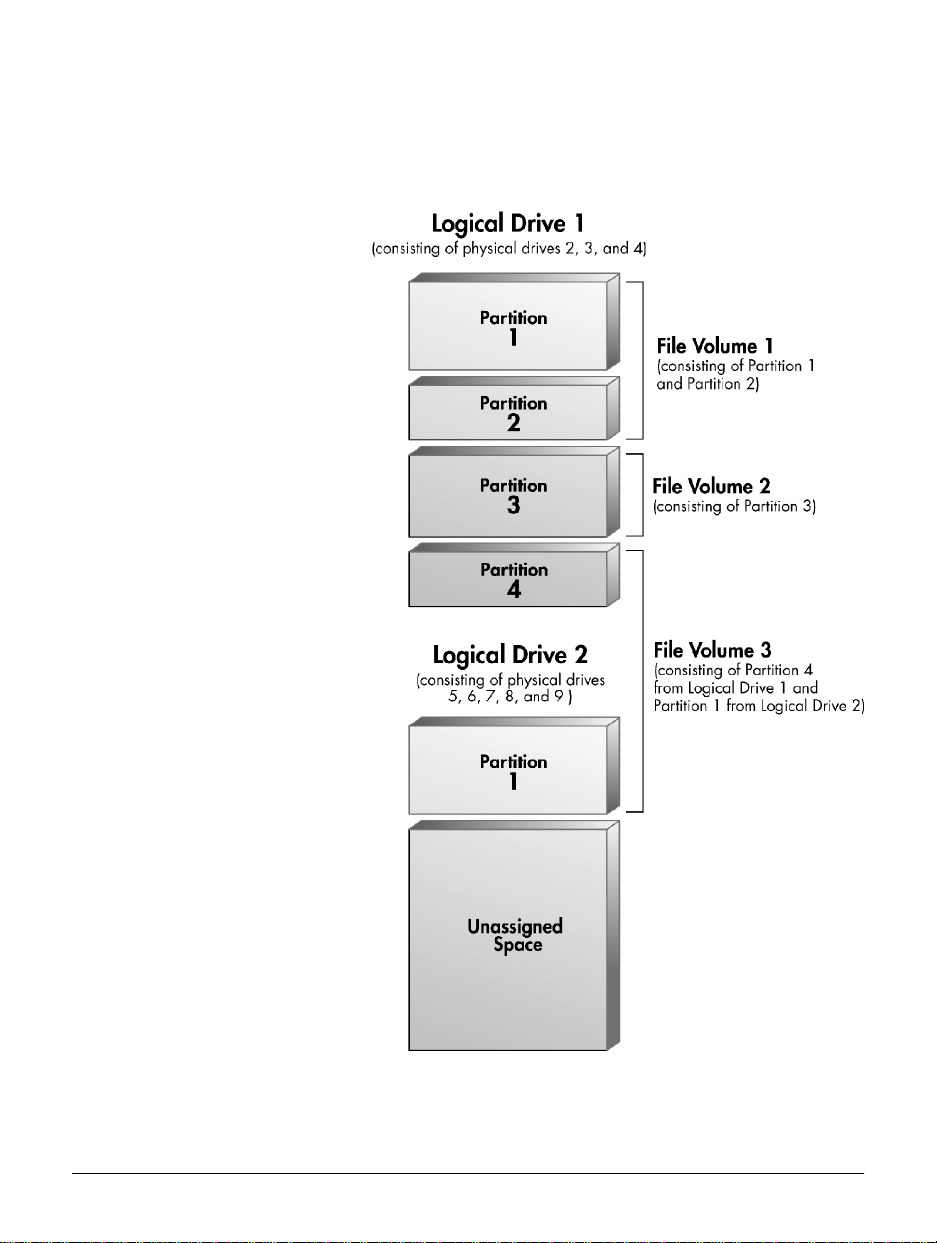
The example shown in figure 1.4 on page 1-7 expands on the previous
example by adding a new logical drive consisting of five newly added
physical drives. This logical drive has had one partition defined. File
volume 3 has then been expanded to include this newly available space.
Overview
HP NetStorage 6000 Hardware
1-6
Overview
HP NetStorage 6000 Hardware
Figure 1.4 Expanding File Volumes
1-7
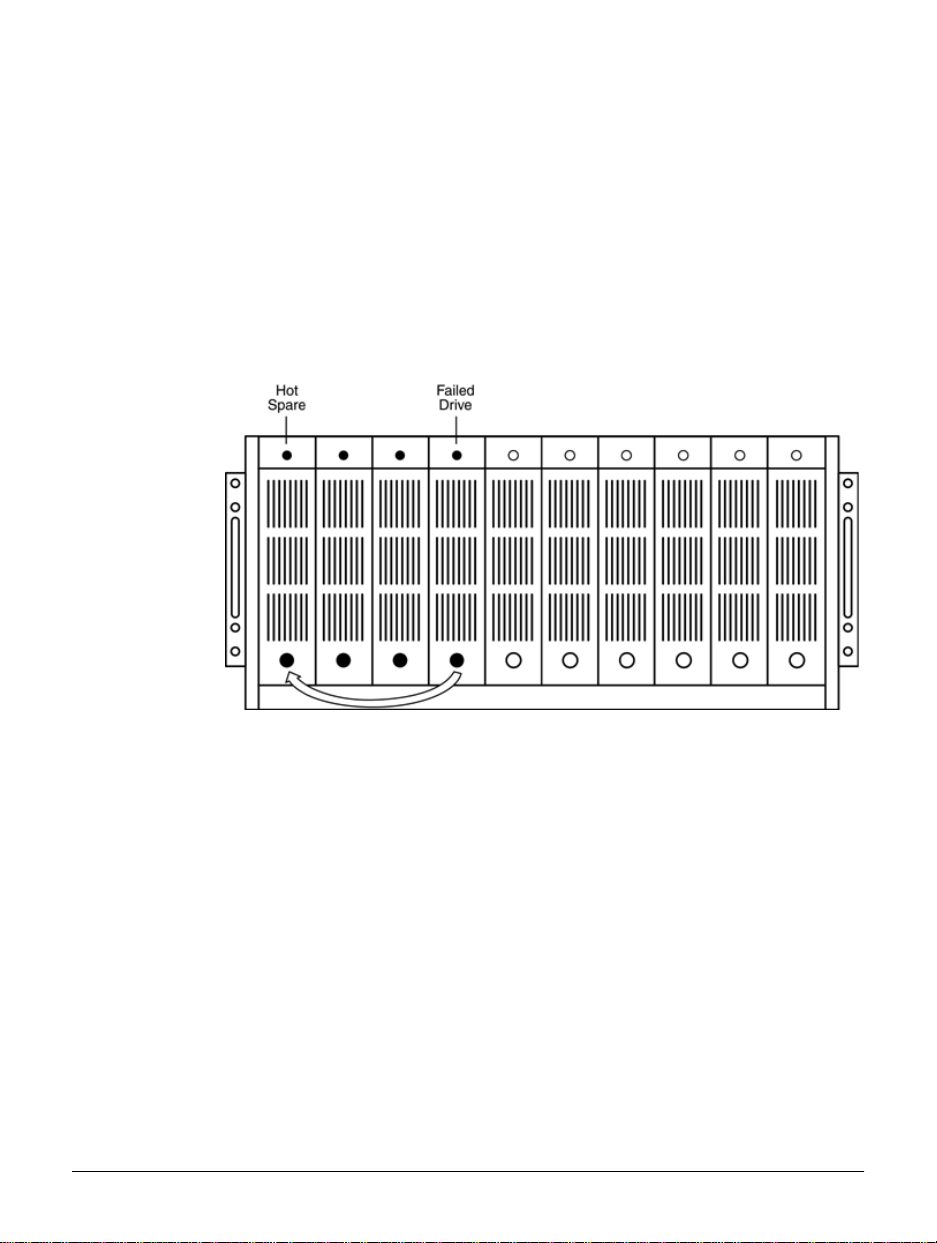
Hot Spare Drives
Hot spare drives are reserved drives that are used only when a physical
drive that is part of a logical drive fails. When this happens, the system
automatically selects the first available hot spare drive to take the place of
the failed drive as shown in figure 1.5. The logical drive is rebuilt using the
hot spare, and the hot spare drive becomes a member of the logical drive.
Figure 1.5 Hot Spare Drive
Overview
HP NetStorage 6000 Hardware
It is important to note that a hot spare must have the same or larger capacity
of the physical drive it is to replace. The system will not select a hot spare
to replace a failed drive if the capacity of the hot spare is less than the dr ive
it is to replace.
Once a hot spare is used to repair a logical drive, its assignment changes
from Hot Spare to Online. If you replace the failed drive, it automatically
receives an assignment of Unassigned. You must manually assign the new
drive to Hot Spare if the new drive is to serve as a hot spare.
Redundant Power Supply Modules
A redundant power supply module is installed in the back of the HP
NetStorage 6000. Three power -suppl y modules are acti ve but only t wo are
necessary to power a fully loaded unit. If a power supply module fails, the
redundant supply provides power to t he unit.
1-8

Overview
The HP NetStorage 6000 Web Interface
Redundant Power Supply Cords
The HP NetStorage 6000 lets you attach more than one power source into
the back of the unit. This redundancy protects against a power failure. The
primary power cord needs to be connected when power is turned on.
The HP NetStorage 6000 Web Interface
The HP NetStorage 6000 is managed via a web browser as shown in
figure 1.6 on page 1-10 (Internet Explorer 5.0 or later or Netscape 4.61 or
later). To access the web interface, enter the IP address of the HP
NetStorage 6000 in the address field of your browser.
Note The first time you open this interface, a security warning appears. The
NetStorage web interface uses Java an d Javascript co mponents to prop erly
display system information. Your browser detects that such programs are
running and asks for your permission to accept these software
components. You must accept content from or grant privileges to HewlettPackard Company. To prevent further security warnings from appearing,
check the box at the bottom of the window to always trust content from
Hewlett-Packard Company.
1-9
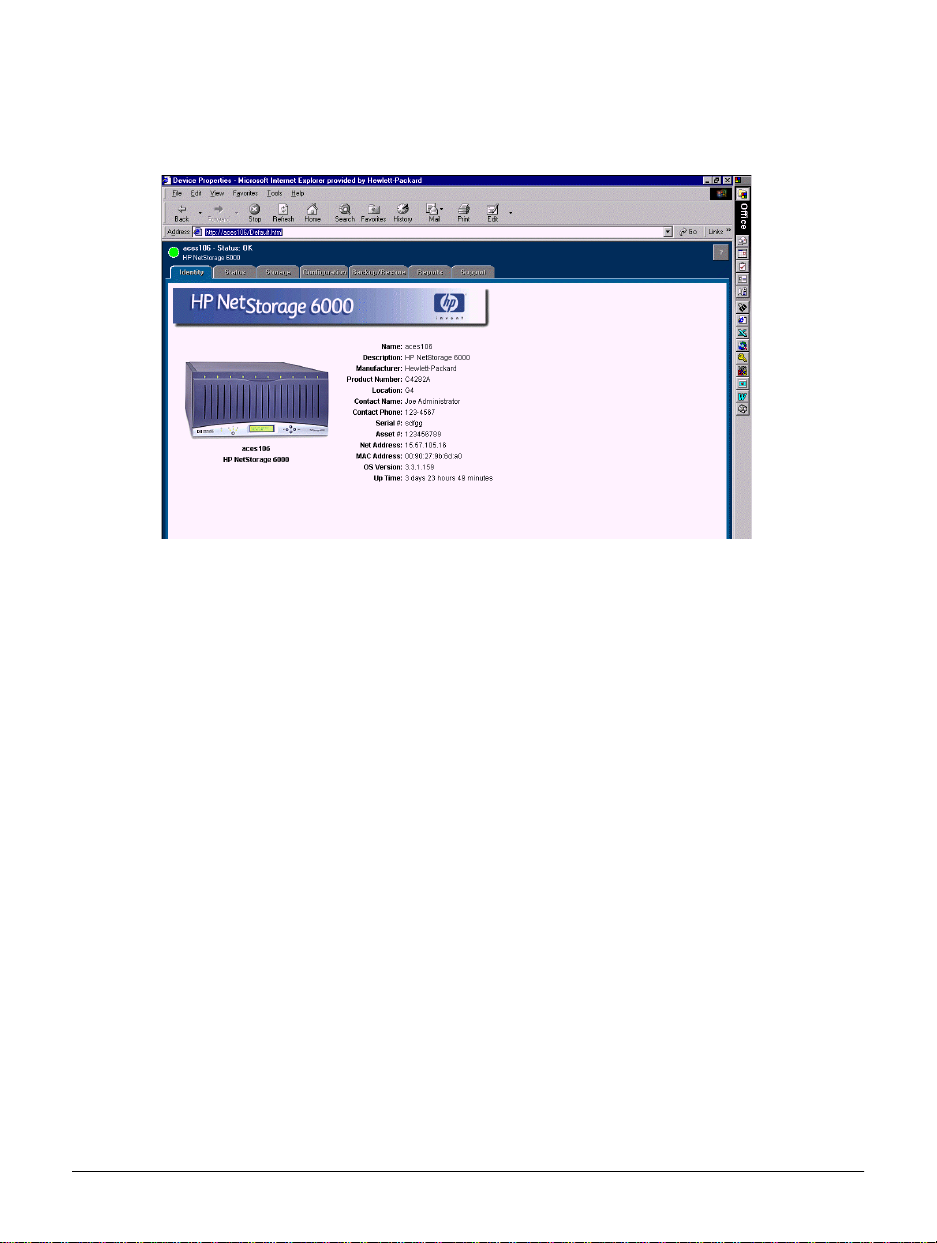
Figure 1.6 HP NetStorage 6000 Web Interface
The web interface’s six tabs are:
n Identity Tab — V iew general system information . See Chapter 2, “The
Identity Tab.”
n Status Tab — View system activity and monitor hardware information.
See Chapter 6, “Monitoring the System.”
n Storage Tab — Create and delete file volumes and directories; create
shares and mount points; modify permissions; view file volume
information; view physical drive specifications. See Chapter 4,
“Managing Storage.”
n Configuration Tab — Initialize, view, and modify network, alert, and
system settings for your device. See Chapter 3, “Configuring Your
System and Network.”
n Backup/Restore T ab — Check the current tape drive status; cr eate disk
checkpoints; schedule a backup; restore volumes, files, and directories;
check settings and features. See Chapter 5, “Backin g Up and Restoring
Files.”
n Support Tab — Request information about the HP NetStorage 6000,
and register and upgrade your operating system. See Chapter 9,
“Contacting Support and Upgrading.”
n Reports Tab — Provides information on hardware and software, file
system configuration, NIC configuration, and environmental status to
up to three email addresses.
Overview
The HP NetStorage 6000 Web Interface
1-10

Overview
Integrating with Network Managem en t Appli ca tion s
Integrating with Network Management Applications
Network management applications let you view and manage devices on
your network. The HP NetStorage 6000 works with the following
management applications:
n HP TopTools versions 4.5 and 5.0
n HP OpenView Network Node Manager version 6.0
n Computer Associates Unicenter TNG Framework version 2.2
n HP OpenView ManageX version 4.21
The integration lets each network management application:
n Identify the HP NetStorage 6000 when it is attached to the network
n Display the HP NetStorage 6000 icon in the platform’s network
topology map
n Launch the HP NetStorage 6000 web-based user interface from a pop-
up menu
n Receive and process event notifications from the HP NetStorage 6000
For more information, see Chapter 10, “Integrating with Management
Applications.”
1-11

Backing up the HP NetS tora ge 600 0
Backing up the HP NetStorage 6000
Local Backup
Y ou can use the backup app lication in the NetStorage web interface plus an
optional HP SureStore DLT Autoloader 818 or 1/9 to perform a local
backup. In a local backup session the data is transferred to the locally
attached Autoloader using a tape format that is unique to the HP NetStorage
6000. The data transfer does not interfere with your LAN traffic.
Remote Backup
You can use third-party backup applications on any computer on the
network with a tape drive attached to perform a remote backup. When you
run a remote backup, data from the HP NetStorag e 6000 tran sfers over the
network to the remote server running the backup application, and then to
the server-attached tape device.
T ape backup is intended to replace the data of an entire drive. It is possible
to restore individual files, but only if you know the exact location of a file.
For a list of remote backup applications the HP NetStorage 6000 integrates
with, see Chapter 11, “Integrating with Remote Backup Applications.”
Overview
1-12

Overview
Locating Information
Locating Information
The online User’s Guide works with HP TopTool s version 5.0. If you do n ot
have TopTools on your system, you can use a web browser to view the
user’s guide (Internet Explorer 5.0 or later or Netscape 4.61 or later). The
context-sensitive, online User’s Guide is pre-loaded on your HP NetStorage
6000.
The guide is organized into main level and sub-level topics.
The left-hand tabs in this help system are:
n Contents — The Contents tab disp lays folders and page s that represent
the categories of information in the online user's guide. When you click
a closed folder, it opens to display its content (subfolders and pages).
When you click an open folder, it closes. When you click pages, you
select topics to view in the right-hand pane.
n Index — The Index tab displays a list of keywords and keyword
phrases. These terms are associated with topics in the help system. To
open a topic in the right-hand pane associated with a keyword, doubleclick the keyword.
A PDF version of the user's guide is also located on the HP NetStorage
6000 CD.
1-13
Note Viewing the PDF-format HP SureStore NetStorage 6000 User’s Guide
requires Adobe Acrobat Reader.
To view this version:
1 Insert the HP NetStorage 6000 CD into your CD-ROM drive.
2 Open a Windows Explorer window.
3 Click on your CD-ROM drive and locate the directory /Doc.
4 Double-click on the file UserGuid.pdf to view it.

Using Help While You Work
You can obtain information about the tabs in the NetStorage web interface
by using context-sensitive help.
1 Click the help icon in the upper right corner of the web interface
window. A help window displays the topic pertai ning to the screen you
are viewing.
2 Review the information, then close the window, or leave help running
in the background by minimizing the screen.
When viewing help, you can maximize the window or resize it with the
buttons in the upper-right corner.
Note Clicking the help icon in the upper right corner does not automatically
bring the on-line help browser window to the top; it may be hidden by
another window. You must raise the window manually by clicking in the
window, clicking the title bar of the window, or selecting it from a task list
Printing Documents
Overview
Using Help While You Work
While using the online user’s guide, you can print topics and information
directly from the viewer . The available print options are determined by the
version of TopTools or your browser.
Select File > Print and click the options you w ant for the screen(s) you are
printing.
1-14

The Identity Tab
Chapter 2
The Identity Tab
The Identity tab displays the following general system information:
n Name—The system or host name for your HP NetStorage 6000
n Description—HP NetStorage 6000
n Manufacturer—Hewlett-Packard Company
n Product Name—The product number corresponding to the original
configuration of the HP NetStorage 6000
n Location—The physical location of the HP NetStorage 6000
n Contact Name—The person to be notified in case of trouble or
questions about the HP NetStorage 6000 (usually the system
administrator)
n Contact Phone—Usually the phone number of the contact name
n Serial #—The factory-set serial number of the unit
n Asset #—A user-assigned number to track company assets
n Net Address—The IP network address of the Network Interface Card
(NIC) in port 1 (although the HP NetStorage 6000 supports multiple
ports, only the first one is displayed)
n MAC Address—The unique Machine Address Code for the NIC in
port 1
n OS Version—The current version of the operating system running on
the HP NetStorage 6000
n Up Time—The cumulative up-time of the HP NetStorage 6000 since
the last reboot
You can change the Name, Location, Contact Name, Contact Phone and
Asset # using the NetStorage 6000 web interface. See“Informational
Settings” on page 3-10 for more information.
2-1

The Identity Tab
2-2

Configuring Your System and Network
The Configuration Tab
Configuring Your System and Network
The Configuration Tab
When you initially set up your HP NetStorage 6000, you must:
n Enter your TCP/IP settings.
n Configure your Network Interface Card parameters.
n Set up your UNIX and/or Windows environments.
If your network configuration changes, you need to alter these settings.
The Configuration tab lets you access:
n Network settings — TCP/IP, Windows and UNIX settings that allow
the NetStorage 6000 to connect with your network and work in
Windows, UNIX or bot h operating systems.
n Alert settings — Optional settings you can enter if you want to receive
e-mail or server notification in case of a hardware failure or system
alerts. You also can specify a remote server to which you can redirect a
copy of the event log.
n System settings — Optional informational settings. Y ou can specify the
date and time as well as password-protect the administration of your
NetStorage web interface.
n User mapping — Configuration and management tools for operating
the HP NetStorage 6000 in a heterogeneous environment with userlevel security for NT clients.
n Shutdown/Restart — Y ou can sh ut down or restar t the HP NetS torage
device from the Configuration tab.
Chapter 3
3-1

Network Settings
TCP/IP Settings
The HP NetStorage 6000 has two Network I nterface Card (NIC) slo ts and
supports the following NICs:
n Single-port 10/100 Base- T
n Dual-port 10/100 Base-T
n Gigabit 1000 Base SX
This support gives the system betw een one and four NIC por ts. When you
initially set up your HP NetStorage 6000, you need to configure your IP
address for the NIC using the front panel display. If you have Dynamic
Host Configuration P rotocol (DHCP) on y our system and it is enabled, NIC
configuration occurs automatically.
If you add a new card or change your IP address, you need to reconfigure
the NIC parameters by filling in each of the individual fields on the TCP/
IP Settings screen.
To set the NIC parameters:
1 Select one of the following two options:
Configuring Your System and Network
Network Settings
• Obtain an IP address from the DHCP Server sets the parameters
automatically if DHCP is enabled. Because the parameters are under
DHCP control, you can not enter or change the IP Address or subnet
mask. If you disable DHCP and then later decide to enable it, you will
need to restart your device.
• Depending on your configuration, the D HCP server provides any or
all of the following parameters: System Name, Gateway IP Address,
DNS Domain Name, NIS parameters, and Windows parameters. You
must manually configur e any parameter that D HCP does not set. You
need to reboot your system to configure the DHCP parameters.
2 Specify an IP Address lets you enter the I P Address and subnet mask.
The text fields show the current value which can be changed by entering
a static IP Address and/o r subnet mask. (If you do not have optional NIC
ports, Not Installed displays beneath the NIC port fields.)
3-2

Configuring Your System and Network
Network Settings
3 Click Apply. A dialog box informs you that:
• You are about to change the system’s NIC parameters. You (a nd other
users) will lose the connection to the device while the changes take
place.
• The NetStorage web interface in the current browser cache becomes
invalid. You should close the browser and reconnect to the system
using the new NIC parameters.
• Any invalid entries in the NIC parameters may result in an inability
to access the NetStorage web interface.
4 Click OK. You do not need to restart the system.
NIC parameter fields are provided for up to three optional NIC ports. They
behave identically to the fields for the primary NIC.
DNS Settings
To define the DNS settings:
1 Using the NetStorage web interface, click the Configuration tab, then
select Network Settings > DNS Settings.
2 Enter the:
3-3
• System Name (Host or Computer Name)
• DNS Domain Name (Name of the domain on which the HP
NetStorage 6000 device resides such as, alpha.corp.com)
• Primary and Secondary DNS server IP addresses
3 Click Apply. You do not need to restart the system.

UNIX Settings
During initial setup, you must specify how to manage and maintain the
Hosts and Trusted Hosts files. Hosts file management lets you map a
machine name to its IP address. Trusted Hosts file management lets you
configure hosts on your network so that they have a trusted relationship
with the HP NetStorage 6000. A trusted re lationship lets the host perform
administrative func tio ns , s uch as f ile ch anges and remote network backup
(on the HP NetStorage 6000).
To add a Hos ts file:
1 Using the NetStorage web interface, click the Configuration tab, then
select Network Settings > UNIX Settings.
2 Click Add next to the Hosts File M anagement field. The Add Host
File Entry screen appears.
3 Enter a Host Name and a Host IP Address.
4 If you are adding:
• multiple hosts, you need to click Apply after each addition, then click
OK when you finish.
• only one host, you can simply click OK.
Configuring Your System and Network
Network Settings
To modify or delete an existing Hosts file:
1 Using the NetStorage web interface, click the Configuration tab, then
select Network Settings > UNIX Settings.
2 Select a host from the Hosts drop-down list.
3 Click either:
• Edit. Modify the Host Name and Host IP Address, then click
Apply.
• Remove. Click OK to confirm your selection.
3-4

Configuring Your System and Network
Network Settings
To set up a Trusted Host, you must first specify it in the Hosts file:
Note Making a host trusted may compromise network security and should only
be done for administrative purposes.
1 Using the NetStorage web interface, click the Configuration tab, then
select Network Set t i ngs > UNIX Settings .
2 Click Add next to the Trusted Hosts File Management field. The Add
Trusted Host Entry screen appears.
3 Enter the host name.
4 If you are adding:
• multiple trusted hosts, you need to click Apply after each addition,
then click OK when you fini sh.
• only one trusted host, you can simply click OK.
To change or delete an existing trusted host:
1 Using the NetStorage web interface, click the Configuration tab, then
select Network Set t i ngs > UNIX Settings .
2 Select a host from the Hosts drop-down list.
3-5
3 Click either:
• Edit. Modify the Trusted Host Name, then click Apply.
• Remove. Click OK to confirm your selection.

Windows Settings
If you support Windows users, you must specify the Windows settings
during initial setup.
To specify the Windows settings:
1 Using the NetStorage web interface, click the Configuration tab, then
select Network Settings > Windows Settings.
2 Enter the:
• Primary and S eco ndary WINS IP Addresses
• Network Neighborhood System Comment (optional)
3 Click either User Level Security or Share Level Security for the
security mode. See “User-Level Security” on page 8-6 or “Share-Level
Security” on page 8-5 for more information.
a If you select User Level Security, enter the:
— Domain Name
— Domain Login Name (the login name speci fied must have
sufficient permission to allow machines to be added to the
domain)
— Domain Passwor d
Configuring Your System and Network
Network Settings
b If you select Share Level Security, enter the name of the
Workgroup where the HP NetStorage 6000 is a member.
4 Click Apply. You do not need to restart the system unless you changed
your security mode.
3-6

Configuring Your System and Network
Alert Settings
Alert Settings
SMTP/Email
The HP NetStorage 6000 lets you automatically notify individuals via email if there is a hardware failure or a critical system alert.
To set up automatic notification:
1 Using the NetStorage web interface, click the Configuration tab, then
select Alert Settings > SMTP/email.
2 Enter the name of the e-mail server. The e-mail server must be an IP
address or a fully qualified name (such as, alpha.corp.com).
Note If you change the e-mail server, it automatically changes the e-mail server
specified in the Reports tab. See “The Report Tab” on page 7-1.
3 Enter the e-mail addresses of as many as four individuals. You must
specify an e-mail server if one or more e-mail recipients are defined.
4 Click either:
• Send Test email to send a test message to the recipients and save
your settings.
3-7
• Apply to only save your settings.
Note The information on this screen is optional. Blank fields do not affect the
functionality of the device. In the event of a hardware failure or system
alert, messages are sent through the network management tool or they are
logged in the event log. See “View Event Log” on page 6-3.
Loading...