


 Loading...
Printing Your |
|
Checking the |
|
||
First Page |
|
Package Contents |
Installing
and
Checking
the Ink
Cartridges
Installing the
Printer Software
Plugging in and
Connecting
the Printer
Unpacking
the
Printer
Attaching
the
Paper Support
4012692-01 xxx

Checking the Package Contents

 printer software & paper support Reference Guide
CD-ROM
Daily Use
Setup guide
printer |
paper manuals |
|
The package contents may vary in certain locations.
ink cartridge package
(contains both black and color ink cartridges.)
power cord*
*The power cord maycome attached to the printer in certain locations.
The ink cartridges packaged with your printer are for initial setup. In order to maintain high quality printouts, your printer will use large quantities of ink during the setup process. As a result, the ink cartridges used for setup will empty faster than normal.
Unpacking the printer
Remove all tape and protective materials from the printer and lift the top corners of the output tray off of the knobs on the top of the printer to lower it.
If the output tray is curled, bend both sides of the tray upwards at the seams.
.
|
|
|
|
|
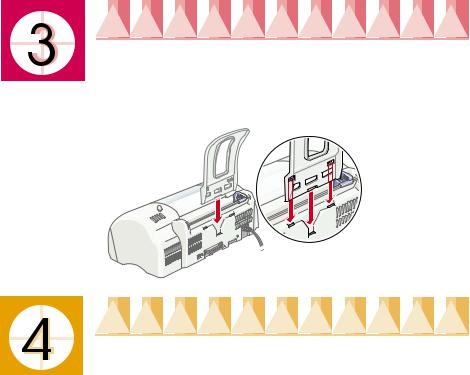
Attaching the Paper Support
Insert the paper support into the slots at the rear of the printer and place the printer on a flat, stable surface.
Plugging In and Connecting the
Printer
Your printer connects to your computer via the parallel or USB interface. Macintosh computers can only be connected via the USB interface. Depending upon your geographic location, you may need to obtain the appropriate cable. See “Options and Consumable Products” in the Daily Use guide for details.
Note:
In order to connect your PC via the USB interface, your computer must be a Windows 98 or Windows 2000 pre-installed model that is equipped with a USB port.
If you use a USB hub, we recommend that you connect the printer to the first tier of the hub, or connect the printer directly to the computer’s USB port.
Using a parallel interface for Windows users
To connect the printer to your PC, you need a shielded, twisted-pair parallel cable. Follow the directions below.
1.Make sure that both the printer and the computer are turned off. Plug the power cord into a properly grounded electrical outlet.

2. Plug the cable connector securely into the printer's interface connector. Then squeeze the wire clips together until they lock in place on both sides. If your printer has a ground connector screw to the right of the interface connector, connect the ground wire to the ground connector screw.
3.Plug the other end of the cable
into the computer's parallel interface. If there is a ground wire at the computer end of the cable, connect it to the ground connector at the back of the computer.
Using a USB interface for Windows and Macintosh users
To connect the printer to a USB port, you need a standard shielded USB cable. Follow these steps.
1.Make sure that both the printer and the computer are turned off. Plug the power cord into a properly grounded electrical outlet.
2. Plug the appropriate end of the cable into the USB port on the back of the printer. (The end that fits the printer has a different shape from the end that fits the computer.)
3. Connect the other end of the cable to the computer’s USB port.
Installing the Printer Software
After connecting the printer to your computer, you need to install the software included on the “Printer Software for EPSON Stylus COLOR 680” CD-ROM shipped with your printer.

Your printer software includes:
Printer driver and utilities
The printer driver runs, or “drives,” your printer; use it to make settings such as print quality, speed, media type, and paper size. The Nozzle Check, Head Cleaning, and Print Head Alignment utilities help you keep your printer in top operating condition. EPSON Status Monitor 3 (for Windows 98, 95, 2000, and NT 4.0) or EPSON StatusMonitor (for Macintosh) notifies you of printer errors and displays printer status information such as the amount of ink remaining. The Status Monitor also guides you through the ink replacement process.
Online guides
The online Reference Guide helps you learn more about your printer.
If you are using the floppy disk version of the software, make a backup copy of the EPSON printer software disk before you begin installation. If you wish to make a floppy disk version of the printer software on your CDROM, you can use the driver disk creation utility included on the CD.
Refer to the appropriate section below.
Installing in Windows 98, 95, 2000, and NT 4.0
Follow the instructions in this section to install the printer software and then, for Windows 98 and Windows 2000 USB users, to ensure that the USB driver is installed correctly.
Note:
When using Windows 2000, you must follow the steps below to install the printer software; otherwise, Microsoft’s Universal driver may be installed instead. To check if the Universal driver has been installed, open the Printers folder and right-click the icon for your printer. To open the printer driver, click Printer Preferences on the shortcut menu that appears, then right-click anywhere in the driver. If About is displayed in the shortcut menu that appears, click it. A message box with the words “Unidrv Printer Driver” appears. You must reinstall the printer software as described below. If About is not displayed, the printer software has been installed correctly.
If the Digital Signature Not Found dialog box appears during the installation process, click Yes. If you click No, you will have to return to step 1 and install the printer software again.
Installing the printer software
Follow these steps to install the printer software.
1.Make sure that your printer is turned off.
Copyright© 2000 by SEIKO EPSON CORPORATION, Nagano, Japan. |
Printed in Japan 00.xx-xx |
Loading...