Epson SC-P9500, SC-P7500 User Manual

User's Guide
CMP0211-00 EN

SC-P9500 Series/SC-P7500 Series User's Guide
Copyrights and Trademarks
Copyrights and Trademarks
No part of this publication may be reproduced, stored in a retrieval system, or transmitted in any form or by any means, electronic, mechanical, photocopying, recording, or otherwise, without the prior written permission of Seiko Epson Corporation. The information contained herein is designed only for use with this Epson printer. Epson is not responsible for any use of this information as applied to other printers.
Neither Seiko Epson Corporation nor its affiliates shall be liable to the purchaser of this product or third parties for damages, losses, costs, or expenses incurred by the purchaser or third parties as a result of accident, misuse, or abuse of this product or unauthorized modifications, repairs, or alterations to this product, or (excluding the U.S.) failure to strictly comply with Seiko Epson Corporation’s operating and maintenance instructions.
Seiko Epson Corporation shall not be liable for any damages or problems arising from the use of any options or any consumable products other than those designated as Original Epson Products or Epson Approved Products by Seiko Epson Corporation.
Seiko Epson Corporation shall not be held liable for any damage resulting from electromagnetic interference that occurs from the use of any interface cables other than those designated as Epson Approved Products by Seiko Epson Corporation.
EPSON, EPSON EXCEED YOUR VISION, EXCEED YOUR VISION, and their logos are registered trademarks or trademarks of Seiko Epson Corporation.
Microsoft®, Windows®, Windows Vista® and PowerPoint® are registered trademarks of Microsoft Corporation.
Apple®, Macintosh®, and Mac OS® are registered trademarks of Apple Inc.
Intel® is a registered trademark of Intel Corporation.
PowerPC® is a registered trademark of International Business Machines Corporation.
Adobe®, Photoshop®, Lightroom®, and Adobe®RGB (1998) are either registered trademarks or trademarks of Adobe Systems Incorporated in the United States and/or other countries.
PANTONE®, Colors generated may not match PANTONE-identified standards. Consult current PANTONE Publications for accurate color. PANTONE®, and other Pantone trademarks are the property of Pantone LLC. Pantone LLC, 2019.
General Notice: Other product names used herein are for identification purposes only and may be trademarks of their respective owners. Epson disclaims any and all rights in those marks.
© 2019 Seiko Epson Corporation. All rights reserved.
2

SC-P9500 Series/SC-P7500 Series User's Guide
Contents
Contents
Copyrights and Trademarks
Notes on Manuals
Meaning of Symbols. . . . . . . . . . . . . . . . . . . . . . . . 6
Illustrations. . . . . . . . . . . . . . . . . . . . . . . . . . . . . . 6
Product Model Descriptions. . . . . . . . . . . . . . . . . . 6
Screenshots Used in this Guide. . . . . . . . . . . . . . . . 6
Printer Parts. . . . . . . . . . . . . . . . . . . . . . . . . . . . . . 7
Front. . . . . . . . . . . . . . . . . . . . . . . . . . . . . . . . . 7 Inside. . . . . . . . . . . . . . . . . . . . . . . . . . . . . . . . . 8 Back. . . . . . . . . . . . . . . . . . . . . . . . . . . . . . . . . . 9 Control panel. . . . . . . . . . . . . . . . . . . . . . . . . . 11 Home screen operations. . . . . . . . . . . . . . . . . . 11
Features. . . . . . . . . . . . . . . . . . . . . . . . . . . . . . . . 12
Realizing High Resolution. . . . . . . . . . . . . . . . . 12
Notes on Usage and Storage. . . . . . . . . . . . . . . . . . 13
Installation space. . . . . . . . . . . . . . . . . . . . . . . 13 Notes when using the printer. . . . . . . . . . . . . . . 13 Notes when not using the printer. . . . . . . . . . . . 14 Notes on handling ink cartridges. . . . . . . . . . . . 14 Notes on handling paper. . . . . . . . . . . . . . . . . . 15
Introducing the Software
Provided Software. . . . . . . . . . . . . . . . . . . . . . . . . 17
Built-in Software in the Printer. . . . . . . . . . . . . . . 18
Using Web Config. . . . . . . . . . . . . . . . . . . . . . . . 19
Starting. . . . . . . . . . . . . . . . . . . . . . . . . . . . . . 19
Closing. . . . . . . . . . . . . . . . . . . . . . . . . . . . . . . 19
Function Summary. . . . . . . . . . . . . . . . . . . . . . 19
Updating Software or Installing Additional
Software. . . . . . . . . . . . . . . . . . . . . . . . . . . . . . . . 20
Checking Whether Updates are Available and Updating Software. . . . . . . . . . . . . . . . . . . . . . 20 Receiving Update Notifications. . . . . . . . . . . . . 20
Uninstalling Software. . . . . . . . . . . . . . . . . . . . . . 21
Windows. . . . . . . . . . . . . . . . . . . . . . . . . . . . . 21
Mac. . . . . . . . . . . . . . . . . . . . . . . . . . . . . . . . . 21
Basic Operations
Loading and Removing the Roll Paper. . . . . . . . . . 22
Loading Roll Paper. . . . . . . . . . . . . . . . . . . . . . 22 Cutting the roll paper. . . . . . . . . . . . . . . . . . . . 25 Removing Roll Paper. . . . . . . . . . . . . . . . . . . . . 26
Loading and Removing Cut Sheets/Poster Board
. . . . . . . . . . . . . . . . . . . . . . . . . . . . . . . . . . . . . . 28
Loading Cut Sheets and Poster Board. . . . . . . . . 28
Removing Cut Sheets/Poster Board. . . . . . . . . . 29
Setting Loaded Paper. . . . . . . . . . . . . . . . . . . . . . . 30
How to Set. . . . . . . . . . . . . . . . . . . . . . . . . . . . 30 When there is no paper information on the
control panel or in the driver. . . . . . . . . . . . . . . 31
Using the Paper Basket. . . . . . . . . . . . . . . . . . . . . 34
Loading and Storing for Front Ejecting. . . . . . . 34
Using the Auto Take-up Reel Unit (SC-P9500
Series Only). . . . . . . . . . . . . . . . . . . . . . . . . . . . . 38
Using the Control Panel. . . . . . . . . . . . . . . . . . 38 Attaching the Roll Core. . . . . . . . . . . . . . . . . . . 39 Attaching the Paper. . . . . . . . . . . . . . . . . . . . . . 39 Removing Paper from the Auto Take-up Reel Unit. . . . . . . . . . . . . . . . . . . . . . . . . . . . . . . . . 41
Basic Printing Methods. . . . . . . . . . . . . . . . . . . . . 43
Printing (Windows). . . . . . . . . . . . . . . . . . . . . 43
Performing Printing (Mac). . . . . . . . . . . . . . . . 44
Canceling Printing (Windows). . . . . . . . . . . . . 46
Canceling Printing (Mac). . . . . . . . . . . . . . . . . 46
Canceling Printing (from the Printer). . . . . . . . 47
Printable area. . . . . . . . . . . . . . . . . . . . . . . . . . . . 47
Roll Paper Printable Area. . . . . . . . . . . . . . . . . 47
Cut Sheets Printable Area. . . . . . . . . . . . . . . . . 48
Turning Off the Power Using Power Off Timer
. . . . . . . . . . . . . . . . . . . . . . . . . . . . . . . . . . . . . . 49
Saving Power. . . . . . . . . . . . . . . . . . . . . . . . . . . . 49
Using the Optional Hard Disk Unit
Function Summary. . . . . . . . . . . . . . . . . . . . . . . . 51
Extended functions. . . . . . . . . . . . . . . . . . . . . . 51 Print Job Management. . . . . . . . . . . . . . . . . . . 51 Data on a Hard Disk. . . . . . . . . . . . . . . . . . . . . 51
Saving Print Jobs. . . . . . . . . . . . . . . . . . . . . . . . . . 52
Viewing and Printing Saved Print Jobs. . . . . . . . . . 53
Using the Printer Driver(Windows)
Displaying the Settings Screen. . . . . . . . . . . . . . . . 54
With the Start button. . . . . . . . . . . . . . . . . . . . 54
Displaying Help. . . . . . . . . . . . . . . . . . . . . . . . . . 55
Click the Help Button to Display. . . . . . . . . . . . 55 Right-click on the item you want to check and display. . . . . . . . . . . . . . . . . . . . . . . . . . . . . . . 55
3

SC-P9500 Series/SC-P7500 Series User's Guide
Contents
Customizing the Printer Driver. . . . . . . . . . . . . . . 56
Saving various settings as your Select Settings
. . . . . . . . . . . . . . . . . . . . . . . . . . . . . . . . . . . . 56 Adjusting the Ink Density. . . . . . . . . . . . . . . . . 56 Rearranging display items. . . . . . . . . . . . . . . . . 57
Summary of the Utility Tab. . . . . . . . . . . . . . . . . . 59
Using the Printer Driver(Mac)
Displaying the Settings Screen. . . . . . . . . . . . . . . . 61
Displaying Help. . . . . . . . . . . . . . . . . . . . . . . . . . 61
Using Presets. . . . . . . . . . . . . . . . . . . . . . . . . . . . 61
Saving to Presets. . . . . . . . . . . . . . . . . . . . . . . . 61 Deleting from Presets. . . . . . . . . . . . . . . . . . . . 62
Using Epson Printer Utility 4. . . . . . . . . . . . . . . . . 62
Starting Epson Printer Utility 4. . . . . . . . . . . . . 62
Epson Printer Utility 4 Functions. . . . . . . . . . . . 62
Printing Varieties
Printing with Darker Tones of Black (Black
Enhance Overcoat). . . . . . . . . . . . . . . . . . . . . . . . 64
Correct color and print. . . . . . . . . . . . . . . . . . . . . 64
Printing Black and White Photos. . . . . . . . . . . . . . 68
Borderless Printing. . . . . . . . . . . . . . . . . . . . . . . . 71
Types of Borderless Printing Methods. . . . . . . . 71 Supported Paper. . . . . . . . . . . . . . . . . . . . . . . . 71 About Roll Paper Cutting. . . . . . . . . . . . . . . . . 72 Setting Procedures for Printing. . . . . . . . . . . . . 73
Enlarged/Reduced Printing. . . . . . . . . . . . . . . . . . 75
Fit to Page/Scale to fit paper size. . . . . . . . . . . . 76 Fit to Roll Paper Width(Windows Only). . . . . . 77 Custom Scale Setting. . . . . . . . . . . . . . . . . . . . . 78
Multi-Page Printing. . . . . . . . . . . . . . . . . . . . . . . 79
Poster Printing (Enlarge to cover several sheets
and print - Windows only). . . . . . . . . . . . . . . . . . 81
Setting Procedures for Printing. . . . . . . . . . . . . 81 Joining the output paper together. . . . . . . . . . . 83
Printing at Non-Standard Sizes. . . . . . . . . . . . . . . 86
Banner printing (on roll paper). . . . . . . . . . . . . . . 89
Layout Manager(Windows Only). . . . . . . . . . . . . . 90
Setting Procedures for Printing. . . . . . . . . . . . . 91 Saving and Recalling Settings. . . . . . . . . . . . . . . 92
Color Management Printing
About Color Management. . . . . . . . . . . . . . . . . . . 94
Color Management Print Settings. . . . . . . . . . . . . 94
Setting profiles. . . . . . . . . . . . . . . . . . . . . . . . . 95
Setting color management with the applications
. . . . . . . . . . . . . . . . . . . . . . . . . . . . . . . . . . . . . . 95
Setting color management with the printer driver
. . . . . . . . . . . . . . . . . . . . . . . . . . . . . . . . . . . . . . 97
Color management printing by Host ICM (Windows). . . . . . . . . . . . . . . . . . . . . . . . . . . . 97 Color Management Printing by ColorSync
(Mac). . . . . . . . . . . . . . . . . . . . . . . . . . . . . . . . 98 Color management printing by Driver ICM(Windows Only). . . . . . . . . . . . . . . . . . . . 98
Menu List
Paper Setting. . . . . . . . . . . . . . . . . . . . . . . . . . . . 101
General Settings. . . . . . . . . . . . . . . . . . . . . . . . . 106
Supply Status. . . . . . . . . . . . . . . . . . . . . . . . . . . 112
Maintenance. . . . . . . . . . . . . . . . . . . . . . . . . . . . 112
Language. . . . . . . . . . . . . . . . . . . . . . . . . . . . . . 113
Status. . . . . . . . . . . . . . . . . . . . . . . . . . . . . . . . . 114
Maintenance
Print Head Maintenance. . . . . . . . . . . . . . . . . . . 115
Maintenance Operations. . . . . . . . . . . . . . . . . 115 Print Head Nozzle Check. . . . . . . . . . . . . . . . . 115 Cleaning the print head. . . . . . . . . . . . . . . . . . 116 Print Head Alignment. . . . . . . . . . . . . . . . . . . 118 Paper Feed Adjust. . . . . . . . . . . . . . . . . . . . . . 122
Replacing Consumables. . . . . . . . . . . . . . . . . . . . 123
Replacing Ink Cartridges. . . . . . . . . . . . . . . . . 123
Replacing Maintenance Box. . . . . . . . . . . . . . . 124
Replacing the Cutter. . . . . . . . . . . . . . . . . . . . 125
Cleaning the Printer. . . . . . . . . . . . . . . . . . . . . . 126
Cleaning the outside. . . . . . . . . . . . . . . . . . . . 126 Cleaning the inside. . . . . . . . . . . . . . . . . . . . . 126
Problem Solver
What to do When a Message is Displayed. . . . . . . 129
SpectroProofer Error. . . . . . . . . . . . . . . . . . . . . . 130
When an Error Message and Error Code are Displayed. . . . . . . . . . . . . . . . . . . . . . . . . . . . . . 131
Troubleshooting. . . . . . . . . . . . . . . . . . . . . . . . . 132
You cannot print (because the printer does not work). . . . . . . . . . . . . . . . . . . . . . . . . . . . . . . 132 The printer sounds like it is printing, but
nothing prints. . . . . . . . . . . . . . . . . . . . . . . . . 134 The prints are not what you expected. . . . . . . . 134 Feeding or ejecting problems. . . . . . . . . . . . . . 146 Others. . . . . . . . . . . . . . . . . . . . . . . . . . . . . . 149
4

SC-P9500 Series/SC-P7500 Series User's Guide
Contents
Appendix
Options and Consumable Products. . . . . . . . . . . 152
Epson Special Media. . . . . . . . . . . . . . . . . . . . 152 Ink cartridges. . . . . . . . . . . . . . . . . . . . . . . . . 152 Others. . . . . . . . . . . . . . . . . . . . . . . . . . . . . . 154 Absorption pad replacement kit (absorption
pads for borderless printing). . . . . . . . . . . . . . 155
Supported Media. . . . . . . . . . . . . . . . . . . . . . . . . 156
Epson Special Media Table. . . . . . . . . . . . . . . 156 Supported Commercially Available Paper. . . . . 167 Before Printing on Commercially Available
Paper. . . . . . . . . . . . . . . . . . . . . . . . . . . . . . . 168
PANTONE Color Explanation. . . . . . . . . . . . . . . 170
Notes When Moving or Transporting the Printer
. . . . . . . . . . . . . . . . . . . . . . . . . . . . . . . . . . . . . 170
Notes When Moving the Printer. . . . . . . . . . . 170 Notes on Transporting. . . . . . . . . . . . . . . . . . 171 Notes when reusing the printer. . . . . . . . . . . . 172
System Requirements. . . . . . . . . . . . . . . . . . . . . 173
Printer Driver. . . . . . . . . . . . . . . . . . . . . . . . . 173
Web Config. . . . . . . . . . . . . . . . . . . . . . . . . . 174
Epson Edge Dashboard. . . . . . . . . . . . . . . . . . 175
Specifications Table. . . . . . . . . . . . . . . . . . . . . . . 176
Where To Get Help
Technical Support Web Site. . . . . . . . . . . . . . . . . 178
Contacting Epson Support. . . . . . . . . . . . . . . . . . 178
Before Contacting Epson. . . . . . . . . . . . . . . . . 178 Help for Users in North America. . . . . . . . . . . 179 Help for Users in Europe. . . . . . . . . . . . . . . . . 179 Help for Users in Taiwan. . . . . . . . . . . . . . . . . 179 Help for Users in Australia/New Zealand. . . . . 180 Help for Users in Singapore. . . . . . . . . . . . . . . 180 Help for Users in Thailand. . . . . . . . . . . . . . . . 181 Help for Users in Vietnam. . . . . . . . . . . . . . . . 181 Help for Users in Indonesia. . . . . . . . . . . . . . . 181 Help for Users in Hong Kong. . . . . . . . . . . . . . 182 Help for Users in Malaysia. . . . . . . . . . . . . . . . 182 Help for Users in India. . . . . . . . . . . . . . . . . . 182 Help for Users in the Philippines. . . . . . . . . . . 183
5

SC-P9500 Series/SC-P7500 Series User's Guide
Notes on Manuals
Notes on Manuals
Meaning of Symbols
 Warning: Warnings must be followed to avoid serious bodily injury.
 Caution: Cautions must be followed to avoid bodily injury.
c Important: Important must be followed to avoid damage to this product.
Note: Notes contain useful or additional information on the operation of this product.
U |
Indicates related reference |
|
content. |
|
|
Illustrations
The illustrations may differ slightly from the model you are using. Please be aware of this when using the manuals.
Product Model
Descriptions
Some models described in this manual may not be sold in your country or region.
Screenshots Used in this Guide
Screenshots used in this guide may differ slightly from the actual screens. Also, screens may differ depending on the operating system or the usage environment.
Unless otherwise specified, the Windows screenshots used in this guide are of Windows 10.
Unless otherwise specified, the Mac OS X screenshots used in this guide are of Windows Mac OS X v 10.8.x.
6
SC-P9500 Series/SC-P7500 Series User's Guide
Notes on Manuals
Printer Parts
Front
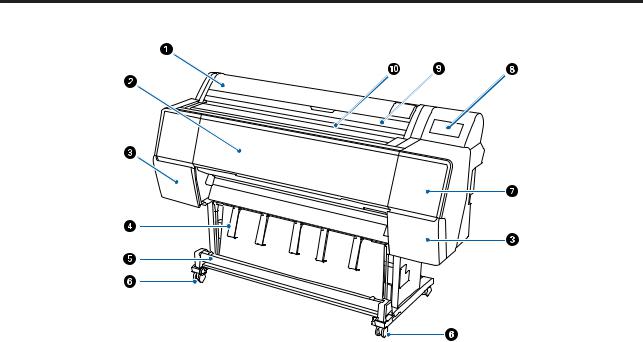
ARoll paper cover
Open to load roll paper.
BFront cover
Open this cover when cleaning the printer or clearing jams.
CCartridge covers (on the left and right)
Open when installing ink cartridges.
U “Replacing Ink Cartridges” on page 123
DPaper support
Use this to adjust the direction of the output paper.
EPaper basket
Output from the printer collects in this basket, keeping the media clean and free of creases.
U “Using the Paper Basket” on page 34
FCasters
There are two casters on each leg. The casters are normally kept locked once the printer is in place.
7
SC-P9500 Series/SC-P7500 Series User's Guide
Notes on Manuals
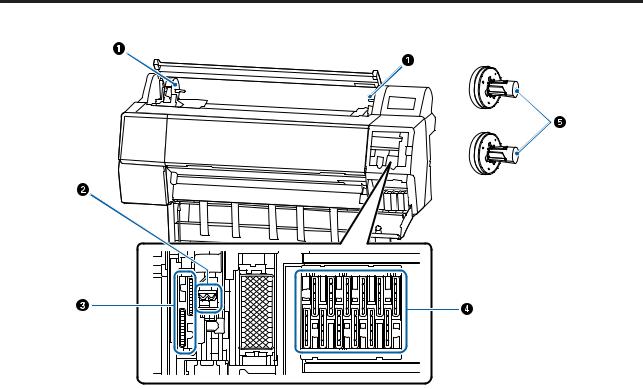
GMaintenance cover (front)
Open when cleaning around the caps.
U “Cleaning around the print head and caps” on page 138
HControl panel
U “Control panel” on page 11
ICut sheet cover
Open when loading cut sheets or poster board.
JPaper slot
Insert the paper into this slot.
Inside
AAdapter holder
The roll paper adapter is placed in this holder when loading the roll paper.
BWipers
Wipe off ink from the nozzle surface of the print head. Try cleaning these when automatic cleaning does not clear clogging in the print head.
U “Cleaning around the print head and caps” on page 138
8
SC-P9500 Series/SC-P7500 Series User's Guide
Notes on Manuals
CSuction caps
During head cleaning, this cap sucks the optimum amount of ink from the print head nozzles. Try cleaning these when automatic cleaning does not clear clogging in the print head.
U “Cleaning around the print head and caps” on page 138
DDrying prevention caps
Except when printing, these caps cover the print head nozzles to prevent them from drying. Try cleaning these when automatic cleaning does not clear clogging in the print head.
U “Cleaning around the print head and caps” on page 138
ERoll paper adapter
When loading roll paper into the printer, insert this through the roll paper.
Back
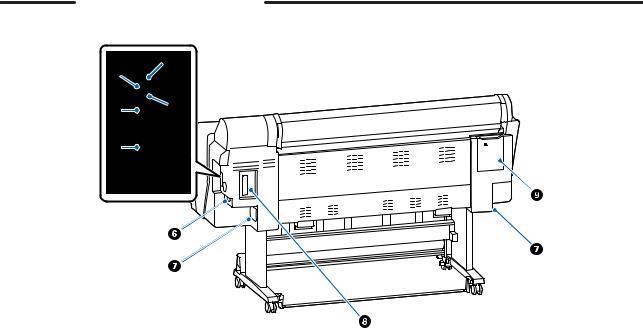
ALAN port
Connects the LAN cable.
BUSB port
Connects the USB cable.
COption port
Connects the optional SpectroProofer mounter or Auto Take-up Reel Unit (for the SC-P9500 Series only).
DStatus light
The color indicates the network transmission speed.
9
SC-P9500 Series/SC-P7500 Series User's Guide
Notes on Manuals
Off : |
10Base-T |
Red : |
100Base-TX |
Green: |
1000Base-T |
EData light
The network connection status and data reception are indicated by a lit or flashing light. On : Connected.
Flashi : Receiving data. ng
FAC inlet
Connect the supplied power cable here.
GMaintenance Box
Absorbs waste ink. For SC-P9500 Series this is placed in two locations on the left and right, while SC-P7500 Series is in one location on the right.
U “Replacing Maintenance Box” on page 124
HOption slot
Slot for installing the optional Adobe® PostScript® 3™ expansion unit or hard disk unit.
IMaintenance cover (rear)
Open when cleaning around the print head.
U “Cleaning around the print head and caps” on page 138
10
SC-P9500 Series/SC-P7500 Series User's Guide
Notes on Manuals
Control panel
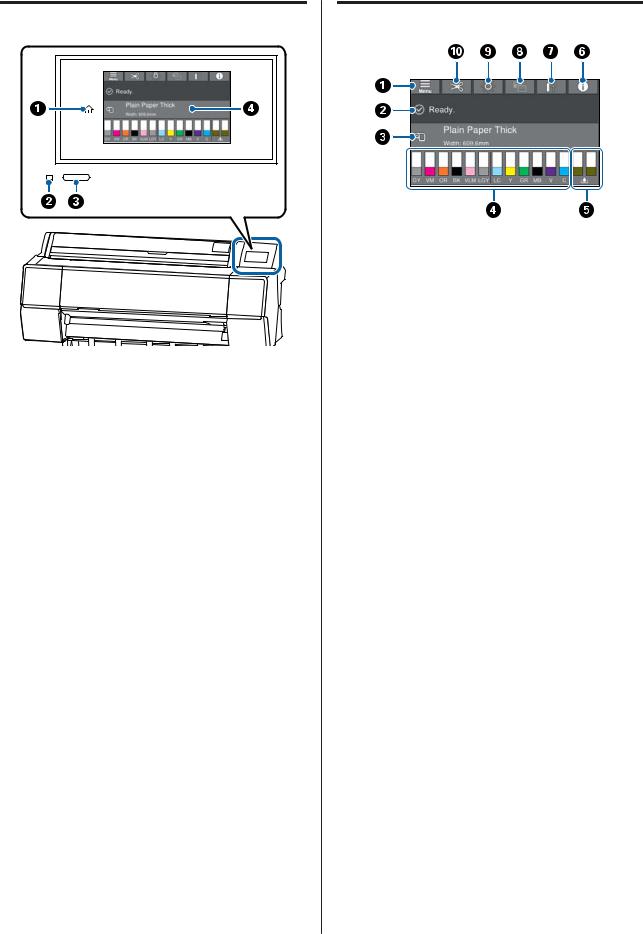
AHome button
Touch this button while a menu is displayed to return to the Home screen.
The home button is off when it cannot be used during operations such as paper feeding.
BPower lamp
On : The power is on.
Flashi : The printer is performing a process such as ng starting up, powering off, data receiving, or
print head cleaning. Please wait without performing any operation until this light stops flashing. Do not disconnect the power cord.
Off : The power is off.
CPower button
DControl panel
This is a touch panel to display the printer's status, menus, error messages, and so on.
Home screen operations
AMenu
Allows you to make paper settings, printer settings, and perform printer maintenance. See the following for a list of the menus.
U “Paper Setting” on page 101
BInformation display area
Displays the printer's status, error messages, and so on.
CPaper loading information
Displays paper information for the loaded paper.
DDisplay ink levels
Displays the amount of ink remaining in the ink
cartridges. When the  symbol is displayed, the ink cartridge is running low. Press the display to check the cartridge model number.
EDisplays amount of space remaining in the maintenance box
Displays the approximate amount of space in the
maintenance box. When the  symbol is displayed, the maintenance box is running low. Press the display to check the maintenance box model number.
FInformation
You can check the status of the printer by viewing consumable information and the list of messages. You can also check the job history.
G Internet connection status
11

SC-P9500 Series/SC-P7500 Series User's Guide
Notes on Manuals
You can check the status of the wired LAN connection and change settings.
HSwitch screens while printing
You can switch the screen display while printing. You can switch to the Professional display (shown above) that shows the remaining ink level, or the Simple display that shows the print completion time.
IInternal lighting
You can turn the internal lighting on or off. Turn on the internal light when you want to check the print as it is being printed.
JFeed/Cut Paper
When roll paper is loaded, you can perform paper feed adjustments and cut the paper.
Features
The main features of this printer are described below.
Realizing High Resolution
The newly developed ink technology provides high definition for photo, fine art, and proofing paper.
New print head design
Our new print heads are equipped with a 2.64 inch integrated precision core μTFP head with a staggered array, and we have adopted a resolution of 300 dpi for optimal printing.
Pigmented inks with superior resistance
Pigment inks maintain more beautiful and more vibrant prints over a long period of time with their high light fastness. They are also extremely fade-resistant and can be safely displayed in direct sunlight. Additionally, the high water and ozone resistance is not only ideal for photo printing, but also allows for store displays and banners, outdoor displays of posters and so on. When you are printing for outdoor use, use lamination processing.
A variety of black and color inks
As well as the five basic ink colors, inks with the following features have also been included.
Two types of black ink to suit your printing purposes
By automatically switching to suit the paper type being used, the two types of black ink provided are Photo Black which realizes a smooth, professional finish on glossy paper, and Matte Black which increases black optical density using matte paper.
Two types of gray ink to improve gradation
In addition to Photo Black and Matte Black, two additional variants of black ink have also been installed (Gray and Light Gray) to provide excellent granularity and richly expressive gradation.
12

SC-P9500 Series/SC-P7500 Series User's Guide
Notes on Manuals
Three spot color inks that help to realize a wide range of color reproduction
This printer is equipped with Orange, Green, and Violet inks allowing us to realize a wide range of color reproduction, thereby achieving high PANTONE coverage.
Notes on Usage and Storage
Installation space
Make sure that you secure a space of at least 300 mm around the entire printer, clear of any other objects, so that paper ejection and consumable replacement are not obstructed.
See the “Specifications Table” for the external dimensions of the printer.
U “Specifications Table” on page 176
Notes when using the printer
Note the following points when using this printer to avoid breakdowns, malfunctions, and print quality decline.
When using the printer, observe the operating temperature and humidity range described in the "Specifications Table".
U “Specifications Table” on page 176
Even when the conditions above are met, you may not be able to print properly if the environmental conditions are not suitable for the paper. Be sure to use the printer in an environment where the paper's requirements are met. For more details, see the documentation supplied with the paper.
Also, when operating in dry areas, air conditioned environment, or under direct sunlight, maintain the appropriate humidity.
13

SC-P9500 Series/SC-P7500 Series User's Guide
Notes on Manuals
Do not install the printer next to heat sources or directly in the path of air from a ventilator or air conditioner. Failure to observe this precaution could result in the print head nozzles drying and clogging.
The print head may not be capped (i.e., may not move to the right-hand side) if an error occurs and the printer is turned off without first resolving the error. Capping is a function for automatically covering the print head with a cap (lid) to prevent the print head from drying out. In this case, turn on the power and wait a while until capping is performed automatically.
When the power is on, do not remove the power plug or cut the power at the breaker. The print head may not be capped properly. In this case, turn on the power and wait a while until capping is performed automatically.
Even when the printer is not in use, some ink will be consumed by head cleaning and other maintenance operations needed to keep the print head in good condition.
Notes when not using the printer
If you are not using it, note the following points when storing the printer. If it is not stored correctly, you may not be able to print properly the next time it is used.
If you do not print for a long time, the print head nozzles may become clogged. We recommend that you print once a week to prevent the print head from clogging.
The roller may leave an impression on paper that is left in the printer. This can also cause wavy or curled paper resulting in paper feeding problems or the print head could be scratched. Remove any paper when storing.
Store the printer after confirming that the print head has been capped (the print head is positioned at the far right). If the print head is left uncapped for a long time, the print quality may decline.
Note:
If the print head is not capped, turn the printer on, and then turn it off.
To prevent the accumulation of dust and other foreign matter in the printer, close all covers before placing it in storage.
If the printer will be not be used for an extended period, protect it with an anti-static cloth or other cover.
The print head nozzles are very small, and they can become clogged easily if fine dust gets on the print head, and you may not be able to print properly.
When turned on after an extended period of disuse, the printer may automatically perform head cleaning to ensure print quality.
U “Print Head Maintenance” on page 115
Notes on handling ink cartridges
Note the following points when handling ink cartridges to maintain good print quality.
The supplied ink cartridges and Maintenance Box are for use during the initial charging. The supplied ink cartridges and Maintenance Box will be required replacement relatively quickly.
We recommend that ink cartridges be stored at room temperature out of direct sunlight and used before the expiry date printed on the packaging.
To ensure good results, we recommend that all the ink in the cartridge be used within a year of installation.
Ink cartridges that have been stored at low temperatures for an extended period should be allowed to return to room temperature over a period of four hours.
Do not touch the IC chips on the ink cartridges. You may not be able to print properly.
Install all ink cartridges into each slot. You cannot print if any of the slots are empty.
Do not leave the printer without ink cartridges installed. The ink in the printer may dry, preventing it from printing as expected. Leave ink cartridges in all slots even while you do not use the printer.
The ink level and other data are stored in the IC chip, allowing cartridges to be used after being removed and replaced.
14

SC-P9500 Series/SC-P7500 Series User's Guide
Notes on Manuals
To avoid getting dirt on the ink supply port, store the removed ink cartridge properly. The ink supply port has a valve in it so it does not need to be capped.
Removed ink cartridges may have ink around the ink supply port, so be careful not to get any ink on the surrounding area when removing the cartridges.
To maintain the quality of the print head, this printer stops printing before ink cartridges are completely expended, and ink remains in the used cartridge.
Although the ink cartridges may contain recycled materials, this does not affect printer function or performance.
Do not dismantle or remodel ink cartridges. You may not be able to print properly.
Do not drop or knock ink cartridges against hard objects; otherwise, the ink may leak.
Notes on handling paper
Note the following points when handling and storing the paper. If the paper is not in good condition, print quality may decline.
Check the documentation supplied with each paper.
Notes on Handling
Use Epson special media under normal room conditions (temperature: 15 to 25˚C, humidity: 40 to 60%).
Do not fold the paper or scratch the surface of the paper.
Avoid touching the printable surface of the paper with your bare hands. Moisture and oils from your hands can affect print quality.
Handle paper by the edges. We recommend wearing cotton gloves.
Changes in temperature and humidity may cause paper to become wavy or curled. Check the following points.
Insert the paper just before printing.
Do not use wavy or warped paper.
For roll paper, cut off any parts that are wavy or curled, and then load the paper again.
For cut sheets, use new paper.
Do not wet the paper.
Do not throw away the paper packaging as you can use it for storing the paper.
Avoid locations that are subject to direct sunlight, excessive heat, or humidity.
Keep cut sheets in their original package after opening, and keep them in a flat place.
Remove roll paper that is not in use from the printer. Rewind it correctly and then store it in the original packaging that came with the roll paper. If you leave the roll paper in the printer for a long time, its quality may decline.
Notes on handling printed paper
To maintain long lasting, high quality print results, note the following points.
Do not rub or scratch the printed surface. If they are rubbed or scratched, the ink may peel off.
Do not touch the printed surface; Failure to observe this precaution may cause ink to rub off.
Make sure the print outs are completely dry before folding of stacking; otherwise, the color may change where they touch (leaves a mark). These marks will disappear if they are separated immediately and dried; however, they will remain if not separated.
If you put the print outs in an album before they are completely dry, they may be blurred.
Do not use a dryer to dry the print outs.
Avoid direct sunlight.
Prevent color distortion while displaying or storing the print outs by following the instructions in the paper's documentation.
15

SC-P9500 Series/SC-P7500 Series User's Guide
Notes on Manuals
Note:
Typically, print outs and photos fade over time (color distortion) due to the effects of light and various constituents in the air. This also applies to Epson special media. However, with the correct storage method, the degree of color distortion can be minimized.
See the documentation supplied with Epson special media for detailed information on handling the paper after printing.
The colors of photos, posters, and other printed materials appear different under different lighting conditions (light sources*). The colors of print outs from this printer may also appear different under different light sources.
* Light sources include sunlight, fluorescent light, incandescent light, and other types.
16

SC-P9500 Series/SC-P7500 Series User's Guide
Introducing the Software
Introducing the Software
Provided Software
The following table lists the provided software.
The supplied software disc contains the software for Windows. When using a Mac or a computer without a disc drive, download the software from http://epson.sn and then install it.
For details on the various software, see the online help of each software or the Administrator's Guide (online manual).
Note:
Convenient software compatible with this printer is introduced on the Epson website. Please check the information from the following link.
http://www.epson.com
Software Name |
Function |
|
|
|
|
Printer Driver |
Install the printer driver to take full advantage of the functionality of this printer when |
|
|
printing. |
|
|
|
|
EPSON Software Updater |
Software to check whether there is any software update information and then notify you |
|
|
and install the software if an update is available. It allows you to update the firmware and |
|
|
already installed software of the printer. |
|
|
U “Updating Software or Installing Additional Software” on page 20 |
|
|
|
|
LFP Print Plug-In for Office* |
Plug-in software for Microsoft Office applications (Word, Excel, and PowerPoint). Installing |
|
(Windows Only) |
this plug-in displays ribbon items in Office applications that give quick access to horizontal |
|
and vertical banner printing and enlarged printing. |
||
|
||
|
It can be installed by selecting it on the Additional Installation screen when installing the |
|
|
software. You can also install it later with EPSON Software Updater. |
|
|
The supported Microsoft versions are shown below. |
|
|
Office 2003/Office 2007/Office 2010/Office 2013/Office 2016 |
|
|
|
|
EpsonNet Config* |
This software allows you to perform network initialization or setting changes as a batch. |
|
|
EpsonNet Config is not installed automatically. Download it from the Epson website and |
|
|
then install it if necessary. |
|
|
http://www.epson.com |
|
|
For Windows, you can install the software from the following folder on the supplied |
|
|
software disc. |
|
|
//Network/EpsonNetConfig |
|
|
U Administrator's Guide |
|
|
|
|
Epson Edge Dashboard* |
Convenient software for administrating multiple printers. This enables confirmation in a |
|
|
list of the status of printers registered for monitoring. |
|
|
|
17

SC-P9500 Series/SC-P7500 Series User's Guide
Introducing the Software
Software Name |
Function |
|
|
|
|
Epson Media Installer |
This tool adds paper information to a printer or printer driver. |
|
|
If you are using Windows, you can start it from the printer driver. |
|
|
If you are using a Mac, you can start it from the /Applications/Epson Software/Epson |
|
|
Utilities/Epson Media Installer.app. |
|
|
Instructions U “When there is no paper information on the control panel or in the driver” |
|
|
on page 31 |
|
|
|
|
LFP HDD Utility* |
The Utility can be used to manage print jobs stored on the optional hard disk unit. Use this |
|
(Windows Only) |
when connecting the printer directly to the computer using a USB cable. |
|
|
||
|
|
|
Epson Print Layout* |
This is a plug-in software for Adobe Photoshop, Adobe Lightroom, Nikon ViewNX-i, and |
|
|
SILKYPIX. It provides a number of useful features such as pre-print previews or layouts |
|
|
allowing you to easily print re-touched or processed photos. |
|
|
|
*Download software from the Internet, and install. Connect the computer to the Internet and install.
Built-in Software in the Printer
The following software comes preinstalled in the printer. Start and use it from a Web browser via the network.
Software Name |
Function |
|
|
|
|
Web Config |
The network securitysettings can be configured from Web Config. This software also has an |
|
|
email notification function for notifying of printer errors and other problems. |
|
|
U “Using Web Config” on page 19 |
|
|
|
18
SC-P9500 Series/SC-P7500 Series User's Guide
Introducing the Software
Using Web Config
This section describes how to start the software and provides a summary of its functions.
Starting
Start the software from a web browser on a computer that is connected to the same network as the printer.
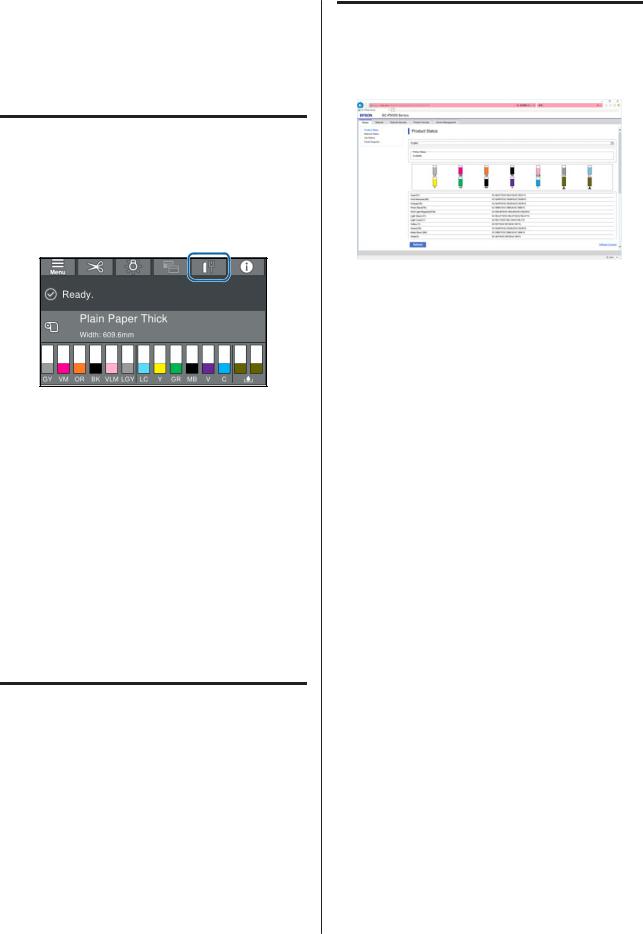
A Check the IP address of the printer from the control panel.
B Start a Web browser on a computer connected to the printer over the network.
C Enter the IP address of the printer in the address bar of the Web browser and press the Enter or
Return key.
Format:
IPv4: http://IP address of printer/
IPv6: http://IP address of printer/
Example:
IPv4: http://192.168.100.201/
IPv6: http://[2001:db8::1000:1]/
Function Summary
This section introduces the main functions of Web Config. See the Administrator's Guide for more details.
Main Functions
Check the printer's status, such as the remaining amount of ink.
Check and update the printer's firmware version.
Configure the printer's network settings and advanced security settings, such as SSL/TLS communication, IPsec/IP filtering, and IEEE802.1X, which cannot be configured with the printer alone.
You can export and import settings.
You can use this to back up settings, replace printers, and so on.
Closing
Close the Web browser.
19

SC-P9500 Series/SC-P7500 Series User's Guide
Introducing the Software
Updating Software or Installing Additional Software
When you install the software during setup as described in the Setup Guide, Epson Software Updater is installed. Epson Software Updater allows you to update the firmware and software already installed on your computer as well as install additional software compatible with the printer.
Note:
The software is updated as needed for greater convenience and more robust functionality. We recommend setting to receive update notifications in Epson Software Updater and updating the software as soon as possible when there is a notification.
Checking Whether Updates are Available and Updating Software
A Check that the computer and printer are in the following states.
Computer is connected to the Internet.
Printer and computer can communicate.
B StartWindowsEpson Software Updater.
Display the list of all the programs and then click Epson Software Updater in the Epson Software folder.
Note:
If you press the Windows key (key with Windows logo mark) on the keyboard and then type the software name in the search box of the displayed window, the software appears immediately.
The software can also be started by clicking the printer icon on the Taskbar of the desktop and then selecting Software Update.
Mac
Select Go - Applications - Epson Software - EPSON Software Updater.
C Select the software or manuals to be updated and then update them.
Follow the on-screen instructions.
c Important:
Do not turn off the computer or printer during the update.
Note:
Software not displayed in the list cannot be updated with EPSON Software Updater. Check the latest versions of software on the Epson website.
Please note that you cannot update or install software using Epson Software Updater if you are using a Windows Server OS. Download the software from the Epson website.
http://www.epson.com
Receiving Update Notifications
Windows
A Start Epson Software Updater.
B Click Auto update settings.
C Select the timing to perform the update check in the Interval to Check field on the printer, and then click OK.
Mac
The software is set by default to check and notify whether there are updates every 30 days.
20
SC-P9500 Series/SC-P7500 Series User's Guide
Introducing the Software
Uninstalling Software
Windows
c Important:
You must log in as an Administrator.
If the password or confirmation of an administrator is requested, enter the password and then continue with the operation.
A Turncable.off the printer, and unplug the interface
B Close all applications running on your computer.
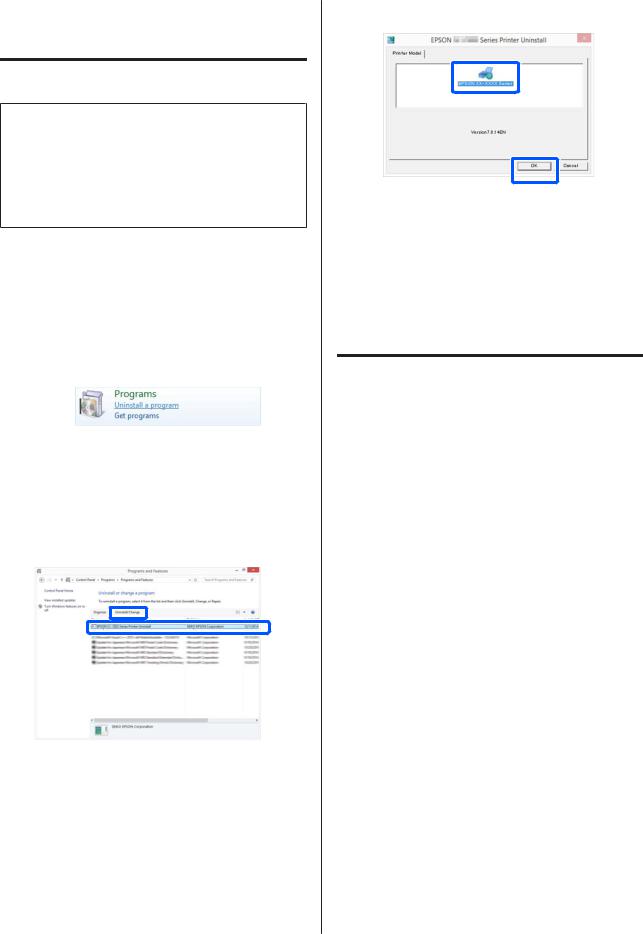
C Go to the Control Panel and click Uninstall a program from the Programs category.
D Select the software you want to remove and then click Uninstall/Change (or Change/Remove/ Add or remove).
You can remove the printer driver and EPSON Status Monitor 3 by selecting EPSON SC-XXXXX Printer Uninstall.
E Select the target printer icon, and then click OK.
F |
Follow the on-screen instructions to continue. |
|
When the delete confirmation message appears, |
|
click Yes. |
Restart the computer if you are reinstalling the printer driver.
Mac
When reinstalling or upgrading the printer driver or other software, follow the steps below to uninstall the target software first.
Printer Driver
Use the "Uninstaller".
Downloading the Uninstaller
Download the "Uninstaller" from the Epson website.
http://www.epson.com/
Using the Uninstaller
Check the procedure when downloading "Uninstaller" on the Epson website, and follow the instructions.
Other software
Drag and drop folder with the software name from the Applications folder into Trash to delete.
21
SC-P9500 Series/SC-P7500 Series User's Guide
Basic Operations
Basic Operations
Loading and Removing
the Roll Paper
Loading Roll Paper
Load roll paper after attaching the supplied roll paper adapters.
Use the printer's roll paper adapter. Do not use roll paper adapters from other models.
c Important:
Insert the paper just before printing. The roller may leave an impression on paper that is left in the printer.
Note:
The paper that can be used in the printer is detailed in the following section.
U “Supported Media” on page 156
You can load the paper while viewing the loading procedure on the screen. To view the procedure, open the roll paper cover and touch See Description on the control panel.
A Turn on the printer.
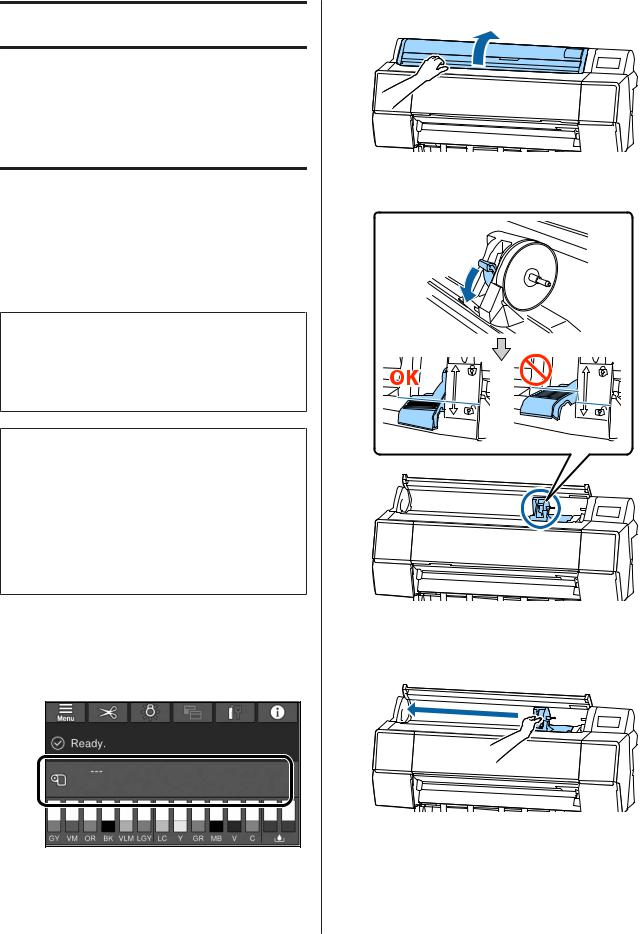
B Press Paper loading information on the control panel, and then select Roll Paper.
C
D
E
Open the roll paper cover.
Lower the lock lever for the adapter holder to release the lock.
Move the adapter holder to the left.
When moving the adapter holder, make sure you use the handle.
22
SC-P9500 Series/SC-P7500 Series User's Guide
Basic Operations
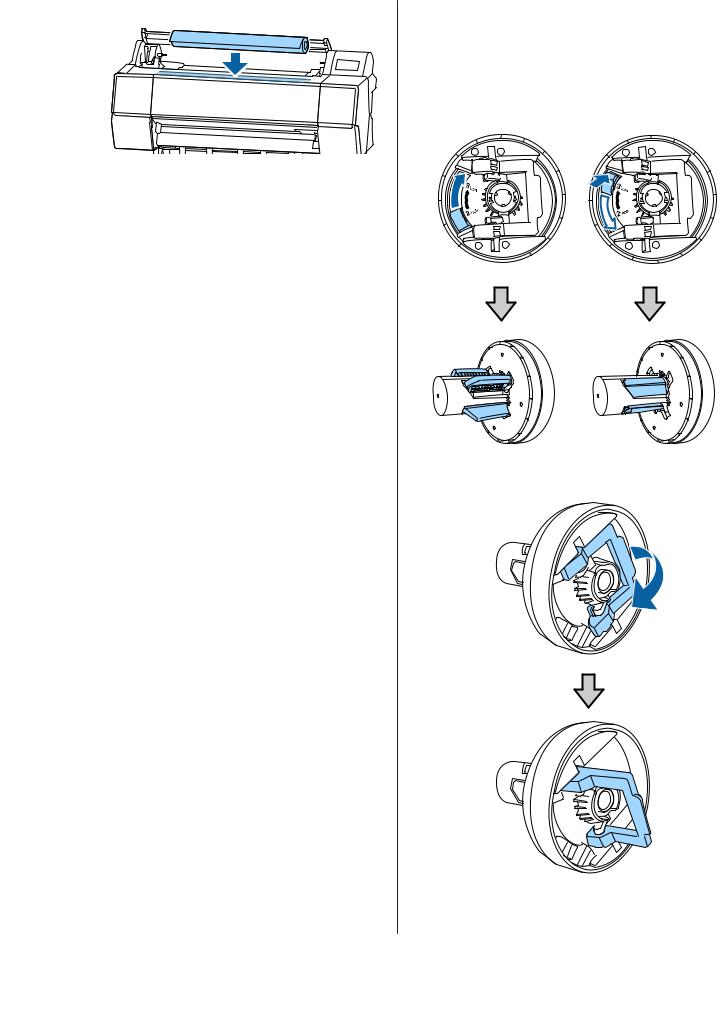
F Place the roll paper on top of the printer. |
G |
H
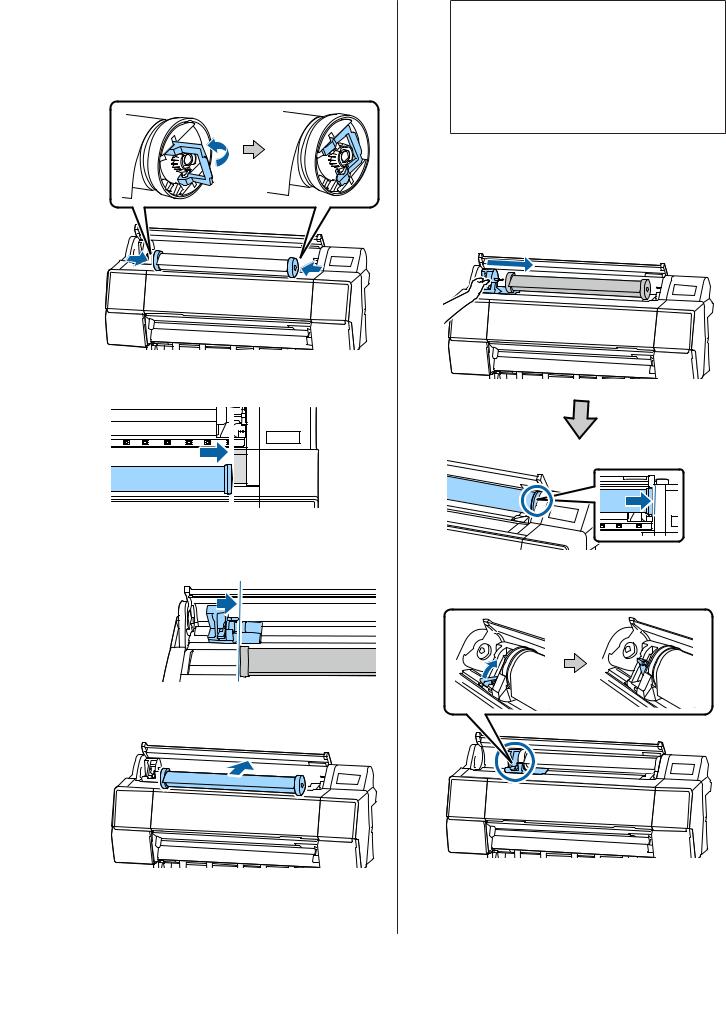
Adjust the size of the roll paper adapters to the size of the roll core.
Change the size of both of the roll paper adapters so that they are the same size.
3-inch core |
2-inch core |
Raise the adapter lock lever to release the lock on each of the two roll paper adapters.
23
SC-P9500 Series/SC-P7500 Series User's Guide
Basic Operations
I Attach the roll paper adapters to both ends of the roll paper, and then lower the lock levers on the left and right to lock them in place.
Make sure you insert the adapters fully before locking them.
J Push the roll paper to the right until it touches the roll paper loading guide.
K Move the adapter holder so that the u on the adapter holder and the left roll paper adapter are aligned.
c Important:
Rolling the roll paper with too much force may damage the adapter holder or the printer. If the adapter is damaged, you may not be able to remove it from the printer. To avoid this, remove the adapter while lifting it up.
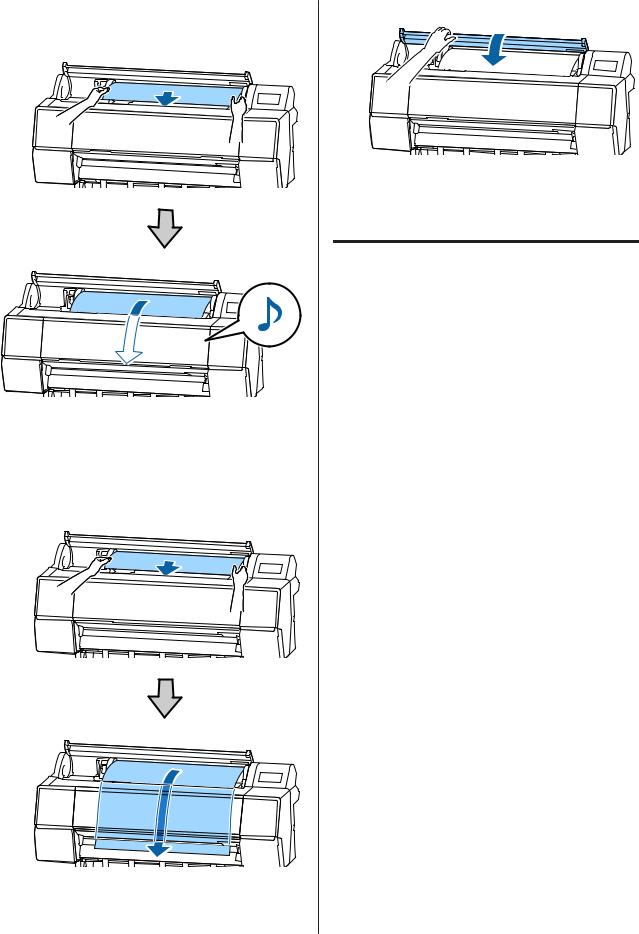
M Grip the handle on the adapter holder and slide to the right until it is fully inserted to the holder shaft.
Make sure that both ends of the roll paper are seated securely to the adapters.
N Raise the lock levers on the adapter holders to lock them in place.
L Rollholder.the roll paper slowly into the roll paper
24
SC-P9500 Series/SC-P7500 Series User's Guide
Basic Operations
O Insert the leading edge of the roll paper into the paper feed slot, and continue to feed until you hear a sound.
P When auto paper feed is set to Off, insert the leading edge of the roll paper into the paper feed slot, and feed until the leading edge extends out of the printer.
Make sure that the roll paper is free of slack and the end is not folded.
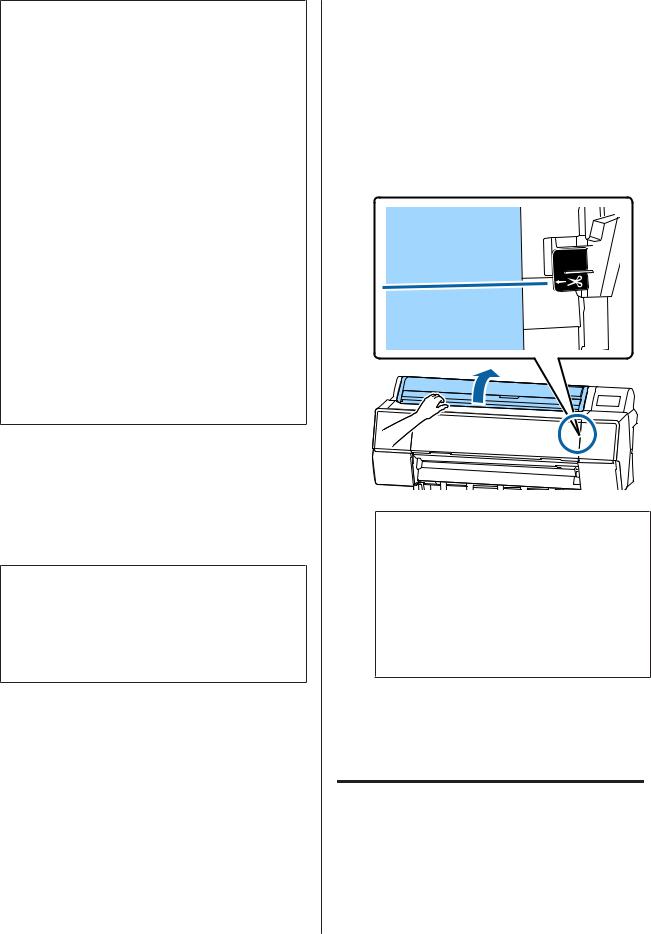
Q Close the roll paper cover.
R |
Check the media type. |
|
U “Setting Loaded Paper” on page 30 |
Cutting the roll paper
The printer is equipped with a built-in cutter. You can cut roll paper after printing by using one of the following methods.
Auto Cut:
The cutter cuts automatically at a determined position each time a page is printed in accordance with the setting of the printer driver or control panel menu.
Manual cut:
The cutting position is specified on the control panel, and then the roll paper is cut. A cutline is printed for manual cutting and can be used as a guide when cutting paper using the built-in cutter.
25
SC-P9500 Series/SC-P7500 Series User's Guide
Basic Operations
c Important:
The commercially available media types, such as those shown below, may not be cut cleanly by the built-in cutter. Furthermore, cutting the following media types may damage or reduce the lifetime of the built-in cutter.
Fine art paper
Canvas
Vinyl
Matte poster board
Adhesive paper
Banner media
Cut these media types with commercially available scissors or a cutter in the following manner:
With the front cover closed, hold down the X - Forward buttons on the control panel while viewing the inside of the printer until the cutting position emerges from below the front cover. Cut the paper using scissors or a third-party cutter.
Setting Auto Cut
You can specify the method either on the control panel or the printer driver. Note, however, that the setting selected with the printer driver takes priority when the printer driver is used.
Note:
Disable the auto cut settings in the printer and the printer driver when using the optional auto take-up reel unit.
It may take a while to cut the roll paper.
Setting on the computer
Set Auto Cut from the Roll Paper Option in the printer driver's Properties (or Printing preferences) screen.
Setting from the printer
Set this in General Settings - Printer Settings - Paper Source Settings - Roll Paper Setup - Cut Settings -
Auto Cut from the control panel.
Manual cut method
When Off is selected in the printer driver or Off is selected for Auto Cut in the control panel, the paper can be cut in any location after printing as described below.
A |
With the front cover closed, hold down the X - |
||
Forward or Backward button on the control |
|||
|
panel while viewing the inside of the printer until |
||
|
the cutting position reaches the position of the |
||
|
label. |
||
|
|
|
|
Note:
To cut the paper using the built-in cutter, the distance from the cutting position to the edge of the paper needs to be 60 to 127 mm. The necessary length differs depending on the paper type and cannot be changed. If the necessary length has not been reached, paper is fed automatically leaving a margin. Use a commercially available cutter to remove the unnecessary margin.
B Touch Cut.
A confirmation screen is displayed. Press the Cut button to cut using the built-in cutter.
Removing Roll Paper
This section describes how to remove and store roll paper after printing. The pressure roller may leave impressions on paper that is left in the printer.
26
SC-P9500 Series/SC-P7500 Series User's Guide
Basic Operations
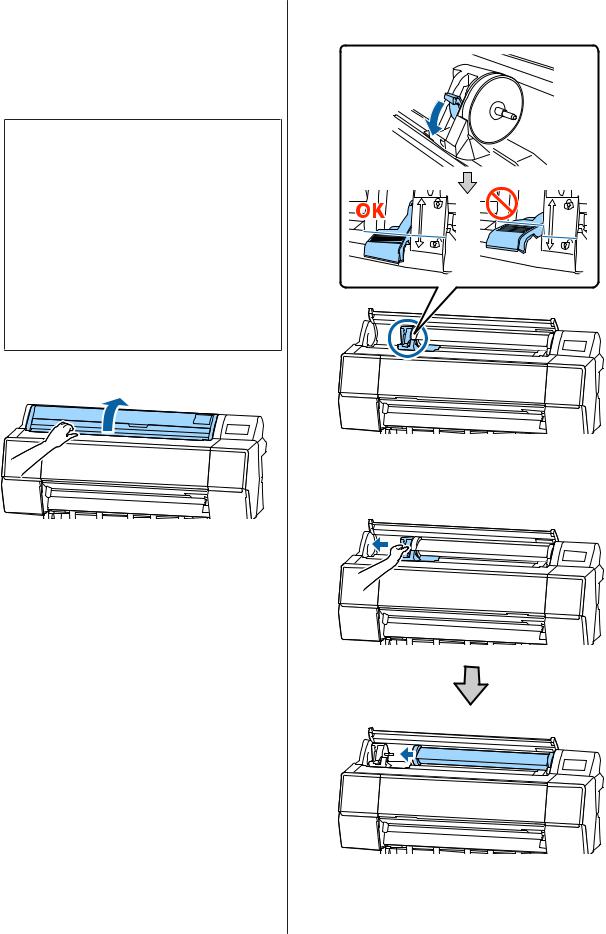
A Press Paper loading information from the home screen, and then select Remove.
The paper is rewound and ejected.
When Manage Remaining Amount is set to On, the barcode is automatically printed prior to rewinding.
Note:
If printed paper is not cut and remains, a confirmation screen appears.
Touch Cut to cut the paper at the default cut position or touch Print Cutting Guideline to print cut lines at the default position.
If you want to change the cut position or cut lines print position to a desired position, touch Close to cancel the message, and change the position in the
Feed/Cut Paper menu.
See the following for more details.
U “Cutting the roll paper” on page 25
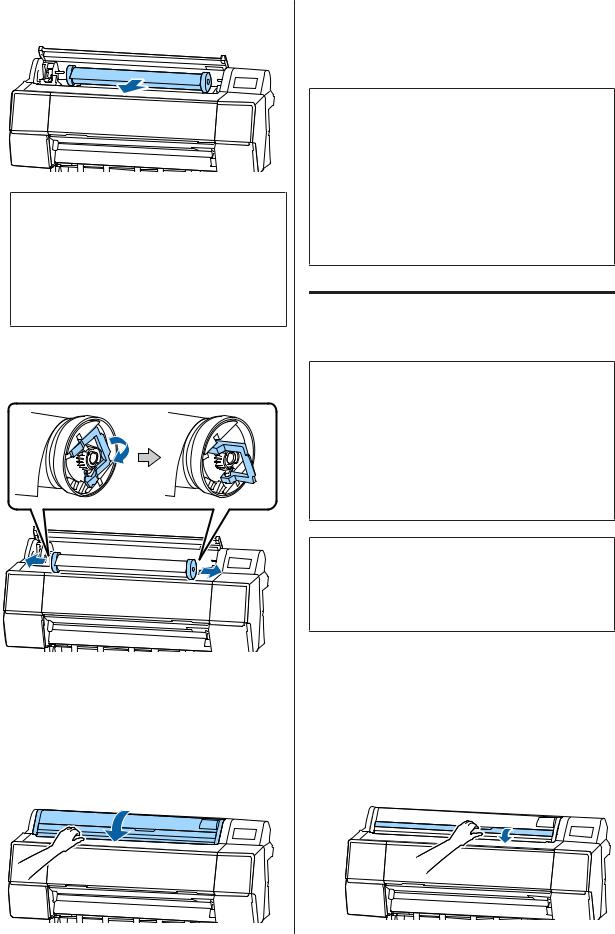
B Open the roll paper cover.
C
D
Lower the lock lever for the adapter holder to release the lock.
Move the adapter holder to the left.
When moving the adapter holder, make sure you use the handle.
27
SC-P9500 Series/SC-P7500 Series User's Guide
Basic Operations
E Roll over the paper roll to the front side to place it on the top of the printer.
c Important:
Rolling the roll paper with too much force may damage the adapter holder or the printer. If the adapter is damaged, you may not be able to remove it from the printer. To avoid this, remove the adapter while lifting it up.
F Raise the adapter lock levers to release the locks, and remove the roll paper adapters from the roll paper.
After rewinding the roll paper carefully, store it in the original package.
G |
Raise the lock lever for the adapter holder. |
H |
Close the roll paper cover. |
Loading and Removing
Cut Sheets/Poster Board
c Important:
If the paper is wavy or curled, use new paper. If wavy or curled paper is loaded, this printer may not be able to recognize the paper size, feed the paper, or print correctly.
We recommend that you return the paper to its original package and store it flat, and take it out of the package just before you use it.
Loading Cut Sheets and Poster
Board
c Important:
Insert the paper just before printing. The roller may leave an impression on paper that is left in the printer.
When roll paper is loaded, rewind the roll paper before loading the cut sheets.
U “Removing Roll Paper” on page 26
Note:
The paper that can be used in the printer is detailed in the following section.
U “Supported Media” on page 156
A Turn on the printer.
B Press Paper loading information on the control panel, and then select Cut Sheet or Poster Board.
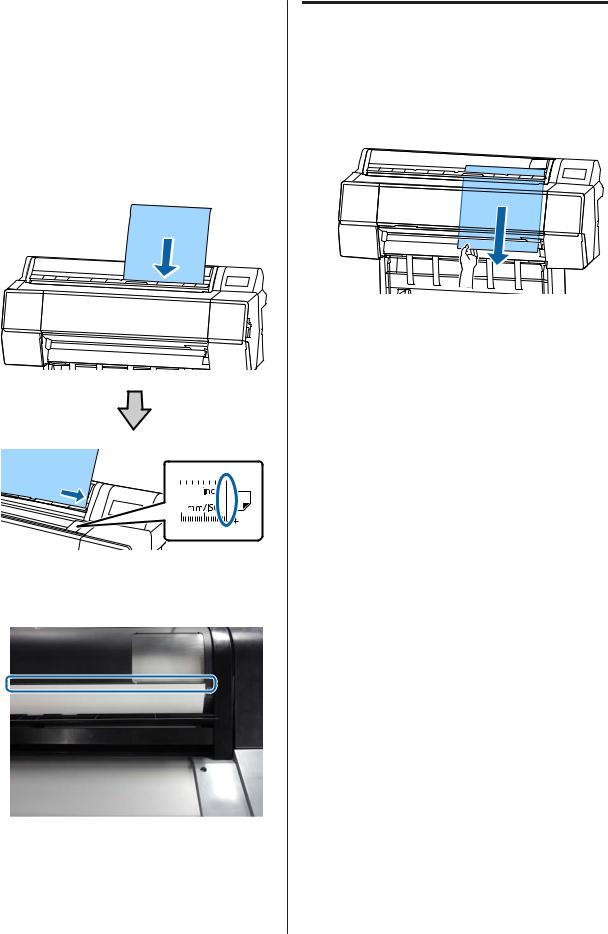
C Open the cut sheet cover.
28
SC-P9500 Series/SC-P7500 Series User's Guide
Basic Operations
D Load the paper with the side you want to print on facing forward, and the edge aligned with the line on the right.
Normally, the paper should be loaded vertically.
You can load thick paper with a length of up to 762 mm. However, you can load thick paper that is longer than 762 mm into the SC-P9500 Series by loading the paper horizontally.
When loading cut sheets, insert the leading edge until you feel resistance.
Removing Cut Sheets/Poster
Board
While supporting the paper so that it does not fall, press Paper loading information on the control panel, and then select Remove. The paper is ejected.
When loading poster board, insert the paper until the trailing edge is below the loading mark on the roll paper cover.
E F
Press the Complete - OK buttons on the control panel.
Check the media type.
U “Setting Loaded Paper” on page 30
29
SC-P9500 Series/SC-P7500 Series User's Guide
Basic Operations
Setting Loaded Paper
Set the paper type before you start printing. Not setting a paper type that matches the loaded paper will cause wrinkles, scuffing, uneven colors, and other trouble.
How to Set
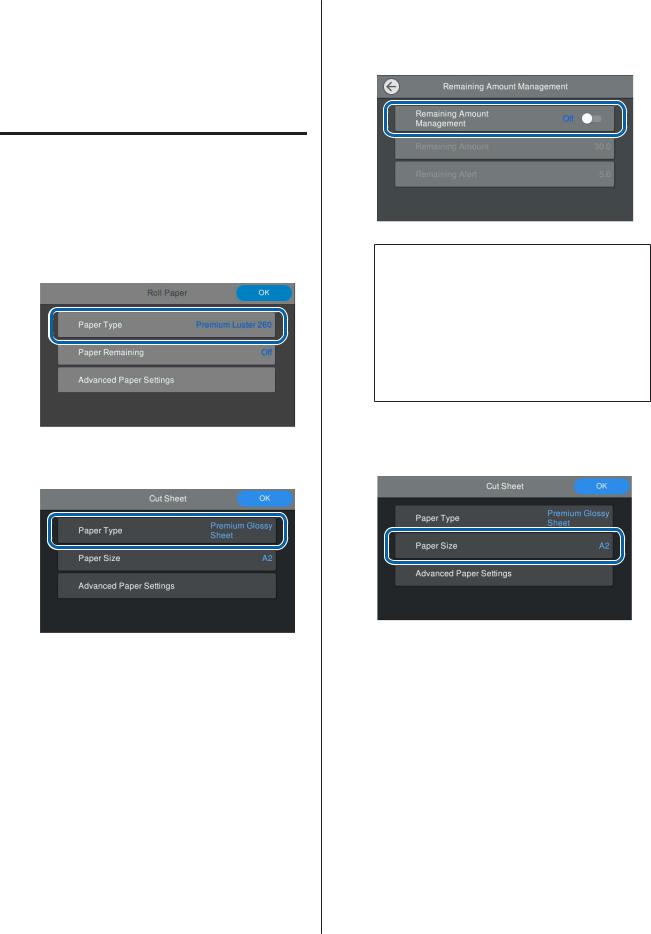
A The paper type is shown on the screen displayed after loading paper. Check that the loaded paper and the paper type displayed on the screen match.
Roll Paper
Cut sheet/Poster board
If the paper type displayed does not match the paper type that you have loaded, touch Paper Type to set the paper type.
See the following if the paper type you have loaded is not displayed on the control panel.
U “When there is no paper information on the control panel or in the driver” on page 31
B To manage the amount of roll paper remaining, set Remaining Amount Management to On, and then set Remaining Amount and Remaining Alert.
Note:
When Manage Remaining Amount is set, a barcode is printed on the leading edge of the paper when you remove the roll paper. The next time you load the roll paper, the amount remaining and the paper type are set automatically.
However, depending on the paper, the printer may not be able to read the barcode.
C For cut sheets/poster board, check that the loaded paper and the paper size displayed on the screen match.
If the loaded paper does not match the paper size displayed on the screen, touch Paper Size to set the paper size.
30
 Loading...