


 Loading...
Copyright Notice
All rights reserved. No part of this publication may be reproduced, stored in a retrieval system, or transmitted in any form or by any means, electronic, mechanical, photocopying, recording, or otherwise, without the prior written permission of SEIKO EPSON CORPORATION. The information contained herein is designed only for use with this EPSON printer. EPSON is not responsible for any use of this information as applied to other printers.
Neither SEIKO EPSON CORPORATION nor its affiliates shall be liable to the purchaser of this product or third parties for damages, losses, costs, or expenses incurred by purchaser or third parties as a result of: accident, misuse, or abuse of this product or unauthorized modifications, repairs, or alterations to this product, or (excluding the U.S.) failure to strictly comply with SEIKO EPSON CORPORATION’s operating and maintenance instructions.
SEIKO EPSON CORPORATION shall not be liable for any damages or problems arising from the use of any options or any consumable products other than those designated as Original EPSON Products or EPSON Approved Products by SEIKO EPSON CORPORATION.
A Note Concerning Responsible Use of Copyrighted Materials
Ink jet printers, digital cameras, and scanners, like photocopiers and conventional cameras, can be misused by improper copying and reprinting of copyrighted material. While some countries’ laws permit limited copying of copyrighted material in certain circumstances, those circumstances may not be as broad as some people assume. EPSON encourages each user to be responsible and respectful of the copyright laws when using ink jet printers, digital cameras, and scanners.
Trademarks
EPSON, EPSON Stylus, and MicroWeave are registered trademarks and PRINT Image Matching is a trademark of SEIKO EPSON CORPORATION.
UltraChrome, BorderFree, PhotoEnhance, and EPSON Software are trademarks, and EPSON Print Lab, EPSON PhotoCenter, EPSON Store, SoundAdvice, and EPSON Connection are service marks of Epson America, Inc.
General Notice: Other product names used herein are for identification purposes only and may be trademarks of their respective owners. EPSON disclaims any and all rights in those marks.
The ENERGY STAR emblem does not represent EPA endorsement of any product or service.
 Printed on recycled paper
|
CPD-13854R2 |
Copyright © 2003 by Epson America, Inc. |
9/03 |
ii
Contents
Welcome! |
1 |
PRINT Image Matching and Exif Print |
2 |
About PRINT Image Matching |
2 |
About Exif Print |
3 |
About Your Software |
3 |
About Your Documentation |
4 |
Using the EPSON Printer Information Center |
5 |
Launching the Movies |
5 |
Launching the Manual |
6 |
Printer Buttons and Lights |
7 |
Loading Paper |
9 |
Loading Paper in the Sheet Feeder |
9 |
Loading Special Paper |
10 |
Loading Envelopes |
11 |
Loading Roll Paper |
12 |
Installing the Roll Paper Cutter and Basket |
15 |
Adjusting the Cutting Position |
16 |
Loading and Printing on Thick Paper |
17 |
Printing From Start to Finish |
19 |
Basic Printing in Windows |
20 |
Selecting the Settings You Use Most Often |
22 |
Basic Printing With Macintosh OS X |
22 |
Basic Printing With Macintosh OS 8.6 to 9.x |
26 |
Customizing Your Windows Print Settings |
28 |
Customizing Macintosh Print Settings |
30 |
Selecting the Correct Media Type |
32 |
Contents iii
Printing on Roll Paper |
32 |
Selecting Roll Paper Print Settings |
33 |
Removing Your Printed Photos |
39 |
Removing and Storing Roll Paper |
40 |
Using PRINT Image Matching |
41 |
Using Film Factory |
42 |
Using the P.I.M. II Plug-in for Adobe Photoshop |
42 |
Printing Borderless Cut Sheets |
43 |
Windows |
44 |
Macintosh OS X |
45 |
Macintosh 8.6 to 9.x |
47 |
Managing Color with Custom Profiles |
48 |
Printing a Custom Profile Test Target |
48 |
Creating Your Custom Profile |
50 |
Printing With Your Custom Profile |
50 |
Solving Color Management Problems |
56 |
Maintaining Your Printer |
57 |
Cleaning the Print Head |
57 |
Running the Head Cleaning Utility |
58 |
Examining the Nozzle Check Pattern |
59 |
Replacing an Ink Cartridge |
59 |
Checking the Ink Supply |
60 |
Purchasing Ink Cartridges |
60 |
Ink Cartridge Precautions |
61 |
Removing and Installing Ink Cartridges |
61 |
Swapping the Interchangeable Ink Cartridge |
63 |
Confirming the Swapped Cartridge in the Software |
64 |
Aligning the Print Head |
65 |
Cleaning the Automatic Roll Paper Cutter |
68 |
iv Contents
Cleaning the Printer |
68 |
Cleaning the Exterior |
68 |
Cleaning the Interior |
69 |
Transporting the Printer |
70 |
Solving Problems |
73 |
Printer Parts |
73 |
Diagnosing Printer Problems |
74 |
Running a Printer Check |
75 |
Problems and Solutions |
76 |
Setup and Software Installation Problems |
76 |
Printer Problems |
77 |
Quality Problems |
78 |
Paper Problems |
80 |
Miscellaneous Problems |
81 |
Uninstalling and Reinstalling Printer Software |
82 |
Where To Get Help |
83 |
Technical Support for Other Photo Software |
84 |
Requirements and Notices |
85 |
Windows System Requirements |
85 |
Macintosh System Requirements |
85 |
Important Safety Instructions |
86 |
Ink Cartridge Safety Instructions |
87 |
Automatic Roll Paper Cutter Safety Instructions |
87 |
FCC Compliance Statement |
88 |
Declaration of Conformity |
89 |
Energy Star Compliance |
89 |
Epson America, Inc. Limited Warranty |
90 |
Index |
93 |
Contents v
vi Contents
Welcome!
Your EPSON Stylus® Photo 2200 is the ultimate desktop printer for professional and amateur photography. Your outstanding printouts result from these advanced features:
■EPSON’s 7-color inks let you print up to 2880 × 1440 dpi (dots per inch).
■Large gamut, pigment-based, EPSON® UltraChrome™ inks and compatible, lightfast papers deliver long-lasting, water-resistant prints.
■Four-picoliter variable ink droplets give you finer shadow detail, dazzling highlights, and better fill across a wider range of colors.
■Interchangeable Photo Black and optional Matte Black ink cartridges for precision ink coverage on any type of paper.
■Large format capabilities let you print panoramics, portraits, and specialty prints up to 13 × 44 inches.
■Straight-through, manual feed slot for thick paper (up to 0.05-inch) gives you more media choices than ever before.
■Roll paper feeder and automatic roll paper cutter enable continuous printing and cutting of multiple photos.
1

PRINT Image Matching and Exif Print
Your EPSON Stylus Photo 2200 printer supports these innovative digital image formats to give you the best photo prints possible:
■PRINT Image Matching™ (both P.I.M. and P.I.M. II)
■Exif Print
About PRINT Image Matching
EPSON’s revolutionary PRINT Image Matching (P.I.M.) technology lets your digital camera and printer work together automatically to produce the best prints possible. Digital camera manufacturers that support PRINT Image Matching include EPSON, Casio,® Konica,® Kyocera,® Minolta,® Nikon,® Olympus,® Pentax,® Ricoh,® Sanyo,® Sony,® and Toshiba®. Check with your camera’s manufacturer or visit www.printimagematching.com to find out if PRINT Image Matching technology is included with your camera.
With PRINT Image Matching, the digital camera manufacturer can set specific printing options for each camera model. These options include:
■contrast, sharpness, and brightness
■gamma level, color space, color saturation, and noise reduction
■shadow point, highlight point, and color balance
The camera saves this information in each JPEG or TIFF image file. Your printer— along with EPSON Software™ Film Factory™ or the P.I.M. II Plug-in for Adobe® Photoshop® (included with your printer)—uses the information to ensure the most accurate image reproduction.
But don’t worry if your camera doesn’t include PRINT Image Matching technology—your EPSON Stylus Photo 2200 gives great photo printing results, just without the adjustments P.I.M.-enabled cameras may add.
2 Welcome!

About Exif Print
The Exif (Exchangeable Image File) Print format includes information about your digital camera settings in JPEG/TIFF files so your printer and application can use them to create accurate print settings. Most digital cameras store Exif Print information such as shutter speed, metering, flash, and exposure settings, resolution, and lens use in the JPEG/TIFF image file. Your printer—along with EPSON Software Film Factory and the P.I.M. II Plug-in for Adobe Photoshop—uses the information to ensure the most accurate image reproduction.
About Your Software
Your printer CD-ROM includes all the software you need for printing. See the Start Here sheet for installation instructions.
■Your printer driver runs your printer and lets you control how your documents look. You can’t print without it.
Tip: It’s a good idea to check EPSON’s support web site periodically for free updates to your printer driver. Visit http://support.epson.com. Download instructions are posted for your convenience.
■Your photo software includes these great tools:
EPSON Software Film Factory is a photo management program that lets you organize, beautify, and print your photos in a flash. Supports PRINT Image Matching, P.I.M. II, and Exif Print.
P.I.M. II Plug-in for Adobe Photoshop lets you retain PRINT Image Matching, P.I.M. II, and Exif Print image quality when you import JPEG or TIFF files from your P.I.M.-enabled digital camera. (Compatible with Photoshop 6.0 and 7.0, and Photoshop Elements 1.0 and 2.0.)
■Your EPSON Printer Information Center gives you quick, on-screen access to information about your printer. It includes EPSON Print Show animated tutorials on loading roll paper, replacing ink cartridges, and other tasks. It also includes an on-screen Reference Guide for additional information about your printer. (The desktop icon may be different on some Mac OS X systems.)
Welcome! 3

■EPSON PhotoCenterSM is EPSON’s free photo-sharing web site where you can store, organize, and share your photos; print high-resolution photos straight from the web; and create free online postcards with your photos. Your printer software installer lets you add a link to EPSON PhotoCenter on your desktop.
■Exclusive software offers, demos, and trial versions:
nik Color Efex Pro!™ provides the most award-winning collection of digital photographic filters available, including Polarization, Skylight, Graduated Blue, Soft Focus, and other filters. (Works only with full versions of Photoshop.)
nik Sharpener Pro!™ provides the most accurate and easiest method for sharpening images without oversharpening or creating halos.
Monaco Systems™ MonacoEZcolor™ lets you build ICC device profiles for accurate color between scanned, displayed, and printed images.
About Your Documentation
To set up your printer and install its software, see the Start Here sheet.
This book contains system requirements, important safety information, your warranty, and instructions on:
■Using the EPSON Printer Information Center
■Loading all types of paper
■Printing with Windows® or on a Macintosh®
■Maintaining the printer
■Solving basic problems
4 Welcome!
Please follow these guidelines throughout:
Warnings must be followed carefully to avoid bodily injury.
Cautions must be observed to avoid damage to your equipment.
Notes contain important information about your printer.
Tips contain hints for better printing.
For more details about your printer, see your Print Show movies and Reference Guide, as described below.
Using the EPSON Printer Information
Center
Need help loading roll paper or installing the cutter? Use the EPSON Printer Information Center to view printer movies and a manual that quickly tell you how. Follow the instructions on the Start Here sheet to install the EPSON Printer Information Center, if you haven’t already.
Note: You need a browser—such as Microsoft® Internet Explorer 4.0 or later or Netscape® Navigator® 3.0 or later—to view the manual. If you are using a different browser, the pages may not display correctly.
Launching the Movies
1.Double-click the  EPSON Printer Information Center icon on your desktop.
2.Click Print Show.
3.Click a movie title.
Use the program tools to pause a movie, replay a step, or skip ahead.
4.Click Exit to exit EPSON Print Show.
Welcome! 5
Launching the Manual
1.Double-click the  EPSON Printer Information Center icon on your desktop.
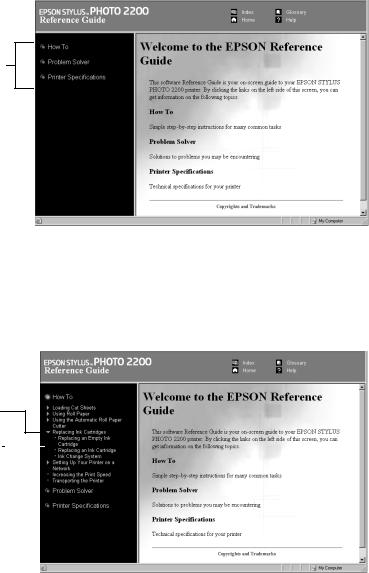
2.Click Reference Guide. You see this screen:
Click a topic to expand the table of contents
3.Click a topic on the left to expand the table of contents.
4.Click on the topic you want to view.
■Click right arrows  to view subtopics, then click on a topic.
■Click down arrows  to close a subtopic list.
Closed list, click to expand
Click to go to topic
Note: If you see an icon for a graphic when viewing your Reference Guide in Netscape Navigator, click the Reload button to load the graphic.
6 Welcome!

Printer Buttons and Lights
The tables below summarize the functions of the printer buttons and lights. See the instructions in your documentation for details on using the buttons. To diagnose problems indicated by the printer lights, see page 74.
Printer buttons
Printer buttons |
Uses |
|
|
P power |
Turns the printer on and off. Hold down the button until the Power |
|
light comes on or goes off. |
|
|
m paper |
Loads or ejects paper. |
|
Resumes printing after a paper-out or multiple-sheet-feed error. |
|
|
H ink |
Moves the print head to the ink cartridge replacement position and |
|
returns it to its home position. |
|
Cleans the print head. Hold down the button for three seconds |
|
when all the red H Ink Out lights are off. |
|
|
z roll paper |
Prints a cutting guideline and feeds roll paper to the removal |
|
position after roll paper printing. |
|
Returns roll paper to the printing position after cutting. |
|
When using the automatic roll paper cutter, cuts, feeds, and |
|
returns the paper to printing position automatically. |
|
Reverses roll paper out of the printer. Hold down the button for |
|
three seconds. |
|
|
Printer lights
Printer lights |
Meaning |
|
|
|
|
P power |
On: printer is turned on. |
|
|
Flashing: printer is receiving data, printing, in ink replacement |
|
|
mode, charging ink, or cleaning the print head. |
|
|
|
|
m paper out |
On: printer is out of paper or multiple sheets have been fed. |
|
|
Flashing: paper is jammed in the printer. |
|
|
|
|
H ink (seven) |
On: the indicated ink cartridge is empty. |
|
|
Flashing: the indicated ink cartridge is low on ink. |
|
|
Lights flash in a pattern: the printer is performing an ink operation. |
|
|
|
|
|
Welcome! 7 |
|
8 Welcome!

Loading Paper
You can load a variety of paper types in your printer, as described in these sections:
■“Loading Paper in the Sheet Feeder” below
■“Loading Envelopes” on page 11
■“Loading Roll Paper” on page 12
■“Loading and Printing on Thick Paper” on page 17
Loading Paper in the Sheet Feeder
Follow these steps to load plain paper and many special papers in the sheet feeder:
1.Slide the left edge guide to the position for your paper size, as marked on the paper support.
2.Place your paper in the printer on the right side of the sheet feeder.
3.Adjust the left edge guide to fit lightly against the paper.
4.Open the output tray extensions. Also follow these loading guidelines:
■Always load the short edge first, even for printing landscapeoriented documents.
Load paper against  this side
■Load the printable side face up. It’s usually whiter or brighter than the other side.
■Load letterhead or preprinted paper into the printer top edge first.
■Don’t load paper above the arrow on the left edge guide.
9
Loading Special Paper
Load EPSON ink jet papers as follows:
Paper type |
Loading capacity |
|
|
EPSON Enhanced Matte Paper |
20 sheets of letter-size paper with a |
|
support sheet beneath the stack; |
|
10 sheets of A3or Super B-size paper |
|
|
EPSON Premium Semigloss Photo Paper |
20 sheets of letter-size paper; |
|
1 sheet of Super B-size paper |
|
|
EPSON Watercolor Paper - Radiant White |
1 sheet at a time |
|
|
EPSON Premium Luster Photo Paper |
20 sheets of letter-size paper; |
|
1 sheet of A3or Super B-size paper |
|
|
EPSON Premium Glossy Photo Paper |
1 sheet at a time |
|
|
EPSON Velvet Fine Art Paper |
1 sheet at a time; manual feed slot only |
|
|
EPSON Premium Bright White Paper |
Up to 0.3-inch (8 mm) total thickness |
|
(about 30 sheets) |
|
|
■Load EPSON Velvet Fine Art Paper only in the manual feed slot, following the instructions on page 17.
■Check the paper package for additional handling instructions.
■Set the adjust lever on the side of the printer to the m position.
■If ink smears on thicker paper, try printing with the lever set to the ^ position.
10 Loading Paper

Loading Envelopes
You can load up to 10 envelopes at a time, as described below.
Tip: For best results, press each envelope flat before loading it, or load one envelope at a time. You’ll get the best results printing on envelopes using the optional Matte Black ink cartridge.
1.Load envelopes as shown, with the flap side down and the flap edge against the right side of the sheet feeder.
Load with the printable side up, flap edge right
2.Slide the left edge guide against the envelopes.
3.Set the adjust lever to the ^ position.
4.Choose these settings in your printer software:
■ Plain Paper as the Type (Windows) or Media Type (Macintosh) setting
■ Black Ink Only (Windows) or Black as the Ink setting (Macintosh)
■The envelope size as the Size (Windows) or Paper Size (Macintosh) setting
■Landscape as the Orientation setting
See page 20 (Windows), page 22 (Macintosh OS X), or page 26 (Macintosh OS 8.6 to 9.x) for instructions.
Loading Paper 11
Loading Roll Paper
You can load roll paper in these sizes:
■4 inches wide
■8.3 inches wide
■13 inches wide
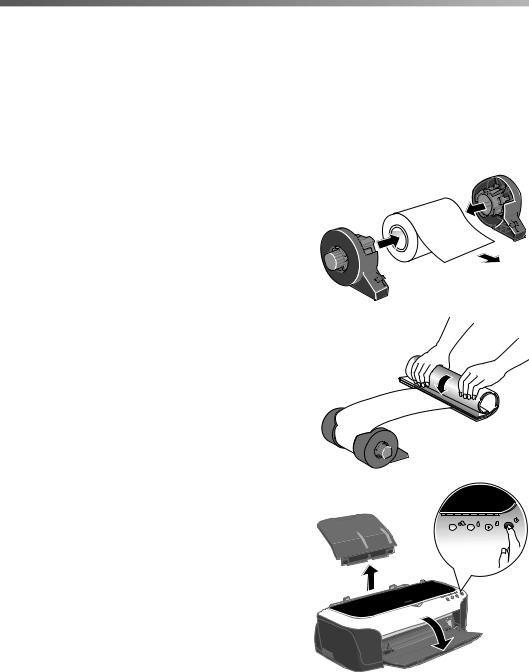
1.Place the roll paper on the holders as shown, then remove the tape and protective paper from the end of the roll.
2.Make sure the end of the paper is cut straight across, with 90° corners. If the end is cut diagonally, you may have problems feeding the paper.
3.If the paper curls at the end, roll it backwards between a folded sheet of paper to uncurl it.
Avoid touching the printable surface of the roll paper.
4.Remove any paper that’s in the sheet feeder at the top of the printer. Then remove the paper support, lower the output tray, and turn on the printer.
12 Loading Paper

5. Set the adjust lever to the m position.
6.Install the roll paper holders on the printer. Insert the left holder into the far left slot, then insert the other holder into the corresponding slot on the right.
7.Load the paper part of the way into the roll paper feeder, then slide the right roll paper edge guide to fit lightly against the paper.
Caution: Don’t load roll paper into the sheet feeder at the top of the printer.
Don’t load roll paper in the cut sheet feeder
Roll paper feeder
Loading Paper 13

8. Push the paper into the feeder as far as it will go; the printer feeds the paper automatically.
9. To verify that the paper is loaded straight, open the printer cover and look into the printer.
If the paper is crooked, press the z roll paper button for three seconds to back the paper all the way out.
If crooked, press 
 z button for three seconds
Then turn the roll paper holder knobs to roll up the paper. Press the z roll paper button to clear the paper out error.
Repeat steps 7 through 9 to reload the paper.
If you want to use the cutter, follow the steps on page 15 to install it.
If not, follow the instructions on page 32 to print on roll paper.
14 Loading Paper

Installing the Roll Paper Cutter and Basket
1. Turn off the printer.
2. Press the lever on the left side of the output tray, then gently guide the tray off its mounting tabs, left side first.
Lever
3. Insert the cutter into the top of the opening as shown, and press it in evenly on both sides, until it clicks into place.
4. Position the basket as shown, and slide it onto the guide rails on the bottom of the cutter.
Caution: Don’t install the basket if you’re printing photos longer than 11.7 inches; this may cause a paper jam. The basket holds 40 photos, up to 7 inches long. For longer photos, remove each one after it’s printed.
5.If the cloth on the basket isn’t attached at both ends, lift the free edge of the cloth over the basket frame and attach the loops to the hooks on the frame.
Loading Paper 15
6.Push down the cloth in the middle to form a basket to hold your cut photos.
7.Turn the printer back on.
8.Now adjust the cutting position as described below.
Adjusting the Cutting Position
Before you print your photos on roll paper using the automatic roll paper cutter, you need to adjust the cutting position. This adjustment affects roll paper only.
1.Windows and Mac OS 8.6 to 9.x: Access the printer settings window (see
page 20 for Windows or page 26 for Macintosh OS 8.6 to 9.x). Then click the Maintenance tab (Windows) or the  utility icon (Macintosh OS 8.6 to 9.x).
Mac OS X: Open the OS X Applications folder and select EPSON Printer Utility. Then double-click SP 2200.
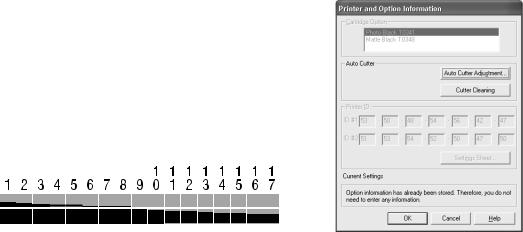
2.Click the Printer and Option Information icon. You see a window like this (the Macintosh windows look different):
3.Click the Auto Cutter Adjustment button. You see an adjustment screen.
4.Click Print. The printer prints and cuts a cutting position pattern like this:
5.Place the two cut pieces together and examine the patterns. Identify the one with the most precise cut between the orange and black boxes. Then select that pattern number in the window and click Finish.
6.Follow the instructions on page 32 to print and cut your photos.
If you notice any ink smears on your cut paper, clean the cutter as described on page 68.
16 Loading Paper

Loading and Printing on Thick Paper
You can load thick paper, such as EPSON Velvet Fine Art Paper, in the manual feed slot. Make sure your paper is white, up to 0.05-inch (1.3 mm) thick, and is flat and smooth, with no folded edges.
Note: You can’t print on thick paper in the manual feed slot when you’re printing with Macintosh OS X applications.
1. Turn off the printer and remove the roll paper holder and automatic roll paper cutter, if they’re installed (see page 40).
Note: You must remove the automatic roll paper cutter or manual feed slot printing won’t work.
2.Remove any paper loaded in the sheet feeder.
3.Turn on the printer. (The printer must be on to load thick paper correctly.)
4.Set the adjust lever to the ! position. The m paper light begins flashing rapidly.
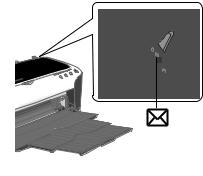
5.Place one sheet of thick paper—printable side up—in the manual feed slot. Slowly insert it into the slot against the far left side.
6.Open the printer cover and look down into the printer as you slide the paper into the manual feed slot.
Position the leading edge so it’s just past the small gray rollers, about 0.4-inch (1 cm).
Make sure the paper is feeding straight; if not, tilt the paper slightly to the left or right to straighten it.
0.4-inch (1 cm)
Loading Paper 17
7. Set the adjust lever to the ^ position.
Note: If the m paper light flashes, make sure the adjust lever is set to the ^ position, then press the m paper button again.
8. Before printing, select Manual as the Source setting (Windows) or Manual Feed as the Paper Source setting (Macintosh) in your printer software (see page 20 for Windows or page 26 for Macintosh).
9.When you’re finished printing on thick paper, return the adjust lever to the m position.
Caution: Don’t move the adjust lever during printing; this could damage your printer.
18 Loading Paper
Printing From Start to Finish
Follow the steps in these sections to print using all your printer’s special features:
■“Basic Printing in Windows” on page 20
■“Basic Printing With Macintosh OS X” on page 22
■“Basic Printing With Macintosh OS 8.6 to 9.x” on page 26
■“Customizing Your Windows Print Settings” on page 28
■“Customizing Macintosh Print Settings” on page 30
■“Selecting the Correct Media Type” on page 32
■“Printing on Roll Paper” on page 32
■“Using PRINT Image Matching” on page 41
■“Printing Borderless Cut Sheets” on page 43
■“Managing Color with Custom Profiles” on page 48
Tip: Whenever you print, make sure you:
■Use the right paper.
For the best-looking photos, most vivid colors, and greatest detail, always use genuine EPSON papers and EPSON UltraChrome inks.
■Choose the right printer settings for the paper.
Your printer automatically adjusts itself for the type of paper you’ve selected, so make sure your printer settings are correct for the paper you loaded.
19

Basic Printing in Windows
After you create a document in a software program, follow these steps to print it using the basic printer settings:
1. From the File menu, click Print. You see a Print window like this one:
Check for your printer name here
Click here to open your printer software
2.Make sure EPSON Stylus Photo 2200 is selected.
3.Click the Properties or Preferences button. (If you see a Setup, Printer, or
Options button, click it. Then click Properties or Preferences on the next screen.)
20 Printing From Start to Finish

4. Select the following settings on the Main tab in your printer settings window:
1 Select the type of document you’re printing:
2Select your paper source
3Select your
paper type (see  page 32)
4Select your  paper size
5Select your document or image orientation
6Click OK
Draft: For rough drafts with reduced print quality
Text: For text-only documents (like letters) with good print quality
Text & Image: For documents with text and images with higher print quality
Photo: For photos and graphics with good print quality and speed
Best Photo: For photos or graphics with high print quality
Note: For more information about printer settings, click the ? or Help button.
5.Click OK. You return to the Print window.
6.Click OK or Print to start printing.
During printing, this window appears. Use it to cancel, pause, or resume printing and see how much ink you have left.
Click to cancel printing
Click to pause or resume printing
Printing From Start to Finish 21

Selecting the Settings You Use Most Often
Your printer settings apply only to the program you’re currently using. If you want, you can change the Windows default printer settings for all your programs.
1.Right-click the  printer icon in the lower right corner of your screen.
2.Select Printer Settings. You see the window shown on page 21.
3.Select the default settings you want for all your applications, then click OK. You can still change the printer settings in your program, if necessary.
Basic Printing With Macintosh OS X
If you’re using an OS X compatible printing application, follow the steps below to print a document. (If you’re using a Macintosh Classic mode application, follow the steps on page 26 instead.)
Make sure you added your printer to Print Center, as described on the Start Here sheet.
1.From the File menu, select Page Setup.
2.Open the Format for menu and select your printer and any optional feature. (For roll paper printing, see page 32 for instructions. For borderless printing, see page 43.)
3.Select any other available Page Setup settings, then click OK.
Select your printer from the Format for pop-up menu
Select the Paper Size, Orientation, and any other settings you want to use
22 Printing From Start to Finish

Caution: When printing non-borderless print jobs using a custom paper size, make sure the selected size matches the paper you loaded and is within the printable area for your printer. For example, never choose a paper size wider than your printer’s sheet feeder or longer than your paper length.
4. Select Print from the File menu. You see a screen like this:
Select the same setting as in the Page Setup window
Click here and select Print Settings
5.Open the Printer menu and select the same printer and feature setting you chose in the Page Setup window.
Note: Always select the same setting as the Format for option in the Page Setup window and the Printer option in the Print window. If the settings are different, you may get unexpected results.
6. Select Print Settings from the pull-down menu
Printing From Start to Finish 23

7. Select the following Print Settings:
1 Select your paper type (see page 32)
2 Select Color (for color documents and black and white photographs) or Black for black text documents
3 Select Automatic mode
4 Select Quality or Speed (for faster printing)
Note: For more information about printer settings, click Help. The OS X printer driver contains a subset of the settings available with the OS 8.6 to 9.x Macintosh printer driver described in this book.
8.You can also choose other print settings by selecting these options in the pull-down menu:
■Copies & Pages, to select the number of copies or a page range
■Layout, to select page layout options
■Output Options, to save your print job as a PDF file
■Color Management, to select ColorSync,® adjust the color controls, change the gamma setting, or turn off color adjustments by the printer software
■Ink Configuration, to change the ink density and drying time
■Summary, to view a list of all your selections
■Save Custom Setting, to save your selections for future use. (Not available with Mac OS X 10.2.x.)
9.Click Print.
24 Printing From Start to Finish
Loading...