


 Loading...
Epson Stylus NX510 Series Table of Contents |
|
Home. . . . . . . . . . . . . . . . . . . . . . . . . . . . . . . . . . . . . . . . . . . . . . . . . . . . . . . . . . . . . . . . . |
. 5 |
Change the Language . . . . . . . . . . . . . . . . . . . . . . . . . . . . . . . . . . . . . . . . . . . . . . . . . . . . |
. 7 |
Copy a Document or Photo. . . . . . . . . . . . . . . . . . . . . . . . . . . . . . . . . . . . . . . . . . . . . . . . . |
9 |
Copy Documents . . . . . . . . . . . . . . . . . . . . . . . . . . . . . . . . . . . . . . . . . . . . . . . . . . . . . |
9 |
Copy Photos . . . . . . . . . . . . . . . . . . . . . . . . . . . . . . . . . . . . . . . . . . . . . . . . . . . . . . . . |
11 |
Restore or Crop Photos . . . . . . . . . . . . . . . . . . . . . . . . . . . . . . . . . . . . . . . . . . . . . . . |
13 |
Load Paper . . . . . . . . . . . . . . . . . . . . . . . . . . . . . . . . . . . . . . . . . . . . . . . . . . . . . . . . . . . . |
17 |
Load Paper for Photos . . . . . . . . . . . . . . . . . . . . . . . . . . . . . . . . . . . . . . . . . . . . . . . . |
17 |
Load Paper for Documents . . . . . . . . . . . . . . . . . . . . . . . . . . . . . . . . . . . . . . . . . . . . |
18 |
Load Envelopes . . . . . . . . . . . . . . . . . . . . . . . . . . . . . . . . . . . . . . . . . . . . . . . . . . . . . |
20 |
General Paper Information . . . . . . . . . . . . . . . . . . . . . . . . . . . . . . . . . . . . . . . . . . . . . |
21 |
Sheet Feeder Capacity . . . . . . . . . . . . . . . . . . . . . . . . . . . . . . . . . . . . . . . . . . . . . |
22 |
Available Epson Papers . . . . . . . . . . . . . . . . . . . . . . . . . . . . . . . . . . . . . . . . . . . . |
22 |
Borderless Paper Types and Sizes . . . . . . . . . . . . . . . . . . . . . . . . . . . . . . . . . . . . |
23 |
Paper or Media Type Settings for Loaded Paper . . . . . . . . . . . . . . . . . . . . . . . . . |
24 |
Place Originals for Copying or Scanning . . . . . . . . . . . . . . . . . . . . . . . . . . . . . . . . . . . . . |
25 |
Place Documents . . . . . . . . . . . . . . . . . . . . . . . . . . . . . . . . . . . . . . . . . . . . . . . . . . . . |
25 |
Place Photos . . . . . . . . . . . . . . . . . . . . . . . . . . . . . . . . . . . . . . . . . . . . . . . . . . . . . . . . |
26 |
Print From a Memory Card. . . . . . . . . . . . . . . . . . . . . . . . . . . . . . . . . . . . . . . . . . . . . . . . |
29 |
Insert Memory Card . . . . . . . . . . . . . . . . . . . . . . . . . . . . . . . . . . . . . . . . . . . . . . . . . . |
29 |
Print Photos Using the LCD Screen . . . . . . . . . . . . . . . . . . . . . . . . . . . . . . . . . . . . . |
31 |
Select Individual Photos for Printing . . . . . . . . . . . . . . . . . . . . . . . . . . . . . . . . . . |
31 |
Select All Photos for Printing . . . . . . . . . . . . . . . . . . . . . . . . . . . . . . . . . . . . . . . |
34 |
Print Photos by Date . . . . . . . . . . . . . . . . . . . . . . . . . . . . . . . . . . . . . . . . . . . . . . |
34 |
Print Photos From a Slide Show . . . . . . . . . . . . . . . . . . . . . . . . . . . . . . . . . . . . . |
35 |
Print Photos Using an Index Sheet . . . . . . . . . . . . . . . . . . . . . . . . . . . . . . . . . . . . . . |
36 |
Print Index Sheet . . . . . . . . . . . . . . . . . . . . . . . . . . . . . . . . . . . . . . . . . . . . . . . . . |
36 |
Print Photos From Index Sheet . . . . . . . . . . . . . . . . . . . . . . . . . . . . . . . . . . . . . . |
37 |
Print Photos Pre-selected in Your Camera (DPOF) . . . . . . . . . . . . . . . . . . . . . . . . . . |
38 |
Remove Memory Card . . . . . . . . . . . . . . . . . . . . . . . . . . . . . . . . . . . . . . . . . . . . . . . . |
39 |
Print From Your Computer. . . . . . . . . . . . . . . . . . . . . . . . . . . . . . . . . . . . . . . . . . . . . . . . |
41 |
Windows Printing . . . . . . . . . . . . . . . . . . . . . . . . . . . . . . . . . . . . . . . . . . . . . . . . . . . |
41 |
Print From a Program . . . . . . . . . . . . . . . . . . . . . . . . . . . . . . . . . . . . . . . . . . . . . |
41 |
Print From Windows Photo Gallery in Windows Vista . . . . . . . . . . . . . . . . . . . |
43 |
Print From the Picture and Fax Viewer in XP . . . . . . . . . . . . . . . . . . . . . . . . . . . |
45 |
Select Basic Options . . . . . . . . . . . . . . . . . . . . . . . . . . . . . . . . . . . . . . . . . . . . . . |
48 |
Change Print Layout . . . . . . . . . . . . . . . . . . . . . . . . . . . . . . . . . . . . . . . . . . . . . . |
51 |
Select Advanced Options . . . . . . . . . . . . . . . . . . . . . . . . . . . . . . . . . . . . . . . . . . . |
53 |
Print Your Document or Photo . . . . . . . . . . . . . . . . . . . . . . . . . . . . . . . . . . . . . . |
56 |
Check Printing Status . . . . . . . . . . . . . . . . . . . . . . . . . . . . . . . . . . . . . . . . . . . . . . |
56 |
Change Default Print Settings . . . . . . . . . . . . . . . . . . . . . . . . . . . . . . . . . . . . . . . |
57 |
Macintosh Printing (Mac OS X 10.5) . . . . . . . . . . . . . . . . . . . . . . . . . . . . . . . . . . . . |
58 |
Open Your File for Printing . . . . . . . . . . . . . . . . . . . . . . . . . . . . . . . . . . . . . . . . . |
58 |
1
Select Basic Print Options . . . . . . . . . . . . . . . . . . . . . . . . . . . . . . . . . . . . . . . . . . |
58 |
Select Copies and Pages . . . . . . . . . . . . . . . . . . . . . . . . . . . . . . . . . . . . . . . . . . . |
61 |
Select Page Setup Options . . . . . . . . . . . . . . . . . . . . . . . . . . . . . . . . . . . . . . . . . . |
61 |
Select Advanced Print Options . . . . . . . . . . . . . . . . . . . . . . . . . . . . . . . . . . . . . . |
62 |
Change Print Layout . . . . . . . . . . . . . . . . . . . . . . . . . . . . . . . . . . . . . . . . . . . . . . |
63 |
Manage Color . . . . . . . . . . . . . . . . . . . . . . . . . . . . . . . . . . . . . . . . . . . . . . . . . . . |
63 |
Adjust Image Expansion . . . . . . . . . . . . . . . . . . . . . . . . . . . . . . . . . . . . . . . . . . . |
64 |
Fix Red-Eye Effects . . . . . . . . . . . . . . . . . . . . . . . . . . . . . . . . . . . . . . . . . . . . . . . |
65 |
View Print Setting Summary . . . . . . . . . . . . . . . . . . . . . . . . . . . . . . . . . . . . . . . . |
65 |
Schedule Printing . . . . . . . . . . . . . . . . . . . . . . . . . . . . . . . . . . . . . . . . . . . . . . . . . |
66 |
Print Your Document or Photo . . . . . . . . . . . . . . . . . . . . . . . . . . . . . . . . . . . . . . |
66 |
Check Printing Status . . . . . . . . . . . . . . . . . . . . . . . . . . . . . . . . . . . . . . . . . . . . . . |
66 |
Macintosh Printing (Mac OS X 10.3 and 10.4) . . . . . . . . . . . . . . . . . . . . . . . . . . . . . |
67 |
Open Your File for Printing . . . . . . . . . . . . . . . . . . . . . . . . . . . . . . . . . . . . . . . . . |
68 |
Select Page Options . . . . . . . . . . . . . . . . . . . . . . . . . . . . . . . . . . . . . . . . . . . . . . . |
68 |
Select Basic Print Options . . . . . . . . . . . . . . . . . . . . . . . . . . . . . . . . . . . . . . . . . . |
69 |
Select Advanced Print Options . . . . . . . . . . . . . . . . . . . . . . . . . . . . . . . . . . . . . . |
70 |
Change Print Layout . . . . . . . . . . . . . . . . . . . . . . . . . . . . . . . . . . . . . . . . . . . . . . |
72 |
Select Copy/Collation Options . . . . . . . . . . . . . . . . . . . . . . . . . . . . . . . . . . . . . . |
72 |
Manage Color . . . . . . . . . . . . . . . . . . . . . . . . . . . . . . . . . . . . . . . . . . . . . . . . . . . |
73 |
Adjust Image Expansion . . . . . . . . . . . . . . . . . . . . . . . . . . . . . . . . . . . . . . . . . . . |
74 |
View Print Setting Summary . . . . . . . . . . . . . . . . . . . . . . . . . . . . . . . . . . . . . . . . |
74 |
Schedule Printing . . . . . . . . . . . . . . . . . . . . . . . . . . . . . . . . . . . . . . . . . . . . . . . . . |
75 |
Print Your Document or Photo . . . . . . . . . . . . . . . . . . . . . . . . . . . . . . . . . . . . . . |
76 |
Check Printing Status . . . . . . . . . . . . . . . . . . . . . . . . . . . . . . . . . . . . . . . . . . . . . . |
76 |
Scan to Your Computer . . . . . . . . . . . . . . . . . . . . . . . . . . . . . . . . . . . . . . . . . . . . . . . . . . |
77 |
Start Epson Scan . . . . . . . . . . . . . . . . . . . . . . . . . . . . . . . . . . . . . . . . . . . . . . . . . . . . |
77 |
Scan From Another Program . . . . . . . . . . . . . . . . . . . . . . . . . . . . . . . . . . . . . . . . |
78 |
Scan from the Control Panel . . . . . . . . . . . . . . . . . . . . . . . . . . . . . . . . . . . . . . . . . . . |
78 |
Change Scan Settings . . . . . . . . . . . . . . . . . . . . . . . . . . . . . . . . . . . . . . . . . . . . . . |
79 |
Scan to PC . . . . . . . . . . . . . . . . . . . . . . . . . . . . . . . . . . . . . . . . . . . . . . . . . . . . . . |
79 |
Scan to PDF . . . . . . . . . . . . . . . . . . . . . . . . . . . . . . . . . . . . . . . . . . . . . . . . . . . . . |
79 |
Scan to E-mail . . . . . . . . . . . . . . . . . . . . . . . . . . . . . . . . . . . . . . . . . . . . . . . . . . . |
80 |
Select a Scan Mode . . . . . . . . . . . . . . . . . . . . . . . . . . . . . . . . . . . . . . . . . . . . . . . . . . |
81 |
Scan Automatically (Full Auto Mode) . . . . . . . . . . . . . . . . . . . . . . . . . . . . . . . . . . . |
82 |
Scan in Home Mode (Semi-Automatic) . . . . . . . . . . . . . . . . . . . . . . . . . . . . . . . . . . |
82 |
Select Document or Image Type . . . . . . . . . . . . . . . . . . . . . . . . . . . . . . . . . . . . . |
83 |
Select Scan File Destination . . . . . . . . . . . . . . . . . . . . . . . . . . . . . . . . . . . . . . . . |
84 |
Select Scan Quality (Resolution) . . . . . . . . . . . . . . . . . . . . . . . . . . . . . . . . . . . . . |
84 |
Preview . . . . . . . . . . . . . . . . . . . . . . . . . . . . . . . . . . . . . . . . . . . . . . . . . . . . . . . . |
85 |
Select Scanned Image Area . . . . . . . . . . . . . . . . . . . . . . . . . . . . . . . . . . . . . . . . . |
86 |
Adjust Image Quality . . . . . . . . . . . . . . . . . . . . . . . . . . . . . . . . . . . . . . . . . . . . . . |
88 |
Select Scanned Image Size . . . . . . . . . . . . . . . . . . . . . . . . . . . . . . . . . . . . . . . . . |
89 |
Scan and View Image . . . . . . . . . . . . . . . . . . . . . . . . . . . . . . . . . . . . . . . . . . . . . |
90 |
Scan in Office Mode . . . . . . . . . . . . . . . . . . . . . . . . . . . . . . . . . . . . . . . . . . . . . . . . . |
90 |
Select Scanned Image Area . . . . . . . . . . . . . . . . . . . . . . . . . . . . . . . . . . . . . . . . . |
92 |
2
Adjust Image Quality . . . . . . . . . . . . . . . . . . . . . . . . . . . . . . . . . . . . . . . . . . . . . . 92 Scan and View Image . . . . . . . . . . . . . . . . . . . . . . . . . . . . . . . . . . . . . . . . . . . . . 93 Scan in Professional Mode (Fully Manual) . . . . . . . . . . . . . . . . . . . . . . . . . . . . . . . . 94 Select Document or Image Type . . . . . . . . . . . . . . . . . . . . . . . . . . . . . . . . . . . . . 95 Select Scan File Destination . . . . . . . . . . . . . . . . . . . . . . . . . . . . . . . . . . . . . . . . 95 Select Scan Quality (Resolution) . . . . . . . . . . . . . . . . . . . . . . . . . . . . . . . . . . . . . 95 Preview . . . . . . . . . . . . . . . . . . . . . . . . . . . . . . . . . . . . . . . . . . . . . . . . . . . . . . . . 96 Select Scanned Image Area . . . . . . . . . . . . . . . . . . . . . . . . . . . . . . . . . . . . . . . . . 97 Adjust Image Quality . . . . . . . . . . . . . . . . . . . . . . . . . . . . . . . . . . . . . . . . . . . . . . 99 Select Scanned Image Size . . . . . . . . . . . . . . . . . . . . . . . . . . . . . . . . . . . . . . . . 100 Scan and View Image . . . . . . . . . . . . . . . . . . . . . . . . . . . . . . . . . . . . . . . . . . . . 102 Restore Color as You Scan . . . . . . . . . . . . . . . . . . . . . . . . . . . . . . . . . . . . . . . . . . . 102 Full Auto Mode . . . . . . . . . . . . . . . . . . . . . . . . . . . . . . . . . . . . . . . . . . . . . . . . . 102 Home Mode . . . . . . . . . . . . . . . . . . . . . . . . . . . . . . . . . . . . . . . . . . . . . . . . . . . . 103 Professional Mode . . . . . . . . . . . . . . . . . . . . . . . . . . . . . . . . . . . . . . . . . . . . . . . 104 Scan to a PDF File . . . . . . . . . . . . . . . . . . . . . . . . . . . . . . . . . . . . . . . . . . . . . . . . . . 105 Choose Scan File Settings . . . . . . . . . . . . . . . . . . . . . . . . . . . . . . . . . . . . . . . . . 106 View and Print Scanned Images . . . . . . . . . . . . . . . . . . . . . . . . . . . . . . . . . . . . . . . 108
Use Your Printer on a Network . . . . . . . . . . . . . . . . . . . . . . . . . . . . . . . . . . . . . . . . . . . 111 Configure Epson Scan (Mac OS X) . . . . . . . . . . . . . . . . . . . . . . . . . . . . . . . . . . . . . 111 Access a Memory Card (Mac OS X) . . . . . . . . . . . . . . . . . . . . . . . . . . . . . . . . . . . . 112 Transfer Files To/From a Memory Card. . . . . . . . . . . . . . . . . . . . . . . . . . . . . . . . . . . . . 115 Transfer Files From a Memory Card to Your Computer . . . . . . . . . . . . . . . . . . . . . 115 Transfer Files From Your Computer to a Memory Card . . . . . . . . . . . . . . . . . . . . . 115 Print From a Connected Camera. . . . . . . . . . . . . . . . . . . . . . . . . . . . . . . . . . . . . . . . . . . 117 Connect the Camera . . . . . . . . . . . . . . . . . . . . . . . . . . . . . . . . . . . . . . . . . . . . . . . . . 117 Print Photos From the Camera . . . . . . . . . . . . . . . . . . . . . . . . . . . . . . . . . . . . . . . . . 117 Replace Ink Cartridges . . . . . . . . . . . . . . . . . . . . . . . . . . . . . . . . . . . . . . . . . . . . . . . . . . 121 Check Ink Status From Your Printer . . . . . . . . . . . . . . . . . . . . . . . . . . . . . . . . . . . . 121 Check Ink Status From Your Computer . . . . . . . . . . . . . . . . . . . . . . . . . . . . . . . . . 122 Windows . . . . . . . . . . . . . . . . . . . . . . . . . . . . . . . . . . . . . . . . . . . . . . . . . . . . . . 122 Macintosh . . . . . . . . . . . . . . . . . . . . . . . . . . . . . . . . . . . . . . . . . . . . . . . . . . . . . . 123 Purchase Epson Cartridges . . . . . . . . . . . . . . . . . . . . . . . . . . . . . . . . . . . . . . . . . . . 124 Remove and Install Cartridges . . . . . . . . . . . . . . . . . . . . . . . . . . . . . . . . . . . . . . . . . 125 Adjust Print Quality . . . . . . . . . . . . . . . . . . . . . . . . . . . . . . . . . . . . . . . . . . . . . . . . . . . . 129 Clean the Print Head . . . . . . . . . . . . . . . . . . . . . . . . . . . . . . . . . . . . . . . . . . . . . . . . 129 Check the Print Head Nozzles . . . . . . . . . . . . . . . . . . . . . . . . . . . . . . . . . . . . . . 129 Clean the Print Head Nozzles . . . . . . . . . . . . . . . . . . . . . . . . . . . . . . . . . . . . . . 130 Align the Print Head . . . . . . . . . . . . . . . . . . . . . . . . . . . . . . . . . . . . . . . . . . . . . . . . 132 Clean the Paper Path . . . . . . . . . . . . . . . . . . . . . . . . . . . . . . . . . . . . . . . . . . . . . . . . 134
Adjust the LCD Screen . . . . . . . . . . . . . . . . . . . . . . . . . . . . . . . . . . . . . . . . . . . . . . . . . . 135 Solve Problems . . . . . . . . . . . . . . . . . . . . . . . . . . . . . . . . . . . . . . . . . . . . . . . . . . . . . . . . 137 Checking for Software Updates . . . . . . . . . . . . . . . . . . . . . . . . . . . . . . . . . . . . . . . . 137 Problem-solving Tools . . . . . . . . . . . . . . . . . . . . . . . . . . . . . . . . . . . . . . . . . . . . . . . 137 Check LCD Display Screen Messages . . . . . . . . . . . . . . . . . . . . . . . . . . . . . . . 137 Run a Printer Check . . . . . . . . . . . . . . . . . . . . . . . . . . . . . . . . . . . . . . . . . . . . . . 139
3
Problems and Solutions . . . . . . . . . . . . . . . . . . . . . . . . . . . . . . . . . . . . . . . . . . . . . . 139 Setup Problems . . . . . . . . . . . . . . . . . . . . . . . . . . . . . . . . . . . . . . . . . . . . . . . . . 140 Copying Problems . . . . . . . . . . . . . . . . . . . . . . . . . . . . . . . . . . . . . . . . . . . . . . . 140 Paper Problems . . . . . . . . . . . . . . . . . . . . . . . . . . . . . . . . . . . . . . . . . . . . . . . . . 141 Memory Card Problems . . . . . . . . . . . . . . . . . . . . . . . . . . . . . . . . . . . . . . . . . . . 142 Problems Printing From a Computer . . . . . . . . . . . . . . . . . . . . . . . . . . . . . . . . . 143 Problems Scanning From a Computer . . . . . . . . . . . . . . . . . . . . . . . . . . . . . . . . 145 Page Layout and Content Problems . . . . . . . . . . . . . . . . . . . . . . . . . . . . . . . . . . 145 Print Quality Problems (quality is correct on screen) . . . . . . . . . . . . . . . . . . . . 147 Image Quality Problems (quality problem appears on screen) . . . . . . . . . . . . . 149
Re-installing Software . . . . . . . . . . . . . . . . . . . . . . . . . . . . . . . . . . . . . . . . . . . . . . . 151 Windows . . . . . . . . . . . . . . . . . . . . . . . . . . . . . . . . . . . . . . . . . . . . . . . . . . . . . . 151 Macintosh . . . . . . . . . . . . . . . . . . . . . . . . . . . . . . . . . . . . . . . . . . . . . . . . . . . . . . 152 Getting More Help . . . . . . . . . . . . . . . . . . . . . . . . . . . . . . . . . . . . . . . . . . . . . . . . . . 153 Clean and Transport Your Printer. . . . . . . . . . . . . . . . . . . . . . . . . . . . . . . . . . . . . . . . . . 155 Cleaning . . . . . . . . . . . . . . . . . . . . . . . . . . . . . . . . . . . . . . . . . . . . . . . . . . . . . . . . . . 155 Transportation . . . . . . . . . . . . . . . . . . . . . . . . . . . . . . . . . . . . . . . . . . . . . . . . . . . . . 156 Specifications and Notices . . . . . . . . . . . . . . . . . . . . . . . . . . . . . . . . . . . . . . . . . . . . . . . 157 Printer Parts . . . . . . . . . . . . . . . . . . . . . . . . . . . . . . . . . . . . . . . . . . . . . . . . . . . . . . . 157 Important Safety Instructions . . . . . . . . . . . . . . . . . . . . . . . . . . . . . . . . . . . . . . . . . . 158 General Safety . . . . . . . . . . . . . . . . . . . . . . . . . . . . . . . . . . . . . . . . . . . . . . . . . . 158 Ink Cartridge Safety . . . . . . . . . . . . . . . . . . . . . . . . . . . . . . . . . . . . . . . . . . . . . . 159 LCD Display Screen Safety . . . . . . . . . . . . . . . . . . . . . . . . . . . . . . . . . . . . . . . . 160 Computer System Requirements . . . . . . . . . . . . . . . . . . . . . . . . . . . . . . . . . . . . . . . 160 Windows Requirements . . . . . . . . . . . . . . . . . . . . . . . . . . . . . . . . . . . . . . . . . . . 160 Macintosh Requirements . . . . . . . . . . . . . . . . . . . . . . . . . . . . . . . . . . . . . . . . . . 160 Product Specifications . . . . . . . . . . . . . . . . . . . . . . . . . . . . . . . . . . . . . . . . . . . . . . . 161 Printing . . . . . . . . . . . . . . . . . . . . . . . . . . . . . . . . . . . . . . . . . . . . . . . . . . . . . . . . 161 Scanning . . . . . . . . . . . . . . . . . . . . . . . . . . . . . . . . . . . . . . . . . . . . . . . . . . . . . . . 161 Paper . . . . . . . . . . . . . . . . . . . . . . . . . . . . . . . . . . . . . . . . . . . . . . . . . . . . . . . . . 162 Memory Cards . . . . . . . . . . . . . . . . . . . . . . . . . . . . . . . . . . . . . . . . . . . . . . . . . . 163 Ink Cartridges . . . . . . . . . . . . . . . . . . . . . . . . . . . . . . . . . . . . . . . . . . . . . . . . . . 165 Size and Weight . . . . . . . . . . . . . . . . . . . . . . . . . . . . . . . . . . . . . . . . . . . . . . . . . 165 Electrical . . . . . . . . . . . . . . . . . . . . . . . . . . . . . . . . . . . . . . . . . . . . . . . . . . . . . . 166 Environmental . . . . . . . . . . . . . . . . . . . . . . . . . . . . . . . . . . . . . . . . . . . . . . . . . . 166 Standards . . . . . . . . . . . . . . . . . . . . . . . . . . . . . . . . . . . . . . . . . . . . . . . . . . . . . . 166 Interface . . . . . . . . . . . . . . . . . . . . . . . . . . . . . . . . . . . . . . . . . . . . . . . . . . . . . . . 167 Network (wireless) . . . . . . . . . . . . . . . . . . . . . . . . . . . . . . . . . . . . . . . . . . . . . . . 167 Software Notices . . . . . . . . . . . . . . . . . . . . . . . . . . . . . . . . . . . . . . . . . . . . . . . . . . . 167 Copyright and Trademarks . . . . . . . . . . . . . . . . . . . . . . . . . . . . . . . . . . . . . . . . . . . 198
4
Home
Welcome to the Epson Stylus® NX510 Series User’s Guide.
5
6
Change the Language
You can choose English, French, Spanish, or Portuguese as the language of the LCD display screen.
1.Press Setup.
2.Press  or
or  to select Maintenance, then press OK.
3.Press  to select Language, then press OK.
4.Press  or
or  to select your language, then press OK.
7
8
Copy a Document or Photo
You can copy documents or photos in color or black-and-white. You can also make quick draft copies.
Copy Documents Copy Photos
Restore or Crop Photos
Note:
Copies may not be exactly the same size as your original document.
Copy Documents
You can copy documents onto letteror A4-size plain paper or Epson special paper (various types available) just like you would on a copy machine.
1.Load letteror A4-size plain paper or Epson special paper in the sheet feeder.
Note:
Load only the recommended number of sheets.
2.Place your original document on the scanner glass.
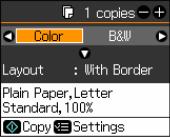
3.Press the Copy button.
4.To print more than 1 copy, press + or – to select the number (up to 99).
5.Press  or
or  to select Color or B&W copies.
6.Press  , then press
  to change the layout, if necessary.
Select With Border to leave a small margin around the image or select Borderless to expand the image all the way to the edge of the paper (slight cropping may occur).
Note:
Layout must be set to With Border to select Plain Paper.
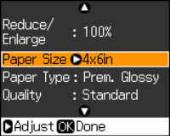
7.To change any of the print settings displayed on the screen, press Menu and select your settings.
Copy Mode Print Settings
9

•To adjust the copy size, select Reduce/Enlarge and choose either Actual (to select a percentage using + or –) or Auto Fit Page (to automatically size the image to fit your paper).
•To change the paper type, select Paper Type and choose the type of paper you loaded.
Paper type |
Paper Type setting |
|
|
Plain paper |
Plain Paper |
|
|
Epson Bright White Paper |
|
|
|
Epson Presentation Paper Matte |
|
|
|
Epson Premium Presentation Paper Matte |
Matte |
|
|
Epson Premium Photo Paper Glossy |
Prem. Glossy |
|
|
Epson Premium Photo Paper Semi-gloss |
|
|
|
Epson Ultra Premium Photo Paper Glossy |
Ultra Glossy |
|
|
Epson Photo Paper Glossy |
Glossy |
|
|
•To change the paper size, select Paper Size and choose the size of paper you loaded.
Note:
Paper Size options depend on the Paper Type setting you choose.
•If you chose Plain Paper as your Paper Type setting, you can change the copy quality. Select Quality and choose Standard, Best, or Draft.
•To adjust the darkness or lightness of the copy, select Density and choose a higher (darker) or lower (lighter) setting.
•To adjust the amount of image expansion when printing borderless photos, select
Expansion and choose Standard, Medium, or Minimum.
Note:
You may see white borders on your printed photo if you use the Minimum setting. [DROP DOWN END]
10
After you finish selecting your settings, press OK.
8.Press  Start to begin copying.
To cancel copying, press  Stop/Clear Settings.
Copy Photos
You can copy photos onto 4 × 6-inch (102 × 152 mm), 5 × 7-inch (127 × 178-mm), letter-size, or A4-size Epson special paper (various types available) for instant photo reprints.
1.Load 4 × 6-inch (102 × 152 mm), 5 × 7-inch (127 × 178-mm), letter-size, or A4-size Epson special paper in the sheet feeder.
Note:
Load only the recommended number of sheets.
2.Place your original photo on the scanner glass.
3.Press the Copy button.
4.To print more than 1 copy, press + or – to select the number (up to 99).
5.Press  or
or  to select Color or B&W copies.
6.Press  , then press
  to change the layout, if necessary.
Select With Border to leave a small margin around the image or select Borderless to expand the image all the way to the edge of the paper (slight cropping may occur).
Note:
Layout must be set to With Border to select Plain Paper.
7.To change any of the print settings displayed on the screen, press Menu and select your settings.
Copy Mode Print Settings
11
•To adjust the copy size, select Reduce/Enlarge and choose either Actual (to select a percentage using + or –) or Auto Fit Page (to automatically size the image to fit your paper).
•To change the paper type, select Paper Type and choose the type of paper you loaded.
Paper type |
Paper Type setting |
|
|
Plain paper |
Plain Paper |
|
|
Epson Bright White Paper |
|
|
|
Epson Presentation Paper Matte |
|
|
|
Epson Premium Presentation Paper Matte |
Matte |
|
|
Epson Premium Photo Paper Glossy |
Prem. Glossy |
|
|
Epson Premium Photo Paper Semi-gloss |
|
|
|
Epson Ultra Premium Photo Paper Glossy |
Ultra Glossy |
|
|
Epson Photo Paper Glossy |
Glossy |
|
|
•To change the paper size, select Paper Size and choose the size of paper you loaded.
Note:
Paper Size options depend on the Paper Type setting you choose.
•If you chose Plain Paper as your Paper Type setting, you can change the copy quality. Select Quality and choose Standard, Best, or Draft.
•To adjust the darkness or lightness of the copy, select Density and choose a higher (darker) or lower (lighter) setting.
•To adjust the amount of image expansion when printing borderless photos, select
Expansion and choose Standard, Medium, or Minimum.
Note:
You may see white borders on your printed photo if you use the Minimum setting. [DROP DOWN END]
12
8.After you finish selecting your settings, press OK.
9.Press  Start to begin copying.
To cancel copying, press  Stop/Clear Settings.
Restore or Crop Photos
You can copy photos onto 4 × 6-inch (102 × 152 mm), 5 × 7-inch (127 × 178-mm), letter-size, or A4-size Epson special paper (various types available) for instant photo reprints.You can restore the colors in faded photos, convert color photos to black-and-white, and crop your photos.
Note:
To restore photos larger than 5 × 7 inches, use the software on your computer
1.Load 4 × 6-inch (102 × 152 mm), 5 × 7-inch (127 × 178-mm), letter-, or A4-size Epson special paper in the sheet feeder.
Note:
Load only the recommended number of sheets.
2.Place your original photo on the scanner glass.
3.Press the Photo button, then press OK.
4.To turn on Color Restoration to restore colors in faded photos as you copy, press  , select On, then press OK. (If your photo is not faded, do not turn on Color Restoration.)
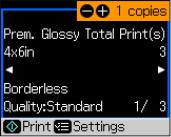
5.Press OK to prescan your photo. You see these settings over a preview of your photo:
6.To print more than 1 copy, press + or – to select the number.
7.If you want to crop your photos and enlarge the resulting image area to fit onto your paper, press Display/Crop.
Crop adjustments
13
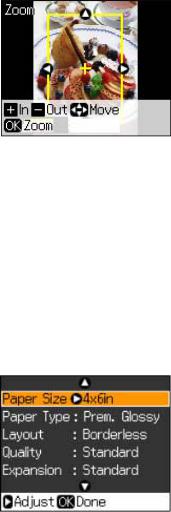
•To resize the image area, press + or –.
•To move the image area, use the arrow buttons.
•To check the zoomed image, press OK. [DROP DOWN END]
After you finish cropping your photos, press OK.
8.To change any of the print settings displayed on the screen, press Menu and select your settings.
Restore Mode Print Settings
•To change the paper type, select Paper Type and choose the type of paper you loaded.
Paper type |
Paper Type setting |
|
|
Epson Premium Photo Paper Glossy |
Prem. Glossy |
|
|
Epson Premium Photo Paper Semi-gloss |
|
|
|
Epson Ultra Premium Photo Paper Glossy |
Ultra Glossy |
|
|
Epson Photo Paper Glossy |
Glossy |
|
|
Epson Premium Presentation Paper Matte |
Matte |
|
|
•To change the paper size, select Paper Size and choose the size of paper you loaded.
14
Note:
Paper Size options depend on the Paper Type setting you choose.
•To change the layout, select Layout and choose With Border to leave a small margin around the image or select Borderless to expand the image all the way to the edge of the paper (slight cropping may occur).
•To adjust the amount of image expansion when printing borderless photos, select
Expansion and choose Standard, Medium, or Minimum.
Note:
You may see white borders on your printed photo if you use the Minimum setting.
Note:
When you are restoring or cropping photos, the Quality setting is set to Standard. You cannot adjust it.
[DROP DOWN END]
After you finish selecting your settings, press OK.
9.Press  Start to begin copying.
To cancel copying, press  Stop/Clear Settings.
15
16
Load Paper
Before you copy or print, load paper for the type of printing you will do.
Load Paper for Photos
Load Paper for Documents
Load Envelopes
General Paper Information
Load Paper for Photos
You can print photos on a variety of paper types and sizes, including borderless photos.
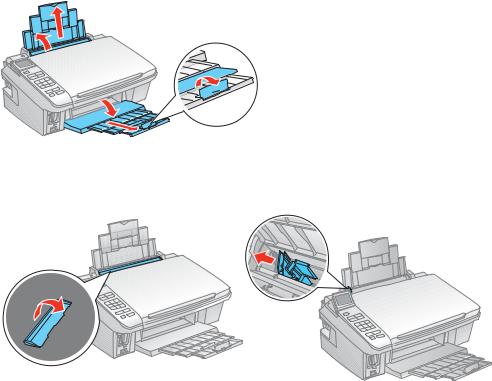
1.Open the paper support and pull up the extensions.
2.Open the output tray, pull out the extensions, and flip up the stopper.
3. Flip the feeder guard up, out of the way, then squeeze the edge guide and slide it left.
4.Insert paper, glossy or printable side up, short edge first, against the right side and beneath the tab.
17

Tip:
Load only the recommended number of sheets.
Load paper short edge first, no matter which way your photo faces. Check the photo paper package for any additional loading instructions.
5. Slide the edge guide to the edge of the paper, but not too tightly.
See also:
Load Paper for Documents
Load Envelopes
Load Paper for Documents
You can print documents on a variety of paper types and sizes.
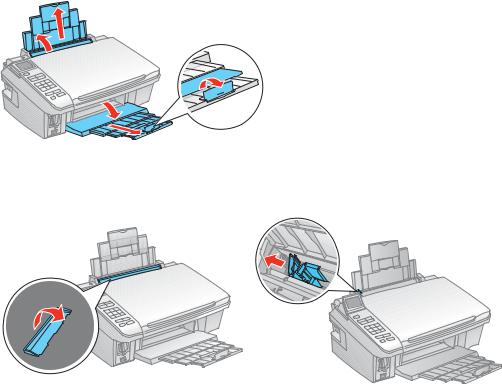
1.Open the paper support and pull up the extensions.
2.Open the output tray and pull out the extensions. Then flip up the paper stopper on the last extension, unless you’re printing on legal-size paper.
3. Flip the feeder guard up, out of the way, then squeeze the edge guide and slide it left.
18

4. Insert paper, printable side up, against the right side and beneath the tab.
Tip:
Load only the recommended number of sheets.
Load paper short edge first, no matter which way your document faces. Load letterhead or pre-printed paper top edge first.
Do not load paper with holes punched in it. Do not load transparencies.
Do not load paper above the arrow on the edge guide.
Check the paper package for any additional loading instructions.
5. Slide the edge guide to the edge of the paper, but not too tightly.
19
See also:
Load Paper for Photos
Load Envelopes
Load Envelopes
You can print on plain paper envelopes in 4 1/8 × 9 1/2 inch (#10) (105 × 241 mm) size.
1.Open the paper support and pull up the extensions.
2.Open the output tray, pull out the extensions, and flip up the stopper.
3. Flip the feeder guard up, out of the way, then squeeze the edge guide and slide it left.
4.Load up to 10 envelopes against the right side and beneath the tab. Load them printable side up and flap edge left.
20
Tip:
Press each envelope flat before loading it or load one envelope at a time. 5. Slide the edge guide to the edge of the envelopes, but not too tightly.
See also:
Load Paper for Photos
Load Paper for Documents
General Paper Information
Sheet Feeder Capacity
Available Epson Papers
Borderless Paper Types and Sizes
Paper or Media Type Settings for Loaded Paper
21
Sheet Feeder Capacity
Paper type |
Load up to this many sheets |
|
|
Plain paper—letter-size (8.5 × 11 inches [216 × 279 mm]) |
Approximately 100 sheets* |
|
|
Epson Bright White Paper |
80 sheets |
Epson Presentation Paper Matte |
|
|
|
Epson Photo Paper Glossy |
20 sheets |
Epson Premium Photo Paper Glossy |
|
Epson Ultra Premium Photo Paper Glossy |
|
Epson Premium Photo Paper Semi-gloss |
|
Epson Premium Presentation Paper Matte |
|
|
|
Epson Premium Presentation Paper Matte Double-sided |
1 sheet |
Epson Photo Quality Self-adhesive Sheets |
|
Epson Iron-on Cool Peel Transfer |
|
Plain paper—legal size (8.5 × 14 inches [216 × 356 mm]) |
|
|
|
* Based on 20-lb [75 g/m2] paper weight. Do not load paper higher than the  arrow mark on the left edge guide.
Available Epson Papers
You can purchase genuine Epson ink and paper.
Paper type |
Size |
Part number |
Sheet |
count |
|||
|
|
|
|
Epson Bright White Paper |
Letter (8.5 × 11 inches |
S041586 |
500 |
|
[216 × 279 mm]) |
|
|
|
|
|
|
Epson Photo Paper Glossy |
Borderless 4 × 6 inches |
S042038 |
100 |
|
(102 × 152 mm) |
S041809 |
50 |
|
|
|
|
|
Letter (8.5 × 11 inches |
S041141 |
20 |
|
[216 × 279 mm]) |
S041649 |
50 |
|
|
S041271 |
100 |
|
|
|
|
Epson Premium Photo Paper Glossy |
Borderless 4 × 6 inches |
S041808 |
40 |
|
(102 × 152 mm) |
S041727 |
100 |
|
|
|
|
|
Borderless 5 × 7 inches |
S041464 |
20 |
|
(127 × 178 mm) |
|
|
|
|
|
|
|
Borderless 8 × 10 inches |
S041465 |
20 |
|
(203 × 254 mm) |
|
|
|
|
|
|
|
Letter (8.5 × 11 inches |
S041667 |
50 |
|
[216 × 279 mm]) |
|
|
|
|
|
|
22
Paper type |
Size |
|
Part number |
Sheet |
|
count |
|||
|
|
|
|
|
Epson Ultra Premium Photo Paper |
Borderless 4 × 6 inches |
S042181 |
60 |
|
Glossy |
(102 |
× 152 mm) |
S042174 |
100 |
|
|
|
|
|
|
Borderless 5 × 7 inches |
S041945 |
20 |
|
|
(127 |
× 178 mm) |
|
|
|
|
|
|
|
|
Borderless 8 × 10 inches |
S041946 |
20 |
|
|
(203 |
× 254 mm) |
|
|
|
|
|
|
|
|
Letter (8.5 × 11 inches |
S042182 |
25 |
|
|
[216 × 279 mm]) |
S042175 |
50 |
|
|
|
|
|
|
Epson Premium Photo Paper Semi-gloss |
Borderless 4 × 6 inches |
S041982 |
40 |
|
|
(102 |
× 152 mm) |
|
|
|
|
|
|
|
|
Letter (8.5 × 11 inches |
S041331 |
20 |
|
|
[216 × 279 mm]) |
|
|
|
|
|
|
|
|
Epson Presentation Paper Matte |
Letter (8.5 × 11 inches |
S041062 |
100 |
|
|
[216 × 279 mm]) |
|
|
|
|
|
|
|
|
|
Legal (8.5 × 14 inches |
S041067 |
100 |
|
|
[216 × 356 mm]) |
|
|
|
|
|
|
|
|
Epson Premium Presentation Paper Matte |
Borderless 8 × 10 inches |
S041467 |
50 |
|
|
(203 × 254 mm) |
|
|
|
|
|
|
|
|
|
Letter (8.5 × 11 inches |
S041257 |
50 |
|
|
[216 × 279 mm]) |
|
|
|
|
S042180 |
100 |
||
|
|
|
||
|
|
|
|
|
Epson Premium Presentation Paper Matte |
Letter (8.5 × 11 inches |
S041568 |
50 |
|
Double-sided |
[216 × 279 mm]) |
|
|
|
|
|
|
|
|
Epson Photo Quality Self-adhesive |
A4 (8.3 × 11.7 inches |
S041106 |
10 |
|
Sheets |
[210 × 297 mm]) |
|
|
|
|
|
|
|
|
Epson Iron-on Cool Peel Transfer |
Letter (8.5 × 11 inches |
S041153 |
10 |
|
|
[216 × 279 mm]) |
|
|
|
|
|
|
|
|
Borderless Paper Types and Sizes
Borderless paper type |
Borderless paper size |
|
|
Epson Photo Paper Glossy |
4 × 6 inches (102 × 152 mm) |
Epson Premium Photo Paper Semi-gloss |
Letter (8.5 × 11 inches [216 × 279 mm]) |
|
|
23
Borderless paper type |
Borderless paper size |
|
|
|
|
Epson Premium Photo Paper Glossy |
4 |
× 6 inches (102 × 152 mm) |
Epson Ultra Premium Photo Paper Glossy |
5 |
× 7 inches (127 × 178 mm) |
|
8 |
× 10 inches (203 × 254 mm) |
|
Letter (8.5 × 11 inches [216 × 279 mm]) |
|
|
|
|
Epson Premium Presentation Paper Matte |
8 |
× 10 inches (203 × 254 mm) |
|
Letter (8.5 × 11 inches [216 × 279 mm]) |
|
|
|
|
Paper or Media Type Settings for Loaded Paper
For optimal image quality, it is important to choose the correct Type or Media Type setting. It tells your printer what kind of paper you’re using and adjusts the ink coverage accordingly.
For this paper |
Select this paper Type or Media Type |
|
setting |
||
|
||
|
|
|
Plain paper |
Plain Paper/Bright White Paper |
|
Epson Bright White Paper |
|
|
Epson Presentation Paper Matte |
|
|
|
|
|
Epson Ultra Premium Photo Paper Glossy |
Ultra Premium Photo Paper Glossy |
|
|
|
|
Epson Premium Photo Paper Glossy |
Premium Photo Paper Glossy |
|
|
|
|
Epson Photo Paper Glossy |
Photo Paper Glossy |
|
|
|
|
Epson Premium Photo Paper Semi-gloss |
Premium Photo Paper Semi-Gloss |
|
|
|
|
Epson Premium Presentation Paper Matte |
Premium Presentation Paper Matte |
|
Epson Premium Presentation Paper Matte |
|
|
Double-sided |
|
|
Epson Photo Quality Self-adhesive Sheets |
|
|
Epson Iron-on Cool Peel Transfer |
|
|
|
|
|
Envelopes |
Envelope |
|
|
|
24
Place Originals for Copying or Scanning
Before you copy or scan, place your documents or photos on the scanner. Place Documents
Place Photos
Caution:
Do not place anything on top of the document cover or use the cover as a writing surface, or it could get permanently scratched.
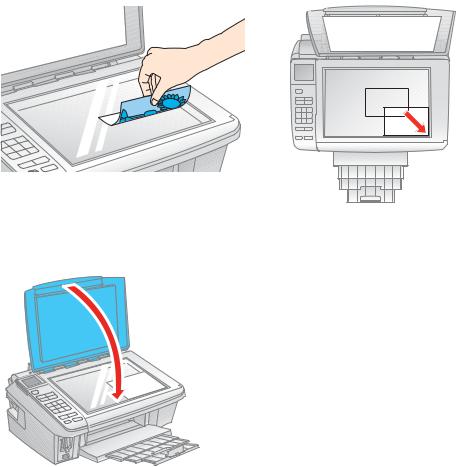
Place Documents
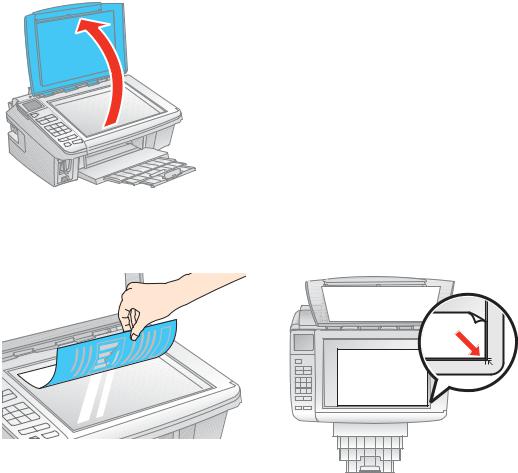
Position your document on the scanner glass to copy or scan. 1. Open the document cover.
2.Place your original document face-down on the scanner glass with the top facing into the front right corner.
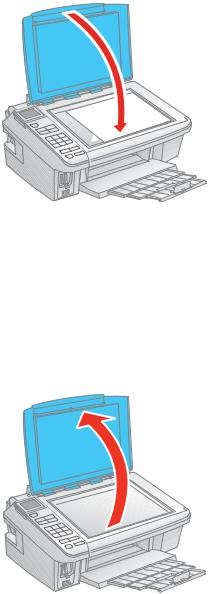
3. Close the document cover gently to keep your document in place.
25
See also:
Place Photos
Place Photos
Position your photos on the scanner glass to copy or scan. 1. Open the document cover.
2.Place your original photo face-down on the scanner glass with the top facing into the front right corner.
26
3. Close the document cover gently to keep your document in place.
See also:
Place Documents
27
28
Print From a Memory Card
You can print photos right from your digital camera’s memory card by inserting it into your printer’s memory card slot.
Before you begin, make sure to load photo paper.
Follow the steps in these sections to print from a memory card: Insert Memory Card
Print Photos Using the LCD Screen
Print Photos Using an Index Sheet
Print Photos Pre-selected in Your Camera (DPOF) Remove Memory Card
Insert Memory Card
Insert one card at a time into one of the printer’s memory card slots. Insert the type of card you have into the correct slot, as shown below.
Compatible memory cards
Slot |
Type of card |
|
|
Right slot |
CompactFlash® Type I and II |
|
Microdrive™ |
29
Slot |
Type of card |
|
|
Left slot |
SD |
|
SDHC |
|
miniSD* |
|
miniSDHC* |
|
microSD* |
|
microSDHC* |
|
MultiMediaCard |
|
MMplus |
|
MMCmobile* |
|
MMCmicro* |
|
Memory Stick |
|
Memory Stick Duo* |
|
Memory Stick PRO |
|
Memory Stick PRO Duo* |
|
Memory Stick PRO-HG Duo* |
|
Memory Stick Micro* |
|
MagicGate Memory Stick |
|
MagicGate Memory Stick Duo* |
|
xD-Picture Card |
|
xD-Picture Card Type H |
|
xD-Picture Card Type M |
|
xD-Picture Card Type M+ |
|
|
* Requires adapter
[DROP DOWN END]
Make sure the files on the card are compatible with your printer. Compatible image files
File format |
JPEG with the Exif version 2.21 standard |
|
|
Image size |
80 × 80 pixels to 9200 × 9200 pixels |
|
|
Number of files |
Up to 9990 |
|
|
[DROP DOWN END]
Note:
Also consult your memory card and adapter documentation for any special use instructions for your card or adapter.
1.Turn on your printer.
2.Insert your card into the correct slot as shown below:
30
Loading...