


SC-S40600
Table of contents
 Loading...
Manual for RIP Printing
This document explains how to prepare media for RIP printing with optimal settings and
operational procedures for day-to-day printing.
Version 1.2 EN
© 2015 Seiko Epson Corporation. All rights reserved.

Copyrights and Trademarks
EPSON, EPSON EXCEED YOUR VISION, EXCEED YOUR VISION and their logos are registered trademarks or trademarks
of Seiko Epson.
Microsoft® and Windows® are registered trademarks of Microsoft Corporation.
Mac® and Mac OS® are registered trademarks of Apple Inc.
Adobe®, Illustrator®, Photoshop® and Adobe® RGB (1998) are either registered trademarks or trademarks of Adobe Systems
Incorporated in the United States and/or other countries.
General Notice: Other product names used herein are for identification purposes only and may be trademarks of their
respective owners. Epson disclaims any and all rights in those marks.
© 2015 Seiko Epson Corporation. All rights reserved.
2

Contents
Copyrights and Trademarks ................................................................................................................ 2
Contents ................................................................................................................................................ 3
Getting Started ..................................................................................................................................... 4
What to Prepare ................................................................................................................................................................................4
Work Flow .........................................................................................................................................................................................5
Registering Media Settings (EMX File) ................................................................................................ 6
Register Media Settings (Printer) ....................................................................................................................................................6
Register Print Information (RIP) ....................................................................................................................................................7
ONYX rip Settings ................................................................................................................................. 8
Install and Connect ...........................................................................................................................................................................8
Importing Print Information ........................................................................................................................................................ 10
Importing Print Information Manually .............................................................................................................................................11
Creating Quick Sets ....................................................................................................................................................................... 13
Prepare Printing of Hot Folder ...........................................................................................................................................................16
Open and Print File........................................................................................................................................................................ 17
Select Registered Quick Set and Print ................................................................................................................................................17
Drag and Drop Files to the Hot Folder ..............................................................................................................................................19
Caldera RIP Settings ........................................................................................................................... 20
Install and Connect ........................................................................................................................................................................ 20
Importing Print Information ........................................................................................................................................................ 21
Create Configuration (Print Settings) ......................................................................................................................................... 25
Open and Print File........................................................................................................................................................................ 28
Select Registered Print Settings and Print ..........................................................................................................................................28
Create a Hot Folder and Print .............................................................................................................................................................30
DINAX Mirage Settings ....................................................................................................................... 32
Install and Connect ........................................................................................................................................................................ 32
Importing Print Information ........................................................................................................................................................ 32
Color Settings ................................................................................................................................................................................. 33
Print Procedure .............................................................................................................................................................................. 34
Troubleshooting ................................................................................................................................. 35
Print settings cannot be retrieved from Dashboard .................................................................................................................. 35
The scheduled print end time does not match (Windows) ...................................................................................................... 35
The seams between the pages are prominent (Tiled printing) ................................................................................................ 36
ONYX rip Settings ................................................................................................................................................................................37
Caldera RIP Settings .............................................................................................................................................................................39
The print color does not match the image data confirmed on the screen ............................................................................. 40
3
Print information
Getting Started
It is necessary to register the information for the media to be used with each printer and RIP when performing RIP
printing. When quickly printing, it is possible to register basic media information by selecting the media type which
corresponds to your media with "Easy Media Settings" from the printer's configuration menu. It is then possible to print
by setting the media type and print mode in the RIP. At that time, advanced settings for optimal printing with
commercial media can be easily configured using the print configuration file (hereafter "EMX file") provided by Epson.
This document explains the RIP printing method using an EMX file.
What to Prepare
Software RIP (hereafter "RIP")
As of January 2016, RIP availability for SC-S80600 Series /SC-S60600 Series /SC-S40600 Series printers are as follows.
Information on the latest supported RIP can be viewed at [Information] on the Epson Control Dashboard (hereafter
"Dashboard"). For detailed information on each RIP, see the RIP manufacturer's Website.
・ONYX rip (V11.1.2 or later)
*
・Caldera RIP
・DINAX Mirage (V3.50 or later)
(Ver10.2 or later)
* Mac OS X version only supported. The Linux version cannot be used because Dashboard does not support it.
Epson Control Dashboard (Dashboard)
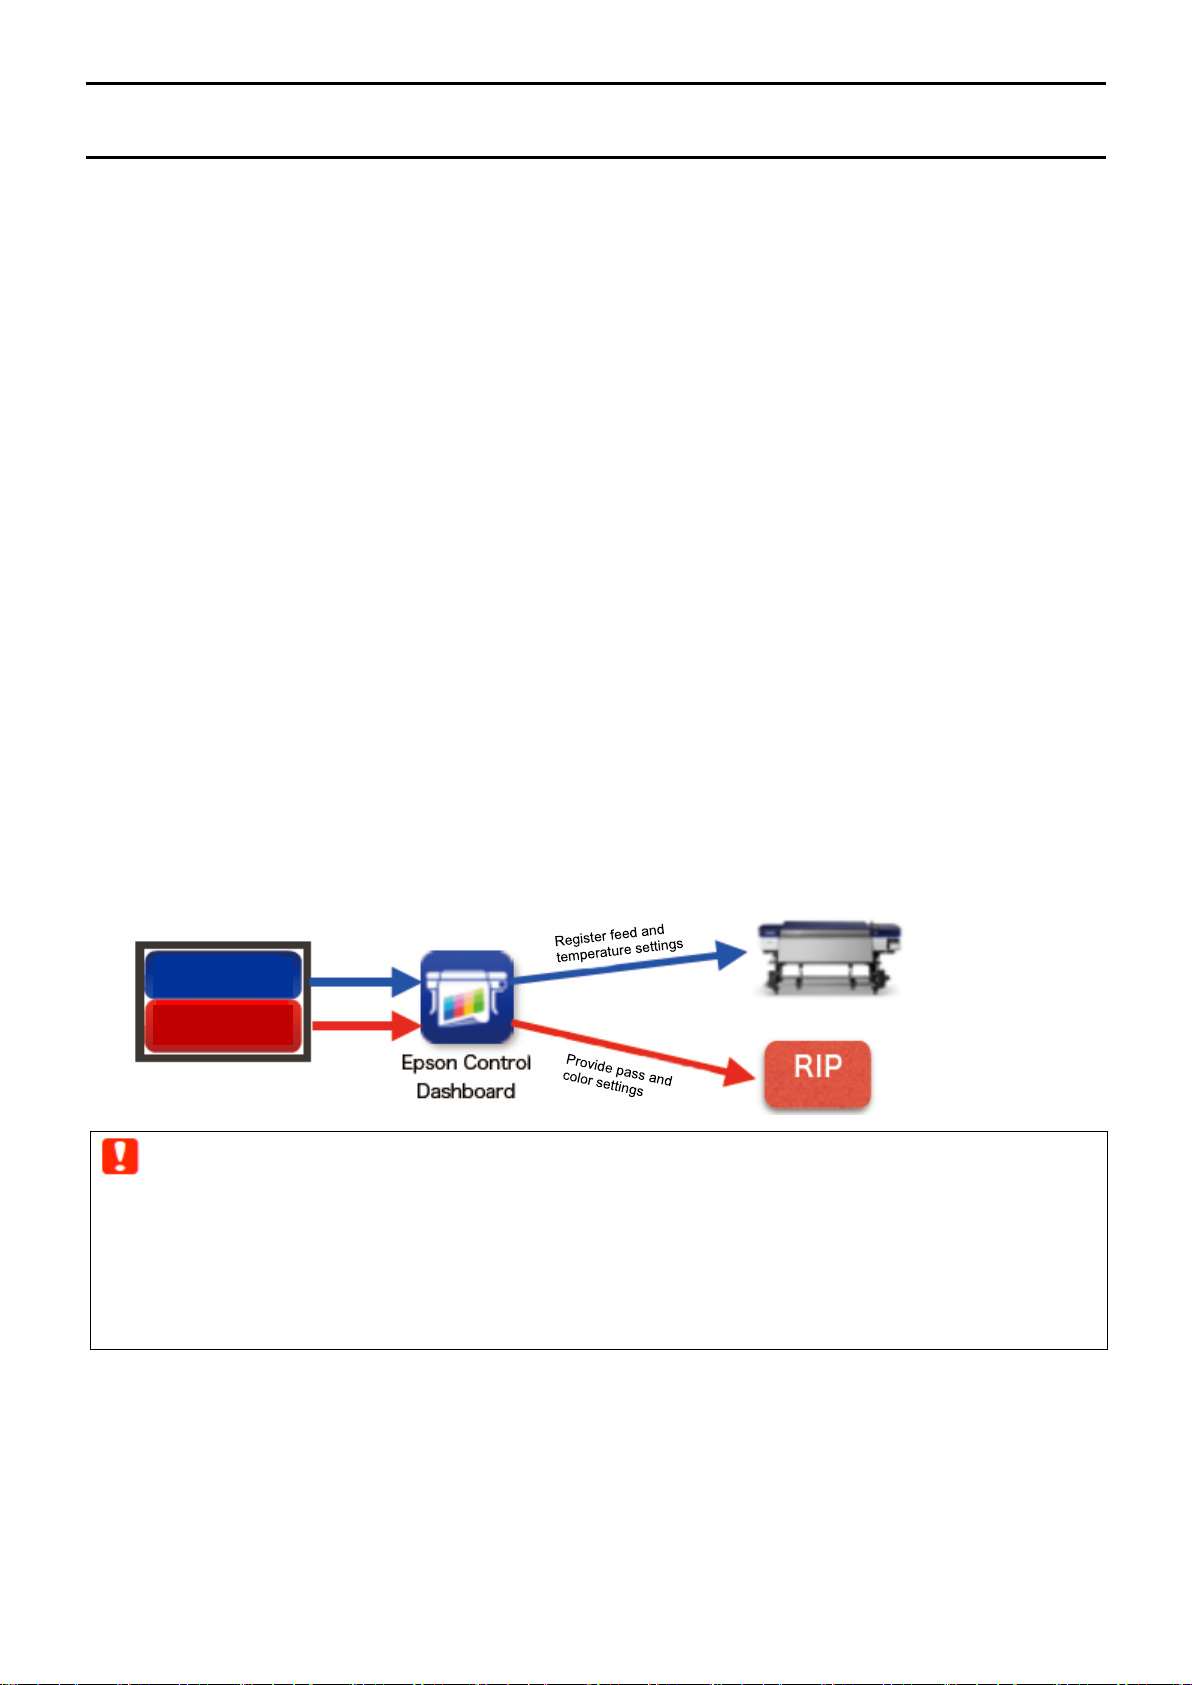
Using Dashboard, you can download the EMX file and import configuration information to a printer or RIP.
For features and usage instructions, see the Dashboard Help. The EMX file is a media-specific print configuration file
containing the following information needed to properly print on commercial media.
・Media settings: Media settings to be registered to the printer (heater temperature, platen gap, etc.)
・Print information: Settings information such as the ICC profile, resolution, and number of passes imported to RIP.
Media settings
Important :
・Make sure if the following conditions have been met for the computer in which Dashboard has been installed.
・An Internet connection must be established , otherwise EMX files cannot be downloaded.
・RIP and Dashboard are installed on the same computer. If they are installed on separate computers, they may not work together
correctly.
・Make sure to use the latest version of Dashboard at all times. When you receive an update notification, update immediately.
Print Data
The supported file formats and versions vary depending on the RIP used, however PDF formats (conforming to the
PDF/X-1a or PDF/X-4 standard) are recommended as they can be used with almost all RIPs. With PDF files, you will not
have broken links or collapsed layouts, and you don't need to outline characters. In addition, even if the image processing
software version is different, there is no difference in the display.
For information on how to convert printouts to PDF format, see
Adobe Photoshop or Adobe Illustrator).
the manual for your image processing software (such as
4
Work Flow
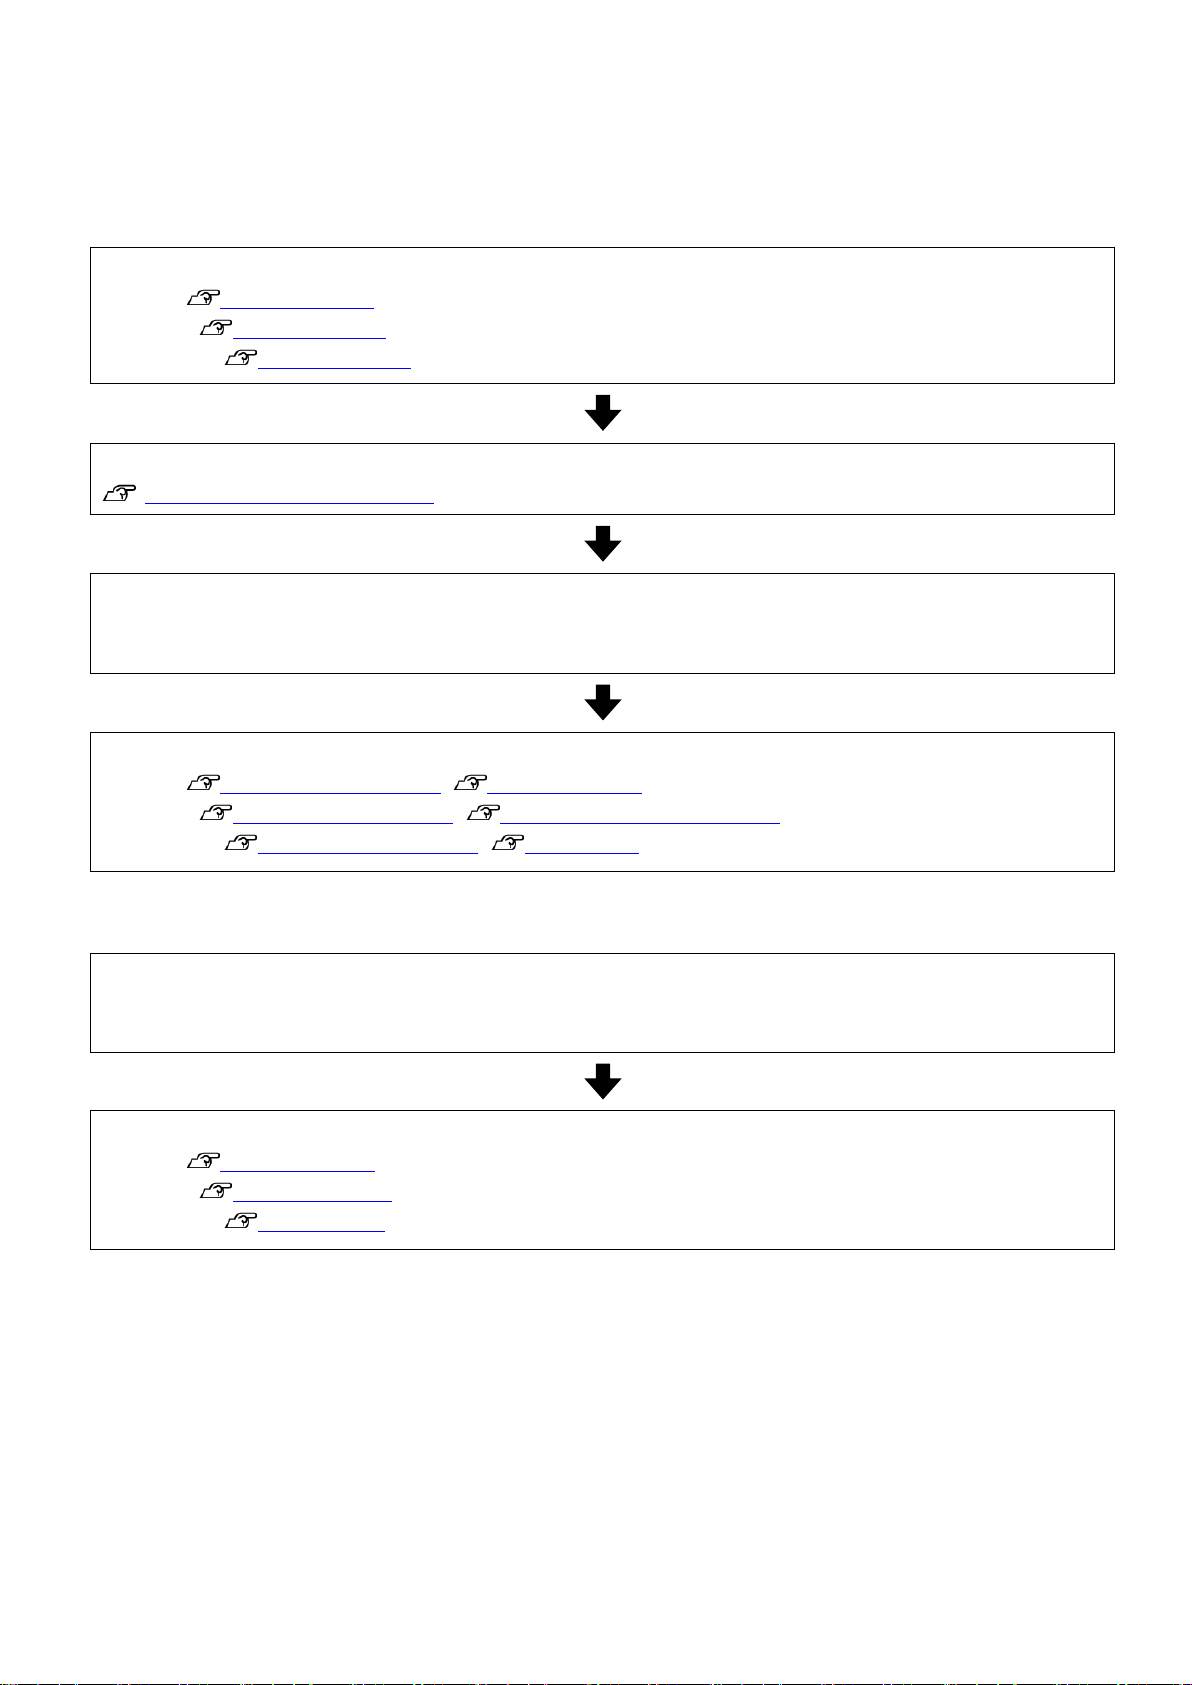
Once you complete the following steps, you can perform daily print operation easily.
1. Prepare Printing
1. Install and connect the software. (Steps vary depending on the RIP you use.)
ONYX rip "Install and Connect"
Caldera RIP "Install and Connect"
DINAX Mirage "Install and Connect"
2. Download the EMX file from Dashboard and register the media settings to the printer.
"Registering Media Settings (EMX File)"
3. Set the media on the printer and perform [Media Adjust].
Set the media correctly, and then perform [Media Adjust] using the media setting number registered in step 2.
For details on how to set media and [Media Adjust], see the "User's Guide" (PDF).
4. Import the print information to the RIP, and create a print mode. (Steps vary depending on the RIP you use.)
ONYX rip "Importing Print Information", "Creating Quick Sets"
Caldera RIP "Importing Print Information", "Create Configuration (Print Settings)"
DINAX Mirage "Importing Print Information", "Color Settings"
2. Printing Work
1. Set the media on the printer and select the registered media setting number.
Set the media properly and select the media number registered in the printer.
For details on how to set media and select the media setting number, see the "User's Guide" (PDF).
2. Open the file to be printed with RIP and print. (Steps vary depending on the RIP that is used.)
ONYX rip "Open and Print File"
Caldera RIP "Open and Print File "
DINAX Mirage "Print Procedure"
5
Registering Media Settings (EMX File)
This section explains how to register downloaded EMX files to a printer or RIP.
Install Dashboard on your computer in advance and perform [Printer Registration]. For details, see the Dashboard
Help.
Register Media Settings (Printer)
Follow the steps below to download the EMX file and register the media settings to the printer.
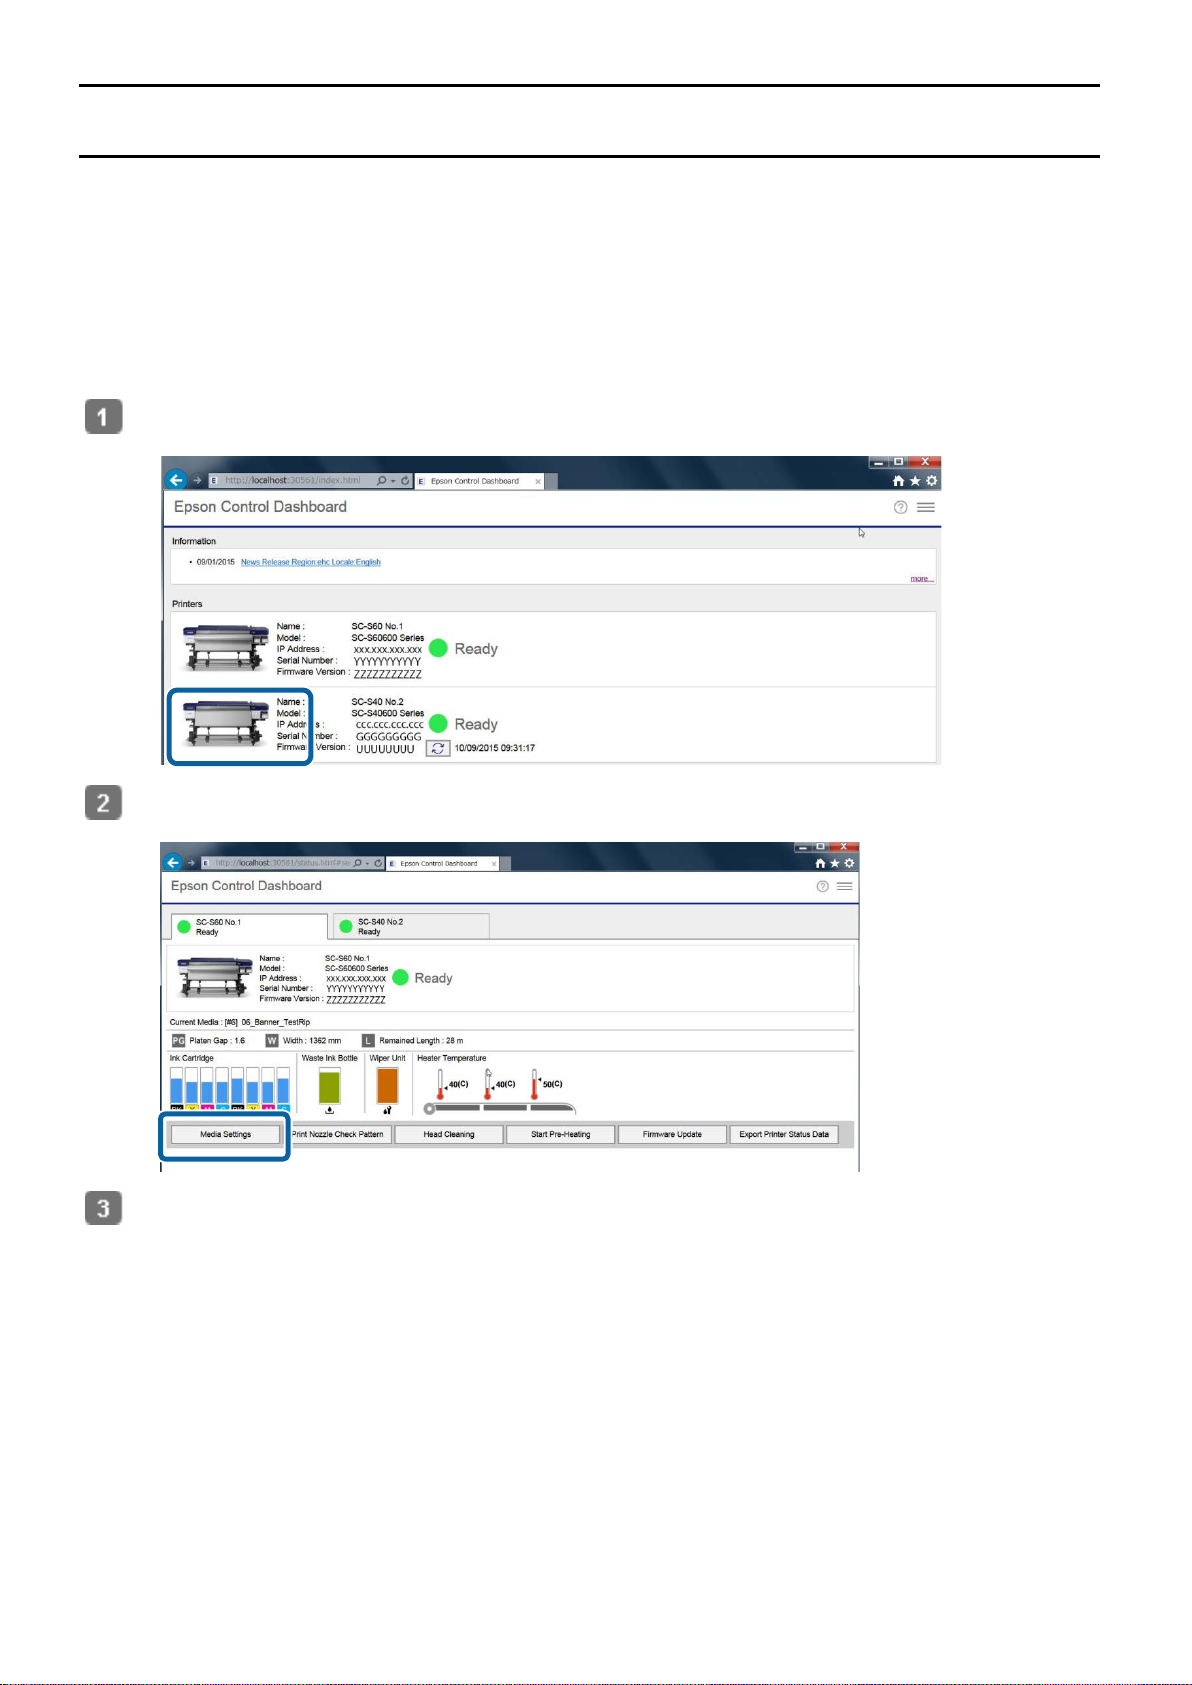
Start Dashboard, and click the image of the target printer on the [Home] screen.
Click [Media Settings] on the [Printer Status] screen.
See Help for the [Media Settings] screen and download the EMX file for the media used.
6
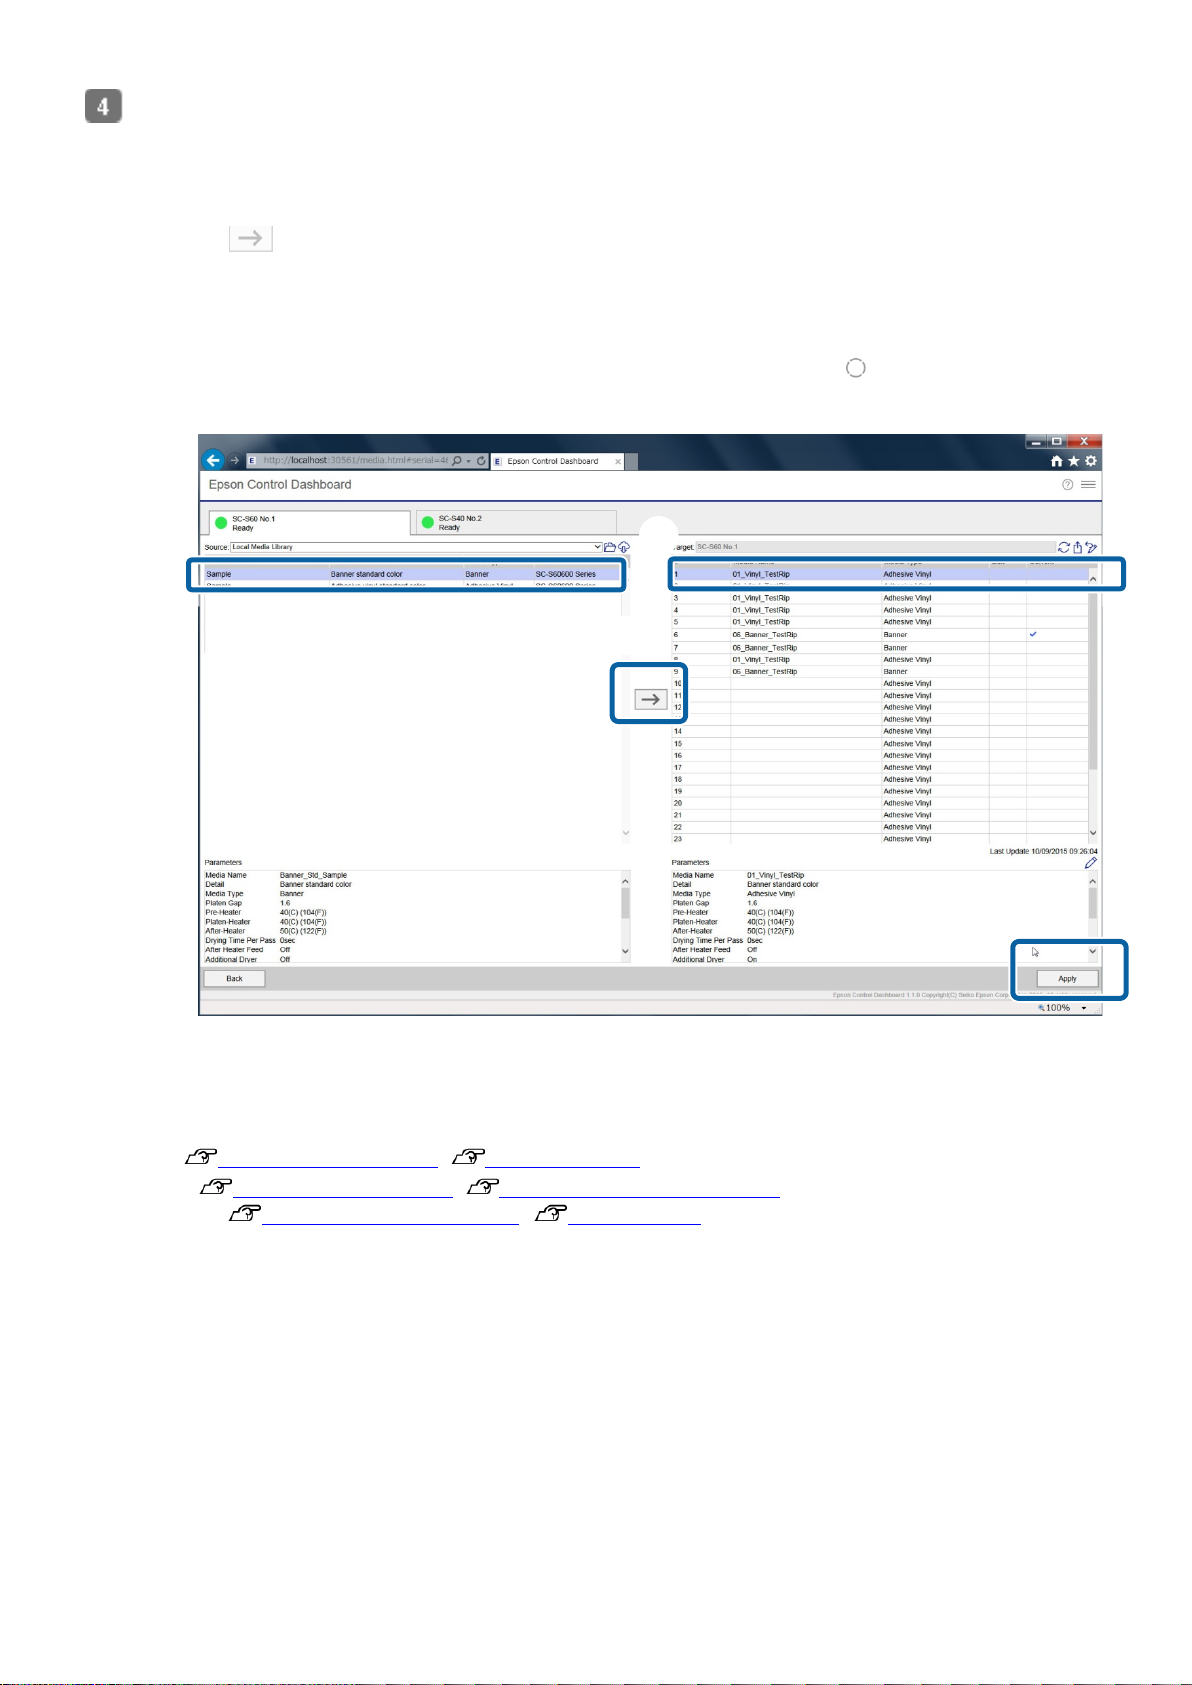
Write the downloaded media settings to the printer.
(2)
3)
1)
(4)
(1) Click the media settings to copy.
(2) Click the target number from the media setting list.
If you do not select a blank target number, the contents of the selected target number will be over-written.
(3) Click . The media settings are copied.
(4) Confirm that the status icon for the printer tab is ● (Ready) and then click [Apply]. The media settings of the
printer are updated.
The media settings for the destination printer cannot be updated if the icon is other than
If [Ready to Print] is not displayed on the printer operation panel, the icon will be .
When registering media settings, do not operate the printer panel.
(
●.
(
Register Print Information (RIP)
The method to register print information varies depending on the RIP you use. For details, see the following.
ONYX rip "Importing Print Information", "Creating Quick Sets"
Caldera RIP "Importing Print Information", "Create Configuration (Print Settings)"
DINAX Mirage "Importing Print Information", "Color Settings"
7
ONYX rip Settings
There is a number of software for ONYX rip, including RIP Queue, Media Manager, and Job Editor.
This section explains how to configure RIP Queue (Ver. 12).
Install and Connect
Install the software to your computer in the following order.
(1) Communication driver of the printer you use
(2) Dashboard
(3) ONYX rip
(4) ONYX rip printer driver (.PrnInst)
(5) Epson exclusive wide gamut input profile file (Installed together with Dashboard)
Important :
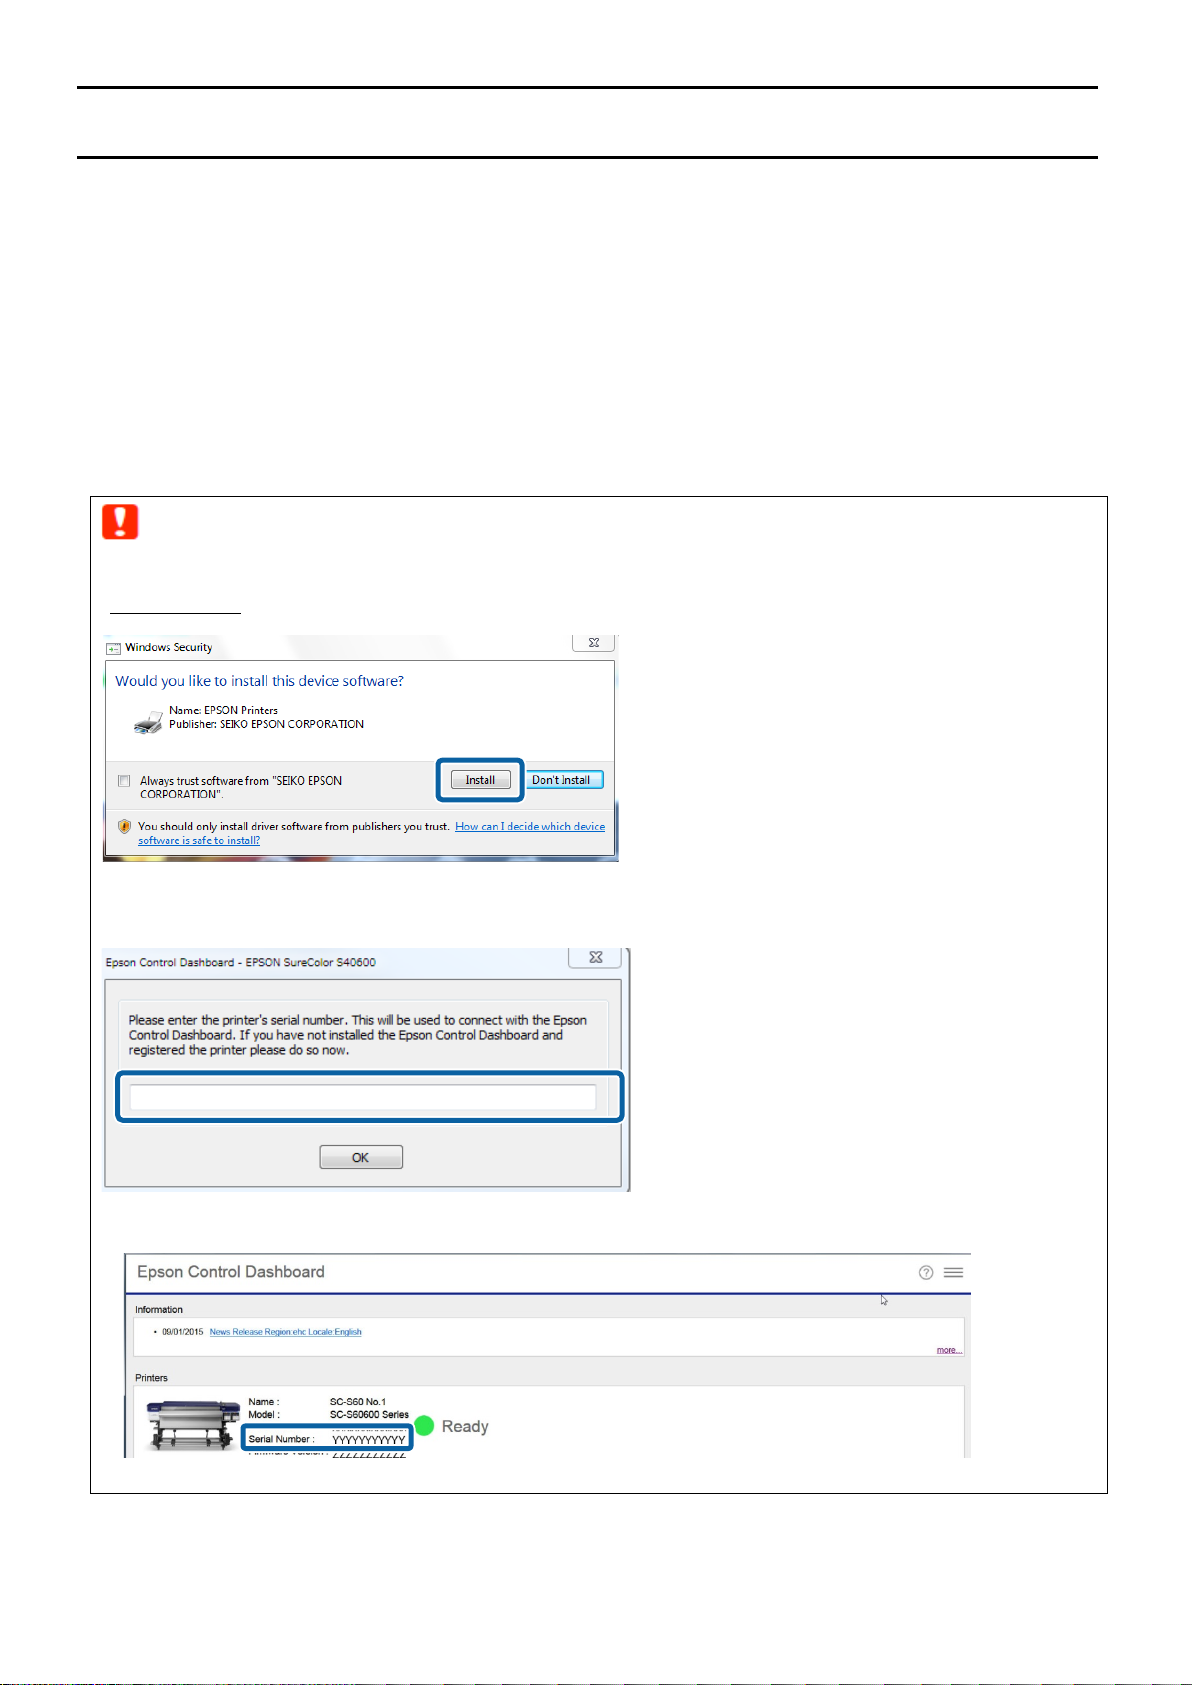
・(1) Install the communication driver from the software disk that came with your printer or from Setup Navi
(http://epson.sn/
). If the following screen appears during installation, make sure to click [Install].
・(4) When the ONYX rip printer driver (.PrnInst) is installed, the following screen will appear.
Copy and paste or type the serial number of the printer displayed on the [Home] screen of Dashboard.
Once all of the installations are completed, connect the RIP and Dashboard with the following steps.
8
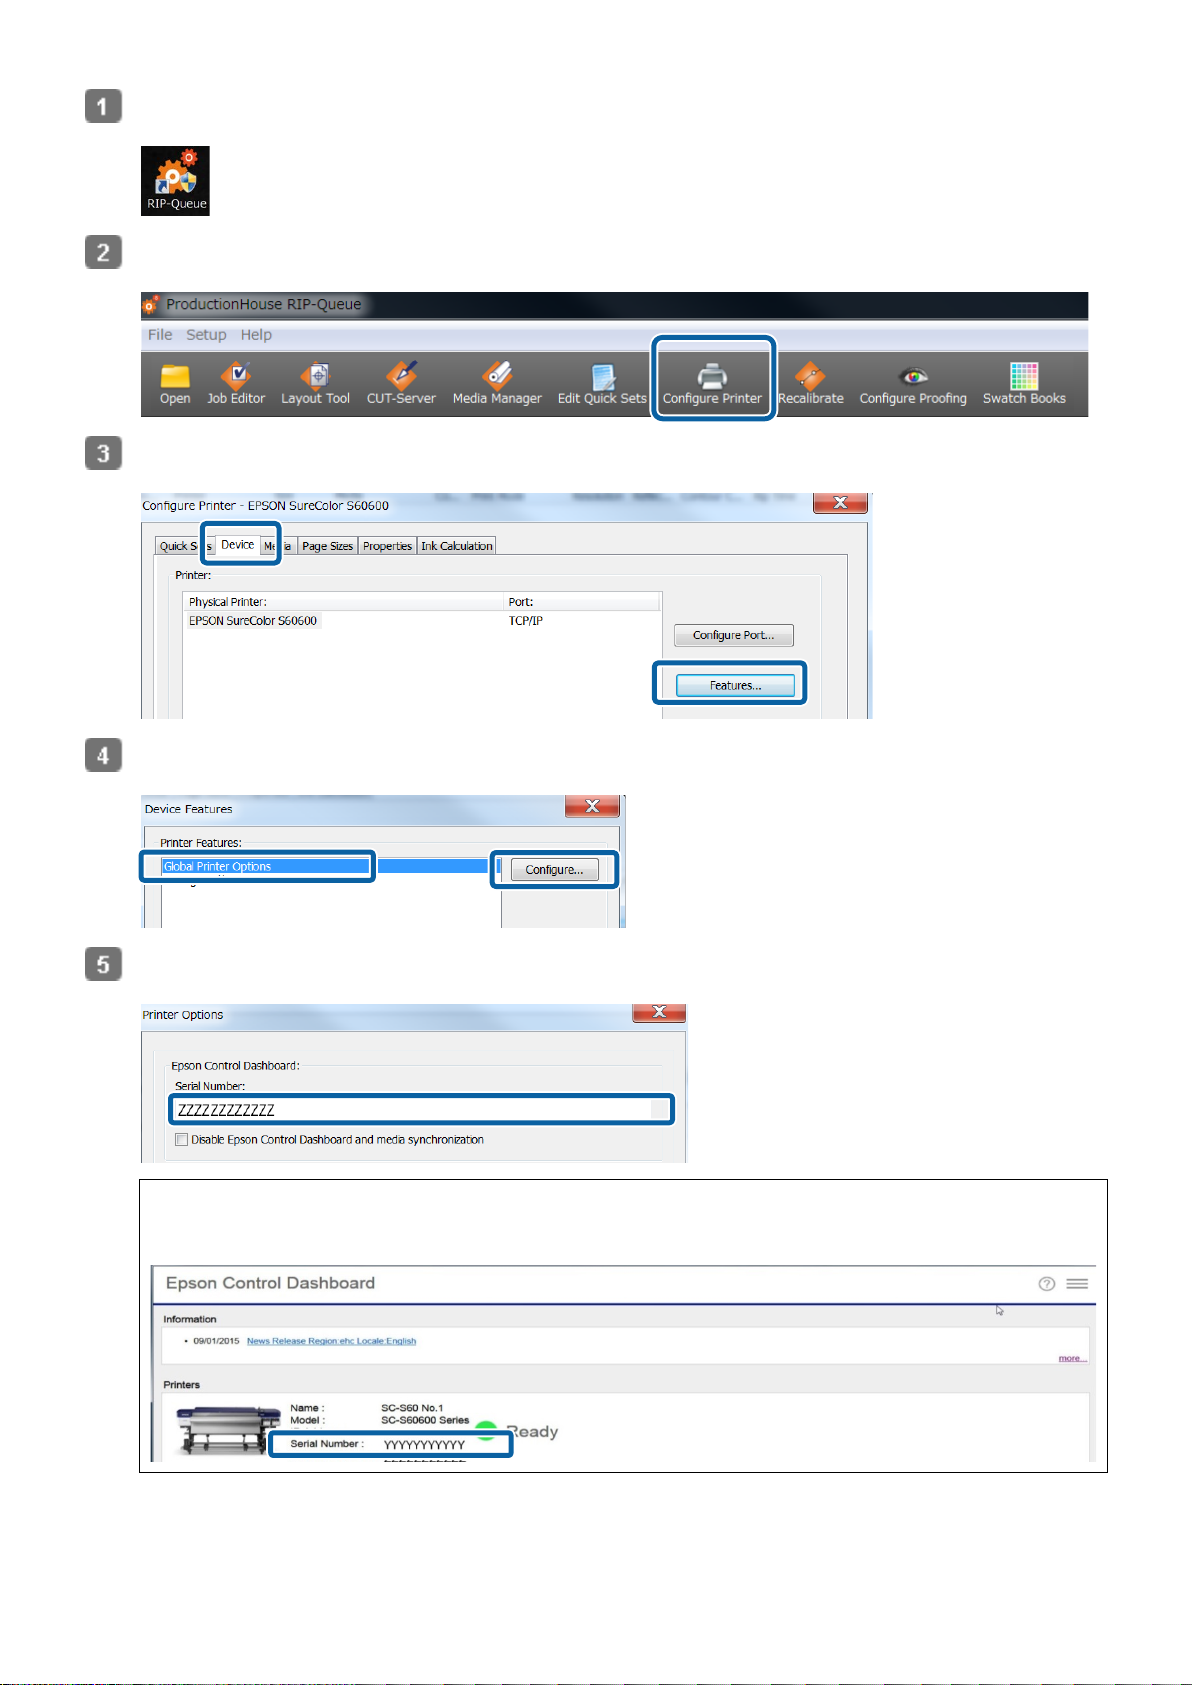
Double-click the RIP Queue icon.
Click [Configure Printer] from the toolbar.
Click [Features] from the [Device] tab.
Select [Global Printer Options] and click [Configure].
Check that the serial number of your printer appears in [Serial Number] in [Epson Control Dashboard].
Note :
The printer serial number can be checked on the [Home] screen of Dashboard.
9

Copy the Epson exclusive wide gamut input profile file. (Optional)
Copy source: Copy and paste the following to the address bar of Explorer.
%PUBLIC%¥Documents¥Epson¥Control Dashboard¥Profile
Copy destination:
[ONYX rip installation folder] - [Profiles] - [CMYK]
Note :
If the above folder cannot be found, search for the files with the keyword "EpsonWideCMYK" for the copy source, and
"OnyxCMYK" for the copy destination.
Importing Print Information
After registering media settings to the printer from the downloaded EMX files, ONYX rip communicates with the printer
and automatically imports the print information to the RIP.
Note :
The following screen is displayed when media that has not been imported is loaded in the printer.
Click [OK] to automatically import the print information.
See the following when printing by auto-synchronizing with the printer’s media settings.
"Creating Quick Sets"
See the following section if you want to save all frequently used settings as presets in advance, or if you cannot import the
print information automatically.
10
Importing Print Information Manually
To import print information manually, perform the following steps after registering media settings to the printer.
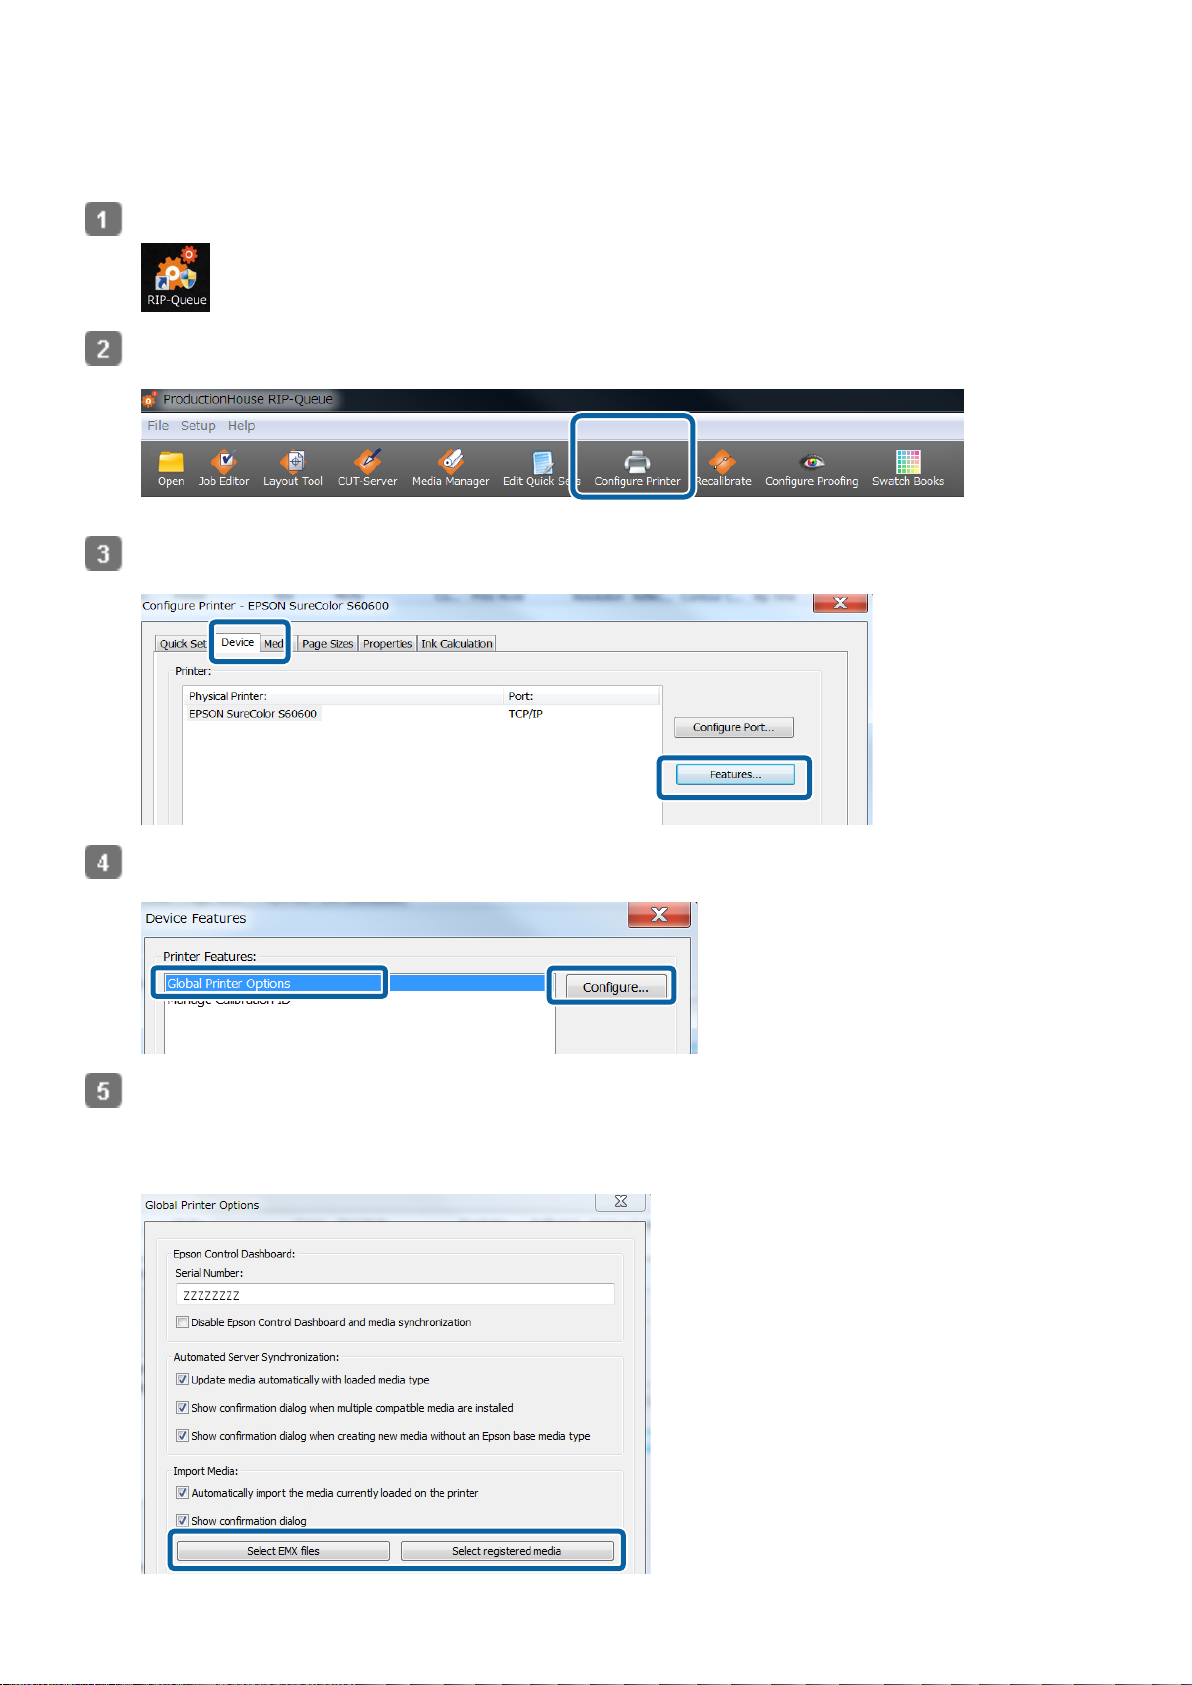
Double-click the RIP Queue icon.
Click [Configure Printer] from the toolbar.
Click [Features] from the [Device] tab.
Select [Global Printer Options], and then click [Configure].
In [Import Media], select the location of the EMX file you want to import.
In most cases, click [Select registered media].
When loading an EMX file copied from another computer, click [Select EMX files], and then select the EMX file.
11
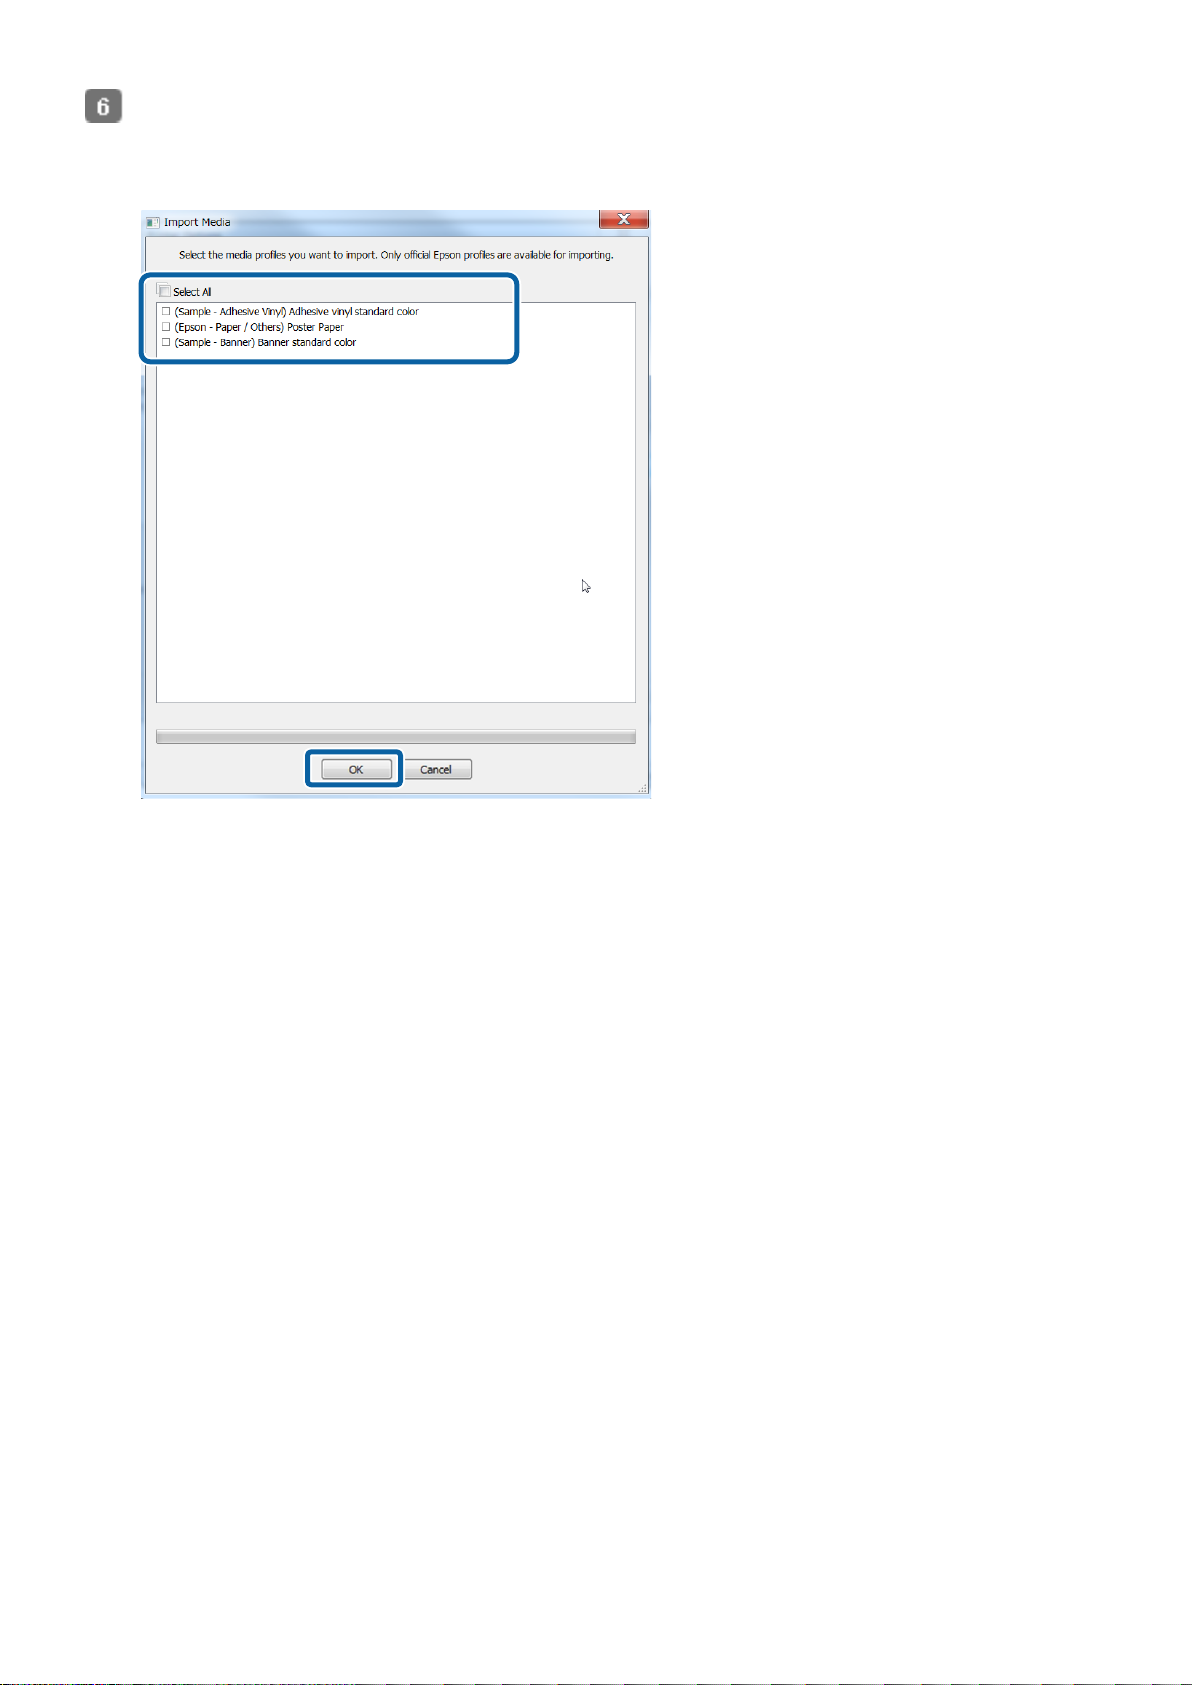
Select the profile to import.
Select the checkbox of the profiles you wish to import, and then click [OK].
[Select All] allows you to import all the profiles displayed.
12

Creating Quick Sets
In ONYX rip, you can save frequently used settings as presets called Quick Sets.
Creating a quick set makes day-to-day printing operations easier.
Right-click the RIP Queue icon and select [Run as administrator].
When creating or changing a quick set, make sure you run as an administrator.
Click [Configure Printer] from the toolbar.
Click [New] from the [Quick Sets] tab.
Enter [Quick Set Name].
We recommend to use an easy to understand name for those who perform printing.
13
Loading...