


i n s t r u c t i o n s
Coffee Maker
EC330
Please retain these instructions for future reference

Coffee Maker |
2 |

Thank you for choosing this coffee machine. To get the very best out of your new coffee machine it is advisable to read these instructions before using the appliance. This is the only way to ensure optimum results and maximum safety.
Using for the first time
Before using the machine for the first time, wash all the accessories in warm soapy water and rinse. For the best tasting coffee the internal circuits must be flushed through at least five times.To do this follow the instructions in the paragraph “How to prepare espresso coffee” using just water.
Installation
•Place the coffee maker on flat work surface at a safe distance from taps and sinks.
•Check that the voltage corresponds to that indicated on the appliance rating plate.The appliance must always be connected to a well-earthed socket rated at 10A minimum.The manufacturer is not liable for damage caused by inadequate earthing of the appliance.
•In the event of incompatibility between the plug on the appliance and the socket, have the plug replaced by a qualified professional.
If the cable is damaged or requires replacing, contact a service centre authorised by the manufacturer only.
•Never install the machine in an environment that can reach a temperature less than or equal to 0°C (if the water in it freezes, the coffee maker may be damaged).
3 |
Coffee Maker |
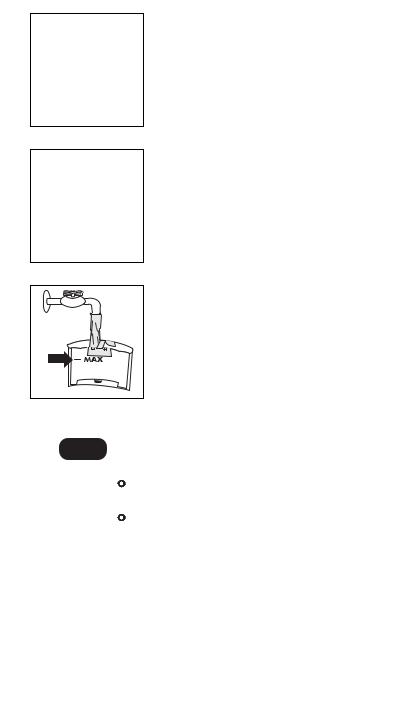
fig. 1
fig. 2
fig. 3
fig. 4
How to prepare espresso coffee
Filling the water tank
To remove the water tank lift the lid (fig.1) and simply pull upwards (fig 2) and fill the tank at the sink (fig 3). Do not exceed the MAX level on the water tank. The tank may also be filled without removing it, simply by pouring water into it directly from a jug. Replace the tank by connecting the valve at the bottom of the tank with the hole in the base on the machine.
WARNING: it is completely normal for there to be water in the compartment under the tank; as a result, this compartment should be dried using a clean sponge.
Note: Do not operate the appliance without water in the tank and always remember to fill the tank when the level drops to a couple of centimetres from the bottom.
Preheating the coffee machine
To ensure your espresso coffee is dispensed at the right temperature it is essential that the coffee unit is preheated.
1.Press the ON/OFF button (fig. 4).
2.Attach the empty filter holder (without coffee) to the machine by positioning it under the boiler outlet with the handle towards the left (fig. 5). Push upwards and at the same time turn the handle as far right as possible. It does not matter if the handle is not centrally aligned with the machine, as long as the filter holder is firmly attached to the appliance.
3.Position a cup under the filter holder. Use the same cup that the coffee will be served in, so that it may be preheated. Wait until the “OK” light comes on (fig. 6), then immediately press the coffee knob (fig. 7). Allow the water to run until the
OK indicator light goes out, then stop the water by pressing the coffee button again (fig. 7).
4.Empty the cup, wait until the “OK” pilot light comes on again and repeat the whole operation one more time.
(It is normal for a small and harmless puff of steam to be given off when removing the filter holder).
|
|
|
|
|
|
|
|
|
|
|
|
|
|
|
|
|
|
|
|
|
|
|
|
|
|
|
|
|
|
|
|
|
|
|
|
|
|
|
|
|
|
|
|
|
|
|
|
|
|
|
|
|
|
|
|
|
|
|
|
|
|
|
|
|
|
|
|
|
|
|
|
|
|
|
|
|
|
|
|
|
|
|
|
|
|
|
|
fig. 5 |
fig. 6 |
|
|
|
fig. 7 |
|
|
|||
Coffee Maker |
|
|
4 |
|
|
|
|
|||

How to prepare espresso coffee
1.After carrying out the preheating of the machine as described in the preceding section, in order to make just one cup of espresso coffee, insert the 1-cup filter (the smaller of the two provided) into the filter holder (Fig. 8) and fill it with one level
measuring spoon of ground coffee (fig. 9) – about 7 grams. If you wish to prepare two cups of espresso coffee, use the 2-cup filter (the larger of the two provided) and fill it with two less- than-level measuring spoons of ground coffee (about 6+6 grams).
IMPORTANT: for correct operation, before adding the ground coffee to the filter holder, make sure the filter is free from ground coffee from the previous infusion.
2.Distribute the ground coffee evenly and press it lightly with the coffee tamper (Fig. 10).
NOTE:Pressing the coffee is very important in order to prepare a good coffee. However if you press too hard, coffee will come out slowly and crema will be of a dark colour. If you press to light, coffee will come out too fast and crema will be a very light colour.
3.Remove any excess coffee from the rim of the filter holder. Attach the filter holder to the machine by positioning the handle to the left of the boiler outlet, then pushing upwards and turning the handle to the right (as in preheating the machine fig. 5).
4.Place the cup or cups (cups can be preheated by rinsing under hot water or heating on the cup warmer plate for 10 minutes) on the removable drip tray (fig 11). Ensure that the cup or cups line up with the dispensing holes on the filter holder. Press the on/off button (fig. 4).
5.Wait until the “OK” light comes on (fig 6) then press the coffee button (fig. 7). Once the required quantity of coffee has been obtained, interrupt delivery by pressing the same button again (fig. 7).
6.To detach the filter holder, turn the handle from right to left.
To avoid any splashing, do not detach the filter holder while the machine is dispensing coffee.
7.To remove the used coffee lock the filter with the built-in lever and let the coffee fall out by knocking the over turned filter holder (fig. 12).
8.To turn the coffee machine off, press the ON/OFF button (fig. 4).
fig. 8
fig. 9
fig. 10
fig. 11
fig. 12
5 |
Coffee Maker |
 Loading...