


9600/3600
USER’S GUIDE
•Read this User’s Guide before you start using your P-touch.
•Keep this User’s Guide in a handy place for future reference.

PREFACE
Thank you for purchasing this P-touch!
With your new P-touch, you can create labels for any purpose. Select from a variety of frames, fonts and character styles to design beautiful custom labels. In addition, the many pre-formatted templates available make label-making quick and easy.
You can print professional-looking labels in no time. The quality and performance of this P-touch make it an extremely practical machine to meet all your labelling needs.
Although this P-touch is easy to use, we suggest that you read this User’s Guide carefully before starting. Keep this manual nearby for future reference.
NOTE
The P-touch will make a noise when it is turned on or while it is printing; however, this does not indicate a malfunction.
|
Declaration of Conformity |
We |
BROTHER INDUSTRIES, LTD. |
|
1-1-1, Kawagishi, Mizuho-ku, |
|
Nagoya 467-8562, Japan |
declare that the Labelling System PT-9600/3600 conforms with the following normative documents:
EMC: |
EN 55022:1998 Class B |
|
EN 55024:1998 |
|
EN 61000-3-2:1995 |
|
EN 61000-3-3:1995 |
and follows the provisions of the Electromagnetic Compatibility Directive 89/336/EEC (as amended by 91/ 263/EEC and 92/31/EEC). The AC adapter also conforms with EN 60950 and follows the provisions of the Low Voltage Directive 73/23/EEC.
Issued by: BROTHER INDUSTRIES, LTD. P & H company Development DIV.

|
QUICK REFERENCE |
Entering text |
|
|
|
Adding a space |
Space bar |
|
|
Entering/Exiting Insert |
i |
mode |
|
Adding an uppercase |
hor t+ desired character |
letter |
|
Adding a series of |
c→ Type character |
uppercase letters (enter- |
|
ing Caps mode) |
|
|
|
Adding a lowercase let- |
hor t+ desired character |
ter in Caps mode |
|
Adding an accented |
a→ Type character |
character |
OR |
|
|
|
d+ s→ Type letter (OR n) → mor gto select letter → |
|
Rotate r(OR jor k) to select → Press r(OR n) |
|
OR |
|
:or l+ Type letter |
|
|
Adding a symbol |
Rotate rto select SYMBOL, then press r(OR just press s) → |
|
Rotate r(OR mor g) to select category → Rotate r(OR jor k) |
|
to select symbol → n |
|
|
Adding a new line |
n |
|
|
|
|
Adding a new block |
d+ n |
|
|
Adding a barcode |
Rotate rto select BARCODE, then press r(OR just press d+ i) |
|
→ Type barcode data → Press r(OR n) |
Adding a special char- |
Rotate rto select BARCODE, then press r(OR just press d+ i) |
acter to the barcode |
→ s→ mor gto select special character → n |
|
|
|
|
Changing a barcode |
Rotate rto select BARCODE, then press r(OR just press d+ i) |
parameter |
→ m→ jor kto select parameter → Rotate r(OR mor g) to |
|
|
|
select setting → Press r(OR n) |
|
|

Setting up the Euro con- |
Rotate rto select CONVERSION SETUP, then press r(OR just press |
version function |
d+ h) → Rotate r(OR mor g) to select currency → Press |
|
|
|
r(OR n) → Type in exchange rate → Press r(OR n) → Rotate |
|
r(OR mor g) to select separator → Press r(OR n) → Rotate r |
|
(OR mor g) to select printing order → Press r(OR n) |
|
|
Converting euros to/ |
d+ 7→ Rotate r(OR jor k) to select conversion direction |
from other currencies |
→ Type in value to be converted → Press r(OR n) |
|
|
|
|
Editing text
Deleting text |
bOR q |
|
|
Deleting one line of text |
d+ q |
|
|
Clearing all of the text |
d+ b→ mor gto select TEXT & FORMAT → n |
and formats |
|
Clearing only the text |
d+ b→ mor gto select TEXT ONLY → n |
|
|
Formatting text
Changing formats for |
Rotate rto select GLOBAL FORMAT, then press r(OR just press d+ |
entire text |
1) → Rotate r, then press r(OR jor k) to select function → Rotate |
|
|
|
r, then press r(OR mor g) to select setting → Press r(OR n) |
|
|
Changing formats for a |
j, k, mor gto select text block → Rotate rto select BLOCK |
block of text |
FORMAT, then press r(OR just press d+ 2) → Rotate r, then |
|
|
|
press r(OR jor k) to select function → Rotate r, then press r |
|
(OR mor g) to select setting → Press r(OR n) |
Changing formats for a |
j, k, mor gto select text line → Rotate rto select LINE FOR- |
line of text |
MAT, then press r(OR just press d+ 3) → Rotate r, then press |
|
|
|
r(OR jor k) to select function → Rotate r, then press r(OR m |
|
or g) to select setting → Press r(OR n) |
Changing the font |
Select GLOBAL FORMAT, BLOCK FORMAT or LINE FORMAT, then |
|
press r(OR just press d+ 1, 2or 3) → Rotate r, then press |
|
r(OR jor k) to select FONT → Rotate r(OR mor g) to select |
|
setting → Press r(OR n) |

Changing the character |
Select GLOBAL FORMAT, BLOCK FORMAT or LINE FORMAT, then |
|
size |
press r(OR just press d+ 1, 2or 3) → Rotate r, then press |
|
|
||
|
r(OR jor k) to select SIZE → Rotate r(OR mor g) to select |
|
|
setting → Press r(OR n) |
|
Changing the character |
Select GLOBAL FORMAT, BLOCK FORMAT or LINE FORMAT, then |
|
width |
press r(OR just press d+ 1, 2or 3) → Rotate r, then press |
|
|
||
|
r(OR jor k) to select WIDTH → Rotate r(OR mor g) to |
|
|
select setting → Press r(OR n) |
|
Changing the character |
Select GLOBAL FORMAT, BLOCK FORMAT or LINE FORMAT, then |
|
style |
press r(OR just press d+ 1, 2or 3) → Rotate r, then press |
|
|
||
|
r(OR jor k) to select STYLE1 or STYLE2 → Rotate r(OR mor |
|
|
g) to select setting → Press r(OR n) |
|
Changing the line effects |
Select GLOBAL FORMAT, BLOCK FORMAT or LINE FORMAT, then |
|
|
press r(OR just press d+ 1, 2or 3) → Rotate r, then press |
|
|
r(OR jor k) to select LINE EFFECTS → Rotate r(OR mor g) |
|
|
to select setting → Press r(OR n) |
|
Changing the frame |
Select GLOBAL FORMAT, BLOCK FORMAT or LINE FORMAT, then |
|
|
press r(OR just press d+ 1, 2or 3) → Rotate r, then press |
|
|
r(OR jor k) to select FRAME → Rotate r(OR mor g) to |
|
|
select setting → Press r(OR n) |
|
Changing the text align- |
Select GLOBAL FORMAT, BLOCK FORMAT or LINE FORMAT, then |
|
ment |
press r(OR just press d+ 1, 2or 3) → Rotate r, then press |
|
|
||
|
r(OR jor k) to select ALIGNMENT → Rotate r(OR mor g) to |
|
|
select setting → Press r(OR n) |
|
Changing the label mar- |
Select GLOBAL FORMAT, then press r(OR just press d+ 1) → |
|
gins |
Rotate r, then press r(OR jor k) to select T. MARGIN → Rotate r |
|
|
||
|
(OR mor g) to select setting → Press r(OR n) |
|
|
|
|
Changing the label |
Select GLOBAL FORMAT, then press r(OR just press d+ 1) → |
|
length |
||
Rotate r, then press r(OR jor k) to select T. LENGTH → Rotate r |
||
|
||
|
(OR mor g) to select setting → Press r(OR n) |
|
|
|
|
Changing the block |
Select GLOBAL FORMAT, then press r(OR just press d+ 1) → |
|
margins |
||
Rotate r, then press r(OR jor k) to select B. MARGIN → Rotate |
||
|
||
|
r(OR mor g) to select setting → Press r(OR n) |
|
|
|

Changing the block |
Select GLOBAL FORMAT or BLOCK FORMAT, then press r(OR just |
|
length |
press d+ 1or 2) → Rotate r, then press r(OR jor k) to |
|
|
||
|
select B. LENGTH → Rotate r(OR mor g) to select setting → Press |
|
|
r(OR n) |
|
Printing in reverse (mir- |
Rotate rto select MIRROR, then press r(OR just press d+ p) → |
|
ror printing) |
Rotate r(OR mor g) to select setting → Press r(OR n) |
|
|
||
|
|
|
Formatting text for a |
d+ S→ Rotate r(OR mor g) to select setting → Press r(OR |
|
stamp |
||
n) |
||
|
||
|
|
|
Rotating the text |
Select GLOBAL FORMAT or BLOCK FORMAT, then press r(OR just |
|
|
press d+ 1or 2) → Rotate r, then press r(OR jor k) to |
|
|
select ROTATE → Rotate r(OR mor g) to select setting → Press r |
|
|
(OR n) |
Using an Auto format template
Creating a label or |
Rotate rto select AUTO FORMAT, then press r(OR just press d |
|
stamp from an Auto for- |
+ 6) → Rotate r(OR mor g) to select template → Press r(OR |
|
mat template |
||
|
n) → Type in each line of text, then press r(OR n) → Continue |
|
|
with 1, 2, 3 or 4 |
|
|
|
|
1 Printing an Auto for- |
Rotate r(OR mor g) to select PRINT → Press r(OR n) |
|
mat template |
||
|
||
|
|
|
2 Editing the Auto for- |
Rotate r(OR mor g) to select CONTINUE → Press r(OR n) → |
|
mat template text |
||
Type in each line of text, then press r(OR n) |
||
|
||
|
|
|
3 Changing the style of |
Rotate r(OR mor g) to select CHANGE STYLE → Press r(OR |
|
the Auto format tem- |
n) → Rotate r(OR mor g) to select format style → Press r(OR |
|
plate |
||
|
n) |
|
|
|
|
4 Quitting the Auto |
Rotate r(OR mor g) to select FINISH → Press r(OR n) → Press |
|
format function |
||
r(OR n) |
||
|
||
|
|
Printing text |
|
|
|
Previewing the label |
Rotate rto select LAYOUT PREVIEW, then press r(OR just press |
|
|
|
d+ 9) (jor kto scroll) |
|
|

Changing how the |
Rotate rto select AUTO CUT, then press r(OR just press d+ f) |
|
labels are cut |
||
→ Rotate r(OR mor g) to select setting → Press r(OR n) |
||
|
||
|
|
|
Printing using the cur- |
p |
|
rent print options |
|
|
Feeding and cutting |
f |
|
24 mm of tape |
|
|
Printing many copies |
Rotate rto select REPEAT, then press r(OR just press d+ 4) → |
|
|
Rotate r(OR mor g) to select number (OR type number) → Press |
|
|
r(OR n) |
|
|
|
|
Printing many copies |
Rotate rto select NUMBER, then press r(OR just press d+ 5) |
|
while increasing |
→ j, k, mor gto select start of numbering field → Press r(OR |
|
selected text |
||
|
n) → jor kto select end of numbering field → Press r(OR n) |
|
|
→ Rotate r(OR mor g) to select (or type) number → Press r(OR |
|
|
n) |
|
|
|
Storing, recalling, deleting & printing text files
Saving a file |
Rotate rto select MEMORY, then press r(OR just press d+ 8) |
|
|
→ Rotate r(OR mor g) to select STORE → Press r(OR n) → |
|
|
Rotate r(OR mor g) to select file number → Type file name → |
|
|
Press r(OR n) |
|
|
|
|
Recalling a previously |
Rotate rto select MEMORY, then press r(OR just press d+ 8) |
|
saved file |
→ Rotate r(OR mor g) to select RECALL → Press r(OR n) → |
|
|
||
|
Rotate r(OR mor g) to select file number → Press r(OR n) |
|
|
|
|
Deleting a previously |
Rotate rto select MEMORY, then press r(OR just press d+ 8) |
|
saved file |
||
→ Rotate r(OR mor g) to select CLEAR → Press r(OR n) → |
||
|
||
|
Rotate r(OR mor g) to select file number → Space bar so ! |
|
|
appears → Press r(OR n) → Press r(OR n) |
|
|
|
|
Printing a previously |
Rotate rto select MEMORY, then press r(OR just press d+ 8) |
|
saved text file |
||
→ Rotate r(OR mor g) to select PRINT → Press r(OR n) → |
||
|
||
|
Rotate r(OR mor g) to select file number → Space bar so ! |
|
|
appears → Press r(OR n) |
|
|
|


CONTENTS
Chapter 1 |
|
Before You Start ...................................................... |
1 |
GENERAL DESCRIPTION ............................................................. |
2 |
Top view .............................................................................................................. |
2 |
Bottom view ........................................................................................................ |
3 |
LCD display ........................................................................................................ |
3 |
Keyboard ............................................................................................................. |
4 |
Carrying case ...................................................................................................... |
5 |
Chapter 2 |
|
Getting Started ........................................................ |
7 |
PRECAUTIONS ............................................................................ |
8 |
Connecting the AC adapter ................................................................................ |
9 |
Turning on/off the P-touch .................................................................................. |
9 |
Installing/replacing a tape cassette .................................................................... |
9 |
Connecting the P-touch to a computer ............................................................. |
10 |
Installing the Software & Printer Driver .......................................................... |
11 |
Reading the User’s Guide ................................................................................. |
27 |
Using P-touch Editor 3.2 .................................................................................. |
28 |
Using P-touch Quick Editor ............................................................................. |
30 |
Uninstalling the Software & Printer Driver ..................................................... |
33 |
Attaching labels ................................................................................................ |
36 |
Assembling stamps ............................................................................................ |
37 |
Chapter 3 |
|
Functions .............................................................. |
41 |
Performing basic operations ............................................................................ |
42 |
Entering text ...................................................................................................... |
44 |
Editing text ........................................................................................................ |
51 |
Formatting ........................................................................................................ |
52 |
Printing ............................................................................................................. |
68 |
Storing and recalling files ................................................................................ |
71 |
i

Chapter 4 |
|
Machine Adjustments ........................................... |
79 |
Machine adjustments ......................................................................................... |
80 |
ERROR MESSAGE LIST .............................................................. |
83 |
TROUBLESHOOTING ............................................................... |
89 |
MACHINE SPECIFICATIONS ..................................................... |
93 |
Appendix .............................................................. |
95 |
Symbols .............................................................................................................. |
96 |
Special barcode characters ............................................................................... |
99 |
Fonts .................................................................................................................. |
99 |
Sizes and widths ............................................................................................... |
100 |
Type styles ....................................................................................................... |
102 |
Framing and shading patterns ........................................................................ |
104 |
Pre-set templates ............................................................................................. |
105 |
Template text styles ......................................................................................... |
108 |
INDEX ..................................................................................... |
109 |
ACCESSORIES .......................................................................... |
113 |
ii
Ch.1 Before You Start
Chapter 1
Before You Start
Before You Start
1
Start You Before
Ch. 1 Before You Start
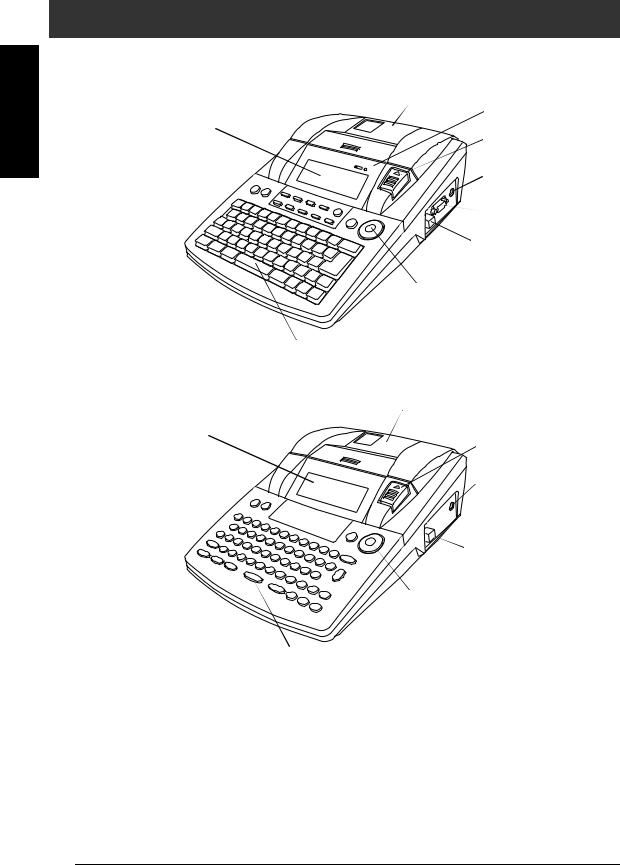
GENERAL DESCRIPTION
Top view
P-touch 9600: |
Tape compartment cover |
|
|
|
Recharging indicator |
|
LCD display |
|
Cover release button |
|
AC adapter connector |
 RS-232C port
 USB port
 Navigation dial
Keyboard
P-touch 3600:
Tape compartment cover
LCD display
 Cover release button
 AC adapter connector
 USB port
 Navigation dial
Keyboard
2
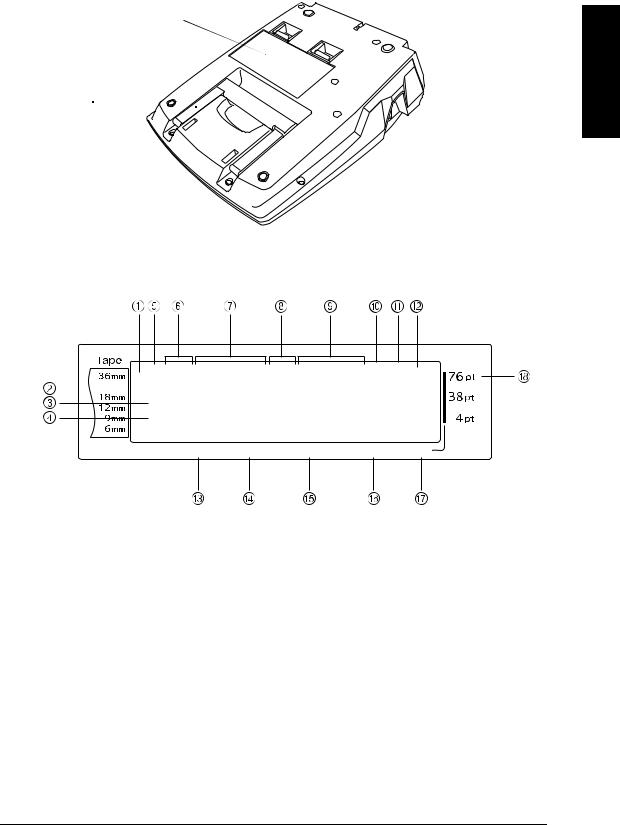
Bottom view
Battery compartment cover (PT-9600 only)
Handle 
Ch.1 Before You Start
Before You Start
 Tape exit slot
LCD display
R123456789 A B C DEFK
 G <<<P-touch>>>
H NO |
|
|
|
|
L |
|
|
|
|
M |
|
|
|
Q |
I 1:_ |
|
|
|
|
J AUTO |
0.4 |
HELSINKI |
A |
AUTO |
Length |
Margin |
Font |
Width |
Size |
1 |
Tape width indicator p. 10 |
0 |
Mirror printing setting indicator p. 64 |
2 |
Caps indicator p. 44 |
A Rotate setting indicator p. 60 |
|
3 |
Alt indicator p. 45 |
B Auto cut setting indicator p. 68 |
|
4 |
Insert mode indicator p. 44 |
C Tape length setting p. 62 |
|
5 |
Line effects setting indicator p. 58 |
D Tape margin setting p. 61 |
|
6 |
Frame setting p. 58 |
E Font setting p. 54 |
|
7 |
Style1 setting indicators p. 56 |
F Character width setting p. 55 |
|
8 |
Style2 setting indicators p. 57 |
G Character size setting p. 54 |
|
9 |
Text alignment setting indicators p. 59 |
H Character size setting indicator p. 54 |
|
3
Ch. 1 Before You Start
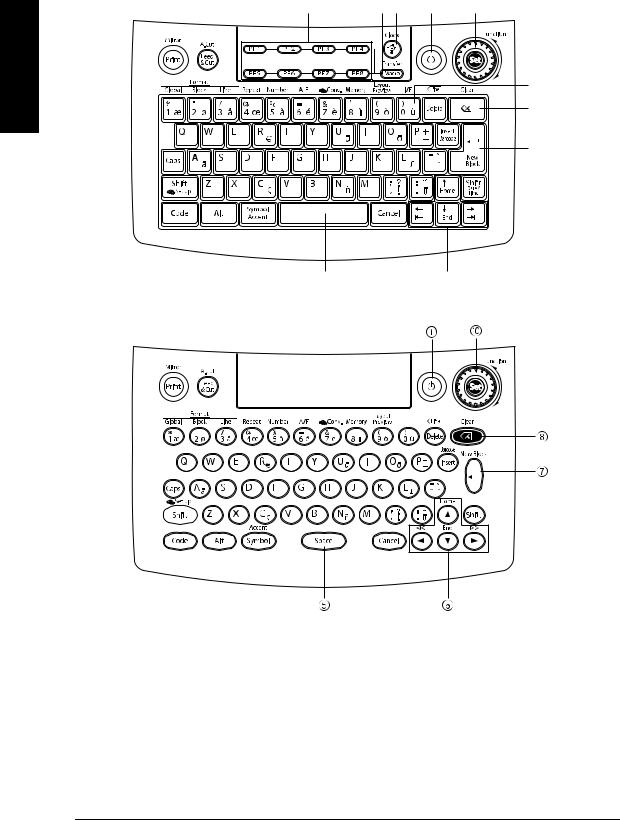
Keyboard
P-touch 9600:
4 |
32 |
1 |
0 |
Start You Before
5 6
P-touch 3600:
9
8
7
1 |
Power key p. 9 |
6 |
Arrow keys p. 42 |
2 |
Screen backlight key (PT-9600 only) |
7 |
Return key p. 43 |
|
Refer to the Advanced Functions booklet. |
||
3 |
Macro key (PT-9600 only) |
8 |
Backspace key p. 51 |
|
Refer to the Advanced Functions booklet. |
||
4 |
PF keys (PT-9600 only) |
9 |
Interface key (PT-9600 only) |
|
Refer to the Advanced Functions booklet. |
|
Refer to the Advanced Functions booklet. |
5 |
Space bar p. 44 |
0 |
Function dial/Set key p. 43 |
4
Ch.1 Before You Start
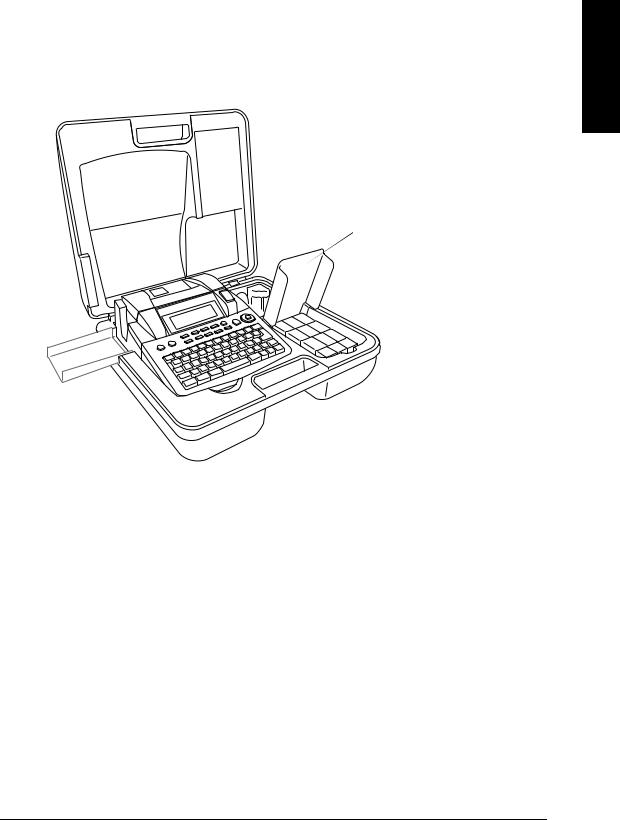
Carrying case
The carrying case, which is included with the PT-9600 and available as an option for the PT-3600, is useful for storing and transporting the P-touch and its accessories. The cover attached inside the case at the right helps protect your tape cassettes from dust. In addition, if the cover is removed and attached to the left side of the carrying case, it can be used as a tray for collecting labels that are fed out.
Tape cassette cover/label tray
Before You Start
5

Ch. 1 Before You Start
Start You Before
6

Ch. 2
Chapter 2
Getting Started
Getting Started
7

Ch. 2 Getting Started
PRECAUTIONS
|
● Use only Brother TZ tapes with this machine. Do not use tapes that do not have the |
|
|
|
|
||
|
mark. |
||
|
● Do not pull on the tape being fed from the P-touch, otherwise the tape cassette may be dam- |
||
|
aged. |
||
|
● Avoid using the machine in extremely dusty places. Keep it out of both direct sunlight and rain. |
||
|
● Do not expose the machine to extremely high temperatures or high humidity. Never leave it on |
||
|
the dashboard or in the back of your car. |
||
|
|||
Getting |
● Do not store tape cassettes where they would be exposed to direct sunlight, high humidity or |
||
● Do not leave any rubber or vinyl on the machine for an extended period of time, otherwise the |
|||
Started |
dust. |
||
● Do not clean the machine with alcohol or other organic solvents. Only use a soft, dry cloth. |
|||
|
machine may be stained. |
||
|
● Do not put any foreign objects into or heavy objects on the machine. |
||
|
● To avoid injuries, do not touch the cutter’s edge. |
||
|
|||
|
● Use only the AC adapter designed exclusively for this machine. Use of any other adapter will |
||
|
void the warranty. |
||
|
● Do not try to disassemble the AC adapter. |
||
|
● When the machine is not to be used for a long period of time, disconnect the AC adapter, and |
||
|
(for the PT-9600 only) remove the rechargeable battery to prevent it from leaking and damaging |
||
|
the machine. |
||
|
● Use only the Ni-MH rechargeable battery designed exclusively for this machine. (PT-9600 only) |
||
|
● Never try to disassemble the P-touch. |
||
|
● Use only the enclosed USB interface cable. Use of any other USB cable will void the warranty. |
||
8
Connecting the AC adapter
● ● ● ● ● ● ● ● ● ● ● ● ● ● ● ● ● ● ● ● ● ●
This P-touch can be used anywhere a standard electrical outlet is available.
1Insert the plug on the adapter cord into the AC adapter connector on the right side of the P-touch.
2Insert the pronged plug on the other end of the adapter cord into the nearest standard electrical outlet.
NOTE
Only use the AC adapter designed exclusively for this machine.
If you do not intend to use this machine for an extended period of time, disconnect the AC adapter.
Turning on/off the P-touch
● ● ● ● ● ● ● ● ● ● ● ● ● ● ● ● ● ● ● ● ● ●
The power key (o) is located in the upperright corner of the machine’s keyboard. If the P-touch has remained plugged in, the previous session’s text is displayed when you turn it on again. This feature allows you to stop work on a label, turn off the machine, and return to it later without having to re-enter the text.
If the PT-9600 is being operated from its rechargeable battery, the machine will automatically turn off if no key is pressed or no operation is performed for 5 minutes.
NOTE
Do not unplug the AC adapter if the P-touch is plugged in and turned on, otherwise the data being edited will be erased. Be sure to turn off the P-touch before unplugging the AC adapter.
If the P-touch is connected to a computer through a USB interface cable, the P-touch will automatically turn off if no key is pressed or no operation is performed for 30 minutes.
If the PT-9600 is connected to a computer through a serial (RS-232C) interface cable or is printing data from the computer, it will not automatically turn off.
If the P-touch is connected to a computer through a USB interface cable and is printing data from the computer, the P-touch will not automatically turn off.
Press oto turn on or turn off the P-touch.
Ch. 2 Getting Started
Installing/replacing a tape cassette
● ● ● ● ● ● ● ● ● ● ● ● ● ● ● ● ● ● ● ● ● ●
Tape cassettes are available for this machine in a wide variety of types, colours and sizes, enabling you to make distinctive colour-coded and stylised labels. In addition, this machine has been designed to allow you to change the tape cassette quickly and easily.
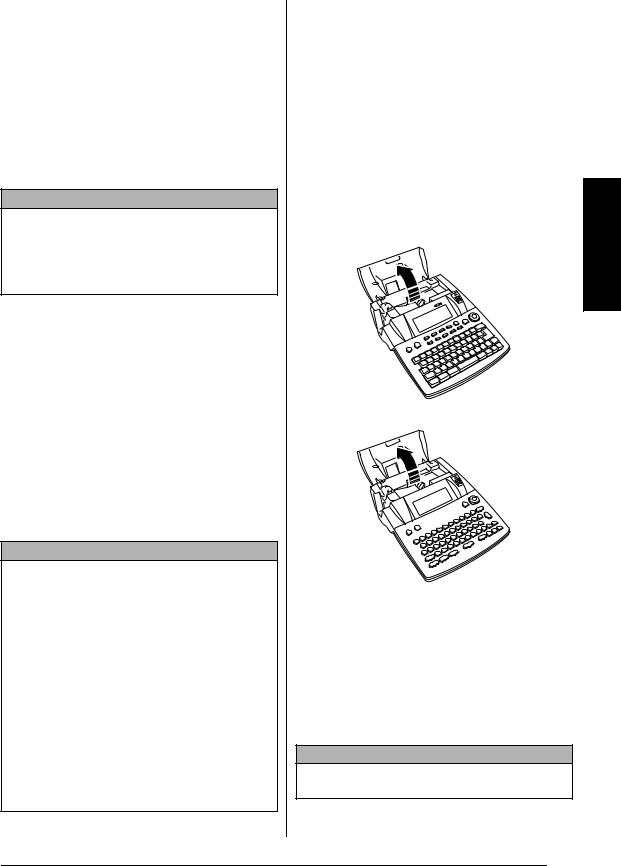
1Press the cover release button, and then lift open the tape compartment cover.
P-touch 9600:
P-touch 3600:
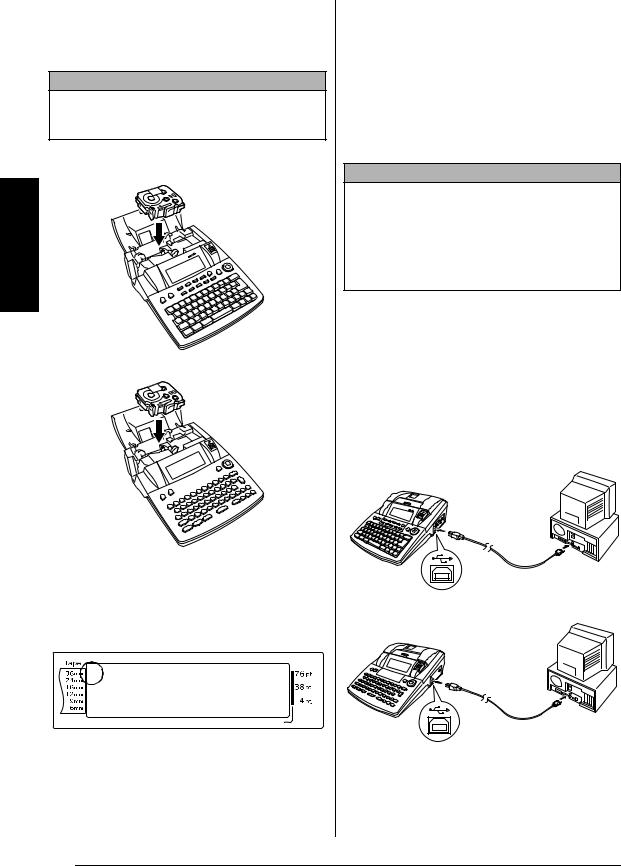
2If a tape cassette is already installed and you wish to replace it, remove it by pulling it straight up.
3If the ink ribbon is loose in the tape cassette to be installed, use your finger to wind the toothed wheel in the direction of the arrow on the cassette until there is no slack in the ribbon. Also, make sure that the end of the tape feeds under the tape guides.
NOTE
If you are using a new tape cassette provided with a stopper, be sure to remove the stopper.
Getting Started
9
Started Getting
Ch. 2 Getting Started
4Insert the tape cassette firmly into the tape compartment, making sure that the entire back of the cassette touches the bottom of the compartment.
NOTE
When inserting the tape cassette, make sure that the inner ribbon does not catch on the corner of the metal guide.
.
P-touch 9600:
P-touch 3600:
5Close the compartment cover, and then press o to turn on the machine, if it is off. The width of the currently installed tape is shown by the tape width indicator on the left edge of the display.
R123456789 ABCDEFK |
|||||
R |
<<< P-touch >>> |
|
|||
RG |
|
||||
RH |
|
|
|
|
|
RI |
1:_ |
|
|
|
Q |
RJ |
0.4 |
HELSINKI |
A |
AUTO |
|
|
AUTO |
||||
|
Length |
Margin |
Font |
Width |
Size |
6Press f once to remove any slack in the tape and cut off the excess.
Connecting the P-touch to a computer
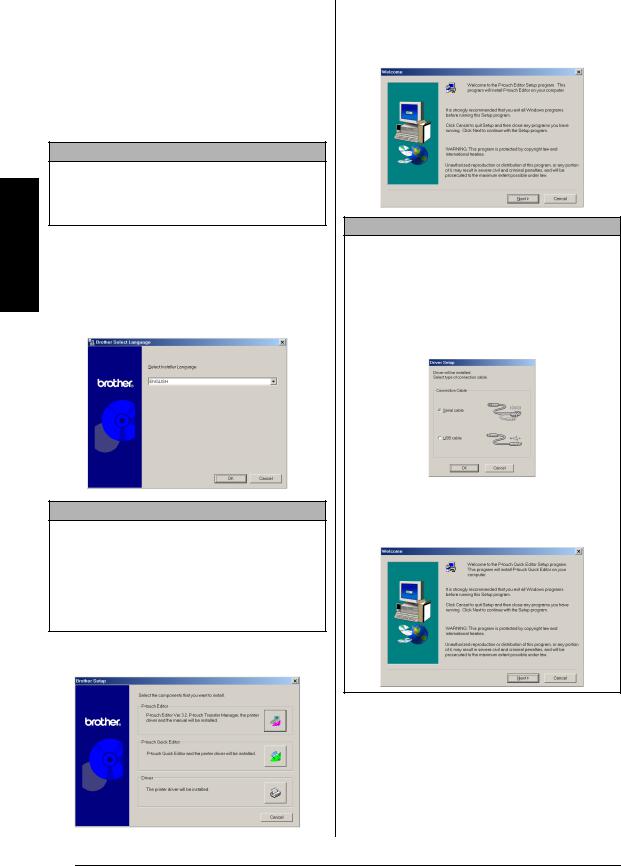
● ● ● ● ● ● ● ● ● ● ● ● ● ● ● ● ● ● ● ● ● ●
This machine is equipped with a USB port, allowing you to use a USB cable to connect the
P-touch to a computer running Windows® or Mac OS, and print labels created using the P-touch Editor software.
NOTE
Do not connect the P-touch to the computer before installing the P-touch Editor software, otherwise it may not be installed correctly. Follow the installation procedure on pages 11 through 27 to install the P-touch Editor software and the printer driver, and connect the P-touch to the computer when you are instructed to do so.
To connect a computer to the P-touch through the USB port:
1Insert the flat (A) connector on the USB cable into the USB port on the computer.
2Insert the square (B) connector on the USB cable into the USB port on the right side of the P-touch.
3Turn on the P-touch.
P-touch 9600:
P-touch 3600:
10
After the P-touch is connected to a computer using a USB cable, the P-touch enters Interface mode when data is sent to it from the computer.
NOTE
To exit Interface mode for a USB connection and return to the text, press any key.
The P-touch cannot enter Interface mode for a USB connection while it is printing, feeding tape or in Interface mode for an RS-232C connection (PT-9600 only) or while a macro is being assigned to a PF key (PT-9600 only).
R123456789 ABCDEFK |
||||
R |
INTERFACE |
|
|
|
RG |
|
|
||
RH |
|
|
|
Q |
RI |
|
|
|
|
RJ AUTO |
0.4 |
HELSINKI |
A |
AUTO |
Length |
Margin |
Font |
Width |
Size |
Ch. 2 Getting Started
Installing the Software &
Printer Driver
● ● ● ● ● ● ● ● ● ● ● ● ● ● ● ● ● ● ● ● ● ●
In order to provide even more illustration and layout features to the label-making possibilities available with your P-touch, two applications are available on the enclosed CD-ROM: P- touch Editor 3.2 and P-touch Quick Editor. With either application, the printer driver must also be installed in order to print labels from the P- touch.
On a Computer Running
Windows®
Before installation
Check that your system configuration meets the following requirements.
Computer: IBM PC or compatible.
Operating system: Pre-installed with Microsoft® Windows® 98, 98 SE, Me, 2000 Professional or XP
NOTE
For installation on Windows® 2000, administrator privileges are required. In addition, printing requires power user or administrator privileges. This software cannot be operated in Users groups. In addition, this software is not compatible with the Windows® 2000 Server operating system.
With Windows® XP, printing and installation is only possible from an account with administrator privileges. These operations cannot be performed from an account with limited privileges.
Hard disk free space: At least 20 MB (100 MB for a full installation)
NOTE
Up to 100 MB of hard disk free space may be needed when printing long labels or large amounts of data.
Memory: At least 64 MB
Monitor: VGA or higher graphics card
USB port CD-ROM drive
Getting Started
11
Started Getting
Ch. 2 Getting Started
Installing the P-touch Editor 3.2 software
The P-touch Editor 3.2 software includes a variety of more complex functions for printing barcodes and images, enabling you to design just about any label that you can image. Install the P-touch Editor 3.2 software onto a PC as described below.
NOTE
Do not connect the P-touch to the computer before installing the software, otherwise it may not be installed correctly. Be sure to connect the P-touch only when you are instructed to do so.
To install the P-touch Editor 3.2 software
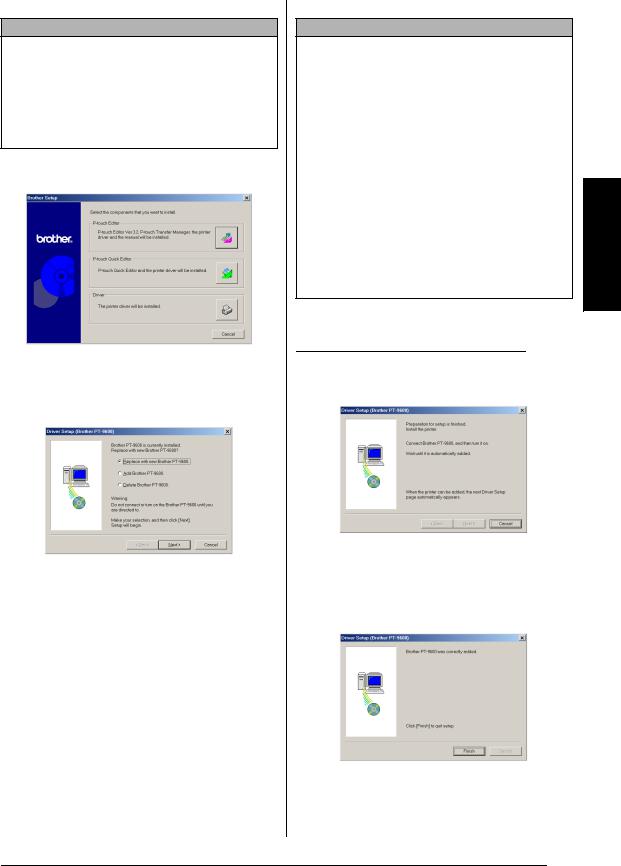
1Insert the enclosed CD-ROM into the computer’s CD-ROM drive. A dialog box automatically appears, allowing you to the select the language of the Installer.
NOTE
If the dialog box does not automatically appear, double-click “My Computer” on the desktop, and then double-click the CD-ROM drive containing
the CD-ROM. (For Windows® XP, click “My Computer” in the Start menu, and then double-click the CD-ROM drive containing the CD-ROM.) Next, double-click “Setup.exe” to display the dialog box.
2Select the desired language, and then click the OK button.
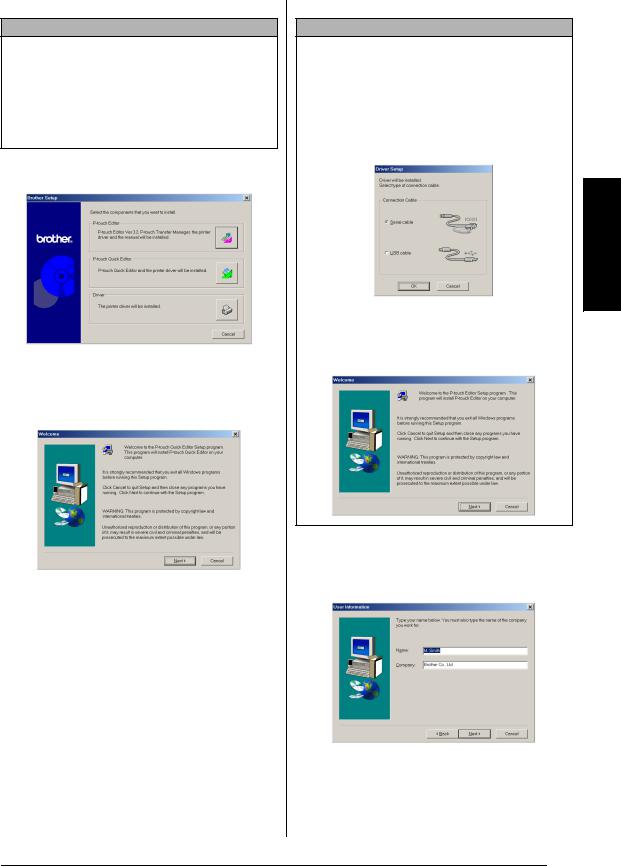
3Click the upper button (P-touch Editor). The InstallShield® Wizard for installing the P-touch Editor software starts up, and then the Welcome dialog box appears.
NOTE
To install just the printer driver, click the lower button (Driver). The first Driver Setup dialog box appears, allowing you to select whether the P- touch will be connected through the USB port or the RS-232C port. Continue with the procedure in Installing the USB printer driver on page 16. (To install the serial printer driver, refer to the Advanced Functions booklet.)
To install the P-touch Quick Editor software, click the middle button (P-touch Quick Editor). Continue with the procedure in Installing the P-touch Quick Editor software on page 14.
4Carefully read the contents of the Welcome dialog box, and then click the Next button to continue. The User Information dialog box appears.
12
5 Type the necessary information into the appropriate boxes (If the information has
already been registered in Windows®, it will automatically appear.), and then click the Next button. A dialog box appears, asking for confirmation of the entered information.
6Click the Yes button to register the entered information.
NOTE
To change the registration information, click the No button, and then return to step 4.
The Setup Type dialog box appears.
7Select the installation method, and then click the Next button.
●For a Typical or Compact installation
Selecting “Typical” or “Compact”, then clicking the Next button immediately starts installation.
Ch. 2 Getting Started
Typical: All of the basic options (P-touch Editor 3.2, Clip art, Auto Format templates, Help and fonts) are installed.
Compact: Only P-touch Editor 3.2 is installed.
●For a Custom installation
Selecting “Custom”, then clicking the Next button displays a dialog box that allows you to select which options to install. Only the options with a check mark beside them will be installed. In addition to the basic options listed for a Typical installation, the User’s Guide can also be installed.
1)Select which options to install.
Editor: P-touch Editor 3.2 software
Clip Art: Illustrations for the P-touch Editor 3.2 Clip Art function
Fonts
Auto Format Templates: Templates for the Auto Format function
Help: Help files for P-touch Editor 3.2 User’s Guide: HTML User’s Guide for P-touch Editor 3.2 (The User’s Guide can also be viewed from the CDROM.)
Getting Started
13
Started Getting
Ch. 2 Getting Started
Transfer Manager: (PT-9600 only-not compatible with the software for the PT-3600) Two applications: Transfer Manager (which allows you to transfer templates, a database linked to a template or image data to the P-touch from a computer) and Backup Manager (which allows you to back up P-touch data on a PC and transfer it back to the P-touch)
If the Change button can be clicked while an option is selected, sub-com- ponents can be selected. Click the Change button to display the Select Sub-components dialog box, and then select the sub-components that you wish to install by putting a check mark beside them. If certain options or subcomponents are not installed, some P- touch Editor functions may not be available. After selecting the desired sub-components, click the Continue button.
2)Click the Next button to begin installation.
8After P-touch Editor is installed, a dialog box appears, allowing you to select whether or not to install the printer driver.
To install the printer driver, click the Yes button. The first Driver Setup dialog box appears, allowing you to select whether the P-touch will be connected through the USB port or the RS-232C port.
Continue with the procedure in Installing the USB printer driver on page 16. (To install the serial printer driver, refer to the Advanced Functions booklet.)
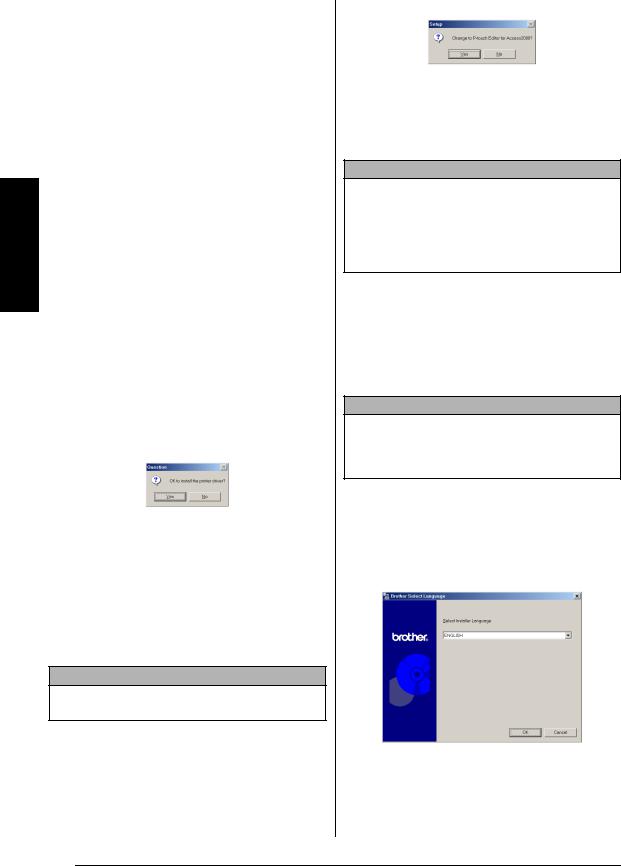
NOTE
If the printer driver is already installed, click the No button.
9When installation of P-touch Editor is finished, a dialog box appears, allowing you to upgrade P-touch Editor 3.2 so that it will be compatible with Access 2000.
To upgrade P-touch Editor 3.2 for Access 2000, click the Yes button, and then follow the instructions that appear.
If you do not wish to upgrade P-touch Editor 3.2 for Access 2000, click the No button.
NOTE
If a dialog box appears, indicating that the installation is finished and explaining that the computer should be restarted, select the option for restarting the computer, click the Finish button to restart the computer, and then remove the CD-ROM from the CD-ROM drive.
Installing the P-touch Quick Editor software
The P-touch Quick Editor software provides quick access to the more simple label-designing features for easy text input and instant printing of labels. Install the P-touch Quick Editor software onto a PC as described below.
NOTE
Do not connect the P-touch to the computer before installing the software, otherwise it may not be installed correctly. Be sure to connect the P-touch only when you are instructed to do so.
To install the P-touch Quick Editor software
1Insert the enclosed CD-ROM into the computer’s CD-ROM drive. A dialog box automatically appears, allowing you to the select the language of the Installer.
14
Ch. 2 Getting Started
NOTE
If the dialog box does not automatically appear, double-click “My Computer” on the desktop, and then double-click the CD-ROM drive containing
the CD-ROM. (For Windows® XP, click “My Computer” in the Start menu, and then double-click the CD-ROM drive containing the CD-ROM.) Next, double-click “Setup.exe” to display the dialog box.
2Select the desired language, and then click the OK button.
3Click the middle button (P-touch Quick Editor). The InstallShield® Wizard for installing the P-touch Quick Editor software starts up, and then the Welcome dialog box appears.
NOTE
To install just the printer driver, click the lower button (Driver). The first Driver Setup dialog box appears, allowing you to select whether the P-touch will be connected through the USB port or the RS-232C port. Continue with the procedure in Installing the USB printer driver on page 16. (To install the serial printer driver, refer to the Advanced Functions booklet.)
Getting Started
To install the P-touch Editor 3.2 software, click the upper button (P-touch Editor). Continue with the procedure in Installing the P-touch Editor 3.2 software on page 12.
4Carefully read the contents of the Welcome dialog box, and then click the Next button to continue. The User Information dialog box appears.
15
Started Getting
Ch. 2 Getting Started
5Type the necessary information into the appropriate boxes (If the information has already been registered in Windows®, it will automatically appear.), and then click the Next button. A dialog box appears, asking for confirmation of the entered information.
6Click the Yes button to register the entered information.
NOTE
To change the registration information, click the No button, and then return to step 4.
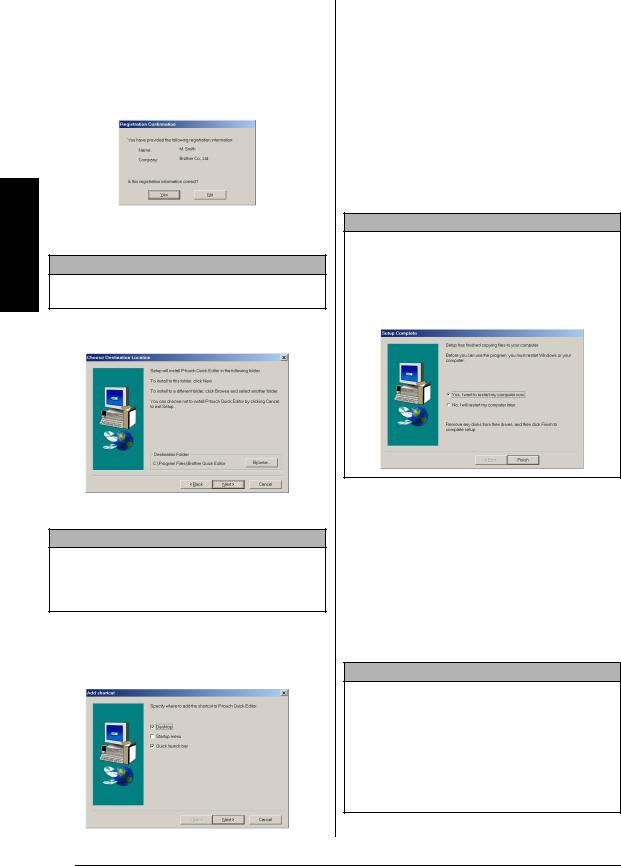
The Choose Destination Location dialog box appears.
7 Click the Next button to begin installation.
NOTE
To change the location where P-touch Quick Editor will be installed, click the Browse button, and then select the installation folder in the Choose Folder dialog box that appears. Then, click the OK button.
After P-touch Quick Editor is installed, a dialog box appears, allowing you to select where shortcuts to P-touch Quick Editor will be added.
8Select the desired locations for the shortcuts, and then click the Next button. A dialog box appears, allowing you to select whether or not to install the printer driver.
To install the printer driver, click the Yes button. The first Driver Setup dialog box appears, allowing you to select whether the P-touch will be connected through the USB port or the RS-232C port.
Continue with the procedure in Installing the USB printer driver on page 16. (To install the serial printer driver, refer to the Advanced Functions booklet.)
NOTE
If the printer driver is already installed, click the No button. A dialog box appears explaining that installation is finished. Select “Yes, I want to restart my computer now.”, click the Finish button to restart the computer, and then remove the CD-ROM from the CD-ROM drive.
Installing the USB printer driver
With Plug-and-Play, new devices connected to the system are detected, and their drivers are automatically installed. If the P-touch 9600/ 3600 is to be connected through the USB port, its driver will be installed with Plug-and-Play. Be sure to read the installation instructions described below before installing the printer driver supplied on the CD-ROM.
NOTE
Do not connect the P-touch to the computer until you are instructed to do so, otherwise the printer driver may not be installed correctly.
The dialog boxes shown in the procedures below are for the installation of the software for the PT-9600. When installing the software for the PT-3600, the dialog boxes may be slightly different from those shown.
16
To install the USB printer driver
With Windows® 98, 98 SE, Me or 2000:
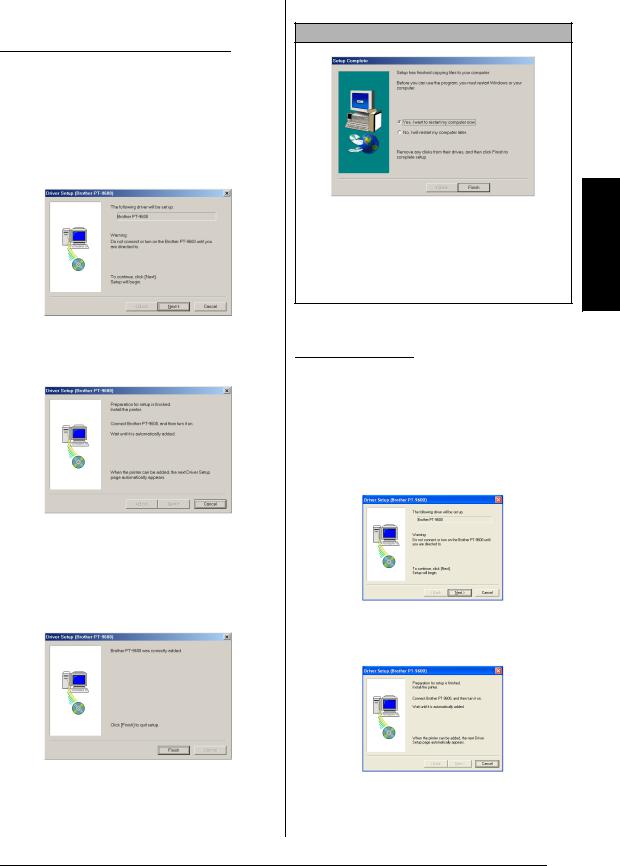
1In the dialog box that appears, allowing you to select whether the P-touch will be connected with a USB cable or an RS-232C cable, select “USB cable”, and then click the OK button. A dialog box appears, informing you that the PT-9600/3600 printer driver will be installed.
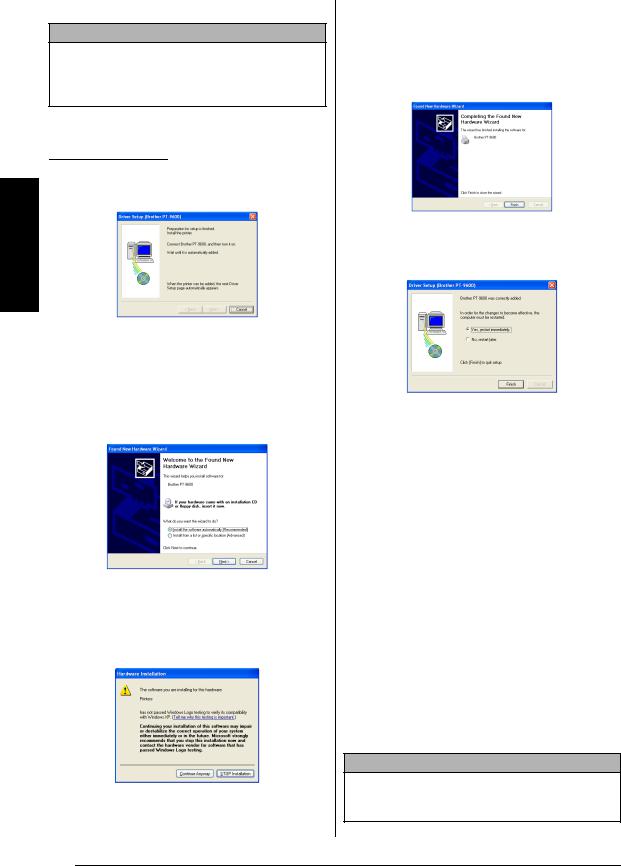
2 Click the Next button. A dialog box appears, instructing you to connect the P- touch to the computer.
3Connect the P-touch to the computer using the enclosed USB interface cable as described on page 10, and then turn on the P-touch. A dialog box appears, indicating that the printer driver has been installed.
Ch. 2 Getting Started
4 Click the Finish button.
NOTE
If a dialog box appears, indicating that the installation is finished and explaining that the computer should be restarted, select the option for restarting the computer, click the Finish button to restart the computer, and then remove the CD-ROM from the computer.
With Windows® XP:
1In the dialog box that appears, allowing you to select whether the P-touch will be connected with a USB cable or an RS-232C cable, select “USB cable”, and then click the OK button. A dialog box appears, informing you that the PT-9600/3600 printer driver will be installed.
2 Click the Next button. A dialog box appears, instructing you to connect the P-touch to the computer.
Getting Started
17

Started Getting
Ch. 2 Getting Started
3Connect the P-touch to the computer using the enclosed USB interface cable as described on page 10, and then turn on the P-touch. The first Found New Hardware Wizard dialog box appears.
4Select “Install the software automatically (Recommended)”, and then click the Next button. A dialog box appears, warning that the software has not passed Windows® Logo testing.
5Click the Continue Anyway button to continue with the installation. A Found New Hardware Wizard dialog box appears, indicating that the Found New Hardware Wizard has finished installing the software for the PT-9600/3600.
6 Click the Finish button.
NOTE
If a Driver Setup dialog box appears, indicating that the printer driver has been installed, click the Finish button.
A dialog box appears, indicating that the installation is finished.
7Select “Yes, I want to restart my computer now.” (or “Yes, restart immediately” if the printer driver was installed separately), click the Finish button to restart the computer, and then remove the CD-ROM from the computer.
Replacing or adding a USB printer driver
To replace or add a USB printer driver
1Turn off the P-touch, and then disconnect it from the computer.
2Insert the enclosed CD-ROM into the computer’s CD-ROM drive. A dialog box automatically appears, allowing you to the select the language of the Installer.
18
Ch. 2 Getting Started
NOTE
If the dialog box does not automatically appear, double-click “My Computer” on the desktop, and then double-click the CD-ROM drive containing
the CD-ROM. (For Windows® XP, click “My Computer” in the Start menu, and then double-click the CD-ROM drive containing the CD-ROM.) Next, double-click “Setup.exe” to display the dialog box.
3Select the desired language, and then click the OK button.
4Click the lower button (Driver). A Driver Setup dialog box appears, allowing you to select whether to replace, add or delete the PT-9600/3600 printer driver.
5Select either “Replace with new Brother PT9600/3600.” or “Add Brother PT-9600/ 3600.”, and then click the Next button.
NOTE
If “Replace with new Brother PT-9600/3600.” is selected, the previously installed printer driver is deleted, and replaced with a new one. Select this option when upgrading the printer driver, or when running Windows® 2000 or XP and changing to a P-touch 9600/3600 with a different serial number.
If “Add Brother PT-9600/3600.” is selected, a new printer driver is added. With a USB connection on Windows® 98 or Me, only a port is added without adding it as a new printer. Select this option when connecting and using multiple P-touch 9600/3600s with the same computer.
To delete the printer driver, follow the proce-
dure in Uninstalling the printer driver on page 33.
With Windows® 98, 98 SE, Me or 2000:
6A dialog box appears, instructing you to connect the P-touch to the computer.
7Connect the P-touch to the computer using the enclosed USB interface cable as described on page 10, and then turn on the P-touch. A dialog box appears, indicating that the printer driver has been installed.
Getting Started
19
Started Getting
Ch. 2 Getting Started
8 Click the Finish button.
NOTE
If a dialog box appears, explaining that the computer should be restarted, select the option for restarting the computer, and then click the Finish button.
With Windows® XP:
6A dialog box appears, instructing you to connect the P-touch to the computer.
7Connect the P-touch to the computer using the enclosed USB interface cable as described on page 10, and then turn on the P-touch. A dialog box appears, indicating that the printer driver has been installed. The first Found New Hardware Wizard dialog box appears.
8Select “Install the software automatically (Recommended)”, and then click the Next button. A dialog box appears, warning that the software has not passed Windows® Logo testing.
9Click the Continue Anyway button to continue with the installation. A Found New Hardware Wizard dialog box appears, indicating that the Found New Hardware Wizard has finished installing the software for the PT-9600/3600.
0Click the Finish button. A Driver Setup dialog box appears, indicating that the printer driver has been installed.
ASelect “Yes, restart immediately”, click the Finish button to restart the computer, and then remove the CD-ROM from the computer.
On a Macintosh Computer
The Mac version of the software is for a Macintosh with an English operating system. If the software is installed on a Macintosh with an operating system in a different language, the software may not run properly.
Before installation
Check that your system configuration meets the following requirements.
Computer: Macintosh with Power PC processor Operating system: Mac OS 8.6 or later, or Mac OS X v10.1 or v10.2
Hard disk free space: At least 20 MB (100 MB for a full installation)
NOTE
Up to 100 MB of hard disk free space may be needed when printing long labels or large amounts of data.
20
 Loading...