


Washing Machine
Plně automatická pračka Automatická pračka
Pralka automatyczna
WMB 71242 PTLA WMB 71442 PTLA WMB 71642 PTLA

1 Warnings
General Safety
•Never place your machine on a carpet covered floor. Otherwise, lack of airflow from below of your machine may cause electrical parts to overheat. This may cause problems with your washing machine.
•If the power cable or mains plug is damaged you must call Authorized Service for repair.
•Fit the drain hose into the discharge housing securely to prevent any water leakage and to allow machine to take in and discharge water as required. It is very important that the water intake and drain hoses are not folded, squeezed, or broken when the appliance
is pushed into place after it is installed or cleaned.
•Your washing machine is designed to continue operating when the power restores after a power interruption. The machine will resume its program when the power restores. Press the “Start/Pause/Cancel” button for
3 seconds to cancel the program (See, Canceling a Program)
•There may be some water in your machine when you receive it. This is from the quality control process and is normal. It is not harmful to your machine.
•Some problems you may encounter may be caused by the infrastructure. Press “Start/ Pause/Cancel” button for 3 seconds to cancel the program set in your machine before calling the authorized service.
First Use
•Carry out your first washing process without loading your machine and with detergent under “Cottons 90°C” program.
•Ensure that the cold and hot water connections are made correctly when installing your machine.
•If the current fuse or circuit breaker is less than 16 Amperes, please have a qualified electrician install a 16 Ampere fuse or circuit breaker.
•While using with or without a transformer, do not neglect to have the grounding installation laid by a qualified electrician. Our company shall not be liable for any damages that may arise when the machine is used on a line without grounding.
•Keep the packaging materials out of reach of children or dispose them by classifying according to waste directives.
Intended use
•This product has been designed for home use.
•The appliance may only be used for washing and rinsing of textiles that are marked accordingly.
•This appliance is not intended for use by persons (including children) with reduced
physical, sensory or mental capabilities, or lack of experience and knowledge, unless they have been given supervision or
instruction concerning use of the appliance by a person responsible for their safety.
Safety instructions
•This appliance must be connected to an earthed outlet protected by a fuse of suitable capacity.
•The supply and draining hoses must always be securely fastened and remain in an undamaged state.
•Fit the draining hose to a washbasin or bathtub securely before starting up your machine. There may be a risk of being scalded due to high washing temperatures!
•Never open the loading door or remove the filter while there is still water in the drum.
•Unplug the machine when it is not in use.
•Never wash down the appliance with a water hose! There is the risk of electric shock!
•Never touch the plug with wet hands. Do not operate the machine if the power cord or plug is damaged.
•For malfunctions that cannot be solved by information in the operating manual:
•Turn off the machine, unplug it, turn off the water tap and contact an authorized service agent. You may refer to your local
agent or solid waste collection center in your municipality to learn how to dispose of your
2 Installation
Removing packaging reinforcement
Tilt the machine to remove the packaging reinforcement. Remove the packaging reinforcement by pulling the ribbon.
Opening the transportation locks
ATransportation safety bolts must be removed before operating the washing machine! Otherwise, the machine will be damaged!
1.Loosen all the bolts with a spanner until they rotate freely (“C”)
2.Remove transportation safety bolts by turning them gently.
3.Fit the covers (supplied in the bag with the Operation Manual) into the holes on the rear panel. (“P”)
C Keep the transportation safety bolts in a safe place to reuse when the washing machine needs to be moved again in the future.
C Never move the appliance without the transportation safety bolts properly fixed in place!
2 - EN
Adjusting the feet
ADo not use any tools to loosen the lock nuts. Otherwise, they can be damaged.
1.Manually (by hand) loosen the lock nuts on the feet.
2.Adjust them until the machine stands level and firmly.
3.Important: Tighten all lock nuts up again.
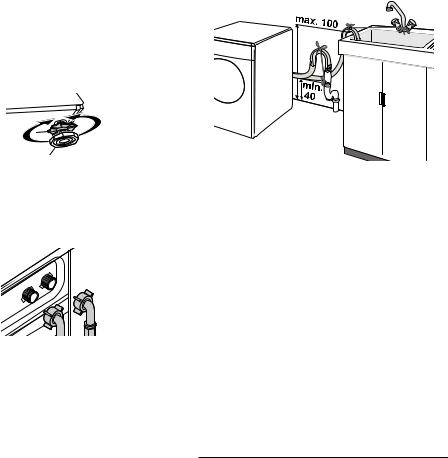
Connecting to the water supply.
Important:
•The water supply pressure required to run the machine must be 1-10 bar (0,1 – 1 MPa).
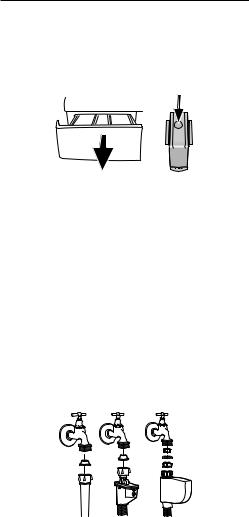
•Connect the special hoses supplied with the machine to the water intake valves on the machine.
•If you are going to use your double water-inlet machine as a single (cold) water-inlet unit, you must install the stopper*, supplied with your machine to the hot water valve.
•If you want to use both water inlets of the product, you can connect the hot water hose
after removing the stopper and gasket group from the hot water valve.
* Applies for the products supplied with a blind stopper group.
•Models with a single water inlet should not be connected to the hot water tap.
When returning the appliance to its place after maintenance or cleaning, care should be taken not to fold, squeeze or block the hoses.
Connecting to the drain
The water discharge hose can be attached to the edge of a washbasin or bathtub. The drain hose should be firmly fitted into the drain as to not get out of its housing.
Important:
•The end of the drain hose must be directly connected to the wastewater drain or to the washbasin.
•The hose should be attached to a height of at least 40 cm, and 100 cm at most.
•In case the hose is elevated after laying it on the floor level or close to the ground (less than 40 cm above the ground), water discharge becomes more difficult and the laundry may come out wet.
•The hose should be pushed into the drainage for more than 15 cm. If it is too long you may have it shortened.
•The maximum length of the combined hoses must not be longer than 3.2 m.
Electrical connection
Connect the machine to an earthed outlet protected by a fuse of suitable capacity.
Important:
• Connection should comply with national regulations.
• The voltage and the allowed fuse protection are specified in the section “Technical Specifications”.
• The specified voltage must be equal to your mains voltage.
• Connection via extension cords or multi-plugs should not be made.
BA damaged power cable must be replaced by a qualified electrician.
BThe appliance must not be operated unless it is repaired! There is the risk of electric shock!
3 Initial preparations for washing
Preparing clothes for washing
Laundry items with metal attachments such as, bras, belt buckles and metal buttons will damage the machine. Remove metal attachments or place the items in a clothing bag, pillow case, or something similar.
•Sort the laundry according to type of fabric, color, and degree of soiling and permissible water temperature. Always follow the advice on the garment labels.
•Place small items like infants’ socks and nylon stockings, etc. in a laundry bag, pillow case or something similar. This will also save your laundry from getting lost.
•Wash “machine washable” or “hand washable” labeled products only with an appropriate program.
•Do not wash colors and whites together. New, dark colored cottons may release a lot of dye. Wash them separately.
•Use only dyes/color changers and lime removers suitable for machine wash. Always follow the instructions on the packaging.
3 - EN
•Wash trousers and delicate clothes turned inside out.
Correct load capacity
C Please follow the information in the "Program Selection Table". Washing results will degrade when the machine is overloaded.
Loading door
The door locks during program operation and the Door Locked Symbol lights up. The door can be opened when the symbol fades out.
Detergents and softeners
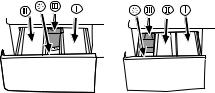
Detergent Drawer
The detergent dra wer is composed of three compartments:
The detergent dispenser may be in two different types according to the model of your machine.
–(I) for prewash
–(II) for main wash - (III) siphon
–( ) for softener
Detergent, softener and other cleaning agents
Add detergent and softener before starting the washing program.
Never open the detergent dispenser drawer while the washing program is running!
When using a program without pre-wash, no detergent should be put into the pre-wash compartment (Compartment no. I).
Detergent quantity
The amount of washing detergent to be used depends on the amount of laundry, the degree of soiling and water hardness.
•Do not use amounts exceeding the quantities recommended on the package to avoid problems of excessive foam, poor rinsing, financial savings and finally, environmental protection.
•Never exceed the (> max <) level marking; otherwise, the softener will be wasted without being used.
•Do not use liquid detergent if you want to wash using the time delay feature.
4 - EN

4 Selecting a Program and Operating Your Machine
Control panel
1 |
|
2 |
3 |
4 |
5 |
||||||
|
|
|
|
|
|
|
|
|
|
|
|
|
|
|
|
|
|
|
|
|
|
|
|
|
|
|
|
|
|
|
|
|
|
|
|
|
|
|
|
|
|
|
|
|
|
|
|
|
|
|
|
|
|
|
|
|
|
|
|
|
|
|
|
|
|
|
|
|
|
|
|
|
|
|
|
|
|
|
|
|
|
|
|
|
|
6 |
7 |
8 |
|
|
|
1 |
- |
Spin Speed Adjustment Button |
|
5 |
- |
On/Off Button |
|
2 |
- |
Display |
|
|
6 |
- |
Time Delaying Button (+/-) |
3 |
- |
Temperature Adjustment Button |
|
7 |
- |
Auxiliary Function Buttons |
|
4 |
- |
Program Selection Knob |
|
8 |
- |
Start/Pause/Cancel Button |
|
|
|
|
|
|
|
||
Display symbols |
|
|
Turning the machine on |
||||
|
|
Plug in your machine. Turn the tap on completely. |
|||||
a |
- Spin Symbol |
|
|
Check if the hoses are connected tightly. Place |
|||
b |
- Spin Speed Indicator |
|
|
the laundry in the machine. Add detergent and |
|||
c |
– Water cut-off symbol (According to your |
softener. Press the “On/Off” button. |
|||||
|
machine’s model) |
|
|
|
|
|
|
d |
- Economy Symbol |
|
|
Program selection |
|||
e |
- Temperature Indicator |
|
|
||||
|
|
Select the appropriate program from the program |
|||||
f |
- Temperature Symbol |
|
|
||||
|
|
table according to type, amount and degree of |
|||||
g |
- Door Locked Symbol |
|
|
||||
|
|
soiling of the laundry and washing temperatures. |
|||||
h |
- Standby Symbol |
|
|
||||
|
|
Turn the Program Selection Knob to the program |
|||||
i |
- Start Symbol |
|
|
||||
|
|
mode that you wish to wash your laundry. |
|||||
j |
- Auxiliary Function Symbols |
|
|||||
|
|
|
|
||||
k |
- Remaining Time and Delaying Time Indicator |
The recommended temperature and spin speed |
||||||
l |
- Program Indicator Symbols (pre-wash/main |
for the selected program appear. Press "Start/ |
||||||
Pause/Cancel" button to start the program. |
||||||||
|
wash/rinse/softener/spin) |
|
|
|||||
|
|
|
Main programs |
|||||
m |
- Time Delaying Symbol |
|
|
|||||
|
|
|
|
|
|
|
Depending on the type of textile, the following |
|
|
|
a |
b |
c d |
e |
f |
main programs are available: |
|
|
|
• Cottons |
||||||
|
|
|
|
|
|
|
You can wash your durable clothes with this |
|
|
|
|
|
|
|
|
program. Your laundry will be washed with |
|
|
|
|
|
|
|
|
vigorous washing movements during a longer |
|
|
m |
|
|
|
|
g |
washing cycle. It is recommended for your cotton |
|
|
|
|
|
|
items (such as bed sheets, duvet and pillowcase |
|||
|
|
|
|
|
|
h |
sets, bathrobes, underclothing, etc.). |
|
|
|
|
|
|
|
• Synthetics |
||
|
|
|
|
|
|
i |
||
|
|
F1 |
F2 |
F3 |
F4 |
|
You can wash your less durable clothes on this |
|
|
|
|
|
|||||
|
|
|
|
|
|
|
program. Gentler washing movements and a |
|
|
l |
k |
|
j |
|
|
shorter washing cycle is used compared to |
|
|
|
|
|
|
|
|
the “Cottons” program. It is recommended for |
|
|
|
|
|
|
|
|
your synthetic clothes (such as shirts, blouses, |
|
5 - EN
synthetic/cotton blended garments, etc.). For curtains and lace, the “Synthetic 40” program with pre-wash and anti-creasing functions selected is recommended. Detergent should not be put in the pre-wash compartment. Less detergent should be put in the main wash compartment as loose knit fabrics (lace) foam too much due to its meshed structure.
• Woollens
You can wash your machine-washable woolen garments on this program. Wash by selecting the proper temperature according to the labels of your clothes. It is recommended to use appropriate detergents for woolens.
Additional programs
For special cases, there are also extra programs available:
C Additional programs may differ according to the model of your machine.
• Cotton Economic
You may wash your laundry to be washed in cottons program in longer periods which ensure very good washing performance.
C Cottons economy program consumes less energy compared to other cottons programs.
• Babycare
Increased hygiene is provided by a longer heating period and an additional rinse cycle. It is recommended for baby clothes and clothes worn by allergic people.
• Hand wash
You can wash your woolen/delicate clothes that bear “not machinewashable” labels for which hand wash is recommended on this program.
It washes the laundry with very tender washing movements without damaging your clothes.
• Daily express
You can use this program to quickly wash a small number of lightly soiled and unstained cotton garments. E.g.: bathrobes, duvet covers, sport wear, daily clothes and etc. used only once.
• Express 14
You can use this program to quickly wash a small number of lightly soiled and unstained cotton garments. E.g.: bathrobes, duvet covers, sport wear, daily clothes and etc. used only once.
• Darkcare
Use this programme to wash your dark coloured laundry, or the coloured laundry that you do not want them get faded. This programme washes your laundry with low mechanical movements and at low temperature. We recommend you to use liquid detergent or woolen shampoo for dark coloured laundry.
• Mix
You can use this program to wash cottons and synthetics together. There is no need to sort them.
• Shirts
You can use this program to wash the shirts made
of cotton, synthetic and synthetic blended fabrics.
• Freshen Up
You can use “Refreshing” program to remove odors from laundry that are used only for once and do not have any spots or dirt on them.
• Eco clean 20 (Eco Clean)
You can use this program, which is more sensitive to environment and natural resources, to wash lightly soiled and unspotted cotton laundry (max 3.5 kg) in a short time and economical way. It is suggested to use liquid or gel washing detergents.
• Self Clean
It is suggested to run this program with certain intervals (e.g. once in 1 or 2 months) for the self-cleaning of your machine. This program must certainly be run without any laundry in the machine. Make sure that the machine is empty before starting the program. For more effective cleaning, you can run the program by adding powder lime remover for washing machines into compartment II of the detergent drawer. After the program is completed, leave the door ajar to allow the inside of the machine get dry.
C This is not a program for washing laundry. This is a maintenance program for the machine.
C Never use this program if there is something in your machine.
C When this feature is started your machine senses the load inside of it automatically, if any, and interrupts the program.
Economy Symbol
Shows energy saving programs and temperature selections.
As "Intensive" and "Hygiene" programs are long programs with higher temperature selections to ensure hygiene, “Economy” Symbol will not light up.
Special programs
For specific applications, select any of the following programs:
• Rinse
This program is used when you want to rinse or starch separately.
• Spin + Drain
This program spins with maximum possible rpm in the default setting after the water drains from the machine.
C Use a lower spin speed for delicate laundries.
Temperature selection
Whenever a new program is selected, the temperature anticipated for that program appears on the temperature indicator.
To change the temperature, press the temperature button. Temperature decreases in 10° increments.
Cold selection is shown with “-” symbol.
6 - EN
|
Normally soiled, white cottons and |
90˚C |
linens. (Ex.: coffee table covers, |
|
tablecloths, towels, bed sheets) |
|
Normally soiled, fade proof colored |
|
linens, cottons or synthetic clothes |
60˚C |
(Ex.: shirts, nightgowns, pajamas) |
|
and lightly soiled white linen clothes |
|
(Ex.: underwear) |
40˚C |
Blended clothes including synthetics |
30˚C Cold |
and woolens as well as delicates. |
Spin Speed selection
Whenever a new program is selected, the maximum spin speed of the selected program is displayed on the spin speed indicator.
To decrease the spin speed, press the “Spin” button. Spin speed decreases gradually. Then, rinse hold and no spin options are shown respectively.
Rinse hold is shown with “ ” and no spin is
shown with “ ” symbols.
If you are not going to unload your clothes immediately after the cycle, you may use rinse hold function in order to prevent your clothes become wrinkled when there is no water in the machine. With this function, your laundry is kept in the final rinsing water. If you want to spin your laundry after the rinse hold function:
-Adjust the spin speed.
-Press “Start/Pause/Cancel” button. Program resumes. Your machine drains the water and spins your laundry.
You can use no spin function in order to drain the water without spinning at the end of the program.
7 - EN
Program and consumption table
EN |
|
|
|
|
|
|
Auxiliary functions |
|
|
||||
|
|
|
|
|
|
|
|
|
|
|
|
|
|
|
|
|
(kg)LoadMax. |
ConsumptionWater(l) |
ConsumptionEnergy(kWh) |
Speed***Max. |
Prewash |
WashQuick |
PlusRinse |
Creasing-Anti |
HoldRinse |
removalhairPet |
Selectable |
|
|
|
|
|
|
|
|
|
|
|
|
|
|
Programme (°C) |
|
|
|
|
|
|
|
|
|
|
|
temperature |
|
|
|
|
|
|
|
|
|
|
|
|
|
|
range °C |
|
|
|
|
|
|
|
|
|
|
|
|
|
|
Cottons |
|
90 |
7 |
74 |
2.30 |
1600 |
• |
• |
• |
• |
• |
• |
90-Cold |
|
|
|
|
|
|
|
|
|
|
|
|
|
|
Cottons |
|
60 |
7 |
72 |
1.50 |
1600 |
• |
• |
• |
• |
• |
• |
90-Cold |
|
|
|
|
|
|
|
|
|
|
|
|
|
|
Cottons |
|
40 |
7 |
72 |
0.85 |
1600 |
• |
• |
• |
• |
• |
• |
90-Cold |
|
|
|
|
|
|
|
|
|
|
|
|
|
|
Babycare |
|
90 |
7 |
66 |
2.70 |
1600 |
|
|
* |
|
• |
|
90-30 |
|
|
|
|
|
|
|
|
|
|
|
|
|
|
Cotton Economic |
|
60** |
7 |
49 |
1.05 |
1600 |
• |
• |
• |
• |
• |
• |
60-Cold |
|
|
|
|
|
|
|
|
|
|
|
|
|
|
Cotton Economic |
|
40 |
7 |
64 |
0.72 |
1600 |
• |
• |
• |
• |
• |
• |
60-Cold |
|
|
|
|
|
|
|
|
|
|
|
|
|
|
Synthetics |
|
60 |
3 |
45 |
1.00 |
1000 |
• |
• |
• |
• |
• |
• |
60-Cold |
|
|
|
|
|
|
|
|
|
|
|
|
|
|
Synthetics |
|
40 |
3 |
45 |
0.45 |
1000 |
• |
• |
• |
• |
• |
• |
60-Cold |
|
|
|
|
|
|
|
|
|
|
|
|
|
|
Eco Clean |
|
20 |
3.5 |
39 |
0.16 |
1600 |
|
|
|
|
• |
|
20 |
|
|
|
|
|
|
|
|
|
|
|
|
|
|
Mix |
|
40 |
3.5 |
45 |
0.55 |
1000 |
• |
• |
• |
• |
• |
• |
40-Cold |
|
|
|
|
|
|
|
|
|
|
|
|
|
|
Shirts |
|
40 |
3.5 |
45 |
0.55 |
800 |
• |
• |
• |
* |
• |
|
60-Cold |
|
|
|
|
|
|
|
|
|
|
|
|
|
|
Express 14 |
|
30 |
2 |
35 |
0.10 |
1400 |
|
|
• |
|
• |
|
30-Cold |
|
|
|
|
|
|
|
|
|
|
|
|
|
|
Daily express |
|
90 |
7 |
60 |
2.00 |
1400 |
|
|
• |
|
• |
|
90-Cold |
|
|
|
|
|
|
|
|
|
|
|
|
|
|
Daily express |
|
60 |
7 |
60 |
1.15 |
1400 |
|
|
• |
|
• |
|
90-Cold |
|
|
|
|
|
|
|
|
|
|
|
|
|
|
Daily express |
|
30 |
7 |
70 |
0.20 |
1400 |
|
|
• |
|
• |
|
90-Cold |
|
|
|
|
|
|
|
|
|
|
|
|
|
|
Woollens |
|
40 |
1.5 |
56 |
0.30 |
1000 |
|
|
• |
|
• |
|
40-Cold |
|
|
|
|
|
|
|
|
|
|
|
|
|
|
Hand wash |
|
30 |
1 |
40 |
0.25 |
1000 |
|
|
|
|
|
|
30-Cold |
|
|
|
|
|
|
|
|
|
|
|
|
|
|
Darkcare |
|
40 |
3 |
82 |
0.55 |
1000 |
|
|
* |
|
• |
|
40-Cold |
|
|
|
|
|
|
|
|
|
|
|
|
|
|
Self Clean |
|
70 |
- |
100 |
1.70 |
800 |
|
|
* |
|
|
|
70 |
|
|
|
|
|
|
|
|
|
|
|
|
|
|
Freshen Up |
|
- |
2 |
20 |
0.03 |
1000 |
|
|
|
|
• |
|
- |
|
|
|
|
|
|
|
|
|
|
|
|
|
|
• : Selectable
* : Automatically selected, not cancellable.
**: Energy Label program (EN 60456)
***If maximum spin speed of your machine is lower, selection may be made until maximum spin speed. - : See program description for maximum load.
C The auxiliary functions in the table vary according to the model of your machine.
C Water and power consumption and program duration differ from the table subject to changes in water pressure, water hardness and temperature, ambient temperature, type and amount of laundry, selection of auxiliary functions, and changes in supply voltage.
C Program duration will be displayed on the screen of your machine according to your selection.
8 - EN
Auxiliary functions |
made in intervals of 30 minutes. |
|
Auxiliary function selection |
Open the loading door, place the laundry inside |
|
If an auxiliary function that should not be selected |
and fill detergent drawer. Set the washing |
|
together with a previously selected function is |
program, temperature, spin speed and, if required, |
|
chosen, the first selected function will be cancelled |
select the auxiliary functions. Press “Time delaying” |
|
and the last auxiliary function selection will remain |
buttons “+” and “-” to set your desired time delay. |
|
active. |
The Time delaying symbol will flash. Press “Start/ |
|
Ex.: If you want to select pre-wash first and then |
Pause/Cancel” button. Then the time delay starts |
|
quick wash, pre-wash will be cancelled and quick |
to count down. The Time delaying symbol will light |
|
wash will remain active. |
up. The Start symbol will light up. |
|
Auxiliary function that is not compatible with the |
The “:” in the middle of the displayed time delay |
|
program cannot be selected. (see, “Program |
will start to flash. |
|
Selection Table”) |
• |
More laundry may be loaded or taken out |
• Prewash |
during the time delay period. At the end of the |
|
When you select this function, the display will |
|
time delay countdown process, time delaying |
indicate "F1" symbol. |
|
symbol fades and the washing starts as the |
• A pre-wash is only worthwhile for heavily |
|
program duration is displayed. |
soiled laundry. Without pre-wash you save |
Changing the delay time |
|
energy, water, detergent and time. |
If you want to change the time during the |
|
• Pre-wash without detergent is recommended |
countdown: |
|
for lace and curtains. |
Press “Start/Pause/Cancel” button. “ : “ in the |
|
• Quick Wash |
middle of the screen will stop flashing. The |
|
With this function, the wash time is shortened. |
Standby symbol will light up. The Time delaying |
|
"F2” symbol lights up on the display. |
symbol will flash. The Start Symbol will fade. Press |
|
• Use this function for smaller amounts or |
“Time delaying” buttons “+” or “-” to set your |
|
slightly soiled laundries. |
desired time delay. Press “Start/Pause/Cancel” |
|
• Rinse Plus |
button. The Time delaying symbol will light up. The |
|
When this function is selected, washing and rinsing |
Standby symbol will fade. The Start symbol will |
|
is performed with plenty of water. "F3” symbol |
light up.The “:” in the middle of the displayed time |
|
lights up on the display. |
delay will start to flash. |
|
|
Canceling the time delay |
|
• Anti-Creasing |
If you want to cancel the time delay countdown |
|
With this function, drum movement will be |
and start the program immediately: |
|
lessened to prevent creasing and spinning speed |
Press “Start/Pause/Cancel” button. The “:” in |
|
is limited. In addition, washing is carried out at a |
the middle of the displayed time delay will stop |
|
higher water level. "F4” symbol lights up on the |
flashing. Start symbol will fade. The standby |
|
display. |
symbol and the time delaying symbol will flash. |
|
• Use this function for delicate laundries that |
Press time delaying button “-” to decrease the |
|
crease easily. |
desired time delay. Program duration after 30 |
|
C Whenever you select this auxiliary function, |
minutes shall be displayed. Press Start/Pause/ |
|
load your machine with half of the maximum |
Cancel Button to start the program. |
|
laundry specified in the program table. |
Starting the Program |
|
• Pet hair removal |
Press Start/Pause/Cancel button to start the |
|
This function helps you to remove the pet hairs |
program. The start symbol which indicates that |
|
that remain on your clothes. |
the program has started will light up. The door |
|
When this function is selected, your machine |
locks and the door locked symbol will light up. The |
|
adds pre-wash and additional rinsing steps to |
Symbol of the relevant step (prewash, main wash, |
|
the normal program cycle. Thus, pet hairs are |
rinse, softener and spin) that the program has |
|
removed more effectively by performing the |
started from will light up. |
|
washing with more water (30%). |
Changing the selections after the program |
|
ANever wash your pets in your washing |
has started |
|
machine. |
The selected spin speed and program temperature |
|
Time display |
fade out. An empty frame appears. |
|
The display shows the time remaining for the |
When the “Program selection” button is brought |
|
program to complete while a program is running. |
to the appropriate position, rpm and temperature |
|
Time is displayed in hours and minutes as “01:30”. |
data reappear. |
|
Time delay |
Switching the machine to standby mode |
|
The machine is switched to standby mode by |
||
With the “Time delay” function you can delay the |
pressing “Start/Pause/Cancel” button momentarily. |
|
program start up to 24 hours. Setting can be |
|
|
9 - EN
The Standby symbol which indicates the machine is in standby mode lights up and the start symbol that shows the program has started and is still continuing fades out.
Selecting or canceling an auxiliary function in pause mode
Auxiliary functions can be cancelled or selected in accordance with the step the program is at.
Adding/removing laundry in pause mode
The door can be opened if the water level is suitable. The door locked symbol will light up until the door is suitable for opening. This symbol will fade out as soon as the door is allowed to open. Laundry may be added / taken out by opening the door.
Door lock
The Door Locked Symbol lights up when the loading door is locked. This symbol will flash until the door is allowed to open. Do not force the door at this stage. This symbol will fade out as soon as the door is allowed to open. You may open the door after the symbol fades out.
Child-proof lock
Protect the appliance from being tampered by children by means of the child-proof lock. In this case, no change can be made in the running program.
C Your machine can be turned on and off with On/Off button while the child-proof lock is activated. In this case, your machine will resume its program with child-proof lock activated.
The machine is switched to child-lock by pressing the 2nd and 4th auxiliary functions for 3 sec. “C:on” (Child-proof lock is activated) label appears on the display.
The same symbol will also be displayed whenever any button is pressed while the machine is childlocked.
To deactivate the child-proof lock, press the 2nd and 4th auxiliary function buttons for 3 sec.
“C:OFF” (Child-proof lock is deactivated) label appears on the screen.
Ending the program through canceling
“Start/Pause/Cancel” button is pressed for 3 seconds to cancel the program. Start symbol will flash during cancellation. After cancellation, the symbol of the corresponding step at which the cancellation was made will remain lit and “End” will appear on the screen.
End of program
When the program is finished, the symbols of the relevant steps will remain lit up and the auxiliary function, spin and temperature data selected at the start-up of the program will remain selected. “End” will appear on the display.
5 Maintenance and cleaning
Detergent Drawer
Remove any powder residue buildup in the drawer. To do this;
1.Press the dotted point on the siphon in the softener compartment and pull towards you until the compartment is removed from the machine.
CIf more than a normal amount of water and softener mixture starts to gather in the softener compartment, the siphon must be cleaned.
2.Wash the dispenser drawer and the siphon with plenty of lukewarm water in a washbasin.
3.Replace the drawer into its housing after cleaning. Check if the siphon is in its original location.
Inlet water filters
There is a filter at the end of each water intake valve at the back side of the machine and also at the end of each water intake hose where they are connected to the tap. These filters prevent the foreign substances and dirt in the water to enter into the machine. Filters should be cleaned as they get dirty.
•Close the taps.
•Remove the nuts of the water intake hoses to clean the surfaces of the filters on the water intake valves with an appropriate brush.
•If the filters are very dirty, you can pull them out by means of pliers and clean them.
•Take out the filters on the flat ends of the water intake hoses together with the gaskets and clean thoroughly under streaming water.
•Replace the gaskets and filters carefully to their places and tighten the hose nuts by hand.
Draining any remaining water and
cleaning the pump filter
Your product is equipped with a filter system which ensures a cleaner water discharge that extends
10 - EN
pump life by preventing solid items such as |
• After draining process is completed, replace |
|
buttons, coins and fabric fibers from clogging the |
the plug into the end of the hose and fit the |
|
pump propeller during discharge of the washing |
hose back into its place. |
|
water. |
If your product is not supplied with an emergency |
|
• If your machine fails to drain the water, the |
drain hose, do the following as shown in the figure |
|
pump filter may be clogged. You may have |
below: |
|
to clean it every 2 years or whenever it is |
|
|
plugged. Water must be drained off to clean |
|
|
the pump filter. |
|
|
In addition, water may have to be drained off |
|
|
completely in the following cases: |
|
|
• before transporting the machine (e.g. when |
|
|
moving house) |
|
|
• when there is the danger of frost |
|
|
In order to clean the dirty filter and discharge the |
• Place a large container in front of the filter to |
|
water; |
||
receive water flowing from the filter. |
||
1- Unplug the machine to cut off the supply power. |
||
• Loosen pump filter (anticlockwise) until water |
||
There may be water at 90°C in the machine. |
starts to flow out of it. Direct the flowing water |
|
ATherefore, the filter must be cleaned only |
into the container you have placed in front |
|
after the inside water is cooled down to avoid |
of the filter. You can use a piece of cloth to |
|
hazard of scalding. |
absorb any spilled water. |
|
2- Open the filter cap. The filter cap may be |
• When there is no water left, turn the pump |
|
composed of one or two pieces according to the |
filter until it is completely loose and remove it. |
|
model of your machine. |
• Clean any residues inside the filter as well as |
|
If it is composed of two pieces, press the tab on |
fibers, if any, around the propeller region. |
|
the filter cap downwards and pull the piece out |
• If your product has a water jet feature, be sure |
|
towards yourself. |
to fit the filter into its housing in the pump. |
|
If it is composed of one piece, hold it from both |
Never force the filter while replacing it into |
|
sides and open it by pulling out. |
its housing. Fit the filter fully into its housing; |
|
|
otherwise, water may leak from the filter cap. |
|
|
4- Close the filter cap. |
|
|
Close the two-piece filter cap of your product by |
|
|
pushing the tab on it. |
|
|
Close the one-piece filter cap of your product by |
|
|
fitting the tabs on the bottom into their positions |
|
3- An emergency drain hose is supplied with some |
and pushing the upper part of it. |
|
of our models. Others are not supplied with this |
|
|
item. |
|
|
If your product is supplied with an emergency |
|
|
drain hose, do the following as shown in the figure |
|
|
below: |
|
•Pull out the pump outlet hose from its housing.
•Place a large container at the end of the hose. Drain the water off into the container by pulling out the plug at the end of the hose. If the amount of water to be drained off is greater than the volume of the container, replace the plug, pour the water out, then resume the draining process.
11 - EN

6 Solution suggestions for problems
|
|
|
|
Cause |
Explanation / Suggestion |
||
Program cannot be started or selected. |
|
|
|
|
|
|
|
• Machine may have switched to self |
• Reset your machine by pressing “Start/Pause/ |
||
protection mode due to an infrastructure |
|||
Cancel” button for 3 seconds. (see, Canceling |
|||
problem (such as line voltage, water |
|||
a Program) |
|||
pressure, etc.). |
|||
|
|
||
|
|
|
|
There is water coming from the bottom of the machine.
|
• Be sure the seals of the water inlet hoses are |
• There might be problems with hoses or the |
securely fitted. |
• Tightly attach the drain hose to the tap. |
|
pump filter. |
• Make sure that the pump filter is completely |
|
closed. |
|
|
Machine stopped shortly after the program started.
•Machine can stop temporarily due to low voltage.
•It will resume operating when the voltage is back to the normal level.
It continuously spins. Remaining time does not count down. (For models with a display)
•There may be an imbalance of laundry in the machine.
•The automatic spin correction system might have been activated due to the unbalanced distribution of the laundry in the drum.
•The laundry in the drum may be clustered (bundled laundry in a bag). Laundry should be rearranged and re-spun.
•No spinning is performed when the laundry is not evenly distributed in the drum to prevent any damage to the machine and to its environment.
It continuously washes. Remaining time does not count down. (For models with a display)
• |
In the case of a paused countdown while taking • |
The machine will wait until there is a sufficient |
|
in water: |
amount of water to avoid poor washing results due |
• |
Timer will not countdown until the machine is |
to lack of water. Then the timer will start to count |
|
filled with the correct amount of water. |
down. |
•In the case of a paused countdown at the heating step:
•Time will not count down until the selected temperature for the program is reached
|
• |
The automatic spin correction system might have |
|
|
|
been activated due to the unbalanced distribution of |
|
• In the case of a paused countdown at the |
|
the laundry in the drum. |
|
• |
The laundry in the drum may be clustered (bundled |
||
spinning step: |
|
laundry in a bag). Laundry should be rearranged and |
|
• There may be an imbalance of laundry in |
|
||
|
re-spun. |
||
the machine. |
|
||
• |
No spinning is performed when the laundry is |
||
|
|||
|
|
not evenly distributed in the drum to prevent any |
|
|
|
damage to the machine and to its environment. |
|
|
|
|
|
There is foaming over the detergent drawer |
|
|
•Too much detergent was used.
•Mix 1 tablespoonful softener and ½ liter water and pour into the main wash compartment of the detergent drawer.
12 - EN

7 Specifications
Models |
WMB 71242 PTLA |
WMB 71442 PTLA |
WMB 71642 PTLA |
|
|
|
|
Maximum dry laundry capacity (kg) |
7 |
7 |
7 |
Height (cm) |
84 |
84 |
84 |
Width (cm) |
60 |
60 |
60 |
Depth (cm) |
54 |
54 |
54 |
Net Weight (±4 kg) |
71 |
70 |
73 |
Electricity (V/Hz.) |
230 V / 50Hz |
230 V / 50Hz |
230 V / 50Hz |
Total Current (A) |
10 |
10 |
10 |
Total Power (W) |
2200 |
2200 |
2200 |
Spinning cycle (rpm max.) |
1200 |
1400 |
1600 |
Specifications of this appliance may change without notice to improve the quality of the product. Figures in this manual are schematic and may not match your product exactly.
Values stated on the machine labels or in the documentation accompanying it are obtained in laboratory in accordance with the relevant standards. Depending on operational and environmental conditions of the appliance, values may vary.
This appliance’s packaging material is recyclable. Help recycle it and protect the environment by dropping it off in the municipal receptacles provided for this purpose. Your appliance also contains a great amount of recyclable material. It is marked with this label to indicate the used appliances that should not be mixed with other waste. This way, the appliance recycling organised by your manufacturer will be done under the best possible conditions, in compliance with European Directive 2002/96/EC on Waste Electrical and Electronic Equipment. Contact your town hall or your retailer for the used appliance collection points closest to your home. We thank you doing your part to protect the environment.
Dark wash |
Dark wash |
Synthetics |
Cottons |
Pre-wash |
Main |
Rinse |
Wash |
Spin |
Delicates Pet hair |
|
|
|
|
|
wash |
|
|
|
removal |
Drain |
Anti- |
Duvet |
Child- |
Hand |
Baby |
Cotton |
Woolens |
expres 14 |
Daily |
|
creasing |
|
proof lock |
Wash |
|
Eco |
|
Super short |
|
|
|
|
|
|
|
|
|
express |
|
Daily |
Rinse hold |
Start/ |
No spin |
Quick |
Finished |
Cold |
Temperature Self |
Lingerie |
|
express |
|
Pause |
|
wash |
|
|
|
Clean |
|
Mixed 40 |
Super 40 |
Extra rinse |
Freshen |
Shirts |
Jeans |
Sport |
Time delay Intensive |
Fasion |
|
|
|
|
up |
|
|
|
|
|
care |
2820521598_EN/270810.0856
13 - EN

1 Varování
Obecné bezpečnostní pokyny
•Nikdy neinstalujte přístroj na podlahu s kobercem. Jinak by nedostatečné proudění vzduchu pod strojem mohlo způsobit přehřívání elektrických součástí. Tím by mohly vzniknout potíže s vaší pračkou.
•Pokud je poškozen napájecí kabel nebo zástrčka, nutně požádejte o opravu autorizovaný servis.
•Pevně zapojte odčerpávací hadici do výstupního otvoru, aby nedošlo k úniku vody a stroj mohl dle potřeby přijímat a vypouštět vodu. Je důležité, aby přívodní a odčerpávací hadice nebyly přehnuté, zmáčknuté nebo rozbité, když spotřebič stěhujete na místo po instalaci nebo čištění.
•Vaše pračka by měla pokračovat v provozu v případě výpadku elektrické energie. Po obnovení přívodu energie pračka neobnoví svůj program. Stiskněte tlačítko “Start/ Pauza/Storno” na 3 sekundy pro stornování programu (viz Stornování programu)
•Při přijetí může být ve vaší pračce zbytková voda. Pochází z procesu kontroly kvality a nejde o závadu. Nemůže tím dojít k poškození vaší pračky.
•Některé problémy, které se mohou vyskytnout, mohou být způsobeny infrastrukturou. Stiskněte tlačítko “Start/Pauza/Storno” na
3 sekundy pro stornování programu ve vaší pračce, než zavoláte autorizovaný servis.
První použití
•První prací cyklus proveďte bez vložení prádla, jen s pracím práškem a při nastavení programu “Bavlna 90°C“.
•Zajistěte, aby instalace teplé a studené vody byla správně provedená.
•Pokud je hlavní jistič nebo proudový chránič omezen na méně než 16 ampér, požádejte kvalifikovaného elektrikáře o nainstalování 16 ampérové pojistky nebo proudového chrániče.
•Při používání s transformátorem nebo bez něj nezapomeňte na správné uzemnění provedené kvalifikovaným elektrikářem. Naše společnost nezodpovídá za škody vzniklé používáním přístroje na vedení bez uzemnění.
•Obaly skladujte mimo dosah dětí nebo je zlikvidujte podle příslušných odpadových směrnic.
Určené použití
•Tento produkt byl vyroben pro domácí použití.
•Spotřebič lze používat k praní a máchání prádla, které je označeno jako vhodné pro praní v pračce.
•Tento spotřebič by neměly používat osoby (včetně dětí) se sníženými fyzickým, smyslovými či duševními schopnostmi, s nedostatkem zkušeností a znalostí, pokud nemají dohled nebo pokyny týkající se
používání spotřebiče, od osoby, jež zodpovídá za jejich bezpečí.
Bezpečnostní pokyny
•Tento spotřebič musí být připojen k uzemněné zástrčce ochráněné pojistkou s vhodnou kapacitou.
•Přívodní a odčerpávací hadice musí být vždy pevně připevněné a v nepoškozeném stavu.
•Před spuštěním spotřebiče připojte pevně odčerpávací hadici k umyvadlu nebo vaně. Jinak hrozí riziko opaření vlivem vysokých teplot při praní!
•Nikdy neotevírejte vkládací dvířka a nevyjímejte filtr, když je voda v bubnu.
•Odpojte stroj, když jej nepoužíváte.
•Nikdy neumývejte zařízení proudem vody! Hrozí riziko zásahu elektrickým proudem!
•Nikdy se nedotýkejte zásuvky mokrýma rukama. Přístroj nepoužívejte,, pokud je napájecí kabel nebo zástrčka poškozena.
•V případě, že vznikne závada, kterou nelze odstanit podle instrukcí v návodu, postupujte následovně:
•Vypněte pračku, odpojte ji ze sítě, uzavřete přívodní kohoutek a kontaktujte autorizovaný servis. Informace o likvidaci stroje vám poskytne místní prodejce nebo středisko sběru tuhých odpadů ve vaší obci.
Pokud máte v domě děti…
•Udržujte děti mimo dosah přístroje, pokud je v provozu. Nedovolte jim hrát si se přístrojem.
•Zavřete vkládací dvířka, když opouštíte místo, kde je pračka instalována.
2 Instalace
Sejmutí výztuh obalů
Nakloňte stroj pro sejmutí výztuh obalů. Sejměte výztuhy obalů tak, že zatáhnete za stuhu.
Odstranění přepravních pojistek
APřed použitím pračky je třeba odstranit přepravní pojistky.
1.Uvolněte všechny šrouby klíčem, dokud jimi nelze volně otáčet (“C”)
2.Odstraňte přepravní bezpečnostní šrouby tak, že jimi jemně otočíte.
3.Nasaďte kryty ((dodané v sáčku s Návodem k použití) do otvorů na zadním panelu. (“P”)
C Uschovejte přepravní bezpečnostní šrouby na bezpečném místě pro další použití, v případě možného přemístění..
C Nikdy nepřemisťujte spotřebič bez řádně upevněných bezpečnostních přepravních šroubů!
15 - CZ

Seřízení nožek
ANa uvolnění blokovacích matic nepoužívejte žádné nástroje. Jinak by se mohly poškodit.
1.Ručně povolte blokovací matice na nožkách.
2.Upravujte jejich stav, dokud přístroj nebude ve vodorovné poloze.
3.Důležité upozornění: Po seřízenívšechny blokovací matice znovu utáhněte.
Připojení k přívodu vody.
Důležité upozornění:
•Tlak vody nezbytný pro použití stroje musí být 1-10 barů (0,1 – 1 MPa).
•Připojte zvláštní hadice dodávané s pračkou k přívodním ventilům pračky.
•Aby nedošlo k úniku vody v místě spojů, jsou k hadicím připojena těsnění (4 těsnění pro modely s dvojím vstupem vody a 2 těsnění pro ostatní modely). Tato těsnění použijte na koncích hadice pro připevnění ke kohoutku vody a k pračce. Rovný konec hadice s filtrem musí být připevněn ke kohoutku a konec s loktem připojen k pračce. Pevně utáhněte matice hadice rukou; na matice nikdy nepoužívejte klíče.
•Modely s jediným přívodem vody nepřipojujte ke kohoutku s horkou vodou.
Při vracení spotřebiče na místo po údržbě nebo čištění dávejte pozor, abyste nepřekroutili, nezmáčkli nebo nezablokovali hadice.
Připojení k odpadu
Hadici pro odpadní vodu lze připevnit k okraji vany nebo umyvadla. Odpadovou hadici pevně upevněte k odpadu, aby nemohla vypadnout z krytu.
Důležité upozornění:
•Konec odpadové hadice přímo připojte k odpadu nebo do vany.
•Hadici připevněte do výšky nejméně 40 cm a nejvýše 100 cm.
•Pokud je hadice zvednutá poté, co ležela na zemi nebo v její blízkosti (méně než 40 cm nad zemí), je odčerpání vody ztíženo a prádlo může být při vyjímání z pračky mokré.
•Hadici zatlačte do odpadu nejméně 15 cm. Pokud je příliš dlouhá, můžete ji zkrátit.
•Maximální délka spojených hadic nesmí přesahovat 3,2 m.
Elektrické zapojení
Připojte spotřebič k uzemněné zástrčce ochráněné pojistkou s vhodnou kapacitou.
Důležité upozornění:
• Připojení by mělo splňovat místní předpisy.
• Napětí a povolená ochrana pojistek jsou uvedeny v oddíle “Technické parametry”.
• Stanovené napětí musí být shodné s napětím ve vaší síti.
• Připojení přes prodlužovací kabely nebo rozdvojky se nedoporučuje.
BPoškozený napájecí kabel musí vyměnit kvalifikovaný elektrikář.
BSpotřebič nesmíte používat, dokud není důkladně opraven! Hrozí riziko zásahu elektrickým proudem!
3 Počáteční přípravy na praní
Příprava oděvů k praní
Předměty s kovovými částmi, jako jsou podprsenky, spony pásků a kovové knoflíky, mohou poškodit pračku. Kovové části odstraňte nebo umístěte předměty do sáčku, povlaku na polštář nebo podobné pomůcky.
•Prádlo roztřiďte podle typu látky, barvy a stupně zašpinění a povolené teploty vody. Vždy dodržujte pokyny uvedené na štítcích oděvů.
•Malé oděvy jako dětské ponožky a nylonové punčochy vkládejte vždy do pracího sáčku, povlaku na polštář nebo podobné pomůcky. Předejdete tím také ztrátě oděvů.
•Oděvy označené jako “lze prát v pračce” nebo “perte v ruce” perte jen s využitím vhodného programu.
•Neperte barevné a bílé prádlo společně. Nové, tmavé bavlněné oděvy mohou pouštět barvu. Perte je odděleně.
•Používejte jen barviva/měniče barev a odstraňovače vodního kamene vhodné pro pračky. Vždy postupujte podle pokynů na
16 - CZ

obalu.
•Kalhoty a jemné oděvy perte obrácené naruby.
Správná maximální zátěž
C Dodržuje prosím pokyny v “Tabulce pro výběr programu”. Při přetížení pračky dojde ke snížení účinnosti praní.
Vkládací dvířka
Dvířka se zamknou během programu a rozsvítí se symbol zamčených dvířek. Dvířka lze otevřít, jakmile symbol zhasne.
Prací prášky a aviváže
Přihrádka na prací prášek
Přihrádka na prací prášek se skládá ze tří částí:
Přihrádka na prací prášek může mít dva druhy podle modelu vaší pračky.
–(I) pro předeprání
–(II) pro hlavní praní - (III) sifon
–( )pro aviváž
Množství prášku
Prací prášek a aviváž vložte před spuštěním pracího programu.
Nikdy neotevírejte přihrádku na prací prášek, když je program spuštěný!
Pokud použijete program bez předepírání, nevkládejte žádný prášek do prostoru pro předeprání (prostor č. I).
Množství prášku
Množství použitého pracího prášku závisí na množství prádla, stupni zašpinění a tvrdosti vody.
•Nepoužívejte množství přesahující hodnoty doporučené na obalu, aby nedocházelo k přílišnému pěnění, nedostatečnému vymáchání, zbytečným výdajům a také k poškození životního prostředí.
•Nikdy nepřekračujte hodnotu (>max<); jinak bude aviváž zbytečně odplavena.
•Nepoužívejte tekutý prací prášek, pokud chcete prát s využitím funkce odloženého startu.
17 - CZ
 Loading...