


AXIS Q1798-LE Network Camera
User Manual

AXIS Q1798-LE Network Camera |
|
Table of Contents |
|
Solution overview . . . . . . . . . . . . . . . . . . . . . . . . . . . . . . . . . . . . . . . . . . . |
3 |
. . . . . . . . . . . . . . . . . . . . . . . . . . . . . . . . . . . . . . . . . . . . . . . . . . . . . . . . . . . . . . |
3 |
Get started . . . . . . . . . . . . . . . . . . . . . . . . . . . . . . . . . . . . . . . . . . . . . . . . |
4 |
Find the device on the network . . . . . . . . . . . . . . . . . . . . . . . . . . . . . . . . . . . . |
4 |
Access the device . . . . . . . . . . . . . . . . . . . . . . . . . . . . . . . . . . . . . . . . . . . . . . . |
4 |
Webpage overview . . . . . . . . . . . . . . . . . . . . . . . . . . . . . . . . . . . . . . . . . . . . . . |
5 |
Setup . . . . . . . . . . . . . . . . . . . . . . . . . . . . . . . . . . . . . . . . . . . . . . . . . . . . . |
7 |
Adjust the image . . . . . . . . . . . . . . . . . . . . . . . . . . . . . . . . . . . . . . . . . . . . . . . . |
7 |
View and record video . . . . . . . . . . . . . . . . . . . . . . . . . . . . . . . . . . . . . . . . . . . . |
13 |
Set up rules and alerts . . . . . . . . . . . . . . . . . . . . . . . . . . . . . . . . . . . . . . . . . . . |
14 |
Add audio . . . . . . . . . . . . . . . . . . . . . . . . . . . . . . . . . . . . . . . . . . . . . . . . . . . . . |
21 |
Learn more . . . . . . . . . . . . . . . . . . . . . . . . . . . . . . . . . . . . . . . . . . . . . . . . |
22 |
Cleaning recommendations . . . . . . . . . . . . . . . . . . . . . . . . . . . . . . . . . . . . . . . |
22 |
Long-distance connections . . . . . . . . . . . . . . . . . . . . . . . . . . . . . . . . . . . . . . . . |
22 |
Image quality . . . . . . . . . . . . . . . . . . . . . . . . . . . . . . . . . . . . . . . . . . . . . . . . . . . |
22 |
Streaming and storage . . . . . . . . . . . . . . . . . . . . . . . . . . . . . . . . . . . . . . . . . . . |
24 |
Applications . . . . . . . . . . . . . . . . . . . . . . . . . . . . . . . . . . . . . . . . . . . . . . . . . . . . |
25 |
Troubleshooting . . . . . . . . . . . . . . . . . . . . . . . . . . . . . . . . . . . . . . . . . . . . |
26 |
Reset to factory default settings . . . . . . . . . . . . . . . . . . . . . . . . . . . . . . . . . . . |
26 |
Firmware options . . . . . . . . . . . . . . . . . . . . . . . . . . . . . . . . . . . . . . . . . . . . . . . |
26 |
Check the current firmware . . . . . . . . . . . . . . . . . . . . . . . . . . . . . . . . . . . . . . . |
26 |
Upgrade the firmware . . . . . . . . . . . . . . . . . . . . . . . . . . . . . . . . . . . . . . . . . . . . |
27 |
Technical issues, clues and solutions . . . . . . . . . . . . . . . . . . . . . . . . . . . . . . . . |
27 |
Performance considerations . . . . . . . . . . . . . . . . . . . . . . . . . . . . . . . . . . . . . . . |
28 |
Need more help? . . . . . . . . . . . . . . . . . . . . . . . . . . . . . . . . . . . . . . . . . . . . . . . . |
29 |
Specifications . . . . . . . . . . . . . . . . . . . . . . . . . . . . . . . . . . . . . . . . . . . . . . |
30 |
Product overview . . . . . . . . . . . . . . . . . . . . . . . . . . . . . . . . . . . . . . . . . . . . . . . . |
30 |
LED indicators . . . . . . . . . . . . . . . . . . . . . . . . . . . . . . . . . . . . . . . . . . . . . . . . . . |
31 |
Buzzer . . . . . . . . . . . . . . . . . . . . . . . . . . . . . . . . . . . . . . . . . . . . . . . . . . . . . . . . |
31 |
SD card slot . . . . . . . . . . . . . . . . . . . . . . . . . . . . . . . . . . . . . . . . . . . . . . . . . . . . |
31 |
Buttons . . . . . . . . . . . . . . . . . . . . . . . . . . . . . . . . . . . . . . . . . . . . . . . . . . . . . . . |
32 |
Connectors . . . . . . . . . . . . . . . . . . . . . . . . . . . . . . . . . . . . . . . . . . . . . . . . . . . . |
32 |
2

AXIS Q1798-LE Network Camera
Solution overview
Solution overview
3

AXIS Q1798-LE Network Camera
Get started
Get started
Find the device on the network
To find Axis devices on the network and assign them IP addresses in Windows®, use AXIS IP Utility or AXIS Device Manager. Both applications are free and can be downloaded from axis.com/support.
For more information about how to find and assign IP addresses, see the document How to assign an IP address and access your device on the device page at axis.com.
Browser support
You can use the device with the following browsers:
|
ChromeTM |
Firefox® |
Edge® |
Safari® |
Windows® |
recommended |
x |
x |
|
OS X® |
recommended |
|
|
x |
Other operating systems |
x |
x |
|
|
|
|
|
|
|
If you need more information about recommended browsers, go to axis.com/browser-support.
Access the device
1.Open a browser and enter the IP address or host name of the Axis device.
If you have a Mac computer (OS X), go to Safari, click on Bonjour and select the device from the drop-down list. To add Bonjour as a browser bookmark, go to Safari > Preferences.
If you do not know the IP address, use AXIS IP Utility or AXIS Device Manager to find the device on the network.
2.Enter the username and password. If you access the device for the first time, you must set the root password. See
Set a secure password for the root account on page 4 .
3.The live view page opens in your browser.
Verify that no one has tampered with the firmware
To make sure that the device has its original Axis firmware, or to take full control of the device after a security attack:
1.Reset to factory default settings. See Reset to factory default settings on page 26. After the reset, secure boot guarantees the state of the device.
2.Configure and install the device.
Set a secure password for the root account
Important
The default administrator username is root. If the password for root is lost, reset the device to factory default settings.
1.Type a password. Follow the instructions about secure passwords. See Secure passwords on page 5 .
2.Retype the password to confirm the spelling.
3.Click Create login. The password has now been configured.
4

AXIS Q1798-LE Network Camera
Get started
Secure passwords
Important
Axis devices send the initially set password in clear text over the network. To protect your device after the first login, set up a secure and encrypted HTTPS connection and then change the password.
The device password is the primary protection for your data and services. Axis devices do not impose a password policy as they may be used in various types of installations.
To protect your data we strongly recommend that you:
•Use a password with at least 8 characters, preferably created by a password generator.
•Don’t expose the password.
•Change the password at a recurring interval, at least once a year.
Webpage overview
1Live view control bar
2Live view
3Product name
4User information, color themes, and help
5Video control bar
5

AXIS Q1798-LE Network Camera
Get started
6 Settings toggle
7 Settings tabs
Need more help?
You can access the built-in help from the device’s webpage. The help provides more detailed information on the device’s features and their settings.
6

AXIS Q1798-LE Network Camera
Setup
Setup
Adjust the image
To find out more about what you can do with the image, see Learn more on page 22.
Level the camera
To adjust the view in relation to a reference area or object, use the leveling guide in combination with a mechanical adjustment of the camera.
1. |
Go to Settings > System > Orientation and click |
. |
2. |
Adjust the camera mechanically until the position of the reference area or object, is aligned with the leveling guide. |
|
Adjust the focus
This product has three focus modes:
•Auto: The camera automatically adjusts focus based on the entire image.
•Area: The camera automatically adjusts focus based on a selected area of the image.
•Manual: The focus is set manually at a fixed distance.
To turn off autofocus and adjust the focus manually:
1.In the live view window, if the Zoom slider is visible, click Zoom and select Focus.
2.Click M and use the slider to set the focus.
Select exposure mode
There are different exposure mode options in the camera that adjusts aperture, shutter speed, and gain to improve image quality for specific surveillance scenes. Go to Settings > Image > Exposure and select between the following exposure modes:
•For most use cases, select Automatic exposure.
•For environments with certain artificial lighting, for example fluorescent lighting, select Flicker-free. Select the same frequency as the power line frequency.
•For environments with certain artificial light and bright light, for example outdoors with fluorescent lighting at night and sun during daytime, select Flicker-reduced.
Select the same frequency as the power line frequency.
•To lock the current exposure settings, select Hold current.
Optimize IR illumination
In most cases, the exposure of the image is automatically adjusted to obtain optimal image quality. If the camera is placed close to a wall or a corner, it can sometimes result in saturation of parts of the image. When this happens, the LED’s closest to the wall or corner are automatically dimmed to avoid saturating the image.
Depending on the installation environment and the conditions around the camera, for example external light sources in the scene, you can sometimes improve the IR illumination if you manually adjust the intensity of the LED’s.
1. Go to Settings > Image > Day and night, and turn on Allow IR illumination.
7

AXIS Q1798-LE Network Camera
Setup
2.Turn on Live view control.
3.Minimize Settings.
4.In the live view, click the Illumination button, turn on IR light and select Manual.
5.Adjust the intensity.
Benefit from IR light in low-light conditions using night mode
Your camera uses visible light to deliver color images during the day. As the available light diminishes, you can set the camera to automatically shift to night mode, in which the camera uses both visible light and near-infrared light to deliver black-and-white images. Since the camera uses more of the available light it can deliver brighter, more detailed, images.
1.Go to Settings > Image > Day and night, and make sure that the IR cut filter is set to Auto.
2.To determine at what light level you want the camera to shift to night mode, move the Threshold slider toward Bright or Dark.
3.Enable Allow IR illumination and Synchronize IR illumination to use the camera’s IR light when night mode is activated.
Note
If you set the shift to occur when it’s brighter, the image remains sharper as there will be less low-light noise. If you set the shift to occur when it’s darker, the image colors are maintained for longer, but there will be more image blur due to low-light noise.
Reduce noise in low-light conditions
To reduce noise in low-light conditions, you can adjust one or more of the following settings:
•Set the exposure mode to automatic.
Note
A high max shutter value can result in motion blur.
•To slow down the shutter speed, set max shutter to the highest possible value.
•Reduce sharpness in the image.
•Set the max gain to a lower value.
Reduce motion blur in low-light conditions
To reduce motion blur in low-light conditions, you can adjust one or more of the following settings:
Note
Image noise will increase if you increase the gain.
•Increase shutter speed and gain. Go to Settings > Image > Exposure and set Max shutter to a shorter time, and Max gain to a higher value.
If you are still experiencing motion blur, you can try one of the following:
•Increase the light level in the scene.
•Mount the camera so that objects move toward it or away from it rather than sideways.
Maximize details in an image
Important
If you maximize details in an image, the bitrate will probably increase and you might get a reduced frame rate.
8

AXIS Q1798-LE Network Camera
Setup
•Set the compression as low as possible.
•Select MJPEG streaming.
•Turn off Zipstream functionality.
Handle scenes with strong backlight
Dynamic range is the difference in light levels in an image. In some cases the difference between the darkest and the brightest areas can be significant. The result is often an image where either the dark or the bright areas are visible. Wide dynamic range (WDR) makes both dark and bright areas of the image visible.
1.Go to Settings > Image > Wide dynamic range.
2.If required, turn on WDR.
Image without WDR.
Image with WDR.
Note
WDR may cause artifacts in the image.
Find out more about WDR and how to use it at axis.com/web-articles/wdr.
Stabilize a shaky image with Electronic Image Stabilization (EIS)
Electronic Image Stabilization (EIS) can be used in environments where the product is mounted in an exposed location and subject to vibrations, for example, wind or passing traffic. Turn on EIS to get a smoother and steadier image without blur.
EIS also reduces the file size of the compressed image and lowers the bitrate of the video stream.
Note
When EIS is turned on the image is cropped slightly, lowering the maximum resolution.
1. Go to Settings > Image > Image correction.
9
AXIS Q1798-LE Network Camera
Setup
2. Turn on EIS.
Compensate for barrel distortion
Barrel distortion is a phenomenon where straight lines appear increasingly bent closer to the edges of the frame. A wide field of view often creates barrel distortion in an image. Barrel distortion correction compensates for this distortion.
Note
Barrel distortion correction affects the image resolution and field of view.
1.Go to Settings > Image > Image correction.
2.Turn on Barrel distortion correction (BDC).
3.Set the level of correction that gives you the best image.
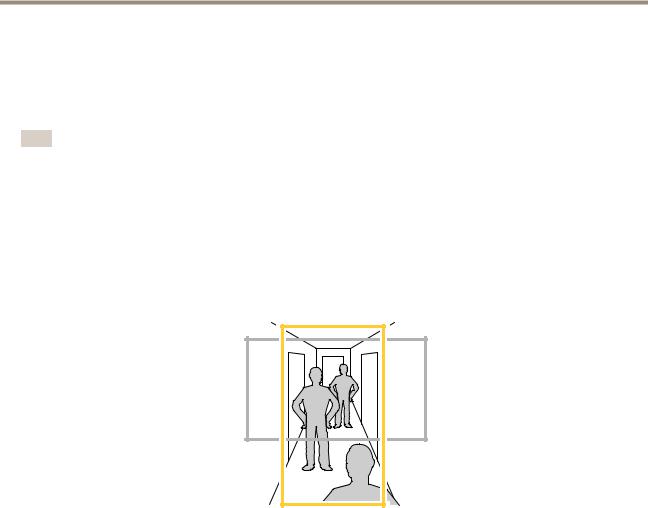
Monitor long and narrow areas
Use corridor format to better utilize the full field of view in a long and narrow area, for example a staircase, hallway, road, or tunnel.
1.Depending on your device, turn the camera or the 3-axis lens in the camera 90° or 270°.
2.If the device doesn’t rotate the view automatically, log in to the webpage and go to Settings > System > Orientation.
3.Click  .
.
4.Rotate the view 90° or 270°.
Find out more at axis.com/axis-corridor-format.
Improve facial recognition
To better recognize the face of a person passing by the camera, you can set the optimal pixel resolution with the camera’s pixel counter.
10
AXIS Q1798-LE Network Camera
Setup
1.Go to Settings > System > Orientation and click  .
.
2.In the camera’s live view, adjust the size and placement of the rectangle around the area of interest, for example, where the faces of passing persons are expected to appear. You can then see the number of pixels represented by the sides of the rectangle.
Note
You can use an object of a known size in the view as a reference to decide how much resolution is needed for recognition.
Improve license plate recognition
To better recognize the license plate of a car passing by the camera, you can apply and adjust a number of things. One option is to use the pixel counter in your camera to set the optimal pixel resolution:
1.Go to Settings > System > Orientation and click  .
.
2.Adjust the size and placement of the rectangle in the camera’s live view around the area of interest, for example where the license plates of passing cars are expected to appear. You can then see the number of pixels represented by the sides of the rectangle.
Note
You can use an object of a known size in the view as a reference to decide how much resolution is needed for recognition.
In addition, you can try to adjust the following to optimize license plate recognition:
•Shutter speed
•Gain
•Zoom
Optimize the image for traffic surveillance
To get the best possible image for traffic surveillance, use the AXIS Traffic Wizard in combination with the Traffic overview scene profile.
1.Go to Settings > Apps > AXIS Traffic Wizard.
2.Start the application if it is not already running.
11
 Loading...