


292
Table of contents
 Loading...
ENGLISH
FRANCAIS
DEUTSCH ESPAÑOL
ITALIANO
AXIS 292
Network Video Decoder
Installation Guide


AXIS 292 Installation Guide Page 3
ENGLISH
AXIS 292
Installation Guide
This installation guide provides instructions for installing the AXIS 292 on a network. For all
other aspects of using the product, please see the User’s Manual, available on the CD included
in this package or from www.axis.com/techsup
Installation steps
1. Check the package contents against the list below.
2. Hardware overview. See page 4.
3. Install the hardware. See page 5.
4. Set an IP address. See page 6.
5. Set the password. See page 6.
6. Accessing the AXIS 292. See page page 10.
Package contents
Item Models/variants/notes
Network Video Decoder AXIS 292
PS-K indoor power supply
(country specific)
Europe
UK
Australia
USA/Japan
Argentina
Korea
Mounting kit Mounting kit for wall/rack
CD AXIS Network Video Product CD, including installation tools and other software,
product documentation
Printed Materials AXIS 292 Installation Guide (this document)
Axis Warranty Document
Page 4 AXIS 292 Installation Guide
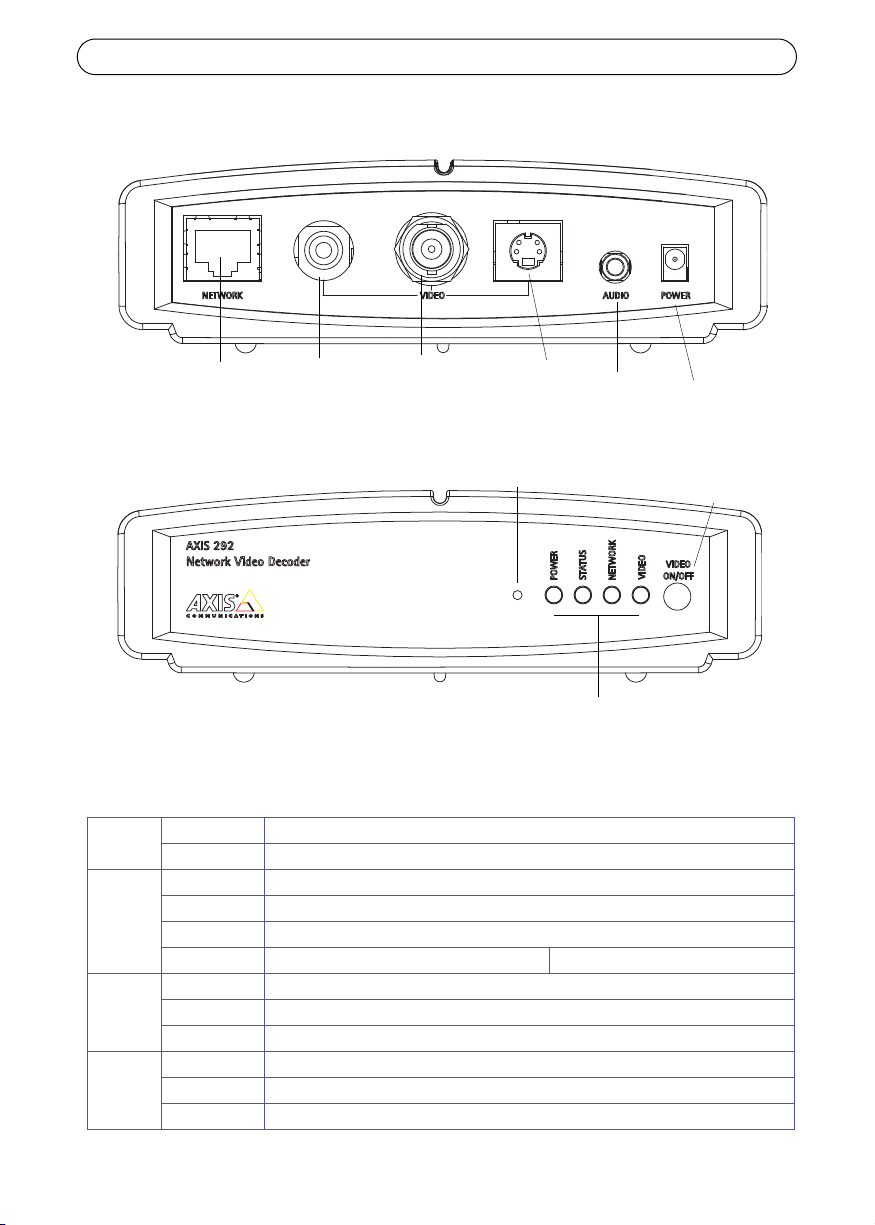
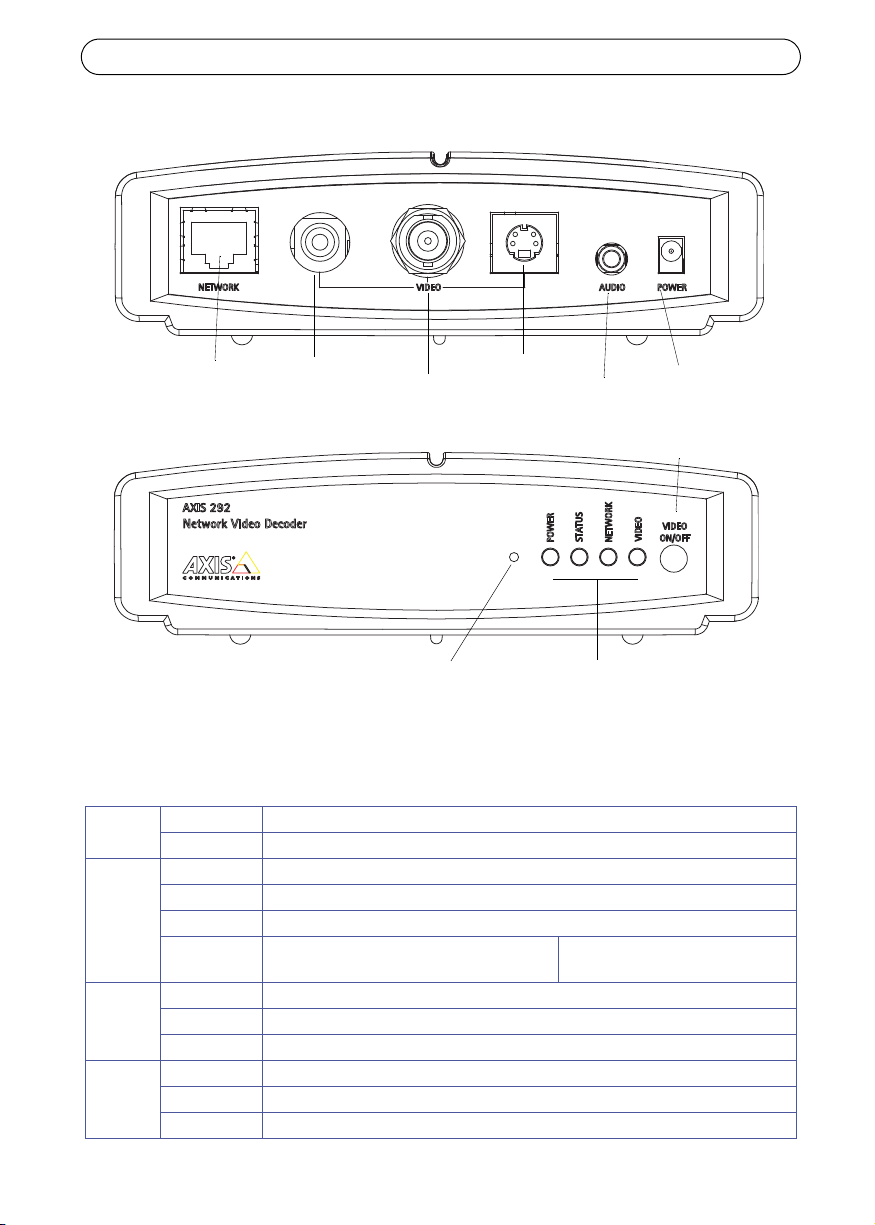
Hardware Overview
Once the AXIS 292 has been connected to power and network, the multi-colored Network,
Status, Power and Video LED indicators show the following information:
Power Green Continuous for normal operation
Green/Amber Flashes green/amber during upgrade
Status
Green Continuous for normal operation
Green/Amber Flashes green/amber during startup
Amber Continuous when resetting to factory default
Red Continuous for hardware error Flashes for illegal serial number
Network
Green Flashes for activity on a 100 Mbit/s network
Amber Flashes for activity on a 10 Mbit/s network
None No connection
Video
Green Continuous for video connected
Amber Continuous when connecting
Red Continuous when video disconnected
Network
RCA
BNC Y/C
Power
Audio
Control
button
Video
on/off
Power/Status/Network/Video
indicators
Video
out
Video
out
Video
out
AXIS 292 Installation Guide Page 5
ENGLISH
Installing the AXIS 292
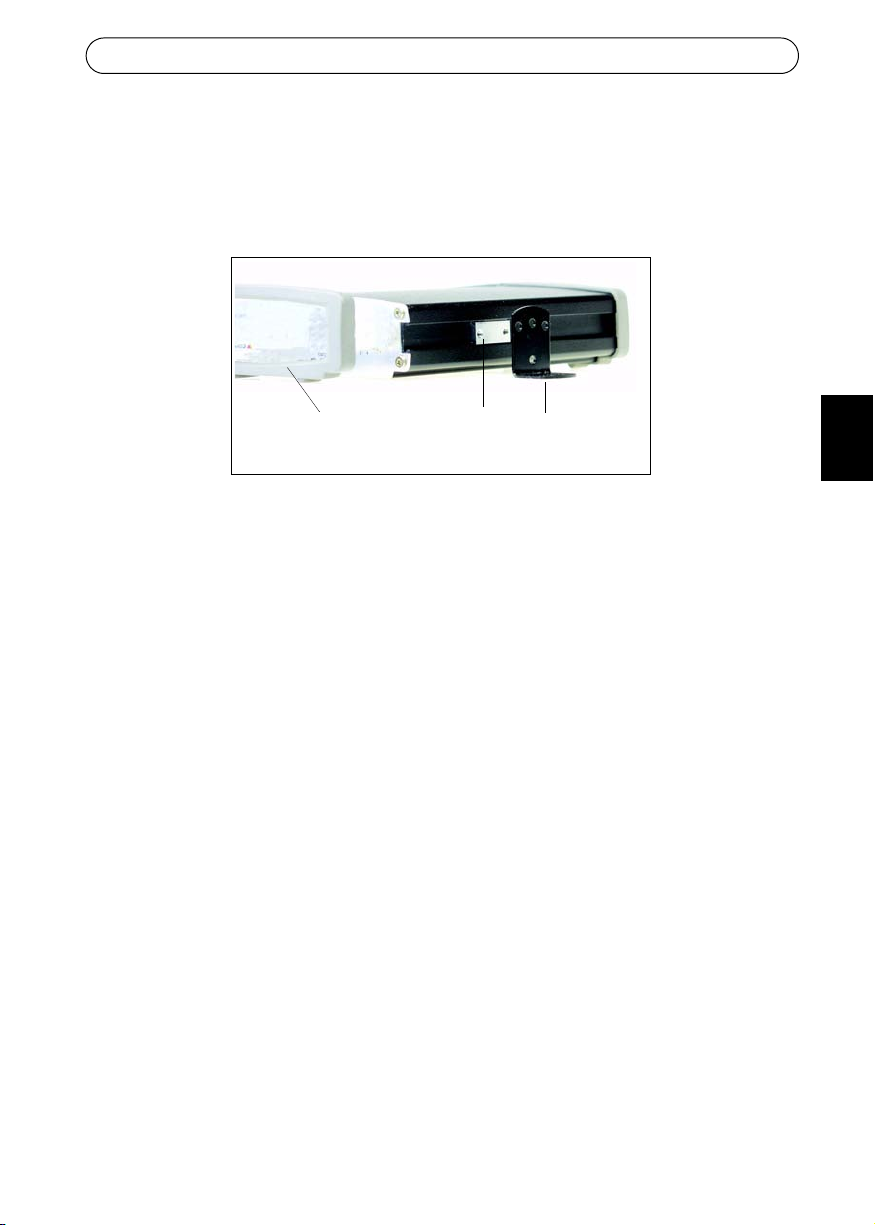
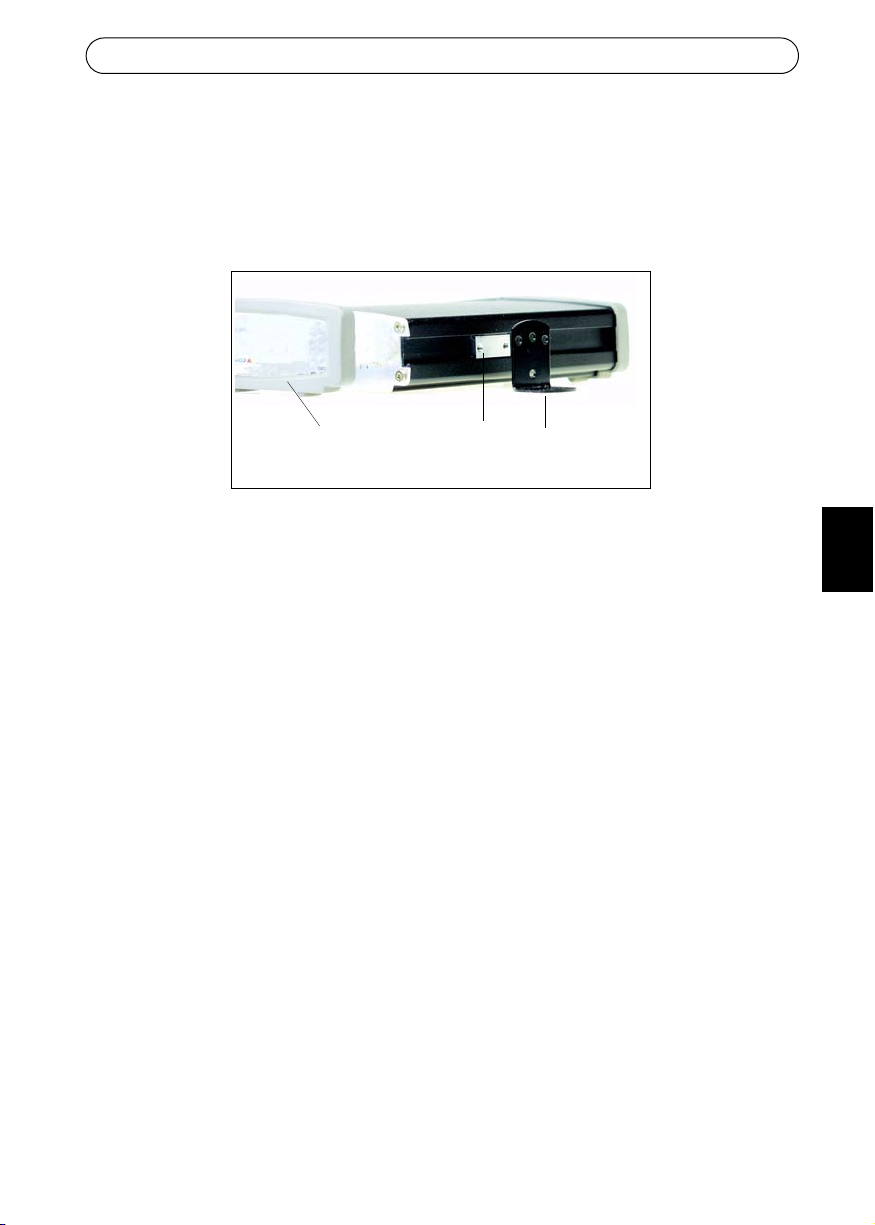
The AXIS 292 is supplied with a mounting kit for wall or rack mounting. The mounting
brackets can be positioned for mounting the network video decoder on a vertical surface or in
a rack (4U). Follow the instructions below to attach the mounting bracket to the video server:
1. Slide the grey frame off the front panel of the network video decoder (no tools needed).
2. Insert the metal plates in the slots on each side of the network video decoder.
3. Position and attach the brackets on each side using the provided screws.
Connecting a TV monitor to the AXIS 292
Check the TV monitor to see which connectors are available. S-video is recommended if
available. Connect the TV monitor to the appropriate video output connector:
•RCA
•BNC
•Y/C (S-video)
Connecting the power and network cables
1. Connect the AXIS 292 to the network using a standard network cable.
2. Connect power using the power adaptor supplied with the product.
3. Check that the LED indicators show the correct conditions. See the table on page 4 for
further details.
grey
metal
bracket
plateframe

Page 6 AXIS 292 Installation Guide
Installing the AXIS 292 on a network
The AXIS 292 is designed for installation on an Ethernet network. This involves assigning an
IP address, either manually or via an automated network service (DHCP). Depending on the
network, select one of the following procedures:
• Automatic Installation using DHCP, on page 6.
• Manual Installation using AXIS IP Utility, on page 7.
• Manual Installation using ARP and Ping in Windows, on page 8.
• Manual Installation using ARP and Ping in UNIX/Linux, on page 9.
Notes:
• The AXIS 292 has the default IP address 192.168.0.90
• DHCP is enabled by default
Automatic Installation using DHCP
DHCP is enabled by default on the AXIS 292. If a DHCP server is available on the network,
follow these instructions to install the AXIS 292.
1. Make sure that the power, network and video cables are connected, see Connecting the
power and network cables, on page 5 for instructions.
2. The IP address will be displayed on the TV monitor during startup.
3. Start a Web browser on a computer connected to the network and enter the IP address in
the Address/Location field. Press Enter.
4. Enter the password for the root user (administrator). See Setting the password, on page 6.
5. The installation is now complete. Please refer to the AXIS 292 User’s Manual and the
online help files for descriptions of the available functionality.
Setting the password
The password will need to be changed in order to prevent unauthorized tampering. The
default user name is root and the default password is pass.
1. Locate the AXIS 292 on the network. See Accessing the AXIS 292, on page 10.
2. Click Maintenance on the overview page for the AXIS 292.
3. Under Server Maintenance, enter the new password and then confirm the new password.
4. If the password is lost, the AXIS 292 must be reset to the default settings. Refer to
Factory default settings, on page 11, for instructions.
Notes:
• If the monitor displays the default IP address (192.168.0.90), DHCP probably failed. In
this case, please proceed to one of the manual installation procedures on the following
pages.
AXIS 292 Installation Guide Page 7
ENGLISH
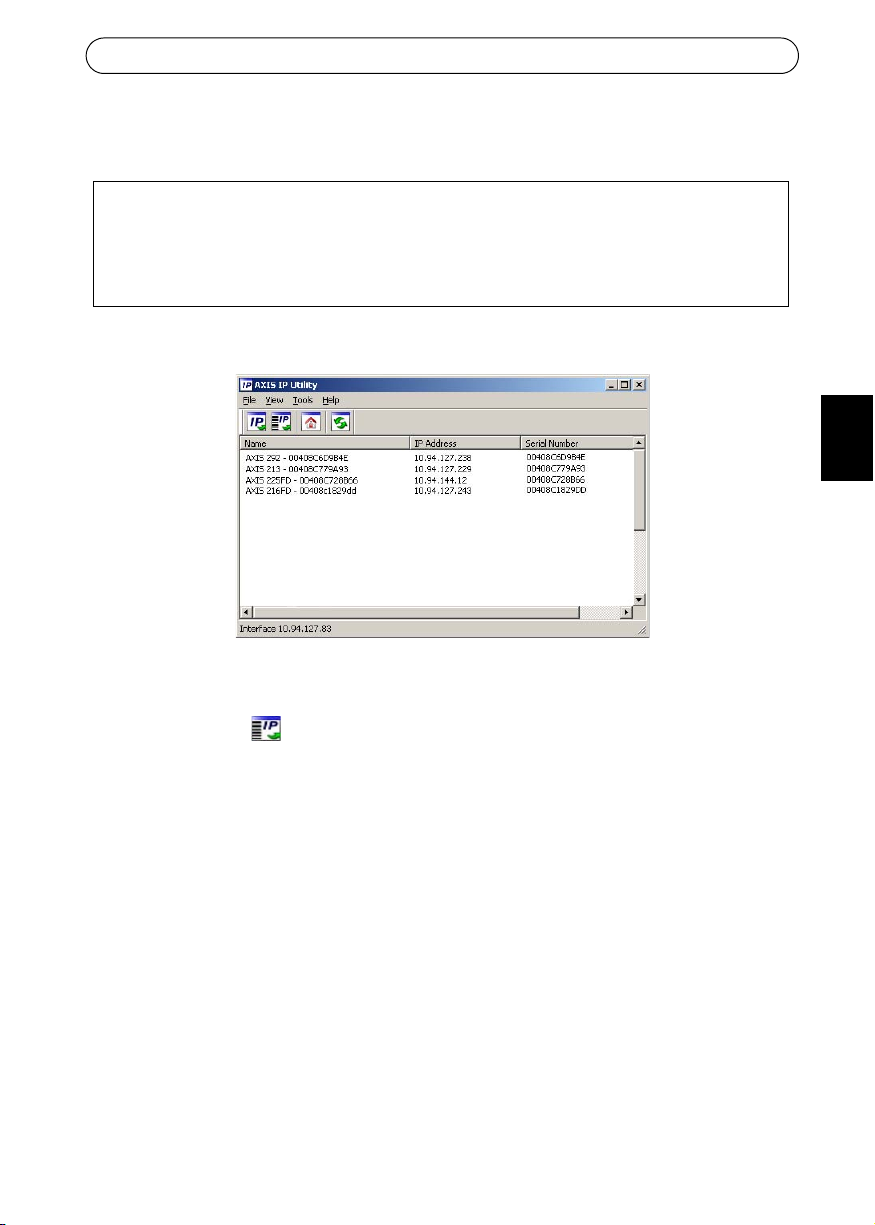
Manual Installation using AXIS IP Utility
1. Acquire an unused IP address on the same network segment as your computer.
2. Click the button Assign new IP address using serial number and enter the serial
number and IP address for the Product shortname. The serial number is located on the
product label.
3. Click the Assign button and follow the instructions.
4. Click the Home Page button to access the camera’s web pages.
5. Enter a password for the root user (administrator). See Setting the password, on page 6.
6. The installation is now complete. Proceed to Accessing the AXIS 292, on page 10.
Note:
If the password is lost, the AXIS 292 must be reset to the default settings. Refer to Factory
default settings, on page 11, for instructions.
AXIS IP Utility is a Windows software application that installs the AXIS 292 to the local
network using a static IP address.
• Download the AXIS IP Utility software, free of charge, from the Support pages at
http://www.axis.com/techsup
Page 8 AXIS 292 Installation Guide
Manual Installation using ARP and Ping in Windows
Assign a unique IP address to the AXIS product using a computer on your network as follows:
1. Acquire an unused IP address for the AXIS 292 from the network administrator. The
AXIS 292 must be installed on the same subnet as the computer.
2. Connect a standard network cable from the AXIS 292 to the network.
3. Locate the serial number/MAC Address (S/N) on the label on the underside of the AXIS
292.
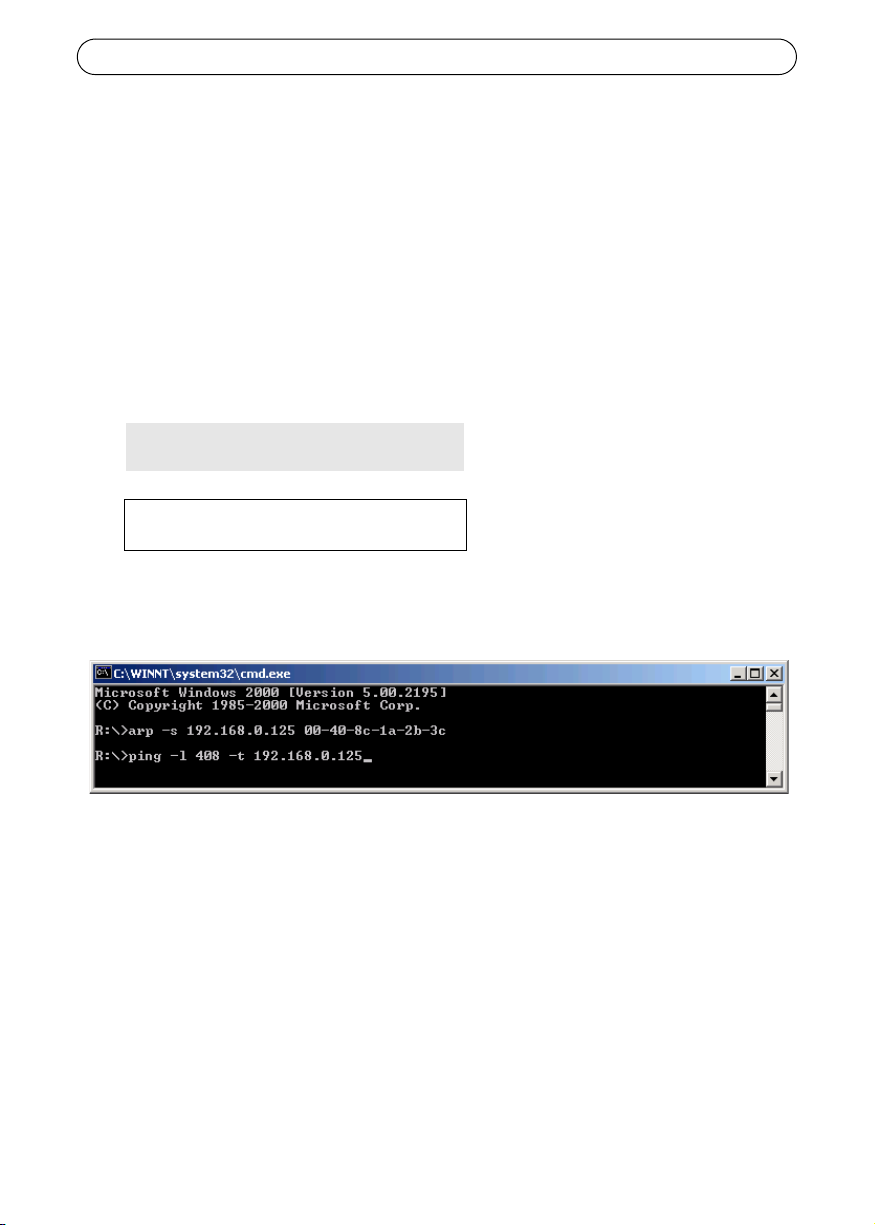
4. From a computer on the network, open a Command Prompt, i.e. from the Windows Start
menu, select Run... and type command or cmd in the field. Click OK.
5. Enter the commands:
Syntax:
Example
6. Connect power to the AXIS 292.
7. When ‘Reply from 192.168.0.125: ...’ is displayed (approximately 10-15 seconds), type
Ctrl+C to close the ARP Ping session.
8. Start a Web browser, enter the IP address in the Address/Location field and Press Enter.
9. Enter a password for the root user (administrator). See Setting the password, on page 6.
10. The installation is now complete. Proceed to Accessing the AXIS 292, on page 10.
Note:
If the password is lost, the AXIS 292 must be reset to the default settings. Refer to Factory
default settings, on page 11, for instructions.
arp -s <IP address> <MAC address>
ping -l 408 -t <IP address>
Note: The ping command is
followed by -l (lower case L)

AXIS 292 Installation Guide Page 9
ENGLISH
Manual Installation using ARP and Ping in UNIX/Linux
Assign a unique IP address to the AXIS product using a computer on your network as follows:
1. Acquire an unused IP address for the AXIS 292 from the network administrator. The
AXIS 292 must be installed on the same subnet as the computer.
2. Connect a standard network cable from the AXIS 292 to the network.
3. Locate the serial number/MAC Address (S/N) on the label on the underside of the
AXIS 292.
4. Connect power to the AXIS 292.
5. Close the ARP Ping session once ‘Reply from 192.168.0.125: ...’ (or similar) is displayed
(approximately 10-15 seconds).
6. Start a Web browser, enter the IP address in the Address/Location field and Press Enter.
7. Enter the password for the root user (administrator). See Setting the password, on page 6.
8. The installation is now complete. Proceed to Accessing the AXIS 292, on page 10.
Notes:
• In some Unix systems, the arp command can be located in a directory that is not on the
command path.
• The default user name is root and the default password is pass. The password should be
changed to prevent unauthorized tampering. If the password is lost, the AXIS 292 must
be reset to the default settings. Refer to Factory default settings, on page 11, for instruc-
tions.
Syntax:
arp -s <IP Address> <MAC Address> temp
ping -s 408 <IP address>
Example:
arp -s 192.168.0.125 00:40:8c:18:10:00 temp
ping -s 408 192.168.0.125
Page 10 AXIS 292 Installation Guide
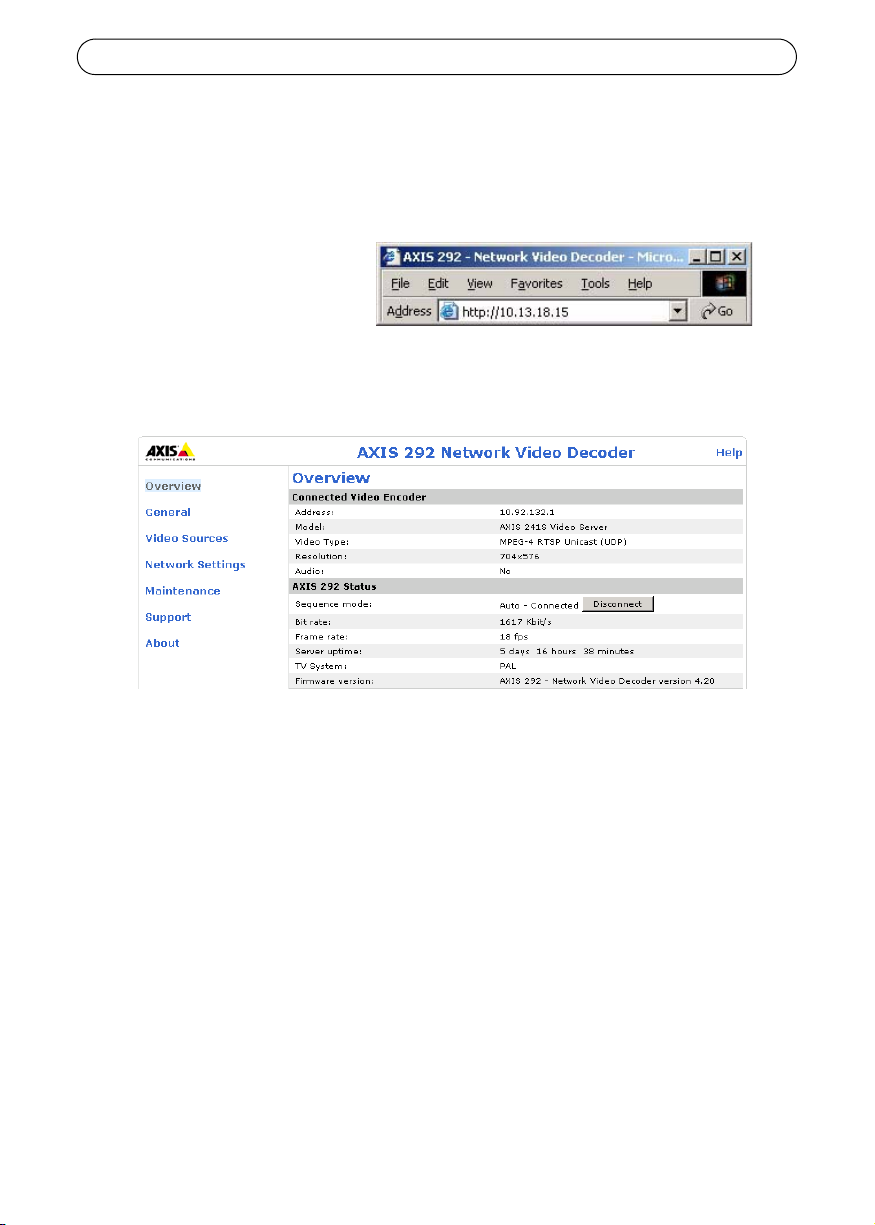
Accessing the AXIS 292
The AXIS 292 can be used with most standard operating systems and supports Microsoft
Internet Explorer 5.x or later, Netscape 7.1 or later, and Mozilla 1.4 or later.
1. Start a browser (Netscape Navigator, Internet Explorer, Mozilla).
2. Enter the IP address or host
name of the AXIS 292 in the
Location/Address field of your
Web browser.
3. Enter the user name and
password. See Setting the password, on page 6.
4. The overview page will be displayed in the Web browser. See the illustration.
For more information on configuration, please refer to the AXIS 292 User’s Manual and the
online help files.

AXIS 292 Installation Guide Page 11
ENGLISH
Factory default settings
Follow the instructions below to reinstate the product factory default settings using the
Control button:
1. Disconnect power from the AXIS 292.
2. Press and keep the Control button pressed and reconnect power.
3. Keep the Control button pressed until the Status Indicator displays steady amber (this
may take up to 15 seconds).
4. Release the Control button. When the Status Indicator displays green (which can take up
to several minutes), the AXIS 292 will then have been reset to its original factory default
settings.
5. Re-assign the IP address using one of the methods described in this document.
6. The default user name is root and the default password is pass. The password should be
changed to prevent unauthorized tampering.
Further information
For more information, please refer to the AXIS 292 User’s Manual which is available from the
Axis Web site at www.axis.com or from the Axis Network Product CD supplied with this
product.


AXIS 292 Installationsanleitung Seite 13
DEUTSCH
AXIS 292
Installationsanleitung
In dieser Anleitung wird die Installation des AXIS 292 in einem Netzwerk beschrieben. Alle
weiteren Hinweise zur Verwendung des Produkts finden Sie im Benutzerhandbuch, das auf
der mitgelieferten CD oder auf unserer Website unter www.axis.com/techsup zur Verfügung
steht.
Installationsschritte
1. Prüfen Sie, ob alle in der nachfolgenden Liste aufgeführten Komponenten vorhanden
sind:
2. Hardwareübersicht: (Siehe Seite 14)
3. Hardware installieren: (Siehe Seite 15)
4. IP-Adresse festlegen: (Siehe Seite 16)
5. Setzen des Kennwort: (Siehe Seite 16)
6. Auf den AXIS 292 zugreifen: (Siehe Seite 20)
Lieferumfang
Komponente Modell/Variante/Anmerkung
Netzwerkvideodekoder AXIS 292
PS-K-Netzteil für
geschlossene Räume
(landesspezifisch)
Europa
Großbritannien
Australien
USA/Japan
Argentinien
Korea
Montagesatz Montagesatz für Wand/Rack
CD CD für AXIS-Netzwerkvideoprodukte einschließlich Installationstools und
anderer Software sowie Produktdokumentation
Gedruckte Dokumente AXIS 292 Installationshandbuch (dieses Dokument)
Axis-Garantieerklärung
Seite 14 AXIS 292 Installationsanleitung
Hardwareübersicht
Sobald der AXIS 292 am Stromnetz angeschlossen und mit dem Netzwerk verbunden ist,
zeigen die mehrfarbigen Netzwerk-, Status-, Strom- und Video-LED-Anzeigen die folgenden
Informationen an:
Betrieb Grün Leuchtet konstant bei Normalbetrieb
Grün/Gelb Blinkt während der Aktualisierung grün/gelb
Status
Grün Leuchtet konstant bei Normalbetrieb
Grün/Gelb Blinkt beim Start grün/gelb
Gelb Leuchtet konstant beim Zurücksetzen auf Werkseinstellungen
Rot Leuchtet konstant bei Hardwarefehler Blinkt bei Verwendung einer
unzulässigen Seriennummer
Netzwerk
Grün Blinkt bei Aktivität in einem 100 Mbit/s-Netzwerk
Gelb Blinkt bei Aktivität in einem 10 Mbit/s-Netzwerk
Keine Keine Verbindung
Video
Grün Leuchtet konstant, wenn angeschlossen
Gelb Leuchtet beim Verbinden konstant
Rot Leuchtet konstant, wenn keine Verbindung
Netzwerk
RCA
BNC
Y/C Netzteilanschluss
Audio
Steuer-
taste
Video-
ein-/ausschalter
Strom-/Netzwerk-/Video-
anzeigen
Video-
ausgang
Video-
ausgang
Video-
ausgang
AXIS 292 Installationsanleitung Seite 15
DEUTSCH
Installieren des AXIS 292
Im Lieferumfang des AXIS 292 ist ein Montagesatz für Wandanbringung oder Rackeinbau
enthalten. Die Halterungen können so montiert werden, dass der Netzwerkvideodekoder auf
einer senkrechten Fläche angebracht oder in ein Rack (4 U) eingebaut werden kann. Befolgen
Sie die nachstehenden Anweisungen für die Anbringung der Halterung am Videoserver:
1. Ziehen Sie den grauen Rahmen von der Frontplatte des Netzwerkvideodekoders ab (kein
Werkzeug erforderlich).
2. Schieben Sie die Metallplatten in die Schlitze auf beiden Seiten des
Netzwerkvideodekoders.
3. Bringen Sie die Halterungen in die richtige Lage, und befestigen Sie sie auf beiden Seiten
mit den dafür vorgesehenen Schrauben.
TV-Bildschirm an den AXIS 292 anschließen
Untersuchen Sie Ihren TV-Bildschirm auf vorhandene Anschlüsse. Falls vorhanden, wird ein
S-Video-Anschluss empfohlen. Verbinden Sie den TV-Bildschirm mit dem entsprechenden
Videoausgang.
•RCA
•BNC
•Y/C (S-Video)
Anschluss von Netz- und Stromkabel
1. Schließen Sie den AXIS 292 über ein Standard-Netzwerkkabel an das Netzwerk an.
2. Verwenden Sie für den Stromanschluss das mitgelieferte Netzteil.
3. Überprüfen Sie, ob die LED-Anzeigen die korrekten Betriebszustände zeigen. Weitere
Informationen finden Sie in der Tabelle auf Seite 14.
grauer
Metall-
Halterung
platte
Rahmen

Seite 16 AXIS 292 Installationsanleitung
AXIS 292 in einem Netzwerk installieren
Der AXIS 292 ist für die Installation in einem Ethernet-Netzwerk vorgesehen. Dazu muss
entweder manuell oder über einen automatischen Netzwerkservice (DHCP) eine IP-Adresse
zugewiesen werden. Wählen Sie Ihrem Netzwerk entsprechend eine der folgenden Methoden:
• Automatische Installation mit DHCP, auf Seite 16.
• Manuelle Installation mit AXIS IP Utility, auf Seite 17.
• Manuelle Installation mit ARP und Ping unter Windows, auf Seite 18.
• Manuelle Installation mit ARP und Ping unter UNIX/Linux, auf Seite 19.
Hinweise:
• Die Standard-IP-Adresse des AXIS 292 lautet 192.168.0.90.
• Standardmäßig ist DHCP aktiviert.
Automatische Installation mit DHCP
Standardmäßig ist beim AXIS 292 DHCP aktiviert. Wenn im Netzwerk ein DHCP-Server zur
Verfügung steht, folgen Sie diesen Anweisungen zur Installation des AXIS 292.
1. Stellen Sie sicher, dass Strom-, Netzwerk- und Videokabel angeschlossen sind (siehe
Seite 15).
2. Die IP-Adresse wird beim Start auf dem TV-Bildschirm angezeigt.
3. Starten Sie auf einem Computer im Netzwerk einen Webbrowser, und geben Sie die
IP-Adresse in der Adresszeile ein. Drücken Sie die Eingabetaste.
4. Geben Sie das Kennwort für den Benutzer Root (Administrator) ein.
5. Die Installation ist damit abgeschlossen. Weitere Informationen zu den verfügbaren
Funktionen finden Sie im AXIS 292 Benutzerhandbuch und in den Online-Hilfedateien.
Setzen des Kennwort
Das Kennwort muss geändert werden um nicht authorisierte Zugriffe zu vermeiden. Der
voreingestellte Benutzername ist root und das voreingestellte Kennwort pass.
1. Greifen Sie über das Netzwerk auf den AXIS 292 zu. Sehen Sie dazu Auf den AXIS 292
zugreifen, auf Seite 20.
2. Klicken Sie auf “Maintenance” in der Übersichtsseite des AXIS 292.
3. Geben Sie unter “Server Maintenance“ ein neues Kennwort an und bestätigen Sie dieses.
4. Wenn das Kennwort verloren wurde muss der AXIS 292 auf Werkseinstellungen
zurückgesetzt werden. Sehen Sie unter Werkseinstellungen, auf Seite 21.
Hinweise:
• Wenn auf dem Bildschirm die Standard-IP-Adresse (192.168.0.90) angezeigt wird, ist
DHCP womöglich fehlgeschlagen. Fahren Sie in diesem Fall mit einer der manuellen
Installationsmethoden auf den folgenden Seiten fort.

AXIS 292 Installationsanleitung Seite 17
DEUTSCH
Manuelle Installation mit AXIS IP Utility
1. Wählen Sie eine nicht zugewiesene IP-Adresse aus dem Netzwerksegment, in dem sich
auch Ihr Computer befindet.
2. Klicken Sie auf die Schaltfläche Zuweisung eine neue IP-Adresse unter
Verwendung von die Seriennummer und geben Sie Seriennummer und IP-Adresse der
Product shortname ein. Die Seriennummer befindet sich auf dem Produktaufkleber.
3. Klicken Sie auf die Schaltfläche Zuweisen und folgen Sie den Anweisungen.
4. Klicken Sie auf Home Page um auf die Webseiten der Kamera zuzugreifen.
5. Geben Sie ein Kennwort für den Benutzer Root (Administrator) ein.
6. Die Installation ist damit abgeschlossen. Fahren Sie mit dem Abschnitt Auf den AXIS
292 zugreifen, auf Seite 20 fort.
Hinweis:
Wenn das Kennwort verloren wurde muss der AXIS 292 auf Werkseinstellungen
zurückgesetzt werden. Sehen Sie unter Werkseinstellungen, auf Seite 21.
AXIS IP Utility ist eine Anwendungssoftware für Windows, mit deren Hilfe der AXIS 292 über
eine statische IP-Adresse in Ihrem lokalen Netz installiert wird.
• Laden Sie die AXIS IP Utility-Software kostenlos von den Support-Seiten unter
http://www.axis.com/techsup herunter.
Loading...