


AXIS Q1700-LE License Plate Camera
User Manual

AXIS Q1700-LE License Plate Camera |
|
Table of Contents |
|
Solution overview . . . . . . . . . . . . . . . . . . . . . . . . . . . . . . . . . . . . . . . . . . . |
3 |
Product overview . . . . . . . . . . . . . . . . . . . . . . . . . . . . . . . . . . . . . . . . . . . |
4 |
Get started . . . . . . . . . . . . . . . . . . . . . . . . . . . . . . . . . . . . . . . . . . . . . . . . |
5 |
Find the device on the network . . . . . . . . . . . . . . . . . . . . . . . . . . . . . . . . . . . . |
5 |
Access the device . . . . . . . . . . . . . . . . . . . . . . . . . . . . . . . . . . . . . . . . . . . . . . . |
5 |
Webpage overview . . . . . . . . . . . . . . . . . . . . . . . . . . . . . . . . . . . . . . . . . . . . . . |
6 |
Setup . . . . . . . . . . . . . . . . . . . . . . . . . . . . . . . . . . . . . . . . . . . . . . . . . . . . . |
8 |
Optimize the camera for licence plate capture . . . . . . . . . . . . . . . . . . . . . . . . |
8 |
Long-distance connections . . . . . . . . . . . . . . . . . . . . . . . . . . . . . . . . . . . . . . . . |
8 |
Image quality . . . . . . . . . . . . . . . . . . . . . . . . . . . . . . . . . . . . . . . . . . . . . . . . . . . |
9 |
Privacy masks . . . . . . . . . . . . . . . . . . . . . . . . . . . . . . . . . . . . . . . . . . . . . . . . . . |
12 |
Overlays . . . . . . . . . . . . . . . . . . . . . . . . . . . . . . . . . . . . . . . . . . . . . . . . . . . . . . . |
12 |
Pan, tilt, and zoom (PTZ) . . . . . . . . . . . . . . . . . . . . . . . . . . . . . . . . . . . . . . . . . . |
13 |
Streaming and storage . . . . . . . . . . . . . . . . . . . . . . . . . . . . . . . . . . . . . . . . . . . |
13 |
Events . . . . . . . . . . . . . . . . . . . . . . . . . . . . . . . . . . . . . . . . . . . . . . . . . . . . . . . . |
15 |
Applications . . . . . . . . . . . . . . . . . . . . . . . . . . . . . . . . . . . . . . . . . . . . . . . . . . . . |
16 |
Troubleshooting . . . . . . . . . . . . . . . . . . . . . . . . . . . . . . . . . . . . . . . . . . . . |
18 |
Reset to factory default settings . . . . . . . . . . . . . . . . . . . . . . . . . . . . . . . . . . . |
18 |
Check the current firmware . . . . . . . . . . . . . . . . . . . . . . . . . . . . . . . . . . . . . . . |
18 |
Upgrade the firmware . . . . . . . . . . . . . . . . . . . . . . . . . . . . . . . . . . . . . . . . . . . . |
18 |
Technical issues, clues and solutions . . . . . . . . . . . . . . . . . . . . . . . . . . . . . . . . |
19 |
. . . . . . . . . . . . . . . . . . . . . . . . . . . . . . . . . . . . . . . . . . . . . . . . . . . . . . . . . . . . . . |
20 |
Performance considerations . . . . . . . . . . . . . . . . . . . . . . . . . . . . . . . . . . . . . . . |
20 |
Specifications . . . . . . . . . . . . . . . . . . . . . . . . . . . . . . . . . . . . . . . . . . . . . . |
22 |
LED Indicators . . . . . . . . . . . . . . . . . . . . . . . . . . . . . . . . . . . . . . . . . . . . . . . . . . |
22 |
SD card slot . . . . . . . . . . . . . . . . . . . . . . . . . . . . . . . . . . . . . . . . . . . . . . . . . . . . |
22 |
Buttons . . . . . . . . . . . . . . . . . . . . . . . . . . . . . . . . . . . . . . . . . . . . . . . . . . . . . . . |
22 |
Connectors . . . . . . . . . . . . . . . . . . . . . . . . . . . . . . . . . . . . . . . . . . . . . . . . . . . . |
23 |
2

AXIS Q1700-LE License Plate Camera
Solution overview
Solution overview
This camera is optimized to get clear images of the number plates of passing cars. With additional third party applications you can use these images to:
•Perform license plate recognition
•Track number of passing cars based on license plate
•Capture forensic evidence for law enforcement
•Detect suspicious vehicle movement or patterns
•Alert authorities and find wanted cars after incidents
3

AXIS Q1700-LE License Plate Camera
Product overview
Product overview
1Network connector
2Part nu mber (P/N) & Serial number (S/N)
3Safety wire
4Power connector
5I/O connector
6Audio connector
7Control button
8microSD card slot
9Function button
10Status LED indicator
1IDC network connector
2Foot
3Grounding screw
4Mounting plate
4

AXIS Q1700-LE License Plate Camera
Get started
Get started
Find the device on the network
To find Axis devices on the network and assign them IP addresses in Windows®, use AXIS IP Utility or AXIS Device Manager. Both applications are free and can be downloaded from axis.com/support
For more information about how to find and assign IP addresses, see the document How to assign an IP address and access your device on the device page at axis.com
Browser support
You can use the device with the following browsers:
|
ChromeTM |
Firefox® |
Edge® |
Safari® |
Windows® |
recommended |
x |
x |
|
OS X® |
recommended |
|
|
x |
Other operating systems |
x |
x |
|
|
|
|
|
|
|
If you need more information about recommended browsers, go to axis.com/browser-support
Access the device
1.Open a browser and enter the IP address or host name of the Axis device.
If you have a Mac computer (OS X), go to Safari, click on Bonjour and select the device from the drop-down list. To add Bonjour as a browser bookmark, go to Safari > Preferences.
If you do not know the IP address, use AXIS IP Utility or AXIS Device Manager to find the device on the network.
2.Enter the username and password. If you access the device for the first time, you must set the root password. See
Set a secure password for the root account on page 5 .
3.The live view page opens in your browser.
Set a secure password for the root account
Important
The default administrator username is root. If the password for root is lost, reset the device to factory default settings.
1.Type a password. Follow the instructions about secure passwords. See Secure passwords on page 5 .
2.Retype the password to confirm the spelling.
3.Click Create login. The password has now been configured.
Secure passwords
Important
Axis devices send the initially set password in clear text over the network. To protect your device after the first login, set up a secure and encrypted HTTPS connection and then change the password.
The device password is the primary protection for your data and services. Axis devices do not impose a password policy as they may be used in various types of installations.
To protect your data we strongly recommend that you:
5
AXIS Q1700-LE License Plate Camera
Get started
•Use a password with at least 8 characters, preferably created by a password generator.
•Don’t expose the password.
•Change the password at a recurring interval, at least once a year.
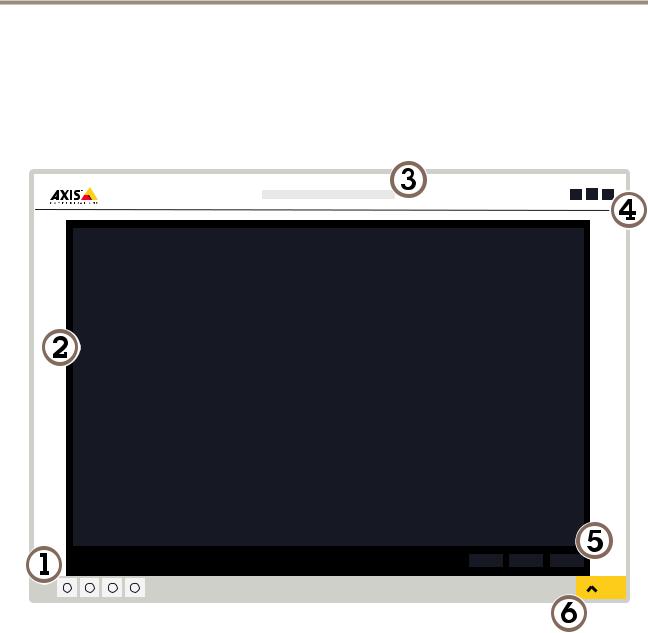
Webpage overview
1Live view control bar
2Live view
3Product name
4User information, color themes, and help
5Video control bar
6Settings toggle
6

AXIS Q1700-LE License Plate Camera
Get started
7 Settings tabs
7

AXIS Q1700-LE License Plate Camera
Setup
Setup
Optimize the camera for licence plate capture
1.Go to the camera’s webpage.
2.The License plate capture assistant starts automatically when you start up the camera for the first time. To start it manually, go to Settings > System > Orientation > License plate capture assistant and click Configure.
3.Type the distance between the camera and the ground and click Next.
4.Type the distance between the camera and the middle of the lane.
5.Type the typical speed of the cars and click Next.
6.The camera measures how it is mounted and presents the angles. Use these angles as a guide when aligning the camera.
-Loosen the screw in the arm.
-Aim the camera at the road approximately 20–50 m (66–164 ft) away. With additional IR illumination you can aim it up to 100 m (328 ft) away. The assistant calculates and displays the Car distance.
-Minimize the Roll angle to keep the license plates horizontal in the image.
-Tighten the screw in the arm.
7.Click Next.
8.The assistant suggests Image settings that should provide good images for your installation. To save these settings, click
Done.
9.In the Live view, Zoom in so that the view covers the lane or lanes that you want to monitor. The camera focuses automatically when you change the zoom level.
If the image is still out of focus, switch to manual focus and then back to autofocus.
10.Verify the settings by recording a few cars passing by and looking at the license plates in the recording.
Long-distance connections
This product supports fiber-optic cable installations through a media converter. Fiber-optic cable installations offer a number of benefits such as:
•Long-distance connection
•High speed
•Long lifetime
•Large capacity of data transmission
•Electromagnetic interference immunity
Find out more about fiber-optic cable installations on axis.com/technologies/fiber-optics
For information about how to install the media converter see the Installation Guide for this product.
8
 Loading...