


USER MANUAL
AXIS P1355–E Network Camera

About this document
This manual is intended for administrators and users of the AXIS P1355–E Network Camera, and is applicable to firmware 5.40 and later. It includes instructions for using and managing the product on your network. Previous experience of networking will be of use when using this product. Some knowledge of UNIX or Linux-based systems may also be beneficial, for developing shell scripts and applications. Later version of this document will be posted to the Axis website, as required. See also the product’s online help, available via the web-based interface.
Liability
Every care has been taken in the preparation of this document. Please inform your local Axis office of any inaccuracies or omissions. Axis Communications AB cannot be held responsible for any technical or typographical errors and reserves the right to make changes to the product and manuals without prior notice. Axis Communications AB makes no warranty of any kind with regard to the material contained within this document, including, but not limited to, the implied warranties of merchantability and fitness for a particular purpose. Axis Communications AB shall not be liable nor responsible for incidental or consequential damages in connection with the furnishing, performance or use of this material. This product is only to be used for its intended purpose.
Intellectual Property Rights
Axis AB has intellectual property rights relating to technology embodied in the product described in this document. In particular, and without limitation, these intellectual property rights may include one or more of the patents listed at http://www.axis.com/patent.htm and one or more additional patents or pending patent applications in the US and other countries.
This product contains licensed third-party software. See the menu item “About” in the product’s user interface for more information.
This product contains source code copyright Apple Computer, Inc., under the terms of Apple Public Source License 2.0 (see
http://www.opensource.apple.com/apsl). The source code is available from http://developer.apple.com/darwin/projects/bonjour/
Equipment Modifications
This equipment must be installed and used in strict accordance with the instructions given in the user documentation. This equipment contains no user-serviceable components. Unauthorized equipment changes or modifications will invalidate all applicable regulatory certifications and approvals.
Trademark Acknowledgments
AXIS COMMUNICATIONS, AXIS, ETRAX, ARTPEC and VAPIX are registered trademarks or trademark applications of Axis AB in various jurisdictions. All other company names and products are trademarks or registered trademarks of their respective companies.
Apple, Boa, Apache, Bonjour, Ethernet, Internet Explorer, Linux, Microsoft, Mozilla, Real, SMPTE, QuickTime, UNIX, Windows, Windows Vista and WWW are registered trademarks of the respective holders. Java and all Java-based trademarks and logos are trademarks or registered trademarks of Oracle and/or its affiliates. UPnPTM is a certification mark of the UPnPTM Implementers Corporation.
SD, SDHC and SDXC are trademarks or registered trademarks of SD-3C, LLC in the United States, other countries or both. Also, miniSD, microSD, miniSDHC, microSDHC, microSDXC are all trademarks or registered trademarks of SD-3C, LLC in the United States, other countries or both.
Regulatory Information
Europe

 This product complies with the applicable CE marking directives and harmonized standards:
•Electromagnetic Compatibility (EMC) Directive 2004/108/EC. See
Electromagnetic Compatibility (EMC), on page 2 .
•Low Voltage (LVD) Directive 2006/95/EC. See Safety, on page 2 .
•Restrictions of Hazardous Substances (RoHS) Directive 2011/65/EU. See Disposal and Recycling, on page 2 .
A copy of the original declaration of conformity may be obtained from Axis Communications AB. See Contact Information, on page 3 .
Electromagnetic Compatibility (EMC)
This equipment has been designed and tested to fulfill applicable standards for:
•Radio frequency emission when installed according to the instructions and used in its intended environment.
•Immunity to electrical and electromagnetic phenomena when installed according to the instructions and used in its intended environment.
USA
This equipment has been tested using a shielded network cable (STP) and found to comply with the limits for a Class B digital device, pursuant to part 15 of the FCC Rules. These limits are designed
to provide reasonable protection against harmful interference in a residential installation. This equipment generates, uses and can radiate radio frequency energy and, if not installed and used in accordance with the instructions, may cause harmful interference to radio communications. However, there is no guarantee that interference will not occur in a particular installation. If this equipment does cause harmful interference to radio or television reception, which
can be determined by turning the equipment off and on, the user is encouraged to try to correct the interference by one or more of the following measures:
•Reorient or relocate the receiving antenna.
•Increase the separation between the equipment and receiver.
•Connect the equipment into an outlet on a circuit different from that to which the receiver is connected.
•Consult the dealer or an experienced radio/TV technician for help.
Canada
This Class B digital apparatus complies with Canadian ICES-003.
Europe
This digital equipment fulfills the requirements for RF emission according to the Class B limit of EN 55022.
This product fulfills the requirements for immunity according to EN 61000-6-1 residential, commercial and light-industrial environments.
This product fulfills the requirements for immunity according to EN 61000-6-2 industrial environments.
This product fulfills the requirements for immunity according to EN 55024 office and commercial environments
Australia/New Zealand
This digital equipment fulfills the requirements for RF emission according to the Class B limit of AS/NZS CISPR 22.
Japan
B
Korea
(B )
,.
Safety
This product complies with IEC/EN/UL 60950-1 and IEC/EN/UL 60950-22, Safety of Information Technology Equipment.
Disposal and Recycling
When this product has reached the end of its useful life, dispose of it according to local raws and regulations. For information about your nearest designated collection point, contact your local authority responsible for waste disposal. In accordance with local legislation, penalties may be applicable for incorrect disposal of this waste.
Europe
 This symbol means that the product shall not be disposed of together with household or commercial waste. Directive 2012/19/EU on waste electrical and electronic equipment (WEEE) is applicable in the European Union member states. To prevent potential harm to human health and the environment, the product must be disposed of in an approved and environmentally safe recycling process. For information about your nearest designated collection point, contact
your local authority responsible for waste disposal. Businesses should contact the product supplier for information about how to dispose of this product correctly.
This product complies with the requirements of Directive 2011/65/EU on the restriction of the use of certain hazardous substances in electrical and electronic equipment (RoHS).
China
 This product complies with the requirements of the legislative act Administration on the Control of Pollution Caused by Electronic Information Products (ACPEIP).
Contact Information
Axis Communications AB Emdalavägen 14
223 69 Lund Sweden
Tel: +46 46 272 18 00 Fax: +46 46 13 61 30
www.axis.com
Support
Should you require any technical assistance, please contact your Axis reseller. If your questions cannot be answered immediately, your reseller will forward your queries through the appropriate channels to ensure a rapid response. If you are connected to the Internet, you can:
•download user documentation and software updates
•find answers to resolved problems in the FAQ database. Search by product, category, or phrase
•report problems to Axis support staff by logging in to your private support area
•chat with Axis support staff (selected countries only)
•visit Axis Support at www.axis.com/techsup/
Learn More!
Visit Axis learning center www.axis.com/academy/ for useful trainings, webinars, tutorials and guides.

AXIS P1355–E Network Camera |
|
Table of Contents |
|
Hardware Overview . . . . . . . . . . . . . . . . . . . . . . . . . . . . . . . . . . . . . . . . . . |
6 |
Connectors . . . . . . . . . . . . . . . . . . . . . . . . . . . . . . . . . . . . . . . . . . . . . . . . . . . . |
8 |
LED Indicators . . . . . . . . . . . . . . . . . . . . . . . . . . . . . . . . . . . . . . . . . . . . . . . . . . |
9 |
Status LED when using Focus Assistant . . . . . . . . . . . . . . . . . . . . . . . . . . . . . . |
9 |
Replacing the lens . . . . . . . . . . . . . . . . . . . . . . . . . . . . . . . . . . . . . . . . . . . . . . . |
9 |
Accessing the Product . . . . . . . . . . . . . . . . . . . . . . . . . . . . . . . . . . . . . . . |
11 |
Access from a Browser . . . . . . . . . . . . . . . . . . . . . . . . . . . . . . . . . . . . . . . . . . . |
11 |
Access from the Internet . . . . . . . . . . . . . . . . . . . . . . . . . . . . . . . . . . . . . . . . . . |
12 |
Set the Root Password . . . . . . . . . . . . . . . . . . . . . . . . . . . . . . . . . . . . . . . . . . . |
12 |
Set Power Line Frequency . . . . . . . . . . . . . . . . . . . . . . . . . . . . . . . . . . . . . . . . . |
12 |
PTZ Mode . . . . . . . . . . . . . . . . . . . . . . . . . . . . . . . . . . . . . . . . . . . . . . . . . . . . . . |
13 |
The Live View Page . . . . . . . . . . . . . . . . . . . . . . . . . . . . . . . . . . . . . . . . . . . . . . |
13 |
Media Streams . . . . . . . . . . . . . . . . . . . . . . . . . . . . . . . . . . . . . . . . . . . . . |
16 |
How to Stream H.264 . . . . . . . . . . . . . . . . . . . . . . . . . . . . . . . . . . . . . . . . . . . . |
16 |
MJPEG . . . . . . . . . . . . . . . . . . . . . . . . . . . . . . . . . . . . . . . . . . . . . . . . . . . . . . . . |
16 |
AXIS Media Control (AMC) . . . . . . . . . . . . . . . . . . . . . . . . . . . . . . . . . . . . . . . . |
16 |
Alternative Methods of Accessing the Video Stream . . . . . . . . . . . . . . . . . . . . |
17 |
Accessing Audio Streams . . . . . . . . . . . . . . . . . . . . . . . . . . . . . . . . . . . . . . . . . |
18 |
Setting Up the Product . . . . . . . . . . . . . . . . . . . . . . . . . . . . . . . . . . . . . . |
19 |
Basic Setup . . . . . . . . . . . . . . . . . . . . . . . . . . . . . . . . . . . . . . . . . . . . . . . . . . . . |
19 |
Focus . . . . . . . . . . . . . . . . . . . . . . . . . . . . . . . . . . . . . . . . . . . . . . . . . . . . . . . . . |
19 |
Video and Audio . . . . . . . . . . . . . . . . . . . . . . . . . . . . . . . . . . . . . . . . . . . . |
20 |
Video Stream . . . . . . . . . . . . . . . . . . . . . . . . . . . . . . . . . . . . . . . . . . . . . . . . . . . |
20 |
Stream Profiles . . . . . . . . . . . . . . . . . . . . . . . . . . . . . . . . . . . . . . . . . . . . . . . . . |
22 |
Camera Settings . . . . . . . . . . . . . . . . . . . . . . . . . . . . . . . . . . . . . . . . . . . . . . . . |
22 |
View Area . . . . . . . . . . . . . . . . . . . . . . . . . . . . . . . . . . . . . . . . . . . . . . . . . . . . . |
24 |
Overlay . . . . . . . . . . . . . . . . . . . . . . . . . . . . . . . . . . . . . . . . . . . . . . . . . . . . . . . . |
24 |
Privacy Mask . . . . . . . . . . . . . . . . . . . . . . . . . . . . . . . . . . . . . . . . . . . . . . . . . . . |
25 |
Audio Settings . . . . . . . . . . . . . . . . . . . . . . . . . . . . . . . . . . . . . . . . . . . . . . . . . . |
25 |
Audio Clips . . . . . . . . . . . . . . . . . . . . . . . . . . . . . . . . . . . . . . . . . . . . . . . . . . . . |
27 |
Live View Config . . . . . . . . . . . . . . . . . . . . . . . . . . . . . . . . . . . . . . . . . . . . |
28 |
PTZ (Pan Tilt Zoom) . . . . . . . . . . . . . . . . . . . . . . . . . . . . . . . . . . . . . . . . . |
31 |
Preset Positions . . . . . . . . . . . . . . . . . . . . . . . . . . . . . . . . . . . . . . . . . . . . . . . . . |
31 |
Installing a PTZ driver . . . . . . . . . . . . . . . . . . . . . . . . . . . . . . . . . . . . . . . . . . . . |
31 |
Guard Tour . . . . . . . . . . . . . . . . . . . . . . . . . . . . . . . . . . . . . . . . . . . . . . . . . . . . . |
32 |
Advanced . . . . . . . . . . . . . . . . . . . . . . . . . . . . . . . . . . . . . . . . . . . . . . . . . . . . . . |
32 |
Control Queue . . . . . . . . . . . . . . . . . . . . . . . . . . . . . . . . . . . . . . . . . . . . . . . . . . |
33 |
Detectors . . . . . . . . . . . . . . . . . . . . . . . . . . . . . . . . . . . . . . . . . . . . . . . . . . |
34 |
Camera Tampering . . . . . . . . . . . . . . . . . . . . . . . . . . . . . . . . . . . . . . . . . . . . . . |
34 |
Motion Detection . . . . . . . . . . . . . . . . . . . . . . . . . . . . . . . . . . . . . . . . . . . . . . . |
34 |
Audio Detection . . . . . . . . . . . . . . . . . . . . . . . . . . . . . . . . . . . . . . . . . . . . . . . . |
36 |
Applications . . . . . . . . . . . . . . . . . . . . . . . . . . . . . . . . . . . . . . . . . . . . . . . |
37 |
Events . . . . . . . . . . . . . . . . . . . . . . . . . . . . . . . . . . . . . . . . . . . . . . . . . . . . |
38 |
Setting Up an Action Rule . . . . . . . . . . . . . . . . . . . . . . . . . . . . . . . . . . . . . . . . |
39 |
Recipients . . . . . . . . . . . . . . . . . . . . . . . . . . . . . . . . . . . . . . . . . . . . . . . . . . . . . |
40 |
Schedules . . . . . . . . . . . . . . . . . . . . . . . . . . . . . . . . . . . . . . . . . . . . . . . . . . . . . . |
40 |
Recurrences . . . . . . . . . . . . . . . . . . . . . . . . . . . . . . . . . . . . . . . . . . . . . . . . . . . . |
41 |
Recordings . . . . . . . . . . . . . . . . . . . . . . . . . . . . . . . . . . . . . . . . . . . . . . . . . |
42 |
Recording List . . . . . . . . . . . . . . . . . . . . . . . . . . . . . . . . . . . . . . . . . . . . . . . . . . |
42 |
Continuous Recording . . . . . . . . . . . . . . . . . . . . . . . . . . . . . . . . . . . . . . . . . . . . |
42 |
System Options . . . . . . . . . . . . . . . . . . . . . . . . . . . . . . . . . . . . . . . . . . . . . |
43 |
Security . . . . . . . . . . . . . . . . . . . . . . . . . . . . . . . . . . . . . . . . . . . . . . . . . . . . . . . |
43 |
Date & Time . . . . . . . . . . . . . . . . . . . . . . . . . . . . . . . . . . . . . . . . . . . . . . . . . . . . |
44 |
Network . . . . . . . . . . . . . . . . . . . . . . . . . . . . . . . . . . . . . . . . . . . . . . . . . . . . . . . |
45 |
Storage . . . . . . . . . . . . . . . . . . . . . . . . . . . . . . . . . . . . . . . . . . . . . . . . . . . . . . . |
50 |
Ports & Devices . . . . . . . . . . . . . . . . . . . . . . . . . . . . . . . . . . . . . . . . . . . . . . . . . |
51 |
Maintenance . . . . . . . . . . . . . . . . . . . . . . . . . . . . . . . . . . . . . . . . . . . . . . . . . . . |
52 |
Support . . . . . . . . . . . . . . . . . . . . . . . . . . . . . . . . . . . . . . . . . . . . . . . . . . . . . . . |
52 |
Advanced . . . . . . . . . . . . . . . . . . . . . . . . . . . . . . . . . . . . . . . . . . . . . . . . . . . . . . |
53 |
Reset to Factory Default Settings . . . . . . . . . . . . . . . . . . . . . . . . . . . . . . . . . . . |
53 |
Troubleshooting . . . . . . . . . . . . . . . . . . . . . . . . . . . . . . . . . . . . . . . . . . . . |
55 |
4

AXIS P1355–E Network Camera |
|
Table of Contents |
|
Checking the Firmware . . . . . . . . . . . . . . . . . . . . . . . . . . . . . . . . . . . . . . . . . . . |
55 |
Upgrading the Firmware . . . . . . . . . . . . . . . . . . . . . . . . . . . . . . . . . . . . . . . . . . |
55 |
Emergency Recovery Procedure . . . . . . . . . . . . . . . . . . . . . . . . . . . . . . . . . . . . |
55 |
Symptoms, Possible Causes and Remedial Actions . . . . . . . . . . . . . . . . . . . . . |
56 |
Technical Specifications . . . . . . . . . . . . . . . . . . . . . . . . . . . . . . . . . . . . . . |
59 |
Connectors . . . . . . . . . . . . . . . . . . . . . . . . . . . . . . . . . . . . . . . . . . . . . . . . . . . . |
62 |
Performance Considerations . . . . . . . . . . . . . . . . . . . . . . . . . . . . . . . . . . . . . . . |
63 |
5

AXIS P1355–E Network Camera
Hardware Overview
Hardware Overview
1Focus puller
2Zoom puller
3LED indicator
4SD card slot (microSD)
5Audio in
6Audio out
7Network connector PoE
8Power LED
9Network LED
10Control button
11I/O terminal block
12RS485/422 connector
13Iris connector
6

AXIS P1355–E Network Camera
Hardware Overview
1.Sunshield adjustment screw (2x)
2.Sunshield
3.Product number (P/N) & Serial number (S/N). The serial number may be required during the installation.
4.Top cover
5.Network camera
6.Housing LED indicator (fan and heater)
7.Network connector
8.Safety wire tab
9.Cable holes
10.Bottom cover screws (4x)
11.Cable cover
12.Cable cover screws (2x)
13.Bottom cover
14.Heaters. Caution! May be hot
7

AXIS P1355–E Network Camera
Hardware Overview
15.Bracket screws (4x)
16.Bracket adapter
17.Network cable (route through wall bracket). Cable not included
18.Wall bracket
19.Bracket adjustment screw
Connectors
For technical specifications, see page 59.
Network connector - RJ45 Ethernet connector. Supports Power over Ethernet (PoE).
NOTICE
The product shall be connected using a shielded network cable (STP). All cables connecting the product to the network switch shall be shielded (STP) and intended for their specific use. Make sure that the network switch is properly grounded. For information about regulatory requirements, see Regulatory Information, on page 2 .
Audio in (pink) - 3.5 mm input for a mono microphone, or a line-in mono signal (left channel is used from a stereo signal).
Audio out (green) - 3.5 mm output for audio (line level) that can be connected to a public address (PA) system or an active speaker with a built-in amplifier. A stereo connector must be used for audio out.
SD card slot - A standard or high-capacity microSD card (not included) can be used for local recording with removable storage.
NOTICE
To prevent corruption of recordings, the SD card should be unmounted before removal. To unmount, go to Setup > System Options > Storage > SD Card and click Unmount.
Control button - The control button is used for:
•Enabling the Focus Assistant. Press and very quickly release the Control button.
•Resetting the product to factory default settings. See page 53.
•Connecting to an AXIS Video Hosting System service. See page 46. To connect, press and hold the button for about 1 second until the Status LED flashes green.
•Connecting to AXIS Internet Dynamic DNS Service. See page 47. To connect, press and hold the button for about 3 seconds.
Power connector - 2-pin terminal block for power input. Use a limited power source (LPS) with either a rated output power limited to £100 W or a rated output current limited to £5 A.
I/O terminal connector - Use in applications for e.g. motion detection, event triggering, time lapse recording and alarm notifications. In addition to an auxiliary power and a GND pin, the I/O terminal connector provides the interface to:
•Digital output – For connecting external devices such as relays and LEDs. Connected devices can be activated by the VAPIX® Application Programming Interface, output buttons on the Live View page or by an Action Rule. The output will show as active (shown under System Options > Ports & Devices) if the alarm device is activated.
•Digital input – An alarm input for connecting devices that can toggle between an open and closed circuit, for example: PIRs, door/window contacts, glass break detectors, etc. When a signal is received the state changes and the input becomes active (shown under System Options > Ports & Devices).
Note
The I/O connector is connected to the housing (fan/heater) on delivery, and will trigger an input port event to indicate a fan or heater error when activated. See Events, on page 38 for information about events.
8

AXIS P1355–E Network Camera
Hardware Overview
RS-485/RS-422 connector - Two 2-pin terminal blocks for RS-485/RS-422 serial interface used to control auxiliary equipment, e.g. PTZ devices.
LED Indicators
LED |
Color |
Indication |
|
|
|
Network |
Green |
Steady for connection to a 100 MBit/s network. Flashes for network activity. |
|
|
|
|
Amber |
Steady for connection to a 10 MBit/s network. Flashes for network activity. |
|
|
|
|
Unlit |
No network connection. |
|
|
|
Status |
Green |
Steady green for normal operation. |
|
|
|
|
Amber |
Steady during startup and when restoring settings. |
|
|
|
|
Red |
Slow flash for failed upgrade. |
|
|
|
Power |
Green |
Normal operation. |
|
|
|
|
Amber |
Flashes green/amber during firmware upgrade. |
|
|
|
LED |
Color |
Indication |
|
|
|
|
|
Housing |
Green |
Normal operation. |
|
(fan and |
|
|
|
Flashing |
Single flash: Heater error |
||
heater) |
|||
green |
Double flash: Fan error |
||
|
|||
|
|
Triple flash: General error |
|
|
|
Alarm events will be triggered through the camera’s input port. |
|
|
|
Contact your Axis reseller for information about spare parts and troubleshooting. |
|
|
|
|
Note
•The Status LED can be configured to be unlit during normal operation. To configure, go to Setup > System Options > Ports & Devices > LED. See the online help for more information.
•The Status LED can be configured to flash while an event is active.
•The Status LED can be configured to flash for identifying the unit. Go to Setup > System Options > Maintenance .
Status LED when using Focus Assistant
Status |
Color |
Indication |
|
|
|
|
Green |
Focus Assistant is enabled |
|
|
The lens is optimally adjusted |
|
|
|
|
Amber |
The camera has been moved, or an object has been inserted in front of the lens. Exit and |
|
|
restart the Focus Assistant. |
|
|
The lens is less optimally adjusted |
|
|
|
|
Red |
The camera has been moved, or an object has been inserted in front of the lens. Exit and |
|
|
restart the Focus Assistant. |
|
|
The lens is poorly adjusted |
|
|
|
Replacing the lens
It is possible to use optional lenses for the Axis product.
To replace the lens:
1. Disconnect the iris cable.
9
AXIS P1355–E Network Camera
Hardware Overview
2.Unscrew the standard lens.
3.Attach and screw on the new lens.
Note
There is no need to restart the Axis product after changing the lens. However, the product must be restarted if you are interchanging between a P-iris, DC-Iris or fixed/manual iris lens. In order to set the focus and position the lens, the Axis product must be connected to the network.
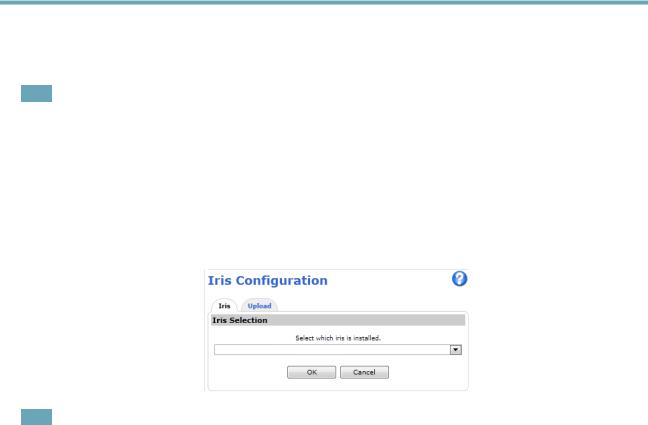
To change the iris configuration:
1.Go to Setup > Video and Audio > Camera Settings. Iris configuration shows the current configured iris type.
2.Click Edit.
3.Select the installed iris lens from the drop-down list and click OK.
Note
For P-iris lenses not listed in the drop-down list, download the iris configuration file from www.axis.com
To upload and use the downloaded configuration file, click the Upload tab. Click Browse and select the configuration file. Click Upload. The installed iris lens should now be included in the Iris Selection drop-down list, select it and press OK. If you select a DC iris configuration file for a P-iris lens, an error message will appear below the iris configuration type in the Camera Settings page. For custom DC Iris lenses, select Generic DC Iris option.
10
AXIS P1355–E Network Camera
Accessing the Product
Accessing the Product
To install the Axis product, refer to the Installation Guide supplied with the product.
The product can be used with most operating systems and browsers. The recommended browsers are Internet Explorer with Windows, Safari with Macintosh and Firefox with other operating systems. See Technical Specifications, on page 59. To view streaming video in Internet Explorer, allow installation of AXIS Media Control (AMC) when prompted.
Note
•QuickTimeTM is also supported for viewing H.264 streams and for audio.
•If your computer restricts the use of additional software components, the product can be configured to use a Java applet for viewing Motion JPEG.
Access from a Browser
1.Start a browser (Internet Explorer, Firefox, Safari).
2.Enter the IP address or host name of the Axis product in the browser’s Location/Address field. To access the product from a Macintosh computer (Mac OS X), click on the Bonjour tab and select the product from the drop-down list.
If you do not know the IP address, use AXIS IP Utility to locate the product on the network. For information about how to discover and assign an IP address, see the Installation and Management Software CD or the document Assign an IP Address and Access the Video Stream on Axis Support web at www.axis.com/techsup
3.Enter your user name and password. If this is the first time the product is accessed, the root password must first be configured. For instructions, see Set the Root Password, on page 12.
4.The product’s Live View page appears in your browser.
Note
The controls and layout of the Live View page may have been customized to meet specific installation requirements and user preferences. Consequently, some of the examples and functions featured here may differ from those displayed in your own Live View page.
11

AXIS P1355–E Network Camera
Accessing the Product
Access from the Internet
Once connected, the Axis product is accessible on your local network (LAN). To access the product from the Internet you must configure your network router to allow incoming data traffic to the product. To do this, enable the NAT-traversal feature, which will attempt to automatically configure the router to allow access to the product. This is enabled from Setup > System Options >
Network > TCP/IP Advanced.
For more information, please see NAT traversal (port mapping) for IPv4, on page 48. See also AXIS Internet Dynamic DNS Service at www.axiscam.net For Technical notes on this and other topics, visit the Axis Support web at www.axis.com/techsup
Set the Root Password
To gain access to the Axis product, you must set the password for the default administrator user root. This is done in the Configure Root Password dialog, which appears when the product is accessed for the first time.
To prevent network eavesdropping, the root password can be set via an encrypted HTTPS connection, which requires an HTTPS certificate. HTTPS (Hypertext Transfer Protocol over SSL) is a protocol used to encrypt traffic between web browsers and servers. The HTTPS certificate ensures encrypted exchange of information. See HTTPS, on page 48.
The default administrator user name root is permanent and cannot be deleted. If the password for root is lost, the product must be reset to the factory default settings. See Reset to Factory Default Settings, on page 53.
To set the password via a standard HTTP connection, enter it directly in the first dialog.
To set the password via an encrypted HTTPS connection, follow these steps:
1.Click Create self-signed certificate.
2.Provide the requested information and click OK. The certificate is created and the password can now be set securely. All traffic to and from the product is encrypted from this point on.
3.Enter a password and then re-enter to confirm the spelling. Click OK. The password has now been configured.
Set Power Line Frequency
Power line frequency is set the first time the Axis product is accessed and can only be changed from Plain Config (see page 53) or by resetting the product to factory default.
12

AXIS P1355–E Network Camera
Accessing the Product
Select the power line frequency (50 Hz or 60 Hz) used at the location of the Axis product. Selecting the wrong frequency may cause image flicker if the product is used in fluorescent light environments.
When using 50 Hz, the maximum frame rate is limited to 25 fps.
Note
Power line frequency is different in different geographic regions. In the Americas, 60 Hz is usually used; most other parts of the world use 50 Hz. Local variations may apply, always check with the local authorities.
PTZ Mode
PTZ mode is set the first time the Axis product is accessed and can only be changed by resetting the product to factory default.
Digital PTZ is the default mode and should be used when a pan/tilt motor is not used.
If the camera is mounted to a pan/tilt motor, select Uploadable PTZ driver. For information about how to upload a PTZ driver, see Installing a PTZ driver, on page 31.
The Live View Page
The controls and layout of the Live View page may have been customized to meet specific installation requirements and user preferences. Consequently, some of the examples and functions featured here may differ from those displayed in your own Live View page. The following provides an overview of each available control.
Controls on the Live View Page
Select a stream profile for the Live View page from the Stream Profile drop-down list. For information about how to configure stream profiles, see page 22.
Click Pulse to activate the product’s output port for a defined period of time. For information about how to enable and configure output buttons, see page 29.
Click the Active/Inactive buttons to manually activate and inactive the product’s output port. For information about how to enable and configure output buttons, see page 29.
The Manual Trigger button is used to trigger an action rule from the Live View page. For information about how to configure and enable the button, see Manual Trigger, on page 13.
Click Snapshot to save a snapshot of the video image. Right-click the video image to save it in JPEG format on your computer. This button is primarily intended for use when the AXIS Media Control viewer toolbar is not available. Enable this button from Live View Config > Action Buttons.
The Audio clip drop-down list allows you to play an audio clip from the Live View page. Select the audio clip and click the Play button.
Manual Trigger
The Manual Trigger is used to trigger an action rule from the Live View page. The manual trigger can for example be used to validate actions during product installation and configuration.
To configure the manual trigger:
13

AXIS P1355–E Network Camera
Accessing the Product
1.Go to Setup > Events.
2.Click Add to add a new action rule.
3.From the Trigger drop-down list, select Input Signal.
4.From the second drop-down list, select Manual Trigger.
5.Select the desired action and configure the other settings as required. For more information about action rules, see Events, on page 38.
To show the manual trigger buttons in the Live View page:
1.Go to Setup > Live View Layout.
2.Under Action Buttons, select Show manual trigger button.
AXIS Media Control viewer toolbar
The AXIS Media Control viewer toolbar is available in Internet Explorer only. See AXIS Media Control (AMC), on page 16 for more information. The toolbar displays the following buttons:
The Play button connects to the Axis product and starts playing a media stream.
The Stop button stops the media stream.
The Snapshot button takes a snapshot of the video image. The location where the image is saved can be specified in the AMC Control Panel.
Click the View Full Screen button and the video image will fill the entire screen. Press ESC (Escape) on the computer keyboard to cancel full screen view.
The Record button is used to record the current video stream. The location where the recording is saved can be specified in the AMC Control Panel. Enable this button from Live View Config > Viewer Settings.
AMC Audio Controls
AMC audio buttons control the speakers and microphone connected to the client computer. The buttons are only visible when audio is enabled.
Speaker button — Click to turn the speakers on or off.
Microphone button – Click to mute or unmute the microphone. In Simplex - speaker only mode, the Microphone and Talk buttons must both be active to send audio to the Axis product. Click either button to stop audio transmission.
Use the slider to control the volume of the speakers and the microphone.
Half-duplex mode
The Talk/Listen button is used to switch between sending and receiving audio. The button can be configured from the Audio tab in the AMC Control panel:
•Push-To-Talk mode: Click and hold the button to talk/send. Release the button to listen.
•Toggle mode: Click once to switch between talking and listening.
Simplex – speaker only mode
To send audio, the Talk and Microphone buttons must both be active. Click either button to stop audio transmission.
14

AXIS P1355–E Network Camera
Accessing the Product
PTZ Controls
The Live View page also displays Pan/Tilt/Zoom (PTZ) controls. The administrator can enable/disable controls for specified users under
System Options > Security > Users.
With the PTZ Control Queue enabled the time each user is in control of the PTZ settings is limited. Click the buttons to request or release control of the PTZ controls. The PTZ Control Queue is set up under PTZ > Control Queue.
Click the Emulate joystick mode button and click in the image to move the camera view in the direction of the mouse pointer.
Click the Center mode button and click in the image to center the camera view on that position. The center mode button could also be used to zoom in on a specific area. Click in the image and drag to draw a rectangle surrounding the area to be magnified. To zoom out, rotate the mouse wheel.
Click the Ctrl panel button to open the PTZ control panel which provides additional PTZ controls.
User-defined buttons can also appear in the Control panel. See Controls, on page 32.
The PTZ controls can be disabled under PTZ > Advanced > Controls, see Controls, on page 32.
15

AXIS P1355–E Network Camera
Media Streams
Media Streams
The Axis product provides several audio and video stream formats. Your requirements and the properties of your network will determine the type you use.
The Live View page in the product provides access to H.264 and Motion JPEG video streams, audio streams and to the list of available stream profiles. Other applications and clients can access video and audio streams directly, without going via the Live View page.
How to Stream H.264
The video compression standard H.264 makes good use of bandwidth, and can provide high quality video streams at less than 1 Mbit/s.
Deciding which combination of protocols and methods to use depends on your viewing requirements, and on the properties of your network. The available options in AXIS Media Control are:
Unicast RTP |
This unicast method (RTP over UDP) is used |
|
|
|
for live unicast video, especially when it is |
|
|
|
important to always have an up-to-date video |
|
|
|
stream, even if some images are dropped. |
Unicasting is used for video-on-demand |
|
|
|
transmission so that there is no video traffic |
|
RTP over RTSP |
This unicast method (RTP tunneled over RTSP) |
||
on the network until a client connects and |
|||
|
is useful as it is relatively simple to configure |
||
|
requests the stream. |
||
|
firewalls to allow RTSP traffic. |
||
|
Note that there are a maximum of 20 |
||
|
|
||
RTP over RTSP over HTTP |
This unicast method can be used to traverse |
simultaneous unicast connections. |
|
|
firewalls. Firewalls are commonly configured to |
|
|
|
allow the HTTP protocol, thus allowing RTP to |
|
|
|
be tunneled. |
|
|
|
|
|
|
Multicast RTP |
This method (RTP over UDP) should be used for live multicast video. The video stream is always |
||
|
up-to-date, even if some images are dropped. |
|
|
|
Multicasting provides the most efficient usage of bandwidth when there are large numbers of |
||
|
clients viewing simultaneously. A multicast cannot however, pass a network router unless the |
||
|
router is configured to allow this. It is not possible to multicast over the Internet, for example. |
||
|
Note also that all multicast viewers count as one unicast viewer in the maximum total of 20 |
||
|
simultaneous connections. |
|
|
|
|
|
|
AXIS Media Control negotiates with the Axis product to determine the transport protocol to use. The order of priority, listed in the AMC Control Panel, can be changed and the options disabled, to suit specific requirements.
Note
H.264 is licensed technology. The Axis product includes one H.264 viewing client license. Installing additional unlicensed copies of the client is prohibited. To purchase additional licenses, contact your Axis reseller.
MJPEG
This format uses standard JPEG still images for the video stream. These images are then displayed and updated at a rate sufficient to create a stream that shows constantly updated motion.
The Motion JPEG stream uses considerable amounts of bandwidth, but provides excellent image quality and access to every image contained in the stream. The recommended method of accessing Motion JPEG live video from the Axis product is to use the AXIS Media Control in Internet Explorer in Windows.
AXIS Media Control (AMC)
AXIS Media Control (AMC) in Internet Explorer in Windows is the recommended method of accessing live video from the Axis product.
16

AXIS P1355–E Network Camera
Media Streams
The AMC Control Panel can be used to configure various video and audio settings. Please see the AXIS Media Control User’s Manual for more information.
The AMC Control Panel is automatically installed on first use, after which it can be configured. Open the AMC Control Panel from:
•Windows Control Panel (from the Start menu)
•Alternatively, right-click the video image in Internet Explorer and click Settings.
Alternative Methods of Accessing the Video Stream
You can also access video and images from the Axis product in the following ways:
•Motion JPEG server push (if supported by the client, Firefox, for example). This option maintains an open HTTP connection to the browser and sends data as and when required, for as long as required.
•Still JPEG images in a browser. Enter the path http://<ip>/axis-cgi/jpg/image.cgi
•Windows Media Player. This requires AXIS Media Control and the H.264 decoder to be installed. The following paths can be used:
-Unicast via RTP: axrtpu://<ip>/axis-media/media.amp
-Unicast via RTSP: axrtsp://<ip>/axis-media/media.amp
-Unicast via RTSP, tunneled via HTTP: axrtsphttp://<ip>/axis-media/media.amp
-Multicast: axrtpm://<ip>/axis-media/media.amp
•QuickTimeTM. The following paths can be used:
-rtsp://<ip>/axis-media/media.amp
-rtsp://<ip>/axis-media/media.3gp
17

AXIS P1355–E Network Camera
Media Streams
Note
•<ip>= IP addess
•The Axis product supports QuickTime 6.5.1 and later.
•QuickTime adds latency to the video stream.
•It may be possible to use other players to view the H.264 stream using the paths above, although Axis does not guarantee this.
Accessing Audio Streams
The Live View page provides access to audio through AXIS Media Control; in addition audio can be accessed in the following ways:
•VAPIX® Application Programming Interface (API) For more information, visit www.axis.com/developer
•Windows Media Player supports simplex audio. The following paths can be used:
-Unicast via RTP: axrtpu://<ip>/axis-media/media.amp
-Unicast via RTSP: axrtsp://<ip>/axis-media/media.amp
-Unicast via RTSP, tunneled via HTTP: axrtsphttp://<ip>/axis-media/media.amp
-Multicast: axrtpm://<ip>/axis-media/media.amp
•QuickTimeTM supports G.711 and AAC audio encoding. The following paths can be used:
-rtsp://<ip>/axis-media/media.amp
-rtsp://<ip>/axis-media/media.3gp
•The Java applet supports simplex audio with G.711 encoding.
18

AXIS P1355–E Network Camera
Setting Up the Product
Setting Up the Product
The Axis product can be configured by users with administrator or operator rights. To open the product’s Setup pages, click Setup in the top right-hand corner of the Live View page.
•Administrators have unrestricted access to all settings.
•Operators have access to all settings except System Options
See also the online help  .
.
Basic Setup
Basic Setup provides shortcuts to the settings that should be made before using the Axis product:
1.Users. See page 43.
2.TCP/IP. See page 45.
3.Date & Time. See page 44.
4.Video Stream. See page 20.
5.Focus. See page 19
6.Audio Settings. See page 25.
The Basic Setup menu can be disabled from System Options > Security > Users.
Focus
You can focus the Axis product under Video & Audio > Focus. For most applications, the adjustments on the Basic tab are sufficient. If required, additional adjustments can be made on the Advanced tab. Before focusing, always click Open iris to open the iris to its maximum. This gives the smallest depth of field and thus best conditions for correct focusing. Click Enable iris when finished focusing.
Basic
Follow the on-screen instructions on the Basic tab to adjust zoom and focus. The pixel counter is used to determine the number of pixels in an area of the image, for example to ensure that the image size fulfills specific requirements. To position the pixel counter, click on the text and drag the window to the desired position.
Note
•The back focus (step 2) should only be reset if the camera has been focused previously.
•Set focus as precisely as possible using the focus puller on the lens (step 3) before starting the automatic fine-tuning (step 4).
•If the camera is placed so that it is difficult to look at the image and move the pullers at the same time, you can use the Focus Assistant to focus the camera; for instructions, see the Installation Guide supplied with the product.
Advanced
The tools on this page can be used to find the optimal focus position. Always open the iris before focusing and enable it when finished focusing. Focus is measured in the part of the image covered by the Focus window. Use the mouse to move and resize the window and then click Fine-tune focus automatically. If needed, click in the Focus position bar or on the arrows at the ends of the bar, to further adjust the focus. The buttons < and > move the focus position one step in either direction. The buttons << and >> move the focus position multiple steps in either direction. Clicking on the bar sets focus to that position. If the camera is not focused after completing the above instructions, try the Full range focus scan. The scan, which can take several minutes, transforms the focus position bar to a graph where peaks indicate the best focus positions. Click in the graph to set focus to the desired position.
19
AXIS P1355–E Network Camera
Video and Audio
Video and Audio
The video and audio settings can be used to optimize video and audio quality. You can configure the following:
•Video stream settings. See page 20.
•Stream profiles. See page 22.
•Camera settings. See page 22.
•Overlay image. See page 24.
•Privacy mask. See page 25.
•Focus. See page 19.
•Audio settings. See page 25.
•Audio clips. See page 27.
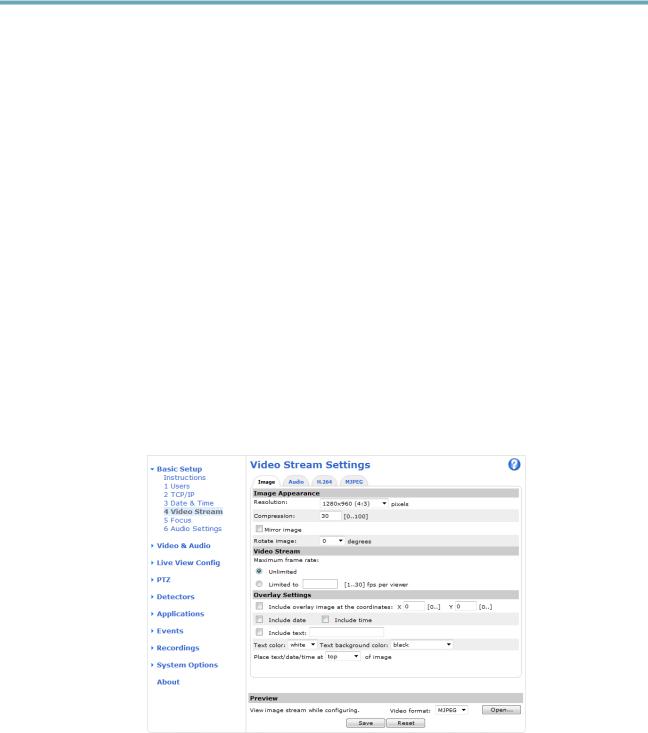
Video Stream
You can define the following video stream settings from Video & Audio > Video Stream:
•Image. See page 21.
•H.264. See page 21.
•MJPEG. See page 21.
Pixel Counter
The pixel counter shows the number of pixels in an area of the image. The pixel counter is useful in situations where there is a requirement that the image is a certain size, for example in face recognition.
The pixel counter can be accessed from:
20
 Loading...