


AXIS M5065 PTZ Network Camera
User Manual

AXIS M5065 PTZ Network Camera |
|
Table of Contents |
|
Solution overview . . . . . . . . . . . . . . . . . . . . . . . . . . . . . . . . . . . . . . . . . . . |
4 |
Hardware overview . . . . . . . . . . . . . . . . . . . . . . . . . . . . . . . . . . . . . . . . . . |
5 |
How to access the product . . . . . . . . . . . . . . . . . . . . . . . . . . . . . . . . . . . . |
6 |
Access the device . . . . . . . . . . . . . . . . . . . . . . . . . . . . . . . . . . . . . . . . . . . . . . . |
6 |
How to access the product from the internet . . . . . . . . . . . . . . . . . . . . . . . . . |
6 |
How to set the root password . . . . . . . . . . . . . . . . . . . . . . . . . . . . . . . . . . . . . |
7 |
Configure capture mode . . . . . . . . . . . . . . . . . . . . . . . . . . . . . . . . . . . . . . . . . . |
7 |
About the live view window . . . . . . . . . . . . . . . . . . . . . . . . . . . . . . . . . . . . . . . |
7 |
About media streams . . . . . . . . . . . . . . . . . . . . . . . . . . . . . . . . . . . . . . . . |
9 |
About H.264 format . . . . . . . . . . . . . . . . . . . . . . . . . . . . . . . . . . . . . . . . . . . . . |
9 |
About MJPEG format . . . . . . . . . . . . . . . . . . . . . . . . . . . . . . . . . . . . . . . . . . . . |
9 |
About AXIS Media Control (AMC) . . . . . . . . . . . . . . . . . . . . . . . . . . . . . . . . . . . |
9 |
Alternative methods of accessing the video stream . . . . . . . . . . . . . . . . . . . . |
10 |
Access Audio Streams . . . . . . . . . . . . . . . . . . . . . . . . . . . . . . . . . . . . . . . . . . . . |
11 |
How to set up the product . . . . . . . . . . . . . . . . . . . . . . . . . . . . . . . . . . . . |
12 |
How to perform a basic setup . . . . . . . . . . . . . . . . . . . . . . . . . . . . . . . . . . . . . |
12 |
Video and Audio . . . . . . . . . . . . . . . . . . . . . . . . . . . . . . . . . . . . . . . . . . . . |
13 |
How to set up video streams . . . . . . . . . . . . . . . . . . . . . . . . . . . . . . . . . . . . . . |
13 |
About stream profiles . . . . . . . . . . . . . . . . . . . . . . . . . . . . . . . . . . . . . . . . . . . . |
16 |
About ONVIF media profiles . . . . . . . . . . . . . . . . . . . . . . . . . . . . . . . . . . . . . . . |
16 |
About camera settings . . . . . . . . . . . . . . . . . . . . . . . . . . . . . . . . . . . . . . . . . . . |
16 |
About overlays . . . . . . . . . . . . . . . . . . . . . . . . . . . . . . . . . . . . . . . . . . . . . . . . . . |
18 |
About privacy masks . . . . . . . . . . . . . . . . . . . . . . . . . . . . . . . . . . . . . . . . . . . . . |
20 |
How to change audio settings . . . . . . . . . . . . . . . . . . . . . . . . . . . . . . . . . . . . . |
20 |
How to configure the live view window . . . . . . . . . . . . . . . . . . . . . . . . . |
21 |
How to set default viewer for browsers . . . . . . . . . . . . . . . . . . . . . . . . . . . . . . |
21 |
About PTZ (Pan Tilt Zoom) . . . . . . . . . . . . . . . . . . . . . . . . . . . . . . . . . . . . |
23 |
About preset positions . . . . . . . . . . . . . . . . . . . . . . . . . . . . . . . . . . . . . . . . . . . |
23 |
OSDI Zones . . . . . . . . . . . . . . . . . . . . . . . . . . . . . . . . . . . . . . . . . . . . . . . . . . . . |
23 |
Advanced . . . . . . . . . . . . . . . . . . . . . . . . . . . . . . . . . . . . . . . . . . . . . . . . . . . . . . |
24 |
About the control queue . . . . . . . . . . . . . . . . . . . . . . . . . . . . . . . . . . . . . . . . . . |
24 |
Applications . . . . . . . . . . . . . . . . . . . . . . . . . . . . . . . . . . . . . . . . . . . . . . . |
26 |
About application licenses . . . . . . . . . . . . . . . . . . . . . . . . . . . . . . . . . . . . . . . . |
26 |
How to upload and start an application . . . . . . . . . . . . . . . . . . . . . . . . . . . . . |
26 |
Application Considerations . . . . . . . . . . . . . . . . . . . . . . . . . . . . . . . . . . . . . . . . |
26 |
About AXIS Audio Volume Detection . . . . . . . . . . . . . . . . . . . . . . . . . . . . . . . . |
27 |
About AXIS Scream Detection . . . . . . . . . . . . . . . . . . . . . . . . . . . . . . . . . . . . . |
27 |
About AXIS Removed Object Detection . . . . . . . . . . . . . . . . . . . . . . . . . . . . . . |
27 |
Events . . . . . . . . . . . . . . . . . . . . . . . . . . . . . . . . . . . . . . . . . . . . . . . . . . . . |
30 |
How to set up action rules . . . . . . . . . . . . . . . . . . . . . . . . . . . . . . . . . . . . . . . . |
30 |
How to add recipients . . . . . . . . . . . . . . . . . . . . . . . . . . . . . . . . . . . . . . . . . . . . |
32 |
How to create schedules . . . . . . . . . . . . . . . . . . . . . . . . . . . . . . . . . . . . . . . . . . |
33 |
How to set up recurrences . . . . . . . . . . . . . . . . . . . . . . . . . . . . . . . . . . . . . . . . |
33 |
About recordings . . . . . . . . . . . . . . . . . . . . . . . . . . . . . . . . . . . . . . . . . . . |
35 |
How to find recordings . . . . . . . . . . . . . . . . . . . . . . . . . . . . . . . . . . . . . . . . . . . |
35 |
How to play recordings . . . . . . . . . . . . . . . . . . . . . . . . . . . . . . . . . . . . . . . . . . . |
35 |
How to export a video clip . . . . . . . . . . . . . . . . . . . . . . . . . . . . . . . . . . . . . . . . |
36 |
About continuous recording . . . . . . . . . . . . . . . . . . . . . . . . . . . . . . . . . . . . . . . |
36 |
About wireless I/O (Z-Wave Plus®) . . . . . . . . . . . . . . . . . . . . . . . . . . . . . |
37 |
How to add a Z-Wave device . . . . . . . . . . . . . . . . . . . . . . . . . . . . . . . . . . . . . . |
38 |
How to remove a Z-Wave device . . . . . . . . . . . . . . . . . . . . . . . . . . . . . . . . . . . |
38 |
How to replace a Z-Wave device . . . . . . . . . . . . . . . . . . . . . . . . . . . . . . . . . . . |
39 |
How to reset the Z-Wave network . . . . . . . . . . . . . . . . . . . . . . . . . . . . . . . . . . |
40 |
How to make the camera's LED flash when the Z-Wave device's battery is |
|
low . . . . . . . . . . . . . . . . . . . . . . . . . . . . . . . . . . . . . . . . . . . . . . . . . . . . . . . . . . . |
40 |
How to direct the camera to a preset position when the wireless PIR motion |
|
sensor detects motion . . . . . . . . . . . . . . . . . . . . . . . . . . . . . . . . . . . . . . . . . . . . |
40 |
About using Z-Wave as I/O . . . . . . . . . . . . . . . . . . . . . . . . . . . . . . . . . . . . . . . . |
41 |
About languages . . . . . . . . . . . . . . . . . . . . . . . . . . . . . . . . . . . . . . . . . . . . |
42 |
About system options . . . . . . . . . . . . . . . . . . . . . . . . . . . . . . . . . . . . . . . . |
43 |
Security . . . . . . . . . . . . . . . . . . . . . . . . . . . . . . . . . . . . . . . . . . . . . . . . . . . . . . . |
43 |
2

AXIS M5065 PTZ Network Camera |
|
Table of Contents |
|
Date & Time . . . . . . . . . . . . . . . . . . . . . . . . . . . . . . . . . . . . . . . . . . . . . . . . . . . . |
45 |
Network . . . . . . . . . . . . . . . . . . . . . . . . . . . . . . . . . . . . . . . . . . . . . . . . . . . . . . . |
46 |
Storage . . . . . . . . . . . . . . . . . . . . . . . . . . . . . . . . . . . . . . . . . . . . . . . . . . . . . . . |
51 |
Maintenance . . . . . . . . . . . . . . . . . . . . . . . . . . . . . . . . . . . . . . . . . . . . . . . . . . . |
53 |
Support . . . . . . . . . . . . . . . . . . . . . . . . . . . . . . . . . . . . . . . . . . . . . . . . . . . . . . . |
54 |
Advanced . . . . . . . . . . . . . . . . . . . . . . . . . . . . . . . . . . . . . . . . . . . . . . . . . . . . . . |
54 |
How to reset to factory default settings . . . . . . . . . . . . . . . . . . . . . . . . . . . . . |
55 |
Troubleshooting . . . . . . . . . . . . . . . . . . . . . . . . . . . . . . . . . . . . . . . . . . . . |
56 |
How to check the current firmware . . . . . . . . . . . . . . . . . . . . . . . . . . . . . . . . . |
56 |
How to upgrade the firmware . . . . . . . . . . . . . . . . . . . . . . . . . . . . . . . . . . . . . |
56 |
Symptoms, possible causes and remedial actions . . . . . . . . . . . . . . . . . . . . . . |
56 |
Specifications . . . . . . . . . . . . . . . . . . . . . . . . . . . . . . . . . . . . . . . . . . . . . . |
60 |
LED Indicators . . . . . . . . . . . . . . . . . . . . . . . . . . . . . . . . . . . . . . . . . . . . . . . . . . |
60 |
SD card slot . . . . . . . . . . . . . . . . . . . . . . . . . . . . . . . . . . . . . . . . . . . . . . . . . . . . |
60 |
Buttons . . . . . . . . . . . . . . . . . . . . . . . . . . . . . . . . . . . . . . . . . . . . . . . . . . . . . . . |
60 |
Connectors . . . . . . . . . . . . . . . . . . . . . . . . . . . . . . . . . . . . . . . . . . . . . . . . . . . . |
61 |
Performance considerations . . . . . . . . . . . . . . . . . . . . . . . . . . . . . . . . . . . . . . . |
61 |
3
AXIS M5065 PTZ Network Camera
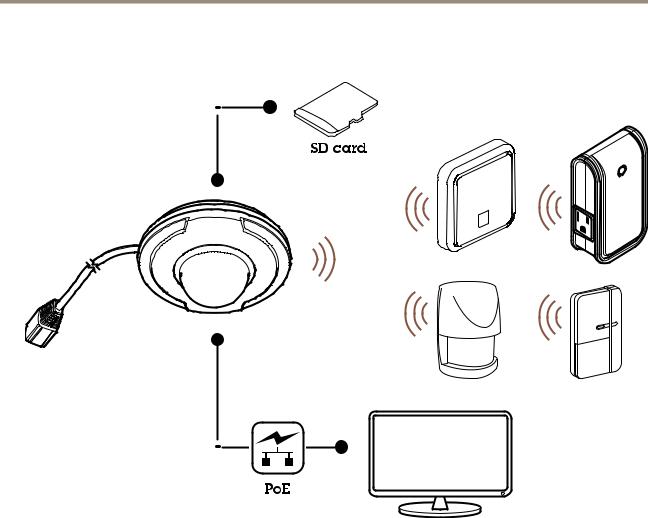
Solution overview
Solution overview
4

AXIS M5065 PTZ Network Camera
Hardware overview
Hardware overview
For specifications of the hardware components, see Specifications on page 60.
1microSD card slot
2Control button
3Part number (P/N) and serial number (S/N)
4Network connector (PoE)
5Microphone
6Status LED indicator
5

AXIS M5065 PTZ Network Camera
How to access the product
How to access the product
To install the Axis product, see the Installation Guide supplied with the product.
To view streaming video in Internet Explorer, allow installation of AXIS Media Control (AMC) when prompted.
The Axis product includes one (1) H.264 decoder license for viewing video streams and one (1) AAC audio license. The licenses are automatically installed with AMC. The administrator can disable the installation of the decoders to prevent installation of unlicensed copies.
Note
• QuickTimeTM is also supported for viewing H.264 streams and for audio.
Access the device
1.Open a browser and enter the IP address or host name of the Axis device.
If you have a Mac computer (OS X), go to Safari, click on Bonjour and select the device from the drop-down list. To add Bonjour as a browser bookmark, go to Safari > Preferences.
If you do not know the IP address, use AXIS IP Utility or AXIS Device Manager to find the device on the network.
2.Enter the username and password. If you access the device for the first time, you must set the root password. See .
3.The live view page opens in your browser.
How to access the product from the internet
A network router allows products on a private network (LAN) to share a single connection to the internet. This is done by forwarding network traffic from the private network to the internet.
Most routers are pre-configured to stop attempts to access the private network (LAN) from the public network (internet).
If the Axis product is located on an intranet (LAN) and you want to make it available from the other (WAN) side of a NAT (Network Address Translator) router, turn on NAT traversal. With NAT traversal properly configured, all HTTP traffic to an external HTTP port in the NAT router is forwarded to the product.
How to turn on the NAT-traversal feature
•Go to Settings > System > Plain config > Network.
•Select NAT traversal enabled.
•Enter External IP address.
•Enter the IP address of the NAT traversal router.
•Manually configure your NAT router to allow access from the internet. See also AXIS Internet Dynamic DNS Service at www.axiscam.net
Note
•In this context, a “router” refers to any network routing device such as a NAT router, network router, internet gateway, broadband router, broadband sharing device, or a software such as a firewall.
•For NAT traversal to work, NAT traversal must be supported by the router. The router must also support UPnP®.
6

AXIS M5065 PTZ Network Camera
How to access the product
How to set the root password
To access the Axis product, you must set the password for the default administrator user root. This is done in the Configure Root Password dialog, which opens when the product is accessed for the first time.
To prevent network eavesdropping, the root password can be set via an encrypted HTTPS connection, which requires an HTTPS certificate. HTTPS (Hypertext Transfer Protocol over SSL) is a protocol used to encrypt traffic between web browsers and servers. The HTTPS certificate ensures encrypted exchange of information. See HTTPS on page 43.
The default administrator user name root is permanent and cannot be deleted. If the password for root is lost, the product must be reset to the factory default settings. See How to reset to factory default settings on page 55.
To set the password, enter it directly in the dialog.
Configure capture mode
Capture mode defines the maximum frame rate available in the Axis product. The capture mode also affects light sensitivity. A capture mode with a high maximum frame rate has reduced light sensitivity and vice versa.
See also About capture modes on page 16.
About the live view window
The controls and layout of the live view window may have been customized to meet specific installation requirements and user preferences. Consequently, some of the examples and functions featured here may differ from those displayed in your own live view window. The following provides an overview of each available control.
About the controls in the live view window
Click the View size buttons to show the image in full size (right button) or to scale down the image to fit the browser window (left button).
Select a stream profile for the live view window from the Stream Profile drop-down list. For information about how to configure stream profiles, see page 16.
Use the Manual Trigger button to trigger an action rule from the live view window. For information about how to configure and enable the button, see About the manual trigger on page 7 .
Click Snapshot to save a snapshot of the video image. This button is primarily intended for use when the AXIS Media Control viewer toolbar is not available. Enable this button from Live View Config > Action Buttons.
About the manual trigger
The Manual Trigger is used to trigger an action rule from the Live View page. The manual trigger can for example be used to validate actions during product installation and configuration.
To configure the manual trigger:
1.Go to Setup > Events.
2.Click Add to add a new action rule.
3.From the Trigger drop-down list, select Input Signal.
7

AXIS M5065 PTZ Network Camera
How to access the product
4.From the second drop-down list, select Manual Trigger.
5.Select the desired action and configure the other settings as required. For more information about action rules, see Events on page 30.
To show the manual trigger buttons in the Live View page:
1.Go to Setup > Live View Config.
2.Under Action Buttons, select Show manual trigger button.
About the AXIS Media Control viewer toolbar
The AXIS Media Control viewer toolbar is available in Internet Explorer only. See About AXIS Media Control (AMC) on page 9 for more information. The toolbar displays the following buttons:
The Play button connects to the Axis product and starts playing a media stream.
The Stop button stops the media stream.
The Snapshot button takes a snapshot of the video image.
Click the View Full Screen button and the video image will fill the entire screen. Press ESC (Escape) on the computer keyboard to cancel full screen view.
The Record button is used to record the current video stream on your computer. The location where the recording is saved can be specified in the AMC Control Panel. Enable this button from Live View Config > Viewer Settings.
AMC Audio Controls
AMC audio buttons control the speakers connected to the client computer. The buttons are only visible when audio is enabled. For information about how to configure audio, see How to change audio settings on page 20.
Speaker button — Click to turn the speakers on or off.
Use the slider to control the volume of the speakers.
8

AXIS M5065 PTZ Network Camera
About media streams
About media streams
The Axis product provides several audio and video stream formats. Your requirements and the properties of your network will determine the type you use.
The live view window in the product provides access to H.264 and Motion JPEG video streams, audio streams and to the list of available stream profiles. Other applications and clients can access video and audio streams directly, without going via the live view window.
About H.264 format
H.264 can, without compromising image quality, reduce the size of a digital video file by more than 80% compared with the Motion JPEG format and as much as 50% more than the MPEG-4 standard. This means that much less network bandwidth and storage space are required for a video file. Or seen another way, much higher video quality can be achieved for a given bit rate.
Deciding which combination of protocols and methods to use depends on your viewing requirements, and on the properties of your network. The available options in AXIS Media Control are:
Unicast RTP |
This unicast method (RTP over UDP) is used |
|
|
|
for live unicast video, especially when it is |
|
|
|
important to have an up-to-date video stream, |
|
|
|
even if some frames are dropped. |
Unicasting is used for video-on-demand |
|
|
|
transmission so that there is no video traffic |
|
RTP over RTSP |
This unicast method (RTP tunneled over RTSP) |
||
on the network until a client connects and |
|||
|
is useful as it is relatively simple to configure |
||
|
requests the stream. |
||
|
firewalls to allow RTSP traffic. |
||
|
Note that there are a maximum of 10 |
||
|
|
||
RTP over RTSP over HTTP |
This unicast method can be used to traverse |
simultaneous unicast connections. |
|
|
firewalls. Firewalls are commonly configured to |
|
|
|
allow the HTTP protocol, thus allowing RTP to |
|
|
|
be tunneled. |
|
|
|
|
|
|
Multicast RTP |
This method (RTP over UDP) should be used for live multicast video. The video stream is always |
||
|
up-to-date, even if some frames are dropped. |
|
|
|
Multicasting provides the most efficient usage of bandwidth when there are large numbers of |
||
|
clients viewing simultaneously. A multicast cannot however, pass a network router unless the |
||
|
router is configured to allow this. It is not possible to multicast over the Internet, for example. |
||
|
Note also that all multicast viewers count as one unicast viewer in the maximum total of 10 |
||
|
simultaneous connections. |
|
|
|
|
|
|
AXIS Media Control negotiates with the Axis product to determine the transport protocol to use. The order of priority, listed in the AMC Control Panel, can be changed and the options disabled, to suit specific requirements.
Note
H.264 is licensed technology. The Axis product includes one H.264 viewing client license. Installing additional unlicensed copies of the client is prohibited. To purchase additional licenses, contact your Axis reseller.
About MJPEG format
This format uses standard JPEG still images for the video stream. These images are then displayed and updated at a rate sufficient to create a stream that shows constantly updated motion.
The Motion JPEG stream uses considerable amounts of bandwidth, but provides excellent image quality and access to every image contained in the stream. The recommended method of accessing Motion JPEG live video from the Axis product is to use the AXIS Media Control in Internet Explorer in Windows.
About AXIS Media Control (AMC)
AXIS Media Control (AMC) in Internet Explorer in Windows is the recommended method of accessing live video from the Axis product.
9

AXIS M5065 PTZ Network Camera
About media streams
The AMC Control Panel can be used to configure various video and audio settings. Please see the AXIS Media Control User’s Manual for more information.
The AMC Control Panel is automatically installed on first use, after which it can be configured. Open the AMC Control Panel from:
•Windows Control Panel (from the Start screen or Start menu)
•Alternatively, right-click the video image in Internet Explorer and click Settings.
Alternative methods of accessing the video stream
You can also access video and images from the Axis product in the following ways:
•Motion JPEG server push (if supported by the client, Chrome or Firefox, for example). This option maintains an open HTTP connection to the browser and sends data as and when required, for as long as required.
•Still JPEG images in a browser. Enter the path http://<ip>/axis-cgi/jpg/image.cgi
•Windows Media Player. This requires AXIS Media Control and the H.264 decoder to be installed. The following paths can be used:
-Unicast via RTP: axrtpu://<ip>/axis-media/media.amp
-Unicast via RTSP: axrtsp://<ip>/axis-media/media.amp
-Unicast via RTSP, tunneled via HTTP: axrtsphttp://<ip>/axis-media/media.amp
-Multicast: axrtpm://<ip>/axis-media/media.amp
•QuickTimeTM. The following paths can be used:
-rtsp://<ip>/axis-media/media.amp
-rtsp://<ip>/axis-media/media.3gp
10
AXIS M5065 PTZ Network Camera
About media streams
Note
•<ip>= IP address
•The Axis product supports QuickTime 6.5.1 and later.
•QuickTime may add latency to the video stream.
•It may be possible to use other players to view the H.264 stream using the paths above, although Axis does not guarantee this.
Access Audio Streams
The Live View page provides access to audio through AXIS Media Control; in addition audio can be accessed in the following ways:
•VAPIX® Application Programming Interface (API) For more information, visit www.axis.com/developer
•Windows Media Player supports simplex audio. The following paths can be used:
-Unicast via RTP: axrtpu://<ip>/axis-media/media.amp
-Unicast via RTSP: axrtsp://<ip>/axis-media/media.amp
-Unicast via RTSP, tunneled via HTTP: axrtsphttp://<ip>/axis-media/media.amp
-Multicast: axrtpm://<ip>/axis-media/media.amp
•QuickTimeTM supports G.711 and AAC audio encoding. The following paths can be used:
-rtsp://<ip>/axis-media/media.amp
-rtsp://<ip>/axis-media/media.3gp
11

AXIS M5065 PTZ Network Camera
How to set up the product
How to set up the product
The Axis product can be configured by users with administrator or operator rights. To open the product’s setup pages, click Setup in the top right-hand corner of the live view window.
•Administrators have unrestricted access to all settings.
•Operators have restricted access to settings, see Users on page 43
See also the online help  .
.
How to perform a basic setup
Basic Setup provides shortcuts to the settings that should be made before using the Axis product:
1.Users. See page 43.
2.TCP/IP. See page 46.
3.Date & Time. See page 45.
4.Video Stream. See page 13.
5.Audio settings. See How to change audio settings on page 20.
The Basic Setup menu can be disabled from System Options > Security > Users.
12

AXIS M5065 PTZ Network Camera
Video and Audio
Video and Audio
The video and audio settings can be used to optimize video and audio quality. You can configure the following:
•Video stream settings. See page 13.
•Stream profiles. See page 16.
•ONVIF Media Profiles. See page 16.
•Camera settings. See page 16.
•Privacy mask. See page 20.
•Audio settings. See page 20.
How to set up video streams
To set up the product’s video streams, go to Video & Audio > Video Stream.
The video stream settings are divided into the following tabs:
•Image. See page 13.
•Audio. See page 20.
•H.264. See page 14.
•Zipstream. See page 15.
•MJPEG. See page 16.
About the pixel counter
The pixel counter shows the number of pixels in an area of the image. The pixel counter is useful in situations where there is a specific size requirement, for example in face recognition.
The pixel counter can be used:
•When setting up a video stream, see How to set up video streams on page 13. Under Preview, click Open and select the Show pixel counter option to enable the rectangle in the image. Use the mouse to move and resize the rectangle, or enter the number of pixels in the Width and Height fields and click Apply.
•When accessing the Live View page in Internet Explorer with AXIS Media Control (AMC) in Windows. Right-click in the image and select Pixel counter. Use the mouse to move and resize the rectangle.
Image
The default image settings can be configured under Video & Audio > Video Stream. Select the Image tab.
The following settings are available:
•Resolution. Select the default resolution.
•Compression. The compression level affects the image quality, bandwidth and file size of saved images; the lower the compression, the higher the image quality with higher bandwidth requirements and larger file sizes.
•Rotate image. If required, the image can be rotated.
13

AXIS M5065 PTZ Network Camera
Video and Audio
•Maximum frame rate. To avoid bandwidth problems, the frame rate allowed to each viewer can be Limited to a fixed amount. Alternatively, the frame rate can be set as Unlimited, which means the Axis product always delivers the highest frame rate possible under the current conditions.
•Overlay settings. See About overlay text on page 18.
Click Save to apply the new settings.
About H.264
H.264, also known as MPEG-4 Part 10/AVC, is a video compression standard that provides high quality video streams at low bitrates. An H.264 video stream consists of different types of frames such as I-frames and P-frames. An I-frame is a complete image, whereas P-frames only contain the differences from previous frames.
About GOP length
A Group of Pictures (GOP) contains one I-frame followed by a number of P-frames. The GOP length is the number of frames between two I-frames.
Equal values for GOP length and frame rate result in one GOP per second. A higher GOP length value results in more small-sized P-frames and fewer large-sized I-frames while keeping the same frame rate. In other words, a high GOP-length value saves bandwidth, but the video quality may decrease. A low GOP-length value increases the video quality but requires more bandwidth.
About H.264 profiles
The Axis product supports the following H.264 profile(s):
•Baseline: Use the Baseline profile if the client does not support CABAC entropy coding.
•Main: The Main profile uses CABAC and provides a better compression with maintained video quality. It requires a larger amount of processing power to decode than the Baseline profile.
•High: The High profile provides a higher compression than both Main and Baseline profiles, but requires more processing power to decode. High profile supports 8x8 blocks, which reduces the bitrate further compared to the Main profile.
About bitrate control
Bitrate control is useful to make sure the video streaming does not take up too much bandwidth.
The built-in bitrate control can be combined with Zipstream, see About Zipstream on page 15. We recommend using a high bitrate limit to enable the full potential of Zipstream.
About variable bitrate
Variable bitrate (VBR) adjusts the bitrate according to the image complexity. When the activity in the scene increases, VBR adjusts the bitrate according to the complexity, using up more bandwidth for increased activity in the scene, and less for lower scene activity. Variable bitrate is suitable if there is a surplus in bandwidth, where the increased bitrate may not be an issue.
About maximum bitrate
If you have limited bandwidth, we recommend Maximum bit rate (MBR). MBR allows you to set a target bitrate to control the bandwidth consumption. The target value limits the bitrate, but it maintains a flexibility to be able to prioritize a continuous video stream. Consequently, the frame rate might need to go down and the image quality might decrease. To partly compensate for this, you can select which variable shall be prioritized. Not setting a priority means that frame rate and image quality are equally affected.
How to set an H.264 profile
1.To change the settings for all H.264 streams that do not use a stream profile, go to Video & Audio > Video Stream > H.264.
2.To increase or decrease the number of frames per GOP, set the GOP length.
14

AXIS M5065 PTZ Network Camera
Video and Audio
3.Select one of the H.264 profiles.
4.Select one of the following:
-Variable bit rate
-Maximum bit rate
5.If you select Maximum bit rate, select which variable to prioritize in the Priority drop-down list.
6.Click Save.
How to include current bitrate in a text overlay
1.Go to Video & Audio > Video Stream > Overlay Settings.
2.In the Include text field enter #b.
3.Click Save.
About Zipstream
Axis’ Zipstream Technology is a bitrate reduction technology optimized for video surveillance. Zipstream reduces the average bitrate in the H.264 stream by removing unnecessary data, which makes it possible to stream higher resolutions, reduce storage cost
or keep recordings for a longer time.
To reduce the average bitrate, Zipstream reduces the bitrate in areas of the image that are less interesting from a video surveillance perspective, for example the background. Image details that are important for forensic video analysis, for example faces and license plates, are encoded with a higher bitrate.
Axis’ Zipstream Technology for H.264 conforms to the H.264 standard and is compatible with third-party clients and VMS solutions that decode H.264 video.
Recommended use of bitrate reduction
Zipstream offers a number of bitrate reduction presets, from Low to Extreme. Low bitrate reduction is enabled by default and is safe to use in all applications while still reducing the bitrate.
We recommend using the Extreme bitrate reduction to maximize storage time for cloud-connected cameras or cameras using edge storage. This setting is suitable to combine with motion detection triggering and variable bitrate (VBR) where the bitrate is allowed to adapt to changes in complexity in the scene.
How to save bandwidth and storage using Zipstream
The bitrate controller built into the product can be combined with Zipstream to ensure a maximum bitrate (MBR) limit. We recommend using VBR or MBR with a high bitrate limit to enable the full potential of Zipstream.
For instance in railway surveillance where at times there is a lot of movement in the scene and where it is important to capture details, such as facial features, the MBR should be set to 10Mbit/s (for 1080p resolution at 30 fps).
To further save bandwidth go to Setup > Video & Audio > Video Stream and do one or more of the following:
•Go to the Image tab and set a low Maximum frame rate value.
•Go to the H.264 tab and set a high GOP length value.
•Go to the Zipstream tab and select Extreme H.264 bitrate reduction.
•Go to the Zipstream tab. Enable Dynamic GOP and set a high Max dynamic GOP length value.
•Go to the Zipstream tab and enable Dynamic FPS.
15

AXIS M5065 PTZ Network Camera
Video and Audio
Always verify that the video stream meets the quality requirements for your surveillance purposes after changing the video stream settings.
About MJPEG settings
Sometimes the image size is large due to low light or complex scenery. Adjusting the maximum frame size helps to control the bandwidth and storage used by the Motion JPEG video stream in these situations. Setting the frame size to the Default setting provides consistently good image quality at the expense of increased bandwidth and storage usage in low light. Limiting the frame size optimizes bandwidth and storage usage, but may result in poor image quality.
About stream profiles
A stream profile is a set of predefined stream settings including resolution, compression, frame rate and overlay settings. Stream profiles can be used:
•When setting up recording using action rules. See Events on page 30.
•When setting up continuous recording. See About continuous recording on page 36.
•In the Live View page – select the stream profile from the Stream profile drop-down list. To create a new profile or modify an existing profile, go to Setup > Video & Audio > Stream Profiles. To select a default stream profile for the Live View page, go to Setup > Live View Config.
About ONVIF media profiles
An ONVIF media profile consists of a set of configurations that can be used to change media stream settings. ONVIF media profiles can be used by a client to configure media stream properties.
The ONVIF Media Profiles page lists all preconfigured profiles. These profiles are included in the product for quick setup. You can add, modify or remove ONVIF media profiles from this page.
About camera settings
The Video & Audio > Camera Settings page provides access to advanced image settings for the Axis product.
About capture modes
Capture mode defines the maximum frame rate available in the Axis product and affects light sensitivity. A capture mode with a high maximum frame rate has reduced light sensitivity and vice versa.
Capture mode is set the first time the product is accessed. Select the desired capture mode and click OK.
Important
Changing capture mode when the product has been configured is not recommended as most other settings will be either removed or reset.
To change capture mode, follow these steps:
1.Go to Setup > Video & Audio > Camera Settings.
2.Select the new capture mode.
Note
When the capture mode is changed, the camera needs to reboot for the changes to take effect.
16

AXIS M5065 PTZ Network Camera
Video and Audio
About image appearance
To change Image Appearance go to the menus under Setup > Video & Audio > Camera Settings.
Increasing the Color level increases the color saturation. The value 100 produces maximum color saturation and the value 0 results in a black and white image.
The image Brightness can be adjusted in the range 0–100, where a higher value produces a brighter image.
Increasing the Sharpness can increase bandwidth usage. A sharper image might increase image noise especially in low light conditions. A lower setting reduces image noise, but the whole image will appear less sharp.
About white balance
To change this setting go to Setup > Video & Audio > Camera Settings
White balance is used to make colors in the image appear the same regardless of the color temperature of the light source. The Axis product can be set to automatically identify the light source and compensate for its color. Alternatively, select the type of light
source from the drop-down list. For a description of each available setting, see the online help .
.
Wide Dynamic Range
Wide Dynamic Range can improve the exposure when there is a considerable contrast between light and dark areas in the image. Enable WDR in intense backlight conditions. Disable WDR in low light conditions for optimal exposure.
Exposure Settings
Configure the exposure settings to suit the image quality requirements in relation to lighting, frame rate and bandwidth considerations.
Exposure control - This setting is used to adapt to the amount of light available. Automatic can be used in most situations. Shutter speed is automatically set to produce optimum image quality.
Max exposure time - Available when Exposure control is set to Automatic. Select the maximum exposure time from the drop-down list. Increasing the time improves image quality, but decreases frame rate. There may also be an increase in motion blur.
Exposure time - Available when Exposure control is set to Manual. Select the exposure time from the drop-down list. Increasing the time improves image quality, but decreases frame rate. There may also be an increase in motion blur.
Max gain - Measured in decibels (dB), gain describes the amount of amplification applied to a signal, in this case visual information in the image. A high level of amplification may provide a better image in very low light situations. A high gain will also increase the amount of image noise.
Exposure zones - This settings determines which part of the image is used to calculate exposure. The default setting is Center.
Exposure priority - When Motion is prioritized and maximum Shutter time is set to a small value, motion blur in the image is minimized. This can be useful for recognizing moving objects such as people and vehicles. However, prioritizing motion may cause an increase in image noise, especially in low light situations.
When Low noise is prioritized and Gain is set to a small value, image noise is minimized. The file size is also reduced, which can be useful if storage space or bandwidth is limited. However, prioritizing low noise may result in a very dark image, especially in low light situations.
About image settings
Image freeze on PTZ - Select All movements to freeze the image while the camera is moving during a pan, tilt or zoom operation. Once the camera reaches its new position, the view from that position is shown. Presets freezes the image only when the camera moves between preset positions.
17

AXIS M5065 PTZ Network Camera
Video and Audio
About overlays
Overlays are superimposed over the video stream. They are used to provide extra information during recordings, such as a timestamp, or during product installation and configuration.
About overlay text
An overlay text can include the current date and time, or a text string. When using a text string, so-called modifiers can be used to display, for example, the current bit rate or the current frame rate.
You can choose between the following text overlay sizes:
Size |
Text height |
Background height |
|
|
|
Small |
10 pixels |
20 pixels |
|
|
|
Medium |
16 pixels |
28 pixels |
|
|
|
Large |
21 pixels |
36 pixels |
|
|
|
It is also possible to display text when an action rule is triggered, see How to include overlay text in an action rule on page 18.
How to include overlay text
1.Go to Video & Audio > Video Stream and select the Image tab.
2.To include date and time, select Include date and Include time.
3.To include a text string, select Include text and enter the text in the field. Modifiers can be used, see File Naming & Date/Time Formats in the online help  .
.
4.Select size, color, and placement of the text string.
5.Click Save.
To modify the date and time format, go to System Options > Date & Time. See Date & Time on page 45.
How to include overlay text in an action rule
1.Go to Video & Audio > Video Stream and select the Image tab.
2.Under Overlay Settings, select Include text.
3.Enter the modifier #D. When the rule is triggered, #D is replaced by the text specified in the action rule. Additional text in this field will be displayed also when the action rule is not active.
4.Go to Events > Action Rules and create your action rule.
5.From the Actions list, select Overlay Text.
6.Enter the text to display in the Text field.
7.Specify the Duration. The text can be displayed while the rule is active or for a fixed number of seconds.
How to display the pan or tilt position as a text overlay
It may be useful to retrieve, for instance from a recorded video, the pan or tilt position (in degrees) in which an event has taken place. This can be obtained by including the position in the image as a text overlay, using a modifier. To display the pan position as a text overlay:
1. Go to Setup > Video > Video Stream.
18

AXIS M5065 PTZ Network Camera
Video and Audio
2.Under Overlay settings, select Include text. Enter #x to show the pan position.
Enter #y to show the tilt position.
3.Configure the optional size, color and position of the text overlay.
4.Click Save.
5.Go to the Live View page to confirm the setting.
About overlay images
An overlay image is a static image superimposed over the video stream. The image, for example a company logo, is first uploaded to the Axis product and then used to provide extra information or to mask a part of the image.
Image specifications:
•The uploaded image should be a Windows 24-bit BMP image with maximum 250 colors.
•The image width and height, in pixels, must be exactly divisible by four.
•If you combine a text overlay with and image overlay, the text overlay always takes presidence over the overlay image in height. A text overlay always stretches across the whole video image which means you cannot shrink the overlay strip to make room for an image. For information about the different text overlay heights, see About overlay text on page 18.
Since it is static, the position and size of an overlay image remains the same regardless of resolution and pan, tilt or zoom movements. To cover a part of the monitored area, use privacy masks. See About privacy masks on page 20.
How to upload an overlay image
1.Go to Video & Audio > Overlay Image.
2.Click Browse and browse to the file.
3.Click Upload.
4.The Transparency Settings page is now displayed:
-To make a color in the overlay image transparent, select Use transparency and enter the RGB hexadecimal value for the color. Example: To make white transparent, enter FFFFFF.
For more examples of hexadecimal values, see the online help  .
.
-To scale the image automatically, select Scale with resolution. The image will be scaled down to fit the resolution used by the Axis product.
5.Click Save.
How to include an overlay image
1.Go to Video & Audio > Overlay Image.
2.Select the image to use from the Use overlay image list and click Save.
3.Go to Video & Audio > Video Stream and select the Image tab.
4.Under Overlay Settings, select Include overlay image at the coordinates.
19
 Loading...