


M1054

USER’S MANUAL
AXIS M10 Series
AXIS M1011 Network Camera
AXIS M1011-W Network Camera
AXIS M1031-W Network Camera
AXIS M1054 Network Camera

AXIS M10 Series -
Notices
This manual is intended for administrators and users of the AXIS M10
Series Network Camera, and is applicable for firmware release 5.20
(AXIS M1011, AXIS M1011-W, AXIS M1031-W), firmware release 5.15
(AXIS M1054) and later. It includes instructions for using and managing
the camera on your network. Previous experience of networking will be
of use when using this product. Some knowledge of UNIX or
Linux-based systems may also be beneficial, for developing shell scripts
and applications. Later versions of this document will be posted to the
Axis Website, as required. See also the product’s online help, available
via the Web-based interface.
AXIS M1011, AXIS M1011-W, AXIS M1031-W support ONVIF v1.0. For
more information about ONVIF go to www.onvif.org For more
information about enabling ONVIF go to the developers page at
www.axis.com
Liability
Every care has been taken in the preparation of this manual. Please
inform your local Axis office of any inaccuracies or omissions. Axis
Communications AB cannot be held responsible for any technical or
typographical errors and reserves the right to make changes to the
product and manuals without prior notice. Axis Communications AB
makes no warranty of any kind with regard to the material contained
within this document, including, but not limited to, the implied
warranties of merchantability and fitness for a particular purpose. Axis
Communications AB shall not be liable nor responsible for incidental or
consequential damages in connection with the furnishing, performance
or use of this material.
Intellectual Property Rights
Axis AB has intellectual property rights relating to technology
embodied in the product described in this document. In particular, and
without limitation, these intellectual property rights may include one or
more of the patents listed at http://www.axis.com/patent.htm and one
or more additional patents or pending patent applications in the US and
other countries.
This product contains licensed third-party software. See the menu item
“About” in the product’s user interface for more information.
This product contains source code copyright Apple Computer, Inc.,
under the terms of Apple Public Source License 2.0 (see
http://www.opensource.apple.com/apsl/).
The source code is available from:
http://developer.apple.com/darwin/projects/bonjour/
Equipment Modifications
This equipment must be installed and used in strict accordance with the
instructions given in the user documentation. This equipment contains
no user-serviceable components. Unauthorized equipment changes or
modifications will invalidate all applicable regulatory certifications and
approvals.
Trademark Acknowledgments
Apple, Boa, Bonjour, Ethernet, Internet Explorer, Linux, Microsoft,
Mozilla, Netscape Navigator, OS/2, Real, QuickTime, UNIX, Windows,
WWW are registered trademarks of the respective holders. Java and all
Java-based trademarks and logos are trademarks or registered
trademarks of Sun Microsystems, Inc. in the United States and other
countries. Axis Communications AB is independent of Sun Microsystems
Inc.
UPnPTM is a certification mark of the UPnPTM Implementers Corporation.
Support
Should you require any technical assistance, please contact your Axis
reseller. If your questions cannot be answered immediately, your
reseller will forward your queries through the appropriate channels to
ensure a rapid response. If you are connected to the Internet, you can:
• download user documentation and firmware updates
• find answers to resolved problems in the FAQ database. Search by
product, category, or phrases
• report problems to Axis support by logging in to your private support
area
• visit Axis Support at www.axis.com/techsup
AXIS M10 Series Network Camera User’s Manual
Rev. 2.0
Copyright© Axis Communications AB, 2008-2010
May 2010 Part no. 39402

3
AXIS M10 Series - Table of contents
Product Description . . . . . . . . . . . . . . . . . . . . . . . . . . . . . . . . . . . . . . . . . . . . . . . . . . . . . . . . . . . . . . . . . . . . . . . . . . . . . . . . 4
Key features 5
Overview 6
LED indicators . . . . . . . . . . . . . . . . . . . . . . . . . . . . . . . . . . . . . . . . . . . . . . . . . . . . . . . . . . . . . . . . . . . . . . . . . . . . . . . . . . . . .8
Accessing the Camera . . . . . . . . . . . . . . . . . . . . . . . . . . . . . . . . . . . . . . . . . . . . . . . . . . . . . . . . . . . . . . . . . . . . . . . . . . . . . .9
Access from a browser 9
Setting the root password 10
Access from the Internet 10
Video Streams . . . . . . . . . . . . . . . . . . . . . . . . . . . . . . . . . . . . . . . . . . . . . . . . . . . . . . . . . . . . . . . . . . . . . . . . . . . . . . . . . . .14
How to stream MPEG-4/H.264 14
Motion JPEG 15
Alternative methods of accessing the video stream 15
Video & Audio Settings . . . . . . . . . . . . . . . . . . . . . . . . . . . . . . . . . . . . . . . . . . . . . . . . . . . . . . . . . . . . . . . . . . . . . . . . . . . .16
Video Stream 16
Stream Profiles 18
Camera Settings 18
Overlay Image 19
Privacy mask 19
Audio Settings (AXIS M1031-W and AXIS M1054) 20
Audio Clips (AXIS M1031-W/AXIS M1054) 21
Layout 22
PTZ (AXIS M1054 only) . . . . . . . . . . . . . . . . . . . . . . . . . . . . . . . . . . . . . . . . . . . . . . . . . . . . . . . . . . . . . . . . . . . . . . . . . . . .25
Preset Positions 25
Guard Tour 26
Advanced 26
Event Configuration . . . . . . . . . . . . . . . . . . . . . . . . . . . . . . . . . . . . . . . . . . . . . . . . . . . . . . . . . . . . . . . . . . . . . . . . . . . . . . .27
Event Servers 27
Event Types 27
Camera Tampering 29
Motion Detection 30
Port Status 31
System Options . . . . . . . . . . . . . . . . . . . . . . . . . . . . . . . . . . . . . . . . . . . . . . . . . . . . . . . . . . . . . . . . . . . . . . . . . . . . . . . . . .32
Security 32
Date & Time 34
Network 34
Ports & Devices 40
LED Settings 40
Maintenance 41
Support 41
Resetting to the Factory Default Settings . . . . . . . . . . . . . . . . . . . . . . . . . . . . . . . . . . . . . . . . . . . . . . . . . . . . . . . . . . . . .42
Troubleshooting . . . . . . . . . . . . . . . . . . . . . . . . . . . . . . . . . . . . . . . . . . . . . . . . . . . . . . . . . . . . . . . . . . . . . . . . . . . . . . . . . .44
Upgrading the Firmware 44
Technical Specifications . . . . . . . . . . . . . . . . . . . . . . . . . . . . . . . . . . . . . . . . . . . . . . . . . . . . . . . . . . . . . . . . . . . . . . . . . . .49
Set the IP address with ARP/Ping 53
Glossary of Terms . . . . . . . . . . . . . . . . . . . . . . . . . . . . . . . . . . . . . . . . . . . . . . . . . . . . . . . . . . . . . . . . . . . . . . . . . . . . . . . . .54
Index . . . . . . . . . . . . . . . . . . . . . . . . . . . . . . . . . . . . . . . . . . . . . . . . . . . . . . . . . . . . . . . . . . . . . . . . . . . . . . . . . . . . . . . . . . .60
4
AXIS M10 Series - Product Description
Product Description
This manual applies to the AXIS M10 Series Network Camera. The information provided here applies to all models, except
where otherwise indicated.
Network Camera Features
AXIS M1011 MPEG-4 and H.264
Wired interface
AXIS M1011-W Wired and wireless interface
MPEG-4 and H.264
AXIS M1031-W Wired and wireless interface
PIR sensor
Illumination LED
Audio
MPEG-4 and H.264
AXIS M1054 Megapixel resolution
H.264
I/O
PoE (Power over Ethernet)
PIR sensor
Illumination LED
Audio
Digital PTZ

5
AXIS M10 Series - Product Description
Key features
• Attractive, small-sized design
These small, smart-looking and yet discreet cameras are perfectly suited for securing small businesses, boutiques, restaurants, hotels or residences.
• Progressive scan
The cameras use progressive scan technology, providing images of moving objects with no distortion.
• Multiple H.264 streams
Multiple H.264 and Motion JPEG streams can be provided simultaneously, individually optimized for different quality
needs and bandwidth constraints. These cameras support MPEG-4 Part 2 for backward compatibility (AXIS M1054
excepted).
• Easy and flexible installation
AXIS M10 Series Network Cameras are easy to install, with the -W variants optionally offering wireless connectivity for
added flexibility.
• Advanced security and network management
Axis network cameras offer advanced security and network management features such as HTTPS encryption with preserved performance, IPv6 and Quality of Service.
• PIR Sensor (AXIS M1031-W and AXIS M1054)
Complementing the video motion detection capability of the cameras, the full-featured AXIS M1031-W and AXIS M1054
additionally integrate a PIR Sensor for detecting movements - even in the dark.
• Illumination (AXIS M1031-W and AXIS M1054)
AXIS M1031-W and AXIS M1054 offer a white LED for illuminating the scene automatically at an event or when
requested by the user.
• Microphone and speaker (AXIS M1031-W and AXIS M1054)
AXIS M1031-W and AXIS M1054 provide two-way audio support with integrated microphone and speaker, allowing
remote listening in on an area as well as communication with persons entering the scene. An event can trigger the sound
of an audio clip, stored in the camera, to be emitted through the speaker.
• Megapixel Resolution (AXIS M1054)
The AXIS M1054 Network Camera offers superior image quality in megapixel resolution with progressive scan, providing
crisp and clear images of both illuminated and dark areas.
• PoE (Power over Ethernet) (AXIS M1054)
The AXIS M1054 Network Camera can be powered through PoE, which simplifies installation since only one cable is
needed for carrying power, as well as video controls.
• ONVIF
This is a global interface standard that makes it easier for end users, integrators, consultants, and manufacturers to take
advantage of the possibilities offered by network video technology. ONVIF enables interoperability between different vendor products, increased flexibility, reduced cost, and future-proof systems.
6
AXIS M10 Series - Product Description
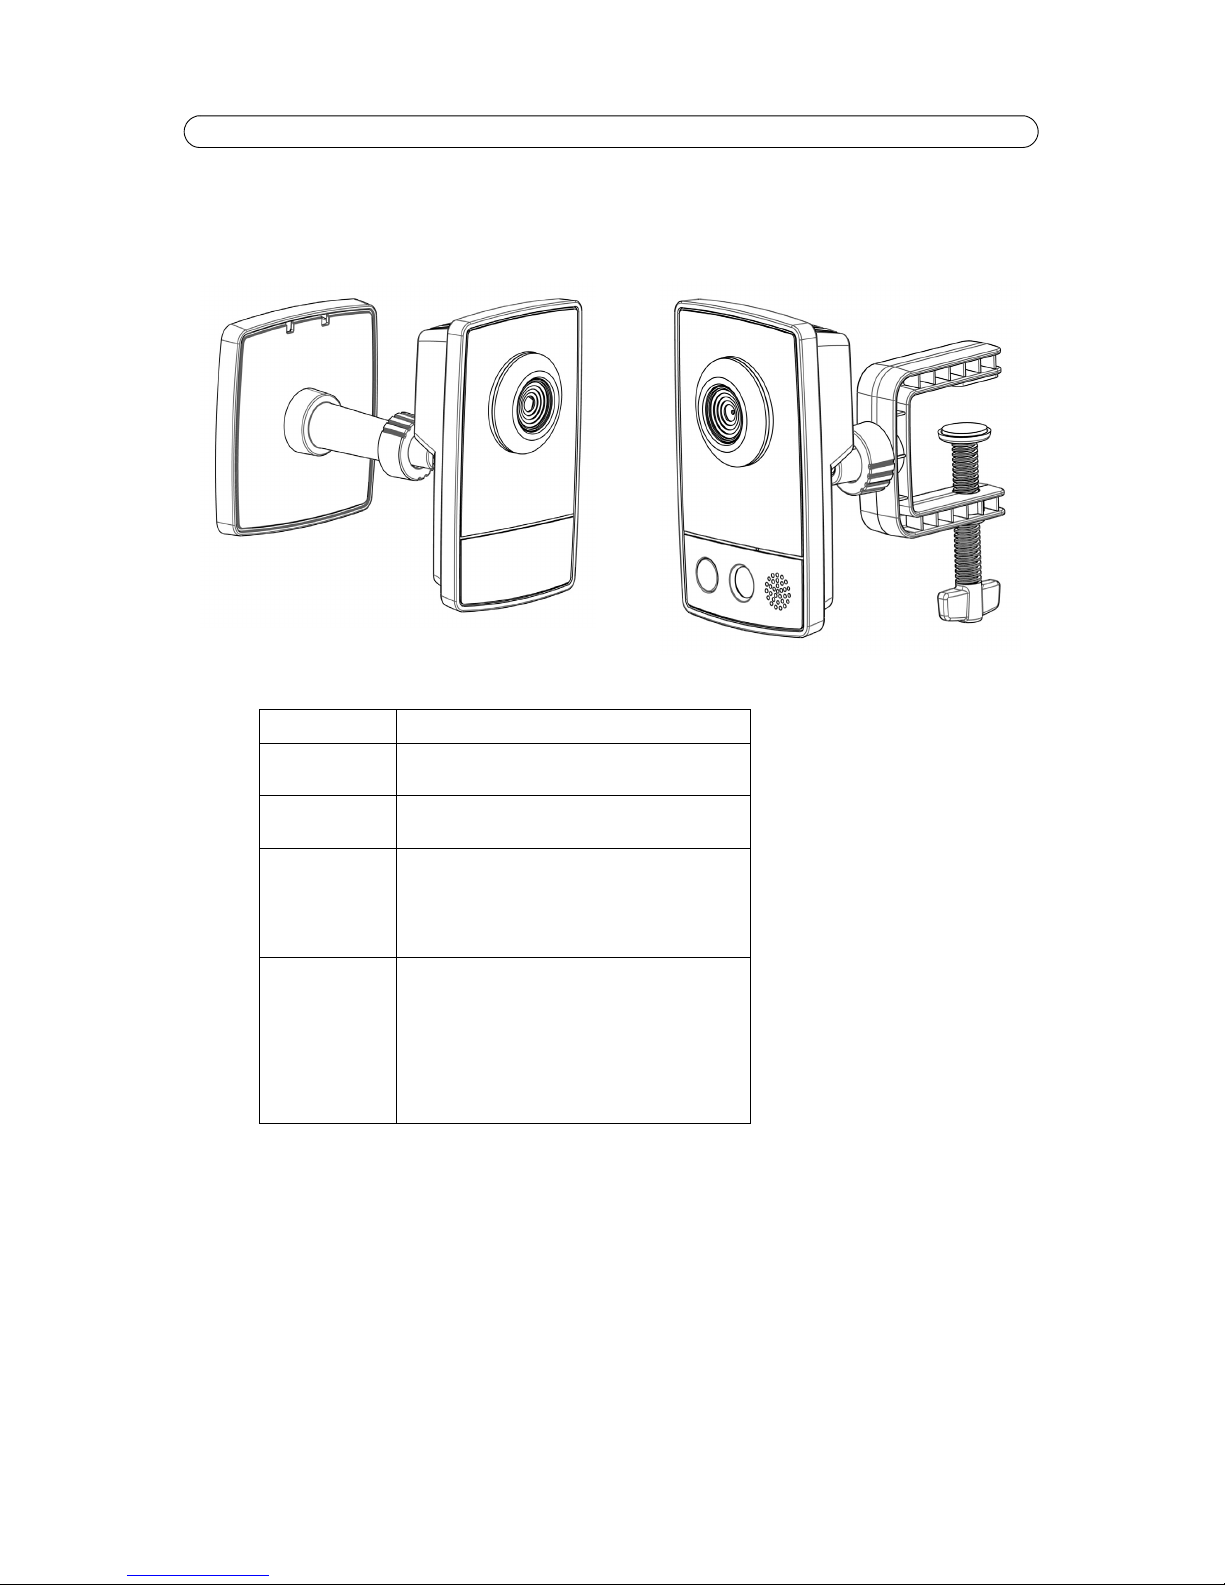
Overview
PIR Sensor - AXIS M1031-W/AXIS M1054 is equipped with a PIR Sensor that has a maximum range of 6 meters for detecting
movement in the dark.
Light - White LED to illuminate the scene.
Microphone/Speaker - Two-way audio support allows for remote users to listen in on an area and communicate with visitors
or intruders.
Power Connector - For connection of the PS-H or PS-V power adapter (included).
Network Connector - The camera connects to the network via a standard network connector. Supporting NWay, the camera
detects the speed of the local network segment (10BaseT/100BaseTX Ethernet).
Serial Number Label - The serial number may be required during installation.
Control Button - Press this button to install the camera using the AXIS Internet Dynamic DNS Service, or to restore the
factory default settings, as described in
Resetting to the Factory Default Settings, on page 42.
Note:
AXIS Internet Dynamic DNS Service is a free service from Axis that allows you to quickly and easily install your camera.
This requires an Internet connection with no HTTP proxy. See www.axiscam.net for more information.
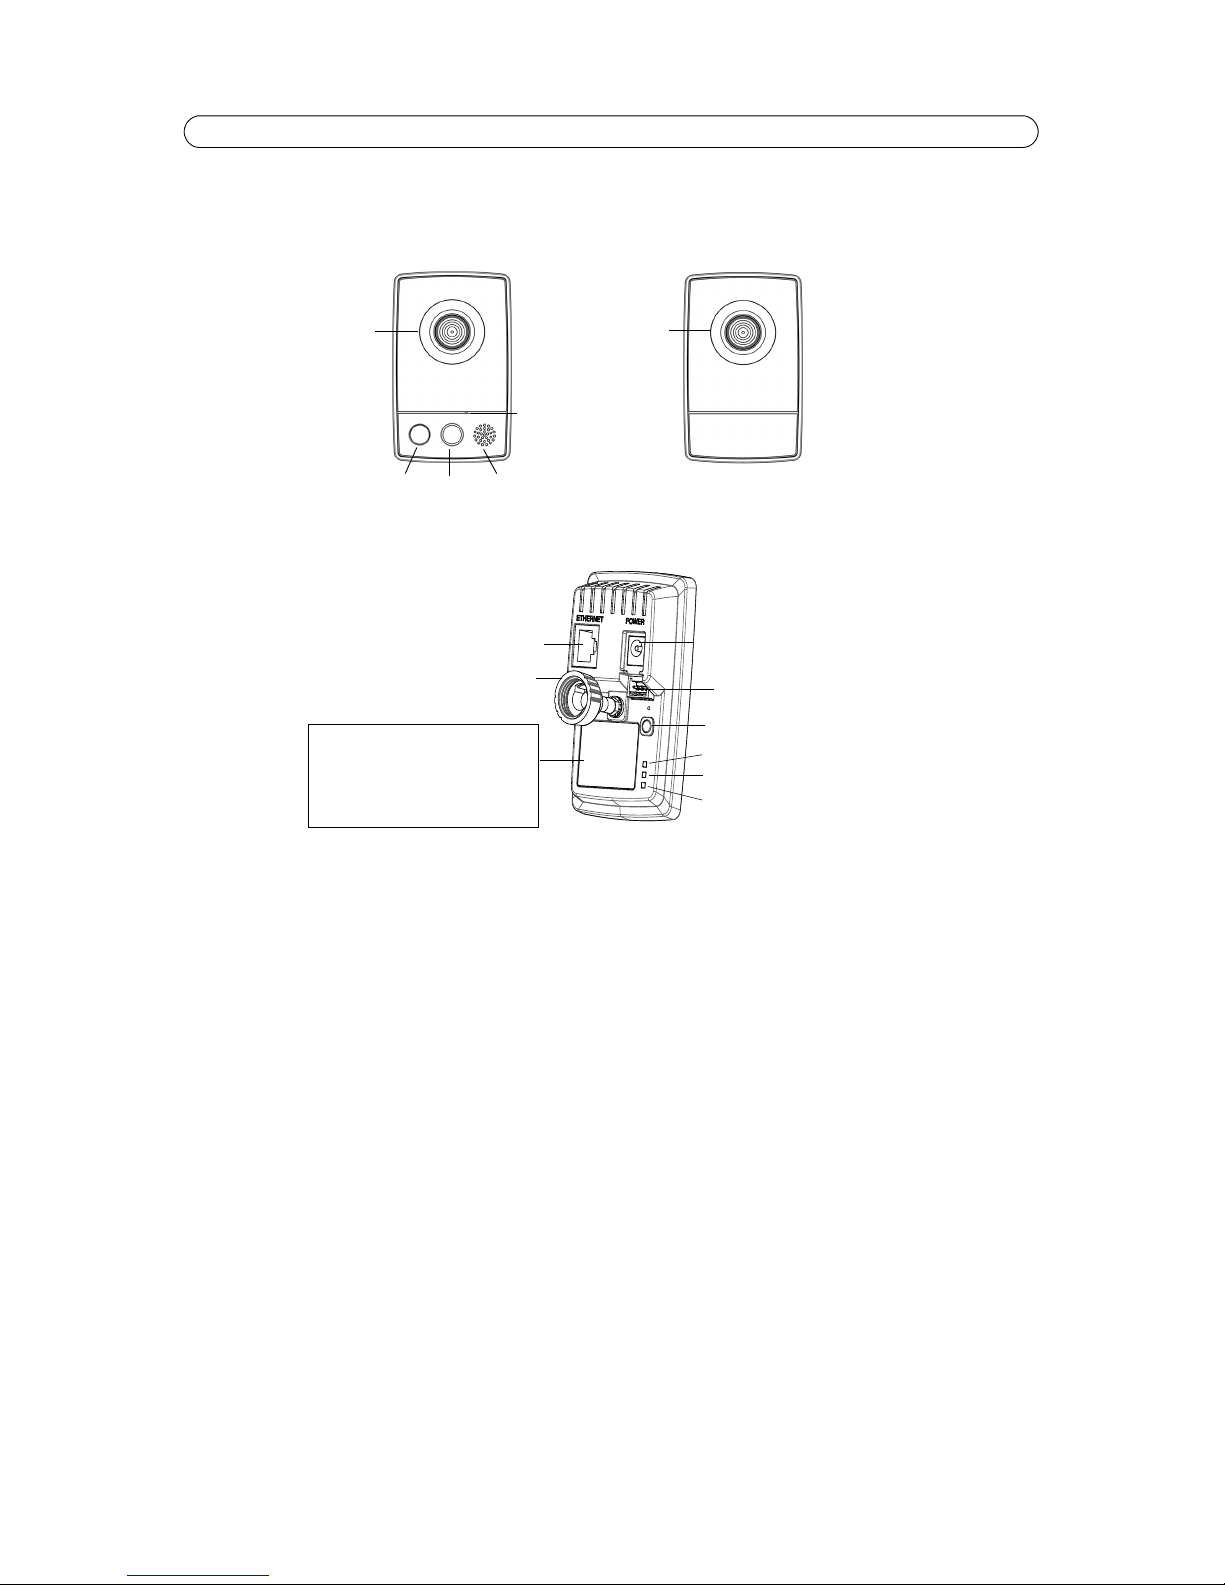
Product number (P/N) &
The serial number may be
required during the installation.
Power connector
Control button
Network connector
Power Indicator LED
Network Indicator LED
Lock ring
Microphone
Light
PIR
Wireless Indicator LED
(activated on wireless models only)
Speaker
AXIS M1031-W/AXIS M1054
AXIS M1011/-W
Rear view (all models)
Lens with
Status Indicator
LED
Front view -
sensor
Serial number (S/N).
Lens
I/O connector
(AXIS M1054 only)
7
AXIS M10 Series - Product Description
Unit connectors
Network connector - RJ-45 Ethernet connector. Shielded cables recommended.
Power connector - Mini DC connector 5.0-5.1V DC, Max 1.5A. Center pin +.
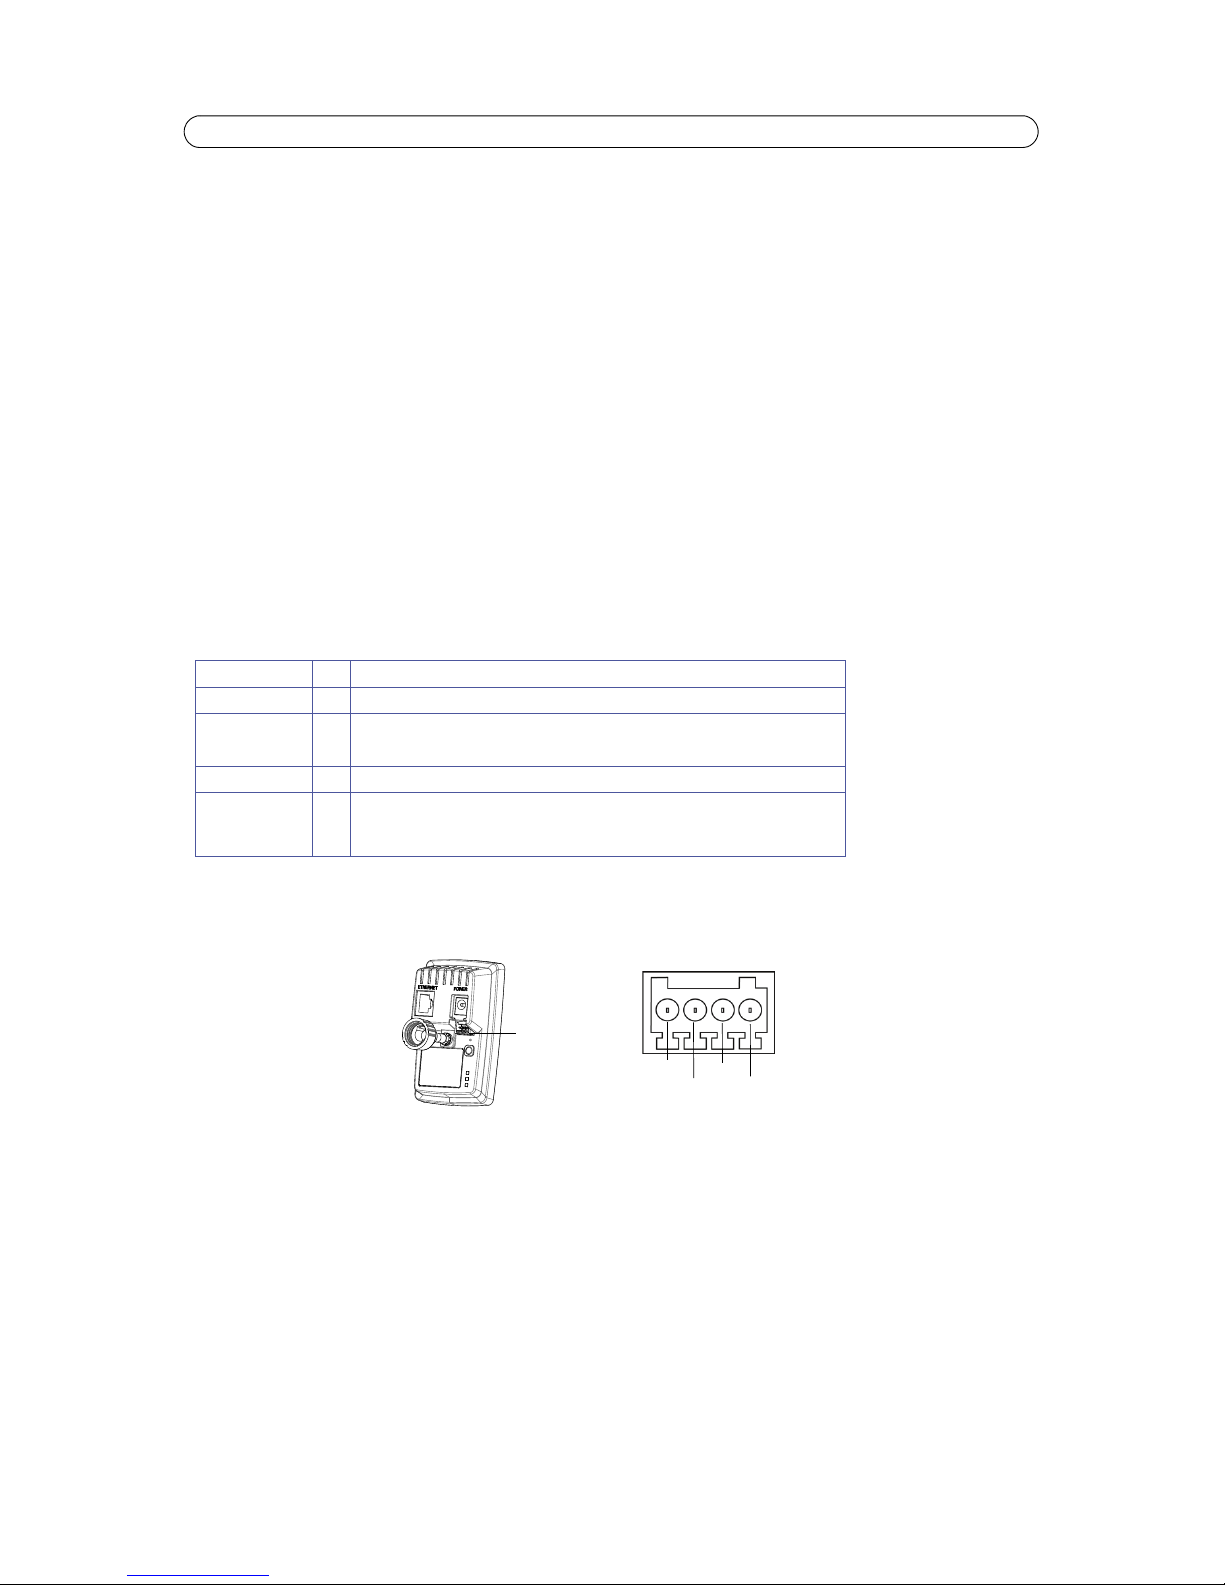
I/O terminal connector (AXIS M1054 only)
The 4-pin I/O terminal connector provides the interface to:
• 1 transistor output
• 1 digital input
• auxiliary power
•GND
The terminal connector is used in applications for motion detection, event triggering, alarm notification via email, and image
storage to FTP locations.
• Input - for connecting a push button, for example. If the push button is pressed, the state changes and the input becomes
active (shown under Events > Port Status).
• Output - connects an alarm device that can be activated by Output buttons on the Live View page, or by an Event Type.
The output shows as active (Events > Port Status) if the alarm device is activated.
Connect input/output devices to the camera as follows:
1. Attach the cables for the device securely to the supplied connector block.
2. Once the cables are connected, connect the connector block to the terminal connector on the camera.
Function Pin Notes
GND 1 Ground
3.3V DC Power 2 Can be used to power auxiliary equipment.
Note: This pin can only be used as power out.
Digital Input 3 Connect to GND to activate, or leave floating (or unconnected) to deactivate.
Transistor Output 4 Uses an open-drain NFET transistor with the source connected to GND. If used
with an external relay, a diode must be connected in parallel with the load, for
protection against voltage transients.
I/O connector
Pin 3
Pin 4
Pin 2
Pin 1

8
AXIS M10 Series - LED indicators
LED indicators
AXIS M1031-W and AXIS M1054 only
AXIS M1031-W and AXIS M1054 are equipped with the following:
PIR sensor - a passive infrared sensor that measures infrared light from passing objects in its field of view. If configured to do
so, the camera can automatically switch on the light when triggered by the PIR sensor. Sensitivity range up to 5m (16ft).
Light - it is possible to configure so that the white illumination LED is triggered by the PIR sensor. It can also be configured via
the web pages under Setup > Live View Config > Light buttons. Note that the light is designed for temporary use and should
not be permanently lit.
Microphone/speaker for full-duplex audio.
LED Color Indication
Network Green Steady for connection to a 100 Mbit/s network. Flashes for network activity.
Amber Steady for connection to 10 Mbit/s network. Flashes for network activity.
Unlit No network connection.
Status Green Steady green for normal operation.
Note: The Status LED can be configured to be unlit during normal operation, or to
flash only when the camera is accessed. To configure, go to Setup > System
Options > LED. See the online help files for more information.
Amber Steady during startup, during reset to factory default or when restoring settings.
Red Slow flash for failed upgrade.
Power Green Normal operation.
Amber Flashes green/amber during firmware upgrade.
Wireless Unlit Wired mode.
Green Steady for connection to a wireless network. Flashes for network activity.
Red Steady for no wireless network connection. Flashes when scanning for wireless net-
works.
9
AXIS M10 Series - Accessing the Camera
Accessing the Camera
To install the AXIS M10 Series network cameras, refer to the installation guide supplied with your product.
The network camera can be used with most standard operating systems and browsers. The recommended browser is Microsoft
Internet Explorer with Windows, Safari with Macintosh and Mozilla Firefox with other operating systems. See Technical
Specifications, on page 49.
Notes:
• To view streaming video in Microsoft Internet Explorer, set your browser to allow ActiveX controls and install AXIS
Media Control (AMC) on your computer.
• QuickTime
TM
is also supported for viewing H.264 and MPEG-4 streams and for audio.
• If your computer restricts the use of additional software components, the camera can be configured to use a Java
applet for viewing Motion JPEG.
• The network camera includes one (1) H.264 decoder license and one (1) MPEG-4 decoder license (AXIS M1054
excepted) for viewing video streams, and (1) AAC audio license (AXIS M1031-W and AXIS M1054 only). They are
automatically installed with AMC. The administrator can disable the installation of the decoders to prevent
installation of unlicensed copies.
Access from a browser
1. Start a browser (Internet Explorer, Firefox).
2. Enter the IP address or host name of the camera in the Location/Address field of your browser.
To access the camera from a Macintosh computer (Mac OSX), click on the Bonjour tab and select one of the AXIS M10
Series from the drop-down list.
3. If this is the first time you are accessing the camera, see Access from the Internet, on page 10. Otherwise enter your
user name and password, set by the administrator.
4. The camera’s Live View page appears in your browser.
Note:
The layout of the Live View page may have been customized to specific requirements. Some of the examples and
functions featured here may differ from those displayed on your own Live View page.
10
AXIS M10 Series - Accessing the Camera
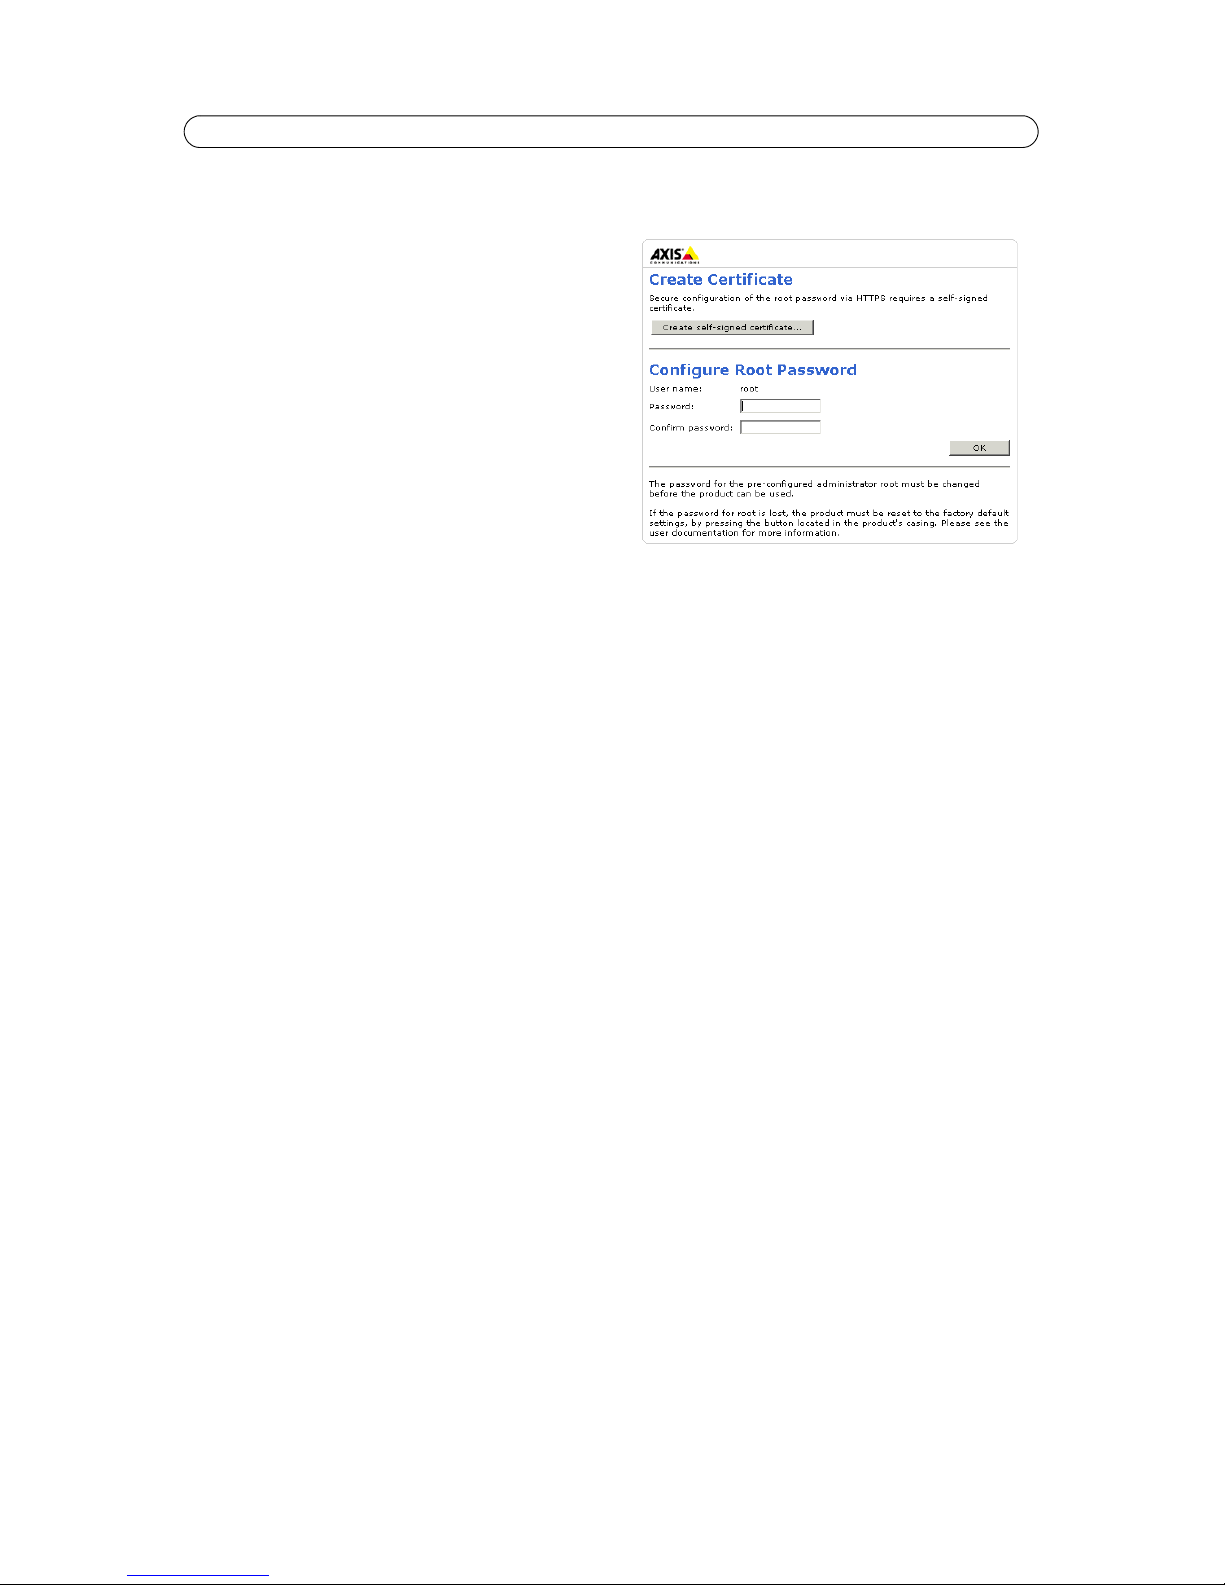
Setting the root password
1. When accessing the camera for the first time, the ‘Configure Root Password’ dialog appears.
2. Enter a password and re-enter to confirm. Click OK.
The
Enter Network Password dialog appears.
3. Enter the User name: root
4. Enter the password set in step 2, and click OK. If the
password is lost, the camera must be reset to the factory
default settings. See page 42.
Notes:
• The default administrator user name ‘root’ is permanent
and cannot be deleted.
• While setting the root password, click Yes to install the
AXIS Media Control (AMC), if you are prompted to. If
required, click the link to install missing decoders. You
will need administrator rights on the computer to do
this.
Access from the Internet
Once connected, the camera is accessible on your local network (LAN). To access the camera from the Internet you must
configure your broadband router to allow incoming data traffic to the camera. To do this, enable the NAT-traversal feature,
which will attempt to automatically configure the router to allow access to the camera. This is enabled from Setup > System
Options > Network > TCP/IP Advanced.
For more information, please see “NAT traversal (port mapping) for IPv4” (page -36). See also the AXIS Internet Dynamic DNS
Service at www.axiscam.net For Technical notes on this and other topics, visit the Axis Support web at www.axis.com/techsup
11
AXIS M10 Series - Accessing the Camera
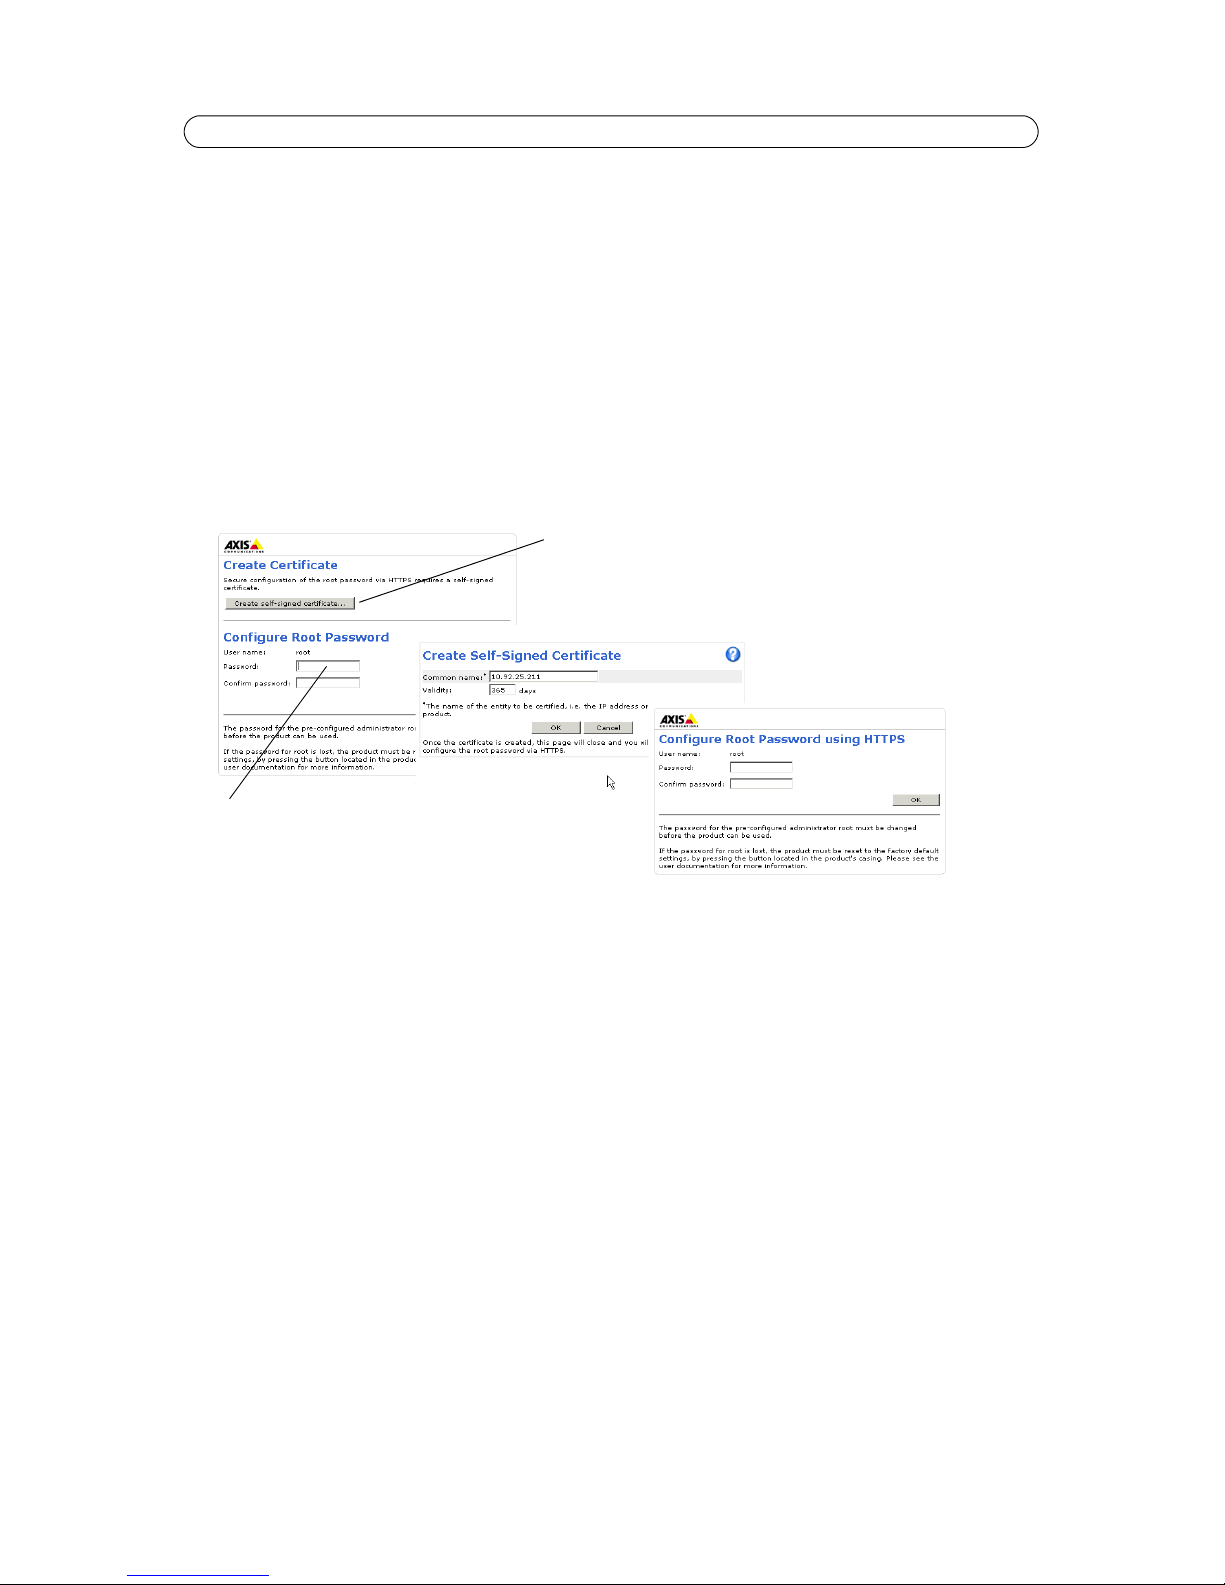
Setting the root password over a secure connection
To gain access to the product, you must set the password for the default administrator user - ‘root’. This is done in the
‘Configure Root Password’ dialog, which appears when the network camera is accessed for the first time.
To prevent network eavesdropping, the root password can be set via an encrypted HTTPS connection, which requires an HTTPS
certificate (see notes below).
To set the password via a standard HTTP connection, enter it directly in the first dialog shown below.
To set the password via an encrypted HTTPS connection, follow these steps:
1. Click the Create self-signed certificate button.
2. Provide the requested information and click OK. The certificate is created and the password can now be set securely.
All traffic to and from the network camera is encrypted from this point on.
3. Enter a password and then re-enter it to confirm the spelling. Click OK. The password has now been configured.
Notes:
• HTTPS (Hypertext Transfer Protocol over SSL) is a protocol used to encrypt the traffic between web browsers and
servers. The HTTPS certificate controls the encrypted exchange of information.
• The default administrator user root cannot be deleted.
• If the password for root is lost or forgotten, the network camera must be reset to the factory default settings. See
page 42.
• A warning may pop up in the browser due to the fact that the certificate is self-signed and not signed by a Trusted
Certificate Authority (CA).
To configure the password directly
via an unencrypted connection, enter
the password here.
To create an HTTPS connection,
click this button.
12
AXIS M10 Series - Accessing the Camera
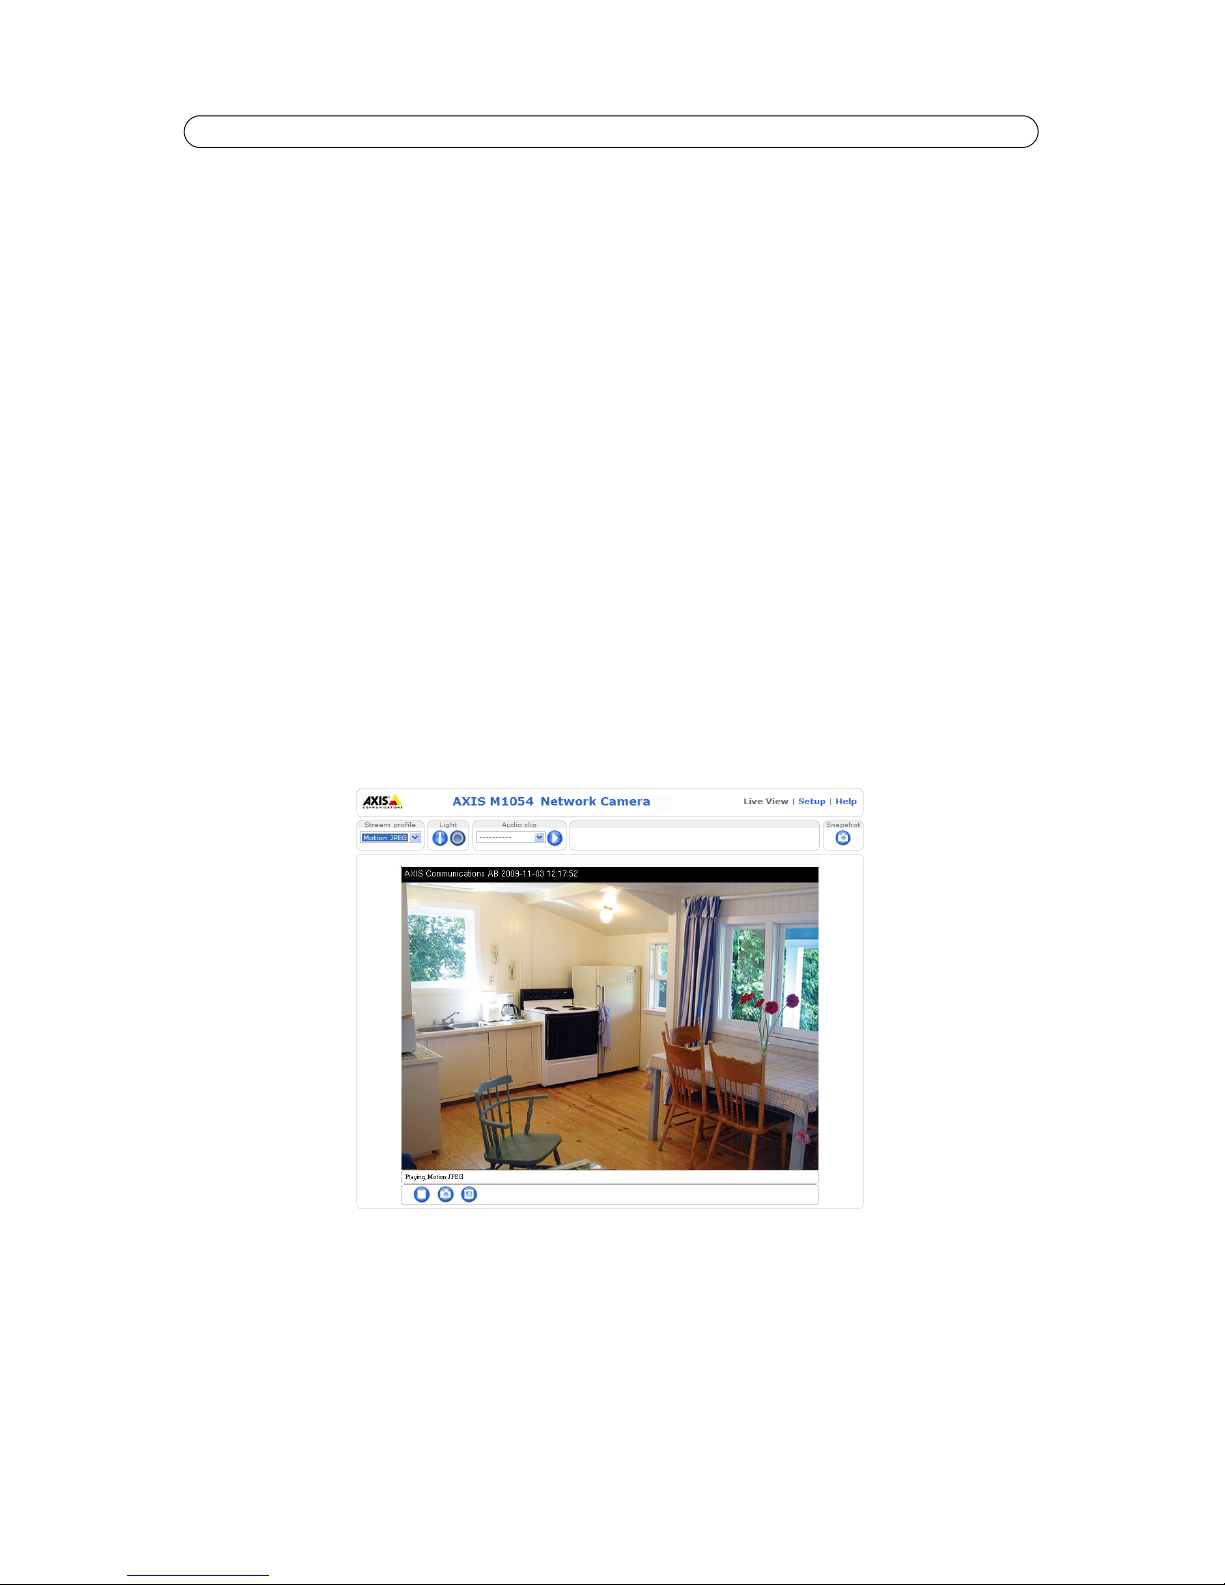
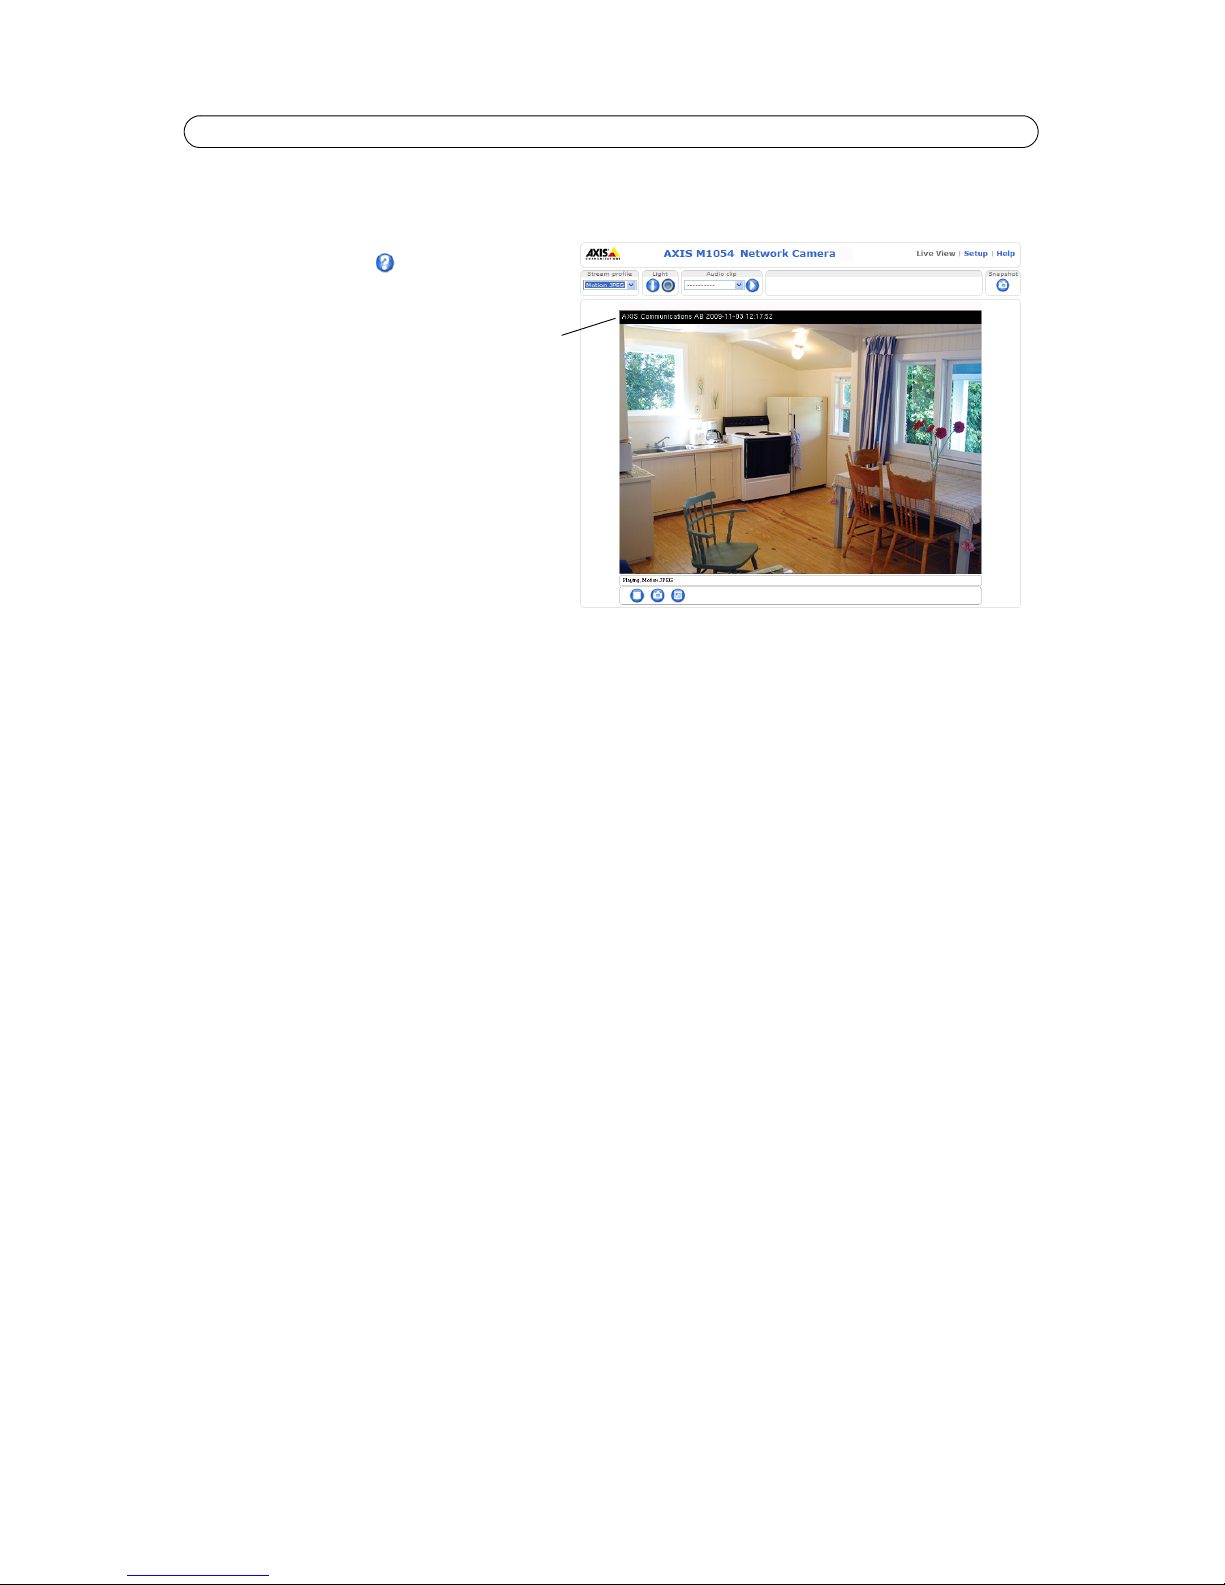
The Live View page
How you customize the Live View page determines which buttons are visible. Not all the buttons described below will show
up unless configured to do so.
General controls
AXIS Media Control (AMC) toolbar
AMC general controls
The AMC viewer toolbar (AXIS Media Control) is available in Microsoft Internet Explorer only. See AXIS Media Control (AMC),
on page 15 for more information. AMC displays the following buttons:
AMC audio controls (AXIS M1031-W/AXIS M1054)
AMC audio controls monitor the client computer’s speaker output. These controls are only available when audio is enabled.
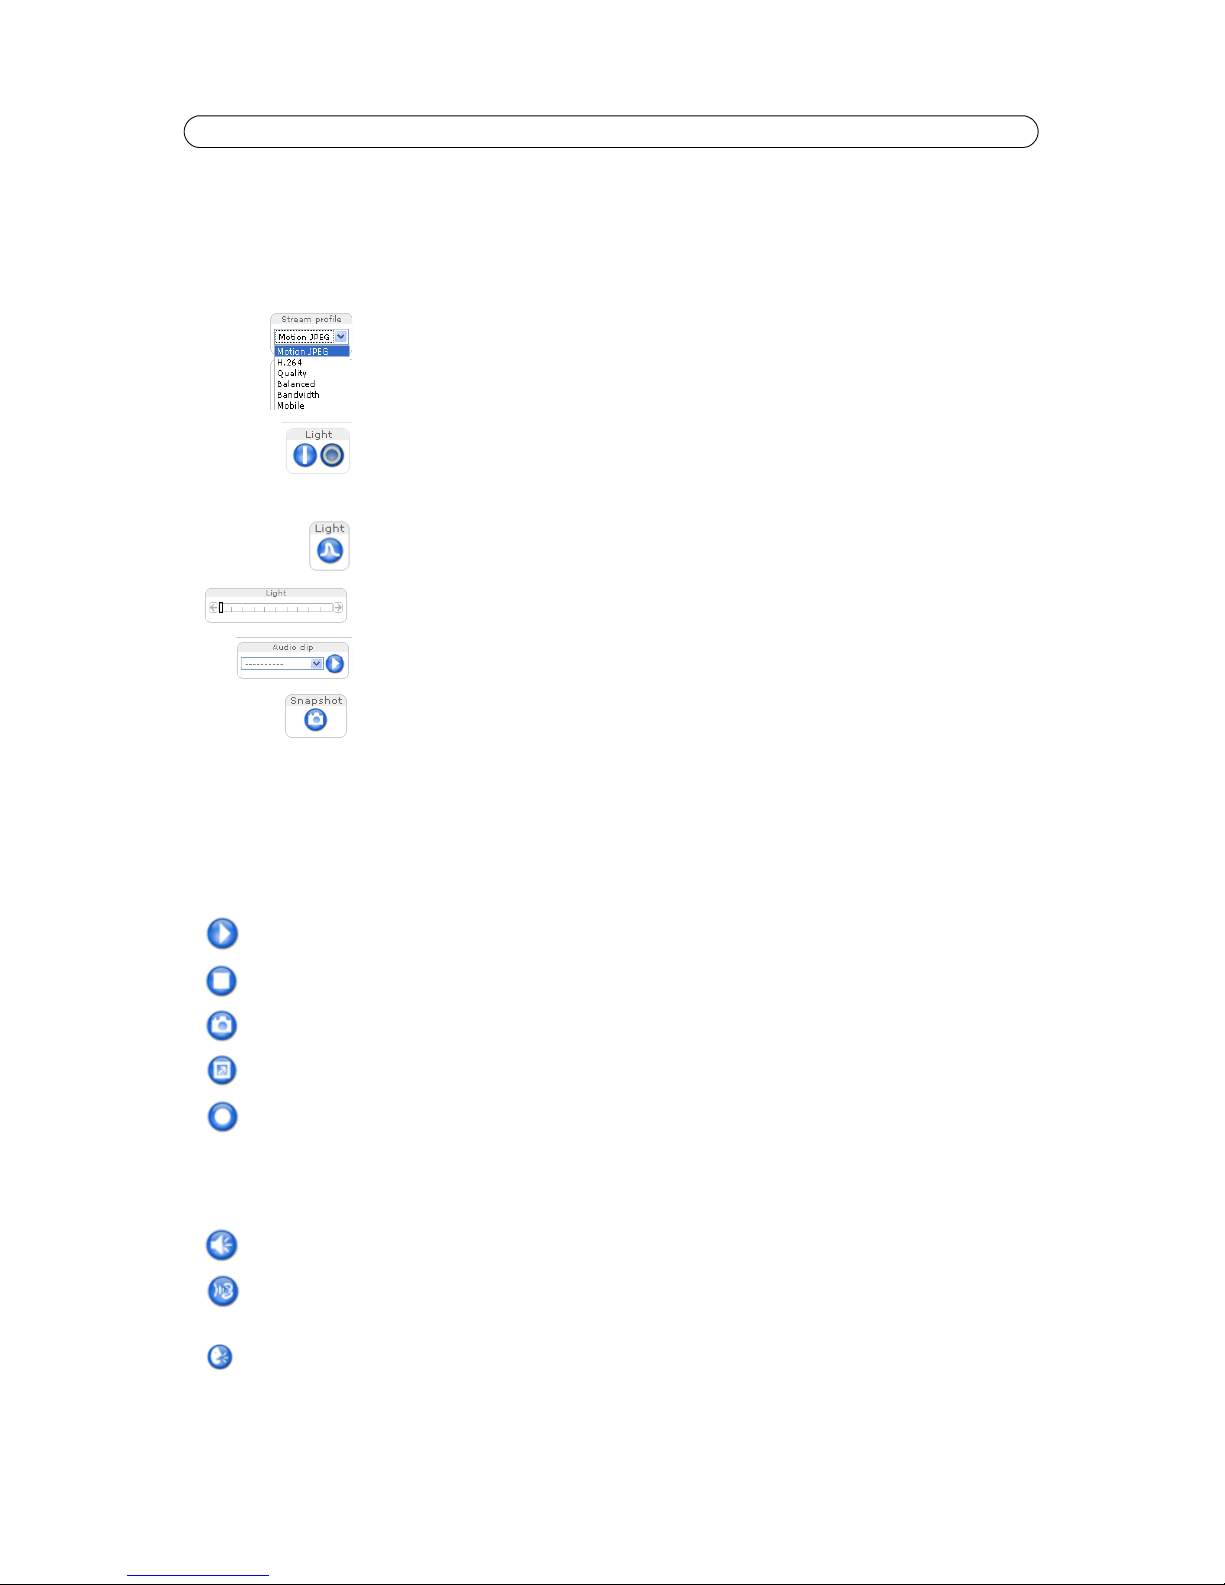
The Stream Profile drop-down list allows you to select a customized or pre-programmed stream
profile on the Live View page. Stream profiles are configured under Video & Audio > Stream Pro-
files, see Stream Profiles, on page 18 for more information.
Light (Active/Inactive) - The built-in light can be controlled directly from the Live View page. The
three options are Pulse, Active/Inactive and a Slider. Select Active/Inactive to display a button for
each action: Activate and Inactivate. The light button is configured under Live View Config > Lay-
out. For more information see Layout, on page 22.
Light (Pulse) - Select Pulse to display one button that activates the port with the defined Activate
and Inactivate actions for the defined period.
Light (Slider) - Use this slider to adjust the brightness of the camera’s white LED.
Audio clip - Audio clips can be played when an event occurs or manually from the Live View page.
The Snapshot button saves a snapshot of the video image on display. Right-click on the video image
to save it in JPEG format on your computer. This button is primarily intended for use when the AMC
viewer toolbar is not available.
The Play button connects to the Axis product and starts playing a media stream.
The Stop button stops the video stream being played.
The Snapshot button takes a snapshot of the current image. The location where the image is saved can be specified
using the AXIS Media Control (AMC).
Click the View Full Screen button and the video image will fill the entire screen. Press Esc (Escape) on the computer
keyboard to cancel full screen view.
The Record button is used to record the current video stream. The location where the recording is saved can be specified using the AXIS Media Control (AMC) toolbar.
Click the Speaker Button to switch the sound off and on to your computer's speaker.
If you have set your network camera to half-duplex mode and the half-duplex Listen button appears first in the Live
View page of your Axis network camera, you are only able to receive audio from an external camera microphone. To
be able to send audio, click this button. See note below.
If you have set your network camera to half-duplex mode and the half-duplex Talk button appears in the Live View
page of your Axis network camera if you push to talk, and you are only able to send audio to your Axis network camera. To be able to receive audio, click this button.

13
AXIS M10 Series - Accessing the Camera
Note:
In Simplex – speaker only or microphone only mode, you can use either the Microphone button or the half-duplex
Talk button to stop sending audio to the network camera. To send audio, both buttons must be enabled.
Click the Microphone button to switch the sound off and on to your computer's microphone.
In Simplex - Network Camera speaker only mode, you can click this button to stop sending audio to the network
camera. See note below.
Use this slider to control the volume of the speakers and the microphone.

14
AXIS M10 Series - Video Streams
Video Streams
The network camera provides several image and video stream formats. Your requirements and the properties of your network
will determine the type you use.
The Live View page in the network camera provides access to H.264, Motion JPEG, and MPEG-4 video streams, and to the list
of available stream profiles. Other applications and clients can also access these video streams/images directly, without going
via the Live View page.
Note:
AXIS M1054 does not support MPEG-4.
How to stream MPEG-4/H.264
This video compression standard makes good use of bandwidth, and can provide high quality video streams at less than 1
Mbit/s.
Your viewing requirements and the properties of your network will determine which combination of protocols and methods to
use. The available options in AMC are:
AMC negotiates with the camera to determine the transport protocol to use in the order listed above. This order can be
changed and the options disabled, to suit specific requirements.
Important!
H.264, MPEG-4, and AAC are licensed technologies. The network camera includes one H.264 viewing client license;
and one MPEG-4 (AXIS M1054 excepted) viewing client license, and one audio client license (AXIS M1031-W and
AXIS M1054 only). Installing additional unlicensed copies of the clients is prohibited. To purchase additional licenses,
contact your Axis reseller.
Unicast RTP This unicast method (RTP over UDP) should
be your first consideration for live unicast
video, especially when it is important to
always have an up-to-date video stream,
even if some images are dropped.
Unicasting is used for video-on-demand broadcasting,
so that there is no video traffic on the network until a
client connects and requests the stream.
Note that there is a maximum of 20 simultaneous unicast connections.
RTP over RTSP This unicast method (RTP tunneled over
RTSP) is useful as it is relatively simple to
configure firewalls to allow RTSP traffic.
RTP over RTSP over
HTTP
This unicast method can be used to traverse
firewalls. Firewalls are commonly configured
to allow the HTTP protocol, thus allowing
RTP to be tunneled.
Multicast RTP This method (RTP over UDP) should be used for live multicast video. The video stream is always
up-to-date, even if some images are dropped.
Multicasting provides the most efficient usage of bandwidth when there are large numbers of clients viewing simultaneously. A multicast broadcast cannot however, pass a network router unless
the router is configured to allow this. It is not possible to multicast over the Internet, for example.
Note also that all multicast viewers count as one unicast viewer in the maximum total of 20
simultaneous connections.
15
AXIS M10 Series - Video Streams
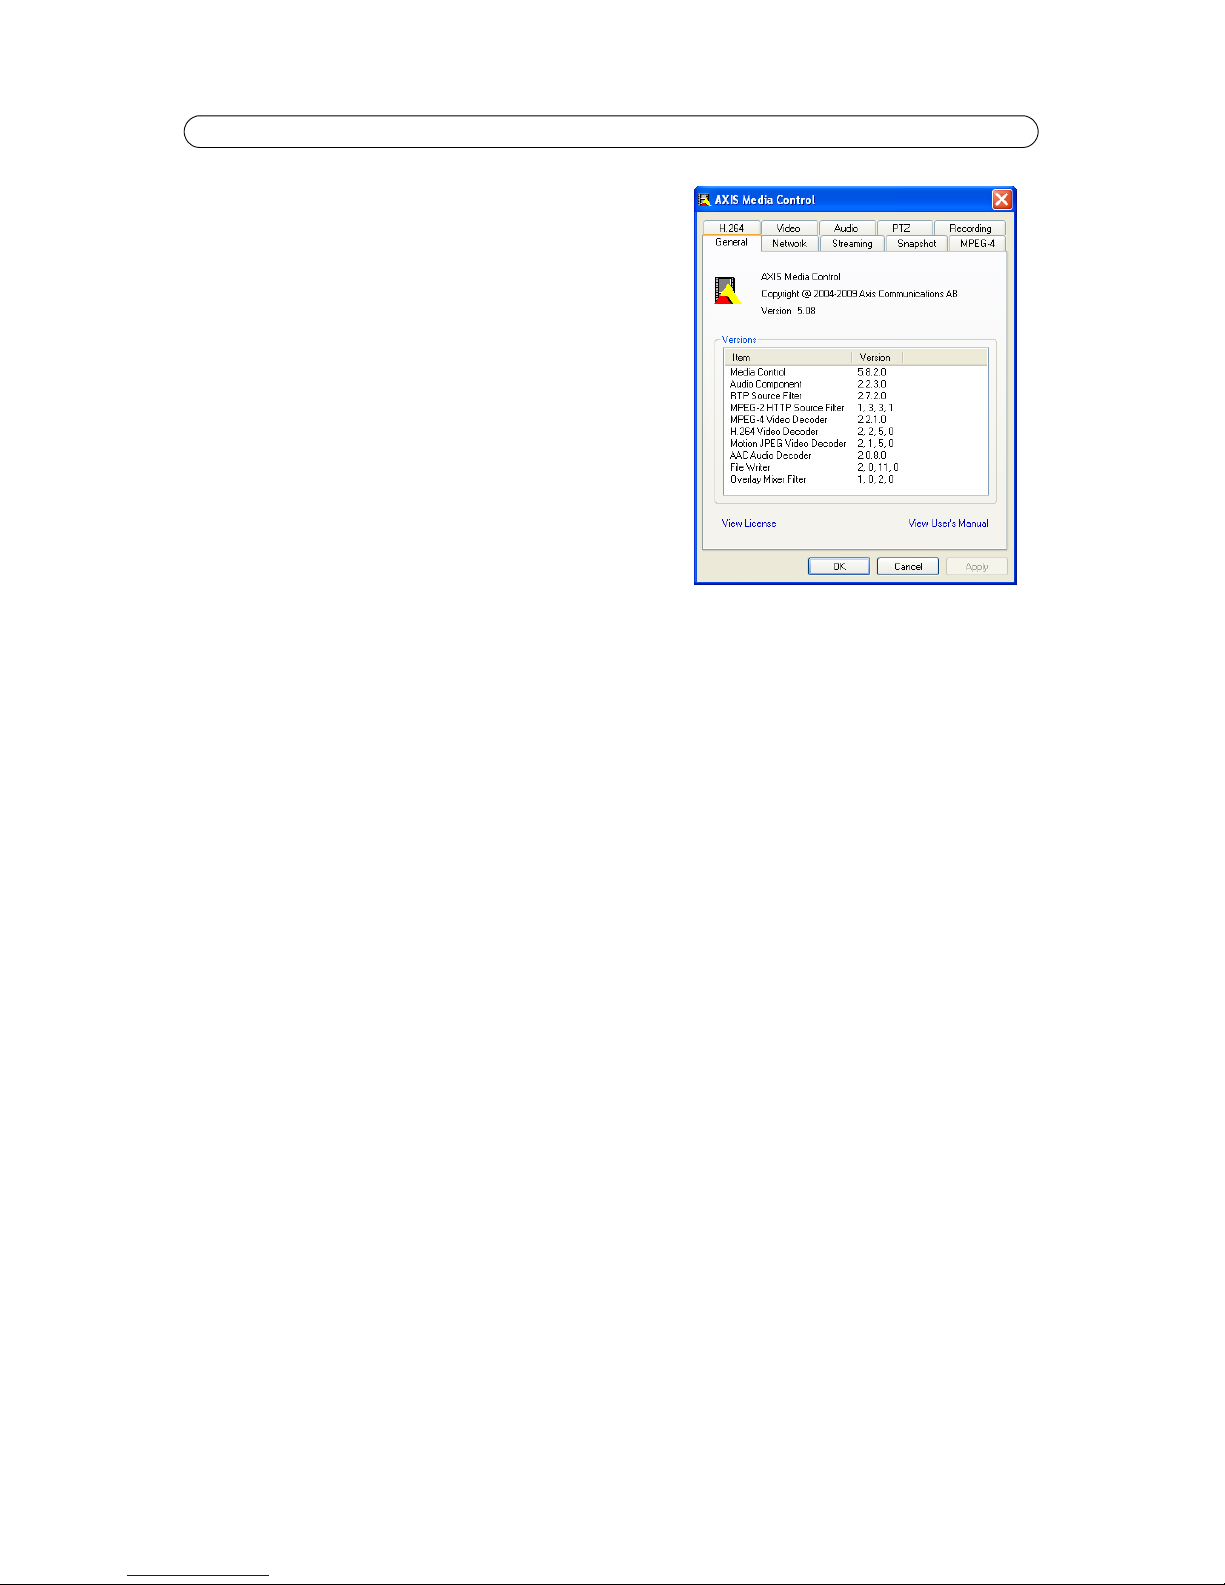
AXIS Media Control (AMC)
AXIS Media Control (AMC) in Microsoft Internet Explorer in Windows is
the recommended method of accessing live video from the network
camera.
The AMC control panel can be used to configure various video and audio
settings. Please see the readme file included in the tool for more
information.
The AMC control panel is automatically installed on first use, after which
it can be configured. Open the AMC Control Panel from:
• Windows Control Panel (from the Start menu)
• Alternatively, right-click the video image in Internet Explorer and
click Settings to access the AMC window.
Note:
AXIS M1011 and AXIS M1011-W do not support audio.
AXIS M1054 does not support MPEG-4.
Motion JPEG
This format uses standard JPEG still images for the video stream. These images are then displayed and updated at a rate
sufficient to create a stream that shows constantly updated motion.
The Motion JPEG stream uses considerable amounts of bandwidth, but provides excellent image quality and access to every
image contained in the stream. The recommended method of accessing Motion JPEG live video from the network camera is to
use the AXIS Media Control (AMC) in Microsoft Internet Explorer in Windows.
Alternative methods of accessing the video stream
You can also access video/images from the network camera in the following ways:
• Motion JPEG server push (if supported by the client, Firefox, for example). This option maintains an open HTTP con-
nection to the browser and sends data as and when required, for as long as required.
• Still JPEG images in a browser. Enter the path - http://<ip>/axis-cgi/jpg/image.cgi
• Windows Media Player. This requires AMC and the MPEG-4/H.264 viewing client to be installed. The paths that can be
used are listed below in the order of preference:
• Unicast via RTP: axrtpu://<ip>/axis-media/media.amp
• Unicast via RTSP: axrtsp://<ip>/axis-media/media.amp
• Unicast via RTSP, tunneled via HTTP: axrtsphttp://<ip>/axis-media/media.amp
• Multicast: axrtpm://<ip>/axis-media/media.amp
• To access the video stream from QuickTime™ the following paths can be used:
• rtsp://<ip>/axis-media/media.amp
• rtsp://<ip>/axis-media/media.3gp
Notes:
• The network camera supports QuickTime 6.5.1 and later.
• QuickTime adds latency to the video and audio stream (up to 3 seconds).
• It may be possible to use other players to view the MPEG-4/H.264 stream using the paths above, although Axis does
not guarantee this.
• <ip> = IP address

16
AXIS M10 Series - Video & Audio Settings
Video & Audio Settings
This section describes how to configure the camera, and is intended for product Administrators, who have unrestricted access
to all settings; and Operators, who have access to the settings for Basic Setup, Video & Audio and Events.
You can configure the camera by clicking Setup in the top right-hand corner of the Live View page. Click on this page to
access the online help that explains the configuration menus.
Video Stream
The video stream settings appear under four
different tabs:
•Image
• Audio (AXIS M1031-W and AXIS
M1054)
• MPEG-4 & H.264
•MJPEG
Note:
AXIS M1054 does not support MPEG-4.
Image
Image Appearance
Use these settings to modify the image resolution and compression. Setting the compression level affects the image quality
and the amount of bandwidth required; the lower the compression, the higher the image quality with higher bandwidth
requirements.
Mirroring (AXIS M1054 and AXIS M1031-W only) - Mirroring is the horizontal flipping of an image, that gives you
another image perspective. This is a useful function when you need a direct view of the image, for example, in ATMs and door
phones. Define mirroring settings before defining parameters for privacy masks and motion detection.
Rotate image - The image can be rotated by selecting one of the available values.
See the online help for more information.
Video Stream
To avoid bandwidth problems on the network, the frame rate allowed to each viewer can be limited. Select the Unlimited
radio button option to allow the highest available frame rate; or select the Limited to radio button option and enter a value
(1-30) fps in the field.
17
AXIS M10 Series - Video & Audio Settings
Overlay Settings
Use these settings to include text, date,
and time as overlay. Click for
information on available options.
Preview
For a preview of the image before saving
the adjusted settings, select the Video
Format and click Open.... When satisfied
with the settings, click Save.
Audio (AXIS M1031-W and AXIS
M1054)
Check the Enable Audio option to enable
audio.
Configuration settings from Video &
Audio > Audio Settings are displayed
under Current Audio Settings. See
Audio Settings (AXIS M1031-W and AXIS M1054), on page 20 for more information on the
audio settings.
H.264 & MPEG-4
GOV Settings
The GOV structure describes the composition of the video stream. Setting the GOV-length to a higher value saves considerably
on bandwidth but may have an adverse effect on image quality.
Bit Rate Control
The bit rate can be set as Variable Bit Rate (VBR) or Constant Bit Rate (CBR).
VBR adjusts the bit rate according to the image complexity, using more bandwidth for increased activity in the image, and less
for lower activity.
CBR allows you to set a fixed Target bit rate that consumes a predictable amount of bandwidth. As the bit rate would usually
need to increase for increased image activity, but in this case cannot, the frame rate and image quality are affected
negatively. To partly compensate for this, it is possible to prioritize either the frame rate or the image quality whenever the bit
rate needs to be increased. Not setting a priority means the frame rate and image quality are equally affected.
Notes:
• AXIS M1054 does not support MPEG-4.
• To determine a reasonable bit rate, go to Setup > Video & Audio > Video Stream > Image, check the Include
checkbox and enter the code #b in the Include text: field. The current bit rate will display as a text overlay on the Live
View page.
• To view the image stream while configuring the GOV settings and Bit rate control, select Open... under Preview..
Preview
To view the image while configuring the settings and check how many pixels are used in an area of the image, choose a Video
format and click Open.
Text, date &
time overlay

18
AXIS M10 Series - Video & Audio Settings
Pixel Counter - The pixel counter is useful in situations where there is a requirement that the image is a certain size, for
example face recognition.
To set the size of the rectangle enter the number of pixels in the Width and Height fields and click Apply. Check Show pixel
counter to enable the box in the image.
MJPEG
Sometimes the image size is large due to low light or complex scenery. Adjusting the maximum frame size helps to control the
bandwidth and storage used by the Motion JPEG video stream in these situations. Defining the frame size as Default provides
consistently good image quality at the expense of increased bandwidth and storage usage during low light. Limiting the frame
size optimizes bandwidth and storage usage, but may give poor image quality. To prevent increased bandwidth and storage
usage, the maximum frame size can be limited.
Stream Profiles
There are four pre-programmed stream profiles available for quick set-up. These settings can be adjusted and new customized
profiles can be created. Each profile has a descriptive name, describing its usage and/or purpose. The profiles can be accessed
from the Live View page.
The Stream Profile List shows all the stream profiles currently configured along with a description and the type of video
encoding.
• To add a new stream profile, click Add to bring up the Stream Profile Settings dialog.
• Choose a descriptive name and enter a description for your profile.
• Choose the form of Video encoding you wish to use from the drop-down list:
H.264 - Also known as MPEG-4 Part 10. This is the new generation compression standard for digital video. This function offers higher video resolution than Motion JPEG or MPEG-4 at the same bit rate and bandwidth, or the same
quality video at a lower bit rate.
MPEG-4 part 2 - A video compression standard for digital video.
Motion JPEG - Delivers a high quality video stream, from which individual images can be extracted and saved.
• Copy an existing stream profile to your system and rename the copy.
• Modify an existing stream profile based on the light situation and motion to be captured by your camera. See Stream
Profile Settings for more information.
• Highlight the stream profile you wish to remove, then click Remove to remove it from the list.
Note:
AXIS M1054 does not support MPEG-4.
Camera Settings
This page provides access to the advanced image settings for the AXIS M10 Series.
Image Appearance
Color level - Select an appropriate level by entering a value in the range 0-100. Lower values mean less color saturation,
whilst the value 100 gives maximum color saturation.
Brightness - The image brightness can be adjusted in the range 0-100, where a higher value produces a brighter image.
Sharpness - Controls the amount of sharpening applied to the image. A sharper image might increase image noise especially
in low light conditions. A lower setting reduces image noise, but the image would be less sharp.
Contrast - Adjust the image's contrast by raising or lowering the value in this field.

19
AXIS M10 Series - Video & Audio Settings
White balance
This is used to compensate for the different colors present in different light sources, to make the colors in the image appear
the same. The AXIS M10 Series can be set to automatically identify the light source and compensate for its color.
Alternatively, the type of light source can be manually selected from the drop-down list. Please see the online help files
for a description of each available setting.
Exposure Settings
Configure the exposure settings to suit the image quality requirements in relation to lighting, frame rate and bandwidth
considerations.
Exposure value - Adjust the slider in the bar to fine-tune the exposure.
Exposure control - This setting is used to remove 50/60 Hz flicker.
Enable Backlight compensation - When there is a bright spot of light in the image use this option to exclude that spot from
the exposure calculation.
Exposure zones - This setting determines which part of the image is used to calculate the exposure. The Auto setting can be
used in most situations, but for particular requirements, select Defined and click the Edit button to open the Exposure
Windows dialog to custom define the exposure zone.
Exposure priority - This defines the balance between image quality and the frame rate. When Motion is prioritized, motion
blur is minimized, but the image quality may be reduced with a higher frame rate. A prioritized Low noise will provide better
image quality with a lower frame rate.
Click for more information.
View Image Settings
Click Save to save the changes and click View to view the video stream with the current configuration.
Overlay Image
An overlay image is a static image superimposed over the video image. An overlay can be used to provide extra information, or
to mask a part of the video image.
To use an overlay image in the AXIS M10 Series Network Camera, it must be selected from the drop-down list of available
images. The overlay (a logo, for example) is then displayed in the video image.
To use your own image, first upload it to the network camera. To upload enter the name of the file in the field provided, or
click the Browse button, locate and click the Upload button.
Privacy mask
Privacy masks are up to three configurable areas of solid color that allow concealment of parts of the image that are not to be
viewable. Privacy masks cannot be bypassed via the VAPIX® Application Programming Interface (API).
The Privacy Mask List shows all the masks that are currently configured in the AXIS M10 Series and indicates if they are
enabled.
To define a new mask:
1. Click Add. A rectangle appears on the image.
1. Place the rectangle over the desired area to conceal.
2. To resize, click and pull the bottom right-hand corner.
3. Choose a color, black, white, gray or red for the box from the Privacy mask color drop-down list.
 Loading...