


213
Table of contents
 Loading...
ENGLISH
DEUTSCH
AXIS 213 PTZ Network Camera
FRANCAIS ESPAÑOL
Installation Guide
ITALIANO


AXIS 213 - Installation Guide
AXIS 213 Installation Guide
Please observe the following before installing the AXIS 213 PTZ Network Camera.
•This product is designed for indoor use or in locations where it is protected from rain and moisture. To
operate the camera in these conditions, use the outdoor housing accessories.
•Do not use strong or abrasive detergents when cleaning the casing. Use a mild detergent and wipe
gently.
•Never position the camera directly towards the sun or other bright objects. Whether the camera is in use
or not, never aim it at the sun or other extremely bright objects.
Connecting the Hardware
If the AXIS 213 is to be mounted in a position where it is difficult to access, it is
recommended that you set the IP address and get the camera up and running before
completing the hardware installation, i.e. skip step 1 below until the installation is
completely verified.
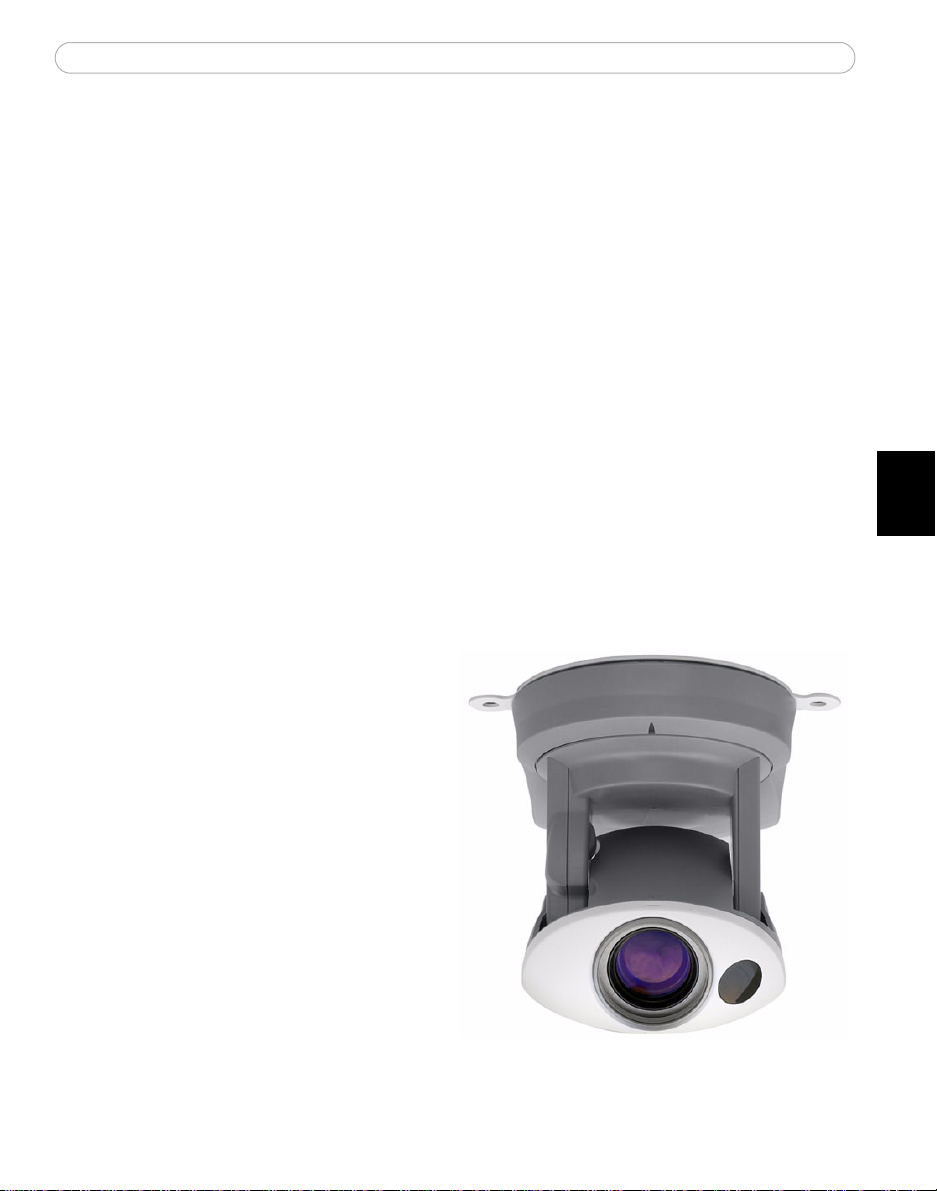
The AXIS 213 PTZ Network Camera is supplied with a bracket for ceiling mounting.
1. Drill two holes in the ceiling and
secure the bracket with the
appropriate screws according to
the ceiling material.
3
ENGLISH
2. Connect a standard network cable
to your AXIS 213 and connect it to
the network.
3. Optionally connect the Connection
Module (not supplied) to the
camera.
4. Connect the power cable.
5. The hardware installation is now
complete, proceed to Setting the IP
address, on page 4.
Note:
If the AXIS 213 is to be placed upright on a desktop, remove the four screws on the underside of the
unit to remove the bracket. Place the adhesive plastic feet by the screw holes.
AXIS 213 - Installation Guide
4
Setting the IP address
The AXIS 213 is designed for use on an Ethernet network and must be assigned an IP
address to make it accessible.
AXIS IP Utility
AXIS IP Utility is the recommended method for setting an IP address in Windows. This free application can be used on networks with or without a DHCP server. See page 5 for more information.
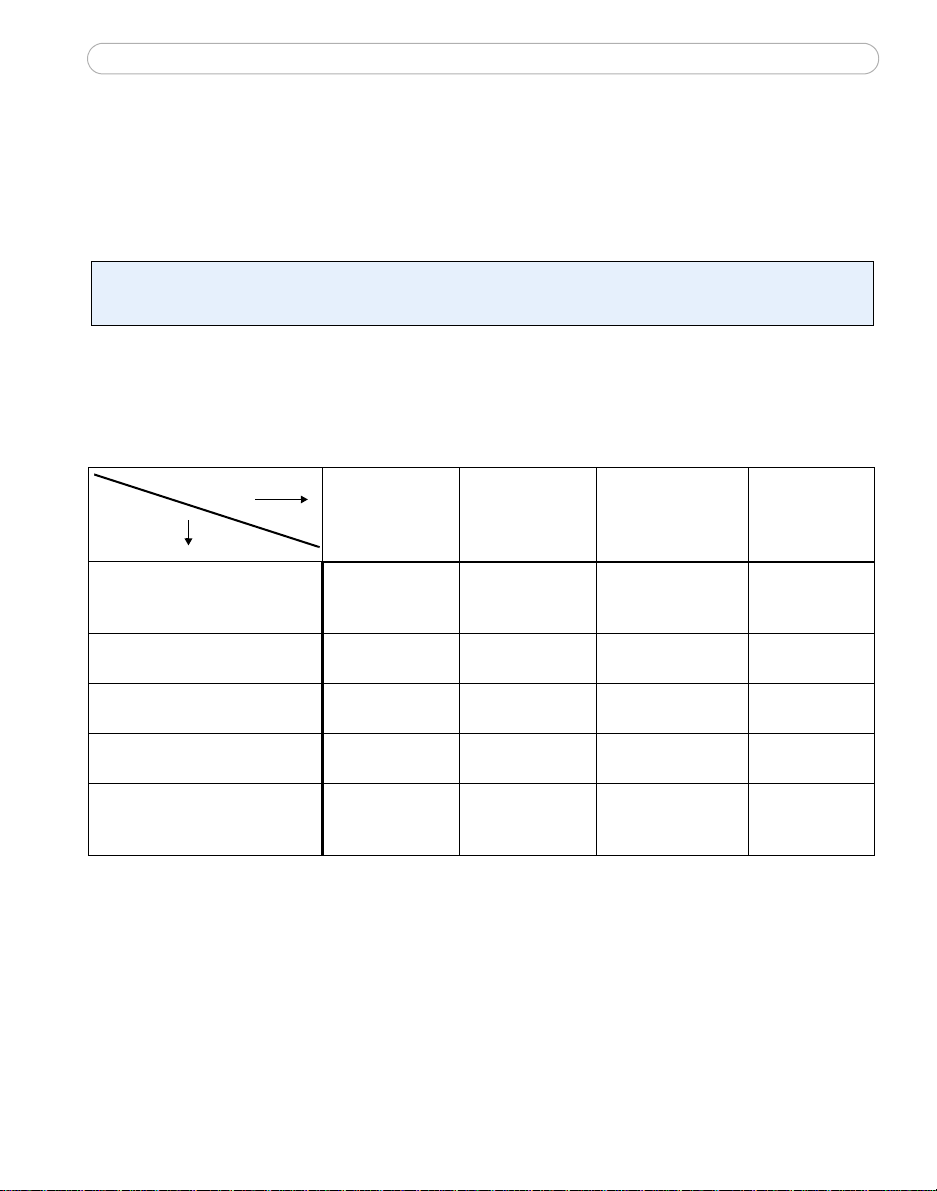
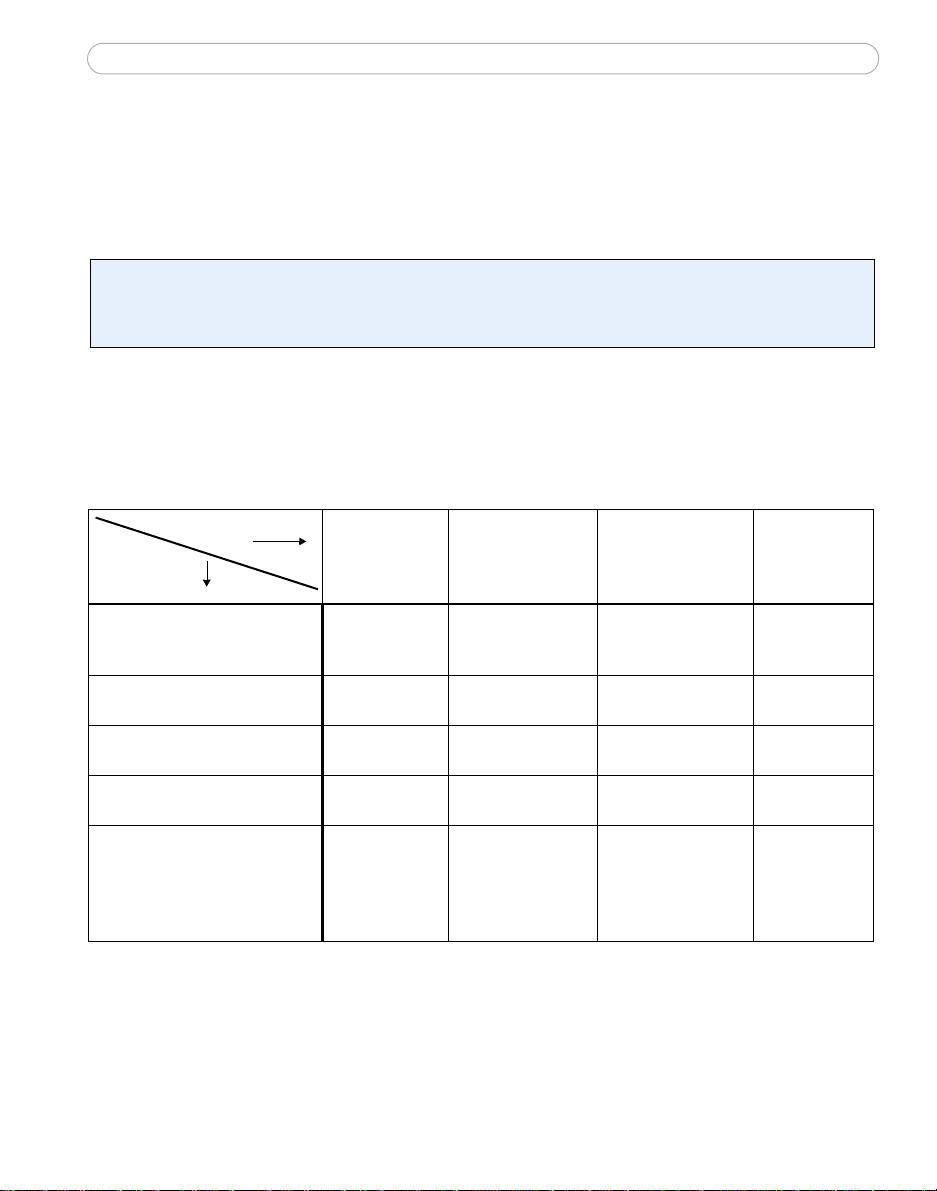
All installation methods
This table shows all of the available methods for setting or discovering the IP address.
Select a method from the left-hand column and check the requirements for it
to the right.
Requirements
Installation
methods
AXIS IP Utility
(recommended method)
See page 5
UPnP™
See page 6
ARP/Ping
See page 6
AXIS Dynamic DNS Service
See page 7
View DHCP server
admin pages for IP address
(See note below)
DHCP Server in
network
Optional Required Windows
Optional Required Windows (ME
Recommended Required All
Required All
Install on
same network
segment
Required All
Notes: • UPnP™ and DHCP are both enabled by default in the AXIS 213.
• The AXIS 213 has the default IP address 192.168.0.90
• To view the admin pages for the DHCP server, please see the server’s own documentation. You may
need to contact your network administrator.
• If setting the IP address fails, check that there is no firewall blocking the operation.
Internet
connection with
no HTTP proxy
Operating
system
or XP)

AXIS IP Utility
AXIS IP Utility is a free Windows
application that discovers and
displays Axis devices on your
network.
The application can also be used to
manually set a static IP address.
AXIS 213 - Installation Guide
5
Note that you must install the PTZ
network camera on the same network segment (physical subnet) as the computer
running AXIS IP Utility.
AXIS IP Utility is available on the CD supplied with this product, or it can be
downloaded from www.axis.com
Automatic discovery
1. Check that the PTZ network camera is connected to the network and that power
has been applied.
2. Start AXIS IP Utility. When the PTZ network camera appears in the window,
double-click it to open the camera’s home page.
3. See page 8 for instructions on how to set the password.
Set the IP address manually
1. Acquire an unused IP address on the same network segment your computer is
connected to.
2. Click the button (Set IP address using serial number) and enter the serial
number and IP address for the PTZ network camera.
3. Click the Set IP button and then restart the PTZ network camera (within 2
minutes).
Locate the serial number (S/N) on the camera’s underside label.
ENGLISH
4. Click View Home Page to access the PTZ network camera’s web pages.
5. See page 8 for instructions on how to set the password.
Note:
AXIS IP Utility can be used to change a dynamically set IP address to a static one.
AXIS 213 - Installation Guide
6
UPnP™
UPnP™ functionality is enabled by default in the AXIS 213. If also enabled on your computer
(Windows ME or XP), the PTZ network camera will automatically be detected and a new icon
will be added to “My Network Places.” Click this icon to access the PTZ network camera. See
also
page 8 for instructions on how to set the password.
Note:
To install the UPnP™ service on your computer, open the Control Panel from the Start Menu and
select Add/Remove Programs. Select Add/Remove Windows Components and open the
Networking Services section. Click Details and then select UPnP as the service to add.
UPnP™ is a certification mark of the UPnP™ Implementers Corporation.
Manual Installation with ARP/Ping
1. Acquire an unused IP address on the same network segment as your computer.
2. Locate the serial number (S/N) on the camera’s underside label.
3. Open a Command Prompt on your computer. As appropriate for your operating
system, enter the following commands:
Windows syntax: Windows example:
arp -s <IP Address> <Serial Number>
ping -l 408 -t <IP Address>
UNIX/Linux/Mac syntax: UNIX/Linux/Mac example:
arp -s <IP Address> <Serial Number> temp
ping -s 408 <IP Address>
arp -s 192.168.0.125 00-40-8c-18-10-00
ping -l 408 -t 192.168.0.125
arp -s 192.168.0.125 00:40:8c:18:10:00 temp
ping -s 408 192.168.0.125
4. Check that the network cable is connected. Start/restart the camera by
disconnecting and reconnecting power, which must be done within 2 minutes of
entering the ARP command.
5. Close the Command prompt when you see ‘Reply from 192.168.0.125: ...’ or similar.
6. Start your browser, type in http://<IP address> in the Location/Address field and
press
Enter
on your keyboard.
7. See page 8 for instructions on how to set the password.
Notes: • To open a command prompt in Windows: from the Start menu, select Run... and type cmd (or
command in Windows 98/ME). Click OK.
• To use the ARP command on a Mac OS X, use the Terminal utility, which is found under Applications
> Utilities.

AXIS 213 - Installation Guide
The AXIS Internet Dynamic DNS Service
The AXIS Internet Dynamic DNS Service is a free service provided by Axis. This
service allows you to quickly and simply install your camera, which then receives a
static name (DNS name) and a dynamic IP address. More information about the AXIS
Internet Dynamic DNS Service is available at www.axiscam.net
To perform this procedure, your network should have an Internet connection with no
HTTP proxy, and IP addresses should preferably be assigned via DHCP.
1. Connect the AXIS 213 to your local network, using a standard network cable.
2. Connect power to the camera.
3. Wait 60 seconds and, using a suitably pointed object, push the reset button on
the underside of the camera once
4. Visit www.axiscam.net where you will be guided through the remainder of the
installation. Please have the serial number of your product ready and follow the
instructions on the screen.
The serial number/MAC address (S/N) is located on the label on the underside of the AXIS 213
.
7
ENGLISH
5. Enter a password for the root user (administrator).
6. If required, accept the installation of AMC onto your workstation. See AXIS
Media Control (AMC), on page 9 for more information.
7. The installation is now complete.
Note:
Please note that this procedure will send the IP address, firmware version, product type, serial
number and HTTP port number of the PTZ network camera to the AXIS Internet Dynamic DNS
Service. No
personal information is transferred.
To remove the DNS name and unregister from this service, open the Setup pages in
the PTZ network camera, click System Options > Network > TCP/IP > Basic, click the
Settings button for the AXIS Internet Dynamic DNS Service and finally, click the
Remove button.
AXIS 213 - Installation Guide
8
Setting the Password
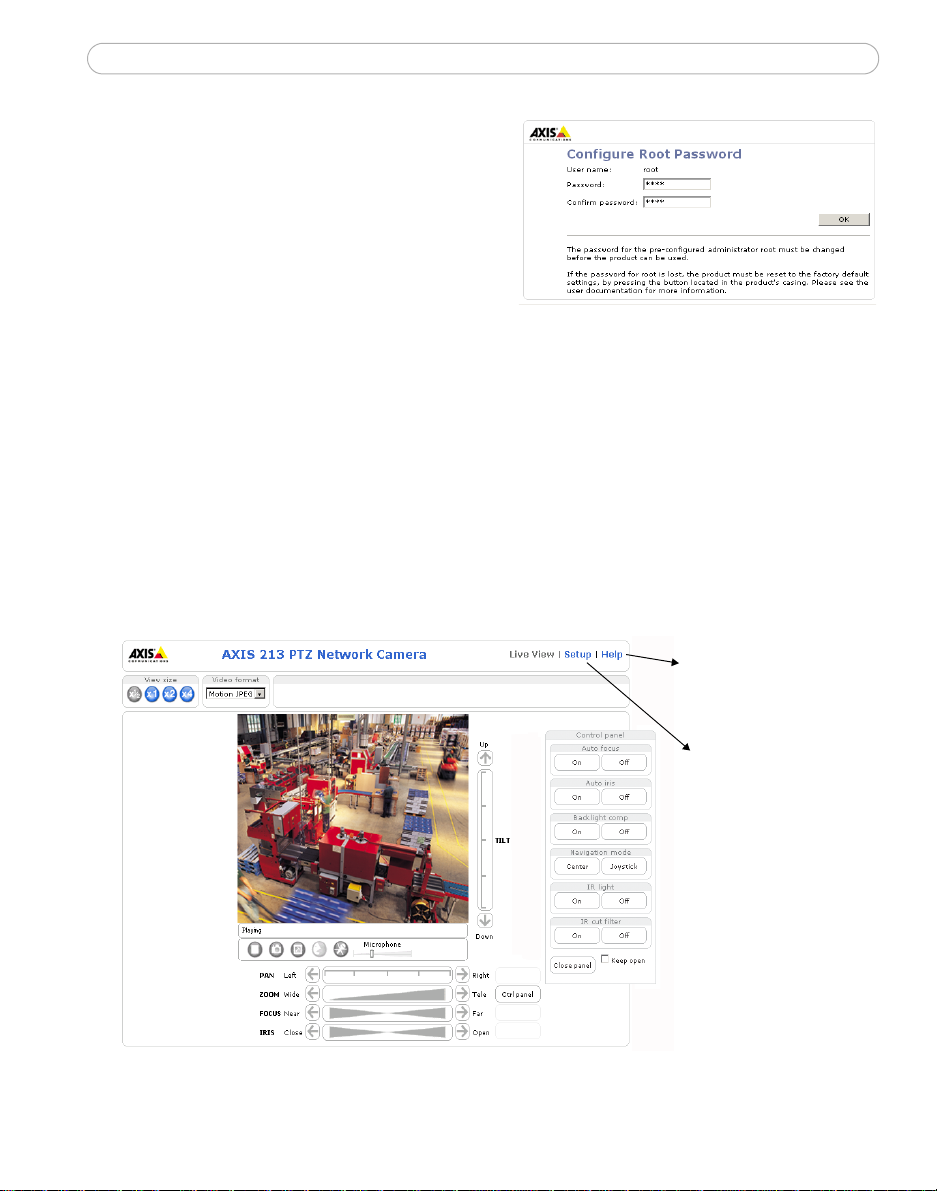
1. When accessing the AXIS 213 for the
first time, the Configure Root Password
dialog will be displayed on the screen.
2. Enter a password and then re-enter it, to
confirm the spelling. Click OK.
3. The Enter Network Password dialog will
appear. Enter the User name: root
Note: The default administrator user name root is permanent and cannot be
deleted.
4. Enter the password as set in step 2 above, and click OK. If the password is lost,
the AXIS 213 must be reset to the factory default settings. See page 9.
5. If required, click Yes to install AMC (AXIS Media Control), to allow viewing of
the video stream in your browser. You will need administrator rights on the
computer to do this.
6. The Live View page of the AXIS 213 is displayed, complete with links to the
Setup tools, which allow you to customize the camera to your specific needs.
Help - Displays online
help on all aspects of
using the camera.
Setup - Provides all
the necessary tools
for setting up the
camera to
requirements.

AXIS 213 - Installation Guide
AXIS Media Control (AMC)
AXIS Media Control (AMC) is an ActiveX component required for Microsoft Internet
Explorer, and is installed automatically on first use.
AMC must be installed for audio support and for viewing live images in Microsoft
Internet Explorer. If your working environment restricts additional software
components, you can configure your AXIS 213 to use a Java applet for updating the
images (applies to video images, not audio). See the online help files under Live View
Config > Layout > Default Viewer for Internet Explorer. Alternatively, use another
supported Web browser.
Once AMC is installed, the AMC viewer toolbar will display the audio controls and
additional video controls.
Accessing the AXIS 213 from the Internet
Once installed, your PTZ network camera is accessible on your local network (LAN).
To access the PTZ network camera from the Internet, network routers must be
configured to allow incoming traffic, which is usually done on a specific port. Please
refer to the documentation for your router for further instructions.
9
ENGLISH
For more information on this and other topics, please visit the Axis Support Web at
www.axis.com/techsup
Resetting to the factory default settings
This will reset all parameters, including the IP address, to the Factory Default settings:
1. Disconnect power from the camera.
2. Press and hold the Reset button (on the underside of the camera) and reconnect
power.
3. Keep the button pressed for 15 seconds, and then release it.
4. Re-install the camera using one of the methods described in this document.
Further information
For further information, please see the AXIS 213 User’s Manual, which is available on
the CD included in this package. Updated versions can be obtained from
www.axis.com

AXIS 213 - Montageanweisung
AXIS 213 Montageanweisung
Beachten Sie Folgendes, bevor Sie die AXIS 213 PTZ-Netzwerkkamera installieren.
•Dieses Produkt ist für eine Nutzung in Innenräumen vorgesehen. Es kann in Außenber eichen eingesetzt werden,
wenn es vor Regen und Feuchtigkeit geschützt wird. Verwenden Sie bei einer Nutzung der Kamera unter diesen
Bedingungen das entsprechende Außengehäusezubehör.
•Setzen Sie beim Reinigen des Gehäuses keine intensiven oder scheuernden Reinigungsmittel ein. Wischen Sie
das Gehäuse vorsichtig mit einem sanften Reinigungsmittel ab.
•Setzen Sie die Kamera niemals direkter Sonneneinstrahlung oder anderen hellen Lichtquellen aus. Richten Sie
die Kamera bei einer Nutzung oder Nichtnutzung nie auf die Sonne oder andere überdurchschnittliche helle
Objekte.
11
Hardware installieren
Wenn das Modell AXIS 213 an einer schwer zugänglichen Position angebracht wird,
empfiehlt es sich, die IP-Adresse festzulegen und die Kamera betriebsbereit zu machen,
bevor die Hardwareinstallation erfolgt. Führen Sie in diesem Fall Schritt 1 (siehe unten)
erst aus, wenn die Installation komplett abgeschlossen ist.
Im Lieferumfang der AXIS 213 PTZ-Netzwerkkamera befindet sich eine Deckenmontagehalterung.
1. Bohren Sie zwei Löcher in die Decke
und befestigen Sie die Halterung je
nach Deckenmaterial mit den passenden Schrauben.
2. Schließen Sie ein Standard-
Netzwerkkabel an AXIS 213 an, um
das Gerät ins Netzwerk einzubinden.
3. Falls vorhanden, schließen Sie das
Verbindungsmodul (Sonderzubehör)
an die Kamera an.
4. Schließen Sie das Netzwerkkabel an.
5. Die Hardwareinstallation ist damit
abgeschlossen. Fahren Sie fort mit
IP-Adresse festlegen, auf Seite 12.
DEUTSCH
Hinweis:Wenn AXIS 213 aufrecht auf einem
Schreibtisch platziert werden soll, lösen Sie die vier Schrauben an der Unterseite des Geräts und
entfernen Sie die Halterung. Setzen Sie die Haftfüße aus Kunststoff an die Schraubenlöcher ein.
AXIS 213 - Montageanweisung
12
IP-Adresse festlegen
Die AXIS 213 ist für die Benutzung in einem Ethernet-Netzwerk vorgesehen. Für den
Zugriff auf die Kamera ist eine IP-Adresse erforderlich.
AXIS IP Utility
Es wird empfohlen, die Festlegung einer IP-Adresse unter Windows mit Hilfe von AXIS IP Utility
vorzunehmen. Dieses kostenlose Programm kann in Netzwerken mit oder ohne DHCP-Server
verwendet werden. Weitere Informationen hierzu finden Sie auf Seite 13.
Alle Installationsmethoden
Diese Tabelle bietet einen Überblick über die verfügbaren Methoden zum Festlegen
bzw. Ermitteln der IP-Adresse. Wählen Sie in der linken Spalte eine Methode, und
entnehmen Sie die Anforderungen den Spalten
rechts davon.
Anforderungen
Installationsmethoden
AXIS IP Utility
(empfohlene Methode)
Siehe Seite 13
UPnP™
Siehe Seite 14
ARP/Ping
Siehe Seite 14
AXIS Dynamic DNS-Service
Siehe Seite 15
Auf den Administrationsseiten
des DHCP-Servers die
IP-Adresse ermitteln
(Siehe unten stehenden
Hinweis)
DHCP-Server
im Netzwerk
Optional Erforderlich Windows
Optional Erforderlich Windows
Empfohlen Erforderlich Alle
Erforderlich Alle
Installation im
gleichen
Netzwerksegment
Erforderlich Alle
Internetverbindung
ohne HTTP-Proxy
Betriebssystem
(ME oder XP)
Hinweise:
• Sowohl UPnP™ als auch DHCP sind in der AXIS 213 standardmäßig aktiviert.
• Die Standard-IP-Adresse der AXIS 213 lautet 192.168.0.90
• Wie Sie die Administrationsseiten des DHCP-Servers anzeigen lassen können, entnehmen Sie bitte der
Dokumentation zum Server. Wenden Sie sich ggf. auch an Ihren Netzwerkadministrator.
• Falls ein Festlegen der IP-Adresse nicht möglich ist, muss sichergestellt sein, dass die Datenübertragung
nicht durch eine Firewall blockiert wird.

AXIS 213 - Montageanweisung
AXIS IP Utility
AXIS IP Utility ist eine kostenlose
Windows-Anwendung, mit der
Axis-Geräte im Netzwerk erkannt
und angezeigt werden.
Die Anwendung dient außerdem
zum manuellen Festlegen einer
statischen IP-Adresse.
Beachten Sie, dass die AXIS 213
im gleichen Netzwerksegment (physisches Subnetz) installiert sein muss wie der
Computer, auf dem AXIS IP Utility ausgeführt werden soll.
AXIS IP Utility befindet sich auf der im Lieferumfang enthaltenen CD und kann auch
aus dem Internet heruntergeladen werden (www.axis.com/techsup).
Automatische Erkennung
1. Stellen Sie sicher, dass die AXIS 213 an das Netzwerk und an die Stromversorgung
angeschlossen ist.
2. Starten Sie AXIS IP Utility. Doppelklicken Sie auf das Symbol der AXIS 213, um die
Homepage der Kamera zu öffnen.
3. Anweisungen zum Festlegen des Kennworts finden Sie auf Seite 16.
13
DEUTSCH
IP-Adresse manuell einstellen
1. Wählen Sie eine nicht zugewiesene IP-Adresse aus dem Netzwerksegment, in dem
sich auch Ihr Computer befindet. Suchen Sie auf dem Etikett auf der Unterseite der
Kamera die Seriennummer (S/N).
2. Klicken Sie auf die Schaltfläche (IP-Adresse mit Seriennummer festlegen), und
geben Sie die Seriennummer und die IP-Adresse für die AXIS 213 ein.
3. Klicken Sie auf die Schaltfläche Set IP (IP einstellen), und starten Sie die AXIS 213
innerhalb von zwei Minuten neu.
4. Klicken Sie auf View Home Page (Startseite anzeigen), um auf die Webseiten der
AXIS 213 zu gelangen.
5. Anweisungen zum Festlegen des Kennworts finden Sie auf Seite 16.
Hinweis:
Mit AXIS IP Utility kann eine dynamische IP-Adresse in eine statische umgewandelt werden.

AXIS 213 - Montageanweisung
14
UPnP™
Die UPnP™-Funktionalität der AXIS 213 ist standardmäßig aktiviert. Sofern diese Funktionalität auch auf Ihrem Computer (Windows ME oder XP) aktiviert ist, wird die Kamera
automatisch erfasst, und unter "Netzwerkumgebung" wird ein entsprechendes Symbol
hinzugefügt. Klicken Sie auf dieses Symbol, um auf die AXIS 213 zuzugreifen. Anweisun
gen zum Festlegen des Kennworts finden Sie auf Seite 16.
Hinweis:
Zur Installation des UPnP™-Dienstes auf Ihrem Computer öffnen Sie im Startmenü die
Systemsteuerung, und wählen Sie hier Software. Wählen Sie Windows-Komponenten
hinzufügen/entfernen, und wechseln Sie zum Bereich Netzwerkdienste. Klicken Sie auf Details, und
wählen Sie dann UPnP als hinzuzufügenden Dienst aus.
UPnP™ ist eine Zertifizierungsmarke der UPnP™ Implementers Corporation.
Manuelle Installation mit ARP/Ping
1. Wählen Sie eine nicht zugewiesene IP-A dresse aus dem Netzwerksegment, in dem
sich auch Ihr Computer befindet.
2. Suchen Sie auf dem Etikett auf der Unterseite der Kamera die Seriennummer
(S/N).
3. Öffnen Sie auf Ihrem Computer das Befehlszeilenprogramm. Geben Sie dazu je
nach verwendetem Betriebssystem folgende Befehle ein:
-
Windows -Syntax: Beispiel für Windows:
arp -s <IP-Adresse> <Seriennummer>
ping -l 408 -t <IP-Adresse>
UNIX/Linux/Mac -Syntax: Beispiel für UNIX/Linux/Mac:
arp -s <IP-Adresse> <Seriennummer> temp
ping -s 408 <IP-Adresse>
arp -s 192.168.0.125 00-40-8c-18-10-00
ping -l 408 -t 192.168.0.125
arp -s 192.168.0.125 00:40:8c:18:10:00 temp
ping -s 408 192.168.0.125
4. Stellen Sie sicher, dass das Netzwerkkabel angeschlossen ist. Starten Sie die
Kamera neu, indem Sie die Stromversorgung trennen und wiederanschliessen.
Dies muss binnen zwei Minuten nach Eingabe des Befehls "ARP" erfolgen.
5. Schließen Sie das Befehlszeilenprogramm, sobald "Reply from 192.168.0.125: ..."
oder etwas Entsprechendes angezeigt wird.
6. Starten Sie einen Browser, geben Sie im Adressfeld "http://<IP-Adresse>" ein, und
betätigen Sie die Eingabetaste auf der Tastatur.
7. Anweisungen zum Festlegen des Kennworts finden Sie auf Seite 16.
Loading...