


iPad User Guide
Everything you need to know about iPad
The cocktail napkin has met its match
With Notes, your sketchbook is always at your fingertips
In the Notes app you can use different tools—like colored pencils, markers, and felt tip pens—to doodle to your heartʼs content. Whether sketching helps you focus, come up with ideas, or just relax and have fun, you never run out of pages with iPad.
Start a sketch
Open a note in the Notes app, then tap  . To see more color choices, swipe the palette left or right.
Zoom in on your work to sketch the details. Pinch open to get up close, then pinch closed when youʼre done to zoom back out.

Experiment with the tools
Just like real drawing tools, the marker is translucent so you can layer your strokes to vary the tone, and the pencil is great for subtle shading. To adjust the angle of the ruler, touch and hold it with two fingers, then rotate your fingers.
Collaborate
Whether itʼs a doodlefilled brainstorm page, a work of art, or something in between, invite a friend to contribute and see what unfolds. Tap  to share your note.

Want to learn more? Check out Create a sketch.
Remember when?
Rediscover special moments with Memories
Memories takes photos and videos from special times in your life—that crazy race with your best friend, the backpacking trip in Colorado, that blurry first year of your sonʼs life—and turns them into short movies.
Get started
Tap the Memories tab in the Photos app and choose a memory. Tap
 to play the Memory movie, or scroll down below the movie to see people, places, and other related memories.
Make it perfect

You can add or remove specific photos and videos, change the music or title, even adjust the length of the Memory movie. Just tap a movie while itʼs playing, then tap  .
.
Remember together
To share your Memory movie, tap the movie while itʼs playing, tap  , then email it to a friend or send it with Messages. Or, if you have Apple TV, get everyone together and watch on a big screen. All your memories are available in the Photos app on Apple TV when you use iCloud Photo Library.
Want to learn more? Check out Memories in the Photos chapter.

A quiet Sunday
Take a break with iPad
Sometimes after a busy week, you just need some down time. Curl up with iPad to enjoy a good book, watch a TV show, do some shopping, and catch up with friends.
Watch a show while you surf the web
Multitask with Picture in Picture while you watch your favorite show—so you can check your mail, look at something on the web, and more. Tap  at the bottom of your video screen. To make the small video screen larger, pinch it open. Pinch closed to shrink it again.
Shop with Apple Pay
Use Safari to visit your favorite store online. When you find that perfect shirt, tap Apple Pay, then follow the instructions to check out with a touch

of your finger—no need to hunt for your credit card.
Hang out
Open FaceTime, tap  , then call your friend for a visit. As you chat, you can take a screenshot to capture a photo of the conversation. Press and hold the Sleep/Wake button on the top of your iPad while you press the Home button.
Fall asleep with a book
Reading a book is a great way to wind down as bedtime draws near. Choose a good read in iBooks, then tone down the blue light that may make it harder for you sleep. Swipe up from

the bottom of the screen and turn on Night Shift  .
.
To learn more, check out Apple Pay, FaceTime, and Multitasking.
Not all features are available in all areas.
Welcome
Set up and get started Whatʼs new in iOS 10 Basics
Personalize your iPad Apps
Sharing
iPad and other devices Privacy and security
Restart, update, reset, and restore Accessibility
Safety, handling, and support
Set up and get started
A quick look at iPad
iPad overview
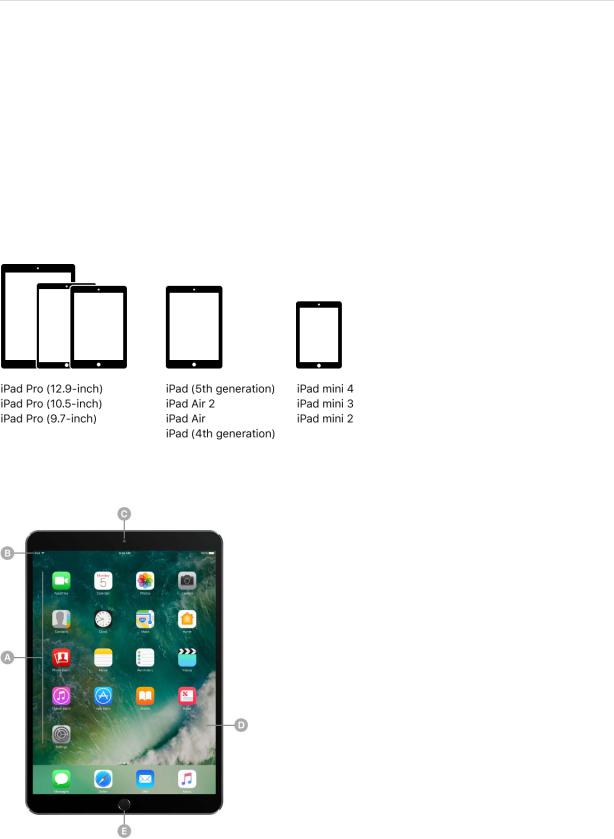
This guide describes iOS 10.3 for:
iPad Pro (10.5-inch)

iPad Pro (10.5-inch) features
App icons
Status bar
FaceTime HD camera
Multi-Touch display
Home button/Touch ID sensor
True Tone Flash
Volume buttons
iSight camera
Sleep/Wake button
Microphones
Headset jack
Speakers
Smart Connector
Speakers
Lightning connector
Nano-SIM tray (cellular models)

iPad Pro (12.9-inch) (2nd generation)
iPad Pro (12.9-inch) (2nd generation) features
App icons
Status bar
FaceTime HD camera
Multi-Touch display
Home button/Touch ID sensor
True Tone Flash
Volume buttons
iSight camera
Sleep/Wake button
Microphones
Headset jack
Speakers
Smart Connector
Speakers
Lightning connector
Nano-SIM tray (cellular models)
iPad (5th generation)

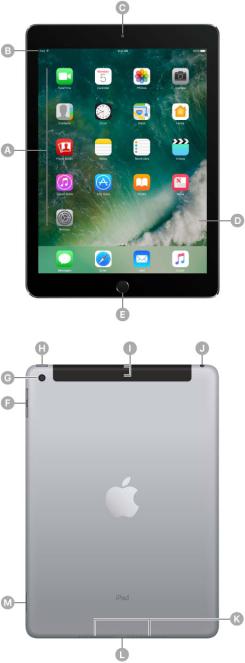
iPad (5th generation) features
App icons
Status bar
FaceTime HD camera
Multi-Touch display
Home button/Touch ID sensor
Volume buttons
iSight camera
Sleep/Wake button
Microphones
Headset jack
Speakers
Lightning connector
Nano-SIM tray (cellular models)
iPad mini 4

iPad mini 4 features
App icons
Status bar
FaceTime HD camera
Multi-Touch display
Home button/Touch ID sensor
Volume buttons
iSight camera
Microphones
Sleep/Wake button
Headset jack
Speakers
Lightning connector
Nano-SIM tray (cellular models)
Your features and apps may vary depending on the model of iPad you have, and on your location, language, and carrier. To learn which features are available on your iPad, go to the Compare iPad models website. To find out which features are supported in your area, go to the iOS Feature Availability website.
Note: Apps and services that send or receive data over a cellular network may incur additional fees. Contact your carrier for information about your iPad service plan and fees.
Sleep/Wake button
Use the Sleep/Wake button to turn on or wake iPad, lock it, or turn it off. Locking iPad puts the display to sleep, saves the battery, and prevents anything from happening if you touch the screen. You can still listen to music and adjust the volume using the buttons on the side of iPad, and you can receive FaceTime calls, text messages, alarms, notifications, and other updates.
iPad locks itself automatically if you donʼt touch the screen for a minute or so. To adjust the timing, go to Settings > Display & Brightness > Auto-Lock.
Turn on iPad. Press and hold the Sleep/Wake button until the Apple logo appears.
Turn off iPad. Press and hold the Sleep/Wake button until the slider appears onscreen, then drag the slider.
Wake iPad. Press the Sleep/Wake button. From the wake screen you can check notifications and recent app activity, take photos, and more. For more information, see Lock screen.
Home button
The Home button takes you to the Home screen, where you can tap an app to open it. The Home button also provides other convenient shortcuts.
On supported models, you can use the Touch ID sensor in the Home button to unlock iPad or when making purchases in the iTunes Store, App Store, and iBooks Store (instead of using your passcode or Apple ID password). See Touch ID.
You can also use Touch ID when using Apple Pay (in countries where Apple Pay is supported) to make a purchase. See Apple Pay.
Set a passcode. For additional security, you can require a passcode to unlock iPad. If you didnʼt create a passcode during setup, go to Settings > Touch ID & Passcode (on models with Touch ID) or Settings > Passcode (on other models).
Unlock iPad. Press the Home button, then enter the passcode if required.
Tip: On models with Touch ID, you can unlock iPad by touching instead of pressing the Home button. Go to Settings > General > Accessibility > Home Button, then turn on Rest Finger to Open.
Go to the Home screen. Press the Home button.
See apps youʼve opened. Double-click the Home button when iPad is unlocked to see the app switcher, then swipe left or right. See Switch between apps.
Use Siri. Press and hold the Home button. See Make requests.
Turn accessibility features on or off. Triple-click the Home button. See Accessibility Shortcut.
Volume controls
Use the Volume buttons on the side of iPad to adjust the volume of songs and other media, alerts, and sound effects. You can also use Siri to turn the volume up or down. Just say “Turn up the volume” or “Turn down the volume.” Use Control Center (or on some iPad models, the Side Switch) to silence audio alerts and notifications.
WARNING: For important information about avoiding hearing loss, see Important safety information.
Lock the ringer and alert volumes. Go to Settings > Sounds, then turn off Change with Buttons.
Note: To limit the maximum headset volume, go to Settings > Music > Volume Limit. To prevent changes to the volume limit, go to Settings > General > Restrictions > Volume Limit.
Use Control Center to adjust the volume. When iPad is locked or when youʼre using another app, swipe up from the bottom edge of the screen to open Control Center, swipe left, then adjust the volume.
Mute the sound. Press and hold the Volume Down button.
You can also use either volume button to take a photo or record a video.
Use Do Not Disturb. You can silence alerts and notifications using Do Not Disturb. Swipe up from the bottom edge of the screen to open Control Center, then tap .
Do Not Disturb and the Side Switch donʼt mute the audio from music, podcasts, movies, and TV shows.
Lightning connector
Connect your Lightning to USB Cable to the Lightning connector to charge or sync your iPad. For more information about charging, see Charge and monitor the battery. For more information about syncing, see Sync with iTunes.
If you have Apple Pencil, plug it into the Lightning connector to pair or charge it with iPad Pro. For more information about Apple Pencil, see the Apple Support article Use Apple Pencil with iPad Pro.
Smart Connector for iPad Pro
Using the Smart Connector, you magnetically attach an accessory, such as iPad Pro Smart Keyboard, to iPad Pro. For more information about iPad Pro Smart Keyboard, see the Apple Support article Use your Smart Keyboard with iPad Pro.
SIM card
An Apple SIM card, an embedded Apple SIM, or a third-party SIM card is used for your cellular data connection. All iPad Wi-Fi + Cellular models include a SIM card tray. Some models also include an embedded Apple SIM (except in China). In some regions, other iPad Wi-Fi + Cellular models may include a preinstalled Apple SIM card.
If you change carriers or if no SIM card is installed, you may need to install or replace the SIM card. Apple SIM card kits are available for purchase at Apple Retail locations in countries with participating carriers. For more information, see the Apple Support article Use Apple SIM with Wi-Fi + Cellular models of iPad.
Eject the SIM card tray. Insert a paper clip or the SIM eject tool (sold separately) into the small hole of the SIM card tray on the right side of iPad, then press firmly to eject and remove the tray. Place the SIM card in the tray—the angled corner determines the correct orientation—then insert the SIM card tray back into iPad.
Cellular data also requires a wireless data plan. See Sign up for cellular service.
Important: A SIM card or an Apple SIM is required to use cellular services when connecting to GSM networks and some CDMA networks. Your iPad is subject to your wireless service providerʼs policies, which may include restrictions on switching service providers and roaming, even after conclusion of any required minimum service contract. Contact your wireless service provider for more details. Availability of cellular capabilities depends on the wireless network.
For more information, see the Apple Support article Learn which SIM card your iPad uses.
Accessories included with iPad
The following accessories are included with iPad:
USB power adapter. Use with the Lightning to USB Cable to charge the iPad battery. The size of your adapter depends on the iPad model and your region.
Lightning to USB Cable. Use this to connect iPad to the USB power adapter or to your computer.
Status icons
The icons in the status bar at the top of the screen give information about iPad:
Status icon |
What it means |
Wi-Fi |
iPad has a Wi-Fi Internet connection. The more |
|
bars, the stronger the connection. See Connect |
|
to Wi-Fi. |
|
|
Cell signal |
iPad (Wi-Fi + Cellular models) is in range of the |
|
cellular network. If thereʼs no signal, “No |
|
service” appears. |
|
|
Airplane Mode |
Airplane Mode is on—you canʼt access the |
|
Internet, or use Bluetooth® devices. Non- |
|
wireless features are available. See Travel with |
|
iPad. |
|
|
LTE |
iPad (Wi-Fi + Cellular model) is connected to the |
|
Internet over a 4G LTE network. |
|
|
4G |
iPad (Wi-Fi + Cellular model) is connected to the |
|
Internet over a 4G network. |
|
|
3G |
iPad (Wi-Fi + Cellular model) is connected to the |
|
Internet over a 3G network. |
|
|
EDGE |
iPad (Wi-Fi + Cellular model) is connected to the |
|
Internet over an EDGE network. |
|
|
GPRS |
iPad (Wi-Fi + Cellular model) is connected to the |
|
Internet over a GPRS network. |
|
|
Personal Hotspot |
|
|
iPad is providing a Personal Hotspot for other |
|
iOS devices. See Personal Hotspot. |
|
|
Syncing |
iPad is syncing with iTunes. See Sync with |
|
iTunes. |
|
|
Activity |
There is network or other activity. Some third- |
|
party apps use this icon to show app activity. |
|
|
VPN |
iPad is connected to a network using VPN. See |
|
VPN settings. |
|
|
Lock |
iPad is locked. See Lock screen. |
|
|
Do Not Disturb |
Do Not Disturb is turned on. See Do Not Disturb. |
|
|
Orientation lock |
Screen orientation is locked. See Change the |
|
screen orientation. |
|
|
Location Services |
An app is using Location Services. See Location |
|
Services. |
|
|
Alarm |
An alarm is set. See Set an alarm or bedtime |
|
schedule. |
|
|
Bluetooth |
Blue or White icon: Bluetooth is on and paired |
|
with a device, such as a headset or keyboard. |
|
Gray icon: Bluetooth is on and paired with a |
|
device, but the device is out of range or turned |
|
off. |
|
See Bluetooth devices. |
|
|
Headphones connected |
iPad is paired with Bluetooth headphones that |
|
are turned on and within Bluetooth range. See |
|
Bluetooth devices. |
|
|
Bluetooth battery |
Shows the battery level of a supported paired |
|
Bluetooth device. |
|
|
Battery |
Shows the battery level or charging status. See |
|
Charge and monitor the battery. |
|
|
Gestures
Use a few simple gestures—tap, drag, swipe, and pinch—to control iPad and its apps.
You can also use additional gestures when editing text or navigating between apps and the Home screen. See Type and edit text and Gestures.

Set up
Apple ID
Your Apple ID is the account you use for just about everything you do with Apple— including storing your content in iCloud; downloading apps from the App Store; streaming Apple Music content; buying music, movies, and TV shows from the iTunes Store; and purchasing books from the iBooks Store.
If you already have an Apple ID, use it to sign in when you first set up iPad, and whenever you need to sign in to use an Apple service. If you didnʼt sign in during setup, go to Settings > Sign in to your iPad.
If you donʼt have an Apple ID, you can create one anyplace youʼre asked to sign in—for example, the iTunes Store, the App Store, and the iBooks Store. Itʼs best to have only one Apple ID.
For more information, go to the Apple ID account website.
iCloud
Safely store your photos and videos, documents, music, calendars, contacts, News favorites and saved stories, and more in iCloud so theyʼre available even if you lose your iPad.
Set up iCloud. Go to Settings > Sign in to your iPhone. Create an Apple ID if you donʼt have one, or use your existing one.
Content stored in iCloud is pushed wirelessly to your other devices where youʼre signed in to iCloud with the same Apple ID.
iCloud is available on devices with iOS 5 or later, on Mac computers with Mac OS X 10.7.5 or later, and on PCs with iCloud for Windows 5 or later (Windows 7 or later is required). You can also sign in to iCloud.com from any Mac or PC to access your iCloud information and features like Photos, Find My iPhone, Mail, Calendar, Contacts, iWork for iCloud, and more.
Note: iCloud may not be available in all areas, and iCloud features may vary by area. For more information, go to the iCloud website (apple.com/icloud).
With iCloud you can:
Access your purchases: Automatically get iTunes purchases on all your devices set up with iCloud, or download previous purchases from the iTunes Store, App Store, and iBooks Store for free, anytime.
Access your music: With an Apple Music membership, any music you added from Apple Music is accessible from iPad. With an iTunes Match subscription, music from your library, including music you imported from CDs or purchased somewhere other than the iTunes Store, can also be stored in iCloud and played on demand.
Store your photos and videos: Use iCloud Photo Library to store all your photos and videos in iCloud. You can access them from any device with iOS 8.1 or later, a Mac with OS X 10.10.3 or later, a PC with iCloud for Windows 5 or later, and on iCloud.com when you sign in with the same Apple ID. Use iCloud Photo Sharing to share photos and videos with only the people you choose, and let them add photos, videos, and comments.
Note: If you use iCloud Photo Library to store your photos and videos, you canʼt use iTunes to sync them with your computer.
Share with your family: With Family Sharing, up to six family members can share their purchases from the iTunes Store, App Store, and iBooks Store. With an optional Apple Music family membership, all family members can use Apple Music. Pay for family purchases with the same credit card and approve kidsʼ spending right from a parentʼs device. Plus, share photos, a family calendar, and more.
Store and retrieve your documents: Store PDFs in iCloud and access them in iBooks from your iPhone, iPad, iPod touch, Mac, or PC. With iCloud Drive you can safely store your presentations, spreadsheets, images, and other documents in iCloud, and access them from your iPhone, iPad, iPod touch, Mac, or PC. iCloud Drive is available on any device with iOS 8 or later and on any Mac with OS X 10.10 or later. If youʼre using an earlier version of iOS, see Set up iCloud Drive.
Synchronize mail, contacts, calendars, and more: Keep your mail, contacts, calendars, notes, and reminders up to date across all your devices.
Note: If you use iCloud to store your contacts and calendars, you canʼt use iTunes to sync them with your computer.
Keep tabs on your browsing: With Safari tabs you can see the tabs you have open on your other iOS devices and Mac computers. See Browse the web.
Keep News up to date across all your devices: Access your favorite News sources and topics as well as the saved stories on all your devices with iOS 9 or later that are set up with iCloud. (News isnʼt available in all areas). See Get started with News.

Back up your data: Back up iPad to iCloud automatically when iPad is connected to power and Wi-Fi. iCloud data and backups sent over the Internet are encrypted. See Back up iPad with iCloud Backup.
Find your iPad: Use the Find My iPhone app on another iOS device—or use the Find My iPhone web app on any Mac or PC—to locate your missing iPad on a map, lock it remotely, suspend or remove the ability to pay using Apple Pay, play a sound, display a message, or erase all the data on it. Find My iPhone also includes Activation Lock, which requires your Apple ID and password to disable Find My iPhone, erase iPad, or reactivate your device. See Find your iPad.
Find your friends: Use Find My Friends to share your location with friends and family.
Store and access your passwords and credit card information: iCloud Keychain keeps passwords and credit card information up to date across all your designated devices.
With iCloud, you get a free email account and 5 GB of storage for your mail, documents, photos and videos, and backups. Your purchased music, apps, TV shows, and books donʼt count against your available storage space. You can purchase additional storage right from your device.
Upgrade your iCloud storage. Go to Settings > [your name] > iCloud, tap iCloud (below Storage), then tap Change Storage Plan. For information about upgrading your iCloud storage, see iCloud Help.
View and download previous or shared purchases. You can download purchases from the iTunes Store, App Store, and iBooks Store.
iTunes Store purchases: Go to the iTunes Store, then tap Purchased. You can also access your purchased songs and videos in the Music app (see Library), the TV app (see Library), and the Videos app (see Add videos to your library).
App Store: Go to the App Store, then tap Purchased.
iBooks Store: Go to iBooks, then tap Purchased.
If you donʼt see your previous or shared purchases, make sure youʼre signed in with your Apple ID in Settings > iTunes & App Store.
Turn on Automatic Downloads for music, apps, or books. Go to Settings > iTunes & App Store.
For more information about iCloud, go to the iCloud website. For support information, go to the iCloud Support website.

Set up iPad
WARNING: To avoid injury, read Important safety information before using iPad.
With only a Wi-Fi connection, you can easily set up iPad. You can also set up iPad by connecting it to your computer and using iTunes.
Note: If youʼre using iPad with a company or other organization, see iPad in the enterprise. If the iPad youʼre using is administered by your school, see your teacher or administrator for setup instructions. Your school may give you a passcode (to turn on or wake up iPad) and a Managed Apple ID (to access features like iCloud Drive). Some standard iPad apps and features arenʼt available to accounts with Managed Apple IDs. For more information, see the Apple Support article What are Managed Apple IDs?
Set up iPad. Turn on iPad, then follow the setup assistant.
To make setup as smooth as possible, have this information at hand:
The name and password (if applicable) of your Wi-Fi network
The email address and password for your Apple ID, to set up iCloud, iTunes, the App Store, and more
Create an Apple ID if you donʼt have one, or use your existing one.
Your credit or debit card account information, if you want to add a card to Apple Pay during setup on supported models
A backup of your data if youʼre upgrading from another device (see Back up iPad with iCloud Backup and Back up iPad with iTunes)
You can also restore iPad from an iCloud or iTunes backup or migrate from an Android device during setup.
Note: Find My iPhone—an app you use to locate your iPad, as well as AirPods,
Apple Watch, and other iOS devices—is turned on automatically when you sign in with your Apple ID during iPad setup. (See Find your iPad.) The Find My iPhone app includes a feature called Activation Lock that prevents anyone else from activating and using your iPad, even if itʼs completely erased. Before you sell or give away iPad, you should erase and unlock iPad so that the next owner can activate it.
Move to iOS from Android
During setup you can migrate your content automatically and securely from your Android device.
Download the Move to iOS app. On your device running Android version 4.0 or later, see the Apple Support article Move from Android to iOS and download the Move to iOS app.

Move your data from Android during setup. When setting up iPad, on the Apps & Data screen, select Move Data from Android, turn on Wi-Fi on the Android device, open the Move to iOS app on the Android device, then follow the steps.
Note: You can use the Move to iOS app only when you first set up iPad. If youʼve already finished setup and want to use Move to iOS, you must erase your iOS device and start over or move your data manually. See the Apple Support article Move content manually from your Android device to your iOS device.
The Settings app
The Settings app is on the Home screen. You use it to configure many of the settings on iPad. For example, tap Settings, then tap Sounds (Settings > Sounds) to choose the sound that plays when you receive an email message. Among other things, you can also use Settings to:
Change your device passcode
Choose a different wallpaper
Configure privacy controls
Find out how much free storage remains on iPad
Enable restrictions
Search for a setting. Open Settings, swipe down to reveal the search field, then enter a term—alert or password, for example.
Set up other mail, contacts, and calendar accounts
In addition to the apps that come with iPad and that you use with iCloud, iPad works with Microsoft Exchange and many of the most popular Internet-based mail, contacts, and calendar services.
For information about setting up a Microsoft Exchange account in a corporate environment, see the Apple Support article Set up Exchange ActiveSync on your iPhone, iPad, or iPod touch.
Set up an account. Go to Settings, choose a setting to configure (Mail, Contacts, or Calendar), tap Accounts, then tap Add Account.
You can add contacts using an LDAP or CardDAV account, if your company or organization supports it. See Add contact accounts.
You can add calendars using a CalDAV calendar account, and you can subscribe to iCalendar (.ics) calendars or import them from Mail. See Use multiple calendars.

Date and time
The date and time are usually set for you based on your location—take a look at the Lock screen to see if theyʼre correct.
Set whether iPad updates the date and time automatically. Go to Settings > General > Date & Time, then turn Set Automatically on or off. If you set iPad to update the time automatically, it gets the correct time over the network and updates it for the time zone youʼre in. Some networks donʼt support network time, so in some areas iPad may not be able to automatically determine the local time.
Set the date and time manually. Go to Settings > General > Date & Time, then turn off Set Automatically.
Set whether iPad shows 24-hour time or 12-hour time. Go to Settings > General > Date & Time, then turn 24-Hour Time on or off (it may not be available in all areas).
Language and region
Go to Settings > General > Language & Region to set:
The language for iPad
The preferred language order for apps and websites
The region format
The calendar format
The temperature unit (Celsius or Fahrenheit)
To add a keyboard for another language, go to Settings > General > Keyboard > Keyboards. For more information, see Use international keyboards.
Sign up for cellular service
If your iPad has an embedded Apple SIM or an Apple SIM card (available on supported models), you can choose a carrier and sign up for cellular service right on iPad. Depending on your home carrier and your destination, you may also be able to travel abroad with iPad and sign up for cellular service with a carrier in the country youʼre visiting. This isnʼt available in all areas and not all carriers are supported; for more information, see the Apple Support article Use Apple SIM with Wi-Fi + Cellular models of iPad, or contact your carrier.
Sign up for cellular service. Go to Settings > Cellular Data, then tap Set Up Cellular Data and follow the onscreen instructions.

Set up cellular service in another country. When traveling to another country, you can choose a local carrier rather than roaming. Go to Settings > Cellular Data, tap Choose a Data Plan, then select the plan you want to use.
If you have a third-party SIM card, contact your carrier to set up cellular service.
For more information, see SIM card, Cellular data settings, and the Apple Support article Set up cellular data service on your Wi-Fi + Cellular model iPad.
Connect to the Internet
iPad connects to the Internet whenever necessary, using a Wi-Fi connection (if available) or your carrierʼs cellular network.
When an app needs to use the Internet, iPad does the following, in order:
Connects over the most recently used available Wi-Fi network
Shows a list of Wi-Fi networks in range and connects using the one you choose
Connects over the cellular data network, if available
Note: If a Wi-Fi connection to the Internet isnʼt available, apps and services may transfer data over your carrierʼs cellular network, which may result in additional fees. Contact your carrier for information about your cellular data plan rates. To manage cellular data usage, see Cellular data settings.
Connect to Wi-Fi
If appears at the top of the screen, youʼre connected to a Wi-Fi network. iPad reconnects when you return to the same location.
Configure Wi-Fi. Go to Settings > Wi-Fi, then turn Wi-Fi on or off. (You can also turn WiFi on or off in Control Center.)
Choose a network: Tap one of the listed networks, then enter the password, if required.
Ask to join networks: Turn on Ask to Join Networks to be notified when a Wi-Fi network is available. Otherwise, you must manually join a network when a previously used network isnʼt available.
Join a closed network: Tap Other, then enter the name of the network. You need to know the network name, security type, and password.

Adjust the settings for a Wi-Fi network: Tap next to a network. You can set an HTTP proxy, define static network settings, turn on BootP, or renew the settings provided by a DHCP server.
Note: Some networks may offer different information.
Forget a network: Tap next to a network youʼve joined before, then tap Forget This Network.
Set up your own Wi-Fi network. If you have an unconfigured AirPort base station turned on and within range, you can use iPad to set it up. Go to Settings > Wi-Fi, then look for Set up an AirPort base station. Tap your base station, and Setup Assistant does the rest.
Manage your AirPort network. If iPad is connected to an AirPort base station, go to Settings > Wi-Fi, tap next to the network name, then tap Manage This Network. If you havenʼt yet downloaded AirPort Utility, tap OK to open the App Store, then download it (this requires an Internet connection).
Connect iPad to your computer
By connecting iPad to your computer you can sync content from your computer using iTunes and back up iPad with iTunes. You can also sync with iTunes wirelessly.
To use iPad with your computer, you need:
A Mac with a USB 2.0 or 3.0 port, or a PC with a USB 2.0 port, and one of the following operating systems:
OS X 10.9 or later with iTunes 12.5 or later
Windows 7 or later with iTunes 12.5 or later
iTunes, available from the iTunes download website
Connect iPad to your computer. Use the included Lightning to USB Cable.
Unless iPad is actively syncing with your computer, you can disconnect it at any time. Look at the top of the iTunes screen on your computer or on iPad to see if syncing is in progress. If you disconnect iPad while itʼs syncing, some data may not get synced until the next time you connect iPad to your computer.
Manage content on your iOS devices
You can transfer information and files between iPad and your other iOS devices and computers, using either iCloud or iTunes.

iCloud stores your photos and videos, documents, music, calendars, contacts, and more. It all gets pushed wirelessly to your other iOS devices and computers, keeping everything up to date. See iCloud.
iTunes syncs music, videos, photos, and more between your computer and iPad. Changes you make on one device are copied to the other when you sync. You can also use iTunes to copy a file to iPad for use with an app, or to copy a document youʼve created on iPad to your computer. See Sync with iTunes.
You can use iCloud or iTunes, or both, depending on your needs. For example, you can use iCloud to automatically keep your contacts and calendars up to date on all your devices, and use iTunes to sync music from your computer to iPad.
You can also manually manage content from iTunes in the iPad Summary pane. To add songs and videos, choose a song, video, or playlist from your iTunes library then drag it to iPad in the iTunes sidebar. This is useful if your iTunes library contains more items than can fit on iPad. See the Apple Support article Sync your iPhone, iPad, or iPod touch with iTunes using USB.
Note: If you have iCloud Music Library turned on, you can manually manage only video.
Sync with iTunes
Syncing with iTunes copies information from your computer to iPad, and vice versa. You can sync by connecting iPad to your computer, or you can set up iTunes to wirelessly sync music, videos, photos, and more with Wi-Fi. For help syncing iPad, open iTunes on your computer, choose Help > iTunes Help, then select “Add items to iPod, iPhone, or iPad.” iTunes is available from the iTunes website.
Note: If features such as iCloud Music Library, iCloud Photo Library, and iCloud calendar and contacts syncing are turned on, you canʼt use iTunes to sync their associated media and data.
Sync using a USB cable. Connect iPad to your computer using the included cable, open iTunes on your computer, then click the iPad button in the top-left of the iTunes window. Select a setting (Summary, Apps, or Music, for example) to configure it.
Note: If iPad doesnʼt appear in iTunes, make sure youʼre using the latest version of iTunes, check that the cable is correctly connected, then try restarting your computer.
To learn more, see the Apple Support article Sync your iPhone, iPad, or iPod touch with iTunes using USB.
Set up wireless syncing. Connect iPad to your computer using the included cable, open iTunes, click the iPad button in the top-left of the iTunes window, click Summary, then select Sync with this iPad over Wi-Fi.

If Wi-Fi syncing is turned on, both iPad and your computer are on and connected to the same wireless network, and iTunes is open on your computer, iPad syncs when itʼs connected to a power source.
To learn more, see the Apple Support article Sync your iPhone, iPad, or iPod touch with iTunes using Wi-Fi.
iTunes provides these syncing options:
In the Music pane, you can sync your entire music library or just selected playlists, artists, albums, and genres.
In the Movies, TV Shows, Podcasts, and Books panes, you can choose to sync all the media they contain, or just the media you choose.
In the Photos pane, you can sync photos and videos from a supported app or a folder on your computer.
In the Summary pane, you can set iTunes to automatically sync iPad when itʼs attached to your computer. To temporarily prevent syncing after you attach the device, press and hold Command and Option (Mac) or Shift and Control (PC) until you see iPad appear in the iTunes window.
Back up iPad with iCloud Backup
When you first sign in with your Apple ID, iCloud Backup turns on automatically. iCloud backs up iPad daily over Wi-Fi, when itʼs connected to a power source and is locked. (To lock iPad, press the Sleep/Wake button. iPad also locks automatically if you donʼt touch the screen for a minute or so.)
iCloud backups are encrypted automatically so that your data is protected from unauthorized access both while itʼs transmitted to your devices and when itʼs stored in iCloud. Purchased content, iCloud Photo Sharing, and My Photo Stream content donʼt count against your 5 GB of free iCloud storage.
Music that wasnʼt purchased in iTunes isnʼt backed up in iCloud, but it can be restored by syncing with iTunes on your computer. See Sync with iTunes.
When you back up iPad using iCloud, you canʼt simultaneously use iTunes to automatically back up iPad to your computer. However, you can use iTunes to manually back up iPad to your computer. See Back up iPad with iTunes.
iCloud backups donʼt include:
Data thatʼs already stored in iCloud, such as contacts, calendars, notes, iCloud Shared Streams, My Photo Stream, iCloud Photo Library, and the contents of iCloud Drive

Data stored in other cloud services, such as Gmail and Exchange mail
Apple Pay information and settings
Touch ID settings
Content you didnʼt get directly from the iTunes Store, App Store, or iBooks Stores, such as imported MP3s, videos, or CDs
Content from the iTunes Store, App Store, or iBooks Store (if itʼs still available, you can tap to redownload content you purchased)
Stop or resume iCloud backups. Go to Settings > [your name] > iCloud, then turn iCloud Backup off or on.
Back up immediately on iCloud. Go to Settings > [your name] > iCloud > iCloud Backup, then tap Back Up Now.
View or remove iCloud backups. Go to Settings > [your name] > iCloud, tap iCloud (below Storage), then tap Manage Storage.
Important: Backups for music, movies, or TV show purchases arenʼt available in all countries. Previous purchases may not be restored from iCloud Backup if they're no longer in the iTunes Store, App Store, or iBooks Store.
If you replace your iPad, you can use its backup to transfer your information to a new device. See Back up iPad with iCloud Drive.
For more information, see the Apple Support article About backups for iOS devices.
 Loading...