


Draft
iPad User Guide
Everything you need to know about iPad
Say hello to the future
The new iPad Pro is all display— with an edge-to-edge screen you unlock with a glance and navigate with familiar gestures.
“Get to know the new iPad Pro”
Draft

Draft
Work smart at school
Use iPad at school to collaborate with your classmates, add drawings and sketches to your notes, and multitask in all your favorite apps.
“Stay ahead of the curve”
Set up Screen Time for your child
Use Screen Time to gain insight into the time your kids spend on their devices, view activity reports, and set limits.
“See how your child spends time on iPad”
Draft

Draft
Relax after a busy day
Use iPad to connect with a friend, get lost in a good book, start a sketchbook, and more.
“Unwind with iPad”
To browse the iPad User Guide, click Table of Contents at the top of the page.
If you need more help, visit the iPad Support website.
Welcome
Whatʼs new in iOS 12
Set up and get started
Basics
Siri
Apps
Apple Pay
Sharing
Use iPad with other devices
Privacy and security
Restart, update, reset, and restore
Accessibility
Safety, handling, and support
Copyright
Draft

Whatʼs new in iOS 12 Draft
AirPlay 2 and smart TVs. (iOS 12.2) Share or mirror almost anything from iPad directly to your AirPlay 2-enabled smart TV. See Stream audio and video to other devices from iPad.
New Animoji. (iOS 12.2) Express yourself with new Animoji in Messages and FaceTime. See Use Animoji and Memoji in Messages on iPad and Become an Animoji or Memoji.
New iPad Pro models. (iOS 12.1) iPad Pro (11-inch) and iPad Pro (12.9-inch) (3rd generation) feature an all-screen design, amazing performance, and enhancements like Face ID, USB-C, and support for the new Apple Pencil. See Supported iPad models, Learn gestures for iPad models with Face ID, and Connect iPad to your computer using USB.
Group FaceTime. (not available in all regions; iOS 12.1) Use Group FaceTime with up to 32 participants simultaneously. See Make a Group FaceTime call on iPad.
Animoji and Memoji. (iOS 12.1) Express yourself in Messages and FaceTime using Animoji or personalized Memoji on iPad Pro (11-inch) and iPad Pro (12.9-inch) (3rd generation). See Use Animoji and Memoji in Messages on iPad.
Draft

Draft
Apple Music. (iOS 12.1) Itʼs now easier to browse, discover, and listen to your favorite music. Visit new artist pages, check out the daily top 100 songs around the world, see what your friends are listening to on Friends Mix, and search for songs by lyrics. See Browse Apple Music, See what others are listening to, and Search Apple Music.
Performance. iOS has been enhanced for a faster and more responsive experience on devices going all the way back to iPad Air.
Messages. Express yourself with new camera effects including filters and stickers. And with the new Photos iMessage app, get photo suggestions based on whom youʼre messaging with, what youʼre talking about, and where youʼve taken photos together. See Add camera effects to a photo or video and Send a photo or video.
FaceTime. Add camera effects like filters, shapes, and stickers. See Add camera effects in FaceTime calls on iPad.
Screen Time. Activity reports provide insight into how you and your family members are using iPad, iPhone, and iPod touch. You can set time limits for using certain apps or entire categories of apps, such as games. See Set screen time, allowances, and limits on iPad.
Draft

Draft
Notifications. Grouped notifications make it easy to see more information at a glance. Instant Tuning and Siri suggestions help you get just the notifications you want and need. See View and respond to notifications on iPad.
Do Not Disturb. New options automatically end Do Not Disturb based on time or actions. Do Not Disturb during Bedtime dims your display and silences overnight notifications until you unlock your iPad in the morning. See Set “Do Not Disturb during Bedtime” on iPad.
Measure. Get the dimensions of real-world objects by pointing your iPad camera at them. See Measure dimensions with iPad.
Draft

Draft
Photos. Photos is smarter than ever with an all-new search engine and a personalized For You tab. It can even suggest sharing a collection of photos with the people who are in them. See View photos, Live Photos, and videos on iPad.
Camera. Camera now highlights QR codes in the frame, making them easier to scan. See Take photos with the camera on iPad.
Siri. Add shortcuts for things you frequently do so you can ask Siri to do them. See Add shortcuts to Siri on iPad. As Siri learns your routines, you also get suggestions for what you need to do, at just the right time, on the Lock screen and in Search. See About Siri Suggestions on iPad.
Shortcuts app. Download this new app from the App Store and automate tasks you do often. Create or customize your own shortcuts to run multiple steps at once. Get started with examples from the gallery and personalize them with steps from multiple apps.
Apple Books. Apple Books (not available in all regions) has an all-new design that makes it easier for you to discover, read, and listen to your favorite books and audiobooks. See Read books in the Books app on iPad.
Draft

Draft
Voice Memos. Itʼs even easier to capture and edit your recordings. And with iCloud, you can access your recordings in the new Voice Memos app on your iPad and Mac. See Make a recording in Voice Memos on iPad.
Draft

Stocks. Stocks has been completely redesignedDraft for iPhone and iPod touch, and itʼs an all-new app for iPad and Mac. See Check stocks on iPad.
Apple News. Itʼs now easier to navigate your news feed using the new sidebar. And you can read News on your Mac, too. See Get started with News on iPad.
Draft

Draft
Battery information. The battery usage chart in Settings now shows your usage for the last 24 hours or 10 days. See Charge and monitor the iPad battery.
Privacy and security. Enhanced tracking prevention protects your privacy in Safari. Automatically create, autofill, and store strong passwords in Safari and iOS apps. See Create website and app passwords on iPad.
Draft
Draft
Learn new tricks for iOS 12. The Tips app adds new suggestions frequently so you can get the most from your iPad. See Get tips on iPad.
Note: New features and apps may vary depending on your iPad model, region, language, and carrier.
Draft

Draft
Set up and get started
Supported iPad models
This guide helps you get started using iPad and discover all the amazing things it can do on iOS 12.2, which is compatible with the following models:
iPad Pro (12.9-inch) (3rd generation) iPad Pro (11-inch)
iPad Pro (12.9-inch) (1st and 2nd generation) iPad Pro (10.5-inch)
iPad Pro (9.7-inch)
iPad (5th generation and later) iPad Air 2
iPad Air iPad mini 4 iPad mini 3 iPad mini 2
If you have a supported iPad model with a previous version of iOS, you can update the iOS software.
Your features and apps may vary depending on your iPad model, region, language, and carrier. To find out which features are supported in your region, go to the iOS Feature Availability website.
Note: Apps and services that send or receive data over a cellular network may incur additional fees. Contact your carrier for information about your iPad service plan and fees.
Draft

Turn on and set up iPad |
Draft |
|
Turn on and set up your new iPad over a Wi-Fi network. You can also set up iPad by connecting it to your computer and using iTunes. If you have another iOS device (with iOS 11 or later) or an Android device, you can copy your data to your new device.
Note: If your iPad is deployed or managed by a company, school, or other organization, see an administrator or teacher for setup instructions. For general information, go to the Apple at Work website or Education website.
Prepare for setup
To make setup as smooth as possible, have the following items available:
An Internet connection through a Wi-Fi network (you may need the name and password of the network) or cellular data service through a carrier (Wi-Fi + Cellular models)
Your Apple ID and password; if you donʼt have an Apple ID, you can create one during setup
Your credit or debit card account information, if you want to add a card to Apple Pay during setup on supported models
Your previous iPad or its backup data, if youʼre upgrading to a new device
Your Android device, if you want to move from an Android device to iPad
Draft
Turn on and set up your iPad |
Draft |
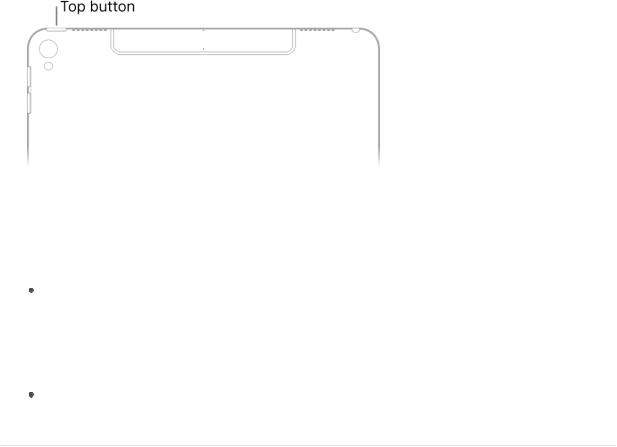
d. Press and hold the top button until the Apple logo appears.
If iPad doesnʼt turn on, you might need to charge the battery. For more help, see the Apple Support article If your iPhone, iPad, or iPod touch won‘t turn on or is frozen.
e. Do one of the following:
If you have another iPhone, iPad, or iPod touch with iOS 11 or later, you can use it to automatically set up your new device with Quick Start. Bring the two devices close together, then follow the onscreen instructions to securely copy many of your settings, preferences, and iCloud Keychain.
If you donʼt have another iOS device, tap Set Up Manually, then follow the onscreen setup instructions.
Move from an Android device to iPad
When you first set up your new iPad, you can automatically and securely move your data from an Android device.
Note: You can use the Move to iOS app only when you first set up iPad. If youʼve already finished setup and want to use Move to iOS, you must erase your iOS device and start over, or move your data manually. See the Apple Support article Move content manually from your Android device to your iOS device.
d.On your device with Android version 4.0 or later, see the Apple Support article Move from Android to iPhone, iPad, or iPod touch and download the Move to iOS app.
e. On your iPad:
a.Follow the setup assistant.
b.On the Apps & Data screen, tap Move Data from Android. h. On the Android device:
a.Turn on Wi-Fi.
Draft

b. Open the Move to iOS app. |
Draft |
c. Follow the onscreen instructions.
WARNING: To avoid injury, read Important safety information for iPad before using iPad.
Set up cellular service on iPad (Wi-Fi + Cellular models)
If you have a Wi-Fi + Cellular model, you can sign up for a cellular data plan. This helps you stay connected when youʼre away from a Wi-Fi network.
You can set up a cellular data plan with the following:
eSIM
Embedded Apple SIM or Apple SIM card
Third-party nano-SIM (from a cellular provider)
Set up cellular service with eSIM
On models that support eSIM, you can activate the cellular service from your iPad. You may also be able to travel abroad with iPad and sign up for cellular service with a carrier in the country youʼre visiting. This isnʼt available in all regions, and not all carriers are supported.
d.Go to Settings  > Cellular Data.
e.Tap Add a New Plan.
h. Do one of the following:
If you donʼt have a QR code provided by your carrier, select a carrier, then follow the onscreen instructions.
If you have a QR code provided by your carrier, tap Other. Position iPad so that the QR code provided by your carrier appears in the frame, or enter the details manually. You may be asked to enter a confirmation code provided by your carrier.
Alternatively, you can activate your cellular plan through your carrierʼs app (if supported). Go to the App Store, download your carrierʼs app, then use the app to purchase a cellular plan.
Draft
You can store more than one eSIM on yourDraftiP d, but you can use only one eSIM at a time. To switch eSIMs, go to Settings > Cellular Data, then tap the plan you want to use (below
Cellular Plans).
Set up cellular service with an embedded Apple SIM or Apple SIM card
On models with an embedded Apple SIM or Apple SIM card, you can activate the cellular service from your iPad. Depending on your home carrier and your destination, you may also be able to travel abroad with iPad and sign up for cellular service with a carrier in the country youʼre visiting. This isnʼt available in all regions, and not all carriers are supported.
d.Go to Settings  > Cellular Data.
e.Tap Add a New Plan, then follow the onscreen instructions. You can choose a carrier and a plan, or you can add your iPad to an existing plan.
If youʼre traveling in another country and you want to use a local carrier instead of roaming, go to Settings > Cellular Data > Add a New Plan, then select a plan.
See the Apple Support article Use Apple SIM with Wi-Fi + Cellular models of iPad, or contact your carrier.
Install a nano-SIM
You can install an Apple SIM card or a nano-SIM provided by a carrier.
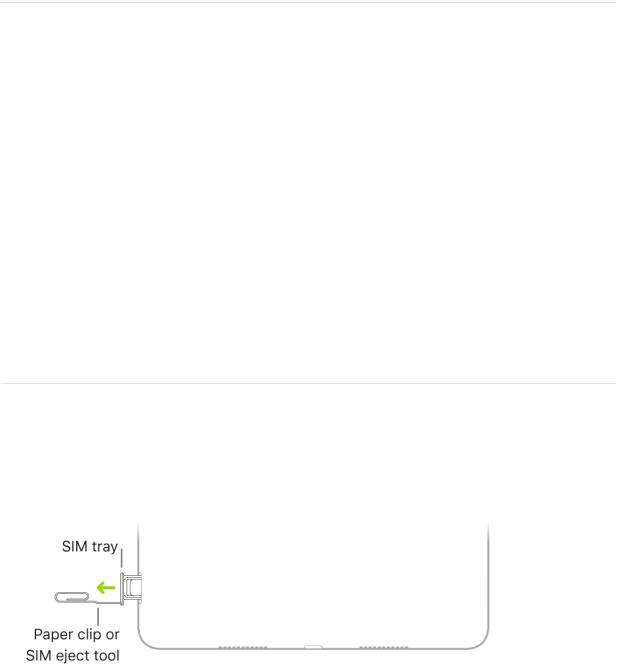
d.Insert a paper clip or SIM eject tool (not included) into the small hole of the SIM tray, then push in toward iPad to eject the tray.
Note: The shape and orientation of the SIM tray depend on the iPad model and your region.
e. Remove the tray from iPad.
h. Place the nano-SIM in the tray. The angled corner determines the correct orientation.
Draft

Draft
k.Insert the tray back into iPad.
l.If you previously set up a PIN on the nano-SIM, carefully enter the PIN when prompted.
WARNING: Never try to guess a SIM PIN. An incorrect guess can permanently lock your SIM, and you wonʼt be able to use cellular data through your carrier until you get a new SIM. See the Apple Support article Use a SIM PIN for your iPhone or iPad.
Cellular data requires a wireless data plan. If youʼre using a third-party nano-SIM, contact your carrier to set up service.
Manage your cellular data service
d.Go to Settings  > Cellular Data.
e.Do any of the following:
Restrict all data to Wi-Fi: Turn off Cellular Data.
Turn on or off LTE and roaming: Tap Cellular Data Options.
Turn on Personal Hotspot: Tap Set Up Personal Hotspot (available from certain carriers), then follow the onscreen instructions.
Manage your cellular account: Tap Manage [account name] or Carrier Services.
For information about managing your cellular data usage, see View or change cellular settings on iPad.
Important: When using cellular services through GSM networks, you need an eSIM, embedded Apple SIM, Apple SIM card, or third-party nano-SIM. When using cellular services through CDMA networks, you need an embedded Apple SIM, Apple SIM card, or third-party nano-SIM. Your iPad is subject to your wireless service providerʼs policies, which may include restrictions on switching service providers and roaming, even after the conclusion of any required minimum service contract. Contact your wireless service provider for more details. The availability of cellular capabilities depends on the wireless network, your iPad model, and your location.
Draft

Connect iPad to the InternetDraft
Connect your iPad to the Internet by using an available Wi-Fi network. Wi-Fi + Cellular models can also connect to the Internet by using a cellular network.
Connect iPad to a Wi-Fi network
d.Go to Settings  > Wi-Fi, then turn on Wi-Fi.
e.Tap one of the following:
A network: Enter the password, if required.
Other: Joins a hidden network. Enter the name of the hidden network, security type, and password.
If  appears at the top of the screen, iPad is connected to a Wi-Fi network. (To verify this, open Safari to view a webpage.) iPad reconnects when you return to the same location.
Connect iPad to a cellular network (Wi-Fi + Cellular models)
Your iPad automatically connects to your carrierʼs cellular data network if a Wi-Fi network isnʼt available. If iPad doesnʼt connect, check the following:
d.Verify that your SIM is activated and unlocked. See Set up cellular service on iPad (Wi-Fi + Cellular models).
e.Go to Settings  > Cellular Data.
h. Verify that Cellular Data is turned on.
When you need an Internet connection, iPad does the following, in order, until the connection is made:
Tries to connect to the most recently used available Wi-Fi network
Shows a list of Wi-Fi networks in range and connects to the one you choose
Connects to your carrierʼs cellular data network (Wi-Fi + Cellular models)
Note: If a Wi-Fi connection to the Internet isnʼt available, apps and services may transfer data over your carrierʼs cellular network, which may result in additional fees. Contact your carrier for information about your cellular data plan rates. To manage cellular data usage, see View or change cellular settings on iPad.
Draft

Manage Apple ID and iCloudDraftsettings on iPad
Your Apple ID is the account you use for just about everything you do with Apple— including storing your content in iCloud, streaming from Apple Music, and buying content from the iTunes Store, the App Store, and Apple Books. On your iPad, you can sign in to all Apple services with a single Apple ID and password. Itʼs best to have only one
Apple ID.
Use iCloud to securely store your photos, videos, documents, music, apps, and more— and keep them updated across all your devices. With iCloud, you can easily share photos, calendars, locations, and more with friends and family. You can even use iCloud to help you find your iPad if you lose it.
iCloud provides you with a free email account and 5 GB of storage for your mail, documents, photos and videos, and backups. Your purchased music, apps, TV shows, and books donʼt count against your available storage space. You can upgrade your iCloud storage right from iPad.
Note: Some iCloud features have minimum system requirements. iCloud may not be available in all regions, and iCloud features may vary by region.
Sign in with your Apple ID
If you didnʼt sign in during setup, do the following:
d.Go to Settings  .
.
e.Tap Sign in to your iPad.
h. Enter your Apple ID and password.
k.If you protect your account with two-factor authentication, enter the six-digit verification code.
If you forgot your Apple ID or password, go to the Recover your Apple ID website.
Change your Apple ID settings
Go to Settings  > [your name], where you can do the following:
Update your contact information
Change your password
Manage Family Sharing
Draft

Change your iCloud settings |
Draft |
Go to Settings  > [your name] > iCloud.
Do any of the following:
See your iCloud storage status.
Upgrade your iCloud storage—tap Manage Storage > Change Storage Plan.
Turn on the features you want to use, such as Photos, Mail, Contacts, and Messages.
Ways to use iCloud on iPad
Keep the following content up to date:
Messages, Mail, Contacts, Calendars, Notes, and Reminders
Photos and videos; see Use iCloud Photos on iPad
Music, apps, and books
Documents; see Use iCloud Drive on iPad
Draft
Bookmarks, your reading list, and the webpagesDraft you have open in Safari; see Browse the web using Safari on iPad
Passwords and credit cards; see Set up iCloud Keychain on iPad
You can also do the following:
View your iCloud data on iPhone, iPad, iPod touch, Mac, and iCloud.com (using a Mac or a Windows PC).
Share your photos and videos with the people you choose. See Share photos from iPad with Shared Albums in iCloud.
Share your iCloud storage on plans with 200 GB or more with up to six family members. See Set up Family Sharing on iPad.
Locate iOS, Apple Watch, or Mac devices that belong to you or your family members. See Use Find My iPhone to locate your device.
Find your friends and family; you, your friends, and family can share locations, follow each other, and see everyoneʼs location on a map. See Locate your friends and family from your iPad.
Back up and restore your data. See Back up iPad using iCloud or iTunes.
Note: If you enable iCloud for apps such as Music, Photos, Calendar, and Contacts on your iPad, you canʼt use iTunes to sync them with your computer.
Other ways to view the iPad User Guide
You can view the iPad User Guide in the Safari app  , or read it in the Books app
  when youʼre offline.
View the user guide in Safari
In Safari, go to https://support.apple.com/guide/ipad.
To view the user guide in a different language, scroll down to the bottom of the page, tap the region link (United States, for example), then choose a region.
Tip: For quick access, add the guide to your Home screen or add a bookmark in Safari. Tap  , then choose any of the following:
Add to Home Screen: The shortcut appears as a new icon on the Home screen.
Add Bookmark: The bookmark appears when you tap  in Safari.
Draft

Draft
Download the user guide from Apple Books
If you download the user guide from Apple Books, you can read it even when iPad isnʼt connected to the Internet.
d.Open the Books app  .
.
e.Tap Search, then enter “iPad User Guide for iOS 12.2.”
h.Tap Get, then wait for the book to download. See Buy books from Apple Books on iPad.
Draft
Draft
Basics
Wake and unlock iPad
iPad turns off the display to save power, locks for security, and goes to sleep when youʼre not using it. You can quickly wake and unlock iPad when you want to use it again.
Wake iPad
To wake iPad, do one of the following:
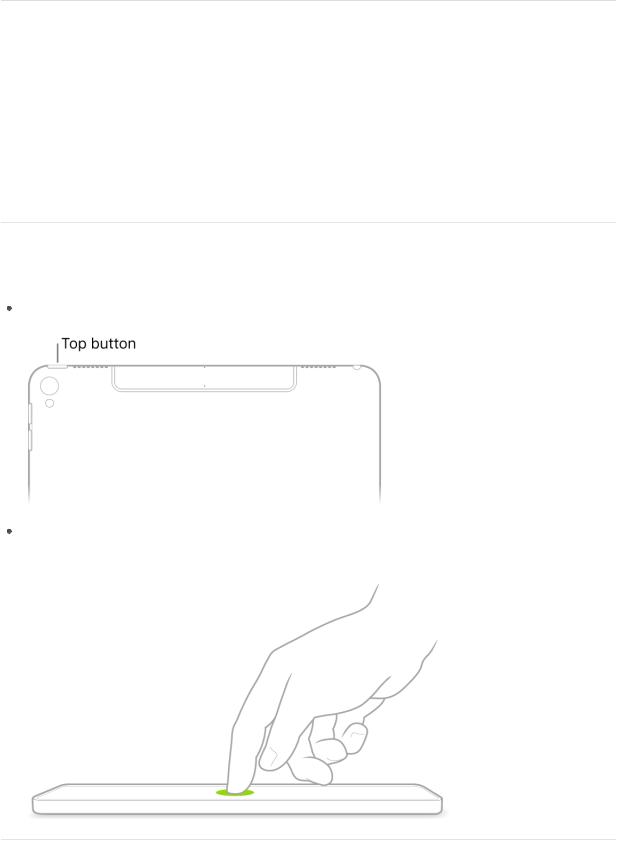
Press the top button.
Tap the screen. Or, on supported models, you can tap the screen with Apple Pencil to wake iPad and open Notes.
Unlock iPad with Face ID
d.On supported models, tap the screen, then glance at your iPad.
The lock icon animates from closed to open to indicate that iPad is unlocked.
e.Swipe up from the bottom of the screen to view the Home screen.
Draft
To lock iPad again, press the top button. iPadDraftlocks automatically if you donʼt touch the screen for a minute or so. However, if Attention Aware Features is turned on in Settings  > Face ID & Passcode, iPad wonʼt dim or lock as long as it detects attention.
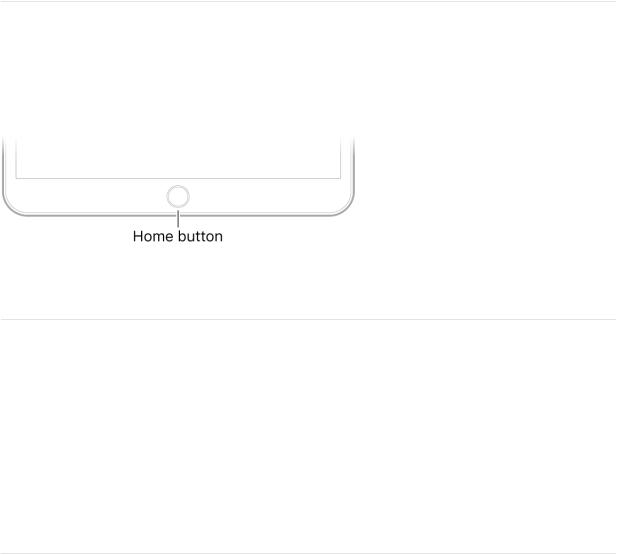
Unlock iPad with Touch ID
On supported models, press the Home button using the finger you registered with Touch ID.
If you didnʼt set up Touch ID when you set up iPad, see Set up Touch ID on iPad.
To lock iPad again, press the top button. iPad locks automatically if you donʼt touch the screen for a minute or so.
Unlock iPad with a passcode
d.Swipe up from the bottom of the Lock screen or press the Home button.
e.Enter the passcode (if you set up iPad to require a passcode).
If you didnʼt create a passcode when you set up iPad, see Set or change the passcode.
To lock iPad again, press the top button. iPad locks automatically if you donʼt touch the screen for a minute or so.
Learn basic gestures to interact with iPad
Control iPad and its apps using a few simple gestures—tap, swipe, scroll, and zoom.
Draft

Draft
Tap. Touch one finger lightly on the screen.
Swipe. Move one finger across the screen quickly.
Scroll. Move one finger across the screen without lifting. For example, in Photos, you can drag a list up or down to see more. Swipe to scroll quickly; touch the screen to stop scrolling.
Zoom. Place two fingers on the screen near each other. Spread them apart to zoom in, or move them toward each other to zoom out.
You can also double-tap a photo or webpage to zoom in, and double-tap again to zoom out.
In Maps, double-tap and hold, then drag up to zoom in or drag down to zoom out.
Learn gestures for iPad models with Face ID
Hereʼs a handy reference to the gestures you use for interacting with iPad Pro (11-inch) and iPad Pro (12.9-inch) (3rd generation).
Go Home. Swipe up from the bottom edge of the screen to return to the Home screen at any time. See Explore the iPad Home screen and open apps.
Quickly access controls. Swipe down from the top-right corner to open Control Center. Touch and hold a control to reveal more options. To add or remove items, go to Settings > Control Center > Customize Controls. See Use and customize Control Center on iPad.
Switch between open apps. Swipe up from the bottom edge, pause in the center of the screen, then lift your finger off the screen. From any open app, you can also swipe right along the bottom to quickly switch apps. See Switch between apps on iPad.
Open the dock within an app. Swipe up from the bottom edge of the screen and pause to reveal the Dock. To quickly open another app, tap it in the Dock. See Open an app from the Dock.
Ask Siri. Just say, “Hey Siri.” Or press and hold the top button and make your request. Siri listens until you release the button. See Ask Siri on iPad.
Draft
Draft
Use Accessibility Shortcut. Triple-click the top button. See Use accessibility shortcuts on iPad.
Take a screenshot. Simultaneously press and quickly release the top button and volume up button. See Take a picture of the screen on iPad.
Turn off. Simultaneously press and hold the top button and either volume button until the sliders appear, then drag the top slider to power off. Or go to Settings > General > Shut Down. See Turn iPad off and on.
Force restart. Press and release the volume up button, press and release the volume down button, then press and hold the top button until the Apple logo appears. See Force restart iPad.
Explore the iPad Home screen and open apps
Get to know the Home screen and apps on your iPad. The Home screen shows all your apps organized into pages. More pages are added when you need space for apps.
d.To go to the Home screen, swipe up from the bottom edge of the screen or press the Home button.
Draft

Draft
e. Swipe left or right to browse apps on other Home screen pages.
h. To open an app, tap its icon on the Home screen.
Draft

k.To return to the first Home screen page,Draftswipe up from the bottom edge of the screen or press the Home button.
You can also move, organize, or remove apps. See Move and organize apps on iPad and Remove apps from iPad.
Change the iPad settings
Use Settings  (located on the Home screen) to configure and customize your iPad settings. Set your language and region, change the name of your iPad, choose different sounds for notifications, and much more. The following sections give some examples.
Set the date and time
By default, the date and time, visible on the Lock screen, are set automatically based on your location. If theyʼre incorrect, you can adjust them.
d. Go to Settings  > General > Date & Time.
Draft

e. Turn on either of the following: |
Draft |
Set Automatically: iPad gets the correct time over the network and updates it for the time zone youʼre in. Some networks donʼt support network time, so in some regions iPad may not be able to automatically determine the local time.
24-Hour Time: (not available in all regions) iPad displays the hours from 0 to 23.
Set the language and region
d.Go to Settings  > General > Language & Region.
e.Set the following:
The language for iPad
The region
The calendar format
The temperature unit (Celsius or Fahrenheit)
h.To add a keyboard for another language, go to Settings  > General > Keyboard > Keyboards.
See Add or change keyboards on iPad.
Change the name of your iPad
The name of your iPad is used by iTunes, iCloud, AirDrop, and Personal Hotspot.
d.Go to Settings  > General > About > Name.
e.Tap  , enter a new name, then tap Done.
Set up mail, contacts, and calendar accounts
In addition to the apps that come with iPad and that you use with iCloud, iPad works with Microsoft Exchange and many of the most popular Internet-based mail, contacts, and calendar services.
d.Go to Settings  > Passwords & Accounts > Add Account.
e.To add a mail account, tap an email service—for example, Google, Yahoo, or Aol.com —then enter your email account information.
h. To add a contacts or calendar account, tap Other, then do any of the following:
Contacts using an LDAP or CardDAV account, if your company or organization supports it; see Use other contact accounts on iPad
Draft

Calendars using a CalDAV calendarDraftaccount; you can also subscribe to iCalendar (.ics) calendars or import them from Mail; see Set up multiple calendars on iPad
Add a contacts account: Tap Add LDAP Account or Add CardDAV Account (if your company or organization supports it), then enter your information; see Use other contact accounts on iPad.
Add a calendar account: Tap Add CalDAV Account, then enter your information; see Set up multiple calendars on iPad.
Subscribe to iCal (.ics) calendars: Tap Add Subscribed Calendar, then enter the URL of the .ics file to subscribe to; or import an .ics file from Mail.
For information about setting up a Microsoft Exchange account in a corporate environment, see the Apple Support article Set up Exchange ActiveSync on your iPhone, iPad, or iPod touch.
Find and change other settings
Go to Settings  , swipe down from the left side of the screen to reveal the search field, then enter a term—alert, password, or iTunes, for example.
Draft
 Loading...