


Apple Confidential
Camera |
12 |
|
Camera at a glance
Quick! Get the camera! From the Lock screen, just swipe  up. Or swipe up from the bottom edge of the screen to open Control Center, then tap
  .
.
Note: When you open Camera from the Lock screen, you can view and edit photos and videos you take while the device is locked by tapping the thumbnail at the lower-left corner of the screen.To share photos and videos, first unlock iPad.
With iPad, you can take both still photos and videos using the front FaceTime camera or the back camera.
Switch between cameras.
Turn on HDR.
Take a photo.
View the photos and videos you’ve taken.
90
Apple Confidential
Take photos and videos
Camera offers several modes, which let you shoot stills, square-format photos, time-lapse, videos, and panoramas.
Choose a mode. Drag up or down, or tap the camera mode labels to choose Time-Lapse, Video, Photo, Square, or Pano.
Take a photo. Choose Photo, then tap the white Take Picture button or press either volume button.
••
••
Take Burst shots: (iPad Air 2) Touch and hold the Take Picture button to take rapid-fire photos in bursts (available while in Square or Photo mode).The shutter sound is different, and the counter shows how many shots you’ve taken, until you lift your finger.To see the suggested shots and select the photos you want to keep, tap the thumbnail, then tap Select. The gray dot(s) mark the suggested photos. To copy a photo from the burst as a separate photo in your Bursts album in Photos, tap the circle in the lower-right corner of the photo. To delete the burst of photos, tap it, then tap  .
.
Apply a filter: Tap  to apply different color effects, such as Mono or Chrome.To turn off a filter, tap
  , then tap None.You can also apply a filter later, when you edit the photo. See Edit photos and trim videos on page 87.
A rectangle briefly appears where the exposure is set.When you photograph people, face detection (iPad 3rd generation or later) balances the exposure across up to 10 faces. A rectangle appears for each face detected.
Exposure is automatic, but you can set the exposure manually for the next shot by tapping an object or area on the screen.With an iSight camera, tapping the screen sets the focus and the exposure, and face detection is temporarily turned off.To lock the exposure and focus, touch and hold until the rectangle pulses. Take as many photos as you want. When you tap the screen again, the automatic settings and face detection turn back on.
Adjust the exposure. Tap to see 

 next to the exposure rectangle, then slide up or down to adjust the exposure.
Chapter 12 Camera |
91 |

Apple Confidential
Take a panorama photo. (iSight camera) Choose Pano, tap the Take Picture button, then pan slowly in the direction of the arrow.To pan in the other direction, first tap the arrow.To pan vertically, first rotate iPad to landscape orientation.You can reverse the direction of a vertical pan, too.
Capture an experience with time-lapse. Choose Time-Lapse, set up iPad where you want, then tap the Record Time-Lapse Video button to start capturing a sunset, a flower opening, or other experiences over a period of time. Tap the Record Time-Lapse Video button again to stop. The time-lapse photos are compiled into a short video that you can watch and share.
Shoot some video. Choose Video, then tap the Record Video button or press either volume button to start and stop recording. Video records at 30 fps (frames per second).
Take it slow. (iPad Air 2) Choose Slo-Mo to shoot slow motion video at 120 fps. You can set which section to play back in slow-motion when you edit the video.
Set the slow-motion section of a video. Tap the thumbnail, then use the vertical bars beneath the frame viewer to set the section you want to play back in slow motion.
Zoom in or out. (iSight camera) Pinch the image on the screen. With iPad Air (all models) and iPad mini 2 and later, zooming works in video mode as well as photo mode.
If Location Services is turned on, photos and videos are tagged with location data that can be used by apps and photo-sharing websites. See Privacy on page 42.
Use the capture timer to put yourself in the shot. Avoid “camera shake” or add yourself to a picture by using the capture timer.To include yourself, first stabilize iPad and frame your shot.
Tap  , tap 3s (seconds) or 10s, then tap the Take Picture button.
Want to capture what’s displayed on your screen? Simultaneously press and release the Sleep/ Wake and Home buttons. The screenshot is added to the Photos tab in Photos and can also be viewed in the Camera Roll album or All Photos album (if you’re using iCloud Photo Library).
Make it better. You can edit photos and trim videos, right on iPad. See Edit photos and trim videos on page 87.
Use Siri. Say something like:
••
••
“Open Camera” “Take a picture”
Chapter 12 Camera |
92 |
Apple Confidential
HDR
HDR (High Dynamic Range) helps you get great shots, even in high-contrast situations. The best parts of three quick shots, taken at different exposures (long, normal, and short), are blended together into a single photo.
Use HDR. (iSight camera on iPad 3rd generation or later) Tap HDR. For best results, keep both iPad and the subject still.
Keep the normal photo and the HDR version. Go to Settings > Photos & Camera > Keep Normal Photo. Both the normal and HDR versions of the photo appear in Photos. HDR versions of photos in your albums are marked with “HDR” in the corner.
View, share, and print
Photos and videos you take are saved in Photos. With iCloud Photo Library enabled, all new photos and videos are automatically uploaded and available in Photos on all your iOS 8.1 or later devices set up with iCloud Photo Library. See iCloud Photo Library on page 84. With iCloud
Photo Library turned off, you can collect up to 1,000 of your most recent photos from all of your enabled devices in the My Photo Stream album. See My Photo Stream on page 84.
View your photos. Tap the thumbnail image, then swipe left or right to see the photos you’ve taken recently. Tap All Photos to see everything in the Photos app.
Tap the screen to show or hide the controls.
Get sharing and printing options. Tap  . See Share from apps on page 36.
Upload photos and videos. Use iCloud Photo Library to upload photos and videos from your iPad to iCloud and access them on your iOS 8.1 or later devices signed in to iCloud using the same Apple ID. You can also upload and download your photos and videos from the Photos app on iCloud.com. See iCloud Photo Library on page 84.
Sync photos and videos to iPad from your Mac. Use the Photos settings pane in iTunes. See Sync with iTunes on page 20.
Camera settings
Go to Settings > Photos & Camera for camera options, which include:
••
••
••
••
iCloud Photo Library, My Photo Stream, and iCloud Photo Sharing
Slideshow
Grid
HDR
Adjust the volume of the shutter sound with the Ringer and Alerts settings in Settings > Sounds.
Or mute the sound using the Ring/Silent switch. (In some countries muting is disabled.)
Chapter 12 Camera |
93 |
Apple Confidential
Contacts |
13 |
|
Contacts at a glance
iPad lets you access and edit your contact lists from personal, business, and other accounts.
Open in
Messages.
 Open in
FaceTime.
Open in Maps.
Set your My Info card for Safari, Siri, and other apps. Go to Settings > Mail, Contacts, Calendars, tap My Info, then select the contact card with your name and information.
Let Siri know who’s who. While editing your My Info card, tap Add Related Name to define relationships you want Siri to know about, so you can say things like “send a message to my sister.”You can also add relationships using Siri. Say, for example,“John Appleseed is my brother.”
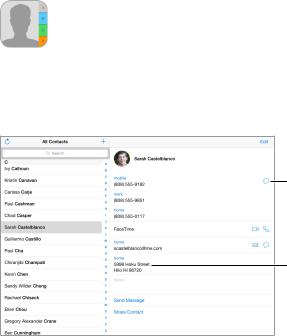
Use Siri. Say, for example,“Sarah Castelblanco is my sister.”
Find a contact. Use the search field at the top of the contacts list.You can also search your contacts using Spotlight Search (see Spotlight Search on page 33).
Use Siri. Say, for example,“What’s my brother’s work address?”
Share a contact. Tap a contact, then tap Share Contact. See Share from apps on page 36.
Change a label. If a field has the wrong label, such as Home instead of Work, tap Edit.Then tap the label and choose one from the list, or tap Custom Field to create one of your own.
Add your friends’social profiles.While viewing a contact, tap Edit, then tap“add social profile.”
You can add Twitter, Facebook, LinkedIn, Flickr, Myspace, and Sina Weibo accounts, or create a custom entry.
Delete a contact. Go to the contact’s card, then tap Edit. Scroll down, then tap Delete Contact.
94
Apple Confidential
Add contacts
Besides entering contacts, you can:
•• Use your iCloud contacts: Go to Settings > iCloud, then turn on Contacts.
•• Import your Facebook Friends: Go to Settings > Facebook, then turn on Contacts in the “Allow These Apps to Use Your Accounts” list. This creates a Facebook group in Contacts.
•• Use your Google contacts: Go to Settings > Mail, Contacts, Calendars, tap your Google account, then turn on Contacts.
•• Access a Microsoft Exchange Global Address List: Go to Settings > Mail, Contacts, Calendars, tap your Exchange account, then turn on Contacts.
•• Set up an LDAP or CardDAV account to access business or school directories: Go to Settings > Mail, Contacts, Calendars > Add Account > Other. Tap Add LDAP account or Add CardDAV account, then enter the account information.
•• Sync contacts from your computer: In iTunes on your computer, turn on contact syncing in the device info pane. For information, see iTunes Help.
•• Import contacts from a vCard: Tap a .vcf attachment in an email or message.
Search a directory. Tap Groups, tap the GAL, CardDAV, or LDAP directory you want to search, then enter your search. To save a person’s info to your contacts, tap Add Contact.
Show or hide a group. Tap Groups, then select the groups you want to see. This button appears only if you have more than one source of contacts.
Update your contacts using Twitter, Facebook, and Sina Weibo. Go to Settings > Twitter, Settings > Facebook, or Settings > Sina Weibo, then tap Update Contacts. This updates contact photos and social media account names in Contacts.
Unify contacts
When you have contacts from multiple sources, you might have multiple entries for the same person. To keep redundant contacts from appearing in your All Contacts list, contacts from different sources that have the same name are linked and displayed as a single unified contact. When you view a unified contact, the title Unified Info appears.
Unify contacts. If two entries for the same person aren’t linked automatically, you can unify them manually. Edit one of the contacts, tap Link Contact, then choose the other contact to link to.
Linked contacts aren’t merged. If you change or add information in a unified contact, the changes are copied to each source account where that information already exists.
If you link contacts with different first or last names, the names on the individual cards won’t change, but only one name appears on the unified card.To choose which name appears when you view the unified card, tap Edit, tap the linked card with the name you prefer, then tap Use This Name For Unified Card.
Contacts settings
Go to Settings > Mail, Contacts, Calendars, where you can:
••
••
••
••
Change how contacts are sorted
Display contacts by first or last name
Change how long names are shortened in lists
Choose to show recent contacts in the multitasking screen
Chapter 13 Contacts |
95 |
 Loading...