


XC-55
3-861-203-11 (1)
Sony Corporation 2000
Printed in Japan
XC-55/55BB
Camera XC-55
Camera XC-55BB
GND2
Monitor
Abnormal
electricity
Power supply unit
GND1
(Ground electric potential difference)
JB-77 Junction box
PC-XC12
Connector (12-pin) CCXC-T20P02 Special cable for
the XC-55BB
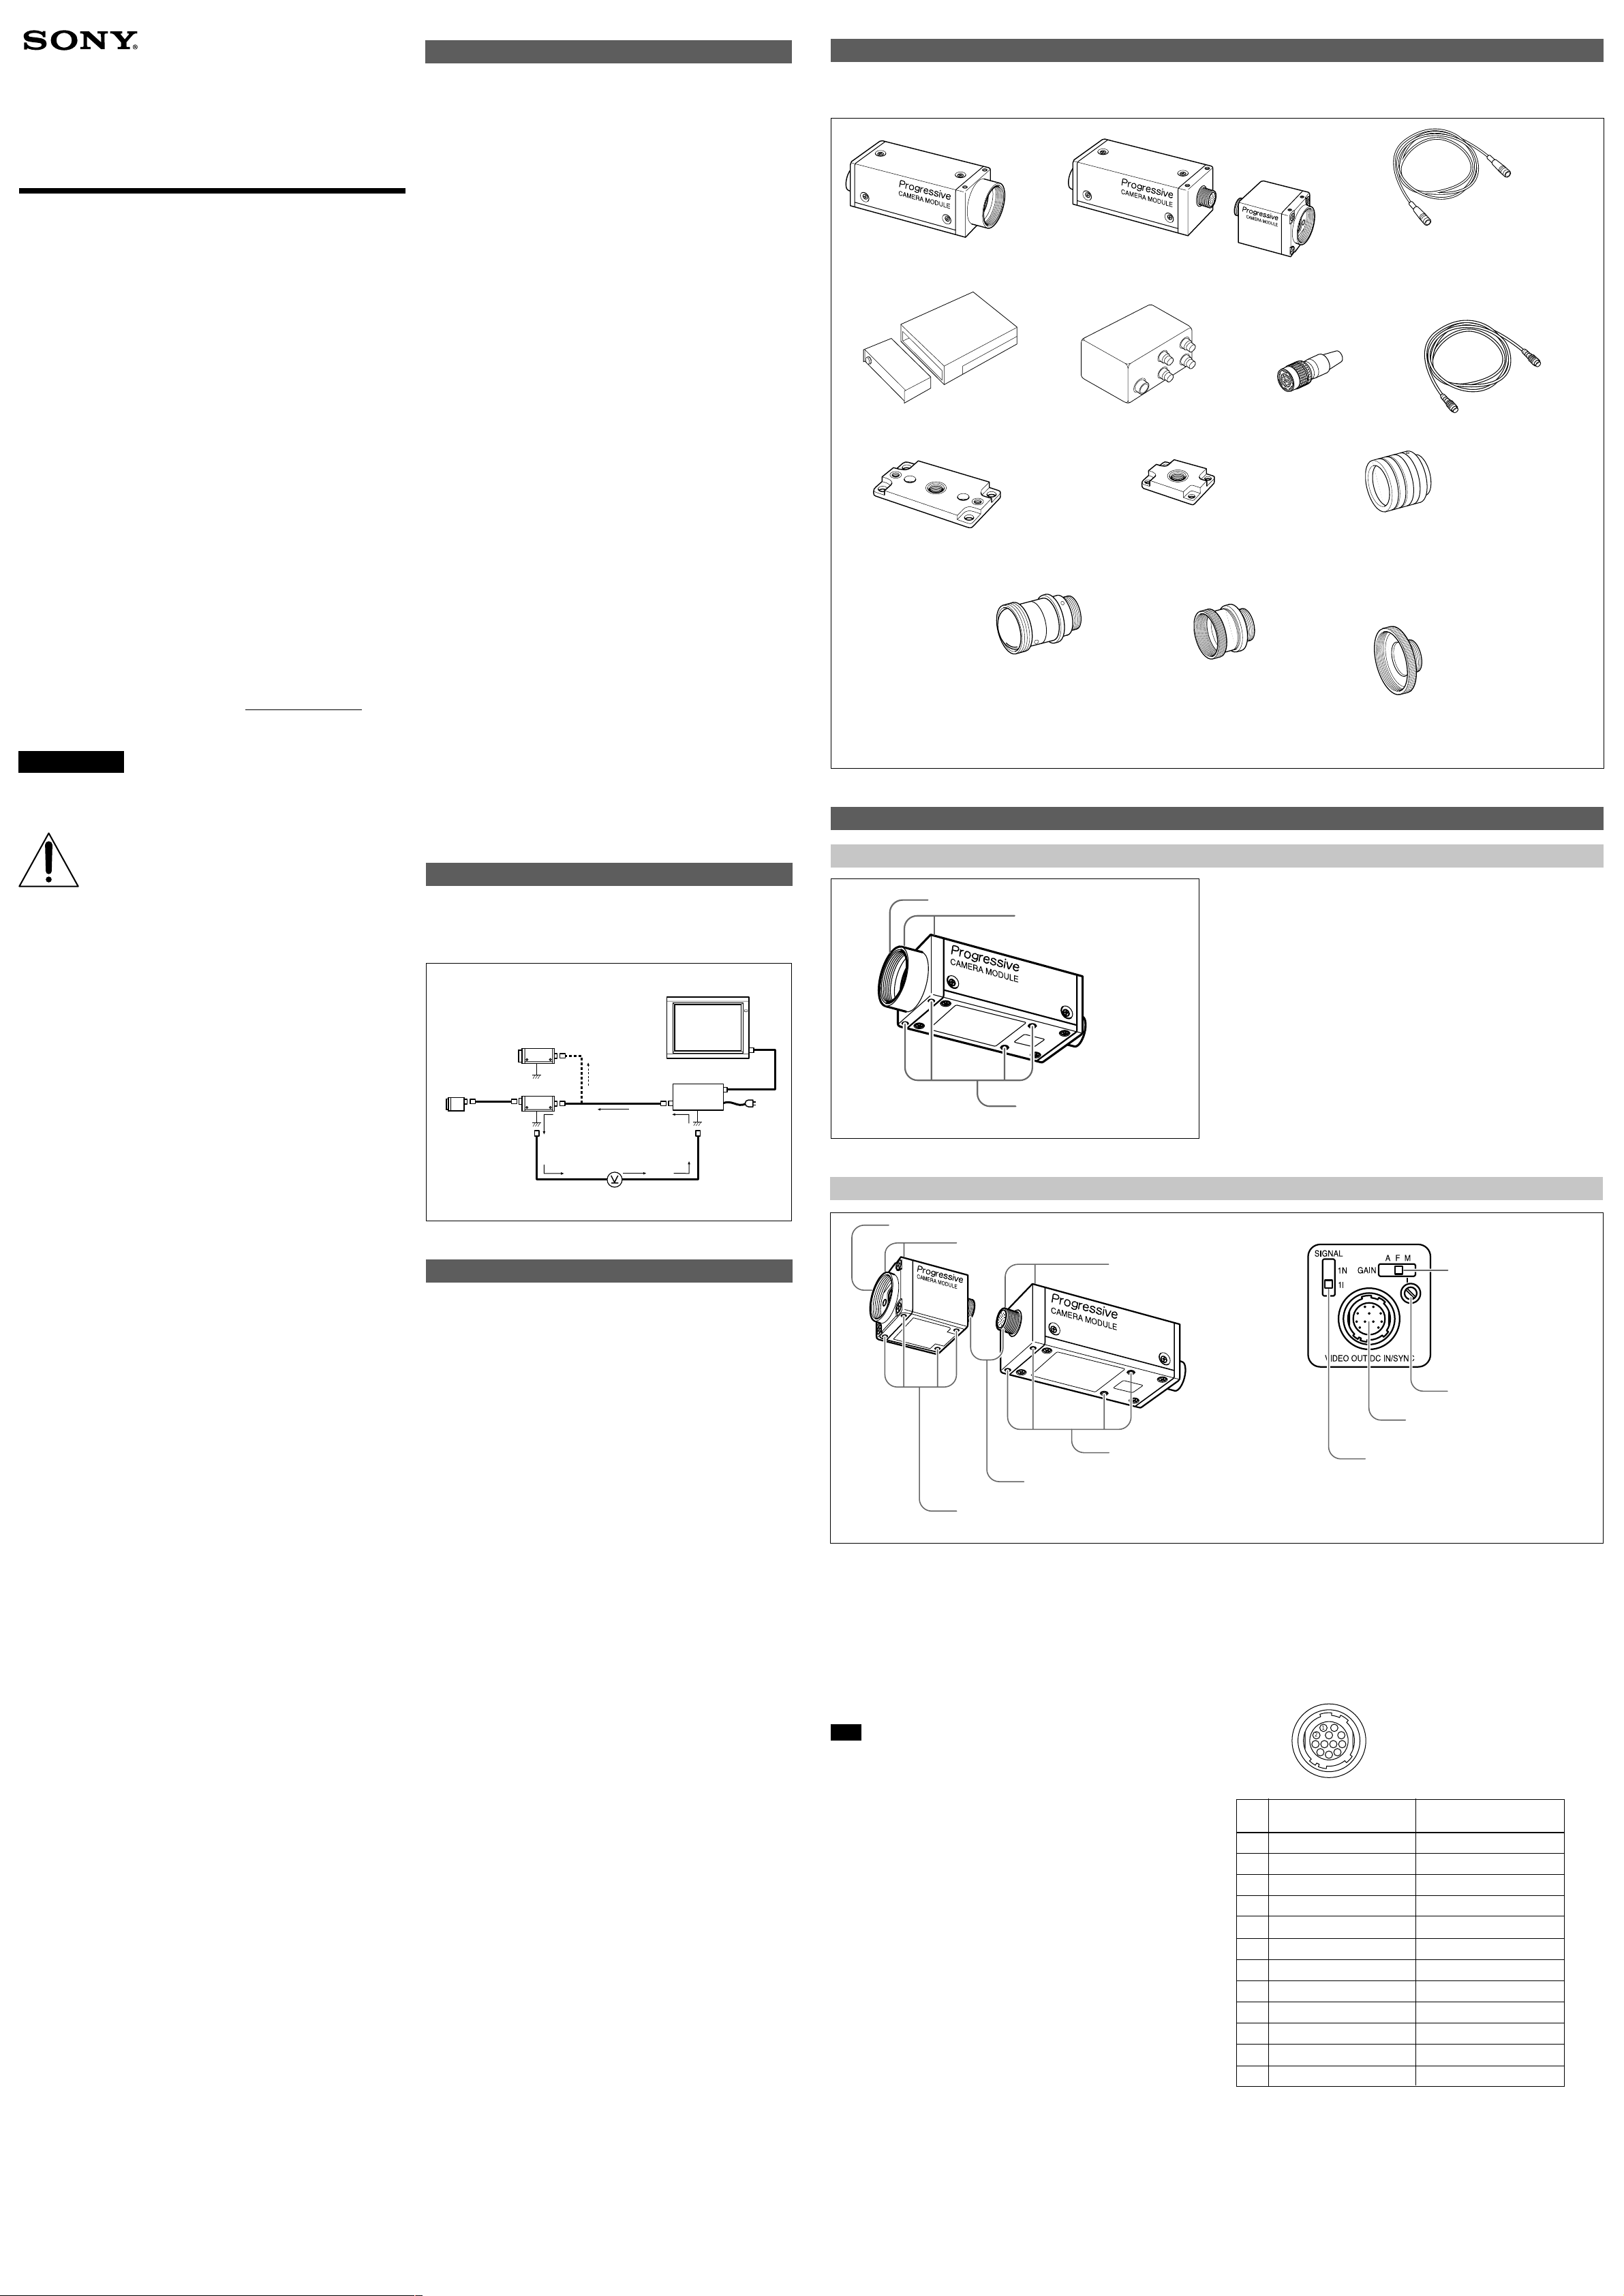
XC-55 Video Camera Module
Camera cables
CCXC-12P02S (2 m [6.6 feet])
CCXC-12P05S (5 m [16.5 feet])
CCXC-12P10S (10 m [33.3 feet])
CCXC-12P25S (25 m [83.25 feet])
CCXC-12P05D/U/R/L (5 m [16.5 feet])
CCMC-12P02 (2 m [6.6 feet])
XC-55BB Video Camera
Module
Control unit (CCU)
Head unit (CHU)
Camera adaptor
DC-77RR/77RRCE
VCT-55I
Tripod Adaptor
(Insulated)
(For the XC-55, the
XC-55BB CCU)
NF-mount lenses
VCL-03S12XM
VCL-06S12XM
VCL-12S12XM
VCL-12SXM
C-mount lenses
VCL-50Y-M
VCL-25Y-M
VCL-16Y-M
VCL-12YM (Standard)
VCL-08YM
LO-999CMT
C-mount adaptor
(For the XC-55BB)
VCT-333I
Tripod Adaptor (Insulated)
(For the XC-55BB CHU)
Extension ring kit
LO-77ERK (For the XC-55)
LO-999ERK (For the XC-55BB)
Location and Function of Parts and Controls
XC-55 Front Panel/Top Panel/Bottom Panel
1 Lens mount (C-mount)
Attach a VCL-12YM standard lens, or any C-mount lens or other optical
equipment.
2 Reference holes for locking the camera/Tripod screw holes
High-precision screw holes for locking the camera onto the lens
mounted surface. Locking the camera minimizes optical axis deviation.
For details, see the Application Guide.
You can attach a tripod to the reference holes (4) on the bottom. You
will need a tripod adapter VCT-55I to install the tripod.
There are two more reference holes on the front of the top surface.
1 Lens mount (C-mount)
2 Reference holes/
Tripod screw holes
1 Lens mount (NF-mount)
Install an NF mounted lens or optical device, e.g., the standard lens
VCL-12S12XM. If you install a C-mount lens on the XC-55BB, you will
need the C-mount adaptor LO-999CMT.
2 Reference holes for locking the camera/Tripod screw holes
(head unit)
You can attach a tripod to the reference holes (4) on the bottom. You
will need a tripod adapter VCT-333I to install the tripod.
There are two more reference holes on the front of the top surface.
Note
The XC-55BB head unit (CHU) must have the same serial number as
the control unit (CCU).
3 Connector for the special cable
Connect the head unit and the control unit with the supplied cable
CCXC-T20P02.
4 Reference holes for locking the camera/Tripod screw holes
(control unit)
High-precision screw holes for locking the camera onto the lens
mounted surface. Locking the camera minimizes optical axis deviation.
For details, see the Application Guide.
You can attach a tripod to the reference holes on the bottom of the
head unit. You will need a tripod adapter VCT-55I to install the tripod.
There are two more reference holes on the front of the top surface.
5 GAIN switch
Use this switch to select the following modes:
A: Automatic
F: Fixed
M:Manual
6 Manual gain control
Controls the gain level (0 to +18 dB) in manual gain mode (with the
GAIN switch 5 set to M).
3 Connector for the
special cable
2 Reference holes/
Tripod screw holes
1 Lens mount (NF-mount)
4 Reference holes/
Tripod screw holes
8 SIGNAL switch
6 Manual gain control
5 GAIN switch
7 VIDEO OUT/DC IN/
SYNC connector
8 SIGNAL switch
Use this switch to select the following modes:
1I : Outputs the field accumulated signals (1/60 second interlaced)
from VIDEO OUTPUT.
1N : Outputs the 1/30 non-interlaces signals from VIDEO OUTPUT.
1
2
3
4
5
6
7
8
9
10
11 12
CCD-Black-and-White
Video Camera Module
Operating Instructions
Before operating the unit, please read these instructions
thoroughly and retain them for future reference.
Owner’s Record
The model and serial numbers are located on the bottom.
Record the serial number in the space provided below.
Refer to these numbers whenever you call upon your Sony dealer
regarding this product.
Model No. XC-55/55BB Serial No.
WARNING
To prevent fire or shock hazard, do not expose
the unit to rain or moisture.
This symbol is intended to alert the user to the
presence of important operating and maintenance
(servicing) instructions in the literature
accompanying the appliance.
For the customers in the USA
This equipment has been tested and found to comply with the limits
for a Class A digital device, pursuant to Part 15 of the FCC Rules.
These limits are designed to provide reasonable protection against
harmful interference when the equipment is operated in a
commercial environment. This equipment generates, uses, and can
radiate radio frequency energy and, if not installed and used in
accordance with the instruction manual, may cause harmful
interference to radio communications. Operation of this equipment
in a residential area is likely to cause harmful interference in which
case the user will be required to correct the interference at his own
expense.
You are cautioned that any changes or modifications not expressly
approved in this manual could void your authority to operate this
equipment.
The shielded interface cable recommended in this manual must be
used with this equipment in order to comply with the limits for a
digital device pursuant to Subpart B of Part 15 of FCC Rules.
Für Kunden in Deutschland
Dieses Produkt kann im kommerziellen und in begrenztem Maße
auch im industriellen Bereich eingesetzt werden. Dies ist eine
Einrichtung, welche die Funk-Entstörung nach Klasse B besitzt.
For the customers in Canada
This Class A digital apparatus complies with Canadian ICES-003.
Pour les utilisateurs au Canada
Cet appareil numérique de la classe A est conforme à la norme
NMB-003 du Canada.
Features
The XC-55/55BB is a black-and-white video camera module that uses
a CCD (Charge Coupled Device) solid-state image sensor compatible
with the VGA (Video Graphic Array) format.
The CCD uses an “all pixels independent read-out” method, which
enables the CCD to output all pixel signals in 1/30 sec.
Wide range of operating modes
You can easily select the required operating mode. The gain, for
example, can be set to AGC (A), to fixed gain (F), or to manual gain
control (M) with a switch on the rear. An internal switch switches γ
(gamma) compensation on or off.
For details on the internal switch, see the Application Guide.
External synchronization
The camera module can be synchronized with the signals (explained
below). The capture frequency range is ±1% of the horizontal scan
frequency.
HD (horizontal drive)/VD (vertical drive) signals:
The camera module analyzes the HD and VD signals input from
external synchronization and automatically determines whether to
operate in interlace or non-interlace mode.
Wide range of electronic shutter modes
The electronic shutter built into this unit is indispensable in attaining the
level of image resolution required for factory automation, etc., and
comes with a variety of shutter modes.
• Electronic shutter
You can select the shutter speed from a wide range of settings (1/100
to 1/8000 sec.).
• E-DONPISHA
1)
II shutter
The E-DONPISHA is an external trigger shutter that can be useful
when shooting moving objects. This function enables a camera in a
fixed location to capture flickerless images of fast-moving objects.
The shutter speed of E-DONPISHA II is controlled by the pulse width
of the external trigger signal.
1)
“DONPISHA” is a registered trademark of Sony Corporation.
Restart/Reset function
Adjusts the timing for image input/output by using a VD pulse for
external synchronization. A long exposure is also available.
Body fixing
High-precision screw holes are provided for mounting a camera module
according to the surface plane of the lens mount face, allowing
mounting with an absolute minimum deviation of the optical axis.
Other features
• Long life and high reliability
• Fine image, minimum distortion
• High resistance to vibration and impact
• Quick start-up
• Stability against strong magnetic fields
• Low power consumption 1.8 W (XC-55)
2.2 W (XC-55BB)
Precautions
Do not touch any internal switches
Do not touch any internal switches unless instructed to do so in the
Application Guide. Touching those switches may damage the system.
For details, see the Application Guide.
To obtain an application guide, contact your Sony dealer.
Power supply
Be sure to operate the video camera module according to the power
requirement outlined under “Specifications” of the back side. In the
U.S., use only with a UL-listed 12 V DC Class 2 power supply.
Foreign objects
Be careful not to spill liquids, or drop any flammable or metal objects
into the camera body.
Operating and storage locations
Avoid operating or storing the camera in the following locations.
• Extremely hot or cold places (operating temperature
–5°C to +45°C [23°F to 113°F])
• In direct sunlight for long periods, or close to heating equipment
• Damp or dusty places
• Where it is exposed to rain
• Locations subject to strong vibration
• Close to generators producing strong magnetism
• Close to generators producing powerful electromagnetic radiation,
such as radio or TV transmitters
Care
• Remove dust or dirt on the surface of the lens or optical filter with a
blower.
• Clean the cabinet with a soft, dry cloth. If it is very dirty, use a cloth
dampened with a small quantity of neutral detergent, then wipe dry.
• Avoid the use of volatile solvents such as alcohol, benzene, and
thinners. They may damage the surface finish, or impair the operation
of the shutter adaptor.
Ventilation
Do not wrap the camera in a cloth, etc., during operation. This may
cause the internal temperature to rise excessively and the camera to
malfunction.
Miscellaneous
• Be careful not to spill water or other liquids on the camera or allow
combustible or metallic objects inside the body. If used with foreign
objects inside, the camera is liable to fail or cause a fire or an electric
shock.
• If the product is transported or shipped, repack it as originally packed
at the factory, or in materials equal in quality.
In the event of any problems with the operation of the video camera
module, contact your Sony service representative.
When installing the camera
When you install the camera with various peripheral devices and if the
devices have different ground electric potential, ground only one
device. In case there is an ground electric potential difference, the
camera may be damaged.
System Components
Pictured below are the components of the XC-55/55BB video camera
module system.
A special cable CCXC-T20P02 is supplied with the XC-55BB. (An
additional cable can be purchased as needed.)
XC-55BB Front Panel/Top Panel/Bottom Panel and XC-55/55BB Rear Panel
7 VIDEO OUT/DC IN/SYNC (Video signal output/DC power input/
sync signal I/O) connector (12-pin)
Connect a CCXC-12P05S camera cable to this connector, the +12 V
DC power supply, and the video signal output from the camera module.
When a sync signal generator outputting external sync signals is
connected to this connector, the camera module is synchronized with
the external sync signals.
The pin configuration of this connector is as follows:
Pin
no.
External sync mode
1 Ground Ground
2 +12 V DC +12 V DC
3 Video output (ground) Video output (ground)
4 Video output (signal) Video output (signal)
5 HD input (ground) HD output (ground)
6 HD input (signal) HD output
a)
(signal)
7 VD input (signal) VD output
a)
(signal)
8 TRIG input (ground) TRIG input (ground)
9 TRIG input (signal) TRIG input (signal)
10 Ground Ground
11 +12 V DC +12 V DC
12 VD input (ground) VD output (ground)
a)
An internal switch change is necessary to output HD and VD signals.
For details, see the Application Guide.
Camera sync output
2 Reference holes
2 Reference holes
4 Reference holes
 Loading...