


4-692-908-23(1)
Bluetooth®
Audio System
Аудиосистема Bluetooth®
Operating Instructions |
GB |
|
|
|
|
Bedienungsanleitung |
DE |
|
|
|
|
Mode d’emploi |
FR |
|
|
|
|
Istruzioni per l’uso |
IT |
|
|
|
|
Gebruiksaanwijzing |
NL |
|
|
|
|
Инструкция по |
RU |
эксплуатации |
|
|
|
|
|
To cancel the demonstration (DEMO) display, see page 16.
For the connection/installation, see page 29.
Zum Deaktivieren der Demo-Anzeige (DEMO) schlagen Sie bitte auf Seite 19 nach.
Informationen zum Anschluss und zur Installation finden Sie auf Seite 34.
Pour annuler la démonstration (DEMO), reportez-vous à la page 18.
Pour le raccordement/l’installation, reportez-vous à la page 32.
Per annullare la dimostrazione (DEMO), vedere pagina 18.
Per l’installazione e i collegamenti, consultare pagina 32.
Om de demonstratie (DEMO) te annuleren, zie pagina 18.
Raadpleeg pagina 32 voor meer informatie over de aansluiting/ installatie.
Для отмены демонстрации на дисплее (режим DEMO) см. стр. 19.
Инструкции по установке/подключению см. на стр. 35.
WX-XB100BT
For safety, be sure to install this unit in the dashboard of the car as the left side of the unit becomes hot during use.
For details, see “Connection/Installation” (page 29).
Made in Thailand
Laser Diode Properties
Emission Duration: Continuous
Laser Output: Less than 53.3 μW
(This output is the value measurement at a distance of 200 mm from the objective lens surface on the Optical Pick-up Block with 7 mm aperture.)
The nameplate indicating operating voltage, etc., is located on the bottom of the chassis.
Hereby, Sony Corporation declares that this equipment is in compliance with Directive 2014/53/ EU.
The full text of the EU declaration of conformity is available at the following internet address: http://www.compliance.sony.de/
This equipment is intended to be used with the approved version(s) of software that are indicated in the EU Declaration of Conformity.
The software loaded on this equipment is verified to comply with the essential requirements of the Directive 2014/53/EU.
Software version: 1_
The software version can be checked in the firmware setup item of the general setup menu.
Notice for customers: the following information is only applicable to equipment sold in countries applying EU Directives
Manufacturer: Sony Corporation, 1-7-1 Konan Minato-ku Tokyo, 108-0075 Japan
For EU product compliance: Sony Belgium, bijkantoor van Sony Europe Limited, Da Vincilaan 7-D1, 1935 Zaventem, Belgium
Disposal of waste batteries and electrical and electronic equipment (applicable in the
European Union and other European countries with separate
collection systems)
This symbol on the product, the battery or on the packaging indicates that the product and the battery shall not be treated as household waste. On certain batteries this symbol might be used in combination with a chemical symbol. The chemical symbols for mercury (Hg) or lead (Pb) are added if the battery contains more than 0.0005% mercury or 0.004% lead.
By ensuring these products and batteries are disposed of correctly, you will help prevent potentially negative consequences for the environment and human health which could otherwise be caused by inappropriate waste handling. The recycling of the materials will help to conserve natural resources.
In case of products that for safety, performance or data integrity reasons require a permanent connection with an incorporated battery, this battery should be replaced by qualified service staff only. To ensure that the battery and the electrical and electronic equipment will be treated properly, hand over these products at end-of-life to the applicable collection point for the recycling of electrical and electronic equipment.
For all other batteries, please view the section on how to remove the battery from the product safely. Hand the battery over to the applicable collection point for the recycling of waste batteries.
For more detailed information about recycling of this product or battery, please contact your local Civic Office, your household waste disposal service or the shop where you purchased the product or battery.
CAUTION
The following frequency 65 – 74 MHz range is not allocated to sound broadcasting in the European Common Allocations table and cannot be used in Europe.
Warning if your car’s ignition has no ACC position
Be sure to set the AUTO OFF function (page 17). The unit will shut off completely and automatically in the set time after the unit is turned off, which prevents battery drain. If you do not set the AUTO OFF function, press and hold OFF until the display disappears each time you turn the ignition off.
Disclaimer regarding services offered by third parties
Services offered by third parties may be changed, suspended, or terminated without prior notice. Sony does not bear any responsibility in these sorts of situations.
2GB

Important notice
Caution
IN NO EVENT SHALL SONY BE LIABLE FOR ANY INCIDENTAL, INDIRECT OR CONSEQUENTIAL DAMAGES OR OTHER DAMAGES INCLUDING, WITHOUT LIMITATION, LOSS OF PROFITS, LOSS OF REVENUE, LOSS OF DATA, LOSS OF USE OF THE PRODUCT OR ANY ASSOCIATED EQUIPMENT, DOWNTIME, AND PURCHASER’S TIME RELATED TO OR ARISING OUT OF THE USE OF THIS PRODUCT, ITS HARDWARE AND/OR ITS SOFTWARE.
Dear customer, this product includes a radio transmitter.
According to UNECE Regulation no. 10, a vehicle manufacturers may impose specific conditions for installation of radio transmitters into vehicles. Please check your vehicle operation manual or contact the manufacturer of your vehicle or your vehicle dealer, before you install this product into your vehicle.
Emergency calls
This BLUETOOTH car handsfree and the electronic device connected to the handsfree operate using radio signals, cellular, and landline networks as well as user-programmed function, which cannot guarantee connection under all conditions. Therefore do not rely solely upon any electronic device for essential communications (such as medical emergencies).
On BLUETOOTH communication
Microwaves emitting from a BLUETOOTH device may affect the operation of electronic medical devices. Turn off this unit and other BLUETOOTH devices in the following locations, as it may cause an accident.
where inflammable gas is present, in a hospital, train, airplane, or petrol station
near automatic doors or a fire alarm
This unit supports security capabilities that comply with the BLUETOOTH standard to provide a secure connection when the BLUETOOTH wireless technology is used, but security may not be enough depending on the setting. Be careful when communicating using BLUETOOTH wireless technology.
We do not take any responsibility for the leakage of information during BLUETOOTH communication.
If you have any questions or problems concerning your unit that are not covered in this manual, consult your nearest Sony dealer.
3GB

Table of Contents
Guide to Parts and Controls . . . . . . . . . . . . . . . . . . . 5
Getting Started
Resetting the Unit . . . . . . . . . . . . . . . . . . . . . . . . . . . 6
Setting the Clock . . . . . . . . . . . . . . . . . . . . . . . . . . . . 6
Checking the Battery Voltage . . . . . . . . . . . . . . . . . 7
Preparing a BLUETOOTH Device. . . . . . . . . . . . . . . . 7
Connecting a USB Device . . . . . . . . . . . . . . . . . . . . . 9
Connecting Other Portable Audio Device . . . . . . . . 9
Listening to the Radio
Listening to the Radio. . . . . . . . . . . . . . . . . . . . . . . . 9 Using Radio Data System (RDS) . . . . . . . . . . . . . . . 10
Playback
Playing a Disc . . . . . . . . . . . . . . . . . . . . . . . . . . . . . 11
Playing a USB Device . . . . . . . . . . . . . . . . . . . . . . . 11
Playing a BLUETOOTH Device. . . . . . . . . . . . . . . . . 11
Searching and Playing Tracks. . . . . . . . . . . . . . . . . 12
Handsfree Calling (via BLUETOOTH only)
Receiving a Call . . . . . . . . . . . . . . . . . . . . . . . . . . . . 13 Making a Call . . . . . . . . . . . . . . . . . . . . . . . . . . . . . . 13 Available Operations during Call . . . . . . . . . . . . . . 14
Useful Functions
Sony | Music Center with iPhone/Android smartphone . . . . . . . . . . . . . . . . . . . . . . . . . . . . 14
Using Siri Eyes Free . . . . . . . . . . . . . . . . . . . . . . . . . 16
Settings
Canceling the DEMO Mode . . . . . . . . . . . . . . . . . . 16
Basic Setting Operation . . . . . . . . . . . . . . . . . . . . . 16
General Setup (GENERAL). . . . . . . . . . . . . . . . . . . . 16
Sound Setup (SOUND) . . . . . . . . . . . . . . . . . . . . . . 17
Display Setup (DISPLAY) . . . . . . . . . . . . . . . . . . . . . 19
BLUETOOTH Setup (BLUETOOTH). . . . . . . . . . . . . . 19
Sony | Music Center Setup (SONY APP) . . . . . . . . 20
Additional Information
Updating the Firmware. . . . . . . . . . . . . . . . . . . . . . 20
Precautions . . . . . . . . . . . . . . . . . . . . . . . . . . . . . . . 20
Specifications . . . . . . . . . . . . . . . . . . . . . . . . . . . . . 21
Troubleshooting . . . . . . . . . . . . . . . . . . . . . . . . . . . 23
Messages . . . . . . . . . . . . . . . . . . . . . . . . . . . . . . . . . 26
Connection/Installation
Cautions . . . . . . . . . . . . . . . . . . . . . . . . . . . . . . . . . 29 Parts List for Installation . . . . . . . . . . . . . . . . . . . . 29 Connection . . . . . . . . . . . . . . . . . . . . . . . . . . . . . . . 30 Installation . . . . . . . . . . . . . . . . . . . . . . . . . . . . . . . 33
4GB
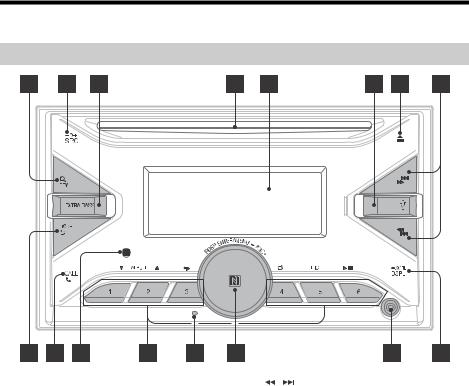
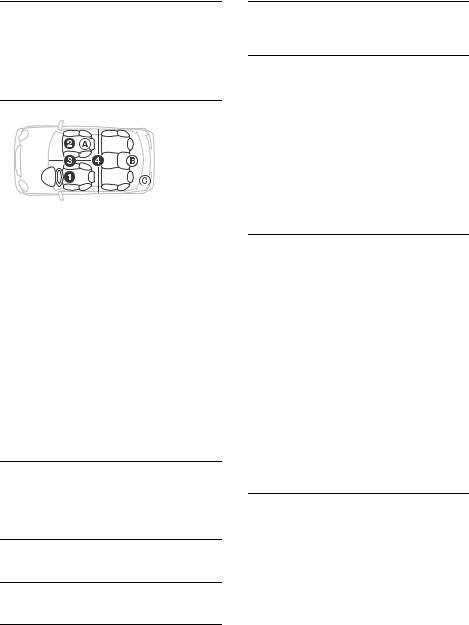
Guide to Parts and Controls
Main unit
 (browse) (page 12)
Enter the browse mode during playback.
(Not available when a USB device in Android™ mode or iPod is connected.)
PTY (program type)
Select PTY in RDS.
SRC (source)
Turn on the power. Change the source.
 OFF
OFF
Press and hold for 1 second to turn the source off and display the clock.
Press and hold for more than 2 seconds to turn off the power and the display.
EXTRA BASS
Reinforces bass sound in synchronization with the volume level. Press to change the EXTRA BASS setting: [1], [2], [OFF].
Disc slot
Display window
USB port
(disc eject)
 /
/  (SEEK –/+)
Tune in radio stations automatically. Press and hold to tune manually.
/ (prev/next)
/ (fast-reverse/fast-forward)
MODE (page 9, 14)
 (back)
Return to the previous display.
CALL 
Enter the call menu. Receive/end a call. Press and hold more than 2 seconds to switch the BLUETOOTH signal.
Receptor for the remote commander
Number buttons (1 to 6)
Receive stored radio stations. Press and hold to store stations.
ALBUM /
Skip an album for audio device. Press and hold to skip albums continuously.
(Not available when a USB device in Android mode or iPod is connected.)
5GB

 (repeat)
(Not available when a USB device in Android mode is connected.)
 (shuffle)
(Not available when a USB device in Android mode is connected.)
MIC (page 14)
(play/pause)
Reset button (page 6)
Control dial
Rotate to adjust the volume.
PUSH ENTER
Enter the selected item.
Press SRC, rotate then press to change the source (timeout in 2 seconds).
MENU
Open the setup menu.
 VOICE (page 14, 15, 16)
Press and hold for more than 2 seconds to activate voice dial, voice recognition (Android smartphone only), or the Siri function (iPhone only).
N-Mark
Touch the control dial with Android smartphone to make BLUETOOTH connection.
AUX input jack
DSPL (display)
Press to change display items.
 SCRL (scroll)
Press and hold to scroll a display item.
Getting Started
Resetting the Unit
Before operating the unit for the first time, after replacing the car battery, or changing the connections, you must reset the unit.
Press the reset button with a ball-point pen, etc.
Note
Resetting the unit will erase the clock setting and some stored contents.
Setting the area/region
After resetting the unit, the area/region setting display appears.
1Press ENTER while [AREA] is displayed.
The area/region currently set appears.
2Rotate the control dial to select [EUROPE] or [RUSSIA], then press it.
3Rotate the control dial to select [YES] or [NO], then press it.
If the setting area/region is changed, the unit is reset, then the clock is displayed.
This setting can be configured in the general setup menu (page 16).
Setting the Clock
1Press MENU, rotate the control dial to select [GENERAL], then press it.
2Rotate the control dial to select [CLOCK ADJ], then press it.
The hour indication flashes.
3Rotate the control dial to set the hour
and minute.
To move the digital indication, press / (SEEK –/+).
4After setting the minute, press MENU.
The setup is complete and the clock starts.
To display the clock
Press DSPL.
6GB
Checking the Battery Voltage
You can check the current battery voltage. (Not available while the source is off and the clock is displayed.)
1Press DSPL repeatedly until the battery voltage display appears.
To disconnect by One touch
Touch the N-Mark part of the unit with the N-Mark part of the smartphone again.
Notes
When making the connection, handle the smartphone carefully to prevent scratches.
One touch connection is not possible when the unit is already connected to two NFC compatible devices. In this case, disconnect either device, and make connection with the smartphone again.
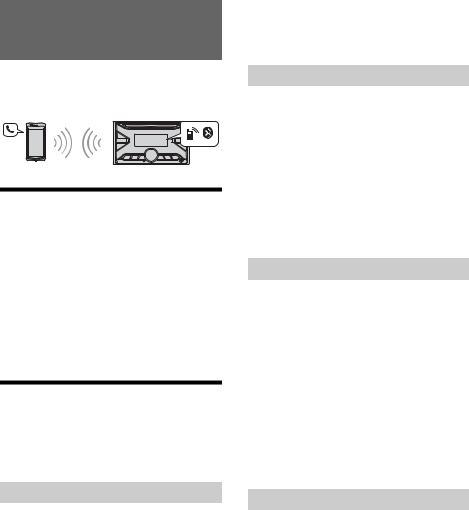
Preparing a BLUETOOTH Device
You can enjoy music, or perform handsfree calling depending on the BLUETOOTH compatible device such as a smartphone, cellular phone and audio device (hereafter “BLUETOOTH device” if not otherwise specified). For details on connecting, refer to the operating instructions supplied with the device.
Before connecting the device, turn down the volume of this unit; otherwise, loud sound may result.
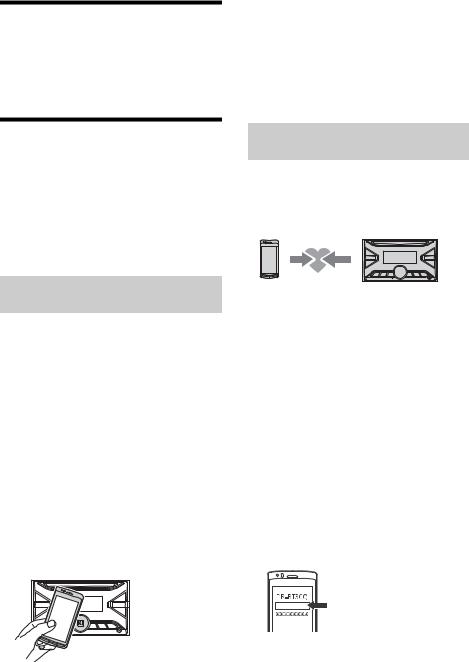
Connecting with a Smartphone by One touch (NFC)
By touching the control dial on the unit with an NFC* compatible smartphone, the unit is paired and connected with the smartphone automatically.
*NFC (Near Field Communication) is a technology enabling short-range wireless communication between various devices, such as mobile phones and IC tags. Thanks to the NFC function, data communication can be achieved easily just by touching the relevant symbol or designated location on NFC compatible devices.
For a smartphone with Android OS 4.0 or lower installed, downloading the app “NFC Easy Connect” available at Google Play™ is required. The app may not be downloadable in some countries/regions.
1Activate the NFC function on the smartphone.
For details, refer to the operating instructions supplied with the smartphone.
2Touch the N-Mark part of the unit with the N-Mark part of the smartphone.
Make sure that  lights up on the display of the unit.
Pairing and connecting with a
BLUETOOTH device
When connecting a BLUETOOTH device for the first time, mutual registration (called “pairing”) is required. Pairing enables this unit and other devices to recognize each other. This unit can connect two BLUETOOTH devices (two cellular phones, or a cellular phone and an audio device).
1Place the BLUETOOTH device within 1 m (3 ft) of this unit.
2Press MENU, rotate the control dial to select [BLUETOOTH], then press it.
3Rotate the control dial to select [PAIRING], then press it.
4Rotate the control dial to select [DEVICE 1]* or [DEVICE 2]*, then press it.
 flashes while the unit is in pairing standby mode.
*[DEVICE 1] or [DEVICE 2] will be changed to the paired device name after pairing is complete.
5Perform pairing on the BLUETOOTH device so it detects this unit.
6Select [WX-XB100BT] shown in the display of the BLUETOOTH device.
If your model name does not appear, repeat from step 2.
WX-XB100BT |
7GB
7If passkey* input is required on the BLUETOOTH device, input [0000].
* Passkey may be called “Passcode,” “PIN code,” “PIN number” or “Password,” etc., depending on the device.
Input passkey |
[0000] |
When pairing is made,  stays lit.
8Select this unit on the BLUETOOTH device
to establish the BLUETOOTH connection.
 or
or  lights up when the connection is made.
Note
While connecting to a BLUETOOTH device, this unit cannot be detected from another device. To enable detection, enter the pairing mode and search for this unit from another device.
To start playback
For details, see “Playing a BLUETOOTH Device” (page 11).
To disconnect the paired device
Perform steps 2 to 4 to disconnect after this unit and the BLUETOOTH device are paired.
Connecting with a paired BLUETOOTH device
To use a paired device, connection with this unit is required. Some paired devices will connect automatically.
1Press MENU, rotate the control dial to select [BLUETOOTH], then press it.
2Rotate the control dial to select [BT
SIGNAL], then press it.
Make sure that  lights up.
3Activate the BLUETOOTH function on the BLUETOOTH device.
4Operate the BLUETOOTH device to
connect to this unit.
 or
or  lights up.
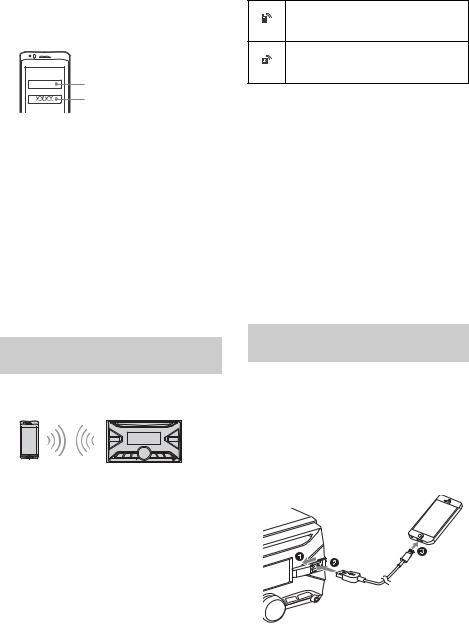
Icons in the display:
Lights up when handsfree calling is available by enabling the HFP (Handsfree Profile).
Lights up when the audio device is playable by enabling the A2DP (Advanced Audio Distribution Profile).
To connect the last-connected device from this unit
Activate the BLUETOOTH function on the BLUETOOTH device.
To connect with the audio device, press SRC to select [BT AUDIO] and press (play/pause). To connect with the cellular phone, press CALL.
Note
While streaming BLUETOOTH audio, you cannot connect from this unit to the cellular phone. Connect from the cellular phone to this unit instead.
Tip
With BLUETOOTH signal on: when the ignition is turned to on, this unit reconnects automatically to the lastconnected cellular phone.
To install the microphone
For details, see “Installing the microphone” (page 32).
Connecting with an iPhone/iPod (BLUETOOTH Auto Pairing)
When an iPhone/iPod with iOS5 or later installed is connected to the USB port, the unit is paired and connected with the iPhone/iPod automatically.
To enable BLUETOOTH Auto Pairing, make sure [AUTO PAIR] in [BLUETOOTH] is set to [ON] (page 20).
1Activate the BLUETOOTH function on the iPhone/iPod.
2 Connect an iPhone/iPod to the USB port.
Make sure that  lights up on the display of the unit.
8GB
Notes
BLUETOOTH Auto Pairing is not possible if the unit is already connected to two BLUETOOTH devices. In this case, disconnect the either device, then connect the iPhone/iPod again.
If BLUETOOTH Auto Pairing is not established, see “Preparing a BLUETOOTH Device” for details (page 7).
Connecting a USB Device
1 Turn down the volume on the unit.
2Connect the USB device to the unit.
To connect an iPod/iPhone, use the USB connection cable for iPod (not supplied).
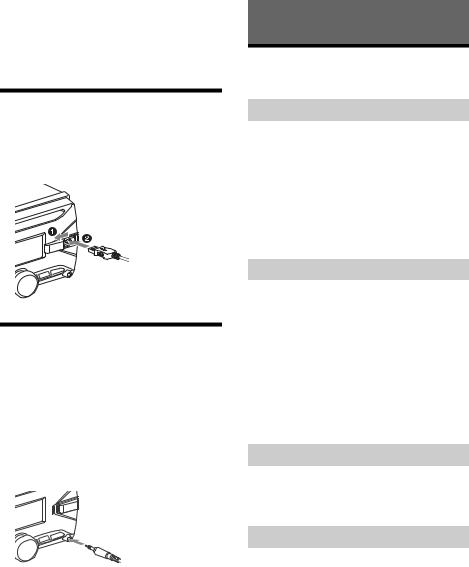
Connecting Other Portable
Audio Device
1 Turn off the portable audio device.
2 Turn down the volume on the unit.
3Connect the portable audio device to the AUX input jack (stereo mini jack) on the unit with a connecting cord (not supplied)*.
* Be sure to use a straight type plug.
4 Press SRC to select [AUX].
To match the volume level of the connected device to other sources
Start playback of the portable audio device at a moderate volume, and set your usual listening volume on the unit.
Press MENU, then select [SOUND] [AUX VOLUME] (page 19).
Listening to the Radio
Listening to the Radio
To listen to the radio, press SRC to select [TUNER].
Storing automatically (BTM)
1Press MODE to change the band (FM1, FM2, FM3, MW or LW).
2Press MENU, rotate the control dial to select [GENERAL], then press it.
3Rotate the control dial to select [BTM], then press it.
The unit stores stations in order of frequency on the number buttons.
Tuning
1Press MODE to change the band (FM1, FM2, FM3, MW or LW).
2 Perform tuning.
To tune manually
Press and hold / (SEEK –/+) to locate the approximate frequency, then press /(SEEK –/+) repeatedly to fine adjust to the desired frequency.
To tune automatically
Press / (SEEK –/+).
Scanning stops when the unit receives a station.
Storing manually
1While receiving the station that you want to store, press and hold a number button (1 to 6) until [MEMORY] appears.
Receiving the stored stations
1Select the band, then press a number button (1 to 6).
9GB

Using Radio Data System (RDS)
Setting alternative frequencies (AF) and traffic announcement (TA)
AF continuously retunes the station to the strongest signal in a network, and TA provides current traffic information or traffic programs (TP) if received.
1Press MENU, rotate the control dial to select [GENERAL], then press it.
2Rotate the control dial to select [AF/TA], then press it.
3Rotate the control dial to select [AF-ON], [TA-ON], [AF/TA-ON] or [AF/TA-OFF], then press it.
To store RDS stations with the AF and TA setting
You can preset RDS stations along with an AF/TA setting. Set AF/TA, then store the station with BTM or manually. If you preset manually, you can also preset non-RDS stations.
To receive emergency announcements
With AF or TA on, emergency announcements will automatically interrupt the currently selected source.
To adjust the volume level during a traffic announcement
Level will be stored into memory for subsequent traffic announcements, independently from the regular volume level.
To stay with one regional program (REGIONAL)
When the AF and REGIONAL functions are on, you will not be switched to another regional station with a stronger frequency. If you leave this regional program’s reception area, set [REGIONAL] in [GENERAL] to [REG-OFF] during FM reception (page 17).
This function does not work in the UK and some other areas.
Local Link function (UK only)
This function enables you to select other local stations in the area, even if they are not stored on your number buttons.
During FM reception, press a number button (1 to 6) on which a local station is stored. Within 5 seconds, press again a number button of the local station.
Repeat this procedure until the local station is received.
Selecting program types (PTY)
1 Press PTY during FM reception.
2Rotate the control dial until the desired program type appears, then press it.
The unit starts to search for a station broadcasting the selected program type.
Type of programs
NEWS (News), AFFAIRS (Current Affairs), INFO (Information), SPORT (Sports), EDUCATE (Education), DRAMA (Drama), CULTURE (Culture), SCIENCE (Science), VARIED (Varied), POP M (Pop Music), ROCK M (Rock Music), EASY M (M.O.R. Music), LIGHT M (Light classical), CLASSICS (Serious classical), OTHER M (Other Music), WEATHER (Weather), FINANCE (Finance), CHILDREN (Children’s program), SOCIAL A (Social Affairs),
RELIGION (Religion), PHONE IN (Phone In), TRAVEL
(Travel), LEISURE (Leisure), JAZZ (Jazz Music), COUNTRY (Country Music), NATION M (National Music), OLDIES (Oldies Music), FOLK M (Folk Music), DOCUMENT (Documentary)
Setting clock time (CT)
The CT data from the RDS transmission sets the clock.
1Set [CT] in [GENERAL] to [CT-ON] (page 17).
10GB
Playback
Playing a Disc
1 Insert the disc (label side up).
Playback starts automatically.
Playing a USB Device
In these Operating Instructions, “iPod” is used as a general reference for the iPod functions on an iPod and iPhone, unless otherwise specified by the text or illustrations.
For details on the compatibility of your iPod, see “About iPod” (page 21) or visit the support site on the back cover.
AOA (Android Open Accessory) 2.0, MSC (Mass Storage Class) and MTP (Media Transfer Protocol) type USB devices* compliant with the USB standard can be used. Depending on the USB device, the Android mode or MSC/MTP mode can be selected on the unit.
Some digital media players or Android smartphones may require setting to MTP mode.
*e.g., a USB flash drive, digital media player, Android smartphone
Notes
For details on the compatibility of your USB device, visit the support site on the back cover.
Smartphones with Android OS 4.1 or higher installed support Android Open Accessory 2.0 (AOA 2.0). However, some smartphones may not fully support AOA 2.0 even if Android OS 4.1 or higher is installed. For details on the compatibility of your Android smartphone, visit the support site on the back cover.
Playback of the following files is not supported. MP3/WMA/AAC/FLAC:
copyright-protected files
DRM (Digital Rights Management) files
Multi-channel audio files
MP3/WMA/AAC:
lossless compression files WAV:
Multi-channel audio files
Before making a connection, select the USB mode (Android mode or MSC/MTP mode) depending on the USB device (page 17).
1Connect a USB device to the USB port (page 9).
Playback starts.
If a device is already connected, to start playback, press SRC to select [USB] ([IPOD] appears in the display when the iPod is recognized).
2 Adjust the volume on this unit.
To stop playback
Press and hold OFF for 1 second.
To remove the device
Stop playback, then remove the device.
Caution for iPhone
When you connect an iPhone via USB, phone call volume is controlled by the iPhone, not the unit. Do not inadvertently increase the volume on the unit during a call, as a sudden loud sound may result when the call ends.
Playing a BLUETOOTH Device
You can play contents on a connected device that supports BLUETOOTH A2DP (Advanced Audio Distribution Profile).
1Make BLUETOOTH connection with the audio device (page 7).
To select the audio device, press MENU, then select [BLUETOOTH] [AUDIO DEV] (page 19).
2 Press SRC to select [BT AUDIO].
3Operate the audio device to start playback.
4 Adjust the volume on this unit.
Notes
Depending on the audio device, information such as title, track number/time and playback status may not be displayed on this unit.
Even if the source is changed on this unit, playback of the audio device does not stop.
[BT AUDIO] does not appear in the display while running the “Sony | Music Center” application via the BLUETOOTH function.
11GB

To match the volume level of the BLUETOOTH device to other sources
Start playback of the BLUETOOTH audio device at a moderate volume, and set your usual listening volume on the unit.
Press MENU, then select [SOUND] [BTA VOLUME] (page 19).
Searching and Playing Tracks
Repeat play and shuffle play
Not available when a USB device in Android mode is connected.
1During playback, press  (repeat) or
  (shuffle) repeatedly to select the desired play mode.
Playback in the selected play mode may take time to start.
Available play modes differ depending on the selected sound source.
Searching a track by name (QuickBrowZer™)
Not available when a USB device in Android mode or iPod is connected.
1During CD, USB or BT AUDIO*1 playback, press  (browse)*2 to display the list of search categories.
When the track list appears, press  (back) repeatedly to display the desired search category.
*1 Available only for audio devices supporting AVRCP (Audio Video Remote Control Profile) 1.4 or above.
*2 During USB playback, press  (browse) for more than 2 seconds to directly return to the beginning of the category list.
2Rotate the control dial to select the desired search category, then press it to confirm.
3Repeat step 2 to search the desired track.
Playback starts.
To exit the Quick-BrowZer mode
Press  (browse).
Searching by skipping items (Jump mode)
Not available when a USB device in Android mode or iPod is connected.
1 Press  (browse).
2 Press (SEEK +).
3Rotate the control dial to select the item.
The list is jumped in steps of 10% of the total number of items.
4Press ENTER to return to the QuickBrowZer mode.
The selected item appears.
5Rotate the control dial to select the desired item, then press it.
Playback starts.
12GB
Handsfree Calling (via BLUETOOTH only)
To use a cellular phone, connect it with this unit. You can connect two cellular phones to the unit. For details, see “Preparing a BLUETOOTH Device” (page 7).
Receiving a Call
1Press CALL when a call is received with a ringtone.
The phone call starts.
Note
The ringtone and talker’s voice are output only from the front speakers.
To reject the call
Press and hold OFF for 1 second.
To end the call
Press CALL again.
Making a Call
You can make a call from the phonebook or call history when a cellular phone supporting PBAP (Phone Book Access Profile) is connected.
When two cellular phones are connected to the unit, select either phone.
From the phonebook
1Press CALL.
When two cellular phones are connected to the unit, rotate the control dial to select either phone, then press it.
2Rotate the control dial to select [PHONE BOOK], then press it.
3Rotate the control dial to select an initial from the initial list, then press it.
4Rotate the control dial to select a name from the name list, then press it.
5Rotate the control dial to select a number from the number list, then press it.
The phone call starts.
From the call history
1Press CALL.
When two cellular phones are connected to the unit, rotate the control dial to select either phone, then press it.
2Rotate the control dial to select [RECENT CALL], then press it.
A list of the call history appears.
3Rotate the control dial to select a name or phone number from the call history, then press it.
The phone call starts.
By phone number input
1Press CALL.
When two cellular phones are connected to the unit, rotate the control dial to select either phone, then press it.
2Rotate the control dial to select [DIAL NUMBER], then press it.
3Rotate the control dial to enter the phone number, and lastly select [ ] (space), then press ENTER*.
The phone call starts.
* To move the digital indication, press / (SEEK –/+).
Note
[_] appears instead of [#] on the display.
By redial
1Press CALL.
When two cellular phones are connected to the unit, rotate the control dial to select either phone, then press it.
2Rotate the control dial to select [REDIAL], then press it.
The phone call starts.
13GB

By voice tags
You can make a call by saying the voice tag stored in a connected cellular phone that has a voice dialing function.
1Press CALL.
When two cellular phones are connected to the unit, rotate the control dial to select either phone, then press it.
2Rotate the control dial to select [VOICE DIAL], then press it.
Alternatively, press and hold VOICE for more than 2 seconds.
3Say the voice tag stored on the cellular phone.
Your voice is recognized, and the call is made.
To cancel voice dialing
Press VOICE.
Available Operations during Call
To adjust the ringtone volume
Rotate the control dial while receiving a call.
To adjust the talker’s voice volume
Rotate the control dial during a call.
To adjust the volume for the other party (Mic gain adjustment)
Press MIC.
Adjustable volume levels: [MIC-LOW], [MIC-MID], [MIC-HI].
To reduce echo and noise (Echo Canceler/ Noise Canceler Mode)
Press and hold MIC.
Settable mode: [EC/NC-1], [EC/NC-2].
To switch between handsfree mode and handheld mode
During a call, press MODE to switch the phone call audio between the unit and cellular phone.
Note
Depending on the cellular phone, this operation may not be available.
Useful Functions
Sony | Music Center with iPhone/Android smartphone
Downloading the latest version of “Sony | Music Center” application is required from the App Store for iPhone or from Google Play for Android smartphone.
Notes
For your safety, follow your local traffic laws and regulations, and do not operate the application while driving.
“Sony | Music Center” is an app for controlling Sony audio devices which are compatible with “Sony | Music Center”, by your iPhone/Android smartphone.
What you can control with “Sony | Music Center” varies depending on the connected device.
To make use of “Sony | Music Center” features, see the details on your iPhone/Android smartphone.
For further details on “Sony | Music Center,” visit the following URL: http://www.sony.net/smcqa/
Visit the website below and check the compatible iPhone/Android smartphone models.
For iPhone: visit the App Store
For Android smartphone: visit Google Play
Establishing the Sony | Music Center connection
1Make the BLUETOOTH connection with iPhone/Android smartphone (page 7).
To select the audio device, press MENU, then select [BLUETOOTH] [AUDIO DEV] (page 19).
2Launch the “Sony | Music Center” application.
3Press MENU, rotate the control dial to select [SONY APP], then press it.
4Rotate the control dial to select [CONNECT], then press it.
Connection to iPhone/Android smartphone starts.
For details on the operations on iPhone/ Android smartphone, see the help of the application.
If the device number appears
Make sure that the number is displayed (e.g., 123456), then select [Yes] on the iPhone/Android smartphone.
14GB
To terminate connection
1Press MENU, rotate the control dial to select [SONY APP], then press it.
2Rotate the control dial to select [CONNECT], then press it.
Selecting the source or application
You can operate to select the desired source or application on iPhone/Android smartphone.
To select the source
Press SRC repeatedly. Alternatively, press SRC, rotate the control dial to select the desired source, then press ENTER.
To display the source list
Press SRC.
Announcement of various information by voice guide (Android smartphone only)
When SMS, Twitter/Facebook/Calendar notifications, etc., are received, they are automatically announced through the car speakers.
For details on settings, refer to the help of the application.
Activating voice recognition (Android smartphone only)
By registering applications, you can control an application by voice command. For details, refer to the help of the application.
To activate voice recognition
1 Press and hold VOICE to activate voice recognition.
2Say the desired voice command into the microphone when [Say Source or App] appears on the Android smartphone.
Notes
Voice recognition may not be available in some cases.
Voice recognition may not work properly depending on the performance of the connected Android smartphone.
Operate under conditions where noise such as engine sound is minimized during voice recognition.
Replying a message of SMS (Android smartphone only)
You can reply a message by voice recognition.
1Activate voice recognition, then input “Reply.”
The message input display appears on the “Sony | Music Center” application.
2Input a reply message by voice recognition.
The list of message candidates appears on the “Sony | Music Center” application.
3Rotate the control dial to select the desired message, then press it.
The message is sent out.
Making sound and display settings
You can adjust the settings relating to sound and display via iPhone/Android smartphone.
For details on settings, refer to the help of the application.
15GB

Using Siri Eyes Free
Siri Eyes Free allows you to use an iPhone handsfree by simply speaking into the microphone. This function requires you to connect an iPhone to the unit via BLUETOOTH. Availability is limited iPhone 4s or later. Make sure that your iPhone is running the latest iOS version.
You must complete BLUETOOTH registration and connection configurations for the iPhone with the unit in advance. For details, see “Preparing a BLUETOOTH Device” (page 7).
To select the iPhone, press MENU, then select [BLUETOOTH] [AUDIO DEV] (page 19).
1Activate the Siri function on the iPhone.
For details, refer to the operating instructions supplied with the iPhone.
2Press and hold VOICE for more than 2 seconds.
The voice command display appears.
3After the iPhone beeps, speak into the microphone.
The iPhone beeps again, then Siri starts responding.
To deactivate Siri Eyes Free
Press VOICE.
Notes
The iPhone may not recognize your voice depending on usage conditions. (For example, if you are in a moving car.)
Siri Eyes Free may not function properly, or the response time may lag in locations where iPhone signals are difficult to receive.
Depending on the iPhone’s operating condition, Siri Eyes Free may not function properly, or may quit.
If you play a track with an iPhone using the BLUETOOTH audio connection, when the track starts playback via BLUETOOTH, Siri Eyes Free automatically quits and the unit switches to the BLUETOOTH audio source.
When Siri Eyes Free is activated during audio playback, the unit may switch to the BLUETOOTH audio source even if you do not specify a track to play.
When connecting the iPhone to the USB port, Siri Eyes Free may not function properly, or may quit.
When connecting the iPhone to the unit via USB, do not activate Siri with the iPhone. Siri Eyes Free may not function properly, or may quit.
There is no audio sound while Siri Eyes Free is activated.
Settings
Canceling the DEMO Mode
You can cancel the demonstration display which appears when the source is off and the clock is displayed.
1Press MENU, rotate the control dial to select [GENERAL], then press it.
2Rotate the control dial to select [DEMO], then press it.
3Rotate the control dial to select [DEMOOFF], then press it.
The setting is complete.
4Press  (back) twice.
The display returns to normal reception/play mode.
Basic Setting Operation
You can set items in the following setup categories: General setup (GENERAL), Sound setup (SOUND), Display setup (DISPLAY), BLUETOOTH setup (BLUETOOTH), Sony | Music Center setup (SONY APP)
1 Press MENU.
2Rotate the control dial to select the setup category, then press it.
The items that can be set differ depending on the source and settings.
3Rotate the control dial to select the options, then press it.
To return to the previous display
Press  (back).
General Setup (GENERAL)
AREA (area)
Specifies the area/region to use this unit: [EUROPE], [RUSSIA].
If the area/region currently set is changed, this unit is reset, then the clock is displayed. (Available only while the source is off and the clock is displayed.)
DEMO (demonstration)
Activates the demonstration: [ON], [OFF].
CLOCK ADJ (clock adjust) (page 6)
16GB

BEEP (beep)
Activates the beep sound: [ON], [OFF].
AUTO OFF (auto off)
Shuts off automatically after a certain time when the unit is turned off: [ON] (30 minutes), [OFF].
STEERING (steering)
Registers/resets the setting of the steering wheel remote control.
(Available only while the source is off and the clock is displayed.)
STR CONTROL (steering control)
Selects the input mode of the connected remote control. To prevent a malfunction, be sure to match the input mode with the connected remote control before use.
CUSTOM (custom)
Input mode for the steering wheel remote control
PRESET (preset)
Input mode for the wired remote control excluding the steering wheel remote control
EDIT CUSTOM (edit custom)
Registers the functions (SOURCE, ATT, VOL +/–, SEEK +/–, VOICE, ON HOOK, OFF HOOK) to the steering wheel remote control:
Rotate the control dial to select the function you want to assign to the steering wheel
remote control, then press it.
While [REGISTER] is blinking, press and hold the button on the steering wheel remote
control you want to assign the function to. When registration is complete, [REGISTERED] is displayed.
To register other functions, repeat steps and .
(Available only when [STR CONTROL] is set to [CUSTOM].)
RESETCUSTOM (reset custom)
Resets the registered functions of the steering wheel remote control: [YES], [NO].
(Available only when [STR CONTROL] is set to [CUSTOM].)
Notes
While making settings, only button operation on the unit is available. For safety, park your car before making this setting.
If an error occurs while registering, all the previously-registered information remains. Restart registration from the function where the error occurred.
This function may not be available on some vehicles. For details on the compatibility of your vehicle, visit the support site on the back cover.
USB MODE (USB mode)
Changes the USB mode: [ANDROID], [MSC/MTP]. (Available only when the USB source is selected.)
CT (clock time)
Activates the CT function: [ON], [OFF].
AF/TA (alternative frequencies/traffic announcement)
Selects the alternative frequencies (AF) and traffic announcement (TA) setting: [AF-ON], [TAON], [AF/TA-ON], [AF/TA-OFF].
REGIONAL (regional)
Restricts reception to a specific region: [ON], [OFF].
(Available only when FM is received.)
BTM (best tuning memory) (page 9) (Available only when the tuner is selected.)
FIRMWARE (firmware)
(Available only while the source is off and the clock is displayed.)
Checks/updates the firmware version. For details, visit the support site on the back cover. FW VERSION (firmware version)
Displays current firmware version. FW UPDATE (firmware update)
Enters firmware update process: [YES], [NO]. Updating the firmware takes a few minutes to complete. During the update, do not turn the ignition to the OFF position, nor remove the USB device.
Sound Setup (SOUND)
This setup menu is not available when the source is off and the clock is displayed.
C.AUDIO+ (ClearAudio+)
Reproduces sound by optimizing the digital signal with the Sony recommended sound settings: [ON], [OFF].
(Automatically sets to [OFF] when [EQ10 PRESET] is changed and/or [EXTRA BASS] is set to [1] or [2] and/or [DSO] is set to [LOW], [MIDDLE] or [HIGH].)
EQ10 PRESET (EQ10 preset)
Selects an equalizer curve from 10 equalizer curves or off:
[OFF], [R&B], [ROCK], [POP], [HIP-HOP], [ELECTRONICA], [JAZZ], [SOUL], [COUNTRY], [KARAOKE]*, [CUSTOM].
The equalizer curve setting can be memorized for each source.
*[KARAOKE] reduces the vocal sound but cannot fully remove it during playback. Also, using a microphone is not supported.
17GB
EQ10 CUSTOM (EQ10 custom) Sets [CUSTOM] of EQ10.
Setting the equalizer curve: [B1] 32 Hz, [B2]
63 Hz, [B3] 125 Hz, [B4] 250 Hz, [B5] 500 Hz, [B6] 1 kHz, [B7] 2 kHz, [B8] 4 kHz, [B9] 8 kHz, [B10] 16 kHz.
The volume level is adjustable in 1 dB steps, from -6 dB to +6 dB.
POSITION (listening position)
F/R POS (front/rear position)
Simulates a natural sound field by delaying the sound output from speakers to suit your position:
[FRONT L] (front left),[FRONT R] (front right),[FRONT] (center front),
[ALL] (center of your car),
[CUSTOM] (position set by the advanced car audio settings on “Sony | Music Center”) [OFF] (no position set)
ADJ POS (adjust position)
Fine-tunes the listening position setting: [+3] – [CENTER] – [-3].
(Available only when [F/R POS] is not set to [OFF] or [CUSTOM].)
SW POS (subwoofer position)[NEAR] (near),
[NORMAL] (normal),[FAR] (far)
(Available only when [F/R POS] is set to other than [OFF].)
DSO (dynamic stage organizer)
Creates a more ambient sound as if there were speakers in the dashboard: [OFF], [LOW], [MIDDLE], [HIGH].
(Automatically sets to [OFF] when [C.AUDIO+] is set to [ON].)
BALANCE (balance)
Adjusts the sound balance: [RIGHT-15] – [CENTER] – [LEFT-15].
FADER (fader)
Adjusts the relative level: [FRONT-15] – [CENTER]
– [REAR-15].
DSEE (digital sound enhancement engine) Improves digitally compressed sound by restoring high frequencies lost in the compression process: [ON], [OFF].
This setting can be memorized for each source other than the tuner.
AAV (advanced auto volume)
Adjusts the playback volume level of all playback sources to the optimum level: [ON], [OFF].
REARBAS ENH (rear bass enhancer)
Enhances the bass sound by applying a low pass filter setting to the rear speakers. This function allows the rear speakers to work as a subwoofer if one is not connected.
(Available only when [SUBW DIRECT] is set to [OFF].)
RBE MODE (rear bass enhancer mode)
Selects the rear bass enhancer mode: [1], [2], [3], [OFF].
LPF FREQ (low pass filter frequency)
Selects the subwoofer cut-off frequency: [50Hz], [60Hz], [80Hz], [100Hz], [120Hz].
LPF SLOPE (low pass filter slope) Selects the LPF slope: [1], [2], [3].
SUBW DIRECT (subwoofer direct connection) Adjusts the settings for the subwoofer connected to the rear speaker lead without a power amplifier.
(Available only when [RBE MODE] is set to [OFF].) Be sure to connect a 4 Ω – 8 Ω subwoofer to either of the rear speaker leads. Do not connect a speaker to the other rear speaker lead.
SUBW MODE (subwoofer mode)
Selects the subwoofer mode: [1], [2], [3], [OFF]. SUBW PHASE (subwoofer phase)
Selects the subwoofer phase: [NORM], [REV]. SW POSITION (subwoofer position)
Selects the subwoofer position: [NEAR], [NORMAL], [FAR].
(Available only when [F/R POS] is set to other than [OFF].)
LPF FREQ (low pass filter frequency)
Selects the subwoofer cut-off frequency: [50Hz], [60Hz], [80Hz], [100Hz], [120Hz].
LPF SLOPE (low pass filter slope) Selects the LPF slope: [1], [2], [3].
SUBWOOFER (subwoofer)
SUBW LEVEL (subwoofer level) Adjusts the subwoofer volume level: [+10 dB] – [0 dB] – [-10 dB].
([ATT] is displayed at the lowest setting.) SUBW PHASE (subwoofer phase)
Selects the subwoofer phase: [NORM], [REV]. SW POSITION (subwoofer position)
Selects the subwoofer position: [NEAR], [NORMAL], [FAR].
(Available only when [F/R POS] is not set to [OFF].)
LPF FREQ (low pass filter frequency)
Selects the subwoofer cut-off frequency: [50Hz], [60Hz], [80Hz], [100Hz], [120Hz].
LPF SLOPE (low pass filter slope) Selects the LPF slope: [1], [2], [3].
18GB

HPF (high pass filter)
HPF FREQ (high pass filter frequency)
Selects the front/rear speaker cut-off frequency: [OFF], [50Hz], [60Hz], [80Hz], [100Hz], [120Hz]. HPF SLOPE (high pass filter slope)
Selects the HPF slope (effective only when [HPF FREQ] is set to other than [OFF]): [1], [2], [3].
AUX VOLUME (AUX volume)
Adjusts the volume level for each connected auxiliary device: [+18 dB] – [0 dB] – [-8 dB]. This setting negates the need to adjust the volume level between sources.
(Available only when the AUX is selected.)
BTA VOLUME (BLUETOOTH audio volume) Adjusts the volume level for each connected BLUETOOTH device: [+6 dB] – [0 dB] – [-6 dB]. This setting negates the need to adjust the volume level between sources.
(Available only when the BT audio or application is selected.)
Display Setup (DISPLAY)
DIMMER (dimmer)
Changes the display brightness: [OFF], [ON], [AT] (auto), [CLK] (clock).
([AT] is available only when the illumination control lead is connected, and the head light is turned on.)
To set this function to be active only during a fixed period, select [CLK], then set the start and end times.
To set the brightness when the dimmer function is activated:
Set [DIMMER] to [ON], then adjust [BRIGHTNESS].
To set the brightness when the dimmer function is deactivated:
Set [DIMMER] to [OFF], then adjust [BRIGHTNESS].
The brightness setting is stored and applied when the dimmer function is activated or deactivated.
BRIGHTNESS (brightness)
Adjusts the display brightness. The brightness level is adjustable: [1] – [10].
BUTTON-C (button color)
Sets a preset color or customized color for the buttons.
COLOR (color)
Selects from 15 presets colors, 1 customized color.
CUSTOM-C (custom color)
Registers a customized color for the buttons.
RGB RED, RGB GREEN, RGB BLUE
Adjustable color range: [0] – [32] ([0] cannot be set for all color ranges).
DSPL-C (display color)
Sets a preset color or customized color for the display.
COLOR (color)
Selects from 15 presets colors, 1 customized color.
CUSTOM-C (custom color)
Registers a customized color for the display.
RGB RED, RGB GREEN, RGB BLUE
Adjustable color range: [0] – [32] ([0] cannot be set for all color ranges).
SOUND SYNC (sound synchronization)
Activates the synchronization of the illumination with the sound: [ON], [OFF].
MOTION DSPL (motion display)
Shows moving patterns: [LM] (level meter), [ON], [OFF].
AUTO SCROLL (auto scroll)
Scrolls long items automatically: [ON], [OFF]. (Not available when the AUX or tuner is selected.)
BLUETOOTH Setup (BLUETOOTH)
PAIRING (pairing) (page 7)
Connects up to two BLUETOOTH devices: [DEVICE 1], [DEVICE 2].
[DEVICE 1] or [DEVICE 2] will be changed to the paired device name after pairing is complete.
AUDIO DEV (audio device)
Selects the audio device. [*] appears on the device paired with [DEVICE 1] or the current A2DP compatible audio device.
RINGTONE (ringtone)
Selects whether this unit or the connected cellular phone outputs the ringtone: [1] (this unit), [2] (cellular phone).
AUTO ANSWER (auto answer)
Sets this unit to answer an incoming call automatically: [OFF], [1] (about 3 seconds), [2] (about 10 seconds).
19GB
AUTO PAIR (auto pairing)
Start BLUETOOTH pairing automatically when iOS device version 5.0 or later is connected via USB: [ON], [OFF].
BT SIGNAL (BLUETOOTH signal) (page 8) Activates/deactivates the BLUETOOTH function.
BT INITIAL (BLUETOOTH initialize)
Initializes all the BLUETOOTH related settings (pairing information, preset number, device information, etc.): [YES], [NO].
When disposing the unit, initialize all the settings.
(Available only while the source is off and the clock is displayed.)
Additional Information
Updating the Firmware
To update the firmware, visit the support site on the back cover, then follow the online instructions.
Notes
Using a USB device (not supplied) is required for updating the firmware. Store the updater in the USB device, and connect the device to the USB port, then perform the update operation.
Updating the firmware takes a few minutes to complete. During the update, do not turn the ignition to the OFF position, nor remove the USB device.
Sony | Music Center Setup
(SONY APP)
AUTO LAUNCH (auto launch)
Activates the “Sony | Music Center” auto launch: [ON], [OFF].
When [ON] is selected, “Sony | Music Center” will automatically connect after the BLUETOOTH connection is complete.
CONNECT (connect)
Establish and terminate “Sony | Music Center” function (connection).
Precautions
Cool off the unit beforehand if your car has been parked in direct sunlight.
Do not leave audio devices brought in inside the car, or it may cause malfunction due to high temperature in direct sunlight.
Power antenna (aerial) extends automatically.
Moisture condensation
Should moisture condensation occur inside the unit, remove the disc and wait for about an hour for it to dry out; otherwise the unit will not operate properly.
To maintain high sound quality
Do not splash liquid onto the unit or discs.
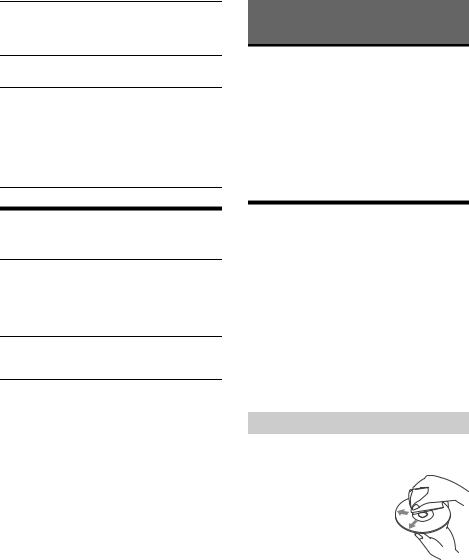
Notes on discs
Do not expose discs to direct sunlight or heat sources such as hot air ducts, nor leave it in a car parked in direct sunlight.
Before playing, wipe the discs
with a cleaning cloth from the center out. Do not use solvents such as benzine, thinner, commercially available cleaners.
This unit is designed to play discs that conform to the Compact Disc (CD) standard.
DualDiscs and some of the music discs encoded with copyright protection technologies do not conform to the Compact Disc (CD) standard, therefore, these discs may not be playable by this unit.
20GB
Discs that this unit CANNOT play
Discs with labels, stickers, or sticky tape or paper attached. Doing so may cause a malfunction, or may ruin the disc.
Discs with non-standard shapes (e.g., heart, square, star). Attempting to do so may damage the unit.
8 cm (3 1/4 in) discs.
Notes on CD-R/CD-RW discs
If the multi-session disc begins with a CD-DA session, it is recognized as a CD-DA disc, and other sessions are not played.
Discs that this unit CANNOT play
CD-R/CD-RW of poor recording quality.
CD-R/CD-RW recorded with an incompatible recording device.
CD-R/CD-RW which is finalized incorrectly.
CD-R/CD-RW other than those recorded in music CD format or MP3 format conforming to ISO9660 Level 1/Level 2, Joliet/Romeo or multisession.
Playback order of audio files
Folder (album) |
Audio file (track) |
About iPod
You can connect to the following iPod models. Update your iPod devices to the latest software before use.
Compatible iPhone/iPod models
Compatible Model |
Bluetooth® |
USB |
|
|
|
iPhone 7 Plus |
|
|
|
|
|
iPhone 7 |
|
|
|
|
|
iPhone SE |
|
|
|
|
|
iPhone 6s Plus |
|
|
|
|
|
iPhone 6s |
|
|
|
|
|
iPhone 6 Plus |
|
|
|
|
|
iPhone 6 |
|
|
|
|
|
iPhone 5s |
|
|
|
|
|
iPhone 5c |
|
|
|
|
|
Compatible Model |
Bluetooth® |
USB |
|
|
|
|
|
iPhone 5 |
|
|
|
|
|
|
|
iPhone 4s |
|
|
|
|
|
|
|
iPod touch |
|
|
|
(6th generation) |
|||
|
|
||
|
|
|
|
iPod touch |
|
|
|
(5th generation) |
|||
|
|
||
|
|
|
|
iPod nano |
|
|
|
(7th generation) |
|
||
|
|
||
|
|
|
“Made for iPod,” and “Made for iPhone,” mean that an electronic accessory has been designed to connect specifically to iPod or iPhone, respectively, and has been certified by the developer to meet Apple performance standards. Apple is not responsible for the operation of this device or its compliance with safety and regulatory standards. Please note that the use of this accessory with iPod or iPhone may affect wireless performance.
If you have any questions or problems concerning your unit that are not covered in this manual, consult your nearest Sony dealer.
Specifications
Tuner section
FM
Tuning range:
When [AREA] is set to [EUROPE]: 87.5 MHz – 108.0 MHz
When [AREA] is set to [RUSSIA]: FM1/FM2: 87.5 MHz – 108.0 MHz
(at 50 kHz step)
FM3: 65 MHz – 74 MHz (at 30 kHz step) Antenna (aerial) terminal:
External antenna (aerial) connector Intermediate frequency:
When [AREA] is set to [EUROPE]:
FM CCIR: -1,956.5 kHz to -487.3 kHz and +500.0 kHz to +2,095.4 kHz
When [AREA] is set to [RUSSIA]:
FM CCIR: -1,956.5 kHz to -487.3 kHz and +500.0 kHz to +2,095.4 kHz
FM OIRT: -1,815.6 kHz to -943.7 kHz and +996.6 kHz to +1,776.6 kHz
Usable sensitivity: 8 dBf Selectivity: 75 dB at 400 kHz Signal-to-noise ratio (mono): 73 dB Separation: 50 dB at 1 kHz
Frequency response: 20 Hz – 15,000 Hz
21GB
MW/LW
Tuning range:
MW: 531 kHz – 1,602 kHz LW: 153 kHz – 279 kHz
Antenna (aerial) terminal:
External antenna (aerial) connector Sensitivity: MW: 26 μV, LW: 50 μV
CD Player section
Signal-to-noise ratio: 120 dB Frequency response: 10 Hz – 20,000 Hz
Wow and flutter: Below measurable limit Maximum number*1 of:
Folders (albums)*2: 150
Files (tracks) and folders*3: 300
Displayable characters for a folder/file name: 32 (Joliet)/64 (Romeo)
Corresponding codec: MP3 (.mp3), WMA (.wma) and AAC (.m4a)
*1 CD-R/CD-RW only
*2 including the root folder
*3 may be less than the measured value if folder/file names contain many characters
USB Player section
Interface: USB (High-speed) Maximum current: 1.5 A
Maximum number of recognizable files (tracks): 10,000
Compatible Android Open Accessory protocol (AOA): 2.0
Corresponding codec: MP3 (.mp3)
Bit rate: 8 kbps – 320 kbps (Supports VBR (Variable Bit Rate))
Sampling rate: 16 kHz – 48 kHz WMA (.wma)
Bit rate: 32 kbps – 192 kbps (Supports VBR (Variable Bit Rate))
Sampling rate: 32 kHz, 44.1 kHz, 48 kHz AAC (.m4a, .mp4)
Bit rate: 8 kbps – 320 kbps Sampling rate: 11.025 kHz – 48 kHz
WAV (.wav)
Bit depth: 16 bit
Sampling rate: 44.1 kHz, 48 kHz FLAC (.flac)
Bit depth: 16 bit, 24 bit Sampling rate: 44.1 kHz, 48 kHz
Wireless Communication
Communication System: BLUETOOTH Standard version 3.0
Output:
BLUETOOTH Standard Power Class 2 (Max. +4 dBm)
Maximum communication range*1: Line of sight approx. 10 m (33 ft)
Frequency band:
2.4 GHz band (2.4000 GHz – 2.4835 GHz)
Modulation method: FHSS Compatible BLUETOOTH Profiles*2:
A2DP (Advanced Audio Distribution Profile) 1.3 AVRCP (Audio Video Remote Control Profile) 1.5 HFP (Handsfree Profile) 1.6
PBAP (Phone Book Access Profile) SPP (Serial Port Profile)
MAP (Message Access Profile)
HID (Human Interface Device Profile) Corresponding codec:
SBC (.sbc), ACC (.m4a)
*1 The actual range will vary depending on factors such as obstacles between devices, magnetic fields around a microwave oven, static electricity, reception sensitivity, antenna (aerial)’s performance, operating system, software application, etc.
*2 BLUETOOTH standard profiles indicate the purpose of BLUETOOTH communication between devices.
NFC Communication
Frequency band and maximum power spec NFC: 13.56 MHz < 60 dBμA/m at 10 m
Power amplifier section
Output: Speaker outputs Speaker impedance: 4 Ω – 8 Ω
Maximum power output: 100 W × 4 (at 4 Ω)
General
Outputs:
Audio outputs terminal (FRONT, REAR, SUB) Power antenna (aerial)/Power amplifier control
terminal (REM OUT) Inputs:
Remote controller input terminal Antenna (aerial) input terminal MIC input terminal
AUX input jack (stereo mini jack) USB port
Power requirements: 12 V DC car battery (negative ground (earth))
Rated current consumption: 10 A Dimensions:
Approx. 178 mm × 100 mm × 178 mm (7 1/8 in × 4 in × 7 1/8 in) (w/h/d)
Mounting dimensions:
Approx. 182 mm × 111 mm × 160 mm (7 1/4 in × 4 3/8 in × 6 3/8 in) (w/h/d)
Mass: Approx. 1.5 kg (3 lb 5 oz) Package contents:
Main unit (1) Microphone (1)
Parts for installation and connections (1 set)
Your dealer may not handle some of the above listed accessories. Please ask the dealer for detailed information.
Design and specifications are subject to change without notice.
22GB

Copyrights
The Bluetooth® word mark and logos are registered trademarks owned by Bluetooth SIG, Inc. and any use of such marks by Sony Corporation is under license. Other trademarks and trade names are those of their respective owners.
The N-Mark is a trademark or registered trademark of NFC Forum, Inc. in the United States and in other countries.
Windows Media is either a registered trademark or trademark of Microsoft Corporation in the United States and/or other countries.
This product is protected by certain intellectual property rights of Microsoft Corporation. Use or distribution of such technology outside of this product is prohibited without a license from Microsoft or an authorized Microsoft subsidiary.
iPhone, iPod, iPod classic, iPod nano, iPod touch, and Siri are trademarks of Apple Inc., registered in the U.S. and other countries. App Store is a service mark of Apple Inc.
MPEG Layer-3 audio coding technology and patents licensed from Fraunhofer IIS and Thomson.
Google, Google Play and Android are trademarks of Google Inc.
libFLAC
Copyright (C) 2000-2009 Josh Coalson
Copyright (C) 2011-2013 Xiph.Org Foundation
Redistribution and use in source and binary forms, with or without modification, are permitted provided that the following conditions are met:
Redistributions of source code must retain the above copyright notice, this list of conditions and the following disclaimer.
Redistributions in binary form must reproduce the above copyright notice, this list of conditions and the following disclaimer in the documentation and/or other materials provided with the distribution.
Neither the name of the Xiph.org Foundation nor the names of its contributors may be used to endorse or promote products derived from this software without specific prior written permission.
THIS SOFTWARE IS PROVIDED BY THE COPYRIGHT HOLDERS AND CONTRIBUTORS “AS IS” AND ANY EXPRESS OR IMPLIED WARRANTIES, INCLUDING, BUT NOT LIMITED TO, THE IMPLIED WARRANTIES OF MERCHANTABILITY AND FITNESS FOR A PARTICULAR PURPOSE ARE DISCLAIMED. IN NO EVENT SHALL THE FOUNDATION OR CONTRIBUTORS BE LIABLE FOR ANY DIRECT, INDIRECT, INCIDENTAL, SPECIAL, EXEMPLARY, OR CONSEQUENTIAL DAMAGES (INCLUDING, BUT NOT LIMITED TO, PROCUREMENT OF SUBSTITUTE GOODS OR SERVICES; LOSS OF USE, DATA, OR PROFITS; OR BUSINESS INTERRUPTION) HOWEVER CAUSED AND ON ANY THEORY OF LIABILITY, WHETHER IN CONTRACT, STRICT LIABILITY, OR TORT (INCLUDING NEGLIGENCE OR OTHERWISE) ARISING IN ANY WAY OUT OF THE USE OF THIS SOFTWARE, EVEN IF ADVISED OF THE POSSIBILITY OF SUCH DAMAGE.
Troubleshooting
The following checklist will help you remedy problems you may encounter with your unit. Before going through the checklist below, check the connection and operating procedures.
For details on using the fuse and removing the unit from the dashboard, see “Connection/Installation” (page 29).
If the problem is not solved, visit the support site on the back cover.
General
The unit is turned off when playing at a high volume.
The power from the power supply lead of the car may not be sufficient.
Check the power connection. If no problem is found in the connection, make the power connection to the battery directly.
If the situation does not improve, consult your nearest dealer.
No sound or the sound is very low.
The position of the fader control [FADER] is not set for a 2-speaker system.
The volume of the unit and/or connected device is very low.
Increase the volume of the unit and connected device.
No beep sound.
An optional power amplifier is connected and you are not using the built-in amplifier.
The contents of the memory have been erased.
The reset button has been pressed.Store again into the memory.
The power supply lead or battery has been disconnected or not connected properly.
23GB

Stored stations and correct time are erased. The fuse has blown.
Makes a noise when the position of the ignition is switched.
The leads are not matched correctly with the car’s accessory power connector.
During playback or reception, the demonstration mode starts.
If no operation is performed for 5 minutes with
[DEMO-ON] set, the demonstration mode starts.Set [DEMO-OFF] (page 16).
The display disappears from/does not appear in the display window.
The dimmer is set to [DIMMER-ON] (page 19).
The display disappears if you press and hold OFF.Press OFF on the unit until the display appears.
The display/illumination flashes.
The power supply is not sufficient.
Check that the car battery supplies enough power to the unit. (The power requirement is 12 V DC.)
The operation buttons do not function. The disc will not eject.
The connection is not correct.
Check the connection of the unit.
If the situation does not improve, press the reset button (page 6). The contents stored in memory are erased.
For your safety, do not reset the unit while you are driving.
Radio reception
Stations cannot be received.
The sound is hampered by noises.
The connection is not correct.
Check the connection of the car antenna (aerial).
If the auto antenna (aerial) will not extend, check the connection of the power antenna (aerial) control lead.
Preset tuning is not possible.
The broadcast signal is too weak.
65 MHz to 74 MHz in FM3 cannot be tuned in.
[AREA] is set to [EUROPE].
Set [AREA] to [RUSSIA] (page 16).
RDS
RDS services cannot be received (when [AREA] is set to [RUSSIA]).
FM3 is selected.
Select FM1 or FM2.
RDS services are unavailable in the current region.
The SEEK starts after a few seconds of listening.
The station is non-TP or has weak signal.Deactivate TA (page 10).
No traffic announcements.
Activate TA (page 10).
The station does not broadcast any traffic
announcements despite being TP.Tune in another station.
PTY displays [- - - - - - - -].
The current station is not an RDS station.
RDS data has not been received.
The station does not specify the program type.
Program service name flashes.
There is no alternative frequency for the current station.
Press SEEK –/+ while the program service name is flashing. [PI SEEK] appears and the unit starts searching for another frequency with the same PI (program identification) data.
CD playback
The disc does not play.
Defective or dirty disc.
The CD-R/CD-RW is not for audio use (page 21).
MP3/WMA/AAC files cannot be played.
The disc is incompatible with the MP3/WMA/AAC format and version. For details on playable discs and formats, visit the support site on the back cover.
MP3/WMA/AAC files take longer to play than others.
The following discs take a longer time to start playback.
A disc recorded with a complicated tree structure.
A disc recorded in Multi Session.
A disc to which data can be added.
The sound skips.
Defective or dirty disc.
USB device playback
You cannot play items via a USB hub.
This unit cannot recognize USB devices via a USB hub.
A USB device takes longer to play.
The USB device contains files with a complicated tree structure.
The sound is intermittent.
The sound may be intermittent at a high-bit-rate.
DRM (Digital Rights Management) files may not be playable in some cases.
24GB

The audio file cannot be played.
USB device formatted with file systems other than FAT16 or FAT32 are unsupported.*
*This unit supports FAT16 and FAT32, but some USB device may not support all of these FAT. For details, refer to the operating instruction of each USB device or contact the manufacturer.
Operations for skipping an album, skipping items (Jump mode), and searching a track by name (Quick-BrowZer) cannot be performed.
These operations cannot be performed when a USB device in Android mode or iPod is connected.
Set [USB MODE] to [MSC/MTP] (page 17).
Remove the iPod.
The USB mode of the device is not set to the appropriate mode.
Make sure that the USB mode of the device is set to MSC/MTP mode.
The sound cannot be output during playback in Android mode.
While the unit is in Android mode, the sound outputs only from the Android smartphone.
Check the status of the audio playback application on the Android smartphone.
Playback may not perform properly depending on the Android smartphone.
NFC function
One touch connection (NFC) is not possible.
If the smartphone does not respond to the touching.
Check that the NFC function of the smartphone is turned on.
Move the N-Mark part of the smartphone closer to the N-Mark part on this unit.
If the smartphone is in a case, remove it.
NFC receiving sensitivity depends on the device. If One touch connection with the smartphone fails several times, make BLUETOOTH connection manually.
BLUETOOTH function
The connecting device cannot detect this unit.
Before the pairing is made, set this unit to pairing standby mode.
While connected to two BLUETOOTH devices, this unit cannot be detected from another device.
Disconnect either connection and search for this unit from another device.
When the device pairing is made, set the BLUETOOTH signal output to on (page 8).
Connection is not possible.
The connection is controlled from one side (this unit or BLUETOOTH device), but not both.
Connect to this unit from a BLUETOOTH device or vice versa.
The name of the detected device does not appear.
Depending on the status of the other device, it may not be possible to obtain the name.
No ringtone.
Adjust the volume by rotating the control dial while receiving a call.
Depending on the connecting device, the ringtone may not be sent properly.
Set [RINGTONE] to [1] (page 19).
The front speakers are not connected to the unit.
Connect the front speakers to the unit. The ringtone is output only from the front speakers.
The talker’s voice cannot be heard.
The front speakers are not connected to the unit.
Connect the front speakers to the unit. The talker’s voice is output only from the front speakers.
A call partner says that the volume is too low or high.
Adjust the volume accordingly using mic gain adjustment (page 14).
Echo or noise occurs in phone call conversations.
Lower the volume.
Set EC/NC Mode to [EC/NC-1] or [EC/NC-2] (page 14).
If the ambient noise other than the phone call sound is loud, try reducing this noise.
E.g.: If a window is open and road noise, etc., is loud, shut the window. If an air conditioner is loud, lower the air conditioner.
The phone is not connected.
When BLUETOOTH audio is played, the phone is
not connected even if you press CALL.Connect from the phone.
The phone sound quality is poor.
Phone sound quality depends on reception conditions of cellular phone.
Move your car to a place where you can enhance the cellular phone’s signal if the reception is poor.
The volume of the connected audio device is low (high).
Volume level will differ depending on the audio device.
Adjust the volume of the connected audio device or this unit (page 19).
25GB

The sound skips during playback of a BLUETOOTH audio device.
Reduce the distance between the unit and the BLUETOOTH audio device.
If the BLUETOOTH audio device is stored in a case which interrupts the signal, remove the audio device from the case during use.
Several BLUETOOTH devices or other devices which emit radio waves are in use nearby.
Turn off the other devices.
Increase the distance from the other devices.
The playback sound stops momentarily when the connection between this unit and the cellular phone is being made. This is not a malfunction.
The connected BLUETOOTH audio device cannot be controlled.
Check that the connected BLUETOOTH audio device supports AVRCP.
Some functions do not work.
Check if the connecting device supports the functions in question.
A call is answered unintentionally.
The connecting phone is set to answer a call automatically.
Pairing failed due to a timeout.
Depending on the connecting device, the time
limit for pairing may be short.
Try completing the pairing within the time.
BLUETOOTH function cannot operate.
Turn off the unit by pressing OFF for more than 2 seconds, then turn the unit on again.
No sound is output from the car speakers during handsfree call.
If the sound is output from the cellular phone, set the cellular phone to output the sound from the car speakers.
Siri Eyes Free is not activated.
Perform the handsfree registration for an iPhone that supports Siri Eyes Free.
Set the Siri function on the iPhone to on.
Cancel the BLUETOOTH connection with the iPhone and the unit, and reconnect.
Sony | Music Center operation
Application name is mismatched with the actual application in “Sony | Music Center”.
Launch the application again from the “Sony | Music Center” application.
While running the “Sony | Music Center” application via BLUETOOTH, the display automatically switches to [BT AUDIO].
The “Sony | Music Center” application or BLUETOOTH function has failed.
Run the application again.
The “Sony | Music Center” application is automatically disconnected when the display switches to [IPOD].
The “Sony | Music Center” application on iPhone/ iPod does not support iPod playback.
Change the source of the unit to other than [IPOD], then establish the “Sony | Music Center” connection (page 14).
The “Sony | Music Center” connection is automatically disconnected when the USB mode of the unit is changed to [ANDROID].
The Android smartphone is not supporting playback in Android mode.
Set the USB mode of the unit to [MSC/MTP], then establish the “Sony | Music Center” connection (page 14).
Messages
The following messages may appear or flash during operation.
AUDIO OUTPUT ERROR: There may be an internal malfunction.
Check the connection. If the error message still remains on in the display, consult your nearest Sony dealer.
INVALID
The selected operation could be invalid.
OVER TEMPERATURE CAUTION: The thermal protector is activated.
Reduce the volume.
READ: Now reading information.
Wait until reading is complete and playback starts automatically. This may take some time depending on the file organization.
(underscore): The character cannot be displayed.
For CD playback:
CD ERROR: The disc cannot be played. The disc will be ejected automatically.
Clean or insert the disc correctly, or make sure the disc is not blank or defective.
26GB

CD NO DISC: There is no disc.
Insert a disc containing playable files (page 22).
CD NO MUSIC: There is no playable file. The disc will be ejected automatically.
Insert a disc containing playable files (page 22).
CD PUSH EJECT: The disc could not be ejected properly.
Press (eject).

 or
or 
 : The beginning or the end of the disc has been reached.
For USB device playback:
HUB NO SUPPORT: USB hubs are not supported.
IPOD STOP: iPod playback has finished.
Operate your iPod/iPhone to start playback.
NOT SUPPORT ANDROID MODE
A USB device not supporting AOA (Android Open Accessory) 2.0 is connected to the unit while [USB
MODE] is set to [ANDROID].
Set [USB MODE] to [MSC/MTP] (page 17).
USB ERROR: The USB device cannot be played.Connect the USB device again.
USB NO DEVICE: A USB device is not connected or recognized.
Make sure the USB device or USB cable is securely connected.
USB NO MUSIC: There is no playable file.
Connect a USB device containing playable files (page 22).
USB NO SUPPORT: The USB device is not supported.
For details on the compatibility of your USB device, visit the support site on the back cover.
USB OVERLOAD: The USB device is overloaded.
Disconnect the USB device, then press SRC to select another source.
The USB device has a fault, or an unsupported device is connected.
For RDS operation:
NO AF: No alternative frequencies.
Press SEEK –/+ while the program service name is flashing. The unit starts searching for another frequency with the same PI (program identification) data ([PI SEEK] appears).
NO PI: No program identification. The selected station has no PI (program identification) data.Select another station.
NO TP: No traffic programs.
The unit will continue searching for available TP stations.
For BLUETOOTH function:
BT AUDIO NO DEVICE: The BLUETOOTH device is not connected or recognized.
Make sure the BLUETOOTH device is securely connected, or the BLUETOOTH connection is established with the BLUETOOTH device.
ERROR: The selected operation could not be performed.
Wait for a while, then try again.
NO DEVICE: The BLUETOOTH device supporting HFP (Handsfree Profile) is not connected or recognized.
Make sure the BLUETOOTH device is securely connected, or the HFP connection is established with the BLUETOOTH device.
NO SUPPORT: The selected operation is not allowed or supported.
Make sure the BLUETOOTH device is supporting HFP (Handsfree Profile).
UNKNOWN: A name or phone number cannot be displayed.
WITHHELD: The phone number is hidden by the caller.
For Sony | Music Center operation:
APP -----------: A connection with the application is not established.
Make the “Sony | Music Center” connection again (page 14).
APP DISPLAY: A screen setting display of the application is open.
Exit the screen setting display of the application to enable button operation.
APP LIST: The contents list of the CD/USB is open.
Exit the list of the application to enable button operation.
APP MENU: A setting display of the application is open.
Exit the setting display of the application to enable button operation.
27GB

APP NO DEVICE: The device with the application installed is not connected or recognized.
Make the BLUETOOTH connection and establish the “Sony | Music Center” connection again (page 14).
APP SOUND: A sound setting display of the application is open.
Exit the sound setting display of the application to enable button operation.
OPEN SONY APP: The “Sony | Music Center” application is not running.
Launch the application.
SONY APP DISCNCTED: The application is disconnected.
Make the “Sony | Music Center” connection (page 14).
For steering wheel remote control operation:
ERROR: An error occurred during the function registration.
Register again from the function where the error occurred (page 17).
TIMEOUT: The function registration failed due to a timeout.
Try completing the registration while [REGISTER] is blinking (about 6 seconds) (page 17).
For firmware update operation:
ERROR: The updater is not stored in the USB device.
Store the updater in the USB device, then try again (page 20).
NO DEVICE: The USB device containing the updater is not connected or recognized.
Make sure the USB device is securely connected.
Disconnect the USB device, then connect the device again.
UPDATE ERROR PRESS ENTER: Firmware update is not completed properly.
Press ENTER to clear the message, then try again. During the update, do not turn the ignition to the OFF position, nor remove the USB device
(page 20).
If these solutions do not help improve the situation, consult your nearest Sony dealer.
If you take the unit to be repaired because of CD playback trouble, bring the disc that was used at the time the problem began.
28GB
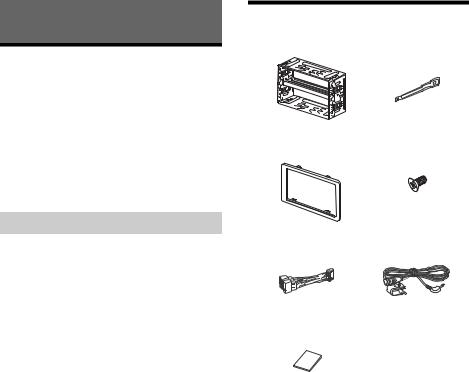
Connection/Installation
Cautions
Run all ground (earth) leads to a common ground (earth) point.
Do not get the leads trapped under a screw, or caught in moving parts (e.g., seat railing).
Before making connections, turn the car ignition off to avoid short circuits.
Connect the power supply lead to the unit and speakers before connecting it to the auxiliary power connector.
Be sure to insulate any loose unconnected leads with electrical tape for safety.
Precautions
Choose the installation location carefully so that the unit will not interfere with normal driving operations.
Avoid installing the unit in areas subject to dust, dirt, excessive vibration, or high temperature, such as in direct sunlight or near heater ducts.
Use only the supplied mounting hardware for a safe and secure installation.
Note on the power supply lead (yellow)
When connecting this unit in combination with other stereo components, the amperage rating of the car circuit to which the unit is connected must be higher than the sum of each component’s fuse amperage rating.
Mounting angle adjustment
Adjust the mounting angle to less than 45°.
Parts List for Installation
× 2
5 × max. 8 mm (7/32 × max. 5/16 in)
× 4
This parts list does not include all the package contents.
The bracket is attached to the unit before
shipping. Before mounting the unit, use the release keys to remove the bracket from the unit. For details, see “Removing the bracket” (page 33).
Keep the release keys for future use as they are also necessary if you remove the unit from your car.
29GB

Connection
Subwoofer*1


 *3
*3


 *3
*3


 *3
*3
Power amplifier*1

 *6
*6
|
*2*7 |
|
 See “Power connection diagram” (page 32)
for details. For details, see “Making connections” (page 31).
When connecting to the battery directly*8*9
from a wired remote control (not supplied)*4
from a car antenna (aerial)*5
30GB
 Loading...