Sony XDCAM User Manual

XDCAM Workflow Guide
Final Cut Studio 2
Final Cut Studio 2 is the new standard for HD post-production, with integrated, real-time tools designed to help you deliver beautiful HD programming on impossibly tight deadlines. Start with Final Cut Pro for editing of virtually any format – DV, SD, HDV, DVCPRO HD, XDCAM HD, fully uncompressed HD as well as Apple’s new ProRes 422 production format. Add 3D motion graphics in real time with Motion, the fastest way to animate and express your creative vision. Sculpt, mix and repair audio using Soundtrack Pro, the only audio application designed from the ground up for HD production work. Finish with Color, the newest addition to the Studio, that allows professional color grading that can elevate the quality of any production. Finally, deliver your finished production in the format of your choice using Compressor.
Final Cut Studio 2
Supported File Formats
MPEG IMX (50/40/30 Mb/s) DVCAM
MPEG HD (35/25/18 Mb/s), 50/60i, 25p, 30p, 23.98p
1. Connecting to XDCAM
You can choose two types of XDCAM Professional Disc device to use with Final Cut Pro:
XDCAM decks and camcorders, connected through i.LINK to your Mac with File Access Mode (FAM) activated.
PDW-U1 stand-alone XDCAM drive, connected through USB 2.0 to your Mac.
In both cases, when a Professional disc is inserted into the drive, it will show up in the Finder, just like any other removable storage.
2. Import to Final Cut Pro
Select File>Import>Sony XDCAM... to launch the import window of the XDCAM Transfer application, which will be connected to your Final Cut Pro project. Metadata will be automatically transferred from the XDCAM disc and thumbnails will be generated for each clip; this information is cached on your Mac enabling the disc contents to be viewed while the disc itself is not connected. Optionally, the proxy version of each clip can also be cached on your Mac. The clip metadata includes information about A/V format, bit-rate, number of audio channels and so on.

XDCAM Workflow Guide
Key workflow features of the XDCAM Transfer application are:
1.Frame-accurate preview and sub-clip creation using proxy video
2.Preview of clips and XDCAM clip lists (sequences)
3.Full support for XDCAM essence marks and Final Cut Pro clip markers
4.Full metadata searching capability
5.Direct preview of full-quality material from XDCAM disc (full-screen mode)
6.Metadata logging and write back to XDCAM disc
7. Generation of printable shot lists |
4 |
Once entire or sub-clips have been selected, a single click will transfer the material to the connected Final Cut Pro project. While the transfer takes place, you are able to resume editing within Final Cut Pro - the transferred clips will drop into the project bin in the background. Support for arbitrary XDCAM filenames and title metadata means that the clips will appear in the project bin with easily-recognised names.
Note: Some of the functions described in this document will be available in the
October ‘07 version of XDCAM Transfer Software after IBC2007.
6
1,2
5
3
3. Export back to disc
Once editing of your sequence is complete in Final Cut Pro, the high resolution content may be exported back to Professional Disc media as an XDCAM-compatible MXF file. Alternatively, the MXF file may be written to any connected storage device, for example, a video server.
Select File>Export>Sony XDCAM... to open the export window of the XDCAM Transfer application. Here you can select the target location for the exported MXF file, as well as control the settings used during the export process.
As with the import operation, once Final Cut Pro has completed any required rendering of your sequence, the transfer to your chosen destination takes place in the background - leaving you free to resume editing.
Note: PDW-U1 Export Function will be implemented in the next available release of the Oct. ‘07 version of XDCAM Transfer Software.
* "XDCAM Transfer Software" is distributed by Sony.
Contact
U.S. Contact
Apple Computer
1 Infinite Loop
Cupertino, CA 95014
Phone +1 408 974-1010
European Contact
European Business Development
Phone +44 207 7184 1072
Sony Electronics Inc. (U.S.)*
Website www.sony.com/XDCAM
Sony Europe*
Website www.sonybiz.net/xdcam
“XDCAM Transfer Software for Final |
|
Information is available on the above |
sites. |
Website //www.apple.com/finalcutstudio
©2007 Sony Corporation. All rights reserved. |
MK10346V4OHB07SEP APL |
|
|

XDCAM Workflow Guide
Only Avid provides the fastest and most comprehensive XDCAM SD/HD support, tightly linked with the world’s best editing tools and most powerful end-to-end production workflow solutions.
In the field or the edit suite, Avid editing systems give you the tools to work quickly and efficiently: XDCAM proxy media can be imported much faster than real-time so editing can begin almost immediately, while only the required high-resolution material is imported to complete the project, saving time and disk space.
All XDCAM formats in SD and HD are supported natively* and can be mixed and played in a single sequence in real-time, even together with proxy media as well as other supported SD or HD video resolutions. And when the program is finished, it can be written back to the XDCAM disc with a single menu command.
With Avid editors attached to an Avid Unity™ MediaNetwork™ or Avid Unity ISIS™ system, XDCAM media is instantly available in real-time to editors, journalists and producers. Furthermore, feed room operators, media logging assistants and reviewers can access the XDCAM media from their desktop and contribute without waiting for an edit suite.
This is how Avid supports XDCAM and incorporates it into the most efficient end-to-end workflow available, with complete access, flexibility and control at any point.
Avid® NewsCutter® family (version 6.7) Avid Media Composer® family (version 2.7) Avid Symphony™ Nitris® (version 1.7)
Avid Xpress Pro* (version 5.7) Avid Liquid™ family (version 7.2)
Supported File Formats
DVCAM
MPEG IMX (30/40/50 Mb/s) MPEG HD (18/25/35 Mb/s) MPEG-4 proxy media
i.LINK workflow for all supported Avid editors, using File Access Mode
Make sure the XDCAM device is set to FAM (File Access Mode) and is attached via i.LINK. The device will show up as a removable drive on the editor CPU.
Proxy editing workflow (Avid Liquid workflow is similar)
1.Select a bin and choose the Import XDCAM Proxy menu command to import all proxy media from the XDCAM disc.
2.Edit the media in the normal way on the timeline. Other SD and HD resolutions can be edited and played together in real-time.
3.When the editing is finished, select the Batch Import menu command. This will import the high-resolution XDCAM media from the disk, but only the media that is required for the edited sequence, plus a selectable handle length.
High-resolution editing workflow (Avid Liquid workflow is similar)
1.Select a bin and choose the Import menu command and navigate to the Clip folder on the XDCAM disc, or simply drag the media files from the Clip folder on the XDCAM disc into the required bin.
2.Edit the media in the normal way on the timeline. Other SD and HD resolutions can be edited and played together in real-time.
Write-back workflow (Avid Liquid workflow is similar, and only for SD)
1.Select the finished sequence in the bin.
2.Select the Export menu command and choose the XDCAM option. The edited program will now be written back to the XDCAM disc.

XDCAM Workflow Guide
Network-attached workflow for Avid NewsCutter, Avid Media Composer and Avid Symphony Nitris, using File Transfer Mode
Make sure that the XDCAM device and Avid editing system are connected via an Ethernet network to an Avid Unity TransferManager or Avid Interplay Transfer server; or the Avid Unity TransferManager or Avid Interplay Transfer running in standalone mode on the Avid editing system.
Ingest workflow (proxy and HD import supported with Avid Interplay Transfer only)
1.From the supported Avid editing system, select the FTPClipList Utility.
2.From the list of XDCAM clips displayed, select the required ones, and if using Interplay Transfer whether proxies or hi-res media is required, and drag
them to the bin. Confirm that the clips should be transferred now. The transfer will start.
If required, the transfer status can be monitored from the Avid Unity TransferManager or Avid Interplay Transfer status window.
Output workflow
•To move the completed program to an Avid AirSpeed or other supported playback server, select the Send To Playback menu command and choose the appropriate device from the list of playback destinations.
•To move the completed program to an Ethernet connected XDCAM device, select the Send To Playback menu command and choose the appropriate device from the list of playback destinations (Avid Interplay Transfer only).
•To move a version of the complete program with associated news text to a web server, use the Post To Web function from the NRCS Tool (Avid NewsCutter only).
Contact
Avid Technology Europe Ltd
Pinewood Studios
Pinewood Road, Iver Heath
Bucks SL0 0NH
United Kingdom
Phone +44 (0) 1753 655999
Website www.avid.com
©2007 Sony Corporation. All rights reserved. |
MK10346V4OHB07SEP AVD |
|
|

XDCAM Workflow Guide
EDIUS Broadcast NLE software provides native editing and realtime processing of HD, HDV, DV, uncompressed SD, MPEG-2, and MPEG-1 formats. With its seamless realtime workflow, EDIUS lets professionals mix and share video content in multiple formats and work with unlimited video, audio and effects layers, while providing realtime, high-quality display. EDIUS delivers increased quality and realtime performance through the company’s acclaimed variable-bitrate Canopus HQ codec. EDIUS includes features such as batch capture from 1080i, 1080p and 720p HDV sources, advanced audio tools and precise colour correction controls, to help editors create the highest quality productions.
EDIUS Broadcast
Supported File Formats
MPEG IMX (50/40/30 Mb/s)
DVCAM
MPEG HD (35/25/18 Mb/s)
EDIUS and XDCAM Workflow
Select & Register
•Connected via i.LINK or an XDCAM FTP server, choose XDCAM Select from the Capture menu. Select the clips you would like to work with, right-click and select Register to Bin.
Auto-conforming from proxies
•Choose Export after Importing Hi-res Data and the hi-res data will be automatically inserted to create the final output.
Editing with proxies
•To edit with proxy files only, from within the Download window select Download after register > Proxy Download. Choose the files you want to work with and press Register to Bin. Proxy data is indicated by a P on the thumbnail, and it can be edited in the timeline as you would any other footage.
Auto-conforming from proxies
•Edit your entire project using proxies, select XDCAM HD Exporter, give the project a name and location, and you will see a further dialog box relating to proxy clip handling
Editing with hi-res data
•If disk space is not an issue, you can check Hi-res Download and Proxy Download. Proxy files are copied in a matter of minutes, but the hi-res files will take some time. But you can still edit using proxy files while the hi-res data is transferred in the background. You will see a dynamically changing timeline as the data transfer plays catch-up.
Contact
For US customers:
Grass Valley
Phone |
+1 888 899 |
EDIT / |
|
+1 408 954 |
4500 |
sales.canopus@thomson.net |
||
For EU customers: |
|
|
Canopus Germany |
|
|
Phone |
+49 2602 1069 0 |
|
sales@canopus.de |
||
Website |
www.canopus.com |
|
©2007 Sony Corporation. All rights reserved. |
MK10346V4OHB07SEP CNP |
|
|

XDCAM Workflow Guide
Dayang’s editing systems are designed to link seamlessly with Sony’s XDCAM system, enabling fast and efficient editing. The two systems can be connected via i.LINK or Ethernet. For both post-production and news editing environment, the editors can browse clips and create mark-in/out points of the content prior to importing, resulting in great reduction of importing time. The content can be imported into Dayang system as Proxy Data where preliminary editing can commence immediately, resulting in an initial edit decision list. This EDL is used as the basis of precise editing and the metadata is subsequently written back to XDCAM disc. The high-resolution AV content can then be edited precisely using the clip list as a guide, enabling the completion of the entire project. As such the time taken to import the Proxy Data are reduced and save editor’s disk space.
Alternatively the high-resolution AV data can be ingested directly for final on-line editing. After editing, the content can be exported to any disc media as an MXF or any other formats file concurrently with the video content as well as the Metadata such as Essence Mark and Shot Mark. These process enables high operational efficiency.
And now Dayang’s editing systems support PDW-U1 to import low-res video with high-res audio.
*Actual workflows will vary with different Dayang editing system. Please contact Dayang Technology Inc. for more information.
D3-Edit HD series |
D3-Edit 3000 series |
Supported File Formats |
D3-Edit 7000 series |
D3-Edit 2000 series |
MPEG IMX (50/40/30 Mb/s) |
D3-Edit 5000 series |
D3-Edit 1000 series |
DVCAM |
MPEG HD |
||
|
|
|
i.LINK (File Access Mode) - Import Proxy Data
1.Import Proxy Clips into the Dayang system through i.LINK (File Access Mode) interface
To import Proxy Data, the following methods are available :
•Can choose to indicate all clips or only clips that have Essence Mark and Shot Mark (which were added by users on the XDCAM device or a PC running the PDZ-1 software).
•Support batch capture and the batch list can be exported to disc for further editing.
•Proxy Audio Data can be converted from its original 8 kHz to 48 kHz for higher sound quality.
•Metadata such as Essence Mark and Shot Mark can be imported together with AV data, allowing the users to search the material easily using the metadata as the track-down point during editing process.
2.Edit Proxy Data
The Proxy Data are edited using the editing functions available in the systems such as 2D&3D effects, caption overlay, quick composition, graphics & titling.
3.Import the high-resolution MXF files corresponding with the Proxy Data on the timeline
4.Edit the imported high-resolution material
The imported materials are edited using the standard editing functions available on the systems.
5.Write the created high-resolution sequences onto a Professional Disc media as an MXF file in MPEG IMX, DVCAM or MPEG HD format

XDCAM Workflow Guide
i.LINK (File Access Mode) - Import MXF Files
1.Import high-resolution MXF files into the Dayang system through i.LINK (File Access Mode) interface
To import MXF files, the following methods are available :
•Can choose to indicate all clips or only clips that have Essence Mark and Shot Mark (which were added by users on the XDCAM device or a PC running the PDZ-1 software).
•Support batch capture and the batch list can be exported to disc for further editing.
•Proxy Audio Data can be converted from its original 8 kHz to 48 kHz for higher sound quality.
•Metadata such as Essence Mark and Shot Mark can be imported together with AV data, allowing the users to search the material easily using the metadata as the track-down point during editing process.
2.Edit the imported high-resolution material
The high-resolution material are edited using the standard editing functions available in the systems such as 2D&3D effects, caption overly, quick composition, graphics & titling.
3.Write the created high-resolution sequences onto a Professional Disc media as an MXF file in MPEG IMX, DVCAM or MPEG HD format
Contact
Dayang Technology Development
Inc.
Dayang Building,
Zhongguancun Software Park,
Haidian district, Beijing, 100094, China
Phone 86-10-58985768 Fax 86-10-58985599 Website www.dayang.com e-mail sales@dayang.com
©2007 Sony Corporation. All rights reserved. |
MK10346V4OHB07SEP DYN |
|
|

XDCAM Workflow Guide
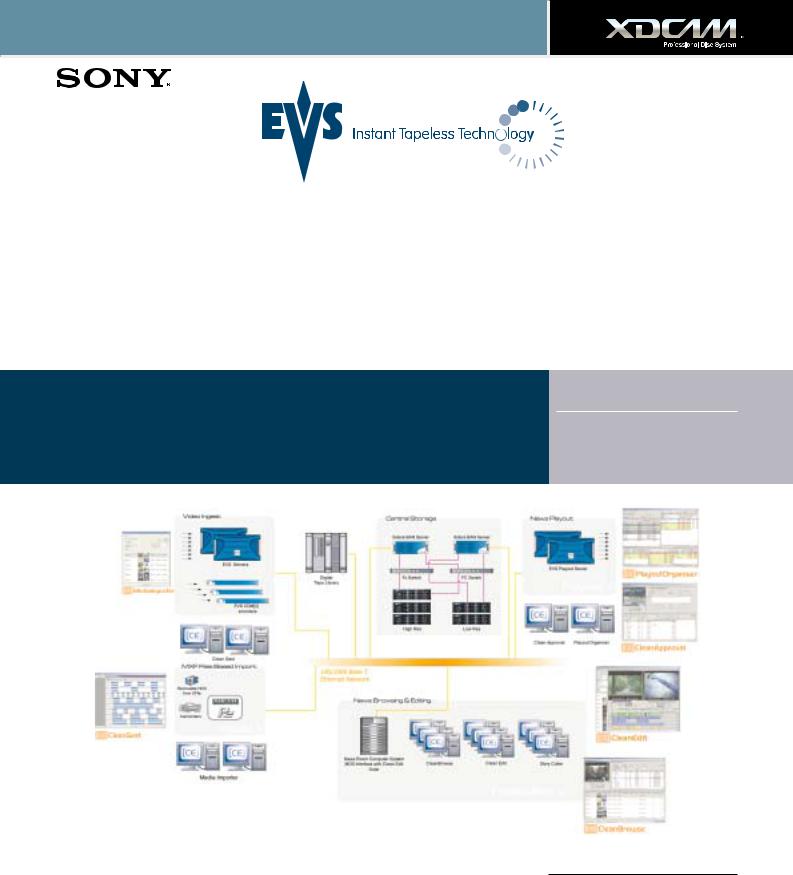
EVS CleanEdit[Suite] is an end-to-end news and sport production system. The fully redundant modular design allows the system to be scaled to meet the most demanding workflow requirements and to be tailored to any newsroom environment. The editing tools allows journalists and editors to work intuitively and since no rendering is ever required, news can be broken to air in a flash. [CE]MediaImporter module allows the import of many different file types (video, audio or graphics) and natively integrates Sony XDCAM formats. Thanks to the asset management functions, an operator can give a description, choose a category and sub-category for fast indexing in the CleanEdit Central Database. The thumbnail viewer as well as the low-res proxy speed up and ease the entire process. As an option, media Importer also allows the merging of several XDCAM clips and even offers transparent high quality audio browsing of XDCAM proxy content. The process of exchanging files directly with an XDCAM drive is fast and simple.
|
Supported File Formats |
CleanEdit[Suite] V 2.0. |
MPEG IMX (50/40/30 Mb/s) |
|
DVCAM |
|
MPEG HD (35/25/18 Mb/s) |
|
|
Contact
EVS
EVS, Sales & Marketing
Phone +32 4 361 7000 Fax +32 4 361 7099 e-mail sales@evs.tv Website www.evs.tv
©2007 Sony Corporation. All rights reserved. |
MK10346V4OHB07SEP EVS |
|
|

XDCAM Workflow Guide
Geevs video servers support the capture and play-out of broadcast media in a wide range of formats, including MPEG-2 and DV25. MXF compliance built into Geevs allows files from XDCAM to be simply dragged and dropped into Geevs storage automatically updating the clip information database. Close integration between Geevs and XDCAM ensures that recorded material is captured transparently by Geevs and is then immediately available for editing or play-out. Interoperability could not be simpler.
Geevs SD, SDE, MR and MR+
Supported File Formats
MPEG IMX (50/40/30 Mb/s)
DVCAM
Geevs ingest/playout servers allow for a highly flexible integration with XDCAM solutions.
1.Import full resolution media and Proxy Data through a 1GB Ethernet Interface
2.Create Clips by browsing Proxy Data
3.Edit the Media using Geevs clients or any 3rd party XDCAM editing solution such as “Lightworks”, “Sony” or other mainstream editing applications.
4.Export XDCAM media via standard networks, including 1GB Ethernet, directly to the Geevs play-out server for programme production or transmission.
Contact
Gee Broadcast Systems Ltd
Unit 9 Grafton Way
Basingstoke, Hants
RG22 6HY, UK
Phone +44 1256 810 123 Fax +44 1256 810 061 Website www.geevs.co.uk
e-mail sales@geebroadcast.co.uk
 Loading...