


 Loading...
AV Center
4-687-624-33(1)
Operating Instructions |
GB |
|
|
|
|
To cancel the demonstration (Demo) display, see page 20.
For the connection/installation, see page 31.
XAV-W651BT/XAV-V631BT/XAV-W601

For safety, be sure to install this unit in the dashboard of the car as the rear side of the unit becomes hot during use.
For details, see “Connection/Installation” (page 31).
This manual contains instructions for XAVW651BT, XAV-V631BT, and XAV-W601. XAV-W651BT is the model representatively used for illustration purposes.
Laser Diode Properties
Emission Duration: Continuous
Laser Output: Less than 46.8 μW
(This output is the value measurement at a distance of 70 mm from the objective lens surface on the Optical Pick-up Block with 7 mm aperture.)
The nameplate indicating operating voltage, etc., is located on the bottom of the chassis.
The validity of the CE marking is restricted to only those countries where it is legally enforced, mainly in the countries EEA (European Economic Area).
Warning
To prevent fire or shock hazard, do not expose the unit to rain or moisture.
To avoid electrical shock, do not open the cabinet. Refer servicing to qualified personnel only.
CAUTION
The use of optical instruments with this product will increase eye hazard. As the laser beam used in this CD/DVD player is harmful to eyes, do not attempt to disassemble the cabinet. Refer servicing to qualified personnel only.
(For Singapore models only)
Disposal of waste batteries and electrical and electronic equipment (applicable in the European Union and other European countries with separate collection systems)
WARNING: Do not ingest battery, Chemical Burn Hazard.
The remote commander contains a coin/ button cell battery. If the coin/button cell battery is swallowed, it can cause severe internal burns in just 2 hours and can lead to death.
Keep new and used batteries away from children. If the battery compartment does not close securely, stop using the product and keep it away from children.
If you think batteries might have been swallowed or placed inside any part of the body, seek immediate medical attention.
Note on the lithium battery
Do not expose the battery to excessive heat such as direct sunlight, fire or the like.
Warning if your car’s ignition has no ACC position
After turning the ignition off, be sure to press and hold HOME on the unit until the display disappears.
Otherwise, the display does not turn off and this causes battery drain.
Disclaimer regarding services offered by third parties
Services offered by third parties may be changed, suspended, or terminated without prior notice. Sony does not bear any responsibility in these sorts of situations.
2GB

Important notice (XAV-W651BT/XAV- V631BT)
Caution
IN NO EVENT SHALL SONY BE LIABLE FOR ANY INCIDENTAL, INDIRECT OR CONSEQUENTIAL DAMAGES OR OTHER DAMAGES INCLUDING, WITHOUT LIMITATION, LOSS OF PROFITS, LOSS OF REVENUE, LOSS OF DATA, LOSS OF USE OF THE PRODUCT OR ANY ASSOCIATED EQUIPMENT, DOWNTIME, AND PURCHASER’S TIME RELATED TO OR ARISING OUT OF THE USE OF THIS PRODUCT, ITS HARDWARE AND/OR ITS SOFTWARE.
Dear customer, this product includes a radio transmitter.
Please check your vehicle operation manual or contact the manufacturer of your vehicle or your vehicle dealer, before you install this product into your vehicle.
Emergency calls
This BLUETOOTH car handsfree and the electronic device connected to the handsfree operate using radio signals, cellular, and landline networks as well as user-programmed function, which cannot guarantee connection under all conditions. Therefore do not rely solely upon any electronic device for essential communications (such as medical emergencies).
On BLUETOOTH communication
•Microwaves emitting from a BLUETOOTH device may affect the operation of electronic medical devices. Turn off this unit and other BLUETOOTH devices in the following locations, as it may cause an accident.
–where inflammable gas is present, in a hospital, train, airplane, or petrol station
–near automatic doors or a fire alarm
•This unit supports security capabilities that comply with the BLUETOOTH standard to provide a secure connection when the BLUETOOTH wireless technology is used, but security may not be enough depending on the setting. Be careful when communicating using BLUETOOTH wireless technology.
•We do not take any responsibility for the leakage of information during BLUETOOTH communication.
If you have any questions or problems concerning your unit that are not covered in this manual, consult your nearest Sony dealer.
3GB

Table of Contents
Warning . . . . . . . . . . . . . . . . . . . . . . . . . . . . . . . . . . . 2 Guide to Parts and Controls . . . . . . . . . . . . . . . . . . . 5
Getting Started
Resetting the Unit . . . . . . . . . . . . . . . . . . . . . . . . . . . 7
Setting the Clock . . . . . . . . . . . . . . . . . . . . . . . . . . . . 7
Preparing a BLUETOOTH Device
(XAV-W651BT/XAV-V631BT) . . . . . . . . . . . . . . . . 7
Connecting a USB Device . . . . . . . . . . . . . . . . . . . . . 9
Connecting Other Portable Audio/Video
Devices. . . . . . . . . . . . . . . . . . . . . . . . . . . . . . . . . 9
Connecting Rear View Camera . . . . . . . . . . . . . . . . 9
Listening to the Radio
Listening to the Radio. . . . . . . . . . . . . . . . . . . . . . . 10 Using Radio Data System (RDS) . . . . . . . . . . . . . . . 11
Playback
Playing a Disc (XAV-W651BT/XAV-W601) . . . . . . . 11
Playing a USB Device . . . . . . . . . . . . . . . . . . . . . . . 12
Playing a BLUETOOTH Device
(XAV-W651BT/XAV-V631BT) . . . . . . . . . . . . . . . 13
Searching and Playing Tracks. . . . . . . . . . . . . . . . . 13
Other Settings During Playback. . . . . . . . . . . . . . . 14
Listening to Pandora® (Australia and New Zealand model of XAV-W651BT/ XAV-W601)
Setting Up Pandora® . . . . . . . . . . . . . . . . . . . . . . . . 14
Streaming Pandora® . . . . . . . . . . . . . . . . . . . . . . . . 14
Available Operations in Pandora® . . . . . . . . . . . . . 15
Handsfree Calling (via BLUETOOTH only) (XAV-W651BT/XAV-V631BT)
Receiving a Call . . . . . . . . . . . . . . . . . . . . . . . . . . . . 15
Making a Call . . . . . . . . . . . . . . . . . . . . . . . . . . . . . . 15
Available Operations During a Call . . . . . . . . . . . . 16
Useful Functions (XAV-W651BT/XAV-
V631BT)
SongPal with Android Phone . . . . . . . . . . . . . . . . . 16 Using Siri Eyes Free . . . . . . . . . . . . . . . . . . . . . . . . . 18
Settings
Basic Setting Operation . . . . . . . . . . . . . . . . . . . . . 18
General Settings . . . . . . . . . . . . . . . . . . . . . . . . . . . 18
Sound Settings . . . . . . . . . . . . . . . . . . . . . . . . . . . . 19
Screen Settings . . . . . . . . . . . . . . . . . . . . . . . . . . . . 20
Visual Settings . . . . . . . . . . . . . . . . . . . . . . . . . . . . . 20
Additional Information
Precautions . . . . . . . . . . . . . . . . . . . . . . . . . . . . . . . 20 Maintenance (except for Oceania and Middle East
model XAV-W601). . . . . . . . . . . . . . . . . . . . . . . 23 Specifications . . . . . . . . . . . . . . . . . . . . . . . . . . . . . 23 Troubleshooting . . . . . . . . . . . . . . . . . . . . . . . . . . . 25 Language Code List
(XAV-W651BT/XAV-W601) . . . . . . . . . . . . . . . . 30
Connection/Installation
Cautions . . . . . . . . . . . . . . . . . . . . . . . . . . . . . . . . . 31 Parts List for Installation . . . . . . . . . . . . . . . . . . . . 31 Connection . . . . . . . . . . . . . . . . . . . . . . . . . . . . . . . 32 Installation . . . . . . . . . . . . . . . . . . . . . . . . . . . . . . . 35
4GB

Guide to Parts and Controls
Main unit
SOURCE
Change the source. Each time it is pressed, it displays a selectable source in a popup on the current display.
 VOICE (XAV-W651BT/XAV-V631BT)
Press and hold to activate the voice command function.
To assign the DSPL function to this button, select [DSPL] in [SOURCE Key Func.] (page 19).
 DSPL (display) (XAV-W601)
Press and hold to open the display menu. The monitor off function can be set on the display menu.
When the monitor off function is activated and the monitor is turned off, touch anywhere on the display to turn it back on.
Volume control dial
Rotate to adjust the volume.
N-Mark (except for XAV-W601 and Indian model XAV-V631BT)
Makes a BLUETOOTH connection when touched with an Android™ phone.
HOME
Turn on the power. Open the HOME menu.
Press to pause playback when Disc (XAV- W651BT/XAV-W601), iPod/USB, BT Audio (XAV- W651BT/XAV-V631BT) or Pandora (Australia and New Zealand model of XAV-W651BT/XAV-W601)
source is selected.
To resume playback, touch  .
.
Press and hold for more than 2 seconds to turn off the unit. When the unit is turned off, remote commander operation is not available (except for Oceania and Middle East model XAV-W601).
 ATT (attenuate)
Press and hold for a second, but less than 2 seconds, then rotate the volume control dial to attenuate the sound.
Receptor for the remote commander
Disc slot (XAV-W651BT/XAV-W601)
(disc eject) (XAV-W651BT/XAV-W601)
USB port
AUX input jack
Reset button
Display/touch panel
5GB

RM-X170 remote commander (except for Oceania and Middle East model XAV-W601)
The remote commander can be used to operate the audio controls. For menu operations, use the touch panel.
OFF
Turn the source off.
Press and hold for 2 seconds to turn off the power and display.
MONITOR OFF
Turn off the monitor.
To turn back on, press again.
POSITION
This button is not supported.
(return)
Return to the previous display.
Return to the menu on a Video CD (VCD) (XAV- W651BT/XAV-W601).
EQ (equalizer)
Select an equalizer curve.
Number buttons (0 – 9)
CLEAR
(play/pause)
/ (previous/next)
/ (fast-reverse/fast-forward)
DVD playback setting buttons (XAV-W651BT/ XAV-W601)
ZAP (ZAPPIN™) (page 10)
/ / /
Select a setup item, etc.
ENTER
Enter the selected item.
MODE
Select the radio band.
VOL (volume) +/–
Remove the insulation film before use.
Screen displays
Playback screen:
Home screen:
6GB
Status indication
Lights up when the sound is attenuated.
Lights up when the “SongPal” connection is established between this unit and your Android phone. (XAV- W651BT/XAV-V631BT)
Lights up when the BLUETOOTH signal is on. Flashes when the connection is in progress. (XAV-W651BT/XAV-V631BT)
Lights up when the audio device is playable by enabling the A2DP (Advanced Audio Distribution Profile). (XAV-W651BT/XAV-V631BT)
Lights up when handsfree calling is available by enabling HFP (Handsfree Profile). (XAV-W651BT/XAV-V631BT)
Indicates the signal strength status of the connected cellular phone. (XAV- W651BT/XAV-V631BT)
Indicates the remaining battery status of the connected cellular phone. (XAV- W651BT/XAV-V631BT)


 (EXTRA BASS)
Touch to select the EXTRA BASS setting: [1], [2],
[off].

 (sound setting menu)
Access the sound setting menu directly (page 19).


 (option)
Open the option menu. The available items differ depending on the source.
Clock (page 7)
When the AUX or Rear Camera source is selected, the clock is not displayed.
Application specific area
Display playback controls/indications or show the unit’s status. Displayed items differ depending on the source.
 (return to the playback screen)
Switch from the HOME screen to the playback screen.
 /
/ 
Move to the next/previous page (This does not necessarily appear on the screen).
Sources and Settings select keys
Change the source or make various settings.
Getting Started
Resetting the Unit
You must reset the unit before operating the unit for the first time, after replacing the car battery, or changing connections.
Note
Pressing the reset button will erase the clock setting and some stored contents.
Setting the Clock
1 Press HOME, then touch [Settings].
2Touch  , then touch [Clock Adjust].
The setting display appears.
3 Touch / to set the hour and minute.
4After setting the hour and minute, touch [Set].
The setting is complete and the clock starts.
Preparing a BLUETOOTH Device
(XAV-W651BT/XAV-V631BT)
You can enjoy music or perform handsfree calling depending on the BLUETOOTH compatible device such as smartphones, cellular phones, and audio devices (hereafter “BLUETOOTH device” if not otherwise specified). For details on connecting, refer to the operating instructions supplied with the device.
Before connecting the device, turn down the volume of this unit; otherwise, a loud sound may result.
7GB
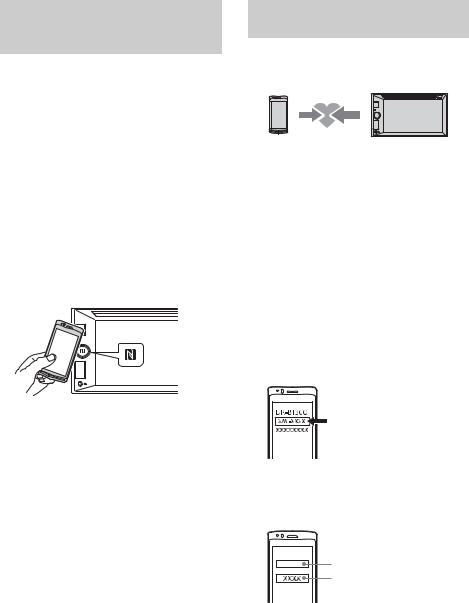
Connecting with a smartphone by One touch (NFC) (except for Indian model XAV-V631BT)
By touching the N-Mark on the unit with an NFC* compatible smartphone, the unit is paired and connected with the smartphone automatically.
*NFC (Near Field Communication) is a technology enabling short-range wireless communication between various devices, such as mobile phones and IC tags. Thanks to the NFC function, data communication can be achieved easily just by touching the relevant symbol or designated location on NFC compatible devices.
For a smartphone with Android OS 4.0 or lower installed, downloading of the app “NFC Easy Connect” available at Google Play™ is required. The app may not be downloadable in some countries/ regions.
1Activate the NFC function on the smartphone.
For details, refer to the operating instructions supplied with the smartphone.
2Touch the N-Mark part of the unit with the N-Mark part of the smartphone.
Pairing and connecting with a
BLUETOOTH device
When connecting a BLUETOOTH device for the first time, mutual registration (called “pairing”) is required. Pairing enables this unit and other devices to recognize each other.
1Place the BLUETOOTH device within 1 m (3 ft) of this unit.
2 Press HOME, then touch [Settings].
3 Touch  .
.
4Touch [Bluetooth Connection], then set the signal to [ON].
The BLUETOOTH signal is turned on and  lights up on the status bar of the unit.
5Touch [Pairing].
 flashes while the unit is in pairing standby mode.
6Perform pairing on the BLUETOOTH device so it detects this unit.
7Select [XAV-xxxx] (your model name) shown in the display of the BLUETOOTH device.
If your model name does not appear, repeat from step 5.
Make sure that  lights up on the status bar of the unit.
To disconnect by One touch
Touch the N-Mark part of the unit with the N-Mark part of the smartphone again.
Notes
•When making the connection, handle the smartphone carefully to prevent scratches.
•One touch connection is not possible when the unit is already connected to another NFC compatible device. In this case, disconnect the other device, and make a connection with the smartphone again.
8If passkey* input is required on the BLUETOOTH device, input [0000].
* Passkey may be called “passcode,” “PIN code,” “PIN number,” “password,” etc., depending on the BLUETOOTH device.
Input passkey |
[0000] |
When pairing is made,  stays lit.
9Select this unit on the BLUETOOTH device to establish the BLUETOOTH connection.
 or
or  lights up when the connection is made.
8GB

Note
While connecting to a BLUETOOTH device, this unit cannot be detected by another device. To enable detection, enter the pairing mode and search for this unit from another device.
To start playback
For details, see “Playing a BLUETOOTH Device (XAV- W651BT/XAV-V631BT)” (page 13).
To cancel pairing
Perform step 5 to cancel the pairing mode after this unit and the BLUETOOTH devices are paired.
Connecting with a paired BLUETOOTH device
To use a paired device, connection with this unit is required. Some paired devices will connect automatically.
1 Press HOME, then touch [Settings].
2Touch [Bluetooth Connection], then touch [ON].
Make sure that  lights up on the status bar of the unit.
3Activate the BLUETOOTH function on the BLUETOOTH device.
4Operate the BLUETOOTH device to connect to this unit.
 or
or  lights up on the status bar.
To connect the last-connected device from this unit
When the ignition is turned to on with the BLUETOOTH signal activated, this unit searches for the last-connected BLUETOOTH device, and connection is made automatically.
If it does not work, touch [Reconnect] to search for the last-paired device again. If the problem is not solved, follow the pairing procedure.
Note
While streaming BLUETOOTH audio, you cannot connect from this unit to the cellular phone. Connect from the cellular phone to this unit instead.
To install the microphone
For details, see “Installing the microphone (XAV- W651BT/XAV-V631BT)” (page 34).
Connecting a USB Device
1 Turn down the volume on the unit.
2Connect the USB device to the unit.
To connect an iPod/iPhone, use the USB connection cable for iPod (not supplied).
Connecting Other Portable
Audio/Video Devices
1 Turn off the portable audio/video device.
2 Turn down the volume on the unit.
3Connect the portable audio/video device to the AUX input jack on the unit with a connecting cord (not supplied).
4 Press HOME, then touch [AUX].
To match the volume level of the connected device to other sources
Start playback of the portable audio/video device at a moderate volume and set your usual listening volume on the unit:
Touch 

 , then set [Input Level] between –10 and +15.
To set to the device type manually
Touch 

 , then set [AUX Input] to [Audio], [Video], or [Auto].
Connecting Rear View Camera
By connecting the optional rear view camera to the CAMERA IN terminal, you can display the picture from the rear view camera. For details, see “Connection/Installation” (page 31).
9GB
Listening to the Radio
Listening to the Radio
To listen to the radio, press HOME then touch [Tuner].
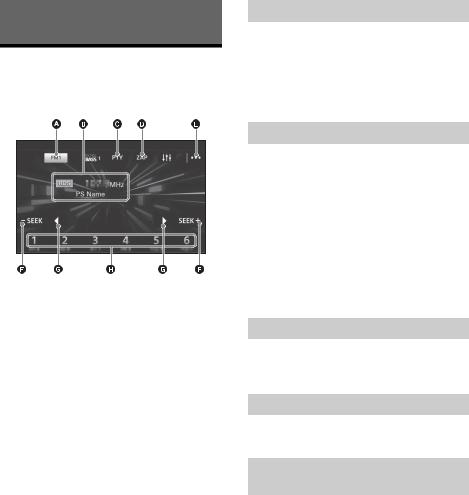
Reception controls/indications
Current band
Opens the band list.
Current frequency, program service name*, RDS indication*
* During RDS reception.
PTY (program types) (FM only)
Opens the PTY list (page 11).
ZAP (ZAPPIN)
Helps to find a desired station by listening to preset stations for a few seconds.


 (option)
Opens the option menu.
–SEEK/SEEK+
Tunes in automatically.
/
Tunes in manually.
Touch and hold to continuously skip frequencies.
Preset numbers (1 to 6)
Selects a preset station.
Touch and hold to store the current frequency in that preset.
Storing automatically (BTM)
1Select the desired band (FM1, FM2, FM3, AM1, or AM2).
2 Touch 

 .
.
3Touch [BTM], then [Search].
The unit stores stations in order of frequency on the preset numbers (1 to 6).
Tuning
1Touch the current band.
The band list appears.
2Touch the desired band (FM1, FM2, FM3, AM1, or AM2).
3Perform tuning.
To tune automatically
Touch –SEEK/SEEK+.
Scanning stops when the unit receives a station.
To tune manually
Touch and hold / to locate the approximate frequency, then touch / repeatedly to fine adjust to the desired frequency.
Storing manually
1While receiving the station that you want to store, press and hold the desired preset number (1 to 6).
Receiving stored stations
1Select the band, then touch the desired preset number (1 to 6).
Searching for the desired station from preset stations (Tuner Preset ZAPPIN)
Tuner Preset ZAPPIN helps you to find a desired station by listening to preset stations for a few seconds.
1During radio reception, touch [ZAP].
Tuner Preset ZAPPIN starts, and subsequent stations are received in sequence.
2Touch [ZAP] again when the desired station is received.
10GB
Using Radio Data System (RDS)
Selecting program types (PTY)
1During FM reception, touch [PTY].
To scroll the list, touch / .
2Touch the desired program type.
The unit searches for a station broadcasting the selected program type.
To close the PTY list
Touch  .
.
Type of programs
News (News), Current Affairs (Current Affairs),
Information (Information), Sport (Sports), Education
(Education), Drama (Drama), Cultures (Culture),
Science (Science), Varied Speech (Varied), Pop Music
(Pop Music), Rock Music (Rock Music), Easy Listening (M.O.R. Music), Light Classics M (Light classical),
Serious Classics (Serious classical), Other Music (Other Music), Weather & Metr (Weather), Finance (Finance),
Children’s Progs (Children’s program), Social Affairs
(Social Affairs), Religion (Religion), Phone In (Phone In), Travel & Touring (Travel), Leisure & Hobby
(Leisure), Jazz Music (Jazz Music), Country Music (Country Music), National Music (National Music), Oldies Music (Oldies Music), Folk Music (Folk Music), Documentary (Documentary)
Setting clock time (CT)
The CT data from the RDS transmission sets the clock.
1Set [Clock Time] to [ON] in [General Settings] (page 18).
Playback
Playing a Disc (XAV-W651BT/
XAV-W601)
Depending on the disc type, some operations may be different or restricted.
1 Insert the disc (label side up).
Playback starts automatically.
If a DVD menu appears
Touch the desired item in the DVD menu.
You can also use the menu control panel, which can be displayed by touching the screen anywhere except the DVD menu items. Touch / / / to move the cursor, then touch [ENTER] to confirm.
If the menu control panel does not appear by touching the display, use the remote commander.
Example of playback indications (DVD)
Current source icon, format
Playback status, elapsed playback time
Chapter/title number, audio format
Touch the display if the indications are not displayed.
For audio discs, some indications are always displayed during playback.
11GB
Loading...