


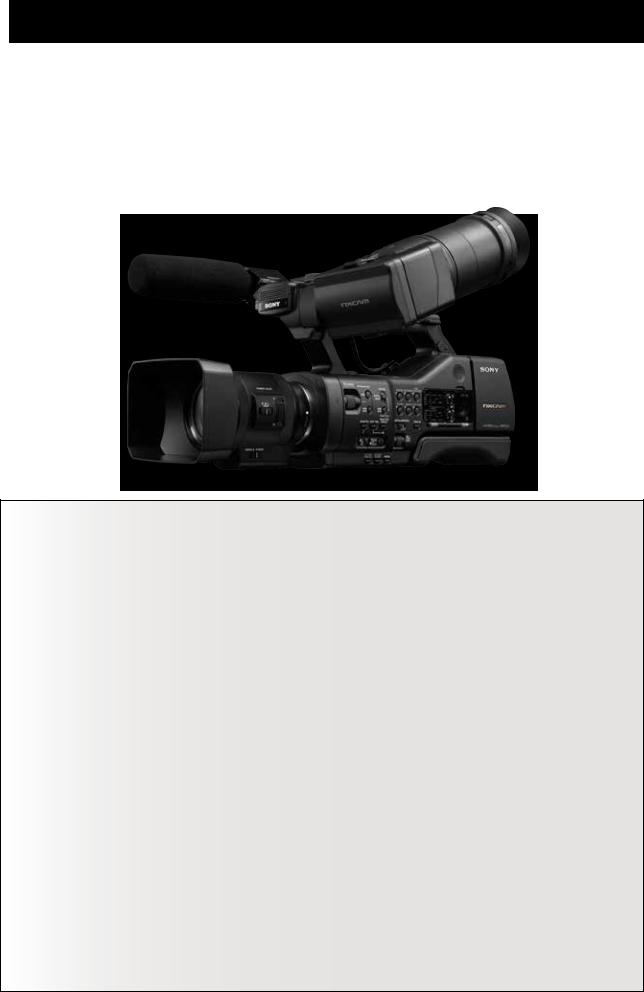
NEX-EA50 Handbook
High reliability in an adaptable design
The NEX-EA50 camcorder features an ultra-large image sensor for optimum high-resolution live-action video capture.
The APS-C size Exmore HD CMOS image sensor with 16.7 million pixels produces unparalleled stereoscopic images at shallow depth of field and guarantees improved clarity with minimal noise in low light settings.
Video cameras with large sensors have been available for some time in the DSLR (digital single lens reflex) camera format. However the NEX-EA50 is superior to conventional DSLR cameras and offers a number of exciting new features.
Extended operation and recording times
Overheat protection enables continuous uninterrupted recording for up to 540 minutes using the NPF970 battery pack, or 330 minutes under normal usage conditions.
Back up recording
The NEX-EA50 supports simultaneous recording onto an optional flash memory unit (HXR-FMU128) as well as the HD memory card to help prevent accidental data loss. Separate START/STOP buttons allow independent recording control for each media type.
SELP 18200 powered zoom lens (not available on all models)
The powered zoom lens delivers smooth zoom action during video capture from 29 mm through to 322 mm (35-mm equivalent).
High-quality digital zoom using fixed focal length lens
The NEX-EA50 provides precise, high quality zooming when using a fixed focal length (prime) lens, without change in the depth of field which is virtually impossible to achieve using an optical zoom lens.
Time code setting (Rec run/free run)
The infrared remote control allows simultaneous reset and synchronized recording of the NEX-EA50 together with other NXCAM
LPCM audio recording/XLR connector
In addition to the built-in stereo microphone, the NEX-EA50 comes with the ECM-XM1 shotgun microphone powered by a 48 Volt XLR connector.
Adaptable shoulder style design
The NEX-EA50 has a handle grip for active hand-held shooting, as well as a retractable shoulder-pad and detachable viewfinder for added stability in shoulder-mounted mode.

Chapter 0
AUTOMATED FUNCTIONS
Chapter 1
SENSOR AND LENS
Chapter 2
SHOOTING STYLES
Chapter 3
FILE-BASED
Chapter 4
PICTURE PROFILE

Chapter 0
AUTOMATED FUNCTIONS
About automated functions
For documentaries and events requiring maximum mobility, automated functions such as Auto Focus and Auto Exposure reduce the workload so that you can concentrate on tracking the subject.
The 11 x powered zoom lens and E-Mount lens supplied with the NEX-EA50 are compatible with Auto Focus and Auto Exposure. A-Mount lenses also support the following automated functions when used in conjunction with the LA-EA1 or LA-EA2 mount adaptor.
Comparison Chart for LA-EA1 and LA-EA2 (When used with NEX-EA50)
|
LA-EA1 |
|
|
|
|
|
LA-EA2 |
|
|
|
|
|
|
|
|
|
|
|
|
|
|
|
|
|
|
|
|
|
Focus |
|
|
Iris |
|
|
Focus |
|
|
Iris |
|
|
|
A-mount |
|
|
|
|
|
|
|
|
|
|
|
|
|
AUTO |
MANUAL |
PUSH |
AUTO |
MANUAL |
IRIS |
AUTO |
MANUAL |
PUSH |
AUTO |
MANUAL |
IRIS |
||
Lens Type |
|||||||||||||
FOCUS |
FOCUS |
AUTO |
|
|
PUSH |
FOCUS |
FOCUS |
AUTO |
|
|
PUSH |
||
|
|
|
|
|
|
AUTO |
|
|
|
|
|
AUTO |
|
|
|
|
|
|
|
|
|
|
|
|
|
|
|
SSM |
No |
Yes |
No |
No |
Yes |
No |
Yes*1 |
Yes |
Yes*2 |
No |
Yes |
Yes |
|
SAM |
No |
Yes |
No |
No |
Yes |
No |
Yes*1 |
Yes |
Yes*2 |
No |
Yes |
Yes |
|
Coupler |
No |
Yes |
No |
No |
Yes |
No |
Yes*1 |
Yes |
Yes*2 |
No |
Yes |
Yes |
|
|
|
|
|
|
|
|
|
|
|
|
|
|
*1 Iris position moves to either F3.5 or maximum iris in AUTO FOCUS mode.
*2 Iris position moves to either F3.5 or maximum iris in PUSH AUTO focus mode while exposure is adjusted by shutter speed.
Video Settings
AUTO EXPOSURE (AE) function lets you control image brightness automatically
Moving the AUTO/MANUAL switch to AUTO enables automatic adjustments of the iris, gain, shutter speed and white balance settings. You can start shooting right away without checking those settings.
AUTO EXPOSURE (AE) is a camcorder function that controls all or some of the iris, shutter speed and gain parameters automatically to achieve ideal brightness for videos.
With the NEX-EA50, the above parameters, as well as white balance, are controlled automatically when the AUTO/MANUAL switch is moved to AUTO. Please note that automatic control of iris is only possible when an E-mount lens is used. When another maker’s lens is used, iris remains under manual control, while other parameters are adjusted automatically. When the AUTO/MANUAL switch is in the MANUAL position, pressing the specific button for a particular parameter, such as the GAIN button, lets you switch between the AUTO and MANUAL modes just for that parameter (gain in the case of the button). The [A] icon next to a parameter indicates it is being controlled automatically.
Even when the AE function is used, it cannot produce perfect results under all lighting conditions. But by also utilizing support functions, you can use the AE function effectively.
AUTO/MANUAL switch
GAIN button
AUTO/MANUAL control display
2

AE SHIFT for automatically shooting video a little brighter or darker ASSIGN
The AE SHIFT function enables you to shoot at an exposure level that is a little higher or lower than the AE function normally selects.
Usage examples
■When the subject is darker than the background, such as when shooting a person against light, a snowfield or another bright background using the AE function. If you want to capture the subject brightly even if the background becomes extremely bright, you can shift AE toward the + (plus) side.
■When the subject is too bright compared to the brightness of the background. If you want to tone down the subject’s brightness even if the background becomes darker, you can shift AE toward the – (minus) side.
LEVEL = +2.0EV |
LEVEL = 0EV |
LEVEL = –2.0EV |
How to set/operate
1.MENU → CAMERA SET → AE SHIFT
2.Select ON/OFF.
3.Adjust the shift brightness in the range - 2.0 (dark) through 0 (normal) to +2.0 (bright). Press the SEL/PUSH EXEC dial to enter the new setting.
Note: This feature is available when auto control is enabled for the iris, shutter speed and/or gain.
|
|
|
AUTO FOCUS function lets you control focus adjustment automatically
With focus, automatic adjustments kick in when the FOCUS switch is moved to AUTO.
FOCUS switch
Using Manual functions for purposeful shooting
Moving the AUTO/MANUAL switch to MANUAL enables manual adjustments of the iris, gain, shutter speed and white balance settings. Please note using this switch will change the settings for all these exposure settings. Regarding focus adjustment, moving the FOCUS switch to MANUAL enables manual adjustment.
BASED FILE 3 STYLES SHOOTING 2 LENS AND SENSOR 1 FUNCTIONS AUTOMATED 0
PROFILE PICTURE 4
3
AUTOMATED FUNCTIONS
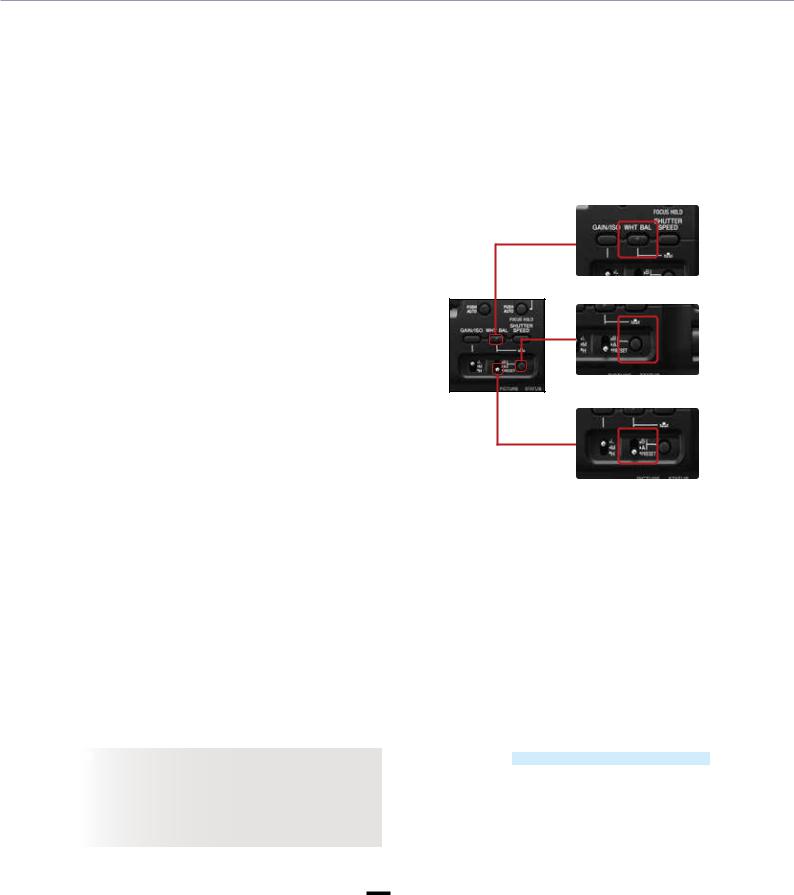
White Balance (WB)
To shoot images in correct colors, you need to adjust your camera so that it can capture a white object as white under lighting conditions with different color temperatures. At the same time, white balance is sometimes used to shoot something that is not white as white for dramatic effects.
One Push White Balance lets you capture white subjects as white
Selecting WHITE BALANCE MEMORY switch A (  A) saves a white balance adjustment value in memory A. Choosing switch B (
 B) enables you to store another white balance adjustment value separately in memory B. Unless you readjust, the saved adjustment values will be held in memory even when the power is turned off. We recommend using this feature when you use ND filters.
How to use/operate
1.Push the WHT BAL button on the camera body.
2.Select A (  A) or B (
  B) with the WHITE BALANCE MEMORY switch located on the camera body.
3.Set the correct exposure under the same lighting conditions as the subject, capture the white subject as large as possible in the screen, and push the  (one push) button.
4.The adjustment value is stored in  A or
A or  B. The saved color temperature is displayed on the LCD screen for about three seconds.
WHT BAL button
 (one push) button
WHITE BALANCE MEMORY switch
WB TEMP SET (white balance temperature set) lets you directly set color temperature
This function enables you to specify the color temperature in numbers, such as 3,200K and 6,500K.
Usage examples
■When you want to match white balance with other broadcasting/professional camcorders whose color temperatures can be configured by entering numbers.
■When you want to keep the numerical values of color temperatures as shooting data when the shooting assignment extends over multiple days, for example.
 TIPS
TIPS
There are times when the correct white balance cannot be obtained by designating a color temperature alone, such as when you are shooting under fluorescent or LED lights. In such cases, we recommend you also use the WB SHIFT function under the Picture Profile menu.
How to set/operate
1.MENU → CAMERA SET → WB PRESET → WB COLOR TEMP Exit from the menu system.
2.Press the WHT BAL button on the side of the camera and set the memory switch to PRESET.
3.Press the  (one push) button to highlight COLOR TEMP on the display, then use the SEL/PUSH EXEC dial to adjust the color temperature in the range 2,300 K through 15,000 K.
4.Press the  (one push) button or the SEL/PUSH EXEC dial to enter the new setting.
4
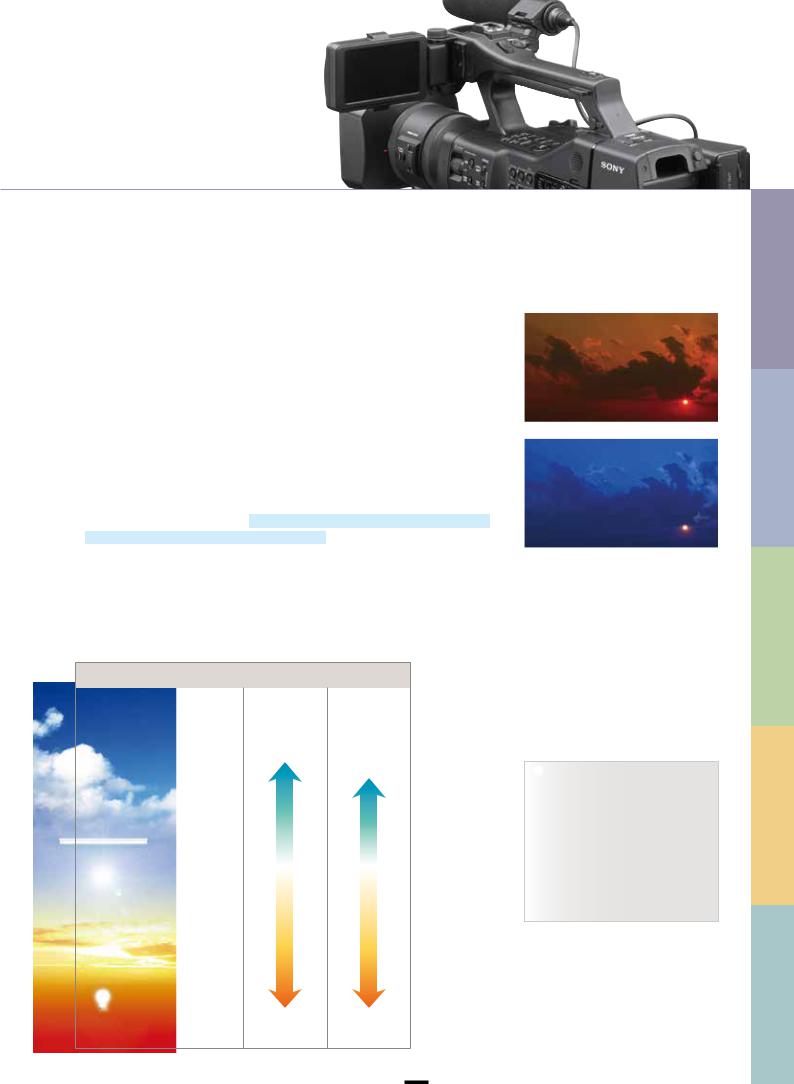
WB OUTDOOR LEVEL (white balance outdoor level) for controlling an image’s color tone with white balance
This function lets you change the color temperature (default value at roughly 5,800K) for the OUTDOOR white-balance preset.
Usage examples
■When you do not have a white subject for setting white balance.
■When you want to match the white balance of multiple cameras as much as possible.
■When you want your image to have an orange tone like during sunsets or a bluish tone like at night and under shade.
How to set/operate
1.MENU → CAMERA SET → WB PRESET → OUTDOOR Exit from the menu system.
2.Press the WHT BAL button on the side of the camera and set the memory switch to PRESET.
3.Press the (one push) button to highlight the display, then use the SEL/PUSH EXEC dial to adjust the correction level in the range -7 (blue tint) through 0 (normal) to +7 (red tint), in increments of approximately 500 K.
4.Press the  (one push) button or the SEL/PUSH EXEC dial to enter the new setting.
Reference: WB preset and color temperature
WB (White Balance) preset
(K) |
|
|
|
WB TEMP SET |
WB OUTDOOR |
|
|
|
(Unit: 100K) |
LEVEL |
|
|
|
|
|
||
30,000 |
|
|
|
|
(Unit: 500K) |
|
|
|
|
|
|
25,000 |
|
|
Clear skylight |
15,000K |
|
|
|
|
|||
10,000 |
|
|
+7 (Approx. 9,300K) |
||
|
|
||||
|
|
|
|
||
|
|
|
|
||
|
|
|
|
|
|
8,000 |
|
|
Bright overcast |
|
|
|
|
skylight |
|
|
|
7,000 |
|
|
|
|
|
|
|
Overcast skylight |
|
|
|
|
|
|
|
||
6,000 |
|
|
Daylight |
|
|
|
|
|
|
||
|
|
fluorescent lamp |
|
|
|
5,000 |
|
|
Daylight |
|
0 (Approx. 5,800K) |
|
|
|
|||
|
|
Noon |
|
|
|
|
|
|
|
|
|
|
|
|
|
|
|
|
|
|
2 hours |
|
|
|
|
|
|
|
|
4,000 |
|
|
after sunrise |
|
|
|
|
|
|
|
|
|
|
|
1 hour |
|
|
|
|
|
|
|
|
3,200 |
|
|
after sunrise |
|
|
|
|
|
|
|
|
3,000 |
|
|
100W |
|
|
|
|
|
|
|
|
|
|
|
tungsten lamp |
|
|
|
|
|
|
2,300K |
–7 (Approx. 2,300K) |
1,500
WB OUTDOOR LEVEL = +7
WB OUTDOOR LEVEL = –7
 TIPS
TIPS
INDOOR color temperature is 3,200K and OUTDOOR color temperature is 5,800K in WB PRESET setting.
Some camcorders in the HDV and NXCAM series are equipped with the same function. You can roughly match their color temperatures by setting their WB OUTDOOR LEVEL at the same level.
BASED FILE 3 STYLES SHOOTING 2 LENS AND SENSOR 1 FUNCTIONS AUTOMATED 0
PROFILE PICTURE 4
5
AUTOMATED FUNCTIONS
Audio settings
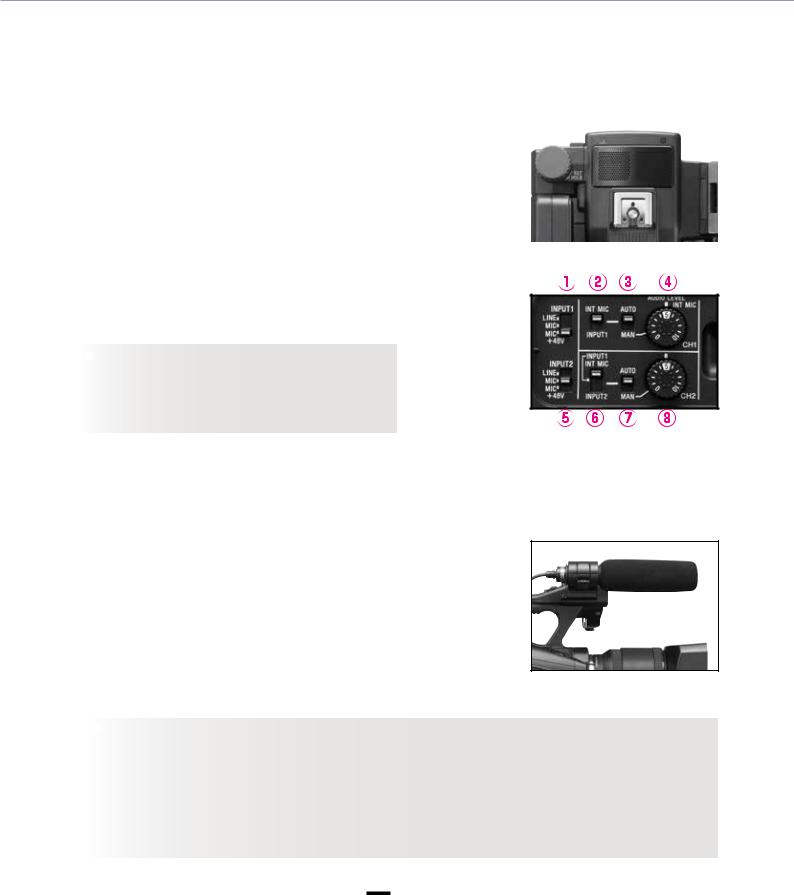
The NEX-EA50 has two audio input channels and accepts three input sources: built-in stereo microphone, unidirectional mono microphone (supplied) and external line in. There is a +48 V phantom power supply.
Using the built-in stereo microphone
The stereo microphone is set into the front of the handle. This microphone has low directionality and provides consistent orientation during both fixed and pan shots. It is designed to provide general ambience with relatively close subjects using a moving camera.
How to set/operate
1.Set the CH1 (INT MIC/INPUT1) switch (see in diagram on right) and the CH2 (INT MIC/INPUT1/INPUT2) switch to INT MIC.
2.Set the input level AUTO/MAN switches and to the AUTO position.
 TIPS
TIPS
For distant subjects where the sound levels are too low, use the menu system to navigate to AUDIO SET → INT MIC SET → INT MIC SENS and select HIGH SENS to boost the audio level in AUTO mode.
Using the supplied ECM-XM1 shotgun microphone (mono only)
The directional shotgun microphone is used to minimize background noise for distant subjects.
How to set/operate
1.Connect the shotgun microphone to INPUT1 (upper) and set the INPUT1 switch (see in diagram above) to MIC+48V.
2.Set both the CH1 switch and the CH2 switch to INPUT1 position.
 TIPS
TIPS
Mono sound signal is distributed evenly between the left and right channels. If the CH2 switch (6) is set to LINE then no sound is recorded on CH2.
When using a dynamic unpowered microphone, switches (1) and (5) should be set to the MIC position. This disables the 48 V power supply.
In strong wind conditions, use the menu system to navigate to AUDIO SET → XLR SET → WIND RED, then turn on wind reduction to reduce wind noise.
6
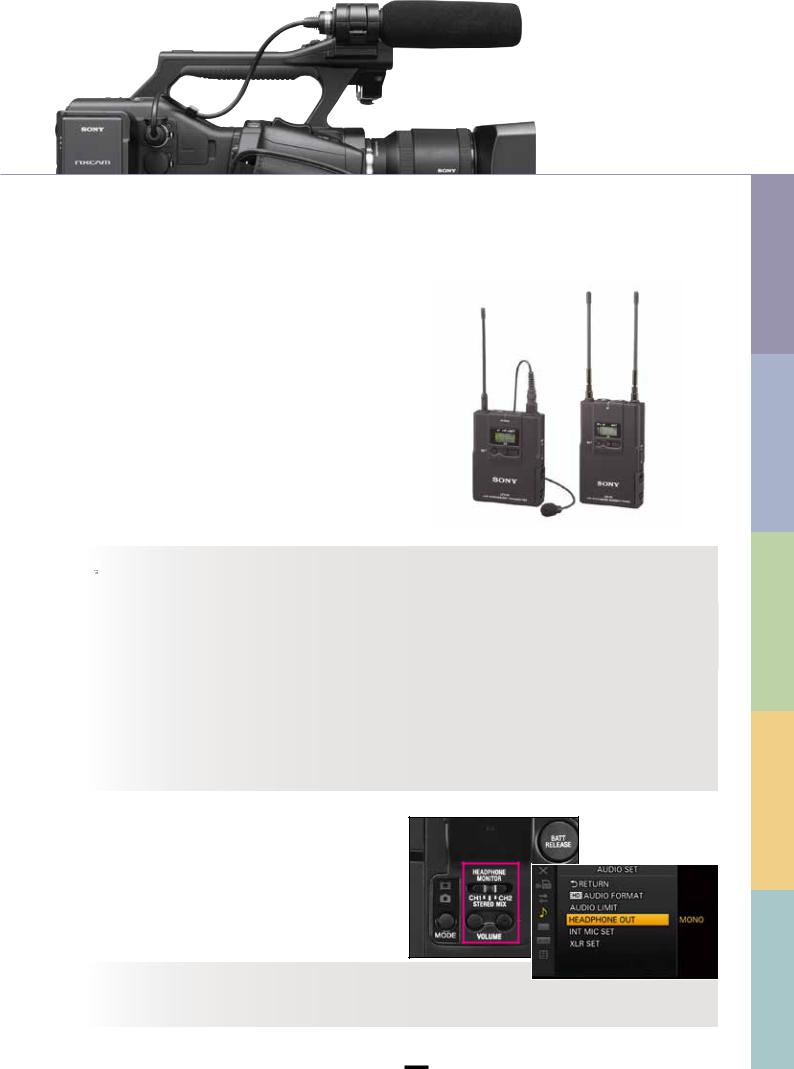
Wireless and other external microphones
Wireless microphones are often used by reporters who are constantly on the move. The microphone is connected to a transmitter worn by the reporter. The receiver is attached to the camera, providing an audio output feed that is connected to the camera input.
How to set/operate
The wireless microphone is connected in the same way as the shotgun microphone. When using a two-channel system with separate microphones, connect the left channel to INPUT1 and the right channel to INPUT2.
For more information, refer to the manufacturer’s instructions for the microphone.
 TIPS Adjusting the input level for external microphones
TRIM is used to adjust the microphone input level in accordance with the sound volume.
In the menu system, navigate to AUDIO SET → XLR SET → INPUT1(2) TRIM, then select the required trim value (-18 dB, -12
 TIPSdB, -6 dB, 0 dB, +6 dB and +12 dB).
For high-sensitivity microphones, or when recording very loud sounds, reduce the trim value. For low sensitivity microphones,
increase the trim value.
Audio distortion may be caused by input distortion (at the microphone) or recording distortion (within the camera), or a combination of both. To reduce input distortion, adjust the trim as described above. To reduce recording distortion, change to manual audio mode (switches and ) and adjust the input level dials ( and ) so that the sound level meters remain out of the peak zone.
In certain settings the Audio Limiter can help to improve the sound quality when recording in manual audio mode. Use the menu system to navigate to AUDIO SET → AUDIO LIMIT.
Adjusting the playback volume
The audio track can be monitored through headphones during recording and playback, and also from the built-in speaker during playback. The volume buttons and channel selector are located on top of the camera at the back.
 TIPS
TIPS
A flat mono mix of CH1 and CH2 in the headphones can be used to check the balance between left and right channels while recording. To switch to the mono mix, use the menu system to navigate to AUDIO SET → HEADPHONE OUT and select MONO.
BASED FILE 3 STYLES SHOOTING 2 LENS AND SENSOR 1 FUNCTIONS AUTOMATED 0
PROFILE PICTURE 4
7
Chapter 1
SENSOR AND LENS
16.7 million pixel APS-C size Exmor HD CMOS sensor
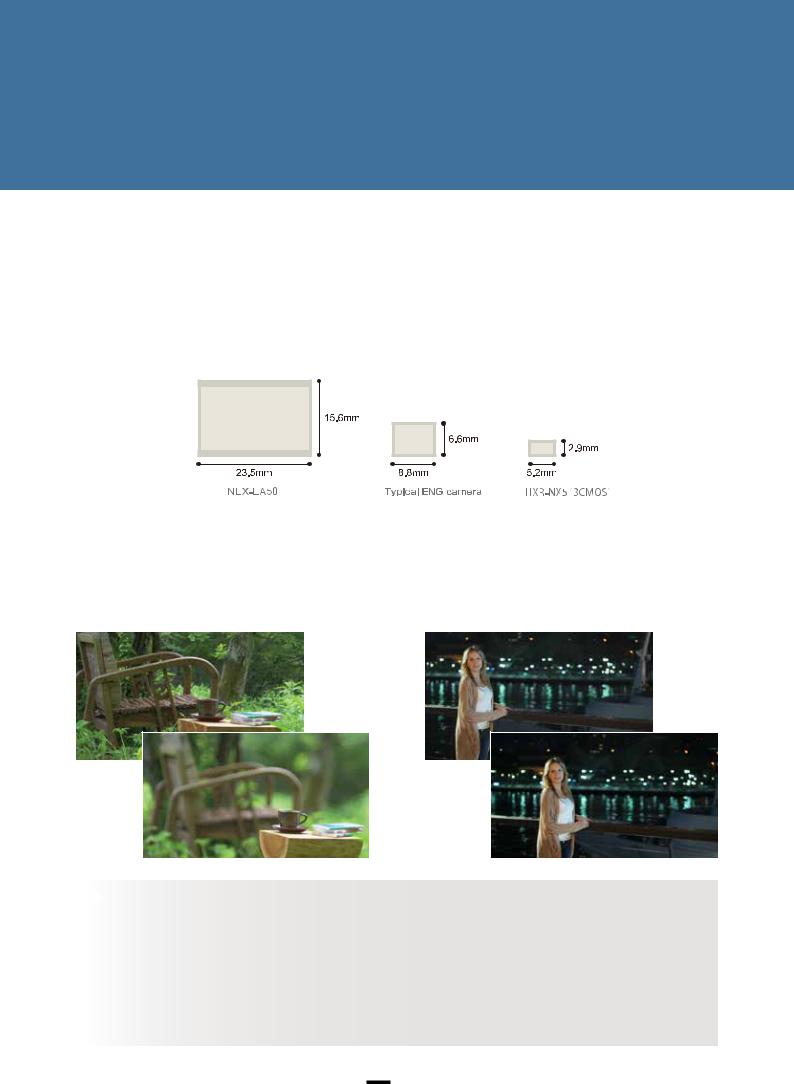
The NEX-EA50 delivers rich “bokeh” that brings the subject to life as well as excellent sensitivity to reduce noise in low-light settings. The large APS-C size sensor produces images at sufficient resolution to allow digital zooming with no loss of picture quality, effectively transforming a single focal length lens into a high-quality zoom lens.
Sensor sizes
APS-C
2/3 size
1/3 size
Depth of field
At a given angle of field, a larger sensor with a longer focal length will create more background blurring. When depth of field is relatively shallow, this accentuates the region that is in focus and creates a striking sense of presence.
High sensitivity and low noise
The larger the sensor, the greater the area available for capturing light. More light in turn boosts the sensitivity and the signal-to-noise ratio, allowing the camera to produce clear images with minimal noise even at maximum gain in low-light settings.
 TIPS
TIPS
About depth of field
To capture the entire view from foreground to background in focus, photographers typically use a wide-angle lens with short focal length together with a narrow aperture, and try to get a reasonable distance from the main subject.
Conversely, to accentuate the subject by blurring the background or surrounding scenery, a telephoto lens with longer focal length is used in combination with a wide aperture, and the camera is brought closer to the subject.
In theory, depth of field is governed by three factors: f-stop (aperture), focal length and distance from the subject. In practice, however, the distance between the subject and the background also influences the amount of blurring.
8
Controlling the brightness
Brightness (or exposure) is closely linked to depth of field. Brightness is governed by three factors: aperture (or iris), shutter speed and gain. In a well-lit setting, an ND filter can be used to control the light level and enhance the “bokeh” effect.
Gain/ISO
The NEX-EA50 allows for higher gain (or ISO) settings, where the image signal level is amplified electrically to boost the image brightness. In this way, the NEX-EA50 can produce excellent images with minimal noise in low-light settings such as a darkened stage, where conventional video cameras would have too much noise.
*Gain and ISO sensitivity can be set independently, with priority given to either as required.
How to set/operate
1.Set the AUTO/MANUAL switch to MANUAL.
2.Press the GAIN/ISO button to display the gain or ISO value.
3.Set the gain switch to H, M or L as required.
Setting range: |
|
|
|
Gain |
H (18 dB) |
M (9 dB) |
L (0 dB) |
ISO |
H (800) |
M (400) |
L (160) |
|
|
|
|
 TIPS
TIPS
The gain and ISO settings can also be modified via the menu system. Navigate to CAMERA SET then either GAIN SET or ISO SET.
Gain range: 0 dB – 30 dB
BASED FILE 3 STYLES SHOOTING 2 LENS AND SENSOR 1 FUNCTIONS AUTOMATED 0
ISO range: 160 – 5,000
WhentheGANMApictureprofileissettoITU709,theISOrangebecomes200–6,400. Note:ISOrangemaydifferforotherpictureprofiles.
PROFILE PICTURE 4
9
SENSOR AND LENS
Controlling the brightness
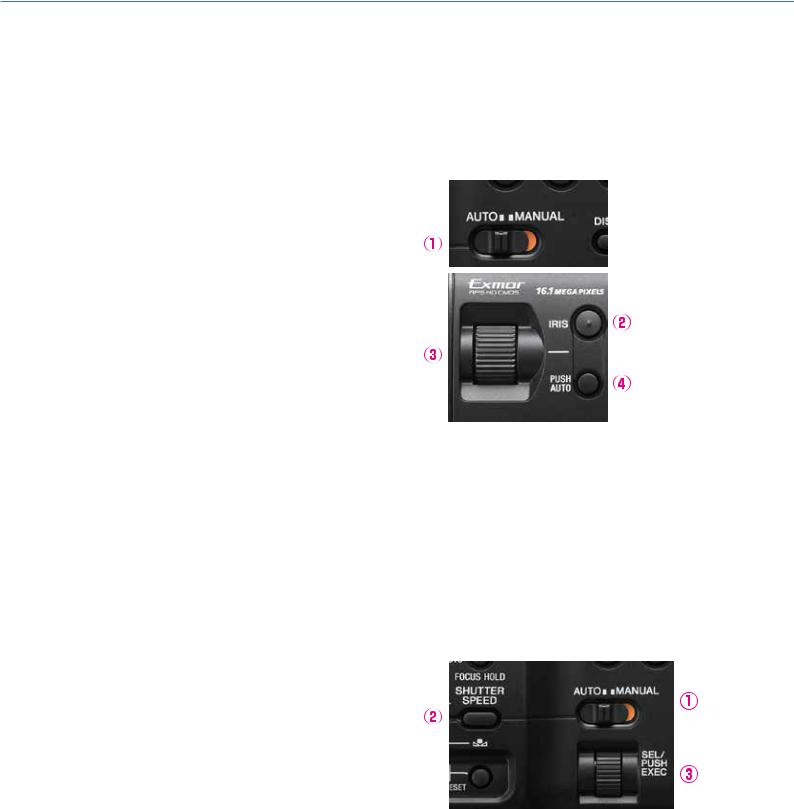
Iris
In manual control mode, the iris ring is used to adjust brightness by opening and closing the lens mechanically.
How to set/operate
1.Set the AUTO/MANUAL switch to MANUAL.
2.Press the IRIS button to display the iris setting.
3.Adjust the iris setting using the iris ring.
Note: A lower iris setting opens the lens and increases the available light volume.
To engage auto control temporarily
4. Press and hold the PUSH AUTO button.
Note: Auto control requires an E-Mount lens or an A-Mount lens with LA-E2+A mount adaptor.
To engage auto control permanently, press the IRIS button again.
Shutter speed
The shutter speed can also be used to control the quantity of transmitted light.
In still photography, both the shutter speed and the aperture (iris) are used to control the light volume. With video cameras, however, shutter speed is more problematic. Faster shutter speeds can cause subject movements to appear brittle and unnatural, while slower shutter speeds can make movements and camera panning appear jerky.
How to set/operate
1.Set the AUTO/MANUAL switch to MANUAL.
2.Press the SHUTTER SPEED button to highlight the shutter speed setting.
3.Adjust the shutter speed using the SEL/PUSH EXEC dial. Note: A shutter speed of 1/100 sec is displayed as 100. Thus a
higher value indicates a faster shutter speed.
10
External ND filter
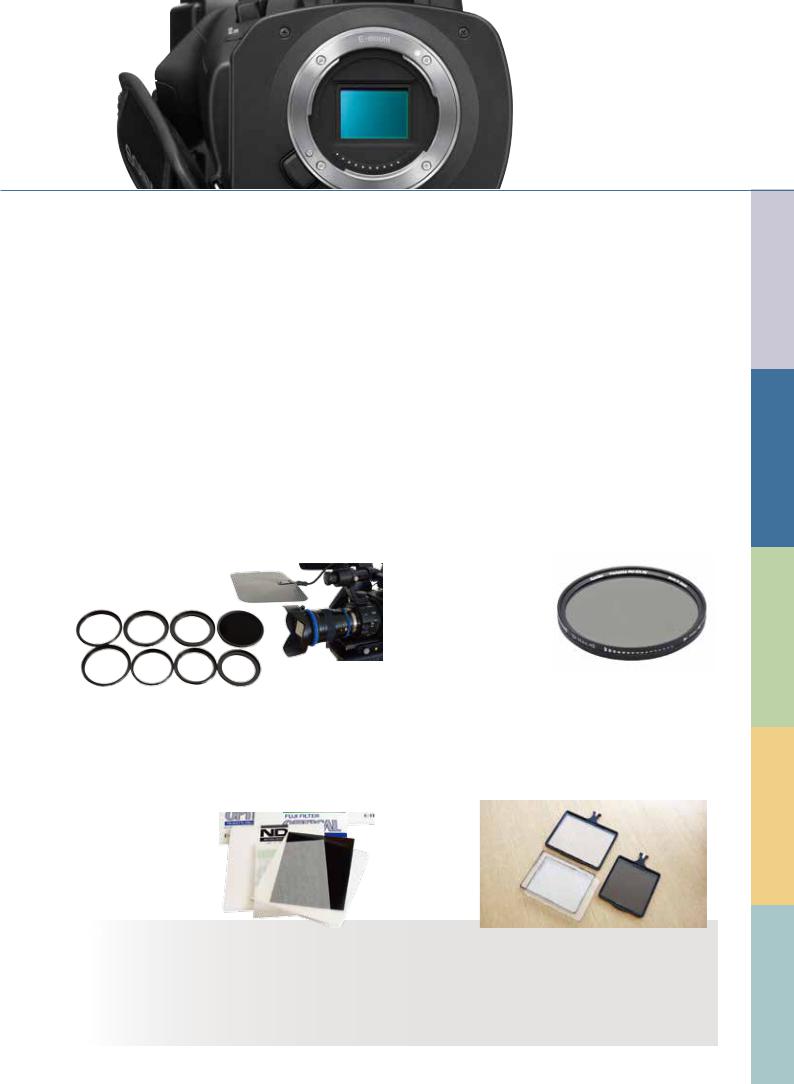
When using a wide aperture in a bright outdoor setting, for instance to achieve a shallow depth of field effect, a high shutter speed is required in order to prevent overexposure. Where a shutter speed of 1/48 sec would be suitable in 24 p mode, at a larger aperture a very fast shutter speed of around 1/1000 sec would be needed, making movements appear brittle and unnatural. An alternative is to fit an external ND filter to the lens to reduce the amount of light entering the camera.
■ Round, glass screw-in type
These filters are designed to be screwed in at the tip of the lens unit. Cheap and widely available, these filters can reduce the light volume to 1/4, 1/8, or 1/16 of the original level.
Because they need to match the lens unit’s filter diameter requirement, you need to obtain filters that are in the right size or alter the filter diameter by using a tool such as a step-up ring.
If the light volume is still too high even with a 1/16 filter, you will need to combine multiple filters. In such instances, diffused reflections can easily cause flares and halation. To prevent them, you need to block the light from directly hitting the filters.
■Filters that enable ND level to be controlled via fader lever
These recently introduced products are round, glass screwin type filters with a lever on their outer circumference. By turning the lever, you can change the light volume.
These filters alter colors more than other types of ND filters. You need to take precautions, such as checking white balance manually for every cut.
■ Sheet type
Because these filers were at first based on gelatin, they are still widely referred to as gelatin filters.
They are inserted into a paper filter-holder. Sometimes, they are cut up into smaller pieces and attached to the back of the lens or the lens mount. You need to be careful with dust and make sure that pieces of the sheet-type
filter do not touch the sensor section. For these reasons, we do not recommend the second usage method.
■ Square glass type
These are high-priced filters that are used in combination with a matte box. They are not affected by the lens diameter, and the light volume can be adjusted by simply changing one filter with another.
 TIPS How to select ND filters
If you normally use two or three lenses, we recommend getting 1/4, 1/8 and 1/16 round, glass screw-in type ND filters that match the diameter of your largest-diameter lens. Or it could be a fader-type ND filter that matches the diameter of your largest-diameter lens. When you use a smaller lens, you can attach your filter to a step-up ring.
If you use many lenses and they include a large-diameter lens, selecting the combination of a matte box and square glass ND filters will give you more flexibility.
BASED FILE 3 STYLES SHOOTING 2 LENS AND SENSOR 1 FUNCTIONS AUTOMATED 0
PROFILE PICTURE 4
11
SENSOR AND LENS
Brightness adjustment
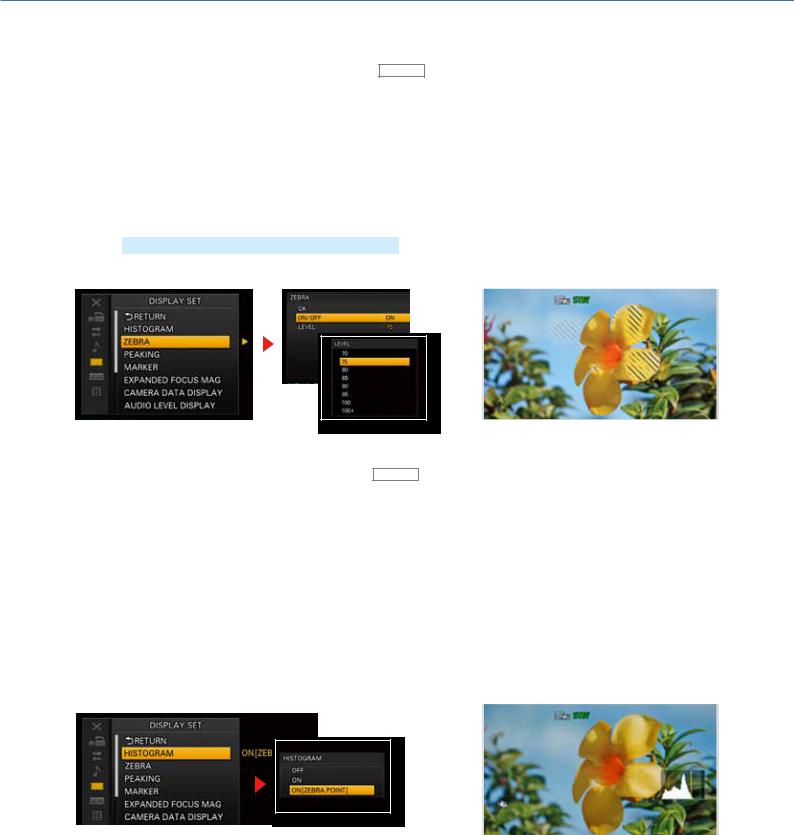
Zebra display—for checking subject brightness ASSIGN
Zebra stripes are superimposed on areas of the image that correspond to the designated brightness level, to provide a guide for brightness adjustment.
To check for whiteout, set the Zebra display to 100+ then adjust the brightness to minimize the stripes visible on the screen. For face close-ups, where a brightness level of 62% – 65% is recommended, set the Zebra display to 75 then adjust the brightness so that the stripes disappear from skin areas.
How to set/operate
1.MENU → DISPLAY SET → ZEBRA
2.Select ON or OFF.
3.Select a brightness level (70, 75, 80, 85, 90, 95, 100 or 100+). Press the SEL/PUSH EXEC dial to enter the new setting.
Histogram—for checking overall light balance ASSIGN
The histogram displays brightness levels across the entire image in the form of a bar graph, with brightness on the horizontal axis and pixel count on the vertical axis. The histogram is a useful way to assess the overall exposure balance of an image. For instance, in an image with many bright areas, the distribution will be skewed to the right.
A vertical line denotes the 100% brightness point. Brightness levels over 100% are displayed with a different background color to help locate areas of whiteout.
The ZEBRA POINT option also shows the selected Zebra brightness level on the histogram, providing a visual indication of brightness levels during filming.
How to set/operate
1.MENU → DISPLAY SET → HISTOGRAM
2.Select ON or ON [ZEBRA POINT].
Press the SEL/PUSH EXEC dial to confirm.
12
 Loading...