


 Loading...
Sony NEX-3A, NEX-3A B, NEX-3A R, NEX-3A S, NEX-3D Instruction Manual
...Additional information on this product and answers to frequently asked questions can be found at our Customer Support Website.
Printed using VOC (Volatile Organic
Compound)-free vegetable oil based ink.
©2010 Sony Corporation Printed in Thailand
5-3/NEX-NEX
Interchangeable
Lens Digital Camera
Instruction Manual
4-183-856-11(1)
Preparing the camera
Mastering the basic operation
Using the recording functions
Using the playback functions
Checking the functions available
Importing images to the computer
Others
E-mount
NEX-3/NEX-3C/NEX-5/NEX-5C

English
Owner’s Record
The model and serial numbers are located on the bottom. Record the serial number in the space provided below. Refer to these numbers whenever you call upon your Sony dealer regarding this product.
Model No. NEX-3/3C/ NEX-5/5C
Serial No. ______________________________
WARNING
To reduce fire or shock hazard, do not expose the unit to rain or moisture.
IMPORTANT SAFETY INSTRUCTIONS -SAVE THESE INSTRUCTIONS DANGER
-TO REDUCE THE RISK OF FIRE OR ELECTRIC SHOCK, CAREFULLY FOLLOW THESE INSTRUCTIONS
If the shape of the plug does not fit the power outlet, use an attachment plug adaptor of the proper configuration for the power outlet.
CAUTION
[ Battery pack
If the battery pack is mishandled, the battery pack can burst, cause a fire or even chemical burns. Observe the following cautions.
•Do not disassemble.
•Do not crush and do not expose the battery pack to any shock or force such as hammering, dropping or stepping on it.
•Do not short circuit and do not allow metal objects to come into contact with the battery terminals.
•Do not expose to high temperature above 60°C (140°F) such as in direct sunlight or in a car parked in the sun.
•Do not incinerate or dispose of in fire.
GB2 • Do not handle damaged or leaking lithium ion batteries.

•Be sure to charge the battery pack using a genuine Sony battery charger or a device that can charge the battery pack.
•Keep the battery pack out of the reach of small children.
•Keep the battery pack dry.
•Replace only with the same or equivalent type recommended by Sony.
•Dispose of used battery packs promptly as described in the instructions.
[ Battery charger
Even if the CHARGE lamp is not lit, the battery charger is not disconnected from the AC power source (mains) as long as it is connected to the wall outlet (wall socket). If some trouble occurs while using the battery charger, immediately shut off the power by disconnecting the plug from the wall outlet (wall socket).
When a power cord (mains lead) is supplied, the power cord (mains lead) can be used with this unit only, and should not be used with any other unit.
For Customers in the U.S.A. and Canada
[ RECYCLING LITHIUM-ION BATTERIES
Lithium-Ion batteries are recyclable.
You can help preserve our environment by returning your used rechargeable batteries to the collection and recycling location nearest you.
For more information regarding recycling of rechargeable batteries, call toll free
1-800-822-8837, or visit http://www.rbrc.org/
Caution: Do not handle damaged or leaking Lithium-Ion batteries.
[ Battery pack
This device complies with Part 15 of the FCC Rules. Operation is subject to the following two conditions:
(1) This device may not cause harmful interference, and (2) this device must accept any interference received, including interference that may cause undesired operation.
This Class B digital apparatus complies with Canadian ICES-003.
GB
3

For Customers in the U.S.A.
UL is an internationally recognized safety organization.
The UL Mark on the product means it has been UL Listed.
If you have any questions about this product, you may call: Sony Customer Information Center
1-800-222-SONY (7669)
The number below is for the FCC related matters only.
[Regulatory Information Declaration of Conformity
Trade Name: SONY
Model No.: NEX-3
Responsible Party: Sony Electronics Inc.
Address: 16530 Via Esprillo,
San Diego, CA 92127 U.S.A.
Telephone No.: 858-942-2230
This device complies with Part15 of the FCC Rules. Operation is subject to the following two conditions: (1) This device may not cause harmful interference, and (2) this device must accept any interference received, including interference that may cause undesired operation.
Declaration of Conformity
Trade Name: SONY
Model No.: NEX-5
Responsible Party: Sony Electronics Inc.
Address: 16530 Via Esprillo,
San Diego, CA 92127 U.S.A.
Telephone No.: 858-942-2230
This device complies with Part15 of the FCC Rules. Operation is subject to the following two conditions: (1) This device may not cause harmful interference, and (2) this device must accept any interference received, including interference that may cause undesired operation.
[ CAUTION
You are cautioned that any changes or modifications not expressly approved in this manual could void your authority to operate this equipment.
GB
4

[ Note:
This equipment has been tested and found to comply with the limits for a Class B digital device, pursuant to Part 15 of the FCC Rules.
These limits are designed to provide reasonable protection against harmful interference in a residential installation. This equipment generates, uses, and can radiate radio frequency energy and, if not installed and used in accordance with the instructions, may cause harmful interference to radio communications. However, there is no guarantee that interference will not occur in a particular installation. If this equipment does cause harmful interference to radio or television reception, which can be determined by turning the equipment off and on, the user is encouraged to try to correct the interference by one or more of the following measures:
–Reorient or relocate the receiving antenna.
–Increase the separation between the equipment and receiver.
–Connect the equipment into an outlet on a circuit different from that to which the receiver is connected.
–Consult the dealer or an experienced radio/TV technician for help.
The supplied interface cable must be used with the equipment in order to comply with the limits for a digital device pursuant to Subpart B of Part 15 of FCC Rules.
For Customers in Europe
[ Notice for the customers in the countries applying EU Directives
The manufacturer of this product is Sony Corporation, 1-7-1 Konan Minato-ku Tokyo, 108-0075 Japan. The Authorized Representative for EMC and product safety is Sony Deutschland GmbH, Hedelfinger Strasse 61, 70327 Stuttgart, Germany. For any service or guarantee matters please refer to the addresses given in separate service or guarantee documents.
This product has been tested and found compliant with the limits set out in the EMC Directive for using connection cables shorter than 3 meters (9.8 feet).
[ Attention
The electromagnetic fields at the specific frequencies may influence the picture and sound of this unit.
[ Notice
If static electricity or electromagnetism causes data transfer to discontinue midway (fail), restart the application or disconnect and connect the communication cable (USB, etc.) again.
GB
5
[Disposal of Old Electrical & Electronic Equipment (Applicable in the European Union and other European countries with separate collection systems)
This symbol on the product or on its packaging indicates that this product shall not be treated as household waste. Instead it shall be handed over to the applicable collection point for the recycling of electrical and electronic
equipment. By ensuring this product is disposed of correctly, you will help prevent potential negative consequences for the environment and human health, which could otherwise be caused by inappropriate waste handling
of this product. The recycling of materials will help to conserve natural resources. For more detailed information about recycling of this product,
please contact your local Civic Office, your household waste disposal service or the shop where you purchased the product.
[Disposal of waste batteries (applicable in the European Union and other European countries with separate collection systems)
This symbol on the battery or on the packaging indicates that the battery provided with this product shall not be treated as household waste.
On certain batteries this symbol might be used in combination with a chemical symbol. The chemical symbols for mercury (Hg) or lead (Pb) are added if the battery contains more than 0.0005% mercury or 0.004% lead.
By ensuring these batteries are disposed of correctly, you will help prevent potentially negative consequences for the environment and human health which could otherwise be caused by inappropriate waste handling of the battery. The recycling of the materials will help to conserve natural resources.
In case of products that for safety, performance or data integrity reasons require a permanent connection with an incorporated battery, this battery should be replaced by qualified service staff only. To ensure that the battery will be treated properly, hand over the product at end-of-life to the applicable collection point for the recycling of electrical and electronic equipment.
For all other batteries, please view the section on how to remove the battery from the product safely.
Hand the battery over to the applicable collection point for the recycling of waste batteries. For more detailed information about recycling of this product or battery, please contact your local Civic Office, your household waste disposal service or the shop where you purchased the product.
Notice for customers in the United Kingdom
GB
6
A moulded plug complying with BS 1363 is fitted to this equipment for your safety and convenience.
Should the fuse in the plug supplied need to be replaced, a fuse of the same rating as the supplied one and approved by ASTA or BSI to BS 1362, (i.e., marked with an  or
or  mark) must be used.
If the plug supplied with this equipment has a detachable fuse cover, be sure to attach the fuse cover after you change the fuse. Never use the plug without the fuse cover. If you should lose the fuse cover, please contact your nearest Sony service station.

Table of contents |
|
Preparing the camera |
|
Checking the accessories supplied ................................. |
10 |
Identifying parts ................................................................ |
12 |
Preparing the battery pack ............................................... |
16 |
Attaching/removing the lens ............................................. |
19 |
Inserting a memory card (sold separately) ....................... |
21 |
Attaching the flash ............................................................ |
23 |
Turning on the camera and setting up the date ............... |
25 |
Mastering the basic operation |
|
Shooting still images ......................................................... |
27 |
Recording movies ............................................................. |
28 |
Playing back images ........................................................ |
29 |
Deleting images ................................................................ |
30 |
Using the control wheel and soft keys .............................. |
32 |
Using the guide function of the camera ........................... |
34 |
Using the recording functions |
|
Defocusing the background easily (Background Defocus |
|
Control) ............................................................................. |
35 |
Selecting the flash mode .................................................. |
36 |
Adjusting the brightness of still images (Exposure |
|
compensation) .................................................................. |
37 |
Using the self-timer........................................................... |
37 |
Shooting still images continuously.................................... |
38 |
Changing the screen display (DISP) ................................ |
38 |
Shooting with various drive mode..................................... |
39 |
Selecting the image size................................................... |
44 |
Focusing on the face (Face Detection) ............................ |
46 |
Using the playback functions |
|
Enlarging the playback image (Enlarge Image) ............... |
47 |
|
Displaying the image list................................................... |
48 |
GB |
Viewing images on a TV ................................................... |
49 7 |
|
Checking the functions available |
|
Menu list ........................................................................... |
50 |
Functions available for each shooting mode ................... |
56 |
Flash modes available...................................................... |
57 |
Importing images to the computer |
|
Installing the software....................................................... |
58 |
What you can do with the supplied software ................... |
60 |
Creating a movie disc (NEX-5/5C) ................................... |
61 |
Others |
|
Checking the number of recordable images ................... |
63 |
List of icons on the LCD monitor ...................................... |
65 |
Learning more about the camera (α Handbook) ............. |
68 |
Troubleshooting................................................................ |
69 |
Precautions....................................................................... |
73 |
Specifications ................................................................... |
76 |
Index................................................................................. |
81 |
This instruction manual is for models NEX-3/3C and NEX-5/5C. The NEX-5/5C is used for illustrations in this manual, unless otherwise specified.
The differences between each model are as follows:
Model |
Movie file format |
Remote control |
NEX-5/5C* |
AVCHD**/MPEG-4 |
Available |
|
|
|
NEX-3/3C* |
MPEG-4 |
Not available |
|
|
|
*NEX-5C/3C are not compatible with Eye-Fi.
**To check whether the camera is 1080 60i-compatible or 1080 50i-compatible, check for the following marks on the bottom of the camera.
1080 60i-compatible camera: 60i
1080 50i-compatible camera: 50i
GB
8
This manual covers several models supplied with different lenses. The model name varies depending on the supplied lens.
Model name |
Lens |
|
NEX-5A/5CA/3A/3CA |
E16 mm |
|
|
|
|
NEX-5D/5CD/3D/3CD |
E18 |
– 55 mm and E16 mm |
|
|
|
NEX-5H/5CH |
E18 |
– 200 mm |
|
|
|
NEX-5K/5CK/3K/3CK |
E18 |
– 55 mm |
|
|
|
GB
9
camera the Preparing
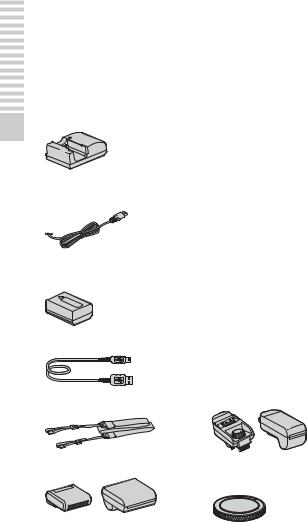
Checking the accessories supplied
First check the model name of your camera (page 9). The accessories supplied differ depending on the model.
The number in parentheses indicates the number of pieces.
x Common accessories
•Battery charger BC-VW1 (1)
•Power cord (mains lead) (1) (not supplied in the U.S.A. and Canada)
•CD-ROM (1)
–Application Software for α camera
–α Handbook
•Instruction Manual (This manual)
(1)
x NEX-5A/5CA/3A/3CA
•E16 mm single focus lens/Lens cap
(1) (attached to the camera)
•Rechargeable battery pack NP-FW50 (1)
x NEX-5D/5CD/3D/3CD
•E16 mm single focus lens/Lens cap/Lens rear cap (1)
•E18 – 55 mm zoom lens/Lens cap
(1) (attached to the camera)/Lens hood (1)
•USB cable (1)
•Shoulder strap (1)
•Flash (1)/Flash case (1)
GB
x NEX-5H/5CH
•E18 – 200 mm zoom lens/Lens cap/Lens rear cap (1) (attached to the camera)/Lens hood (1)
•Extender for Flash (1)/Extender case (1)
•Body cap (1) (attached to the camera)
10
x NEX-5K/5CK/3K/3CK
•E18 – 55 mm zoom lens/Lens cap
(1) (attached to the camera)/Lens hood (1)
camera the Preparing
GB
11
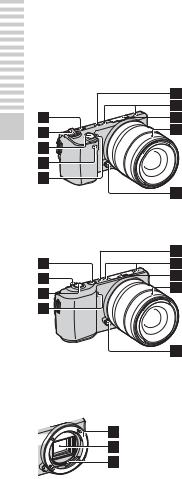
Identifying parts
See the pages in parentheses for details of operation.
NEX-5/5C
the Preparing |
|
camera |
NEX-3/3C |
|
When the lens is removed (NEX-5/5C/3/3C)
A  (Playback) button (29) B ON/OFF (Power) switch (25) C Shutter button (28)
D Remote sensor
EAF illuminator/Self-timer lamp/ Smile Shutter lamp
F Speaker
G Microphone*
H Smart accessory terminal (23) I Lens (19)
J Lens release button (20) K Mount
L Image sensor** M Lens contact**
*Do not cover this part during movie recording.
**Do not touch this part directly.
GB
12

NEX-5/5C
NEX-3/3C
A  (USB) terminal
BHook for shoulder strap
Attaching the shoulder strap is recommended not to drop the camera.
C HDMI terminal (49) |
the Preparing |
|
camera |
||
D Light sensor |
||
|
||
E LCD monitor |
|
|
The tilting LCD monitor of the |
|
|
camera allows flexible shooting |
|
|
positions. |
|
F MOVIE button (28) G Control wheel (32) H Soft keys (33)
I  Image sensor position mark
GB
13

camera the Preparing
NEX-5/5C |
x Flash |
A Screw
NEX-3/3C B Flash
C Connector*
* Do not touch this part directly.
ABattery/Memory card cover (17, 21)
BTripod receptacle
•Use a tripod with a screw length of less than 5.5 mm (7/32 inch). You will be unable to firmly secure the camera to tripods having screws longer than 5.5 mm (7/32 inch), and may damage the camera.
C  Image sensor position mark
DConnection plate cover
For using the AC-PW20 AC Adaptor (sold separately)
E Access lamp (22)
F Memory card insertion slot (21)
G Battery compartment (17)
GB
14
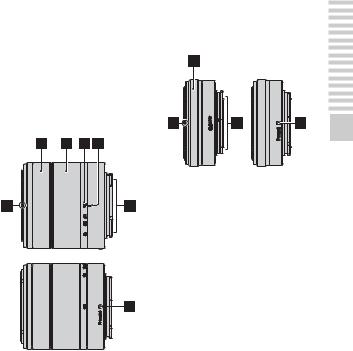
x Lens
On the E18 – 200 mm lens, refer to the instruction manual of the E18 – 200 mm lens (supplied).
E18 – 55 mm F3.5-5.6 OSS (supplied with NEX-5D/ 5CD/5K/5CK/3D/3CD/3K/ 3CK)
A Hood index
B Focusing ring
C Zooming ring
D Focal-length scale
E Focal-length index
F Lens contacts*
G Mounting index
* Do not touch this part directly.
E16 mm F2.8 (supplied with NEX-5A/5CA/3A/3CA)
A Converter index* |
Preparing |
|
B Focusing ring |
the |
|
|
||
C Lens contacts** |
camera |
|
D Mounting index |
||
|
*A converter is sold separately.
**Do not touch this part directly.
GB
15
Preparing the battery pack
camera the Preparing
When using the camera for the first time, be sure to charge the NP-FW50 “InfoLITHIUM” battery pack (supplied).
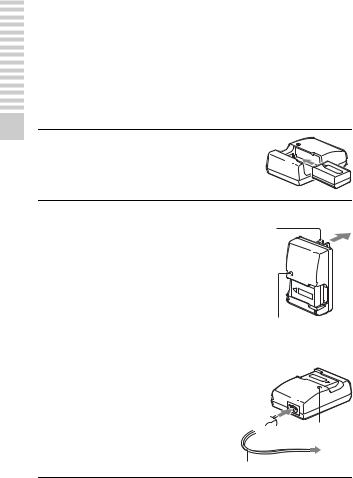
x Charging the battery pack
The “InfoLITHIUM” battery pack can be charged even when it has not been fully depleted. It can also be used when it has not been fully charged.
1 Insert the battery pack onto the battery charger.
• Push the battery pack until it clicks.
2 Connect the battery charger to the wall outlet (wall socket).
•The CHARGE lamp turns off when charging is finished.
•Time required to charge a fully depleted battery pack at a temperature of 25 °C (77 °F) is about 250 minutes.
For the U.S.A and Canada
Plug
CHARGE lamp
For countries/regions other than the U.S.A. and Canada
 CHARGE lamp
Power cord (mains lead)
GB
16
Notes
•The charging time differs depending on the remaining capacity of the battery pack or charging conditions.
•We recommend charging the battery pack in an ambient temperature of between 10 °C to 30 °C (50 °F to 86 °F). You may not be able to efficiently charge the battery pack outside of this temperature range.
•Connect the battery charger to the nearest wall outlet (wall socket).
•Do not try to charge the battery pack again right after it has been charged, or when it has not been used after being charged. Doing so will affect the performance of the battery pack.
z Using your camera abroad — Power source
You can use your camera and battery charger, and the AC-PW20 AC Adaptor (sold separately) in any countries/regions where the power supply is within 100 V to 240 V AC, 50 Hz/60 Hz.
Do not use an electronic transformer (travel converter), as this may cause a malfunction.
camera the Preparing
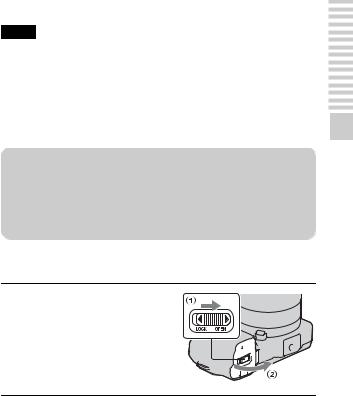
xInserting the charged battery pack
1While sliding the cover open
lever, open the cover. 
GB
17
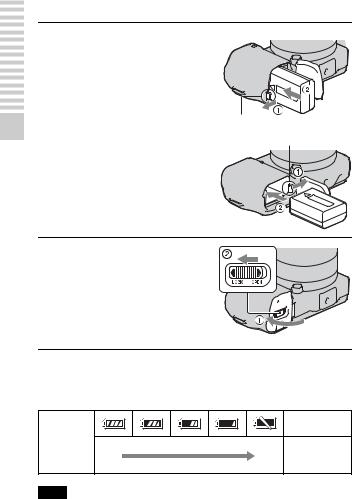
2 Firmly insert the battery pack NEX-5/5C all the way while pressing the
lock lever with the tip of the battery.
camera the Preparing
Lock lever
NEX-3/3C Lock lever
3 Close the cover.
x Checking the remaining battery level
Check the level with the following indicators and percent figures displayed on the LCD monitor.
“Battery |
exhausted.” |
Battery level |
You cannot |
High |
Low shoot any more |
|
image. |
Note
GB • The displayed level may not be correct under certain circumstances.
18
z What is an “InfoLITHIUM” battery pack?
An “InfoLITHIUM” battery pack is a lithium-ion battery pack that has functions for exchanging information related to operating conditions with your camera. Using the “InfoLITHIUM” battery pack, the remaining battery time in percent figures is displayed according to the operating conditions of your camera.
x Removing the battery pack
Turn off the camera and slide the lock |
NEX-5/5C |
lever in the direction of the arrow. Be |
|
careful not to drop the battery pack. |
|
Lock lever
NEX-3/3C Lock lever
camera the Preparing
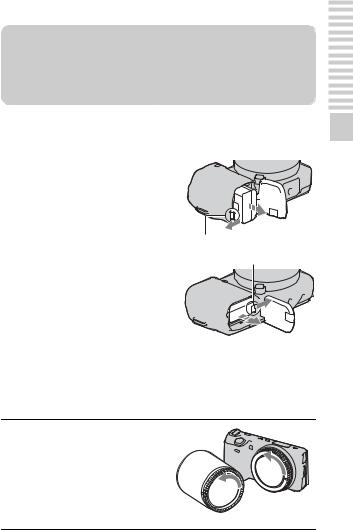
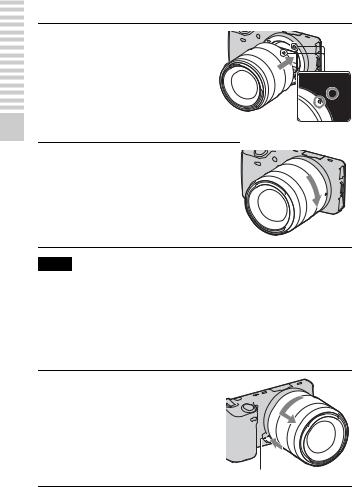
Attaching/removing the lens
The camera will come with the lens attached (except for the NEX-5H/5CH). Refer to the steps below when attaching other lenses.
1 If the body cap or the packaging lid is attached, remove it from the camera or the lens.
• Quickly change the lens somewhere away from dusty locations so as to keep dust or debris from getting inside the camera.
GB
19
camera the Preparing
2 Mount the lens by aligning the white index marks on the lens and the camera.
• Hold the camera’s face downward to prevent the dust from entering into the camera.
White index marks
3 While pusing the lens lightly toward the camera, turn the lens clockwise until it clicks into the locked position.
• Be sure to put the lens on straight.
Notes
•When attaching a lens, do not press the lens release button.
•Do not use force when attaching a lens.
•The Mount Adaptor (sold separately) is required to use an A-mount lens (sold separately). For details, refer to the operating manual supplied with the Mount Adaptor.
x Removing the lens
1 Press the lens release button all the way in and turn the lens counterclockwise until it stops.
Lens release button
GB
20
Notes
•When changing the lens, if dust or debris gets inside the camera and adheres to the surface of the image sensor (the part that acts as the film), it may appear on the image, depending on the shooting environment. The camera vibrates slightly when it is turned off, due to the anti-dust function, to prevent dust from adhering to the image sensor. However, attach or remove the lens quickly somewhere away from dusty locations.
•Do not leave the camera with the lens removed.
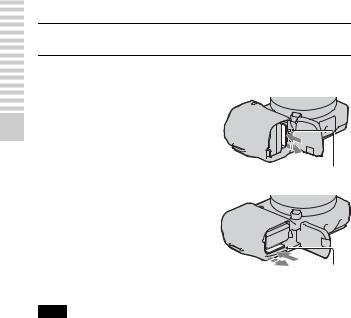
Inserting a memory card (sold separately)
1 Open the cover.
2 Insert a memory card.
•Insert the memory card until it clicks as illustrated.
NEX-5/5C
Check on the direction of the notched corner.
NEX-3/3C
Check on the direction of the notched corner.
GB
camera the Preparing
21
camera the Preparing
3 Close the cover.
x Removing the memory card
Open the cover, make sure that the access NEX-5/5C lamp is not lit, and push the memory card
once.
Access lamp
NEX-3/3C
Access lamp
Note
•When the access lamp is lit, do not remove the memory card or the battery pack, or turn off the power. The data may be corrupted.
x Memory cards that you can use
You can use following memory cards with this camera: “Memory Stick PRO Duo” media, “Memory Stick PRO-HG Duo” media, SD memory card, SDHC memory card, and SDXC memory card. You cannot use MultiMediaCard.
For recording movies, it is recommended that you use following memory cards.
•


 (Mark2) (“Memory Stick PRO Duo” media (Mark2))
•


 (“Memory Stick PRO-HG Duo” media)
•SD memory card, SDHC memory card, SDXC memory card (Class 4 or more)
GB
22
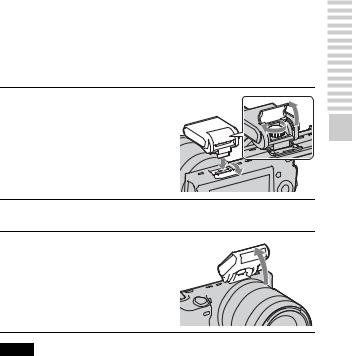
Attaching the flash
When you want to use a flash during shooting, attach the flash device (supplied).
The flash is enabled when it is raised, and disabled when lowered.
1 Attach the flash to the smart accessory terminal of the camera.
• When using the E18 – 200 mm lens, you must attach the extender
(page 24).
2 Fasten the screw to secure the flash.
3 To fire the flash, raise the flash first.
• Lower the flash when you do not intend to use it.
camera the Preparing
Notes
•The power for the flash is provided from the camera. When the camera is charging
the flash, blinks on the LCD monitor. You cannot press the shutter button when this icon is blinking.
•Plug the flash fully into the accessory terminal of the camera, and fasten the screw securely. Make sure that the flash is attached to the camera securely.
GB
23

camera the Preparing
z Carrying the flash
The flash case can be conveniently attached to the shoulder strap.
Put the flash in the case when you are not using it to protect it from harm.
xAttaching the extender (when using the E18 – 200 mm lens)
If you attach the flash directly to the camera, images will be partly shadowed by the lens. To avoid this situation, attach the extender. 1 Attach the extender to the camera
securely.
2 Attach the flash to the extender and fasten the screw.
Note
• Attach only the supplied flash to the extender.
GB
24

Turning on the camera and setting up the date
When you turn on the camera for the first time, the screen to set date and time appears.
1 Set the power switch to ON to turn on the camera.
The screen to set date and time appears.
• To turn off the camera, set the power switch to OFF.
2 Press the center of the control wheel to confirm [OK].
3 Select your area by pressing the right or left of the control wheel and press the center.
4 Press the left or right of the control wheel to select each item, and press the top or bottom, or turn it to select the numeric value.
Daylight Svg.: Turns on or off the daytime saving time setting.
Date Format: Selects the format to display date.
•Midnight is indicated as 12:00 AM, and noon as 12:00 PM.
GB
camera the Preparing
25
Loading...