


19 |
20 |
21

en |
|
Table of contents |
|
Safety ............................................... |
8 |
General information ........................... |
8 |
Intended use...................................... |
8 |
Restriction on user group................... |
8 |
Safety information .............................. |
9 |
Environmental protection and |
|
saving energy ................................. |
12 |
Disposing of packaging ................... |
12 |
Tips for saving energy...................... |
12 |
Installation and connection ............ |
12 |
Scope of supply............................... |
12 |
Installing and connecting the ap- |
|
pliance............................................. |
12 |
Familiarising yourself with your |
|
appliance ........................................ |
13 |
Appliance ........................................ |
13 |
Controls........................................... |
13 |
Display ............................................ |
13 |
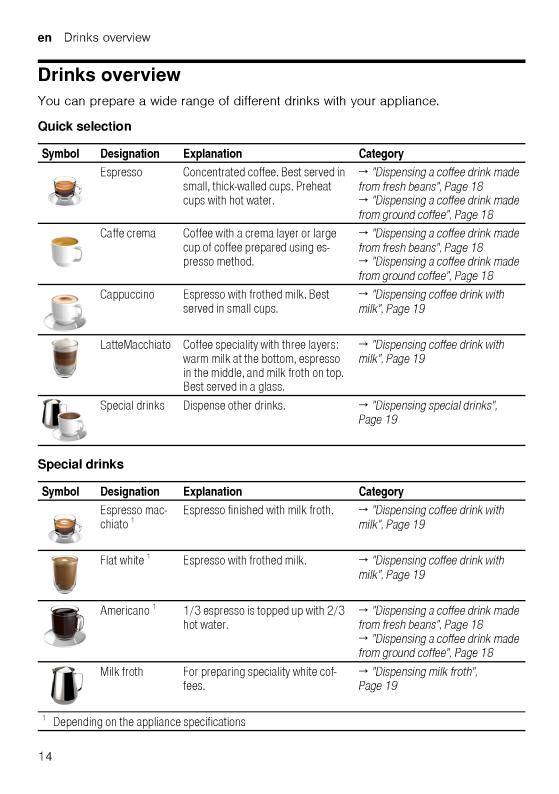
Drinks overview.............................. |
14 |
Accessories.................................... |
15 |
Before using for the first time......... |
15 |
Perform the initial start-up ................ |
15 |
Fill the water tank............................. |
15 |
Fill coffee bean container................. |
15 |
Setting the language........................ |
16 |
Setting the water hardness............... |
16 |
General information ......................... |
16 |
Basic operation .............................. |
17 |
Switching the appliance on and |
|
off.................................................... |
17 |
Dispensing drinks ............................ |
17 |
Dispensing a coffee drink made |
|
from fresh beans ............................. |
18 |
Dispensing a coffee drink made |
|
from ground coffee .......................... |
18 |
Dispensing drinks with milk.............. |
18 |
Dispensing coffee drink with milk..... |
19 |
Dispensing special drinks ................ |
19 |
Dispensing milk froth ....................... |
19 |
Dispensing hot water ....................... |
20 |
Drink settings................................... |
20 |
Water filter ....................................... |
21 |
Childproof lock ............................... |
22 |
Activating the childproof lock ........... |
22 |
Deactivating the childproof lock ....... |
22 |
Cup heater1 ..................................... |
22 |
Basic settings................................. |
23 |
Overview of the basic settings ......... |
23 |
Changing the basic settings............. |
24 |
Cleaning and servicing................... |
24 |
Dishwasher-safe components .......... |
24 |
Cleaning agent ................................ |
24 |
Cleaning the appliance .................... |
25 |
Cleaning the drip tray and coffee |
|
dregs container ............................... |
25 |
Cleaning the ground coffee com- |
|
partment .......................................... |
26 |
Cleaning the milk system ................. |
26 |
Cleaning brewing unit ...................... |
27 |
Service programmes........................ |
27 |
Troubleshooting ............................. |
31 |
Information on display panel ............ |
31 |
Malfunctions .................................... |
33 |
Problem with results ........................ |
34 |
Transportation, storage and dis- |
|
posal............................................... |
37 |
Activate frost protection ................... |
37 |
Disposing of old appliance .............. |
37 |
1 Depending on the appliance specifications
6
en
Customer Service ........................... |
37 |
Product number (E-Nr.) and pro- |
|
duction number (FD)........................ |
38 |
Warranty conditions ......................... |
38 |
Technical specifications................. |
38 |
7

en Safety
 Safety
Please read the safety information to ensure that you use the appliance safely.
General information
You can find general information about this instruction manual here.
¡Read this instruction manual carefully. Only this will ensure you use the appliance safely and efficiently.
¡This manual is intended for the user of the appliance.
¡Follow the safety instructions and warnings.
¡Keep the instruction manual and the product information safe for future reference or for the next owner.
¡Check the appliance after unpacking it. Do not connect the appliance if it has been damaged in transit.
Intended use
Please read the information on intended use to ensure you use the appliance correctly and safely.
Only use this appliance:
¡As specified in this instruction manual.
¡for preparing hot drinks.
¡In private households and in enclosed spaces in a domestic environment.
¡Up to an altitude of max. 2000 m above sea level.
Disconnect the appliance from the power supply when: ¡ cleaning the appliance.
Restriction on user group
Avoid risks to children and vulnerable persons.
8

2.Place the appliance on a level, wa- ter-resistant surface that is capable of bearing its weight.
3.Using the mains plug, connect the appliance to an earthed socket that has been correctly installed.
Familiarising yourself with your appliance
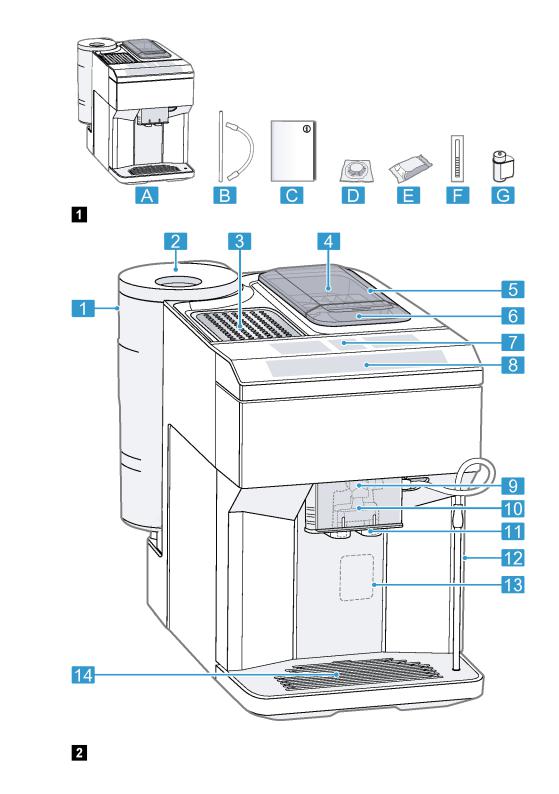
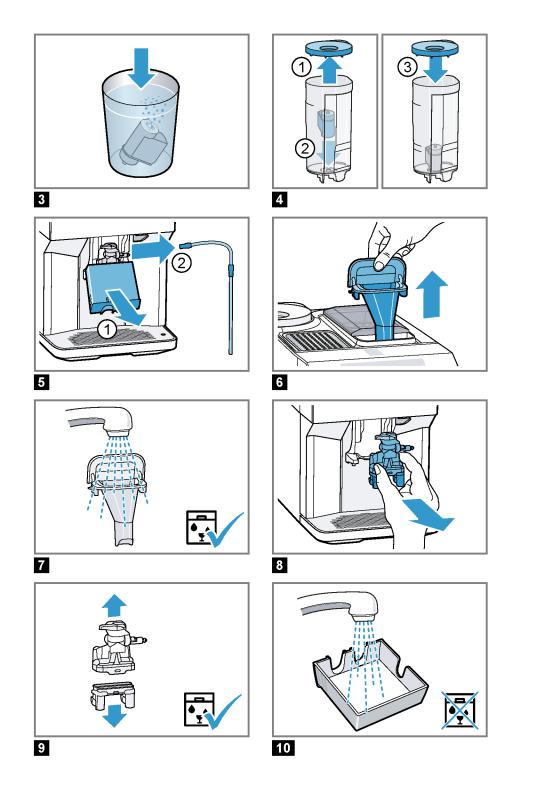
Familiarise yourself with the parts of your appliance.
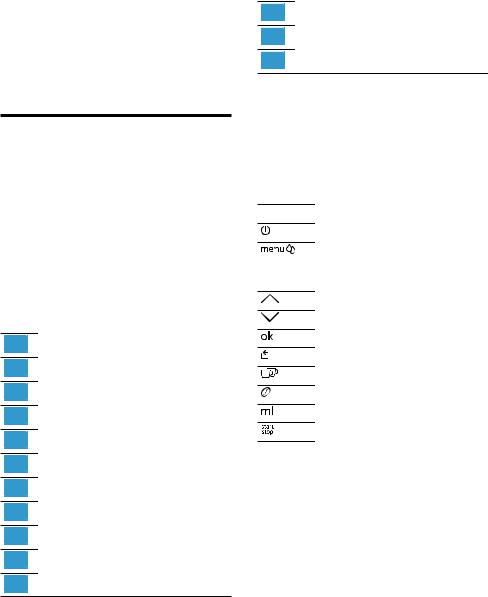
Appliance
You can find an overview of the parts of your appliance here.
Note: Individual details and colours may differ, depending on the appliance model.
→ Fig. 
1 |
Water tank |
2 |
Cover for water tank |
3 |
Cup heater1 |
4 |
Aroma lid |
5 |
Bean container |
6 |
Ground coffee compartment |
7 |
Display |
8 |
Control panel |
9 |
Cover |
10 |
Milk system |
11 |
Outlet system |
1 Depending on the appliance specifications
Familiarising yourself with your appliance en
12 |
Brewing chamber door |
13 |
Rating plate |
14 |
Drip tray |
1 Depending on the appliance specifications
Controls
Here you can find an overview of the symbols on your appliance. Press the symbols to make a selection, start the dispensing process or make/adjust a setting.
Symbol Explanation
Switch appliance on/off
Open menu/leave menu
Note: The menu buttons are only visible when the menu is open.
Navigate upwards in the menu
Navigate downwards in the menu
Confirm/save in the menu
Go back in the menu
Dispense two cups
Select coffee strength
Adjusting the amount
Start/stop
Display
The display shows the selected drinks, settings and setting options, as well as messages about the appliance’s operating status.
The display shows additional information and action steps. The information is hidden after a short period, or by pressing a button. The action steps are hidden when they have been completed.
13


en Before using for the first time
Do not use coffee beans that have been treated with additives containing sugar.
Do not add ground coffee.
1.Open the lid.
2.Fill with the coffee beans.
The appliance will adjust to the coffee beans with the next dispensing process.
3.Close the lid.
Tip: To keep the coffee beans at their best, store them in a sealed container in a cool place.
You can keep the coffee beans in the bean container for a number of days without them losing their aroma.
Setting the language
1.Press  to switch the appliance on.
a The display will show the language that is preset.
2.Press  or
or  until the display shows the desired language.
3.Press 
 .
.
Tip: You can change the language at any time.
→ "Overview of the basic settings",
Page 23
Setting the water hardness
It is important to set the water hardness correctly, so that the appliance indicates in good time that it needs descaling. You can use the enclosed test strip to determine the water hardness, or ask your local water company.
1.Briefly dip the test strip in fresh tap water.
2.Allow the water to drip off the test strip.
a The test strip will indicate the water hardness after 1 minute.
3.If a water softening system is installed in your house, select "Softening system".
4.Press  or
or  until the display shows the desired water hardness.
The table shows the allocation of the levels to the different degrees of water hardness:
Level |
German de- |
Total hard- |
|
grees in °dH |
ness in |
|
|
(mmol/l) |
1 |
1-7 |
0.18 - 1.25 |
2 |
8-14 |
1.42 - 2.49 |
3 |
15-21 |
2.67 - 3.74 |
41 |
22-30 |
3.92 - 5.34 |
1Factory setting (may vary according to model)
5.Press 
 .
.
6.Check whether the bean container has been filled.
7.Press 
 .
.
a The appliance now rinses itself.
a When the symbols for drink selection and the buttons light up on the operating panel, the appliance is ready for use.
Tip: You can change the water hardness at any time.
→ "Overview of the basic settings",
Page 23
General information
Please bear this information in mind so that you can get the best out of your appliance.
Notes
¡The appliance has been programmed at the factory with standard settings for optimum operation.
¡The grinder has been factory-set for optimum operation. If coffee is only dispensed drop by drop or is too thin with too little crema, you can adjust the grinding level when the
16

en Basic operation
Notes
¡If you do not change any settings for approx. 5 seconds, the appliance will exit settings mode. The settings will be automatically saved.
¡With a number of settings your coffee is prepared in several steps. Wait until the process is fully completed.
Dispensing a coffee drink made from fresh beans
1.Place your pre-warmed cup under the outlet system.
2.Press the drinks symbol for a coffee drink without milk.
a The display will show the drink and your current settings.
→"Drink settings", Page 20
3.Change the settings where necessary:
‒ Use  to adjust the amount.
→"Adjusting the amount",
Page 21
‒Use  to adjust the coffee strength.
→ "Adjusting the coffee strength",
Page 20
4.Press 
 .
.
The coffee beans are freshly ground for each brewing process.
a The coffee is brewed and then dispensed into the cup.
Tips
¡You can press 

 to stop the dispensing process prematurely.
¡Find out how to make coffee drinks with milk.
→ "Dispensing drinks with milk",
Page 18
Dispensing a coffee drink made from ground coffee
ATTENTION!
The ground coffee compartment can become blocked.
Do not use coffee beans.
Do not use instant coffee.
Use a soft brush to gently direct the ground coffee residue into the shaft.
Note
When using ground coffee, the following selections are not available:
¡Two cups at once
¡Coffee strength
¡"doubleshot"
1.Place your pre-warmed cup under the outlet system.
2.Press the symbol for your desired drink.
3.Press  repeatedly until the display shows "Gr. coffee".
4.Open the ground coffee compartment.
5.Add a maximum of 2 level teaspoons of ground coffee, max. 12 g.
6.Close the ground coffee compartment.
7.Press 


 .
.
a The coffee is brewed and then dispensed into the cup.
Tips
¡You can press 


 to stop the dispensing process prematurely.
¡If you would like another drink with ground coffee, repeat the process.
¡Always add the ground coffee just before making the drink.
Dispensing drinks with milk
You can use your appliance to dispense coffee drinks with milk and milk froth.
18

Tips
¡You can activate and deactivate the cup heater in the basic settings.
→ "Overview of the basic settings",
Page 23
Basic settings en
¡Place the cups with their base on the cup heater to heat the cups perfectly.
Basic settings
You can configure your appliance to meet your needs and call up additional functions.
Overview of the basic settings
Setting |
Selection |
Description |
Cleaning and care |
Milk system |
Start service programme. |
|
Descale |
→ "Service programmes", |
|
Clean |
Page 27 |
|
calc'nClean |
|
Cup warmer 1 |
Cup warmer off 2 |
Switch cup heater on or off. |
|
Cup warmer on |
→ "Cup heater", Page 22 |
Water filter |
New filter |
Set use of the water filter. |
|
No filter |
|
Coffee temp. |
normal |
|
high |
|
max. |
Set the temperature for coffee drinks.
Note: The setting is effective for all preparation types.
Languages |
See options on the appliance. |
Set menu language. Changes are immediately displayed.
Autom. switch-off |
See options on the appliance. |
Set how long the appliance should wait after preparing the last drink before automatically switching itself off.
Water hardness |
1 |
(soft) |
Set the appliance to the local wa- |
|
|
|
2 |
(medium) |
ter hardness. |
|
|
3 |
(hard) |
→ "Setting the water hardness", |
|
|
4 |
(very hard)2 |
Page 16 |
|
|
Water-softening system |
|
|
Key tones |
Key tones on 2 |
Switch the button tones on or off. |
||
|
|
Key tones off |
|
|
1 |
Depending on the appliance specifications |
|
||
2 |
Factory setting (may vary according to model) |
|
||
23


en Cleaning and servicing
ATTENTION!
Improper cleaning and descaling or a delay in doing so may damage the appliance.
Immediately perform the descaling process in accordance with the instructions.
Do not put any descaling tablets or other products into the ground coffee compartment.
Depending on the water hardness and use of the appliance, the display will show the following messages after prior notification:
¡"Please rinse milk system."
¡"Descaling necessary. Please press menu for 3 sec."
¡"Cleaning necessary. Please press menu for 3 sec."
¡"calc'nClean nec. Please press menu for 3 sec."
Notes
¡The display indicates the progress of the descaling or cleaning process.
¡If your appliance is not descaled in good time, the display will show the following message: "Descaling overdue. Appliance is locked. Please press menu for 3 sec.".
¡If your appliance has been locked, you can only operate it again once the descaling process has been carried out.
¡If you accidentally interrupt the service programme, you must reset it. → "Resetting service programmes",
Page 28
Tips
¡If you use a water filter, this prolongs the time interval until a service programmes needs to be performed.
¡You can combine the cleaning and descaling programmes using the calc'nClean service programme. → "Using calc'nClean", Page 30
¡Clean your appliance with a soft, damp cloth immediately after a service programme to remove any descaling solution residues and prevent corrosion.
Resetting service programmes
Perform the following steps if a service programme is interrupted, e.g. due to a power failure.
1.Rinse out the water tank.
2.Fill the water tank with fresh, noncarbonated water up to the "max" marking.
3.Press 
 .
.
a The appliance will rinse itself for approx. 2 minutes.
4.Empty and clean the drip tray.
5.Insert the drip tray and close the door.
6.Restart the service programme.
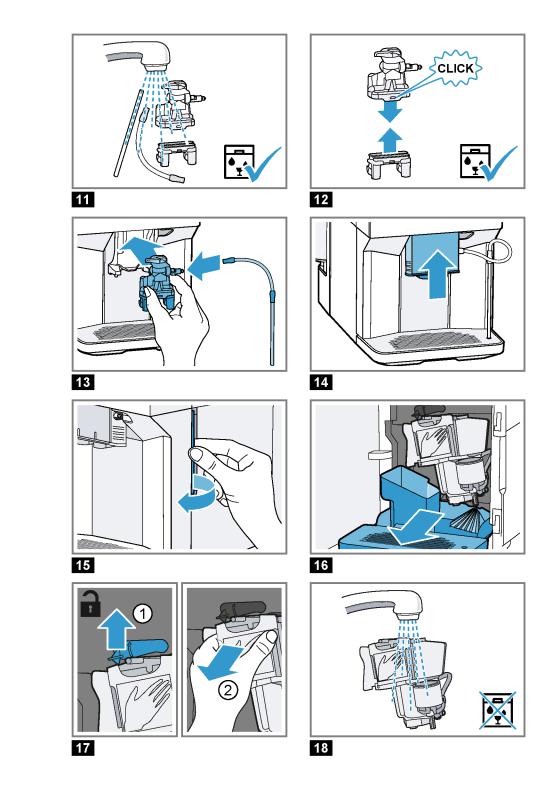
Using the milk system cleaning programme
Rinse the milk system with water, if necessary. The rinsing process takes approx. 1 minute.
1.Press 


 .
.
2.Use  and
and  to select "Cleaning and care" and press
 .
.
3.Use  and
and  to select "Milk system" and press
 .
.
4.To start the programme, press 
 .
.
a The display will guide you through the programme.
5.Place an empty glass under the outlet system and insert the end of the suction pipe in the glass.
6.Press 
 .
.
a The milk system will now clean itself automatically.
7.Empty the glass and clean the suction pipe.
a The program has ended and the appliance is ready for operation.
28
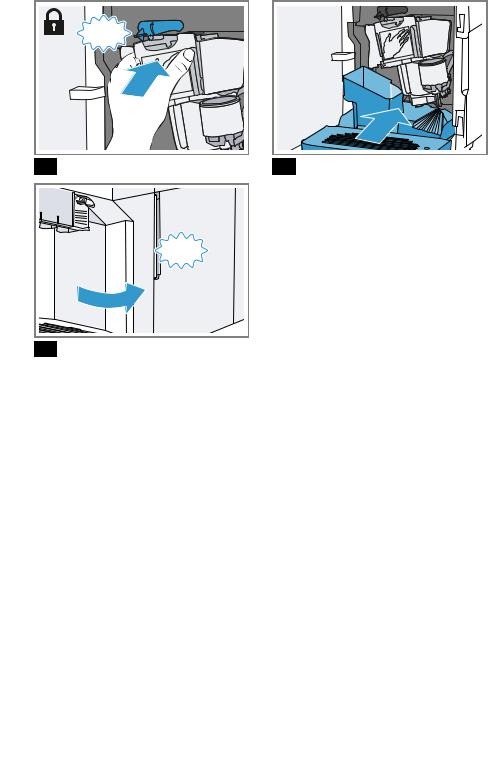
Tip: If you want to clean the milk system particularly thoroughly, clean it regularly by hand.
→ "Cleaning the milk system", Page 26
Using the descaling programme
Run the descaling programme when your appliance prompts you. The process takes approx. 30 minutes.
Requirement: The brewing unit is cleaned.
→ "Cleaning brewing unit", Page 27
1.Press 

 .
.
2.Use  and
and  to select "Cleaning and care" and press
  .
.
3.Use  and
and  to select "Descale" and press
  .
.
4.To start the programme, press  .
.
a The display will guide you through the programme.
5.Empty and insert the drip tray.
6.If there is a water filter, remove it.
7.Press  .
.
8.Empty the water tank.
9.Fill a container with 0.5 l lukewarm water.
10.Add a Siemens descaling tablet to the water and stir until the tablet is fully dissolved.
11.Pour the descaling solution into the water tank up to the calc mark and press  .
.
12.Place a container with a capacity of min. 0.5 l under the outlet system.
13.Place the end of the suction pipe in the container and press  .
.
a The descaling programme will run for approx. 20 minutes.
14.Rinse the water tank.
15.Press  .
.
16.If there is a water filter, insert the water filter.
→ "Insert water filter", Page 21
17.Press  .
.
Cleaning and servicing en
18.Fill the tank with fresh water up to the "max" mark.
19.Press  .
.
a The descaling programme takes approx. 1 minute and rinses the appliance.
20.Empty and insert the drip tray.
21.Thoroughly clean the suction pipe of the milk system.
a The program has ended and the appliance is ready for operation.
Using the cleaning programme
Run the cleaning programme when your appliance prompts you. The process takes approx. 9 minutes.
Requirement: The brewing unit is cleaned.
→ "Cleaning brewing unit", Page 27
1.Press 

 .
.
2.Use  and
and  to select "Cleaning and care" and press
  .
.
3.Use  and
and  to select "Clean" and press
  .
.
4.To start the programme, press  .
.
a The display will guide you through the programme.
5.Empty and insert the drip tray.
6.Open the ground coffee compartment.
7.Place one Siemens cleaning tablet into the ground coffee compartment.
8.Close the ground coffee compartment and press  .
.
9.Place a container with a capacity of min. 0.5 l under the outlet system and press  .
.
a The cleaning programme takes approx. 7 minutes.
10.Empty and insert the drip tray.
a The program has ended and the appliance is ready for operation.
29
en Cleaning and servicing
Using calc'nClean
You can combine the cleaning and descaling programmes using the calc'nClean service programme. Run the calc'nClean programme when your appliance prompts you. The process takes approx. 43 minutes.
Requirement: The brewing unit is cleaned.
→ "Cleaning brewing unit", Page 27
1.Press 

 .
.
2.Use  and
and  to select "Cleaning and care" and press
  .
.
3.Use  and
and  to select "calc'nClean" and press
  .
.
4.To start the programme, press  .
.
a The display will guide you through the programme.
5.Empty and insert the drip tray.
6.If there is a water filter, remove it.
7.Press  .
.
8.Empty the water tank.
9.Fill a container with 0.5 l lukewarm water.
10.Add a Siemens descaling tablet to the water and stir until the tablet is fully dissolved.
11.Pour the descaling solution into the water tank up to the calc mark and press  .
.
12.Place a container with a capacity of min. 0.5 l under the outlet system.
13.Place the end of the suction pipe in the container and press  .
.
a The descaling programme will run for approx. 20 minutes.
14.Rinse the water tank.
15.Press  .
.
16.If there is a water filter, insert the water filter.
→ "Insert water filter", Page 21
17.Press  .
.
18.Fill the tank with fresh water up to the "max" mark.
19.Press  .
.
a The programme takes ap-
prox. 1 minute and rinses the appliance.
20.Empty and insert the drip tray.
21.Open the ground coffee compartment.
22.Place one Siemens cleaning tablet into the ground coffee compartment.
23.Close the ground coffee compartment and press  .
.
24.Place a container with a capacity of min. 0.5 l under the outlet system and press  .
.
a The cleaning programme takes approx. 7 minutes.
25.Empty and insert the drip tray.
26.Thoroughly clean the suction pipe of the milk system.
a The program has ended and the appliance is ready for operation.
30
 Loading...