


TE 506.. / TE 509..
siemens-home.com/welcome
en Instruction manual fr Mode d’emploi
pl Instrukcja obsługi nl Gebruiksaanwijzing cs Návod k použití
ru Инструкция по эксплуатации
Register your product online

en 2
fr 22
pl 43
nl 65
cs 86
ru 106
Included in delivery (see page 2) Contenu de l’emballage (voir page 22)
Zakres dostawy (patrz strona 43)
Leveringsomvang (zie pagina 65)
Součást dodávky (viz strana 86)
Объем поставки (см. стр. 106)
c
a
b
E-Nr. ……… FD… …
d

A |
|
4 |
|
|
|
1 |
2 |
3 |
18 |
|
|
17 |
|
|
16 |
|
|
15 |
|
|
14 |
|
5 |
13 |
|
|
|
|
|
12 |
|
|
11 |
|
6 |
10 |
|
|
9 |
|
TE509 |
|
|
22 |
8 |
|
7 |

B |
|
|
|
19 |
21 |
|
20 |
|
|
C |
|
D |
8a |
8b |
6e |
|
|
|
|
6d |
|
|
8e |
|
6a |
|
|
|
|
|
|
|
|
8c |
6b |
6c |
|
|
8d |
 5c
5c 


 5f
5f
5a |
5b |
|
|
5d |
|
|
|
5e

ende
Table of Contents
Included in delivery 2 Safety instructions 3 Overview 5 Controls 5 Display messages 6 aromaDouble Shot 6
Before using for the first time 7
Water filter 8 Menu settings 9 Adjusting the grinding unit 10 Preparation using coffee beans 10 Preparation using ground coffee 11 Dispensing hot water 11 Preparing milk froth and warm milk 12 Maintenance and daily cleaning 12 Tips on energy saving 15 Service Programmes 15 Frost protection 18 Accessories 18 Disposal 19 Guarantee 19 Technical data 19 Simple troubleshooting 20
Dear Coffee Connoisseur, Congratulations on purchasing this fully
automatic espresso machine from Siemens. These instructions describe various models with different features.
Please also note the enclosed quick reference guide. It can be kept in the special storage compartment (5c) until it is needed.
Included in delivery
(see overview image at the start of the instructions)
aFully automatic espresso machine TE506/TE509
bQuick reference guide
cInstruction manual
dMilk frother
eWater hardness testing strip
fMeasuring spoon
Only for TE509 g Milk container
2

ende
Safety instructions
Please read and follow the operating instructions carefully and keep them for later reference. Enclose these instructions when you give this appliance to someone else. This appliance is designed for the preparation of normal household quantities in the home, or in household-like, non-commercial environments. Household-like environments include staff kitchens in shops, offi ces, agricultural and other small businesses or for use by guests at bed-and-breakfast establishments, small hotels and similar residential facilities.
¡ Danger of electric shock!
Connect and operate the appliance only according to the type plate specifi cations. To avoid potential hazards, repairs such as replacing a damaged cable must only be carried out by our customer service personnel
This appliance may be used by children aged 8 years and older and by persons with reduced physical, sensory or mental capabilities
or who lack experience and/or knowledge if they are supervised or have been given instruction in the safe use of the appliance and have understood the dangers involved Keep children under 8 years of age away from the appliance and connecting cable and do not allow them to use the appliance Children shall not play with the appliance Cleaning and user maintenance shall not be made by children unless they are older than 8 years and supervised
Never immerse the appliance or mains cable in water Use only if power cord and appliance show no signs of damage Should a fault occur, pull the plug or disconnect from the mains immediately
3

ende
¡ Risk of suffocation!
Do not allow children to play with packaging material
¡¡Risk of scalding!
The milk frother outlet (6a) gets very hot. After use, allow to cool down first before touching.
Use this appliance only after the milk frother (6) has been fully assembled and installed.
¡¡Risk of injury!
Do not reach into the grinding unit.
4

Overview
(see overview images A, B, C, D and E at the beginning of this instruction manual)
1Bean container
2Aroma cover
3Selector for grind setting
4Drawer (ground coffee/cleaning tablet)
5Brewing unit (Fig. E)
a)Brewing unit
b)Door
c)Storage compartment for quick reference guide
d)Eject lever for brewing unit
e)Lock
f)Cover
6Milk frother (Fig. C) removable
a)Outlet
b)Rotary selector for warm milk/ milk froth
c)Milk tube
d)Upper part
e)Air nozzle
7Coffee outlet, height-adjustable
8Drip tray (Fig. D)
a)Drip tray panel
b)Coffee grounds container
c)Drip tray for coffee outlet
d)Grate for coffee outlet
9Power on/off switch O / I
10start button
11d button
12h / g button
13e off / j button
14“Coffee strength” rotary knob
15“Drink selection” rotary knob
16Display
17Removable water tank
18Lid for water tank
19Measuring spoon
(insertion aid for water filter)
20Storage compartment for measuring spoon
21Power cable with storage compartment
ONLY FOR TE509 22 Milk container
ende
Controls
Power on/off switch O / I
The power switch O / I (9) is used to switch the appliance on or to switch it off fully (power supply off).
Important: Before switching off, run the cleaning programme or use the e off / j button (13) to switch off.
d button
Press the d button (11) to prepare two cups of the selected drink at the same time. The button can be activated for drinks without milk and without the aromaDouble Shot function.
e off / j button
When the e off / j button (13) is pressed briefly, the appliance rinses and switches off. Pressing and holding down the e off / j button (13) displays the user settings or starts the descaling and cleaning function.
h / g button
Press the h / g button (12) to generate steam for preparing milk froth or warm milk. This button is also used to dispense hot water.
start button
Press the start button (10) to begin drink preparation or to start a service programme. Press the start button (10) again during drink preparation to cut the dispensing process short.
5
ende
“Coffee strength” rotary knob
|
This rotary knob (14) is used |
|
|
to set the coffee strength. |
|
h |
VERY MILD |
|
|
MILD |
|
to |
NORMAL |
|
STRONG |
||
|
||
g |
DOUBLESHOT STRONG+ |
|
DOUBLESHOT STRONG++ |
||
|
With these coffee strengths |
|
|
the coffee is brewed in |
|
|
2 stages. See “aromaDouble |
|
|
Shot”. |
“Drink selection” rotary knob
|
|
|
|
|
This rotary knob (15) is used |
|
|
|
|
|
to select the required drink |
|
|
|
|
|
and the per-cup quantity. It |
|
|
|
|
|
is also used to change user |
|
|
|
|
|
|
|
|
|
|
|
settings. |
|
|
||||
|
|
||||
|
|
|
|
|
Coffee-based drinks without |
a |
|
|
|
|
milk: |
|
|
|
|
SMALL ESPRESSO |
|
to |
|
|
|
|
ESPRESSO |
|
|
|
|
SMALL CAFÉ CRÈME |
|
c |
|
|
|
|
CAFÉ CRÈME |
|
|
|
|
LARGE CAFÉ CRÈME |
|
|
|
|
|
|
|
|
|
|
|
|
Coffee-based drinks with |
m |
|
|
|
|
milk: |
|
|
|
|
SMALL CAPPUCCINO |
|
to |
|
|
|
|
LARGE CAPPUCCINO |
|
|
|
|
SMALL MACCHIATO |
|
n |
|
|
|
|
MACCHIATO |
|
|
|
|
LARGE MACCHIATO |
e |
RINSE MACHINE |
|
|
|
|
f |
RINSE MILK SYSTEM |
|
N.B.: If a drink is selected that cannot be prepared, INVALID COMBINATION appears in the display. Change the coffee strength or the selected drink.
Rotary selector
To dispense milk froth – for example for a latte macchiato or cappuccino – turn the j symbol to the front.
To dispense warm milk, turn the i symbol to the front.
To dispense hot water, set the rotary selector to the horizontal position.
Display messages
The display (16) shows not only the current operating status, but also various messages that give you status information or let
you know when you need to take action. As soon as you have taken the necessary action, the message disappears and the menu for drink selection is displayed again.
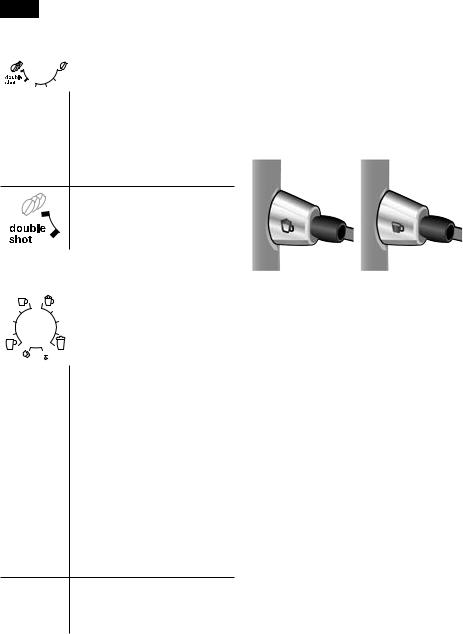
aromaDouble Shot
The longer the coffee is brewed, the more bitter substances and undesired aromas are released. This has a negative effect on the taste and makes the coffee less easily digestible. So for extra strong coffee the TE506/TE509 has a special aromaDouble Shot function. When half the quantity
has been prepared, coffee is ground and brewed again so that only the pleasant, aromatic scents are released.
6
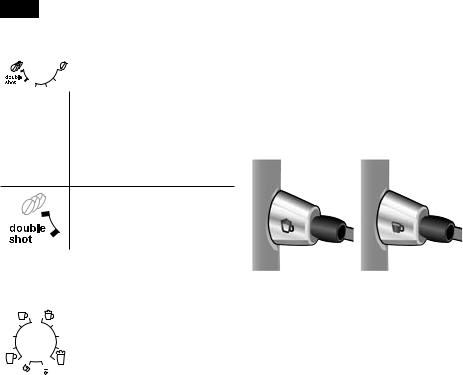
The aromaDouble Shot function is activated with the following settings:
Before using for the first time
General
Fill the appropriate container using only pure, cold, uncarbonated water and only roasted beans (preferably espresso or coffee bean blends for fully automatic coffee machines). Do not use coffee beans that have been glazed, caramelised or treated with other additives containing sugar, since they will block the brewing unit.
The water hardness setting can be adjusted on this appliance. The factory default setting for the water hardness is 4. Check the water hardness with the enclosed test strip. If the check reveals a value other than 4, change the setting on the appliance accordingly after switching on (see “Menu settings”
WATER HARDNESS).
Switching on the appliance
1.Remove the protective film.
2.Place the fully automatic espresso machine on a flat, water-resistant surface that can take its weight. Make sure that the machine’s ventilation slots remain unobstructured.
Important: Only use the appliance in frost-free rooms. If the appliance has been transported or stored at temperatures below 0 °C, wait at least 3 hours before operation.
ende
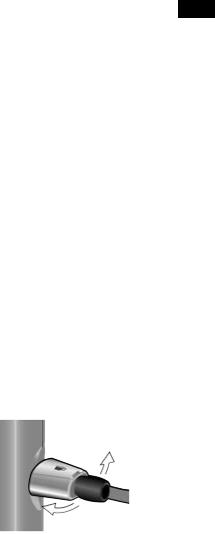
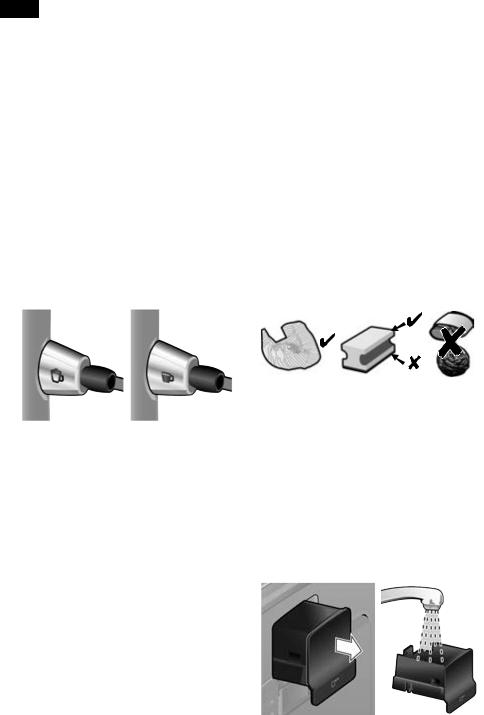
3.Pull the power cord out of the storage compartment (21) and plug in. Adjust the length of the cable by pushing it back in or pulling it out. The easiest way to do this is to place the appliance so that its back is flush with the edge of the counter and either pull the cable downward or push it upward.
4.Install the milk frother. Operate the machine only after the milk frother (6) has been fully assembled and installed.
5.Lift the lid of the water tank (18).
6.Remove and rinse the water tank (17) and fill it with fresh cold water.
Do not fill above the max mark.
7.Replace the water tank (17) and push it firmly downward into place.
8.Close the lid of the water tank (18) again.
9.Fill the bean container (1) with coffee beans (for preparation using ground coffee, see “Preparation using ground coffee”).
10.Press the power switch O / I (9). The display (16) shows the menu for setting the display language.
11.Select the required display language with the upper rotary knob (15).
The following languages are available:
ENGLISH |
NEDERLANDS |
FRANÇAIS |
ITALIANO |
SVENSKA |
ESPAÑOL |
POLSKI |
MAGYAR |
TÜRKÇE |
DANSK |
NORSK |
SUOMI |
PORTUGUÊS |
ČEšTINA |
Ελληνικα |
Български |
Русский |
|
7

ende
12.Place a receptacle under outlet (6a).
13.Press the start button (10).
The language you selected is saved. The appliance heats up and rinses. Some water will run out of the coffee outlet.
When the drink selection menu is shown in the display, the appliance is ready for use.
Switching off the appliance
The factory settings of the fully automatic espresso machine are programmed for optimal performance. The appliance switches off automatically after a specific time (time span can be programmed, see “Menu settings” SHUT OFF).
Exception: The appliance switches off without rinsing if only hot water or steam were dispensed.
To switch the appliance off manually before this, press the e off / j button (13).
The appliance rinses and switches off.
N.B.: If the appliance is being used for the first time, a service program has been run, or the appliance has not been operated for a long period, the first beverage will not have the full aroma and should not be consumed.
When using the espresso machine for the first time, you will achieve a suitably thick and stable “crema” only after the first few cups have been dispensed.
After extended use, water droplets may form on the ventilation slots. This is normal.
Water filter
A water filter can prevent scale buildup. Before a new water filter is used, it must be rinsed. To do this, proceed as follows:
1.Press the water filter firmly into the water tank with the aid of the measuring spoon (19).
2.Fill the water tank (17) with water up to the max mark.
3.Press and hold the e off / j button (13) for at least three seconds. The menu opens.
4.Press the e off / j button (13) repeatedly until the display shows
NO / OLD FILTER.
5.Select ACTIVATE FILTER with the upper rotary knob (15).
6.Press the start button (10).
7.Place a receptacle with a capacity of 0.5 litres under the outlet (6a).
8.Press the start button (10).
9.Water will now flow through the filter to rinse it.
10.Empty the container.
The appliance is ready to use once more.
Note: Rinsing the filter simultaneously activates the setting for the CHANGE FILTER! display.
8
The filter is no longer effective when the
CHANGE FILTER! display appears, or at the latest after 2 months. It needs to be replaced for reasons of hygiene and so that there is no build-up of limescale (this
could damage the appliance). Replacement filters can be obtained from retailers or from customer service (see “Accessories”). If no new filter is used, turn the FILTER setting to
NO / OLD.
Note: You can use the filter indicator to mark the month in which you inserted the filter. You can also mark the month in which you will need to replace the filter next (at the latest after two months).
Note: If the appliance has not been used for a prolonged period (e.g. vacation) the filter should be rinsed before the appliance is used again. To do so, dispense a cup of hot water and pour it away.
Menu settings
You can adapt the appliance to your indi-
1.Hold the e off / j button (13) down for at least 3 seconds.
2.Press the e off / j button (13) repeatedly until the required menu item appears in the display.
3.Select the required setting with the upper rotary knob (15).
4.Confirm by pressing the startvidual needs in the menu settings.
button (10).
To leave the menu without making any changes, turn the rotary selector to EXIT and press the start button (10).
ende
You can set the following:
SHUT OFF: Here you can set the time span after which the appliance automatically switches off following the last drink
preparation. A time between 15 minutes and 4 hours can be set. The default time can be shortened to save energy.
To save power you can specify a shorter period.
FILTER: Here you can set whether a water filter is being used. If a water filter is not being used, turn the setting to NO / OLD. If a water filter is being used, turn the setting to ACTIVATE FILTER. New water filters have to be rinsed before use (see “Water filter”).
START CALC‘N‘CLEAN: The service programmes (CALC‘N‘CLEAN / DESCALING / CLEANING) can be selected manually here. Press the start button (10) and run the selected programme (see “Service Programmes”).
TEMP.: The brewing temperature (HIGH / MIDDLE / LOW) can be set here.
LANGUAGE: The display language can be set here.
WATER HARDNESS: The water hardness setting can be adjusted on this appliance. It is important to set the water hardness correctly, so that the appliance indicates accurately when the descaling programme should be run. The factory setting for the water hardness is 4.
You can check the water hardness using the enclosed test strip or by asking your local water supplier.
Dip the test strip briefly in water, gently shake off any drips, and check the result after one minute.
9
ende |
|
|
|
Level |
|
Water hardness |
|
|
|||
|
|
German (°dH) |
French (°fH) |
1 |
|
1-7 |
1-13 |
2 |
|
8-14 |
14-25 |
3 |
|
15-21 |
26-38 |
4 |
|
22-30 |
39-54 |
DRINK COUNTER: This displays how many drinks have been dispensed since the appliance was first put into operation.
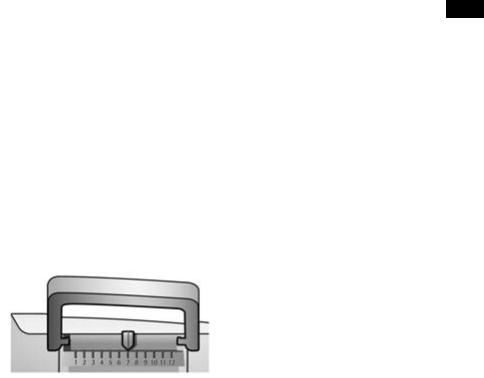
Adjusting the grinding unit
The rotary selector (3) adjusts the grind settings from coarse to fine.
AAWarning!
Adjust the grinding unit only while it is running! Otherwise the appliance may be damaged. Do not reach into the grinding unit.
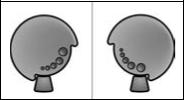
●●While the grinding unit is running, adjust the rotary selector (3) from fine (a: Turn anticlockwise) to coarse (b: Turn clockwise) as required.
a |
b |
Note: The new setting will not become apparent until after the second cup of coffee.
Note: If the message PLEASE ADJUST
GRINDING UNIT TO COARSER SETTING! appears in the display, the grind setting for the coffee beans is too fine. Adjust the grinding unit to a coarser setting.
Tip: For dark roast coffee beans, choose a finer grind, for lighter beans a coarser grind.
Preparation using coffee beans
This fully automatic espresso machine grinds beans freshly for each brew.
The appliance must be ready for use. To prepare a coffee-based drink with milk, first insert the milk tube into a milk container and turn the rotary selector (6b) to “Milk froth” j.
Important: Dried milk residue is difficult to remove, so the milk frother (6) must be cleaned with lukewarm water immediately after use and rinse using the CLEAN MILK SYSTEM programme.
Tip: If possible, use only beans for fully automatic coffee and espresso machines. For optimal quality, deep-freeze the beans or store in a cool place in sealed containers. Coffee beans can be ground while frozen.
Important: Fill the water tank (17) with fresh water every day. The tank (17) should always contain sufficient water for operating the appliance.
Preparation
1.Place the pre-warmed cup(s) under the coffee outlet (7).
Tip: For a small espresso, always preheat the cup, e.g. using hot water.
2.Select the required coffee and the required per-cup quantity by turning the upper rotary knob (15). The selected coffee and the per-cup quantity are shown in the display.
3.Select the required coffee strength by turning the lower rotary knob (14). The selected coffee strength is shown in
the display. To prepare two cups at the same time, press the d button (11) (only for drinks without milk and without the aromaDouble Shot function).
4.Press the start button (10).
10
Coffee is brewed and then poured into the cup(s).
N.B.: With some settings the coffee is prepared in two stages (see “aromaDouble Shot”). Wait until the procedure is fully completed.
Press the start button (10) again to cut the brewing process short.
Preparation using ground coffee
This fully automatic espresso machine can also be operated with ground coffee (not instant coffee powder).
The appliance must be ready for use. To prepare a coffee-based drink with milk,
first insert the milk tube into a milk container and turn the rotary selector (6b) to “Milk froth” j.
N.B.: The aromaDouble Shot function cannot be used when coffee is prepared using ground coffee.
Important: Dried milk residue is difficult to remove, so the milk frother (6) must be cleaned with lukewarm water immediately after use and rinse using the CLEAN MILK SYSTEM programme.
Important: Fill the water tank (17) with fresh water every day. The tank (17) should always contain sufficient water for operating the appliance.
Preparation
1.Open the drawer (4).
2.Pour in no more than 2 level measuring spoons of ground coffee.
Warning: Do not use whole beans or instant coffee.
3.Close the drawer (4).
ende
4.Select the required drink by turning the upper rotary knob (15) (only one cup possible).
5.Press the start button (10).
Coffee is brewed and then poured into the cup.
N.B.: Repeat the procedure for another cup of coffee. If no coffee is taken within 90 seconds, the brewing chamber empties automatically to avoid overfilling. The appliance rinses.
Dispensing hot water
AARisk of burns!
The milk frother (6) gets very hot. Hold the milk frother (6) by the plastic part only.
The milk frother must be cleaned before drawing hot water.
The appliance must be ready for use.
1.Place the pre-warmed cup or glass under the outlet of the milk frother (6).
2.Set the rotary selector (6b) to the horizontal position.
3.Press and hold the h / g button (12) for approx. 3 seconds. The appliance heats up. Hot water runs out of the milk frother outlet (6) for about 40 seconds.
4.Press the h / g button (12) again to cut the process short.
11
ende
Preparing milk froth and warm milk
AARisk of burns!
The milk frother (6) gets very hot. Hold the milk frother (6) by the plastic part only.
Tip: You can foam the milk first and then dispense coffee, or foam the milk separately and pour it onto the coffee.
The appliance must be ready for use.
1.Place a pre-warmed cup under outlet (6a).
2.Insert the milk tube (6c) into a milk container.
3.Turn the rotary selector (6b) to “Milk froth” j or “Warm milk” i.
4.Press the h / g button (12).
The h / g button (12) flashes and the appliance now heats up for approx. 20 seconds.
AARisk of burns!
Milk froth or warm milk comes out of the milk frother (6) at high pressure. Splashes of milk can scald. Do not touch the outlet (6a) or aim it at anyone.
5.End the process by pressing the h / g button (12).
Tip: For optimal milk froth quality, use cold milk with a fat content of at least 1.5 % if possible.
Important: Dried milk residue is difficult to remove, so the milk frother (6) must be cleaned with lukewarm water immediately after use and rinse using the CLEAN MILK SYSTEM programme.
Maintenance and daily cleaning
AARisk of electric shock!
Unplug the appliance before cleaning it. Never immerse the appliance in water. Do not use a steam cleaner.
●●Wipe the outside of the appliance with a soft, damp cloth.
●●Do not use abrasive cloths or cleaning agents.
●●Always remove any limescale, coffee, milk or descaling fluid residue immediately. Such residue can cause corrosion.
●●New sponge cloths may contain salts.
Salts can cause rust film on stainless steel and must therefore be washed out thoroughly before use.
●●Pull the drip tray (8c) with the coffee grounds container (8b) forward and out. Remove the panel (8a) and the grate (8d). Empty and clean the drip tray and coffee grounds container.
●●Remove drawer (4) and clean.
12

OODo not put the following items in the dishwasher: drip tray panel (8a), drawer (4), brewing unit (5a).
NNThe following items are dishwashersafe: drip tray for coffee outlet (8c), coffee grounds container (8b), grate for coffee outlet (8d), aroma cover (2) and measuring spoon (19).
●●Wipe out the inside of the appliance (tray holders and drawer).
Important: Drip tray for coffee outlet (8c) and coffee grounds container (8b) should be emptied and cleaned daily to prevent mould from developing.
N.B.: If the appliance is cold when switched on with the power switch O / I (9) or if it switches off automatically after coffee has been dispensed, it rinses automatically. In other words the system cleans itself.
Important: If the appliance has not been used for a prolonged period of time (e.g. after a vacation), clean the entire appliance thoroughly, including the milk system and brewing unit.
Cleaning the milk system
If the milk system was not cleaned after milk has been dispensed, after a certain amount of time the message CLEAN MILK SYSTEM! will appear on the display.
Clean the milk system immediately after use! To clean, leave the rotary selector (6b) in the same position it was in when last used.
1.Select f by turning the rotary knob (15).
2.Place a tall, empty container under the outlet (6a).
3.Push the outlet as close as possible to the container.
4.Place the end of the milk tube (6c) into the container.
5.Press the start button (10).To pre-clean the milk system automatically:
The machine automatically releases water into the container and vacuums it up again via the milk tube to rinse the milk system.
ende
The rinse procedure stops automatically after about 1 minute.
6.Empty the container and clean the milk tube (6c).
In addition to this, clean the milk system thoroughly at regular intervals (by hand or in the dishwasher).
Dismantling the milk system for cleaning:
1.Pull the milk frother (6) forward out of the appliance.
2.Dismantle the milk frother into its individual parts (6a to 6d) (see figure C at the start of the operating instructions).
3.Clean the individual parts with a detergent solution and a soft brush. If necessary, soak in a warm detergent solution.
4.Rinse all parts with clear water and dry them.
13

ende
5.Reassemble all the parts and replace fully in the appliance.
AARisk of scalding!
Use this appliance only after the milk frother
(6) has been fully assembled and installed.
Cleaning the brewing unit
Clean the brewing unit regularly!
1.Select e by turning the rotary knob (15).
2.Place an empty glass under outlet (6a).
3.Press the start button (10).To pre-clean the brewing unit automatically:
The appliance rinses.
In addition to the automatic cleaning programme, the brewing unit (5a) should be removed regularly for cleaning. (See figure E at the start of the operating instructions.)
1.Switch the appliance off at the power on/off switch O / I (9). No buttons are lit.
2.Open the door (5b) to the brewing unit.
3.Slide the red lock (5e) on the brewing unit (5a) completely to the left.
4.Press the eject lever (5d) down fully. The brewing unit is released.
5.Grasp the brewing unit (5a) by the recessed grips and remove carefully.
6.Remove the cover (5f) of the brewing unit and rinse the brewing unit (5a) thoroughly under running water.
7.Thoroughly clean the brewing unit sieve under the running water.
Important: Do not clean with detergent or other cleaning agents and do not put it in the dishwasher.
8.Wipe out the inside of the appliance thoroughly with a damp cloth and remove any coffee residues.
9.Allow the brewing unit (5a) and the inside of the appliance to dry.
10.Replace the cover (5f) on the brewing unit and reinsert the brewing unit (5a) fully into the appliance.
11.Press the eject lever (5d) up fully.
12.Slide the red lock (5e) fully to the right and close the door (5b).
14

Tips on energy saving
●●Switch off the fully automatic espresso machine when not in use. To do this, press the e off / j button (13). The appliance rinses and switches off.
●●If possible, do not interrupt coffee or milk froth dispensing. Cutting the coffee or milk froth dispensing process short results in higher energy consumption and in more residual water collecting in the drip tray.
●●Descale the appliance regularly to avoid a build-up of limescale. Limescale residue results in higher energy consumption.
Service Programmes
Tip: Refer also to the quick reference guide in the storage compartment (5c).
Depending on usage, the following messages will appear on the display at certain intervals:
DESCALE REQUIRED! or
CLEAN REQUIRED! or
CALC‘N‘CLEAN REQUIRED!
The appliance should be cleaned or descaled immediately using the corresponding programme. You also have the option of combining both processes with the Calc‘n‘Clean function (see “Calc‘n‘Clean”). If the service programme is not run as instructed, the appliance may be damaged.
ende
AAWarning!
Each time you run the service programme, you should follow the instructions for using the descaling and cleaning agents. Please observe the safety instructions on the packaging of the cleaning agent.
Never interrupt the service programme! Do not drink the liquids!
Never use vinegar, vinegar-based products, citric acid or citric acid-based products! Never put descaling tablets or other descaling agents in the ground coffee drawer or the drawer for cleaning tablets (4)!
Specially developed descaling and cleaning tablets are available from retailers or customer service (see “Accessories”).
Descaling
Duration: approx. 25 minutes.
Important: If there is a filter in the water tank (17), it needs to be removed before the descaling programme is run.
If the message DESCALE REQUIRED! appears on the display, press the e off / j button (13) for 3 seconds and then press the start button (10). The descaling programme will start. To descale the appliance before being prompted, press the e off / j button (13) for at least 3 seconds. Then press the e off / j button (13) briefly twice. Turn the upper rotary knob (15) until START DESCALING appears in the display. To start the descaling procedure, press the start button (10). The display will guide you through the programme.
EMPTY DRIP TRAY
INSERT DRIP TRAY
●●Empty drip tray (8) and replace them.
15

ende
N.B.: If the water filter is activated, the display will prompt you to remove the filter and then press the start button (10) again.
Remove the filter now if you have not already done so. Press the start button (10).
FILL DESCALER
PRESS START
●●Pour lukewarm water into the empty water tank (17) up to the 0.5 l mark and then dissolve 1 Siemens descaling tablet TZ80002 in it. When using TZ60002,
2 tablets must be dissolved. ●●Press the start button (10).
PLACE CONTAINER PRESS START
●●Place a receptacle with a capacity of at least 0.5 litres under the outlet (6a).
●●Press the start button (10).
DESCALE IN PROGRESS
The descaling programme will now run for about 20 minutes.
CLEAN / FILL WATER TANK PRESS START
●●Rinse the water tank (17) and refill it with fresh water up to the max mark.
●●Press the start button (10).
DESCALE IN PROGRESS
The descaling programme now runs for about 3 minutes and rinses the appliance.
EMPTY DRIP TRAY
INSERT DRIP TRAY
●●Empty drip tray (8) and replace them.
Replace the filter if one is being used. The appliance has completed descaling and is ready for use again.
Important: Wipe down the appliance using a soft, damp cloth to immediately remove any descaler residue. Such residue can cause corrosion. New sponge cloths may contain salts.
Salts can cause rust film on stainless steel and must therefore be washed out thoroughly before use.
Cleaning
Duration: approx. 10 minutes.
If the message CLEAN REQUIRED! appears on the display, press the e off / j button (13) for 3 seconds and then press the start button (10).
The cleaning programme will start. To clean the appliance before being
prompted, press the e off / j button (13) for at least 3 seconds. Then press the e off / j button (13) briefly twice. Turn the upper rotary knob (15) until START CLEANING appears in the display. To start the cleaning procedure, press the start button (10).
The display will guide you through the programme.
EMPTY DRIP TRAY
INSERT DRIP TRAY
●●Empty drip tray (8) and replace them.
CLEANING IN PROGRESS
The appliance rinses twice.
OPEN DRAWER
●●Open the drawer (4).
FILL CLEANER
●●Drop a Siemens cleaning tablet in the drawer (4) and close.
CLEANING IN PROGRESS
The cleaning programme will now run for about 8 minutes.
EMPTY DRIP TRAY
INSERT DRIP TRAY
●●Empty drip tray (8) and replace them.
The appliance has finished cleaning is ready for use again.
16
Calc‘n‘Clean
Duration: approx. 35 minutes.
Calc‘n‘Clean combines the separate functions of descaling and cleaning. If both programmes are due to be run soon, the espresso machine automatically suggests this service programme.
Important: If there is a filter in the water tank (17), it needs to be removed before the service programme is run.
If the message CALC‘N‘CLEAN REQUIRED! appears on the display, press the e off / j button (13) for 3 seconds and then
press the start button (10). The service programme will start.
To run Calc‘n‘Clean before being prompted, press the e off / j button (13) for at
least 3 seconds. Then press the e off / j
button (13) briefly twice. Turn the upper rotary knob (15) until START CALC‘N‘CLEAN appears in the display. To start Calc‘n‘Clean, press the start button (10). The display will guide you through the programme.
EMPTY DRIP TRAY
INSERT DRIP TRAY
●●Empty drip tray (8) and replace them.
CALC‘N‘CLEAN IN PROGRESS
The appliance rinses twice.
OPEN DRAWER
●●Open the drawer (4).
FILL CLEANER
●●Drop a Siemens cleaning tablet in the drawer (4) and close.
N.B.: If the water filter is activated, the display will prompt you to remove the filter and then press the start button (10) again.
Remove the filter now if you have not already done so.
Press the start button (10).
ende
FILL DESCALER
PRESS START
●●Pour lukewarm water into the empty water tank (17) up to the 0.5 l mark and then dissolve 1 Siemens descaling tablet TZ80002 in it. When using TZ60002,
2 tablets must be dissolved. ●●Press the start button (10).
PLACE CONTAINER PRESS START
●●Place a receptacle with a capacity of at least 1 litre under the outlet (6a).
●●Press the start button (10).
CALC‘N‘CLEAN IN PROGRESS
The descaling programme will now run for about 22 minutes.
CLEAN / FILL WATER TANK PRESS START
●●Rinse the water tank (17) and refill it with fresh water up to the max mark.
●●Press the start button (10).
CALC‘N‘CLEAN IN PROGRESS
The descaling programme now runs for about 10 minutes and rinses the appliance.
EMPTY DRIP TRAY
INSERT DRIP TRAY
●●Empty drip tray (8) and replace them.
Replace the filter if one is being used. The appliance has finished cleaning is ready for use again.
Important: Wipe down the appliance using a soft, damp cloth to immediately remove any descaler residue. Such residue can cause corrosion. New sponge cloths may contain salts. Salts can cause rust film
on stainless steel and must therefore be washed out thoroughly before use.
17

ende
Frost protection
AATo avoid damage from low temperatures during transport and storage, the appliance must be completely emptied first.
Note: The appliance must be ready for use and the water tank (17) filled.
1.Place a large receptacle under outlet (6a).
2.Press the h / g button (12) and allow the appliance to steam for about 15 seconds.
3.Switch the appliance off at the power on/off switch O / I (9).
4.Empty the water tank (17) and the drip tray (8).
Accessories
The following accessories can be obtained from retailers and customer service.
Accessories |
Ordering number |
|
Retail / |
|
Customer service |
Cleaning tablets |
TZ60001 |
|
00310575 |
Descaling tablets |
TZ80002 |
|
00576693 |
Water filter |
TZ70003 |
|
00575491 |
Care set |
TZ80004 |
|
00576330 |
Milk container with |
TZ80009N |
“Fresh Lock” lid |
00576166 |
18

ende
Disposal A
Dispose of packaging in an environmen- tally-friendly manner. This appliance is labelled in accordance with European Directive 2012/19/EG concerning used electrical and electronic appliances (waste electrical and electronic equipment – WEEE). The guideline determines the framework for the return and recycling of used appliances
as applicable throughout the EU. Please ask your specialist retailer about current disposal facilities.
Technical data
Guarantee
The guarantee conditions for this appliance are as defined by our representative in the country in which it is sold. Details regarding these conditions can be obtained from
the dealer from whom the appliance was purchased. The bill of sale or receipt must be produced when making any claim under the terms of this guarantee.
Changes reserved.
Power connection (voltage – frequency) |
220-240 V – 50/60 Hz |
Heater wattage |
1600 W |
Maximum static pump pressure |
15 bar |
Maximum water tank capacity (without filter) |
1.7 liters |
Maximum capacity of the coffee bean container |
300 grams |
Length of power cable |
100 cm |
Dimensions (H x W x D) |
385 x 280 x 479 mm |
Weight, empty |
9.3 kg |
Type of grinding unit |
Ceramic |
|
|
19

deen
Simple troubleshooting
Problem |
Cause |
Solution |
|
Display shows |
Beans are not falling into |
Gently tap the bean container (1). |
|
REFILL BEANS! although the the grinding unit |
Change the type of coffee if |
||
bean container (1) is full, |
(beans too oily). |
necessary. |
|
or the grinding unit does |
|
When the bean container (1) is |
|
not grind the beans. |
|
empty, wipe it with a dry cloth. |
|
No hot water dispensed. |
The milk frother (6) is |
Clean the milk frother (6), see |
|
|
|
soiled. |
“Maintenance and daily cleaning”. |
Too little or no milk froth |
The milk frother (6) is |
Clean the milk frother (6), see |
|
or |
soiled. |
“Maintenance and daily cleaning”. |
|
the milk frother (6) does |
|
Milk unsuitable for frothing. |
Use low-fat milk (1.5 % fat). |
not draw the milk in. |
|
The milk frother (6) is not |
Wet the milk frother parts and |
|
|
correctly assembled. |
press together firmly. |
|
|
Build-up of limescale in the Descale the appliance as |
|
|
|
appliance. |
described in the instructions. |
Coffee dispensing slows |
Coffee is ground too finely. |
Adjust the grinding unit to a |
|
to a trickle or stops |
Pre-ground coffee is too |
coarser setting. Use coarser |
|
completely. |
fine. |
pre-ground coffee. |
|
|
|
Build-up of limescale in the |
Descale the appliance as |
|
|
appliance. |
described in the instructions. |
Coffee has no “crema”. |
Unsuitable type of coffee. |
Use a type of coffee with a higher |
|
|
|
|
proportion of robusta beans. |
|
|
The beans are no longer |
Use fresh beans. |
|
|
fresh. |
|
|
|
The grinding setting is not |
Adjust grinding setting to fine. |
|
|
suitable for the beans. |
|
Coffee is too “acidic”. |
The grinding setting is too |
Adjust the grinding unit to a finer |
|
|
|
coarse or the pre-ground |
setting or use finer pre-ground |
|
|
coffee is too coarse. |
coffee. |
|
|
Unsuitable type of coffee. |
Use a darker roast. |
Coffee is too “bitter”. |
The grinding setting is |
Adjust the grinding unit to a |
|
|
|
too fine or the pre-ground |
coarser setting or use coarser |
|
|
coffee is too fine. |
pre-ground coffee. |
|
|
Unsuitable type of coffee. |
Change type of coffee used. |
Display shows |
The appliance has a fault. |
Please call the hotline. |
|
ERROR |
|
|
|
CALL HOTLINE |
|
|
|
The water filter does not stay in position in the water tank (17).
The water filter is not mounted correctly.
Firmly press the water filter straight down into the tank connection.
If you are unable to solve the problem, always call the hotline!
You will find the telephone numbers at the back of these instructions.
20

ende
Problem |
Cause |
Solution |
Display shows |
Water tank has been |
CHECK |
incorrectly inserted or the |
WATER TANK |
new water filter has not |
|
been rinsed according to |
|
instructions. |
Insert the water tank
correctly or rinse the water filter according to instructions and then switch on.
|
Carbonated water in the |
Fill the water tank with fresh tap |
|
water tank. |
water. |
The coffee grounds are not The grinding setting is too |
Adjust the grinding unit to a |
|
compact and are too wet. |
fine or too coarse, or not |
coarser or finer setting, or use |
|
enough ground coffee has |
2 level measuring spoons of |
|
been used. |
ground coffee. |
Display shows |
Brewing unit (5) is soiled. |
Clean brewing unit (5). |
CLEAN BREWING UNIT |
Too much pre-ground |
Clean brewing unit (5). |
|
coffee in the brewing |
Pour in no more than 2 level |
|
unit (5). |
measuring spoons of ground |
|
|
coffee. |
|
The brewing unit’s |
Remove and clean the brewing |
|
mechanism is stiff. |
unit, see “Maintenance and daily |
|
|
cleaning”. |
Coffee or milk froth quality |
Build-up of limescale in the Descale the appliance as |
|
varies considerably. |
appliance. |
described in the instructions. |
Water dripped onto the |
Drip tray (8) removed too |
Wait a few seconds after the |
inner floor of the appliance |
early. |
last drink was dispensed before |
when the drip tray (8) was |
|
removing the drip tray (8). |
removed. |
|
|
Display shows |
Brewing unit (5) is missing |
INSERT BREWING UNIT |
or was not recognised. |
Switch off the appliance with the brewing unit (5) in place, wait three seconds and switch on the appliance.
Restore the unit to its original factory settings (“Reset”).
You changed some settings and want to discard them.
Turn off the unit with the power on/off switch O / I (9). Press and hold the e off / j (13) and the h (12) button and turn the appliance on with the power on/off switch
O / I (9). Confirm by pressing the start button start (10). The factory settings are now activated.
If you are unable to solve the problem, always call the hotline!
You will find the telephone numbers at the back of these instructions.
21
fr |
|
|
|
|
Sommaire |
|
Chère amatrice de café, |
||
Contenu de l’emballage |
22 |
cher amateur de café. |
||
|
|
|||
Consignes de sécurité |
23 |
Félicitation pour avoir choisi la cafetière |
||
Présentation |
25 |
Siemens. |
||
Eléments de commande |
25 |
Ce mode d’emploi décrit différents modèles |
||
Messages à l’écran |
26 |
qui se différencient par leur niveau |
||
aromaDouble Shot |
26 |
d’équipement. |
||
Avant la première utilisation |
27 |
Veuillez également tenir compte du |
||
Filtre eau |
28 |
Mémento fourni. Un logement (5c) a été |
||
Réglages menu |
29 |
prévu pour le conserver à portée de main |
||
Régler la finesse de la mouture |
30 |
dans la machine. |
||
Préparation avec du café en grains |
30 |
|
|
|
Préparation à partir de café moulu |
31 |
Contenu de l’emballage |
||
Préparer de l’eau chaude |
31 |
|||
Préparer de la mousse |
|
|
|
|
de lait et du lait chaud |
32 |
(voir l’illustration figurant au début du |
||
Entretien et nettoyage quotidien |
33 |
présent |
Mode d’emploi) |
|
Conseils pour économiser l’énergie |
35 |
a Machine à café TE506/TE509 |
||
Programmes de maintenance |
36 |
b Mémento |
||
Protection contre le gel |
39 |
c Mode d’emploi |
||
Accessoires |
39 |
d Mousseur lait |
||
Mise au rebut |
39 |
e Bandelette pour déterminer la |
||
Garantie |
39 |
dureté de l’eau |
||
Eliminer soi-même |
|
f Cuillère-dose |
||
les problèmes simples |
40 |
Uniquement pour TE509 |
||
Caractéristiques techniques |
42 |
|||
|
|
|
g Réservoir de lait |
|
22

fr
Consignes de sécurité
Lire attentivement ce mode d’emploi, s’y conformer lors de l’utilisation et le conserver ! Veuillez joindre ce mode d’emploi si vous passez l’appareil à quelqu’un d’autre. Cet appareil est conçu pour la préparation de quantités usuelles, dans le cadre d’un foyer ou d’un usage non commercial de type domestique. Citons p. ex. les cuisines du personnel dans les commerces, bureaux, exploitations agricoles et établissements artisanaux ainsi que les clients de pensions, petits hôtels et toute autre résidence de type similaire.
¡ Risque de chocs électriques !
Ne brancher et n’utiliser l’appareil que conformément aux données indiquées sur la plaque signalétique Les réparations sur l’appareil telles que le remplacement d’un cordon endommagé ne doivent être effectuées que par notre SAV afi n d’éliminer tout danger.
Cet appareil peut être utilisé par des enfants à partir de 8 ans et par des personnes ayant des facultés physiques, sensorielles ou mentales réduites ou manquant d’expérience et/ou de
connaissances à condition d’être surveillés ou d’avoir été informés quant à la bonne utilisation de l’appareil et d’avoir compris les dangers qui en découlent Les enfants de moins de 8 ans doivent être tenus éloignés de l’appareil et du cordon d’alimentation et ne doivent pas utiliser l’appareil Ne pas laisser les enfants jouer avec l’appareil Le nettoyage et l’entretien incombant à l’utilisateur ne doivent pas être effectués par des enfants sauf s’ils ont 8 ans ou plus et sont surveillés
23

fr
Ne jamais plonger l’appareil ou le cordon électrique dans l’eau N’utiliser la machine que lorsque le cordon électrique et l’appareil ne présentent aucun dommage En cas de défaut, débrancher immédiatement la fi che secteur ou couper la tension du réseau.
¡ Risque d’étouffement !
Ne pas laisser les enfants jouer avec les emballages
¡¡Risque de brûlure !
L’embout (6a) du mousseur de lait devient brûlant. Après utilisation, bien laisser refroidir la buse avant de la saisir.
N’utilisez la machine que lorsque le mousseur de lait (6) est entièrement monté et installé.
¡¡Risque de blessure!
Ne pas glisser les doigts à l’intérieur du broyeur.
24

Présentation
(voir les illustrations de vue d’ensemble A, B, C, D et E au début de la notice)
1Bac à café
2Couvercle préservateur d’arôme
3Sélecteur de réglage de finesse de mouture
4Tiroir à café
(café en poudre/pastille de nettoyage)
5Unité de percolation (figure E)
a)Unité de percolation
b)Volet
c)Logement du Mémento
d)Levier d’éjection pour l’unité de percolation
e)Verrouillage
f)Couvercle de protection
6Mousseur de lait amovible (figure C)
a)Embout
b)Sélecteur rotatif Lait chaud/ Mousse de lait
c)Flexible Lait
d)Partie supérieure
e)Buse à air
7Bec verseur du café, réglable en hauteur
8Bac collecteur (figure D)
a)Support des bacs collecteurs
b)Récipient pour marc de café
c)Bac collecteur du bec verseur du café
d)Grille bec verseur du café
9Interrupteur électrique O / I
10Touche start
11Touche d
12Touche h / g
13Touche e off / j
14Sélecteur rotatif « Arôme du café »
15Sélecteur rotatif
« Sélection de la boisson »
16Ecran
17Réservoir d’eau amovible
18Couvercle du réservoir d’eau
19Cuillère-dose (sert de poignée pour placer le filtre d’eau)
20Logement de la cuillère-dose
21Cordon électrique et logement
UNIQUEMENT POUR TE509 22 Réservoir de lait
fr
Eléments de commande
Interrupteur électrique O / I
L’interrupteur réseau O / I (9) permet de mettre en marche et d’arrêter entièrement la machine (alimentation électrique coupée). Important : Avant d’arrêter la machine, lancer un programme de rinçage ou bien utiliser la touche e off / j (13).
Touche d
Appuyer sur la touche d (11) pour préparer simultanément deux tasses de la boisson sélectionnée. La touche est
utilisable pour les boissons sans lait et sans fonction aromaDouble Shot.
Touche e off / j
Appuyer brièvement sur la touche
e off / j (13) pour effectuer un rinçage et arrêter la machine. Appuyer de manière prolongée sur la touche e off / j (13) pour afficher les réglages utilisateur ou pour lancer un cycle de détartrage et de nettoyage.
Touche h / g
Appuyer sur la touche h / g (12) pour produire de la vapeur, nécessaire pour la production de mousse de lait ou de lait chaud. Cette touche permet également de prélever de l’eau chaude.
Touche start
Appuyer sur la touche start (10) pour lancer la préparation d’une boisson ou pour effectuer un programme de Service.
Pour réduire la quantité de boisson appuyer de nouveau sur la touche start (10) en cours de préparation.
25
fr
Sélecteur rotatif « Arôme du café »
|
Le sélecteur rotatif (14) sert |
|
|
à régler l’arôme du café. |
|
h |
TRÈS DOUX |
|
|
DOUX |
|
à |
NORMAL |
|
FORT |
||
|
||
g |
DOUBLESHOT FORT + |
|
DOUBLESHOT FORT ++ |
||
|
Avec ces réglages de |
|
|
l’arôme, le café est préparé |
|
|
en 2 étapes. Voir point |
|
|
« aromaDouble Shot ». |
Sélecteur rotatif
« Sélection de la boisson »
|
|
|
|
|
|
Le sélecteur (15) permet de |
|
|
|
|
|
|
sélectionner la boisson et |
|
|
|
|
|
|
la quantité. Il permet aussi |
|
|
|
|
|
|
de modifier les réglages de |
|
|
|
|
|
|
|
|
|
|
|
|
|
l’utilisateur. |
|
|
|
|
|
|
|
|
|
|
|
|
|
|
a |
|
Boisson café sans lait : |
||||
|
||||||
|
PETIT ESPRESSO |
|||||
à |
|
|
|
|
|
ESPRESSO |
|
|
|
|
|
PETIT CAFÉ CRÈME |
|
c |
|
CAFÉ CRÈME |
||||
|
GRAND CAFÉ CRÈME |
|||||
|
|
|
|
|
|
|
m |
|
Boisson café avec lait : |
||||
|
PETIT CAPPUCCINO |
|||||
|
|
|
|
|
|
GRAND CAPPUCCINO |
à |
|
|
|
|
|
PETIT MACCHIATO |
n |
|
MACCHIATO |
||||
|
GRAND MACCHIATO |
|||||
|
|
|
|
|
|
|
e |
|
RINÇAGE MACHINE |
||||
|
|
|
|
|
|
|
f |
|
RINCER SYST.DE LAIT |
||||
|
|
|
|
|
|
|
Remarque : Lorsqu’il est sélectionné une boisson impossible à préparer, l’écran affiche COMBINAISON NON VALIDE. Modifier l’arôme du café ou la sélection de la boisson.
Sélecteur rotatif
Pour prélever de la mousse de lait – par exemple pour préparer du Latte Macchiato ou un Cappuccino – tourner le symbole j vers l’avant. Pour prélever du lait chaud, tourner le symbole i vers l’avant.
Pour prélever de l’eau chaude, placer le sélecteur horizontalement.
Messages à l’écran
En plus de l’état de fonctionnement actuel, l’écran (16) affiche également différents messages qui correspondent à des informations d’état ou qui vous demandent d’intervenir. Dès que vous avez effectué l’opération nécessaire, le message disparaît et le menu de sélection des boissons s’affiche de nouveau.
aromaDouble Shot
Plus la percolation du café dure longtemps, plus les substances amères et les arômes indésirables sont prononcés. Cela a un effet négatif sur le goût et rend le café moins digeste. La TE506/TE509 dispose donc d’une fonction spéciale, aromaDouble Shot pour préparer un café très fort. Une fois que la moitié de la quantité a été préparée, la machine moud de nouveau du café et effectue une percolation. Cela permet de ne développer que les arômes parfumés et très digestes du café.
26
 Loading...