


VB558C0S0
5HJLVWHU
\RXU
SURGXFW
RQOLQH
VLHPHQVKRPHEVKJURXSFRPZHOFRPH
/TYZX[IZOUTSGT[GR
Instrucciones de uso ............................25
Instruções de serviço ...........................48
Kullanma klavuzu ...............................70
Built-in oven
Horno integrado
Forno de encastrar
Ankastre fırın
VB558C0S0


en
3
Table of contents
Instruction manual
8 Intended use . . . . . . . . . . . . . . . . . . . . . . . . . . . . . 4
( Important safety information . . . . . . . . . . . . . . . 4
General information . . . . . . . . . . . . . . . . . . . . . . . . . . . 4
] Causes of damage . . . . . . . . . . . . . . . . . . . . . . . . 5
General information . . . . . . . . . . . . . . . . . . . . . . . . . . . 5
7 Environmental protection . . . . . . . . . . . . . . . . . . 6
Saving energy . . . . . . . . . . . . . . . . . . . . . . . . . . . . . . . 6
Environmentally-friendly disposal . . . . . . . . . . . . . . . . .6
* Getting to know your appliance . . . . . . . . . . . . . 7
Control panel . . . . . . . . . . . . . . . . . . . . . . . . . . . . . . . .7
Buttons. . . . . . . . . . . . . . . . . . . . . . . . . . . . . . . . . . . . . 7
Display . . . . . . . . . . . . . . . . . . . . . . . . . . . . . . . . . . . . . 7
Types of heating and functions . . . . . . . . . . . . . . . . . . 8
Temperature selector . . . . . . . . . . . . . . . . . . . . . . . . . . 9
Cooking compartment functions . . . . . . . . . . . . . . . . . 9
_ Accessories . . . . . . . . . . . . . . . . . . . . . . . . . . . . . 9
Shelf positions . . . . . . . . . . . . . . . . . . . . . . . . . . . . . . . 9
Locking function. . . . . . . . . . . . . . . . . . . . . . . . . . . . . 10
Telescopic rail set . . . . . . . . . . . . . . . . . . . . . . . . . . .10
Special accessories . . . . . . . . . . . . . . . . . . . . . . . . . . 10
K Before using for the first time. . . . . . . . . . . . . . 11
Setting the time on the clock . . . . . . . . . . . . . . . . . . .11
Baking out the oven . . . . . . . . . . . . . . . . . . . . . . . . . .11
Cleaning the accessories. . . . . . . . . . . . . . . . . . . . . . 11
Fitting the telescopic shelf set . . . . . . . . . . . . . . . . . . 11
1 Operating the appliance . . . . . . . . . . . . . . . . . . 12
Switching the oven on and off . . . . . . . . . . . . . . . . . . 12
Automatic safety switch-off function . . . . . . . . . . . . . . 12
O Time-setting options . . . . . . . . . . . . . . . . . . . . . 12
Overview of the time-setting options . . . . . . . . . . . . . 12
Operating the electronic clock . . . . . . . . . . . . . . . . . . 12
Setting the automatic timer . . . . . . . . . . . . . . . . . . . . 13
A Childproof lock. . . . . . . . . . . . . . . . . . . . . . . . . . 14
Activating the childproof lock . . . . . . . . . . . . . . . . . . .14
Deactivating the childproof lock. . . . . . . . . . . . . . . . . 14
Q Basic settings. . . . . . . . . . . . . . . . . . . . . . . . . . . 14
List of basic settings . . . . . . . . . . . . . . . . . . . . . . . . . 14
Changing the basic settings. . . . . . . . . . . . . . . . . . . . 15
Setting energy-saving mode. . . . . . . . . . . . . . . . . . . . 15
D Cleaning . . . . . . . . . . . . . . . . . . . . . . . . . . . . . . . 15
Suitable cleaning agents . . . . . . . . . . . . . . . . . . . . . .15
Surfaces in the cooking compartment . . . . . . . . . . . .16
Keeping the appliance clean . . . . . . . . . . . . . . . . . . .16
Cleaning the cooking compartment . . . . . . . . . . . . . .17
p Rails. . . . . . . . . . . . . . . . . . . . . . . . . . . . . . . . . . . 17
Detaching the shelf supports . . . . . . . . . . . . . . . . . . .17
Refitting the shelf supports. . . . . . . . . . . . . . . . . . . . .17
q Appliance door . . . . . . . . . . . . . . . . . . . . . . . . . . 18
Removing and installing the door panels . . . . . . . . . .18
Removing and fitting the appliance door . . . . . . . . . .19
3 Trouble shooting . . . . . . . . . . . . . . . . . . . . . . . . 20
Fault messages . . . . . . . . . . . . . . . . . . . . . . . . . . . . .20
Replacing the oven light bulb. . . . . . . . . . . . . . . . . . .21
4 Customer service . . . . . . . . . . . . . . . . . . . . . . . . 21
E number and FD number . . . . . . . . . . . . . . . . . . . . .21
J Tested for you in our cooking studio. . . . . . . . 22
Table of dishes . . . . . . . . . . . . . . . . . . . . . . . . . . . . . .22
User tips . . . . . . . . . . . . . . . . . . . . . . . . . . . . . . . . . . .23
Test dishes . . . . . . . . . . . . . . . . . . . . . . . . . . . . . . . . .24
Produktinfo
Additional information on products, accessories,
replacement parts and services can be found at
www.siemens-home.bsh-group.com and in the online
shop www.siemens-home.bsh-group.com/eshops

en Intended use
4
8Intended use
Intended use
Read these instructions carefully. Only then
will you be able to operate your appliance
safely and correctly. Retain the instruction
manual and installation instructions for future
use or for subsequent owners.
This appliance is only intended to be fully fitted
in a kitchen. Observe the special installation
instructions.
Check the appliance for damage after
unpacking it. Do not connect the appliance if it
has been damaged in transport.
Only a licensed professional may connect
appliances without plugs. Damage caused by
incorrect connection is not covered under
warranty.
This appliance is intended for domestic use
only. The appliance must only be used for the
preparation of food and drink. The appliance
must be supervised during operation. Only
use this appliance indoors.
This appliance is intended for use up to a
maximum height of 2000 metres above sea
level.
This appliance is not intended for operation
with an external clock timer or a remote
control.
This appliance may be used by children over
the age of 8 years old and by persons with
reduced physical, sensory or mental
capabilities or by persons with a lack of
experience or knowledge if they are
supervised or are instructed by a person
responsible for their safety how to use the
appliance safely and have understood the
associated hazards.
Children must not play with, on, or around the
appliance. Children must not clean the
appliance or carry out general maintenance
unless they are at least 15 years old and are
being supervised.
Keep children below the age of 8 years old at
a safe distance from the appliance and power
cable.
Always slide accessories into the cooking
compartment the right way round.
~ "Accessories" on page 9
(Important safety
information
Import ant safet y informati on
General information
:Warning – Risk of fire!
■ Combustible items stored in the cooking
compartment may catch fire. Never store
combustible items in the cooking
compartment. Never open the appliance
door if there is smoke inside. Switch off the
appliance and unplug it from the mains or
switch off the circuit breaker in the fuse box.
Risk of fire!
■ Loose food remnants, fat and meat juices
may catch fire. Before using the appliance,
remove the worst of the food remnants from
the cooking compartment, heating elements
and accessories.
Risk of fire!
■ A draught is created when the appliance
door is opened. Greaseproof paper may
come into contact with the heating element
and catch fire. Do not place greaseproof
paper loosely over accessories during
preheating. Always weight down the
greaseproof paper with a dish or a baking
tin. Only cover the surface required with
greaseproof paper. Greaseproof paper
must not protrude over the accessories.
:Warning – Risk of burns!
■ The appliance becomes very hot. Never
touch the interior surfaces of the cooking
compartment or the heating elements.
Always allow the appliance to cool down.
Keep children at a safe distance.
Risk of serious burns!
■ Accessories and ovenware become very
hot. Always use oven gloves to remove
accessories or ovenware from the cooking
compartment.
Risk of burns!
■ Alcoholic vapours may catch fire in the hot
cooking compartment. Never prepare food
containing large quantities of drinks with a
high alcohol content. Only use small
quantities of drinks with a high alcohol
content. Open the appliance door with care.
Risk of burns!
■ The telescopic shelves become hot when
the appliance is in use. Take special care
not to get burnt when they are pulled out.

Causes of damage en
5
:Warning – Risk of scalding!
■ The accessible parts become hot during
operation. Never touch the hot parts. Keep
children at a safe distance.
Risk of scalding!
■ When you open the appliance door, hot
steam can escape. Steam may not be
visible, depending on its temperature. When
opening, do not stand too close to the
appliance. Open the appliance door
carefully. Keep children away.
Risk of scalding!
■ Water in a hot cooking compartment may
create hot steam. Never pour water into the
hot cooking compartment.
:Warning – Risk of injury!
■ Scratched glass in the appliance door may
develop into a crack. Do not use a glass
scraper, sharp or abrasive cleaning aids or
detergents.
Risk of injury!
■ The hinges on the appliance door move
when opening and closing the door, and
you may be trapped. Keep your hands away
from the hinges.
:Warning – Risk of electric shock!
■ Incorrect repairs are dangerous. Repairs
may only be carried out by one of our
trained after-sales engineers. If the
appliance is faulty, unplug the mains plug or
switch off the fuse in the fuse box. Contact
the after-sales service.
Risk of electric shock and serious injury!
■ The cable insulation on electrical
appliances may melt when touching hot
parts of the appliance. Never bring
electrical appliance cables into contact with
hot parts of the appliance.
Risk of electric shock!
■ Do not use any high-pressure cleaners or
steam cleaners, which can result in an
electric shock.
Risk of electric shock!
■ When replacing the cooking compartment
bulb, the bulb socket contacts are live.
Before replacing the bulb, unplug the
appliance from the mains or switch off the
circuit breaker in the fuse box.
Risk of electric shock!
■ A defective appliance may cause electric
shock. Never switch on a defective
appliance. Unplug the appliance from the
mains or switch off the circuit breaker in the
fuse box. Contact the after-sales service.
]Causes of damage
Cau s e s of damage
General information
Caution!
■ Accessories, foil, greaseproof paper or ovenware on
the cooking compartment floor: do not place
accessories on the cooking compartment floor. Do
not cover the cooking compartment floor with any
sort of foil or greaseproof paper. Do not place
ovenware on the cooking compartment floor if a
temperature of over 50 ºC has been set. This will
cause heat to accumulate. The baking and roasting
times will no longer be correct and the enamel will
be damaged.
■ Aluminium foil: Aluminium foil in the cooking
compartment must not come into contact with the
door glass. This could cause permanent
discolouration of the door glass.
■ Water in a hot cooking compartment: do not pour
water into the cooking compartment when it is hot.
This will cause steam. The temperature change can
cause damage to the enamel.
■ Moisture in the cooking compartment: Over an
extended period of time, moisture in the cooking
compartment may lead to corrosion. Allow the
cooking compartment to dry after use. Do not keep
moist food in the closed cooking compartment for
extended periods of time. Do not store food in the
cooking compartment.
■ Cooling with the appliance door open: Following
operation at high temperatures, only allow the
cooking compartment to cool down with the door
closed. Do not trap anything in the appliance door.
Even if the door is only left open a crack, the front of
nearby furniture may become damaged over time.
Only leave the cooking compartment to dry with the
door open if a lot of moisture was produced whilst
the oven was operating.
■ Fruit juice: when baking particularly juicy fruit pies,
do not pack the baking tray too generously. Fruit
juice dripping from the baking tray leaves stains that
cannot be removed. If possible, use the deeper
universal pan.
■ Extremely dirty seal: If the seal is very dirty, the
appliance door will no longer close properly during
operation. The fronts of adjacent units could be
damaged. Always keep the seal clean.
~ "Cleaning" on page 15
■ Appliance door as a seat, shelf or worktop: Do not
sit on the appliance door, or place or hang anything
on it. Do not place any cookware or accessories on
the appliance door.
■ Inserting accessories: depending on the appliance
model, accessories can scratch the door panel
when closing the appliance door. Always insert the
accessories into the cooking compartment as far as
they will go.
■ Carrying the appliance: do not carry or hold the
appliance by the door handle. The door handle
cannot support the weight of the appliance and
could break.
en Environmental protection
6
7Environmental protection
Envi r onment al prot ect i on
Your new appliance is particularly energy-efficient.
Here you can find tips on how to save even more
energy when using the appliance, and how to dispose
of your appliance properly.
Saving energy
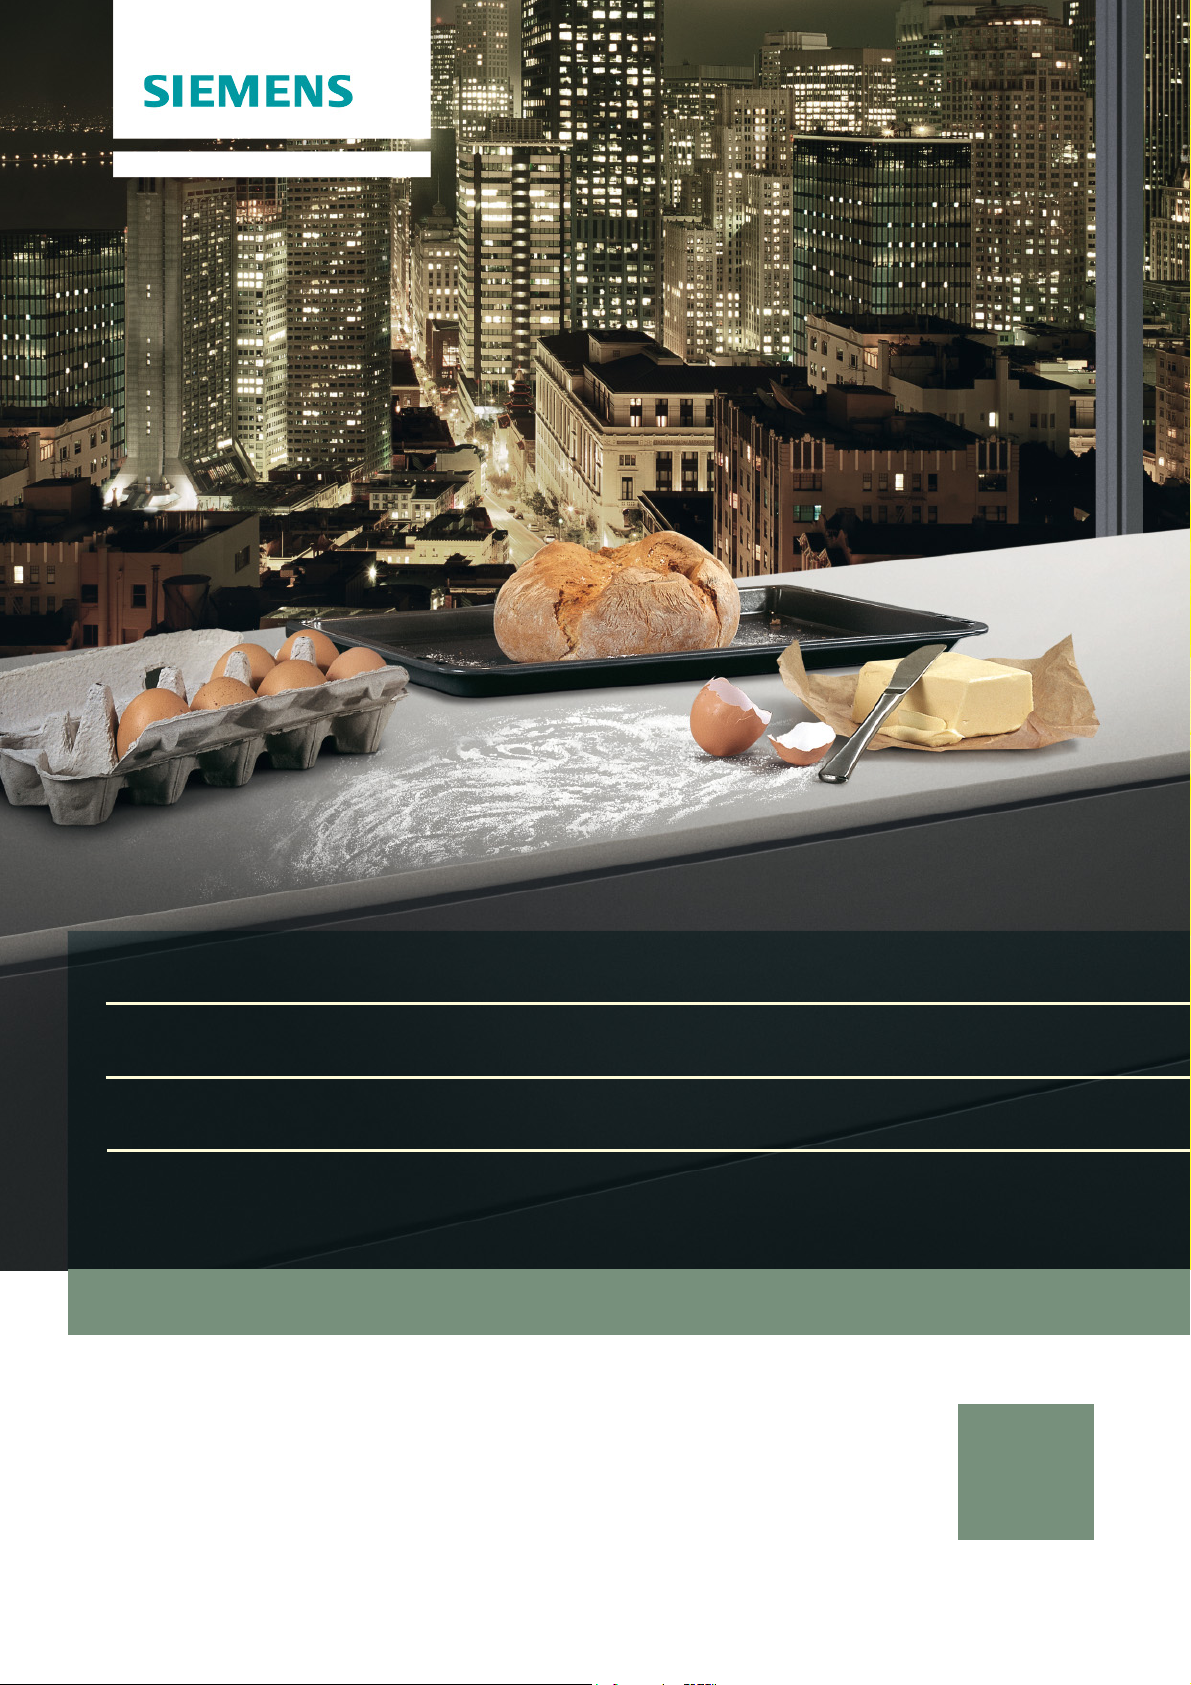
■ Only preheat the appliance if this is specified in the
recipe or in the tables in the operating instructions.
■ Leave frozen food to defrost before placing it in the
cooking compartment.
■ Use baking tins that are dark-coloured, painted black
or have an enamel coating. These absorb the heat
particularly well.
■ Remove any unnecessary accessories from the
cooking compartment.
■ Open the appliance door as infrequently as possible
when the appliance is in use.
■ It is best to bake several cakes one after the other.
The cooking compartment stays warm. This reduces
the baking time for the second cake. You can place
two cake tins next to each other in the cooking
compartment.
■ For longer cooking times, you can switch the
appliance off 10 minutes before the end of the
cooking time and use the residual heat to finish
cooking.
Environmentally-friendly disposal
Dispose of packaging in an environmentally-friendly
manner.
This appliance is labelled in accordance with
European Directive 2012/19/EU concerning
used electrical and electronic appliances
(waste electrical and electronic equipment -
WEEE). The guideline determines the
framework for the return and recycling of used
appliances as applicable throughout the EU.
Getting to know your appliance en
7
*Getting to know your
appliance
Gett i ng to know your appl i anc e
In this chapter, we will explain the indicators and
controls. You will also find out about the various
functions of your appliance.
Note: Depending on the appliance model, individual
details and colours may differ.
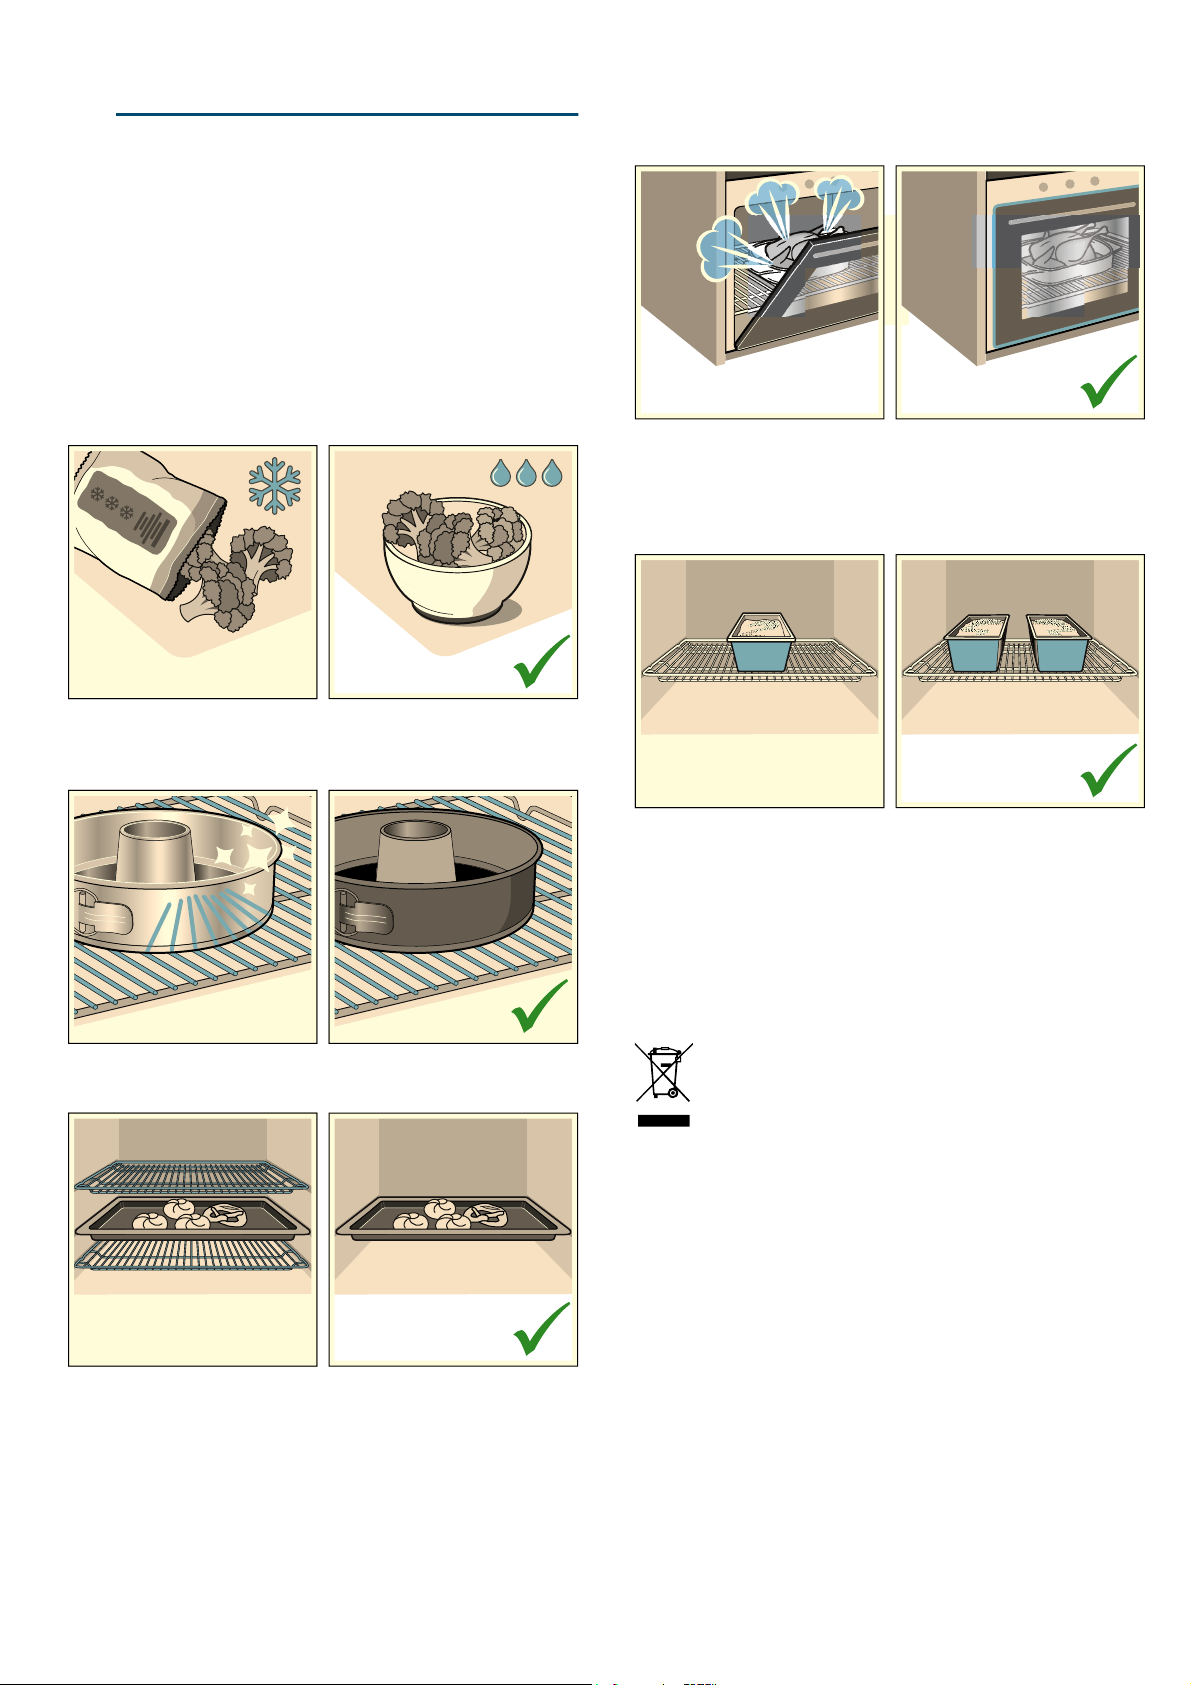
Control panel
You can set your appliance's various functions on the
control panel. Below, you will see an overview of the
control panel and the layout of the controls.
Buttons
You will find a brief explanation of the various buttons
below.
If a button is not operational, an audible signal will
sound.
--------
Display
The display is structured so that the information can be
read at a glance.
The value that you can currently set is in focus. It is
displayed in white lettering with a dark background.
--------
(
Buttons and display
The buttons are touch keys with sensors
underneath. Simply touch a symbol to select the
function it represents.
The display shows symbols for active functions
and the time-setting options.
0
Function selector
Use the function selector to set the heating
function or other functions. Your chosen heating
function or other function will light up.
You can turn the function selector clockwise or
anti-clockwise from the "Off" position.
8
Temperature selector
Use the temperature selector to set the
temperature for the heating function or select the
setting for other functions.
You can also turn the temperature selector
clockwise and anti-clockwise. It does not have an
"Off" position.
Button Explanation
v
Time-setting
options
Set the timer V, duration x,
end time y and clock time v
A
Minus Reduce the setting value
@
Plus Increase the setting value
=
Lighting Switch the interior lighting on/off
c1
Rapid heat-up Switch rapid heat-up on/off
Childproof lock Activate and deactivate the child-
proof lock in standby mode
Symbol Explanation
c
Rapid heat-up
V
Timer
x
Duration
y
End time
v
Clock time
‰‰:‰‰
Time
_
Temperature indicator
'
Childproof lock
H
Door lock
‰‰‰
Temperature

en Getting to know your appliance
8
Types of heating and functions
Use the function selector to set the types of heating and
other functions.
To make sure you always use the right type of heating
to cook your food, we have explained the differences
and applications below.
--------
Note: For each heating function, the appliance specifies
a default temperature or level. You can accept this
value or change it in the appropriate area.
Heating function Temperature/setting Use
Þ
"Off" position - In this position, the oven is switched off.
:
3D hot air 50-280 °C For cooking food on one or two levels. The fans distribute the heat from the ring-
shaped heating elements in the back panel evenly around the cooking compartment.
This heating function is used to measure the energy consumption in air recirculation
mode.
2
Air recirculation 50-280 °C For baking cakes and baked items on one level. The fans distribute the heat from the
heating elements evenly around the cooking compartment.
G
Pizza setting 50-280 °C For cooking fresh pizza and frozen products, e.g. chips or strudel.The heating ele-
ments and fans heat quickly and distribute the heat evenly around the cooking com-
partment.
?
Defrosting 30-60 °C For defrosting, e.g. meat, poultry, bread and cakes. The fan causes the warm air to
circulate around the food.
$
Bottom heating 50-280 °C Use when you want to cook the food for a little longer. The heat is emitted only from
below.
*
Centre-area grill Grill settings:
1 = low
2 = medium
3 = high
For grilling small amounts of steak, sausages, bread and pieces of fish. The centre
part of the grill heating element becomes hot.
(
Full-surface grill Grill settings:
1 = low
2 = medium
3 = high
For grilling flat items, such as steaks or sausages, for making toast, and for browning
food.
The whole area below the grill element becomes hot.
4
Circulated air grill 50-280 °C For baking or roasting meat, poultry and whole fish. The fan causes the hot air to cir-
culate around the food.
8
Top/bottom heating gentle 50-280 °C For gently cooking selected types of food (e.g. meat, vegetables) on one level with-
out preheating.
This heating function is unsuitable for food that rises as it bakes (e.g. bread).
This heating function is used to measure both the energy consumption in the conven-
tional mode and the energy efficiency class.
%
Top/bottom heating 50-280 °C For cakes, bakes and lean joints. Heat is emitted evenly from above and below.

Accessories en
9
Temperature selector
Use the temperature selector to set the temperature.
The temperature that has been set will be shown on the
display.
Note: The temperature can be set in 1 degree
increments up to 100 °C, and in 5 degree increments
thereafter.
Temperature indicator
The temperature indicator bars show the heating-up
phases or residual heat in the cooking compartment.
Cooking compartment functions
Some functions make your appliance easier to use.
This, for example, enables the cooking compartment to
be well lit and a cooling fan to prevent the appliance
from overheating.
Opening the appliance door
If you open the appliance door during an operation, the
operation is paused. Operation continues to run when
you close the door.
Interior lighting
When you open the appliance door, the interior lighting
switches on.If the door remains open for longer than
15 minutes, the lighting switches off again.
In most operating modes, the interior lighting will switch
on as soon as the appliance is started. Once the
program is complete, the lighting will switch off.
Note: In "Top/bottom heating gentle" mode, the interior
lighting will be switched off automatically after
approx. 1 minute. It can be switched on using the
= button.
Cooling fan
The cooling fan switches on and off as required. The
warm air escapes above the door.
Caution!
Do not cover the ventilation slots, otherwise the oven
will overheat.
To cool the cooking compartment more quickly after
operation, the cooling fan continues to run for a certain
period afterwards.
_Accessories
Acc e s s o r i e s
Your appliance is accompanied by a range of
accessories. Here, you can find an overview of the
accessories included and information on how to use
them correctly.
--------
Shelf positions
The baking tray and the baking and roasting shelf can
be moved into four different heights within the cooking
compartment. Always insert them as far as they will go
so that the accessories do not touch the door panel.
Ensure that you always insert the accessories into the
cooking compartment the right way round.
:Warning – Risk of fire!
Under no circumstances should a roasting tin, baking
tray, frying pan or any other form of cookware be
placed directly on the oven floor. This causes the floor
of the appliance to overheat and can seriously damage
the appliance.
Heating-up indica-
tor
The heating-up indicator displays the rising tem-
perature in the cooking compartment. When all
bars are filled, the optimal time for placing the
food in the oven has been reached.
In the grill and cleaning settings, the bars are all
already filled at the start.
The bars are not filled for the gentle top/bottom
heating heating type.
Residual heat
indicator
When the appliance is switched off, the tempera-
ture indicator shows the residual heat in the cook-
ing compartment. Once the temperature has
dropped to approximately 60 °C, the indicator
goes out.
Accessories Description
Baking and roasting shelf
For cookware, cake tins, joints of
meat, grilled items and frozen food.
Universal pan
For moist cakes, pastries, frozen
meals and large roasts. The universal
pan can be used to catch dripping fat
when you are grilling directly on the
wire rack.
Enamel baking tray
For tray bakes and small baked prod-
ucts.
Telescopic rail set
You can use the pull-out rails to pull
the accessories out further.
Locking pins
For locking the hinges.
4
3
2
1
en Accessories
10
Locking function
The accessories can be pulled out approximately
halfway before they lock in place.The locking function
prevents the accessories from tilting when they are
pulled out.The accessories must be inserted into the
cooking compartment correctly for the tilt protection to
work properly.
When inserting the wire rack, ensure that the lug ‚ is at
the rear and is facing downwards. The open side must
be facing the appliance door and the curvature must be
at the bottom (i.e. ¾).
When inserting baking trays, ensure that the lug ‚ is at
the rear and is facing downwards. The sloping edge of
the accessory ƒ must be facing towards the appliance
door.
Example in the picture: Universal pan
Telescopic rail set
:Warning – Risk of burns!
The telescopic shelves become hot when the appliance
is in use. Take special care not to get burnt when they
are pulled out.
The pull-out rails allow you to pull accessories out
completely. When inserting the adapter for the baking
tray and roasting shelf, ensure that it locks into place in
front of the tab on the pull-out rails.
Special accessories
You can buy accessories from the after-sales service.
--------
D
D
D
D
E
Accessories Description
Enamelled baking tray For tray bakes and small baked items.
After-sales service number:
11012235
Universal pan For moist cakes, pastries, frozen
meals and large roasts.
The universal pan can be used to
catch dripping fat when you are grill-
ing directly on the wire rack.
After-sales service number:
11012236
Baking and roasting shelf For cookware, cake tins, joints of
meat, grilled items and frozen food.
After-sales service number:
00776605
Telescopic shelf set Telescopic shelf set for one level.
After-sales service number:
12006236

Before using for the first time en
11
KBefore using for the first
time
Bef or e usi ng for the first time
In this section, you can find out what you must do
before using your oven to prepare food for the first time.
Remove the appliance packaging and dispose of it
appropriately.
Setting the time on the clock
Once the appliance is connected to a power supply,
‚ƒ:‹‹ will flash on the display and the v symbol will
be continuously lit. Set the time.
1. Use the A or @ button to set the time.
2. Press the v button.
Note: Once the period allowed for setting the clock
time has elapsed, the clock time will automatically
be saved.
The time has now been set.
Baking out the oven
Precleaning the oven
1. Remove the accessories and the shelf supports from
the cooking compartment. ~ "Rails" on page 17
2. Completely remove any leftover packaging, e.g.
small pieces of polystyrene, from the cooking
compartment.
3. Some parts are covered with a protective film.
Remove this scratch protection film.
4. Clean the outside of the appliance with a soft, damp
cloth.
5. Clean the cooking compartment with hot soapy
water.
Heating up the oven
To remove the new cooker smell, heat up the oven
when it is empty and closed.
Note: Make sure that there is no leftover packaging,
such as polystyrene pellets, in the cooking
compartment. Before heating up the appliance, wipe
the smooth surfaces in the cooking compartment with a
soft, damp cloth.Keep the kitchen ventilated while the
appliance is heating.
1. Turn the function selector to %.
2. Turn the temperature selector to the maximum
temperature.
3. Switch the oven off after 1 hour.
Note: When the appliance is heating up for the first
time, you may hear crackling noises coming from the
oven.
Recleaning the oven
1. Clean the cooking compartment with hot soapy
water.
2. Refit the hook-in racks.
3. If necessary, clean the door panels. ~ "Appliance
door" on page 18
Cleaning the accessories
Before using the accessories, clean them thoroughly
using a cloth and warm soapy water.
Fitting the telescopic shelf set
Instructions on fitting the telescopic shelf set are
enclosed with the set.

en Operating the appliance
12
1Operating the appliance
Operat i ng the appl i ance
Switching the oven on and off
Switching on the oven
1. Use the function selector to set the heating function.
Note: Each function has a default temperature or
grill setting.
2. Use the temperature selector to alter the
temperature or grill setting.
The oven will then begin to heat.
Note: The temperature indicator will show the current
status of the heating-up phase.
Changing settings
The heating function and temperature or grill setting can
be changed at any time using the relevant selector.
Switching off the oven
Turn the function selector to the "Off" position.
Switching on the rapid heat-up function
To heat up the cooking compartment as rapidly as
possible, press the c1 button.
Note: Rapid heat-up is available for 3D hot air mode, air
recirculation mode, the pizza setting and top/bottom
heating.
Automatic safety switch-off function
The appliance has an automatic safety cut-out function.
The oven switches off automatically after 13 hours.
OTime-setting options
Ti me-s et t i ng opt i ons
Your appliance has different time-setting options.
Overview of the time-setting options
--------
Operating the electronic clock
Setting the timer
The timer has no effect on how the oven works. The
timer duration can be set to between 30 seconds and
13 hours. The duration can be set in 30-second
increments up to 10 minutes, in 1-minute increments
from 10 minutes to 1 hour, and then in 5-minute
increments.
1. Press the v button.
The V symbol will be lit.
2. Use the @ and A buttons to set the required
duration.
An audible signal will sound once the time has
elapsed.
Notes
■ To change the remaining time, press the v button.
Then change the remaining time using the @ and A
buttons.
■ To stop the timer counting down, set the remaining
time to zero.
Switching off the signal tone
To switch the signal off, press any button or open the
appliance door.
Note: After a short time, the audible signal will stop
automatically.
&
Time-setting option Use
V
Timer The timer functions like an egg
timer. It runs independently of the
appliance when it is heating and
of other time-setting options, and
does not affect the appliance.
v
Clock time When no other function is running
in the foreground, the appliance
will show you the time of day on
the display.
x
Cooking time Once the set cooking time has
elapsed, the appliance will auto-
matically stop heating.
y
End time Enter a cooking time and the
required end time. The appliance
will start up automatically so that
it finishes cooking at the required
time.

Time-setting options en
13
Setting the electronic clock
You can alter the clock if you need to (e.g. from
summer to winter time).To do this, the oven must be
switched off.
1. Press the v button.
The V symbol will be lit.
2. Press the v button again.
The v symbol will be lit.
3. Use the @ and A buttons to set the current time.
Setting the automatic timer
The electronic clock can be used to switch the oven on
or off automatically.
Setting the cooking time
You can set the cooking time for your food on the
appliance. This prevents the food from accidentally
being cooked for too long, and means that you do not
have to stop what you are doing to switch off the oven.
1. Set the type of heating and the temperature you
require.
The oven will start.
2. Press the v button twice.
3. Use the @ and A buttons to set the required cooking
time.
Note: The cooking time can be set to between
30 seconds and 13 hours. The cooking time can be
set in 1-minute increments up to 1 hour, and then in
5-minute increments.
The x symbol will be lit.
The cooking time has elapsed
An audible signal will sound. The appliance will stop
heating.
1. To switch the signal off, press any button or open the
appliance door.
Note: After a short time, the audible signal will stop
automatically.
2. Turn the function selector to the "Off" position.
Setting the end time
Baking or roasting starts for the set duration at a later
time which you chose.
1. Set the type of heating and the temperature you
require.
The oven will start.
2. Press the v button twice.
3. Use the @ and A buttons to set the required cooking
time.
Note: The cooking time can be set to between
30 seconds and 13 hours. The cooking time can be
set in 1-minute increments up to 1 hour, and then in
5-minute increments.
The x symbol will be lit.
4. Press the v button again.
5. Use the @ and A buttons to set the end time.
Note: When the button is first pressed, a value will
be suggested on the display. This suggested value
is calculated using the current time on the clock and
the cooking time. This value can be changed using
the @ and A buttons.
The y symbol will be lit. The display will show the
end time. The appliance will now switch to standby
mode.
The cooking time has elapsed
An audible signal will sound. The appliance will stop
heating.
1. To switch the signal off, press any button or open the
appliance door.
Note: After a short time, the audible signal will stop
automatically.
2. Turn the function selector to the "Off" position.

en Childproof lock
14
AChildproof lock
Childproof lock
The oven has a childproof lock to prevent children from
switching it on by accident.
Note: If the hob is being used, it will not be affected by
the childproof lock on the oven.
Activating the childproof lock
The appliance must be switched off.
Press and hold the c1 button for approx. 4 seconds.
The ' symbol will appear on the display. The
childproof lock has now been activated.
Deactivating the childproof lock
Press and hold the c1 button for approx. 4 seconds.
The ' symbol will go out on the display. The
childproof lock has now been deactivated.
QBasic settings
Bas i c set t i ngs
There are various settings available to you in order to
help use your appliance effectively and simply. You can
change these settings as required.
List of basic settings
Depending on the features of your appliance, not all
basic settings will be available.
--------
Basic setting Options
™‹‚
Audible signal duration upon
completion of a cooking time
or timer duration
‚ = approx. 10 seconds
ƒ = approx. 30 seconds*
„ = approx. 2 minutes
™‹ƒ
Amount of time until a setting
is applied
‚ = approx. 3 seconds*
ƒ = approx. 6 seconds
„ = approx. 10 seconds
™‹„
Button tone that sounds when
a button is touched
‹ = off
‚ = on*
™‹…
Brightness of the display illu-
mination
‚ = dark
ƒ = medium*
„ = bright
™‹†
Display time of day
‹ = hide the time
‚ = display the time*
™‹‡
Interior lighting on when
appliance in operation
‹ = no
‚ = yes*
™‹ˆ
Cooling fan run-on time
‚ = short*
ƒ = medium
„ = long
… = extra long
™‹‰
Reset all values to factory set-
tings
‹ = no*
‚ = yes
™‹Š
Activate demo mode
Demo mode is provided for
demonstration purposes only;
the oven does not actually
heat in Demo mode. Demo
mode can only be activated
within 5 minutes of connect-
ing the appliance to the mains
power supply.
‹ = no*
‚ = yes
* Factory setting

Cleaning en
15
Changing the basic settings
The function selector must be set to the "Off" position.
1. Press and hold the v button for approx. 4 seconds.
The first basic setting will appear on the display,
e.g. ™‹‚ ‚.
2. Use the temperature selector to change the setting
as required.
3. Use the @ button to navigate to the next basic
setting.
4. Use the A or @ button to continue going through all
the basic settings as described above, and use the
temperature selector if you want to change any of
these settings.
5. When you have finished, press and hold the
v button again for approx. 4 seconds to confirm the
settings.
This applies all the basic settings.
You can change the basic settings again at any time.
Demo mode can only be activated within 5 minutes of
connecting the appliance to the mains power supply.
Note: Your changes to the basic settings will be
retained even after a power failure.
Setting energy-saving mode
You can save energy by reducing the display
brightness.You can set the display brightness under
basic setting ™‹….
Note: This setting changes the brightness of the display
while the appliance is in operation. In standby mode,
the appliance automatically reduces the display
brightness. The display is at its dimmest at night,
between the hours of 22:00 and 05:59.
DCleaning
Cleani ng
With good care and cleaning, your appliance will retain
its appearance and remain fully functioning for a long
time to come. We will explain here how you should
correctly care for and clean your appliance.
:Warning – Risk of electric shock!
Do not use any high-pressure cleaners or steam
cleaners, which can result in an electric shock.
:Warning – Risk of burns!
The appliance becomes very hot. Never touch the
interior surfaces of the cooking compartment or the
heating elements. Always allow the appliance to cool
down. Keep children at a safe distance.
Suitable cleaning agents
Observe the following information to ensure that the
different surfaces are not damaged by using the wrong
type of cleaning agent.
Do not use any of the following
on the oven:
■ Any harsh or abrasive cleaning agents,
■ Cleaning agents with a high concentration of
alcohol,
■ Hard scouring pads or sponges,
■ High-pressure cleaners or steam cleaners.
Wash new sponge cloths thoroughly before use.
Area Cleaning
Appliance exterior
Stainless steel
front
Hot soapy water:
Clean with a dish cloth and then dry with a soft
cloth.
Remove flecks of limescale, grease, starch and
albumin (e.g. egg white) immediately. Corrosion
can form under such flecks.
Special stainless steel cleaning products suitable
for hot surfaces are available from our after-sales
service or from specialist retailers. Apply a very
thin layer of the cleaning product with a soft cloth.
Control panel Hot soapy water:
Clean with a dish cloth and then dry with a soft
cloth.
Do not use glass cleaner or a glass scraper.
Door panels Hot soapy water:
Clean with a dish cloth and then dry with a soft
cloth.
Do not use a glass scraper or a stainless steel
scouring pad.
Door handle Hot soapy water:
Clean with a dish cloth and then dry with a soft
cloth.
If descaler comes into contact with the door han-
dle, wipe it off immediately. Otherwise, any stains
will not be able to be removed.

en Cleaning
16
--------
Notes
■ Slight differences in colour on the front of the
appliance are caused by the use of different
materials, such as glass, plastic and metal.
■ Shadows on the door panels, which look like
streaks, are caused by reflections made by the
interior lighting.
■ Enamel is baked on at very high temperatures.This
can cause some slight colour variation. This is
normal and does not affect operation.
The edges of thin trays cannot be completely
enamelled. As a result, these edges can be rough.
This does not impair the anti-corrosion protection.
Surfaces in the cooking compartment
The back wall and side parts in the cooking
compartment are self-cleaning. You can tell this from
the rough surface.
The cooking compartment floor and ceiling are
enamelled and have smooth surfaces.
Cleaning enamel surfaces
Clean the smooth enamel surfaces with a dish cloth
and hot soapy water or a vinegar solution. Then dry
them with a soft cloth.
Soften baked-on food remnants with a damp cloth and
soapy water. Use stainless steel wire wool or oven
cleaner to remove stubborn dirt.
Caution!
Never use oven cleaner in the cooking compartment
when it is still warm. This may damage the enamel.
Remove all food remnants from the cooking
compartment and the appliance door before you next
heat up the appliance.
Leave the cooking compartment open to dry after
cleaning it.
Note: Food residues can cause white deposits to form.
These are harmless and do not affect how the
appliance works. You can remove these residues using
lemon juice if required.
Self-cleaning surfaces
The self-cleaning surfaces are coated with a porous,
matte ceramic layer. This coating absorbs and dispels
splashes from baking and roasting while the appliance
is in operation.
Caution!
Do not use oven cleaner on the self-cleaning surfaces.
This will damage the surfaces.If oven cleaner does get
onto these surfaces, dab it off immediately using water
and a sponge cloth. Do not rub the surfaces or use
abrasive cleaning aids.
Keeping the appliance clean
Always keep the appliance clean and remove dirt
immediately so that stubborn deposits of dirt do not
build up.
:Warning – Risk of fire!
Loose food remnants, fat and meat juices may catch
fire. Before using the appliance, remove the worst of the
food remnants from the cooking compartment, heating
elements and accessories.
Tips
■ Clean the cooking compartment after each use. This
will ensure that dirt cannot be baked on.
■ Always remove flecks of limescale, grease, starch
and albumin (e.g. egg white) immediately.
■ Use the universal pan for baking very moist cakes.
■ Use suitable ovenware for roasting, e.g. a roasting
dish.
Appliance interior
Enamel surfaces
and self-cleaning
surfaces
Observe the instructions for the surfaces of the
cooking compartment that follow the table.
Glass cover for
the interior light-
ing
Hot soapy water:
Clean with a dish cloth and then dry with a soft
cloth.
If the cooking compartment is heavily soiled, use
oven cleaner.
Door panels Hot soapy water:
Clean with a dish cloth and dry with a soft cloth.
Do not use a glass scraper or a stainless steel
scouring pad.
It is best to clean the door panels along with the
rest of the cooking compartment. ~ "Cleaning
the cooking compartment" on page 17
Door seal
Do not remove.
Hot soapy water:
Clean with a dish cloth.
Do not scour.
Door cover made from stainless steel:
Use stainless steel cleaner. Follow the manufac-
turers' instructions. Do not use stainless steel
care products.
made from plastic:
Clean using hot soapy water and a dish cloth. Dry
with a soft cloth. Do not use glass cleaner or a
glass scraper.
Remove the door cover for cleaning.
Rails Hot soapy water:
Soak and clean with a dish cloth or brush.
Pull-out system Hot soapy water:
Clean with a dish cloth or a brush.
Do not remove the lubricant while the pull-out rails
are pulled out – it is best to clean them when they
are pushed in. Do not clean in the dishwasher.
Accessories Hot soapy water:
Soak and clean with a dish cloth or brush.
If there are heavy deposits of dirt, use a stainless
steel scouring pad.
Rails en
17
Cleaning the cooking compartment
1. Pour 0.4 litres of water into the centre of the cooking
compartment floor.
2. Set the $ heating function.
3. Use the temperature controller to set a temperature
of 50 °C.
4. Switch off the appliance after 18 minutes.
5. Allow the appliance to cool down.
6. Clean the cooking compartment with a cloth.
:Warning – Risk of burns!
The appliance becomes very hot. Never touch the
interior surfaces of the cooking compartment or the
heating elements. Always allow the appliance to cool
down. Keep children at a safe distance.
pRails
Rai l s
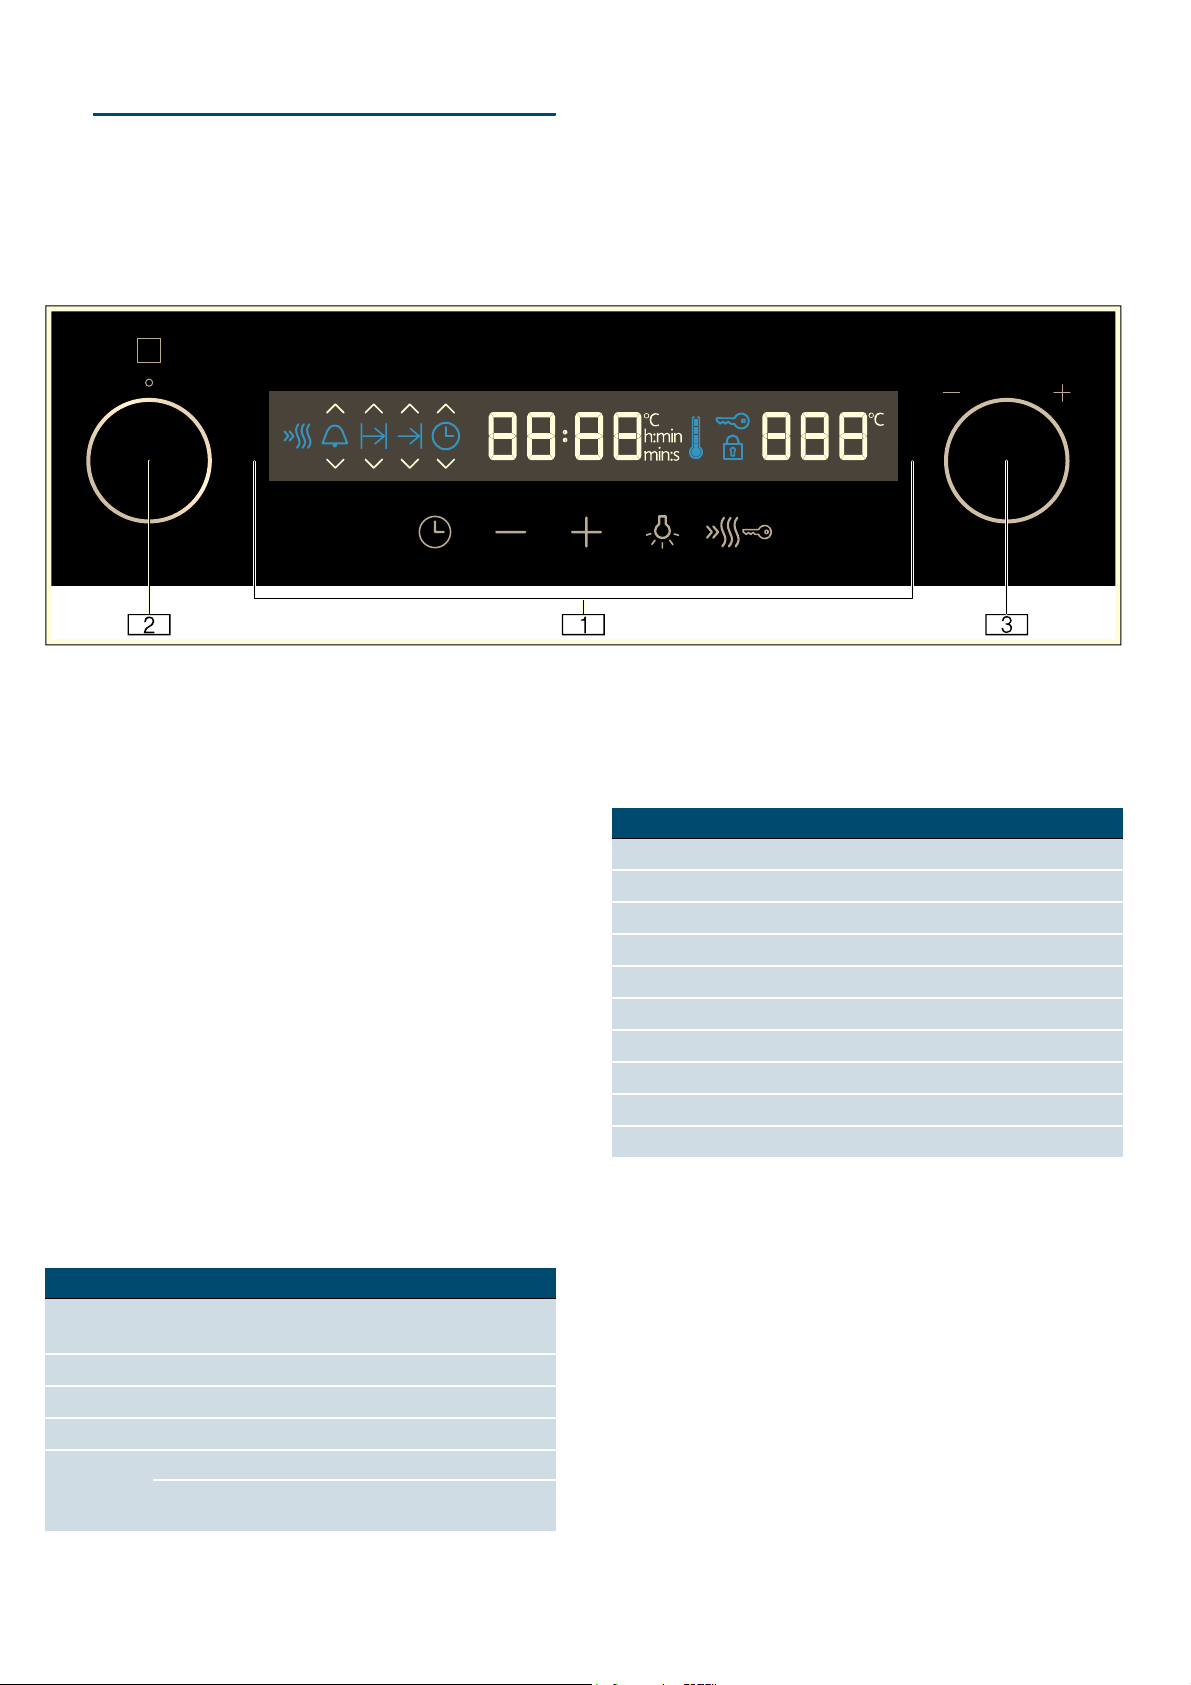
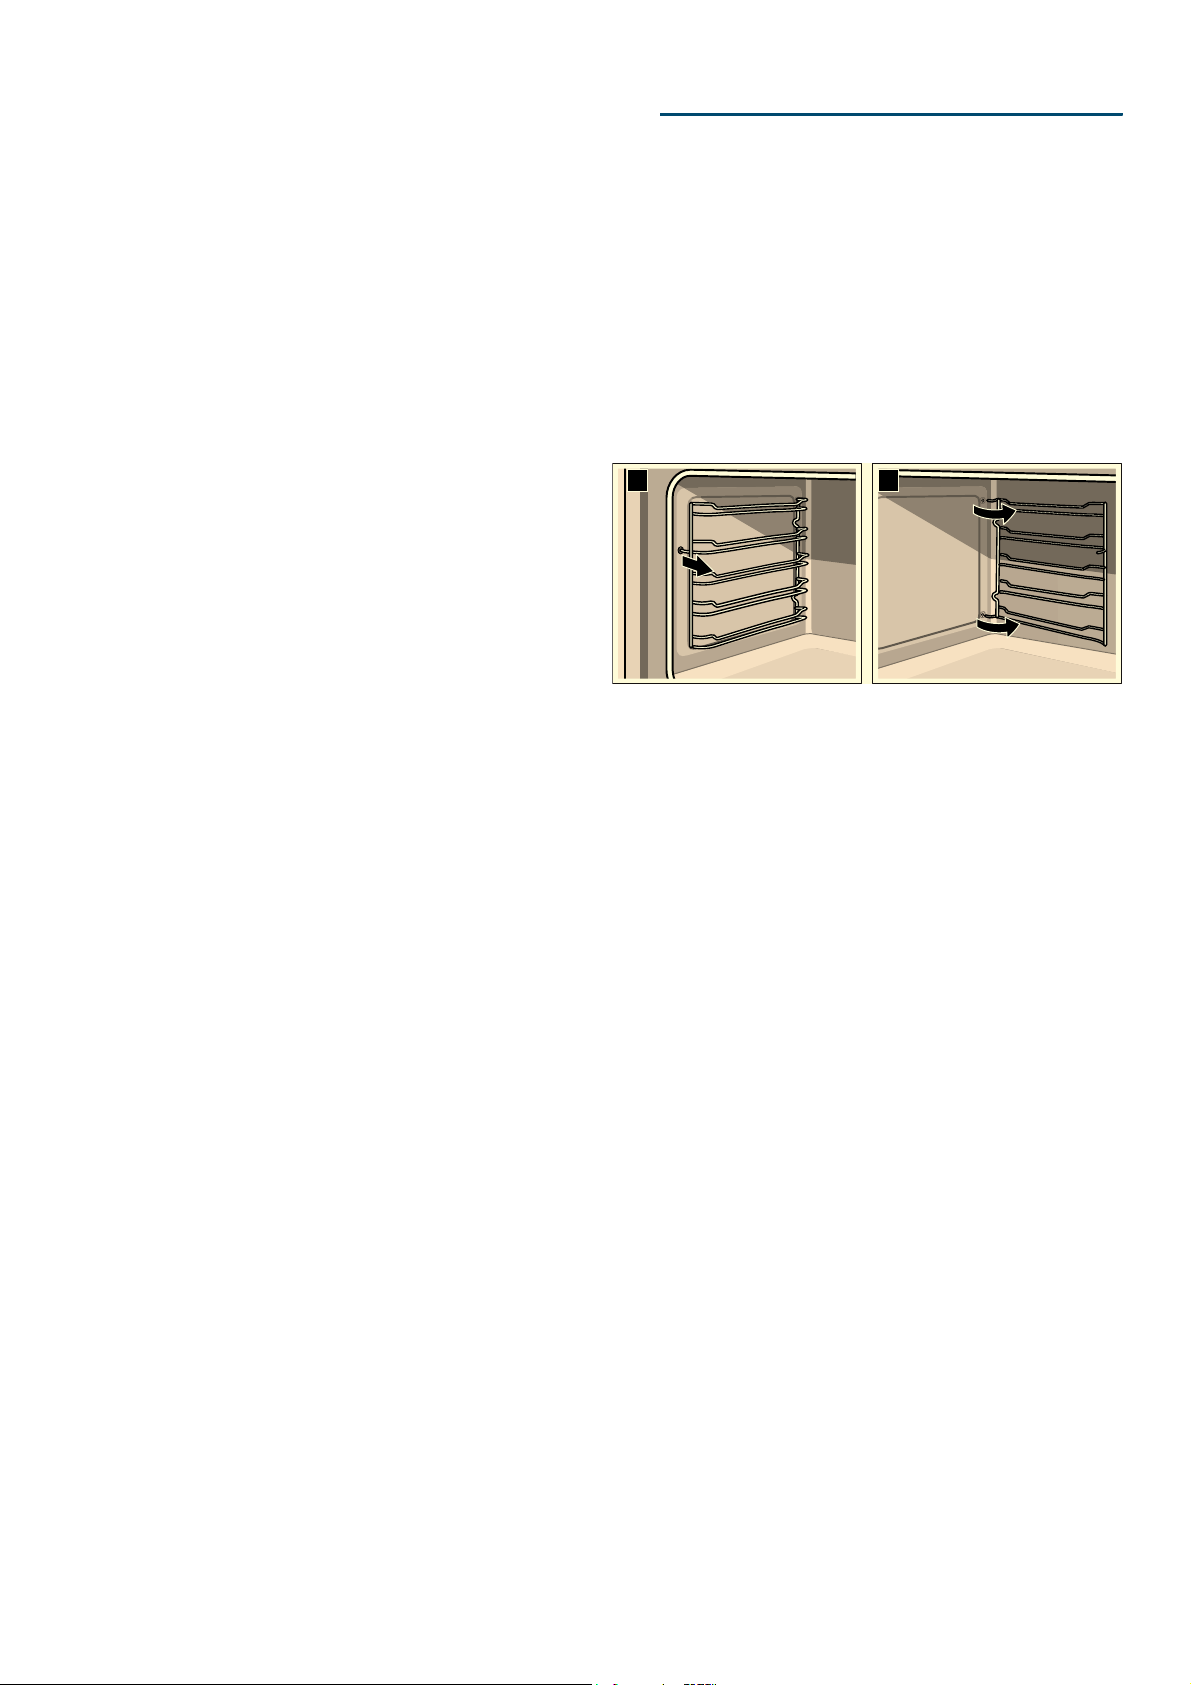
Detaching the shelf supports
The shelf supports are each fixed to the side panels of
the cooking compartment at three points.
1. Grip the front of the shelf support and pull it round to
the middle of the cooking compartment.
The front hook of the shelf support will come out of
the hole.
2. Swing the shelf support round further and pull it out
of the rear holes in the side panel.
3. Remove the shelf supports from the cooking
compartment.
Refitting the shelf supports
1. Insert the hooks of the shelf support into the rear
holes in the side panel.
2. Push the front hook of the shelf support into the
hole.
D
E

en Appliance door
18
qAppliance door
Appl i an c e door
With good care and cleaning, your appliance will retain
its appearance and remain fully functional for a long
time to come. This will tell you how to clean the
appliance door.
Removing and installing the door panels
To facilitate cleaning, you can remove the glass panels
from the oven door.
Removing the door panels
1. Open the oven door fully.
2. Lock both hinges on the left and right using the
locking pin.
Note: The locking pins must be fully inserted into the
holes in the hinges.
3. Lift the bottom of the inner panel slightly until the
fastening pins come out of the holder (1).
4. Carefully lift the top of the inner panel until the
fastening pins come out of the holder (2).
Caution!
When lifting the inner panel, the middle panel may
stick to the inner panel. Make sure that the middle
panel does not fall.
5. Remove the inner panel.
6. Remove the middle panel.
Note: The middle panel is kept in place with rubber
bushings rather than retaining pins.
Clean the panels with glass cleaner and a soft cloth.
:Warning – Risk of injury!
Scratched glass in the appliance door may develop into
a crack. Do not use a glass scraper, sharp or abrasive
cleaning aids or detergents.
Fitting the door panels
1. Reinsert the middle panel.
Notes
– If the Low-E symbol can be read, the middle
panel is inserted correctly.
– Make sure that the panel is seated correctly. All
rubber mounts must lay flat against the outer
panel.
2. Reinsert the inner panel.
Note: All four fastening pins must engage in the
holders provided for them.
3. Remove the locking pins and close the oven door.

Appliance door en
19
Removing and fitting the appliance door
If the oven is very heavily soiled, the oven door can be
removed for easier cleaning. Normally, however, this is
not necessary.
Removing the appliance door
1. Open the oven door fully.
2. Lock the two hinges on the left and right using the
locking pin (a).
Note: The locking pins must be fully inserted into the
holes in the hinges.
3. Take hold of the sides of the oven door with both
hands and close the oven door by approx. 30° (b).
4. Lift the oven door slightly and pull it out.
Note: Do not close the oven door fully,otherwise the
hinges could become bent and the enamel could be
damaged.
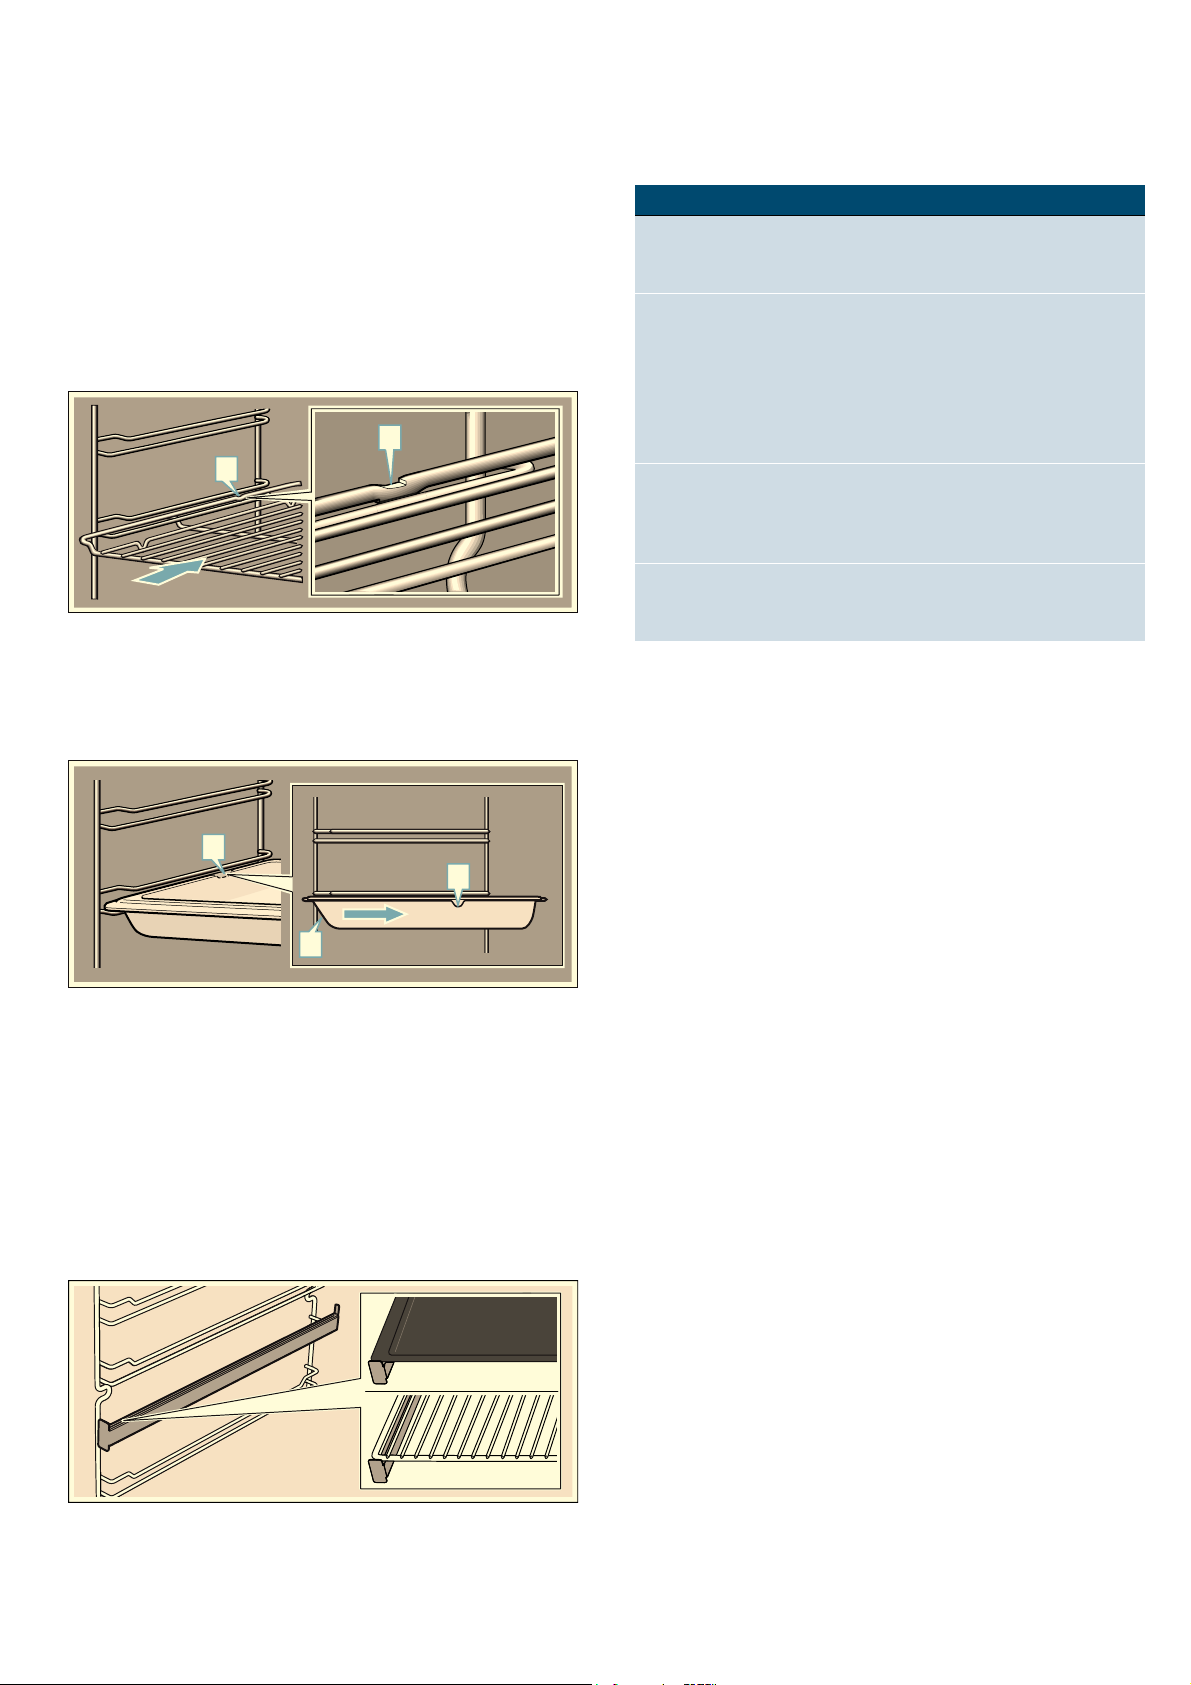
Fitting the appliance door
1. Take hold of the sides of the oven door with both
hands.
2. Slide the hinges into the slots in the oven (a).
Note: The notch at the bottom of the hinges must
engage into the frame of the oven (b).
3. Lower the door.
4. Remove the locking pins.
:Warning – Risk of injury!
If the oven door falls out accidentally or a hinge snaps
shut, do not reach into the hinge. Call the after-sales
service.
:Warning – Risk of injury!
The door may not close properly if the door hinges have
not engaged correctly. This will allow heat to escape
and the parts of the appliance may become very hot. To
prevent this from happening, remove the door again.
Then refit the door as shown in the drawing, making
sure that the groove on the underside of the hinges
engages in the oven frame.
DE
ED

en Trouble shooting
20
3Trouble shooting
Troubl e shoot i ng
--------
Fault messages
If a fault message beginning with “§§ appears on the
display, set the function selector to "Off". If the fault
message does not disappear, please contact our after-
sales service.
--------
Fault Possible cause Notes/remedy
The appliance does not work The plug is not plugged into the mains Connect the appliance to the power supply
Power cut Check whether other kitchen appliances are working
The circuit breaker is faulty Check in the fuse box to make sure that the fuse for
the appliance is OK
The appliance cannot be started The appliance door is not fully closed Close the appliance door
The appliance is not switched off Switch the appliance off and back on again
‚ƒ:‹‹ is flashing on the display
Power failure Reset the clock.
The interior lighting is not working Top/bottom heating gentle mode is active In top/bottom heating gentle mode, the interior light-
ing is not switched on.
The bulb is faulty Replace the bulb.
All food that is cooked in the oven
burns within an extremely short
period of time.
Thermostat faulty. Call the after-sales service.
Door panels are steamed up. This is normal and results from differences in temper-
ature.
Heat the appliance up to 100 °C and then switch it
back off after 5 minutes.
Although the appliance is switched
on, it cannot be operated; the
' symbol is shown on the display
The childproof lock is activated.
Press and hold the c1 touch button until the
' symbol goes out.
Fault message Possible cause Information/remedy
“§§‚
Temperature sensor failed. Call the after-sales service.
“§§ƒ
The temperature in the cooking compartment is too
high.
Call the after-sales service.
“§§…
Door locking mechanism incorrectly activated. Call the after-sales service.
“§§†
Fan heating element faulty or not connected. Call the after-sales service.
“§§‡
Motor faulty or not connected. Call the after-sales service.
“§§‰
Cooling fan faulty or not connected. Call the after-sales service.
Customer service en
21
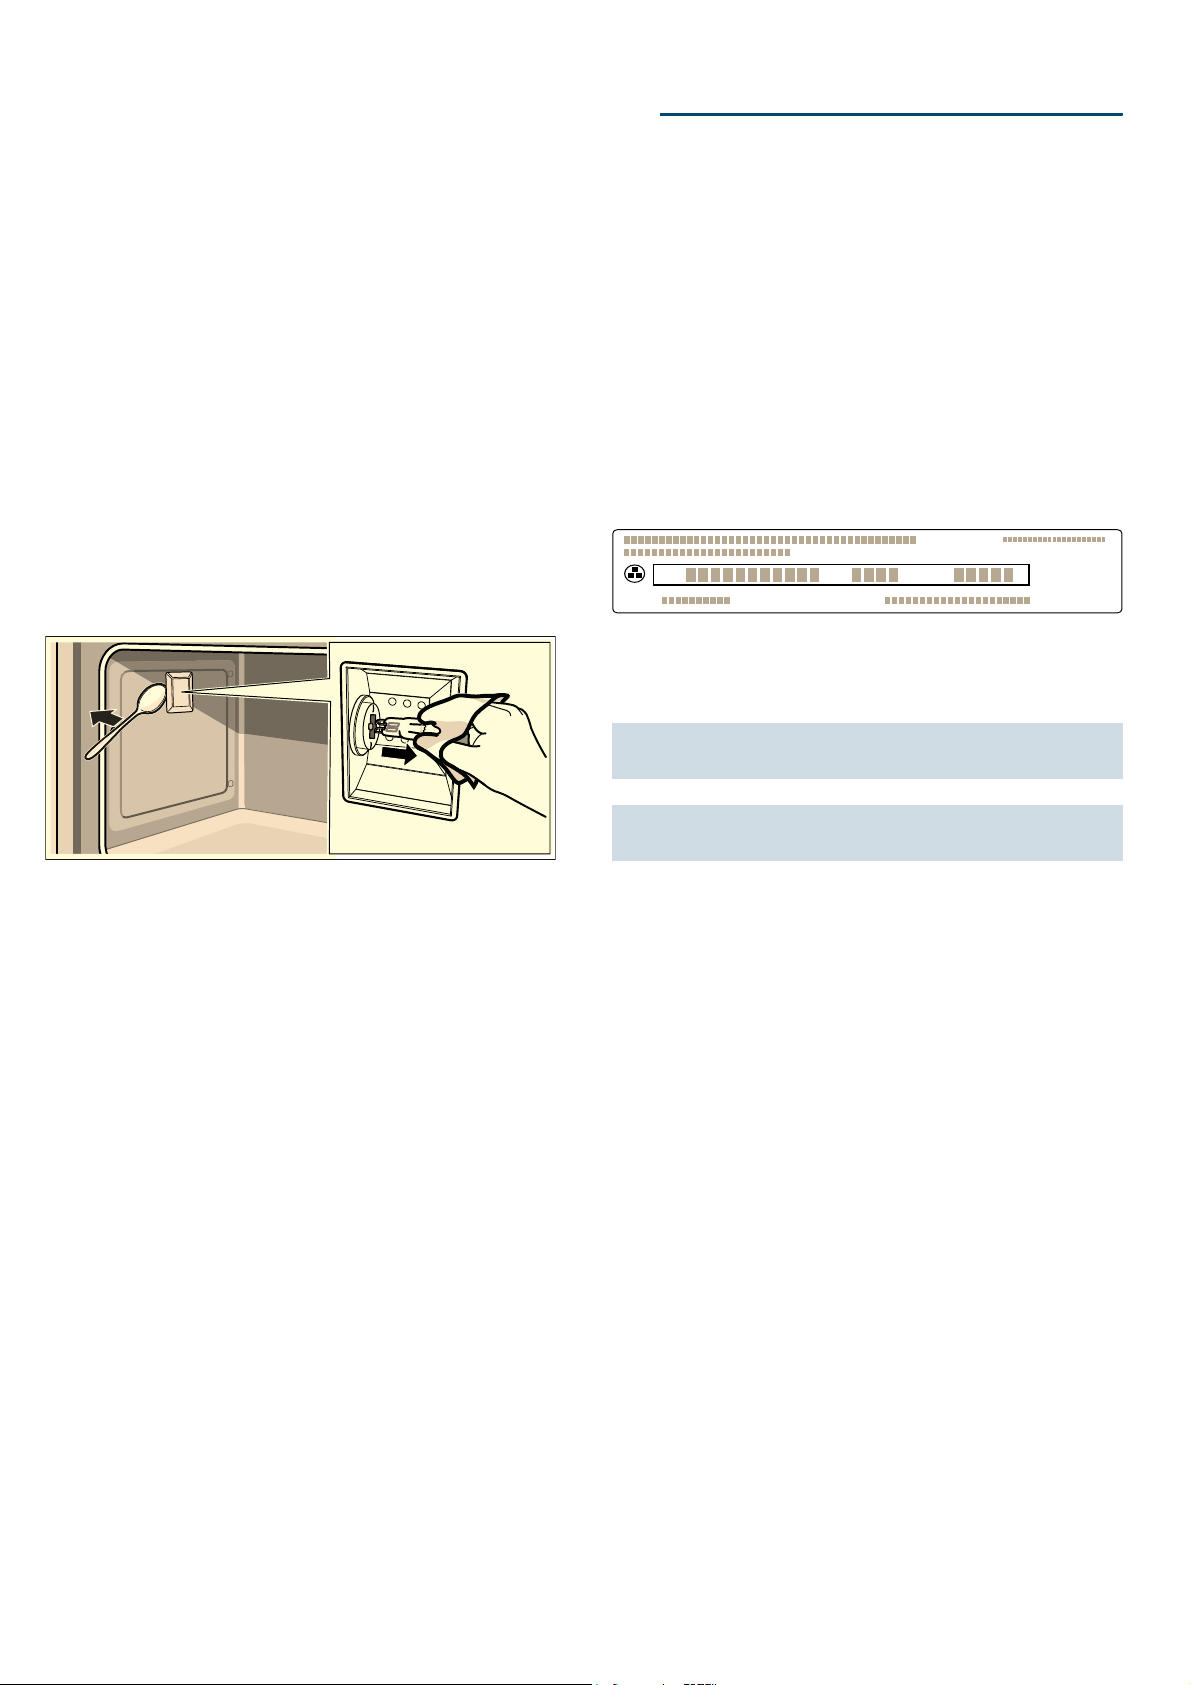
Replacing the oven light bulb
If the oven light bulb fails, it must be replaced.
Replacement heat-resistant bulbs can be obtained from
the after-sales service or from specialist retailers.
Please specify the E number and FD number of your
appliance. Do not use any other type of bulb.
:Warning – Risk of electric shock!
When replacing the cooking compartment bulb, the
bulb socket contacts are live. Before replacing the bulb,
unplug the appliance from the mains or switch off the
circuit breaker in the fuse box.
1. Allow the cooking compartment to cool down.
2. Open the appliance door.
3. Place a tea towel in the cooking compartment to
prevent damage.
4. Remove the shelf supports.
5. Remove the glass cover.To do this, open the glass
cover from the front with your hand. Should you
experience difficulties removing the glass cover, use
a spoon to help you.
6. Remove the oven light bulb.
7. Replace the oven light bulb with a bulb of the same
type:
Voltage: 230 V;
Power: 40 W;
Fitting: G9;
Temperature resistance: 300 °C
8. Refit the glass cover for the oven light bulb.
9. Refit the shelf supports.
10. Remove the tea towel.
11. Switch the circuit breaker back on.
12. Check that the oven lighting is working again.
4Customer service
Cus t o mer servi ce
Our after-sales service is there for you if your appliance
needs to be repaired. We will always find an
appropriate solution, also in order to avoid after-sales
personnel having to make unnecessary visits.
E number and FD number
When calling us, please quote the full product number
(E no.) and the production number (FD no.) so that we
can provide you with the correct advice. The rating plate
bearing these numbers can be found when you open
the appliance door.
On some appliances with a steam-assisted cooking
function, you will find the rating plate behind the control
panel.
To save time, you can make a note of the numbers for
your appliance and the telephone number of the after-
sales service in the space below in case you need
them.
Please note that a visit from an after-sales service
engineer is not free of charge in the event that the
appliance has been misused, even during the warranty
period.
Please find the contact data of all countries in the
enclosed customer service list.
To book an engineer visit and product advice
Rely on the professionalism of the manufacturer. You
can therefore be sure that the repair is carried out by
trained service technicians who carry original spare
parts for your appliances.
E no.
FD no.
After-sales service O
GB 0344 892 8999
Calls charged at local or mobile rate.
IE 01450 2655
0.03 € per minute at peak. Off peak 0.0088 €
per minute.
Z-Nr:FD:E-Nr:
Type:
en Tested for you in our cooking studio
22
JTested for you in our
cooking studio
Test ed for you in our cooki ng st udio
Here, you can find a selection of dishes and the ideal
settings for them. We will show you which type of
heating and temperature are best suited to your dish.
You will get information on suitable cooking
accessories and the height at which they should be
placed in the oven. You will also get tips about
cookware and preparation methods.
Note: . A lot of steam can build up in the cooking
compartment when cooking food.
Your appliance is very energy-efficient and radiates very
little heat to its surroundings during operation. Due to
the high difference in temperature between the
appliance interior and the external parts of the
appliance, condensation may build up on the door,
control panel or adjacent kitchen cabinet panels. This is
a normal physical phenomenon. Condensation can be
reduced by preheating the oven or opening the door
carefully.
Table of dishes
Dish Weight (in kg) Shelf position Heating function Temperature in °C Cooking time in
minutes
Lasagne 3-4 1
%
220-230* 45-50
Pasta bake 3-4 1
%
220-230* 45-50
Joint of veal 2 2
:
180-190* 90-100
Pork loin 1.5-2 2
:
190-200* 90-100
Pork loin 2 2
8
200** 125
Sausages 1.5 3
4
280* First side: 10
Second side: 7
Roast beef 1 2
:
200* 45-55
Roast rabbit 1.5 2
2
180-190* 70-80
Turkey breast 2 2
:
180-190* 110-120
Pork neck joint 2-3 2
:
180-190* 170-180
Roast chicken 1.2 2
:
190-200* 65-70
Pork chops 1.5 3
4
280* First side: 15
Second side: 5
Spare ribs 1.5 3
4
280* First side: 15
Second side: 10
Bacon 0.7 4
(
3* First side: 10
Second side: 8
Fillet of pork 1.5 3
4
280* First side: 12
Second side: 5
Fillet of beef 1 4
(
3* First side: 7
Second side: 4
Large rainbow trout 0.7-1.2 2
:
160-170* 35-40
Monkfish 0.7-1.5 2
:
160* 60-65
Turbot 1.5 2
:
160* 45-50
Pizza 1-1.5 2
G
280* 10-12
Bread 1 2
2
180-190* 25-30
Focaccia 1 2
2
180-190* 20-25
Bundt cake 1 2
2
160* 55-60
Fruit flan 1 2
2
160* 35-40
Cheesecake 1 2
2
160-170* 45-55
Short-crust pastry 1 2
2
160-170* 35-40
Short-crust pastry 1 2
8
170** 65
Parfait cake 1.2 2
2
160* 55-60
Cream puffs 0.7-1.2 2
2
180* 50-60
Sponge cake 1 2
:
150-160* 55-60
Rice pudding 1 2
2
160* 55-60
Brioche 1-1.2 2
2
160* 30-35
* Preheat
** Do not preheat

Tested for you in our cooking studio en
23
User tips
In this section, you will find a selection of tips on how to
use your cookware and prepare your food.
Notes
■ Use the accessories provided. Additional
accessories may be obtained as optional
accessories from specialist retailers or from our
after-sales service.
Before using the oven, remove any unnecessary
accessories and cookware from the cooking
compartment.
■ Always use an oven cloth or oven gloves when
taking hot accessories or cookware out of the
cooking compartment.
■ Top/bottom heating gentle is an intelligent heating
function that allows you to gently cook meat, fish and
baked items that do not need to rise. The appliance
optimally controls the supply of energy to the
cooking compartment. The food is cooked in phases
using residual heat. This means that it remains more
succulent and browns less. If you open the door
before the food has finished cooking or if you
preheat the oven, you will not be able to achieve this
result. Place the food into the empty cooking
compartment before the oven has heated up. Always
keep the appliance door closed when cooking.
Baking tips
Tips for Roasting and Braising
You want to find out whether the cake
is completely cooked in the middle.
Push a cocktail stick into the highest point on the cake. If the cocktail stick comes out clean with no dough res-
idue, the cake is ready.
The cake collapses. Next time, use less liquid. Alternatively, set the temperature to be 10 °C lower and extend the baking time.
Adhere to the specified ingredients and preparation instructions in the recipe.
The cake has risen in the middle but
is lower around the edge.
Only grease the base of the springform cake tin. After baking, loosen the cake carefully with a knife.
The fruit juice overflows. Next time, use the universal pan.
Small baked items stick to one
another during baking.
There should be a gap of approx. 2 cm around each item. This gives enough space for the baked items to
expand well and brown on all sides.
The cake is too dry. Set the temperature 10 °C higher and shorten the baking time.
The cake is generally too light in col-
our.
If the shelf position and the cookware are correct, then you should increase the temperature if necessary or
extend the baking time.
The cake is too light on top, and too
dark underneath.
Bake the cake one level higher in the oven the next time.
The cake is too dark on top, and too
light underneath.
Bake the cake one level lower in the oven the next time. Select a lower temperature and extend the baking
time.
Cakes baked in a tray or tin are too
brown at the back.
Place the baking tray in the middle of the accessories, not directly against the back wall.
The whole cake is too dark. Select a lower temperature next time and extend the baking time if necessary.
The cake is unevenly browned. Select a slightly lower temperature.
Protruding greaseproof paper can affect the air circulation. Always cut greaseproof paper to size.
Ensure that the baking tin does not stand directly in front of the openings in the cooking compartment back
wall.
When baking small items, you should use similar sizes and thicknesses wherever possible.
You were baking on several levels.
The items on the top baking tray are
darker than those on the lower baking
tray.
Always select hot air when baking on several levels. Baked items that are placed into the oven on trays or in
baking tins/dishes at the same time will not necessarily be ready at the same time.
The cake looks good, but is not
cooked properly in the middle.
Use a lower temperature and bake slightly longer; if necessary, add slightly less liquid. For cakes with a moist
topping, bake the base first. Sprinkle it with almonds or breadcrumbs and then place the topping on top.
The cake cannot be turned out of the
dish when it is turned upside down.
Allow the cake to cool down for 5 to 10 minutes after baking. If it still sticks, carefully loosen the cake around
the edges again using a knife. Turn the cake tin upside down again and cover it several times with a cold, wet
cloth. Next time, grease the baking tin/dish and sprinkle with breadcrumbs.
The roast is too dark and the crack-
ling is burned in places, and/or the
roast is too dry.
Check the shelf position and temperature. Select a lower temperature the next time and reduce the roasting
time if necessary.
The crackling is too thin. Increase the temperature or switch on the grill briefly at the end of the roasting time.
The roast looks good but the juices
are burnt.
Next time, use a smaller roasting dish and add more liquid if necessary.

en Tested for you in our cooking studio
24
Acrylamide in foodstuffs
Acrylamide is mainly produced in grain and potato
products prepared at high temperatures, such as potato
crisps, chips, sliced bread, bread rolls, bread or fine
baked goods (biscuits, gingerbread, spiced biscuit).
Test dishes
These tables have been produced for test institutes to
facilitate appliance testing.
As per EN 60350-1.
Baking
Grilling
Also slide in the universal pan. The liquid will be caught
and the cooking compartment stays cleaner.
The roast looks good but the juices
are too clear and watery.
Next time, use a larger roasting dish and add less liquid if necessary.
The meat gets burned during brais-
ing.
The roasting dish and lid must fit together well and close properly.
Reduce the temperature and add more liquid when braising if necessary.
Tips for keeping acrylamide to a minimum
General ■ Keep cooking times as short as possible.
■ Cook food until it is golden brown, but not too dark.
■ Large, thick pieces of food contain less acrylamide.
Baking With top/bottom heating at max. 200 °C.
With hot air at max. 180 °C.
Biscuits With top/bottom heating at max. 190 °C.
With hot air at max. 170 °C.
Egg or egg yolk reduces the production of acrylamide.
Oven chips Spread out a single layer evenly on the baking tray. Cook at least 400 g at once on a baking tray so that
the chips do not dry out.
Dish Accessories Shelf position Heating
function
Temperature in °C Cooking time in
minutes
Shortbread strips Baking tray with grease-
proof paper
2
:
160* 23-25
Shortbread strips, 2 levels 2 baking trays with grease-
proof paper
2+4
:
160* 28
Small cakes Baking tray with grease-
proof paper
2
2
160* 21-22
Small cakes, 2 levels Baking tray + wire rack with
greaseproof paper
2+4
:
160* 30
Hot water sponge cake Springform cake tin 2
2
160* 35
Hot water sponge cake, 2 levels 2 springform cake tins 2+4
:
155-165* 35-45
Double-crusted apple pie, x 1 Springform cake tin 2
%
170* 75-80
Double-crusted apple pie, x 2 2 springform cake tins 2
2
160* 75-80
* Preheat
Dish Accessories Shelf position Heating
function
Grill setting Cooking time in
minutes
Bread for toasting Wire rack 4
(
3* 2
Beef burger, x 10, 75 mm diameter Baking tray + wire rack 3+4
(
3* First side: 15
Second side: 5
* Preheat

Tested for you in our cooking studio es
25
Índice
Instrucci ones de uso
8 Uso correcto del aparato. . . . . . . . . . . . . . . . . . 26
( Indicaciones de seguridad importantes . . . . . 26
En general . . . . . . . . . . . . . . . . . . . . . . . . . . . . . . . . . 26
] Causas de los daños . . . . . . . . . . . . . . . . . . . . . 27
En general . . . . . . . . . . . . . . . . . . . . . . . . . . . . . . . . . 27
7 Protección del medio ambiente . . . . . . . . . . . . 28
Ahorro de energía . . . . . . . . . . . . . . . . . . . . . . . . . . . 28
Eliminación de residuos respetuosa con el medio
ambiente . . . . . . . . . . . . . . . . . . . . . . . . . . . . . . . . . .28
* Presentación del aparato . . . . . . . . . . . . . . . . . 29
Panel de mando. . . . . . . . . . . . . . . . . . . . . . . . . . . . . 29
Teclas . . . . . . . . . . . . . . . . . . . . . . . . . . . . . . . . . . . .29
Pantalla de visualización . . . . . . . . . . . . . . . . . . . . . .29
Tipos de calentamiento y funciones. . . . . . . . . . . . . . 30
Mando de temperatura. . . . . . . . . . . . . . . . . . . . . . . . 31
Funciones del interior del aparato . . . . . . . . . . . . . . . 31
_ Accesorios . . . . . . . . . . . . . . . . . . . . . . . . . . . . . 31
Alturas de inserción . . . . . . . . . . . . . . . . . . . . . . . . . .31
Función de encaje . . . . . . . . . . . . . . . . . . . . . . . . . . .32
Juego de carriles telescópicos . . . . . . . . . . . . . . . . . 32
Accesorios especiales . . . . . . . . . . . . . . . . . . . . . . . . 32
K Antes del primer uso . . . . . . . . . . . . . . . . . . . . . 33
Ajustar la hora . . . . . . . . . . . . . . . . . . . . . . . . . . . . . . 33
Limpiar el horno con calor . . . . . . . . . . . . . . . . . . . . . 33
Limpiar los accesorios . . . . . . . . . . . . . . . . . . . . . . . . 33
Montar el juego de carriles telescópicos . . . . . . . . . .33
1 Manejo del aparato. . . . . . . . . . . . . . . . . . . . . . . 34
Encender y apagar el horno. . . . . . . . . . . . . . . . . . . . 34
Desconexión de seguridad automática . . . . . . . . . . . 34
O Funciones de programación del tiempo . . . . . 34
Resumen de las funciones de tiempo . . . . . . . . . . . . 34
Utilizar el reloj electrónico . . . . . . . . . . . . . . . . . . . . . 34
Ajustar el temporizador automático . . . . . . . . . . . . . .35
A Seguro para niños . . . . . . . . . . . . . . . . . . . . . . . 36
Activar el seguro para niños . . . . . . . . . . . . . . . . . . . 36
Desactivar el seguro para niños . . . . . . . . . . . . . . . . 36
Q Ajustes básicos . . . . . . . . . . . . . . . . . . . . . . . . . 36
Lista de los ajustes básicos . . . . . . . . . . . . . . . . . . . .36
Modificar los ajustes básicos. . . . . . . . . . . . . . . . . . . 37
Ajustar modo de ahorro de energía . . . . . . . . . . . . . .37
D Limpieza . . . . . . . . . . . . . . . . . . . . . . . . . . . . . . . 37
Productos de limpieza apropiados . . . . . . . . . . . . . . .37
Superficies del interior del aparato. . . . . . . . . . . . . . .38
Mantener limpio el aparato. . . . . . . . . . . . . . . . . . . . .39
Limpieza del interior del aparato . . . . . . . . . . . . . . . .39
p Rejillas. . . . . . . . . . . . . . . . . . . . . . . . . . . . . . . . . 39
Desmontaje de las rejillas . . . . . . . . . . . . . . . . . . . . .39
Montaje de las rejillas. . . . . . . . . . . . . . . . . . . . . . . . .39
q Puerta del aparato . . . . . . . . . . . . . . . . . . . . . . . 40
Montaje y desmontaje del cristal de la puerta . . . . . .40
Desmontar y montar la puerta del aparato. . . . . . . . .41
3 ¿Qué hacer en caso de avería? . . . . . . . . . . . . 42
Mensajes de error . . . . . . . . . . . . . . . . . . . . . . . . . . .42
Cambiar la bombilla del horno . . . . . . . . . . . . . . . . . .43
4 Servicio de Asistencia Técnica. . . . . . . . . . . . . 43
Número de producto (E) y número de
fabricación (FD) . . . . . . . . . . . . . . . . . . . . . . . . . . . . .43
J Sometidos a un riguroso control en nuestro
estudio de cocina . . . . . . . . . . . . . . . . . . . . . . . . 44
Tabla de comidas. . . . . . . . . . . . . . . . . . . . . . . . . . . .44
Consejos de aplicación . . . . . . . . . . . . . . . . . . . . . . .45
Comidas normalizadas. . . . . . . . . . . . . . . . . . . . . . . .47
Produktinfo
Encontrará más información sobre productos,
accesorios, piezas de repuesto y servicios en internet:
www.siemens-home.bsh-group.com y también en la
tienda online: www.siemens-home.bsh-group.com/
eshops

es Uso correcto del aparato
26
8Uso correcto del aparato
Us o corr ect o del apar a t o
Leer con atención las siguientes
instrucciones. Solo así se puede manejar el
aparato de forma correcta y segura.
Conservar las instrucciones de uso y montaje
para utilizarlas más adelante o para posibles
futuros compradores.
Este aparato ha sido diseñado exclusivamente
para su montaje integrado. Prestar atención a
las instrucciones de montaje especiales.
Comprobar el aparato al sacarlo de su
embalaje. El aparato no debe conectarse en
caso de haber sufrido daños durante el
transporte.
Los aparatos sin enchufe deben ser
conectados exclusivamente por técnicos
especialistas autorizados. Los daños
provocados por una conexión incorrecta no
están cubiertos por la garantía.
Este aparato ha sido diseñado para uso
doméstico. Utilizar el aparato exclusivamente
para preparar alimentos y bebidas. Vigilarlo
mientras está funcionando y emplearlo
exclusivamente en espacios cerrados.
Este aparato está previsto para ser utilizado a
una altura máxima de 2.000 metros sobre el
nivel del mar.
Este aparato no está previsto para el
funcionamiento con un reloj temporizador
externo o un mando a distancia.
Este aparato puede ser utilizado por niños a
partir de 8 años y por personas con
limitaciones físicas, sensoriales o psíquicas, o
que carezcan de experiencia y conocimientos,
siempre y cuando sea bajo la supervisión de
una persona responsable de su seguridad o
que le haya instruido en el uso correcto del
aparato siendo consciente de los daños que
se pudieran ocasionar.
No dejar que los niños jueguen con el
aparato. La limpieza y el mantenimiento
rutinario no deben encomendarse a los niños
a menos que sean mayores de 15 años y lo
hagan bajo supervisión.
Mantener a los niños menores de 8 años
alejados del aparato y del cable de conexión.
Introducir los accesorios correctamente en el
interior del aparato. ~ "Accesorios"
en la página 31
(Indicaciones de seguridad
importantes
I ndi c aci ones de segur i dad impor t ant es
En general
:Advertencia – ¡Peligro de incendio!
■ Los objetos inflamables que pueda haber
en el interior del horno se pueden
incendiar. No introducir objetos inflamables
en el interior del horno. No abrir la puerta
en caso de que salga humo del aparato.
Desconectar y desenchufar el aparato de la
red o desconectar el interruptor automático
del cuadro eléctrico.
¡Peligro de incendio!
■ Los restos de comida, grasa y jugo de
asado pueden arder. Antes de poner en
funcionamiento, eliminar la suciedad
gruesa del interior del horno, de la
resistencia y de los accesorios.
¡Peligro de incendio!
■ Cuando se abre la puerta del aparato se
producirá una corriente de aire. El papel
para hornear puede entrar en contacto con
los elementos calefactores e incendiarse.
Fijar bien el papel de hornear a los
accesorios al precalentar el aparato.
Colocar siempre una vajilla o un molde
para hornear encima del papel de hornear
para sujetarlo. Cubrir solo la superficie
necesaria con papel de hornear. El papel
de hornear no debe sobresalir del
accesorio.
:Advertencia – ¡Peligro de quemaduras!
■ El aparato se calienta mucho. No tocar la
superficie del interior del horno cuando está
caliente ni los elementos calefactores. Dejar
siempre que el aparato se enfríe. No dejar
que los niños se acerquen.
¡Peligro de quemaduras!
■ Los accesorios y la vajilla se calientan
mucho. Utilizar siempre agarradores para
sacar los accesorios y la vajilla del interior
del horno.
¡Peligro de quemaduras!
■ Los vapores de alcohol pueden inflamarse
cuando el interior del horno está caliente.
No preparar comidas utilizando grandes
cantidades de bebidas alcohólicas de alta
graduación. Si se utilizan bebidas
alcohólicas de alta graduación, hacerlo en
pequeñas cantidades. Abrir la puerta del
aparato con precaución.
¡Peligro de quemaduras!
■ Las guías correderas se calientan durante
el funcionamiento del aparato. Tener
especial precaución cuando estén
extraídas a fin de evitar quemaduras.

Causas de los daños es
27
:Advertencia – ¡Peligro de quemaduras!
■ Las partes accesibles se calientan durante
el funcionamiento. No tocar nunca las
partes calientes. No dejar que los niños se
acerquen.
¡Peligro de quemaduras!
■ Al abrir la puerta del aparato puede salir
vapor caliente. Tenga presente que, según
la temperatura, no puede verse el vapor.
Cuando se abra la puerta se recomienda
no permanecer demasiado cerca del
aparato. Abrir la puerta del aparato con
precaución. No dejar que los niños se
acerquen.
¡Peligro de quemaduras!
■ Si se introduce agua en el interior del horno
puede generarse vapor de agua caliente.
No derramar agua en el interior del horno
caliente.
:Advertencia – ¡Peligro de lesiones!
■ Si el cristal de la puerta del aparato está
dañado, puede romperse. No utilizar
rascadores para vidrio o productos de
limpieza abrasivos o corrosivos.
¡Peligro de lesiones!
■ Las bisagras de la puerta del aparato se
mueven al abrir y cerrar la puerta y podrían
provocar daños. No tocar la zona de las
bisagras.
:Advertencia – ¡Peligro de descarga
eléctrica!
■ Las reparaciones inadecuadas son
peligrosas.Las reparaciones solo pueden
ser efectuadas por personal del Servicio de
Asistencia Técnica debidamente
instruido.Si el aparato está defectuoso,
extraer el enchufe o desconectar el fusible
en la caja de fusibles. Avisar al Servicio de
Asistencia Técnica.
¡Peligro de descarga eléctrica!
■ El aislamiento del cable de un aparato
eléctrico puede derretirse al entrar en
contacto con componentes calientes. No
dejar que el cable de conexión de un
aparato eléctrico entre en contacto con los
componentes calientes.
¡Peligro de descarga eléctrica!
■ No utilizar ni limpiadores de alta presión ni
por chorro de vapor. La humedad interior
puede provocar una descarga eléctrica.
¡Peligro de descarga eléctrica!
■ Al sustituir la lámpara del interior del horno
los contactos del portalámparas están bajo
corriente. Antes de sustituirla, desenchufar
el aparato de la red o desconectar el
interruptor automático del cuadro eléctrico.
¡Peligro de descarga eléctrica!
■ Un aparato defectuoso puede ocasionar
una descarga eléctrica. No conectar nunca
un aparato defectuoso. Desenchufar el
aparato de la red o desconectar el
interruptor automático del cuadro eléctrico.
Avisar al Servicio de Asistencia Técnica.
]Causas de los daños
Cau s a s de los daños
En general
¡Atención!
■ Accesorios, film, papel de hornear o recipientes en
la base del interior del horno: No colocar ningún
accesorio en la base del interior del horno. No cubrir
la base del interior del horno con ninguna clase de
film o con papel de hornear. No colocar ningún
recipiente en la base del interior del horno si la
temperatura está ajustada a más de 50 ºC. Se
calentará demasiado. Los tiempos de cocción y
asado dejan de coincidir y el esmalte se estropea.
■ Papel de aluminio: el papel de aluminio en el interior
del horno no puede entrar en contacto con el cristal
de la puerta. Puede ocasionar decoloraciones
permanentes en el cristal de la puerta.
■ Agua en el interior del horno caliente: No derramar
agua en el interior del horno caliente. Se formará
vapor de agua. La oscilación térmica puede
provocar daños en el esmalte.
■ Humedad en el interior del aparato: la humedad
persistente en el interior del aparato puede dar lugar
a corrosión. Secar el interior del aparato después de
cada uso. No conservar alimentos húmedos durante
un período prolongado en el interior del aparato
cerrado. No conservar los alimentos en el interior
del aparato.
■ Enfriar el interior del aparato con la puerta abierta:
tras un uso a altas temperaturas, dejar enfriar el
interior del aparato únicamente con la puerta
cerrada. No fijar nada en la puerta del aparato. Aun
cuando la puerta solo se encuentre ligeramente
abierta, los frontales de los muebles contiguos
pueden dañarse con el tiempo.
Solo tras un uso con una humedad elevada, dejar
secar el interior del aparato con la puerta abierta.
■ Jugo de fruta: No sobrecargar la bandeja con pastel
de frutas muy jugoso. El jugo que gotea de la
bandeja de horno produce manchas difíciles de
eliminar. Utilizar la bandeja universal más profunda
cuando sea posible.
■ Junta muy sucia: si la junta presenta mucha
suciedad, la puerta del aparato no cerrará
correctamente. Los frontales de los muebles
contiguos pueden deteriorarse. Mantener la junta
siempre limpia. ~ "Limpieza" en la página 37
■ Puerta del aparato como superficie de apoyo: no
apoyarse, sentarse ni colgarse sobre ella. No
colocar recipientes ni accesorios sobre la puerta del
aparato.
■ Introducción de los accesorios: en función del tipo
de aparato, al cerrar la puerta del mismo, los
accesorios pueden rayar el cristal de la puerta.
Introducir siempre los accesorios en el interior del
horno hasta el tope.
■ Transportar el aparato: No transportar ni sujetar el
aparato por el tirador de la puerta. El asa de la
puerta no aguanta el peso del aparato y puede
romperse.
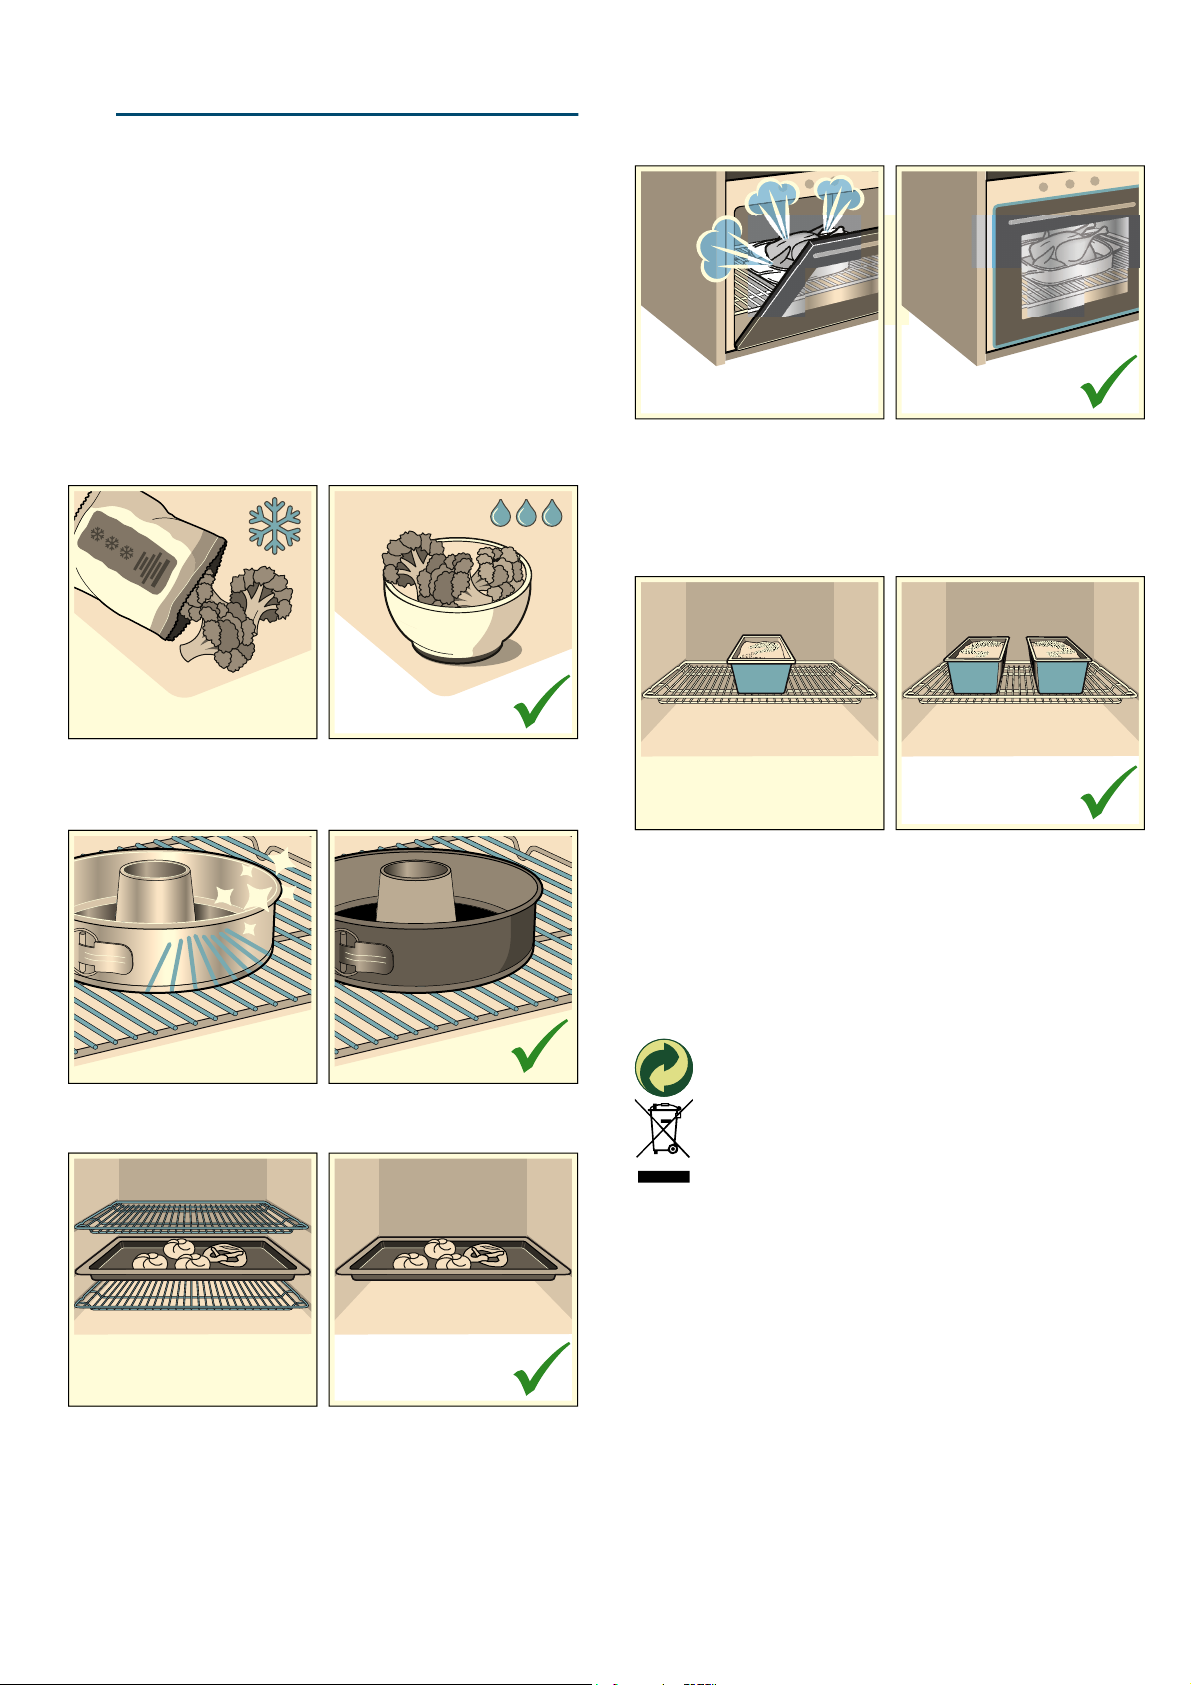
es Protección del medio ambiente
28
7Protección del medio
ambiente
Protecci ón del medi o ambi ent e
Su nuevo aparato presenta una gran eficiencia
energética. Aquí se ofrecen consejos sobre cómo
manejar el aparato ahorrando más energía y cómo
desecharlo correctamente.
Ahorro de energía
■ Precalentar el aparato solo cuando se indique en la
receta o en las tablas de las instrucciones de uso.
■ Dejar descongelar los alimentos congelados antes
de introducirlos en el interior del horno.
■ Utilizar moldes para hornear oscuros, lacados o
esmaltados en negro. Absorberán el calor
especialmente bien.
■ Retirar los accesorios innecesarios del interior del
horno.
■ Abrir la puerta del aparato lo menos posible durante
el funcionamiento.
■ Si se hornean varios pasteles, hacerlo
preferiblemente uno detrás de otro. El interior del
horno se mantiene caliente. De esta manera, se
reducirá el tiempo de cocción del segundo pastel.
También se pueden poner 2 moldes rectangulares a
la vez, uno al lado del otro en el interior del horno.
■ En los tiempos de cocción largos, se puede apagar
el aparato 10 minutos antes de que termine el
tiempo y aprovechar el calor residual para terminar
la cocción.
Eliminación de residuos respetuosa con el
medio ambiente
Eliminar el embalaje de forma ecológica.
Este aparato está marcado con el símbolo de
cumplimiento con la Directiva Europea 2012/
19/UE relativa a los aparatos eléctricos y
electrónicos usados (Residuos de aparatos
eléctricos y electrónicos RAEE).
La directiva proporciona el marco general
válido en todo el ámbito de la Unión Europea
para la retirada y la reutilización de los residuos
de los aparatos eléctricos y electrónicos.
 Loading...