


MODEL: MX-B402
MX-B402SC
DIGITAL MULTIFUNCTIONAL SYSTEM
START GUIDE
Keep this manual close at hand for reference whenever needed.

Each instruction also covers the optional units used with these products.
Caution!
For complete electrical disconnection, pull out the main plug.
The socket-outlet shall be installed near the equipment and shall be easily accessible. To reduce the risk of fire, use only UL-Listed No. 26 AWG or larger telecommunication line cord.
FAX interface cable and Line cable:
These special accessories must be used with the device.
FOR YOUR RECORDS ...
To protect against loss or theft, record and retain for reference the machine's serial number located at the lower left corner of the left side of the machine.
Model Number
Serial Number
Date of Purchase
Place of Purchase
Authorized Sharp Printer
Service Department Number
Notice for Users in U.S.A.:
EMC (this machine and peripheral devices)
WARNING:
FCC Regulations state that any unauthorized changes or modifications to this equipment not expressly approved by the manufacturer could void the user's authority to operate this equipment.
Shielded interface cables must be used with this equipment to maintain compliance with EMC regulations.
NOTE:
This equipment has been tested and found to comply with the limits for a Class A digital device, pursuant to Part 15 of the FCC Rules. These limits are designed to provide reasonable protection against harmful interference when the equipment is operated in a commercial environment. This equipment generates, uses, and can radiate radio frequency energy and, if not installed and used in accordance with the instruction manual, may cause harmful interference to radio communications. Operation of this equipment in a residential area is likely to cause harmful interference in which case the user will be required to correct the interference at his own expense.
This machine contains the software having modules developed by Independent JPEG Group.
This product includes Adobe® Flash® technology of Adobe Systems Incorporated. Copyright© 1995-2007 Adobe Macromedia Software LLC. All rights reserved.

Contents
CAUTIONS . . . . . . . . . . . . . . . . . 3
Symbols in this manual . . . . . . . 3 Power notes . . . . . . . . . . . . . . . . 3 Installation notes . . . . . . . . . . . . 4 About consumables . . . . . . . . . . 5 Handling precautions . . . . . . . . . 6 Laser information . . . . . . . . . . . . 8
OPERATION MANUALS AND HOW TO USE THEM . . . . . . . . . . . . . . . 9
DIGITAL MULTIFUNCTIONAL SYSTEM FUNCTIONS . . . . . . . . 10
ACCESSING THE WEB SERVER IN THE MACHINE. . . . . . . . . . . . . . 11
Opening the Web pages. . . . . . 11
CHECKING THE IP ADDRESS. . . . 12 PART NAMES AND FUNCTIONS . . . .13 SUPPLIES. . . . . . . . . . . . . . . . . 14 OPERATION PANEL . . . . . . . . 15
TURNING THE POWER ON AND OFF . . . . . . . . . . . . . . . . . . . . . . 17
PLACING ORIGINALS . . . . . . . 18
Using the automatic document feeder . . . . . . . . . . . . . . . . . . . . 18 Using the document glass . . . . 19
CHANGING PAPER IN A TRAY. . . 20
Names of the trays . . . . . . . . . . 20 Loading paper in a tray. . . . . . . 21 Loading paper in bypass tray . . . 22
BEFORE INSTALLING THE SOFTWARE . . . . . . . . . . . . . . . 23
CD-ROMS AND SOFTWARE . . . 23 VERIFYING SYSTEM REQUIREMENTS . . . . . . . . . . 26 CONNECTING THE MACHINE . . . 28
SETUP IN A WINDOWS ENVIRONMENT . . . . . . . . . . . . 29
OPENING THE SOFTWARE SELECTION SCREEN (FOR ALL SOFTWARE) . . . . . . . . . . . . . . 29 INSTALLING THE PRINTER DRIVER / PC-FAX DRIVER . . . 31
REGULAR MAINTENANCE . . . 37
SUPPLIES. . . . . . . . . . . . . . . . . 38
SPECIFICATIONS . . . . . . . . . . 39
Machine specifications / copier specifications . . . . . . . . . . . . . . 39 Continuous copying speeds* . . . . 42 Ambient environment . . . . . . . . 42 Chemical emission (measured according to RAL-UZ122: Edition Jun. 2006). . . . . . . . . . . . . . . . . 43 Acoustic noise emission (measurement according to ISO7779) . . . . . . . . . . . . . . . . . 43 Automatic document feeder specifications . . . . . . . . . . . . . . 44
TO THE ADMINISTRATOR OF THE MACHINE . . . . . . . . . . . . . 46
Factory default passwords . . . . 46 Forwarding all transmitted and received data to the administrator (document administration function) . . . . . . . . . . 46 For the users of the fax function . . . 47 Trademark acknowledgments . . . 51
1
Note:
•The explanations in this manual assume that 500 sheet paper feed units (total of four trays) are installed on the MX-B402.
•Considerable care has been taken in preparing this manual. If you have any comments or concerns about the manual, please contact your dealer or nearest SHARP Service Department.
•This product has undergone strict quality control and inspection procedures. In the unlikely event that a defect or other problem is discovered, please contact your dealer or nearest SHARP Service Department.
•Aside from instances provided for by law, SHARP is not responsible for failures occurring during the use of the product or its options, or failures due to incorrect operation of the product and its options, or other failures, or for any damage that occurs due to use of the product.
Products that have earned the ENERGY STAR® are designed to protect the environment through superior energy efficiency.
Warranty
While every effort has been made to make this document as accurate and helpful as possible, SHARP Corporation makes no warranty of any kind with regard to its content. All information included herein is subject to change without notice. SHARP is not responsible for any loss or damages, direct or indirect, arising from or related to the use of this operation manual.
©Copyright SHARP Corporation 2010. All rights reserved. Reproduction, adaptation or translation without prior written permission is prohibited, except as allowed under copyright laws.
2
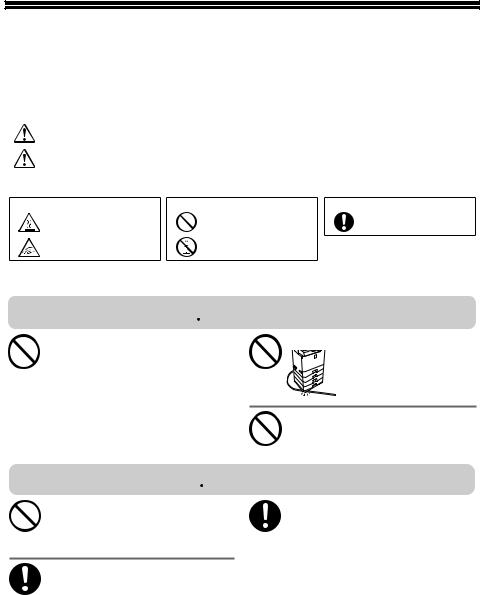
CAUTIONS
Symbols in this manual
To ensure safe use of the machine, this manual uses various safety symbols. The safety symbols are classified as explained below. Be sure you understand the meaning of the symbols when reading the manual.
|
Symbol |
|
|
|
Meaning |
|
|
|
WARNING |
Indicates a risk of death or serious injury. |
|
|
|
||||
|
|
|
|
|
|
|
|
|
CAUTION |
Indicates a risk of human injury or property damage. |
|
||||||
|
|
|
|
|
|
|
|
|
Meaning of the symbols |
|
|
|
|
|
|
|
|
|
|
|
|
|
|
|
|
|
Symbol |
Meaning |
|
|
Symbol |
Meaning |
|
Symbol |
Meaning |
|
CAUTION! |
|
|
|
PROHIBITED ACTIONS |
|
|
MANDATORY ACTIONS |
|
HOT |
|
|
|
|
|
||
|
|
|
|
|
|
|
|
|
|
PINCH POINT |
|
|
|
DO NOT |
|
|
|
|
KEEP CLEAR |
|
|
|
DISASSEMBLE |
|
|
|
|
|
|
|
|
|
|
|
|
Power notes
 WARNING
Be sure to connect the power cord only to a power outlet that meets the specified voltage and current requirements. Also make certain the outlet is properly grounded. Do not use an extension cord or adapter to connect other devices to the power outlet used by the machine. Using an improper power supply may cause fire or electrical shock.
*For the power supply requirements, see the name plate in the lower left corner of the left side of the machine.
Do not damage or modify the power cord.
Placing heavy objects on the power cord, pulling it, or forcibly bending it will damage the cord, resulting in fire or electrical shock.
Do not insert or remove the power plug with wet hands.
This may cause electrical shock.
 CAUTION
When removing the power plug from the outlet, do not pull on the cord.
Pulling on the cord may cause damage such as wire exposure and breakage, and may result in fire or electrical shock.
If you will not use the machine for a long time, be sure to remove the power plug from the outlet for safety.
When moving the machine, switch off the main power and remove the power plug from the outlet before moving.
The cord may be damaged, creating a risk of fire or electrical shock.
3
CAUTIONS
Installation notes
 CAUTION
Do not install the machine on an unstable or slanted surface. Install the machine on a surface that can withstand the weight of the machine.
Risk of injury due to the machine falling or toppling. If peripheral devices are to be installed, do not install on an uneven floor, slanted surface, or otherwise unstable surface. Danger of slippage, falling, and toppling. Install the product on a flat, stable surface that can withstand the weight of the product. (Weight when various peripheral devices are installed: approx. 125.7 lbs. (57 kg))
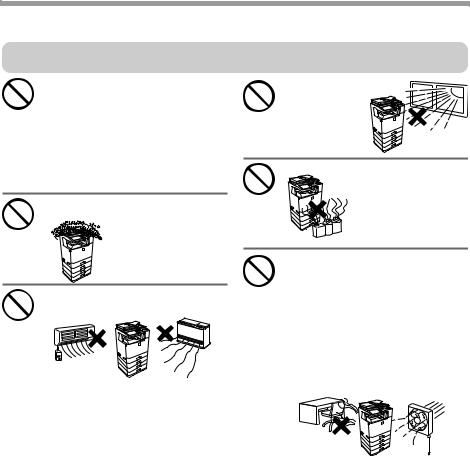
Do not install in a location with moisture or dust.
Risk of fire and electrical shock. If dust enters the machine, dirty output and machine failure may result.
Locations that are excessively hot, cold, humid, or dry (near heaters, humidifiers, air conditioners, etc.)
The paper will become damp and condensation may form inside the machine, causing misfeeds and dirty output.
Ambient environment (page 42)
If the location has an ultrasonic humidifier, use pure water for humidifiers in the humidifier. If tap water is used, minerals and other impurities will be emitted, causing impurities to collect on the inside of the machine and create dirty output.
Locations exposed to direct sunlight
Plastic parts may become deformed and dirty output may result.
Locations with ammonia gas
Installing the machine next to a diazo copy machine may cause dirty output.
Do not install the machine in a location with poor ventilation. Install so that exhaust from the machine does not directly contact people.
A small amount of ozone is created inside the machine during printing. The amount of ozone created is not sufficient to be harmful; however, an unpleasant odor may be noticed during large copy runs, and thus the machine should be installed in a room with a ventilation fan or windows that provide sufficient air circulation. (The odor may occasionally cause headaches.)
*Install the machine so that people are not directly exposed to exhaust from the machine. If installed near a window, ensure that the machine is not exposed to direct sunlight.
4
CAUTIONS
Installation notes (continued)
 CAUTION
Near a wall
Be sure to allow the required space around the machine for servicing and proper ventilation. (The machine should be no closer than the distances indicated below from walls. The indicated distances are for the case when a saddle finisher and large capacity paper tray are not installed.)
MX-B402:
|
11-13/16" |
11-13/16" |
(30 cm) 17-23/32" |
(30 cm) |
(45 cm) |
MX-B402SC: |
11-13/16" |
|
|
11-13/16" |
(30 cm) 17-23/32" |
(30 cm) |
(45 cm) |
Locations subject to vibration.
Vibration may cause failure.
The machine includes a built-in hard drive. Do not subject the machine to shock or vibration. In particular, never move the machine while the power is on.
•The machine should be installed near an accessible power outlet for easy connection.
•Connect the machine to a power outlet which is not used for other electric appliances. If a lighting fixture is connected to the same outlet, the light may flicker.
About consumables
 CAUTION
Do not throw a toner cartridge into a fire.
Toner may fly and cause burns.
Store a toner cartridge out of the reach of children.
5

CAUTIONS
Handling precautions
 WARNING
Do not place a container of water or other liquid, or a metal object that might fall inside, on the machine.
If the liquid spills or the object falls into the machine, fire or electrical shock may result.
Do not remove the machine casing.
High-voltage parts inside the machine may cause electrical shock.
Do not make any modifications to this machine.
Doing so may result in personal injury or damage to the machine.
Do not use a flammable spray to clean the machine.
If gas from the spray comes in contact with hot electrical components or the fusing unit inside the machine, fire or electrical shock may result.
If you notice smoke, a strange odor, or other abnormality, do not use the machine.
If used in this condition, fire or electrical shock may result. Immediately switch off the main power and remove the power plug from the power outlet. Contact your dealer or nearest SHARP Service Department.
If a thunder storm begins, switch off the main power and remove the power plug from the outlet to prevent electrical shock and fire due to lightning.
If a piece of metal or water enters the machine, switch off the main power and remove the power plug from the power outlet.
Contact your dealer or nearest SHARP Service Department. Using the machine in this condition may result in electrical shock or fire.
 CAUTION
Do not look directly at the light source.
Doing so may damage your
 eyes.
eyes.
Do not block the ventilation ports on the machine. Do not install the machine in a location that will block the ventilation ports.
Blocking the ventilation ports will cause heat to build up in the machine, creating a risk of fire.
The fusing unit and paper |
|
exit area are hot. When |
|
removing a misfeed, do |
|
not touch the fusing unit |
|
and paper exit area. Take |
|
care not to burn yourself. |
|
Fusing |
Paper |
unit |
exit area |
When loading paper, removing a misfeed, performing maintenance, closing the front and side covers, and inserting and removing trays, take care that your fingers are not pinched.
6
CAUTIONS
The machine includes the document filing function, which stores document image data on the machine's hard drive. Stored documents can be called up and printed or transmitted as needed. If a hard drive failure occurs, it will no longer be possible to call up the stored document data. To prevent the loss of important documents in the unlikely event of a hard drive failure, keep the originals of important documents or store the original data elsewhere.
With the exception of instances provided for by law, Sharp Corporation bears no responsibility for any damages or loss due to the loss of stored document data.
"BATTERY DISPOSAL"
THIS PRODUCT CONTAINS A LITHIUM PRIMARY MEMORY BACK-UP BATTERY THAT MUST BE DISPOSED OF PROPERLY. PLEASE CONTACT YOUR LOCAL SHARP DEALER OR AUTHORIZED SERVICE REPRESENTATIVE FOR ASSISTANCE IN DISPOSING OF THIS BATTERY.
This product utilizes a CR coin lithium battery which contains a Perchlorate material. Special handling for this material may apply, California residents, see www.dtsc.ca.gov/hazardouswaste/perchlorate/
Others, consult local environmental officers.
This product utilizes tin-lead solder, and a fluorescent lamp containing a small amount of mercury. Disposal of these materials may be regulated due to environmental consideration. For disposal or recycling information, please contact your local authorities, the Electronics Industries Alliance: www.eiae.org, the lamp recycling organization: www.lamprecycle.org or Sharp at 1-800-BE-SHARP.
(For U.S.A. Only)
For North America
Inner Finisher Interface
Do not connect to devices other than specified peripheral devices of our company.
7
CAUTIONS
Laser information
Wave length |
790 nm ±10 nm |
|
|
Pulse times |
4.1 µs ±4.1 ns /7 mm |
(North America and Europe) |
|
|
|
Output power |
Max 0.6 mW (LD1+ LD2) |
|
|
Caution
Use of controls or adjustments or performance of procedures other than those specified herein may result in hazardous radiation exposure.
This Digital Equipment is CLASS 1 LASER PRODUCT (IEC 60825-1 Edition 1.2-2001)
SAFETY PRECAUTIONS
This Digital Equipment is rated Class 1 and complies with 21 CFR 1040.10 and 1040.11 of the CDRH standards. This means that the equipment does not produce hazardous laser radiation. For your safety, observe the precautions below.
•Do not remove the cabinet, operation panel or any other covers.
•The equipment's exterior covers contain several safety interlock switches. Do not bypass any safety interlock by inserting wedges or other items into switch slots.
8
OPERATION MANUALS AND HOW TO USE THEM
Printed manuals and a manual in PDF format are provided with the machine.
Printed manuals
This section explains precautions to ensure safe usage, part names and functions and basic software. Refer to the PDF instruction manual for instructions on how to use the machine.
Start Guide
(this manual)
Manuals in PDF format
The explanation of the functions that can be used on the machine are provided in the Operation Guide in PDF format. The Operation Guide can be downloaded from the Web pages in the machine.
Download the Operation Guide from the Web pages in the machine.
Operation Guide
Convenient methods for using the Operation Guide
The first page contains a regular table of contents as well as an "I want to..." table of contents.
"I want to..." lets you jump to an explanation based on what you want to do. For example, "I use the copier function often, so I'd like to save paper".
Use either table of contents as appropriate based on what you want to know.
The contents of the Operation Guide are as follows:
BEFORE USING THE MACHINE |
FACSIMILE |
SYSTEM SETTINGS |
COPIER |
SCANNER / INTERNET FAX |
TROUBLESHOOTING |
PRINTER |
DOCUMENT FILING |
|
*To view the Operation Guide in PDF format, Adobe® Reader® or Acrobat® Reader® of Adobe Systems Incorporated is required. Adobe® Reader® can be downloaded from the following URL:
http://www.adobe.com/
9

DIGITAL MULTIFUNCTIONAL SYSTEM FUNCTIONS
This machine provides four major areas of functionality.
Refer to the Operation Guide for details on using the various functions within each area.
|
|
Facsimile |
|
|
Copy |
||||
|
|
Document filing
|
|
Scanner |
Printer |
||
|
|
|
10
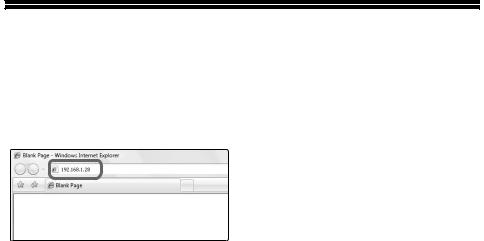
ACCESSING THE WEB SERVER IN THE MACHINE
When the machine is connected to a network, the machine's built-in Web server can be accessed from a Web browser on your computer.
Opening the Web pages
Access the Web server in the machine to open the Web pages.
Start a Web browser on a computer that is connected to the same network as the machine and enter the IP address of the machine.
Recommended Web browsers
•Internet Explorer: 6.0 or higher (Windows®)
•Netscape Navigator: 9 (Windows®)
•Firefox: 2.0 or higher (Windows®)
•Safari: 1.5 or higher (Macintosh)
The Web page will appear.
The machine settings may require that user authentication be performed in order to open the Web page. Please ask the administrator of the machine for the password that is required for user authentication.
11
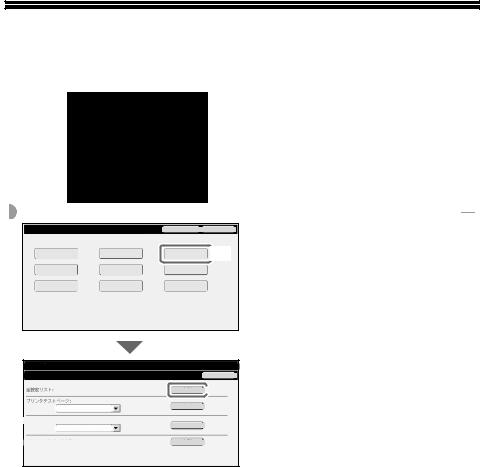
CHECKING THE IP ADDRESS
To check the IP address of the machine, print out the all custom setting list in the system settings.
|
JOB STATUS |
|
|
|
|
SYSTEM |
|
|
|
|
SETTINGS |
|
|
|
|
READY |
|
|
|
|
DATA |
|
|
|
|
|
|
|
|
|
IMAGE SEND |
LINE |
|
|
|
DATA |
LOGOUT |
|
|
|
|
|
||
System Settings |
|
|
Admin Password |
Exit |
|
|
|
(User) |
(1) |
Total Count |
Default Settings |
|
List Print |
|
|
|
|
||
Paper Tray |
Address Control |
|
Fax Data |
|
Settings |
|
Receive/Forward |
|
|
|
|
|
||
Printer Condition |
Document Filing |
|
USB-Device Check |
|
Settings |
Control |
|
|
|
|
|
|
||
System Settings |
|
|
List Print (User) |
|
Back |
|
|
|
|
|
(2) |
All Custom Setting List: |
||
|
|
|
Printer Test Page: |
|
|
PCL Symbol Set List |
|
|
|
|
|
Sending Address List: |
|
|
Individual List |
|
|
|
|
1Press the [SYSTEM SETTINGS] key.
2Select the all custom setting list in the touch panel.
(1)Touch the [List Print (User)] key.
(2)Touch the [Print] key to the right of "All Custom Setting List".
The IP address is shown in the list that is printed.
Document Filling Folder List: |
12
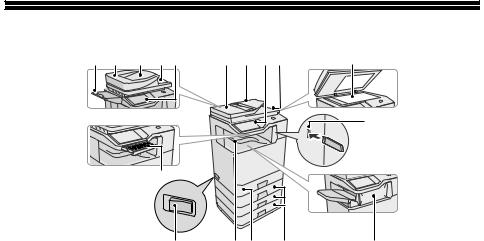
PART NAMES AND FUNCTIONS
(14) |
(1) |
(13) |
(2) |
(3) |
(1) |
(2) |
(3) |
(4) |
(5) |
(6)
(12)
(11) |
(10) |
(9) |
(8) |
(7) |
(1)Automatic document feeder
This automatically feeds and scans multiple originals. Both sides of 2-sided originals can be scanned at once.
(2)Document feeder tray
Place the originals in this tray when using the automatic document feeder.
(3)Operation panel
(4)Original exit tray
Originals are delivered to this tray after scanning.
(5)Document glass
This is used to scan books and other originals that cannot be scanned using the automatic document feeder.
(6)USB connector (type A)
Supports USB 2.0 (Hi-Speed). This is used to connect a USB memory or other USB device to the machine.
(7)Finisher*
This can be used to staple output.
(8)Tray 2/Tray 3/Tray 4 (500 sheet paper feed unit is installed)*
This holds paper. Up to 500 sheets (21 lbs. (80 g/m2)) of paper can be loaded.
(9)Tray 1
Up to 500 sheets of paper (21 lbs. (80 g/m2)) can be loaded in each tray.
(10)Output tray (center tray)
Copy jobs and print jobs are delivered to this tray.
(When a finisher is installed, the output tray (center tray) cannot be used.)
(11)Main power switch
This is used to power on the machine.
When using the fax or Internet fax functions, keep this switch in the "on" position.
(12)Keyboard (MX-B402SC only)
This is a keyboard that is incorporated into the machine. When not used, it can be stored under the operation.
(13)Original exit tray 1
Originals are delivered to this tray after scanning.
(14)Original exit tray 2
If originals are not delivered to original exit tray 1 after scanning, they are delivered to this tray.
13

SUPPLIES
*Peripheral device. For more information, see "PERIPHERAL DEVICES" in "Chapter 1 - BEFORE USING THE MACHINE" in the Operation Guide.
(19)
(18)
(15)(16)
(15)Front cover
Open to replace a toner cartridge.
(16)Bypass tray
Special types of paper and envelopes can be fed from the bypass tray.
(17)USB connector (B type)
Supports USB 2.0 (Hi-Speed). A computer can be connected to
this connector to use the machine as a printer.
(17)
(18)LAN connector
Connect the LAN cable to this connector when the machine is used on a network.
(19)USB connector (type A)
This connector is the same as (6). On the MX-B402, this connector is set so that it cannot be used when shipped from the factory. To use this connector, please contact your service representative.
SUPPLIES
(1) (2)
(1) Toner collection container |
(2) Toner cartridge |
This collects excess toner that remains after printing.
This contains toner for printing. When the toner runs out in a cartridge, the cartridge must be replaced.
14

OPERATION PANEL
Image send indicators
LINE indicator
This lights up during transmission or reception in fax mode. The indicator also lights up during transmission in scan mode.
DATA indicator
When a received fax cannot be printed because of a problem such as out of paper, the indicator blinks. The indicator lights steadily when there is data that is waiting to be transmitted.
Touch panel |
[JOB STATUS] key |
Print mode indicators |
Messages and keys appear in the LCD display.
Operations are performed by touching the keys with your finger.
Press this key to view the job status screen. You can check the status of jobs and cancel jobs in the job status screen.
READY indicator
Print data can be received when this indicator is lit.
DATA indicator
This blinks while print data is being received and lights steadily while printing is taking place.
COPY |
IMAGE SEND |
DOCUMENT |
|
FILING |
|||
|
|
Ready to scan for copy. |
0 |
Job Status |
|
|
|
|
|
MFP Status |
|
Special Modes |
|
|
|
020/015 |
|
|
|
2-Sided Copy |
Copying |
|
|
|
|
Plain |
|
|
|
|
|
8½x11 |
|
|
|
|
|
Output |
005/000 |
|
Exposure |
1. |
8½x11 |
|
|
|
|
|
Waiting |
|||
Auto |
2. |
5½x8½ |
File |
||
|
|
3. |
8½x14 |
|
|
4. |
8½x11 |
010/000 |
|
|
|
Quick File |
|
|
|
Waiting |
Copy Ratio |
Original |
Paper Select |
|
100% |
|
Auto |
010/000 |
|
|
8½x11 |
|
Plain |
Waiting |
|
JOB STATUS
SYSTEM |
SETTINGS |
READY |
||
DATA |
||
|
||
IMAGE SEND |
LINE |
|
DATA |
||
|
||
|
HOME |
Tray1
[SYSTEM SETTINGS] key
Press this key to display the system settings screen. The system settings can be adjusted to make the machine easier to use, such as configuring paper tray settings and storing addresses.
[HOME] key
Touch this key to display the home screen.
The base screen of each mode is opened from the home screen.
15
 Loading...