


USER MANUAL
MF 5571DW

INTRODUCTION
DEAR CUSTOMER
EN
With the purchase of this device, you have chosen a quality Sagemcom product brand. Their device fulfils the most varied requirements for private use or in your office and business everyday.
You use the power and toner saving functions to save electricity and toner, by switching the device to power saving mode or printing in toner saving mode. Use the ECO- button to make toner saving copies quickly and simply.
For printing purposes, your device utilises the most up-to-date laser printing technology. A starter cartridge is provided with the device. This starter cartridge is already installed; however you must remove the packaging used for transportation before you can use the device.
You can insert a supply of paper into the paper tray of up to 250 sheets. You can insert special paper formats, envelopes, slides, sheets of labels or printed documents into the manual paper feed.
The device is equipped with an automatic document feeder. Up to 50 Documents can be feed automatically into the machine to be scanned, faxed or copied. You can scan single documents or smaller templates using the flatbed scanner.
Your device has the image and text enhancement function Crystal with which you achieve optimal printing and copying quality for your documents.
Using the business card copy, you can copy both sides of a small document (for example of a business card) onto one page
Your device prints a weekly overview as a calendar page for you – for the current week, the coming week or a freely selectable week.
If you want, your device can print Sudoku puzzles in four different difficulty levels with solution.
In the telephone book of your device, you can save entries with multiple numbers and collect multiple entries into groups. You can assign various ring tones to the entries.
You have many functions available to you for fax transmission, for example, different resolutions or the timer function. You can secure your fax reception with a code. In that case, incoming faxes are not printed out, but rather are stored in the fax memory. With the fax polling function, you can retrieve faxes that lie ready in the dialled device.
The device prints the date and the exact arrival time on every incoming fax received. This allows you to document the exact time at which you have received a fax transmission. A memory buffer in the device ensures that the correct date and time of reception will be maintained even after a power loss.
With fax reception onto a USB storage medium, the device saves incoming faxes onto a connected USB storage medium. Fax messages are saved as TIFF files with receipt date and time.
The selection menu for USB storage media appears on the display as soon as you connect a USB storage medium (USB stick, external hard drive etc.) to the USB host port on the front of the device. You can print a list of all saved documents or individual documents as well as delete files. Save scanned documents or incoming faxes on to the USB storage medium.
You can connect the device to a computer and use it as a printer or scanner. You'll find the software on the supplied installation CD Companion Center SFX. In this way, you can scan and edit photos and texts, send and receive faxes and access the device's web interfaces, with which you can change many settings.
Your device has a WLAN connection. Thus, you can integrate the device into an existing wireless network (WLAN). All computers in the network can then access the device and scan or print.
We hope you enjoy your device and its many functions!
2 |
Sagemcom · MF 5571dw |

TABLE OF CONTENTS
INTRODUCTION.............................................. |
2 |
Dear Customer .......................................................... |
2 |
1 GENERAL SAFETY INFORMATION .......... |
5 |
About this User Manual ........................................... |
7 |
Make Enlarged or Compressed Copies ................. |
36 |
|
Copying Several Documents onto one Page (= Mosaic |
EN |
|
Copy) ....................................................................... |
37 |
|
Copying both Sides of a Document onto One Side |
|
|
(= Business Card Copy) .......................................... |
37 |
|
|
||
Configure Settings for Second Profile .................. |
38 |
|
2 OVERVIEW................................................. |
8 |
Device Overview ....................................................... |
8 |
Connections on the Rear Side ................................. |
8 |
Panel with Display ................................................... |
9 |
Overview of the Menu Functions ......................... |
10 |
3 INITIAL OPERATION ............................... |
12 |
Packing Contents .................................................. |
12 |
Removing Packaging Material .............................. |
12 |
Attaching the Document Support ........................ |
14 |
Connecting the Telephone Cable ......................... |
15 |
Connecting the Mains Cable ................................. |
15 |
Initial Installation ................................................. |
16 |
Connecting to the Computer ................................ |
17 |
4 COMPANION CENTER SFX ..................... |
18 |
Requirements ........................................................ |
18 |
Installing the Driver and Software ....................... |
18 |
5 WEB INTERFACE ..................................... |
20 |
Calling the Web Interface ..................................... |
20 |
Access the Web Interface with an Internet Browser |
|
................................................................................ |
20 |
6 SCANNER................................................. |
21 |
Loading Documents .............................................. |
21 |
Scan Document and Save to a Computer ............. |
22 |
Scan Document and Save onto a USB Storage |
|
Medium .................................................................. |
23 |
Scanning Document and Saving on Network Compu- |
|
ter ........................................................................... |
24 |
Scanning with the Companion Center SFX .......... |
25 |
7 PRINTER AND PRINTING MEDIA .......... |
26 |
Specifications for Print Media .............................. |
26 |
Insert Paper into the Paper Tray .......................... |
26 |
Load Paper into the Manual Paper Feed .............. |
28 |
Loading Envelopes ................................................ |
28 |
Inserting Slides and Labels ................................... |
28 |
Loading Pre-printed Material ............................... |
29 |
Print a List of Available Documents on USB Storage |
|
Medium .................................................................. |
29 |
Print Document from USB Storage Medium ....... |
30 |
Delete Files on USB Storage Medium .................. |
31 |
Print Calendar ....................................................... |
31 |
Sudoku: Printing a Game ...................................... |
32 |
8 COPIER ..................................................... |
33 |
Loading Documents .............................................. |
33 |
Make Copy Using Standard Settings .................... |
34 |
Creating Multiple Copies ...................................... |
35 |
Creating Crystal Copy with Image and Text Enhance- |
|
ment (Crystal) ........................................................ |
35 |
Make Copies Using the Second Profile ................ |
36 |
Make Copies Using User-Defined Settings .......... |
36 |
9 TELEPHONE BOOK OF THE DEVICE ...... |
39 |
Looking up an Entry ............................................... |
39 |
Saving Entry ........................................................... |
39 |
Edit Entry ............................................................... |
40 |
Delete an Entry ...................................................... |
40 |
Delete all Entries ................................................... |
40 |
Printing the Telephone Book ................................ |
40 |
Groups .................................................................... |
40 |
Exporting/Importing the Telephone Book ........... |
41 |
10 FAX ........................................................... |
42 |
Send a Fax Using Standard Settings ..................... |
42 |
Loading Documents ............................................... |
42 |
Dialling a Number .................................................. |
44 |
Getting Outside Line .............................................. |
44 |
Sending Fax Later (= Timer Function) .................. |
44 |
Sending Fax Manually ........................................... |
44 |
Chain Dialling ......................................................... |
45 |
Eavesdropping while Connection is Established .. |
45 |
Sending to Multiple Recipients (= Broadcasting) |
45 |
Using Fax Templates ............................................. |
45 |
Faxing with the Companion Center SFX ............... |
46 |
Fax Reception ......................................................... |
48 |
Receiving Fax Manually ......................................... |
48 |
Receive Faxes Silently ........................................... |
48 |
Receiving Faxes onto USB Storage Medium ........ |
48 |
Time Stamp ............................................................ |
48 |
Setting Protected Fax Reception .......................... |
49 |
Polling Faxes .......................................................... |
49 |
Jobs ......................................................................... |
49 |
Missed Calls ........................................................... |
50 |
11 NETWORKS.............................................. |
51 |
Wireless Network (WLAN) ..................................... |
51 |
Setting Up a Wireless Network (WLAN) ............... |
51 |
Switching Wireless Network (WLAN) On/Off ...... |
52 |
Setting up a Wireless Network (WLAN) Using the |
|
Wizard .................................................................... |
52 |
Setting Up a Wireless Network (WLAN) Manually |
|
................................................................................. |
52 |
Additional Wireless Network Settings ................. |
55 |
12 SETTINGS ................................................ |
56 |
Set Up Power Saving Function .............................. |
56 |
Set Up Toner Saving Function .............................. |
56 |
Set Up Paper Saving Function ............................... |
56 |
Selecting the Country ............................................ |
57 |
Selecting the Language ......................................... |
57 |
Setting the Date and Time .................................... |
57 |
Entering Your Telephone Number and Name ....... |
58 |
Setting the Ring Tones .......................................... |
58 |
Deactivating the Button Tones ............................. |
58 |
Configure Paper Settings ...................................... |
58 |
Set Resolution ........................................................ |
59 |
Setting the Contrast .............................................. |
59 |
Table of Contents |
3 |

|
Setting the Brightness .......................................... |
59 |
|
Additional Scanner Options .................................. |
59 |
|
Additional Copier Options .................................... |
60 |
|
Setting the Fax Reception Mode .......................... |
60 |
|
Silent Fax Reception ............................................. |
60 |
EN |
Additional Options for Fax Transmission ............ |
60 |
|
Additional Fax Reception Options ........................ |
61 |
|
Locking the Device ................................................ |
62 |
|
Print Lists and Reports ......................................... |
63 |
|
13 TELEPHONE LINES AND ADDITIONAL |
|
|
DEVICES........................................................ |
64 |
|
Switching Caller Line Identification (CLIP) On/Off |
|
|
................................................................................ |
64 |
|
Selecting the Dialling Process .............................. |
64 |
|
Set up the Public Switch Telephone Network (PSTN) |
|
|
................................................................................ |
64 |
|
Set up Private Branch Exchange (PABX) .............. |
64 |
|
DSL Connection ..................................................... |
65 |
|
ISDN Connection ................................................... |
65 |
|
Registering and De-Registering Additional Cordless |
|
|
Telephones ............................................................ |
65 |
|
Connecting Additional Devices ............................. |
66 |
|
Using Additional Telephones (Easylink) .............. |
67 |
|
Using an External Answering Machine ................ |
67 |
|
14 SERVICE ................................................... |
68 |
|
Access Help Pages ................................................ |
68 |
|
Display Counter Levels ......................................... |
68 |
|
Displaying the Toner Level ................................... |
68 |
|
Checking the Firmware Version ........................... |
68 |
|
Updating Firmware ............................................... |
69 |
|
Changing the Toner Cartridge .............................. |
69 |
|
Fixing a Paper Jam ................................................ |
71 |
|
Fixing a Document Jam ......................................... |
74 |
|
Cleaning ................................................................. |
74 |
|
Calibrating the Scanner ........................................ |
75 |
|
Using Service Codes .............................................. |
75 |
|
Power Cycling ........................................................ |
76 |
|
Problems and Possible Causes ............................. |
77 |
|
Error Messages and Possible Causes ................... |
79 |
|
15 GLOSSARY ............................................... |
83 |
|
16 APPENDIX................................................ |
86 |
|
Technical Data ....................................................... |
86 |
|
Guarantee .............................................................. |
87 |
|
Declaration of Conformity (DoC) .......................... |
88 |
|
Customer Information .......................................... |
90 |
4 |
Sagemcom · MF 5571dw |

1 GENERAL SAFETY INFORMATION
Your device has been tested in conformity with standards EN 60950-1 and IEC 60950-1 and should only be operated with telephone systems and power equipment that meet these standards. The device was built exclusively for use in the indicated sales region.
Do not make any changes or settings that are not described in this user manual. Physical injury or damage to the device or loss of data can result from improper handling. Take note of all warning and safety notes indicated.
SETTING UP THE DEVICE
The device should rest securely on a stabile, flat surface. If the device should fall, it can be damaged or can cause injury to people, especially small children. Position all cables in such a way that no one will stumble on them, thus avoiding possible injuries to persons or damage to the device itself. If the device is dropped it should be inspected by a technical service center.
The distance between the device and other devices or objects must be at least 15 centimetres; this also applies to the use of additional cordless telephones. Do not place the device in the vicinity of radios or televisions.
Protect the device against direct sunlight, heat, large temperature fluctuations and moisture. Do not place the device in the vicinity of heaters or air conditioners. Observe the information on temperature and humidity in the technical data.
The device must have sufficient ventilation and may not be covered. Do not put your device in closed cabinets or boxes. Do not place the machine on soft surfaces such as tablecloths or carpets and do not cover the ventilation slits. Otherwise, the device can overheat and catch on fire.
The area in which you operate the device must be adequately ventilated, especially if the device is used frequently. Set up your device in such a way that the flow of the exhaust air stream points away from the work station.
In the event that the device becomes too hot, or if you see smoke coming from the device, you must immediately pull the power cable out of the power socket. Have your device examined by trained professionals at a technical service location. To prevent the spread of fire, open flames should be kept away from the device.
Do not plug in the device in moist rooms. Never touch the mains cable, the mains connection or the telephone socket with wet hands.
Do not allow liquids to enter into the device. Disconnect the device from the electrical power source and from the telephone network, if liquids or foreign objects have entered the device and have your device examined by trained professionals at a technical service location.
Do not allow children to handle the device without |
|
||
supervision. The packing materials should be kept |
|
|
|
EN |
|||
|
|||
out of the hands of children. |
|
||
Do not press forcefully on the scanner cover when |
|
|
|
you scan thicker documents or three-dimensional |
|
|
|
|
|
||
items, this could damage the scanner cover and/or |
|
||
the scanner glass. |
|
||
POWER SUPPLY/TELEPHONE LINE
Check whether the mains voltage of your device (indicated on the type label) matches the mains voltage available at the setup location.
This device complies with EN 55022 Class B. Use only the power and telephones cables supplied. Before you use the device make sure that you connected the telephone cable supplied as described.
Never touch the power or telephone cable if the insulation is damaged. Replace damaged wires immediately. Use suitable cables only; if necessary please contact our technical customer service or your retailer.
Disconnect your device from the mains and telephone network during an electrical storm in order to avoid electrical surge damage. If this is not possible, do not use the device during an electrical storm.
Before cleaning the surface of your device, disconnect it from the power and telephone networks. Use a soft, lint-free cloth. Never use liquid, gaseous or easily flammable cleansers (sprays, abrasives, polishes, alcohol). Do not allow any moisture to reach the interior of the device.
Only clean the display with a dry, soft cloth. If the display breaks, a mildly corrosive liquid may escape. Avoid all contact with your skin and eyes.
In the event of a power failure, your device will not function; saved data is retained.
COMPUTER CONNECTION
Use only a custom high speed certified USB cable to connect the device to your computer. The cable should be no longer than 1.5 metres.
WIRELESS NETWORK (WLAN)
The functioning of security systems, medical equipment or sensitive devices can be disrupted by the transmission power of the device. Observe any usage regulations (or restrictions) in the vicinity of such equipment.
The use of this device can affect the operation of insufficiently shielded medical devices and hearing aids and pacemakers through the release of high frequency radiation. Also consult a doctor or the manufacturer of the medical device to establish whether these are sufficiently shielded from external high frequency radiation.
General Safety Information · |
5 |

USB STORAGE MEDIA
Only use storage media that are compatible with the device. Ensure that the power of a USB device does not exceed the permitted amp limit of the USB con-
EN nection. You can only connect one high power device (USB 2.0) to each USB connection. Do not connect additional devices—such as batteries, fans, charging devices—to your machine. The device only recognises storage media which are formatted with FAT16 or FAT32. NTFS is not supported.
Never pull out the storage medium while the device is accessing it. This could cause data to be damaged or lost.
When carrying out a Firmware update only use the Firmware file for your device from the website: www.sagemcom.com. Using other Firmware files can lead to your device not functioning properly. Sagemcom accepts no liability for device malfunctions which can be traced back to the use of third party Firmware.
The firmware running on the device is partly licensed under GPL. If you have any questions about the licensing of a specific part of the firmware, feel free to contact us on the email address: support.service@sagemcom.com. We can send you a CD containing the relevant source code for the cost of production.
CONSUMABLE MATERIALS
Use only original consumable materials. These are available from a specialised retailer or through our order service (see back side of this user manual). Other consumable materials could damage the device or shorten its service life.
Dispose of old consumable materials according to the waste regulations of your country.
Caution when Handling Toner Powder:
If you breathe in toner powder, go into the fresh air immediately. Call a doctor immediately!
If you get toner powder in your eyes, rinse them with a lot of water for at least 15 minutes. Call a doctor immediately!
If you have swallowed toner powder, drink small amounts of water. Try NOT to vomit. Call a doctor immediately!
Never open a toner cartridge. Store both new and used cartridges in a place where they will not come into the hands of children.
In case of a paper jam, remove the paper carefully out of the device. Throw the paper away carefully: It is possible that the toner may not be completely set on the print-out, and toner dust could be released into the air.
If toner dust is released into the air, you should avoid allowing it to contact your skin and eyes. Do not inhale the released toner dust. Remove the toner dust from clothing or objects with cold water; hot water would only cause the toner to set. Never remove loose toner dust with a vacuum cleaner.
REPAIRS
The fuser unit and and its surroundings inside the device become hot during operation. Do not touch these parts if you have opened the device. Proceed with care when you are removing a paper jam for instance.
Should disruptions occur, follow the instructions on the display and on the error report.
Do not make any repairs to the device yourself. Improper maintenance can result in injuries or damage to the device. Only have your device repaired by an authorised service centre.
Do not remove the type label from your device; this would void the warranty.
LASER SAFETY
With specific reference to lasers, the equipment complies with laser product performance standards set by governmental, national, and international agencies as a Class 1 Laser Product. It does not emit hazardous light, as the beam is totally enclosed during all phases of customer operation and maintenance.
Direct (or indirect reflected ) eye contact with the laser beam might cause serious eye damage. Safety precautions and interlock mechanisms have been designed to prevent any possible laser beam exposure to the operator. Only a qualified service technician should open the device and carry out service operations.
à Class 1 Laser Product
6 |
Sagemcom · MF 5571dw |
ABOUT THIS USER MANUAL |
|
|
With the installation guide on the following pages, |
|
|
you can start using your device quickly and easily. |
|
|
Detailed descriptions can be found in the following |
EN |
|
sections of this user manual. |
||
|
||
Read the entire user manual carefully. Follow all |
|
|
safety instructions in order to ensure proper opera- |
|
|
tion of your device. The manufacturer accepts no lia- |
|
|
bility if these instructions are not followed. |
|
SYMBOLS USED
Notice
TROUBLESHOOTING
This symbol designates tips that will help you to use your device more effectively and easily.
CAUTION!
DAMAGE TO THE DEVICE OR LOSS OF DATA!
This symbol gives warning of damage to the device and possible loss of data. These damages can result from improper handling.
DANGER!
DANGER TO PERSONS!
This symbol gives warning of danger to persons. Physical injury or damage can result from improper handling.
DANGER—LASER!
RADIATION HAZARD!
This symbol in the user manual or inside the device indicates a danger of visible and invisible radiation. Eye injuries or other damage can result from improper handling.
DANGER—HEAT!
HEAT RISK!
This symbol in the user manual or inside the device indicates a danger of hot surfaces. Physical injury or damage can result from improper handling.
7
2 OVERVIEW
EN |
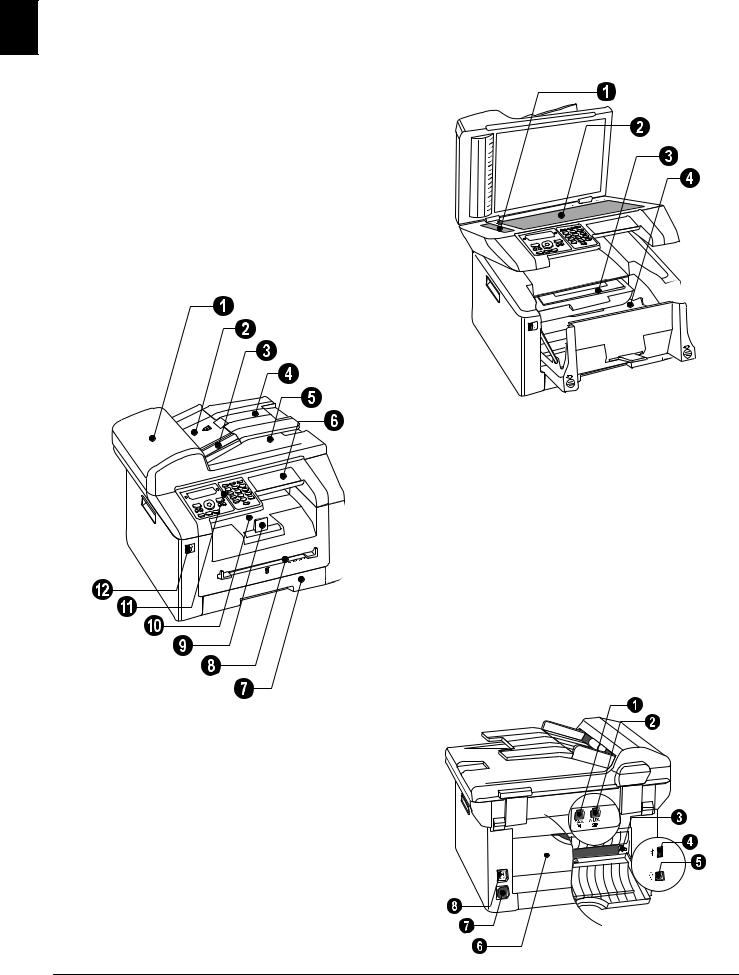
DEVICE OVERVIEW |
‚ Scanner glass of the automatic document feeder |
|
ƒ Scanner glass |
|
|
‚ Cover of the automatic document feeder |
|
|
„ Toner cartridge |
|
|
ƒ Document feed slot |
|
|
… Paper jam door (print unit) |
|
|
„ Document guide |
|
|
|
|
|
… Document support |
|
|
† Scanner cover |
|
|
‡ Letter keypad (covered) |
|
|
ˆ Paper tray |
|
|
‰ Manual paper feed |
|
|
Š Printer output tray |
|
|
‹ Device cover |
|
|
ΠPanel with display |
|
|
÷ ý- Socket—USB Host connection for storage |
|
|
medium |
|
CONNECTIONS ON THE REAR
SIDE
‚FAX/Ñsocket—Connection socket for telephone cable
ƒ AUX./Ò socket—Connection socket for additional devices
„ Tension lever of the fixer unit (Two levers!)
… ý socket—USB Host connection for storage medium
† ý socket—USB connection for the computer
‡ Paper jam door (fuser unit) ˆ Mains cable socket
‰ On/Off switch
8 |
Sagemcom · MF 5571dw |
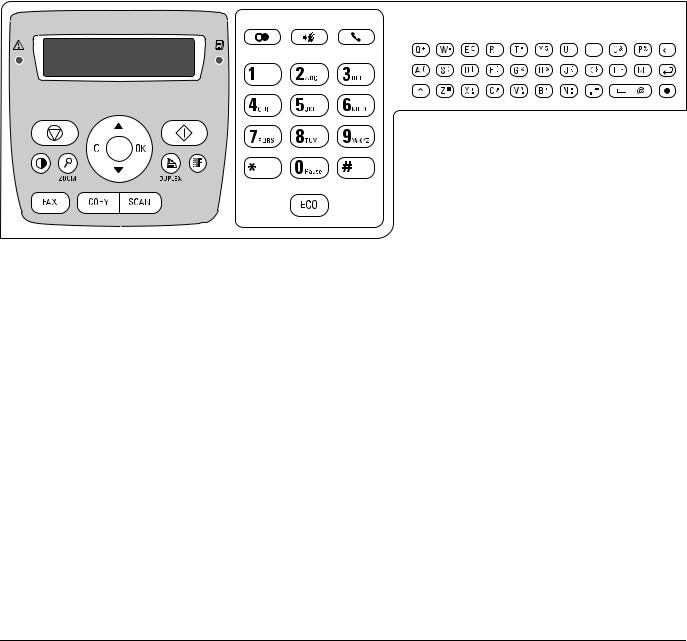
PANEL WITH DISPLAY
Red lamp Æ—If the lamp flashes or is lit, please read what is indicated on the display
Green Lamp â—The green lamp â on the panel will flash whenever there is a fax present in the memory.
j—Function abort / return to the starting mode
C—Calling the menu functions / Returning to the previous menu level / deleting individual digits
[—Setting number of copies / navigation within the menu / selecting options / moving the cursor
C—Press twice: making copies automatically. Press once: adjusting copies / Menu Navigation: confirming input
o—Starting transmission of message / starting action
¬—Set the contrast for the scanner
Ô/ZOOM—Set the zoom parameter (reduced or enlarged scans)
Õ/DUPLEX—Select double-sided or one-sided printing (Duplex/Simplex)
f—Setting higher resolution for faxes and copying (DEFAULT, FINE, SFINE, PHOTO)
FAX—Start a fax transmission or fax reception
COPY—Press twice: making copies automatically. |
|
|
||||||||||
EN |
||||||||||||
|
||||||||||||
Press once: adjusting copies |
|
|||||||||||
SCAN—Starting scanning process |
|
|
||||||||||
@—Redial / caller list: The redial / caller list con- |
|
|
||||||||||
|
|
|||||||||||
tains the last numbers dialled and the last calls |
|
|||||||||||
received (© indicates the numbers dialled, ® the calls |
|
|||||||||||
received and * the calls missed). |
|
|||||||||||
À—Broadcasting: You can send one fax to multiple |
|
|||||||||||
recipients in succession. |
|
|||||||||||
μ—Listening while connection is established |
|
|||||||||||
Numeric keys (0—9)—Entering digits |
|
|||||||||||
ECO—Retrieves the paper, power and toner saving / |
|
|||||||||||
make a copy using the toner saving function |
|
|||||||||||
Keys (A – Z)—Entering characters / +—Shift key: |
|
|||||||||||
Entering capital letters / \—deleting individual |
|
|||||||||||
characters / |—add line break / õ and enter letter |
|
|||||||||||
key—special characters / ½ —enter space and @ |
|
|||||||||||
sign |
|
|||||||||||
|
|
|
|
|
|
|
|
|
|
|
|
|
|
|
|
|
|
|
|
|
|
|
|
|
|
|
|
|
|
|
|
|
|
|
|
|
|
|
|
|
|
|
|
|
|
|
|
|
|
|
|
|
|
|
|
|
|
|
|
|
|
|
|
|
Overview · Panel with Display |
9 |

|
OVERVIEW OF THE MENU |
|
|
FUNCTIONS |
|
|
The following functions are available on your device. |
|
EN |
||
There are two ways in which you can call functions. |
||
|
||
|
Navigating in the Menu: Press C to access the func- |
|
|
tion menu. Page through [ menu entries. Use OK |
|
|
to select a menu function. Press C to return to the |
|
|
previous menu level. Press j to close the menu and |
|
|
return to the starting mode. |
|
|
Calling Functions Directly: You can call a menu func- |
|
|
tion directly using the function number. Press C and |
|
|
enter the appropriate function number using the |
|
|
numeric keypad. Confirm with OK. You will find the |
|
|
function number in the following list. |
0 SETTINGS
002 Setting the paper, power and toner
saving functions........................................ |
page 56 |
007 Deactivating the Button Tones .. |
page 58 |
01 Setting the date and time................. |
page 57 |
021 Entering name............................. |
page 58 |
022 Entering number......................... |
page 58 |
031 Setting the Country .................... |
page 57 |
032 Set the telephone network¦*....... |
page 64 |
033 Setting the Language ................. |
page 57 |
041 Setting the fax reception mode . page 60
042 Set the number of ring tones for fax
reception.................................................... |
page 58 |
051 Switch PABX operation on/off... |
page 65 |
0522 Enter a dialling code for the PABX |
|
operation ................................................... |
page 65 |
053 Set the dialling mode (tone/pulse |
|
dialling)¦* ................................................... |
page 64 |
054 Selecting the Ring Tone ............. |
page 58 |
055 Setting the ring volume ............. |
page 58 |
057Switches Caller Line Identification (CLIP) |
|
on/off......................................................... |
page 64 |
*¦Function is not supported in all countries and networks
1 COPIER
10 Set the copier settings ..................... page 59
11 Make copies using standard settingspage 34
12 Make copies using the second profile
................................................................... |
page 36 |
13 Make enlarged or compressed copies |
|
................................................................... |
page 36 |
14 Copy several documents on one page |
|
(= Mosaic-copy)......................................... |
page 37 |
15 Creates Crystal copy with image and text |
|
enhancement (Crystal).............................. |
page 35 |
16 Copies both sides of a document onto one side (= business card copy)....................... page 37
2 PRINTER
20 Configure paper settings ................. |
page 58 |
211 Print a list of available documents on |
|
USB storage medium ................................ |
page 29 |
212 Print document from USB storage |
|
medium...................................................... |
page 30 |
3 SCANNER
31 Scan document and save to a computer
................................................................... page 22 32 Scan document and save onto a USB storage
medium...................................................... |
page 23 |
36 Scans document and saves on network |
|
computer ................................................... |
page 24 |
30 Configure scanner settings .............. |
page 59 |
4 FAX
401 Set fax transmission................... |
page 61 |
402 Set fax reception ........................ |
page 61 |
403 Setting Protected Fax Receptionpage 49 |
|
404 Switches time stamp on/off ...... |
page 61 |
41 Sending a Fax.................................... |
page 42 |
42 Poll faxes .......................................... |
page 49 |
44 Receiving faxes onto USB storage medium
................................................................... |
page 48 |
45 Printing the Fax Templates.............. |
page 45 |
5 TELEPHONE BOOK
511 Looking up an entry ................... |
page 39 |
512 Saving Entry................................ |
page 39 |
513 Creating group............................ |
page 40 |
514 Edit Entry.................................... |
page 40 |
515 Deleting an Entry........................ |
page 40 |
516 Printing the telephone book...... |
page 63 |
517 Load telephone book from USB storage medium...................................................... page 41
518 Saving telephone book onto USB storage medium...................................................... page 41
5 CORDLESS TELEPHONE
521 Registering cordless telephone¦*page 66
522 De-registering cordless telephone¦*
................................................................... |
page 66 |
523 Locating cordless phones¦* ........ |
page 66 |
*¦Function is optional and functions only with an original adapter, which you can purchase through our order service. More information: support.service@sagemcom.com
10 |
Sagemcom · MF 5571dw |
7 JOBS
71 Immediate job execution .................. |
page 49 |
|
72 Changing a job .................................. |
page 50 |
|
73 Deleting a job.................................... |
page 50 |
EN |
74 Printing a job .................................... |
page 50 |
|
75 Printing the jobs list......................... |
page 63 |
|
|
8 LISTS AND REPORTS
80 Printing list of settings .................... |
page 63 |
81 Printing the List of Available Functions |
|
................................................................... |
page 63 |
82 Printing fax journal........................... |
page 63 |
83 Printing the telephone book ............ |
page 63 |
84 Printing the jobs list......................... |
page 63 |
85 Print Calendar ................................... |
page 31 |
86 Sudoku: printing a game .................. |
page 32 |
87 Printing the Fax Templates.............. |
page 45 |
9 USB STORAGE MEDIUM
911 Print a list of available documents on
USB storage medium ................................ |
page 29 |
912 Print document from USB storage |
|
medium...................................................... |
page 30 |
913 Scan document and save onto a USB |
|
storage medium ........................................ |
page 23 |
914 Receiving faxes onto USB storage |
|
medium...................................................... |
page 48 |
915 Delete files on USB storage medium |
|
................................................................... |
page 31 |
9 MISCELLANEOUS
92 Locking the Device............................ |
page 62 |
931 Calibrating the Scanner.............. |
page 75 |
933 Using service codes .................... |
page 75 |
934 Checking the firmware version .. |
page 68 |
94 Query the counter levels................... |
page 68 |
946 Displaying the Toner Level......... |
page 68 |
08 WIRELESS NETWORK (WLAN)
080 Switches wireless network (WLAN)
on/off......................................................... |
page 52 |
081 Sets up a Wireless Network (WLAN) |
|
using the wizard........................................ |
page 52 |
082 Sets up a Wireless Network (WLAN) |
|
manually .................................................... |
page 52 |
083 Set IP address assignment......... |
page 54 |
084 Set static IP address assignmentpage 54
085 Verify DHCP settings.................. page 54
086 Additional wireless network settings
................................................................... page 55
Overview · Overview of the Menu Functions |
11 |
3 INITIAL OPERATION
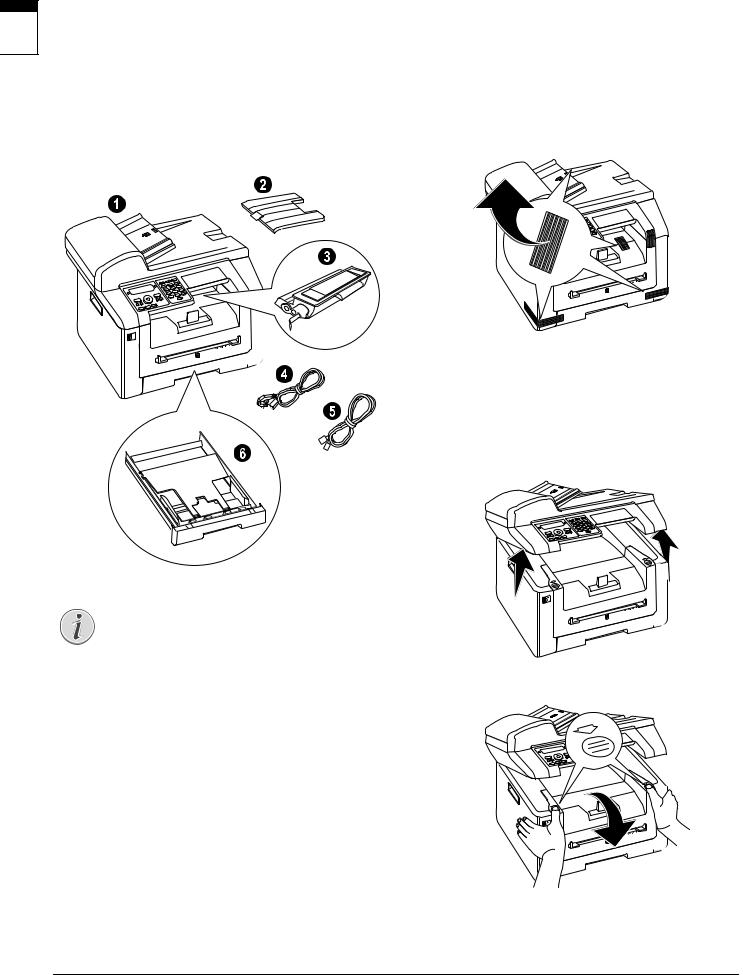
PACKING CONTENTS
EN
‚ Device
ƒ Document support
„ Starter cartridge (already installed)
… Mains cable with plug (country-specific)
† Telephone cable with plug (country-specific)
‡ Paper tray (already installed)
User manual with installation guide (not depicted)
Notice |
MISSING PACKAGE CONTENTS
If one of the parts is missing or damaged, please contact your retailer or our customer service.
REMOVING PACKAGING MATERIAL
REMOVING PACKAGING MATERIAL FROM THE DEVICE
Remove the existing tape used for transportation from the device.
REMOVE THE PACKAGING MATERIAL FROM THE TONER CARTRIDGE
1Open the upper device cover by gripping the cover on the arrow marks on the outside and lift upwards,
2Open the device by lifting the device cover forwards
12 |
Sagemcom · MF 5571dw |

3Remove the toner cartridge by gripping the handle in the middle and pulling it forwards out of the device
4Remove the tape and protective paper, but do not remove the protective strip from the cartridge yet
.
DANGER!
ESCAPING TONER DUST!
Never open a toner cartridge. If toner dust is released into the air, you should avoid allowing it to contact your skin and eyes. Do not inhale the released toner dust. Remove the toner dust from clothing or objects with cold water; hot water would only cause the toner to set. Never remove loose toner dust with a vacuum cleaner.
5Shake the new toner cartridge back and forth several times in order to distribute the toner evenly, thereby improving the print quality.
6Only after completely pull off the protection strip located on the left side of the cartridge.
DANGER!
ESCAPING TONER DUST!
Once you have removed the protection
strip, do not shake the toner cartridge EN any more. Otherwise, it is possible that
toner dust will be released into the air.
7Place the toner cartridge into your device. The cartridge should snap securely into position.
8 Close the device.
CAUTION!
TONER CARTRIDGE NOT INSERTED CORRECTLY!
If the device cover would not close, the toner cartridge is not inserted correctly. Take the toner cartridge out and insert it again correctly.
9 Close the upper device cover.
Initial Operation · Removing Packaging Material |
13 |
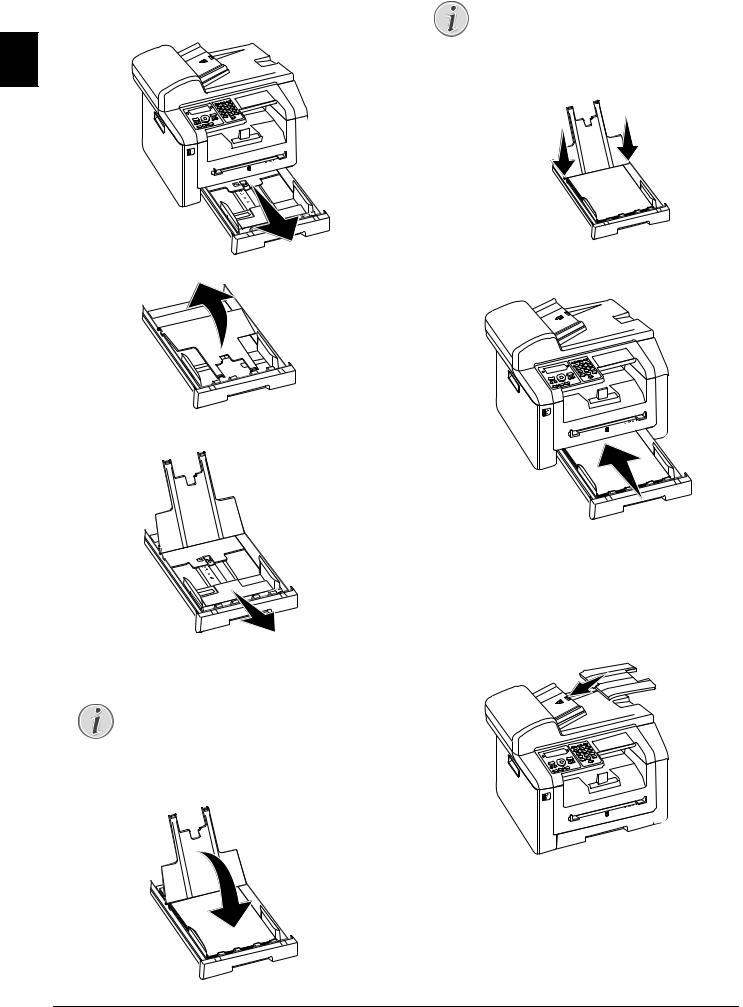
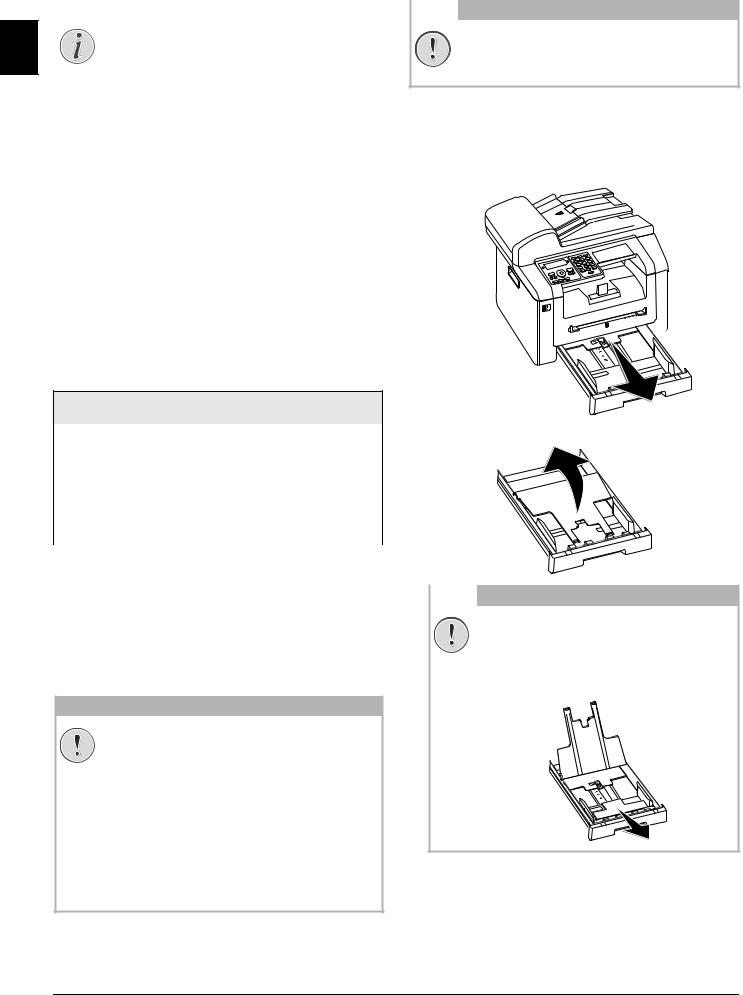
REMOVE THE PACKAGING MATERIAL FROM THE PAPER TRAY
1 Pull the paper tray out of the device.
EN
2 Lift up the cover of the paper tray
3Please remove the protective cardboard from the paper tray before loading paper.
Notice
COVER OF THE PAPER TRAY
If the cover of the paper tray has become detached, fasten the lid into the supports Ensure that the flat side of the cover (with the inscription) faces upwards.
6Push the paper tray into the device all the way to the stopping point.
4Removing the tape in the paper tray which was used for transportation purposes.
Notice
LOADING PAPER
Adjust the paper tray to the paper and insert the paper (see also chapter Printing Media, page 26).
5 Close the paper tray cover.
ATTACHING THE DOCUMENT SUPPORT
Insert the document support into the two openings in the cover. The document support should snap securely into place.
14 |
Sagemcom · MF 5571dw |
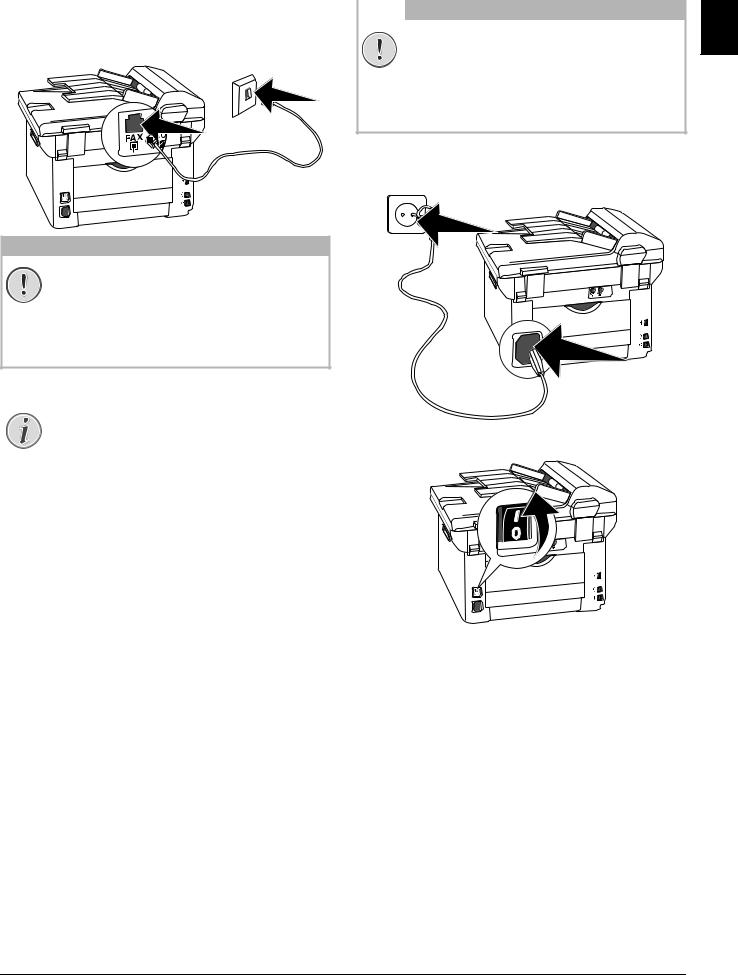
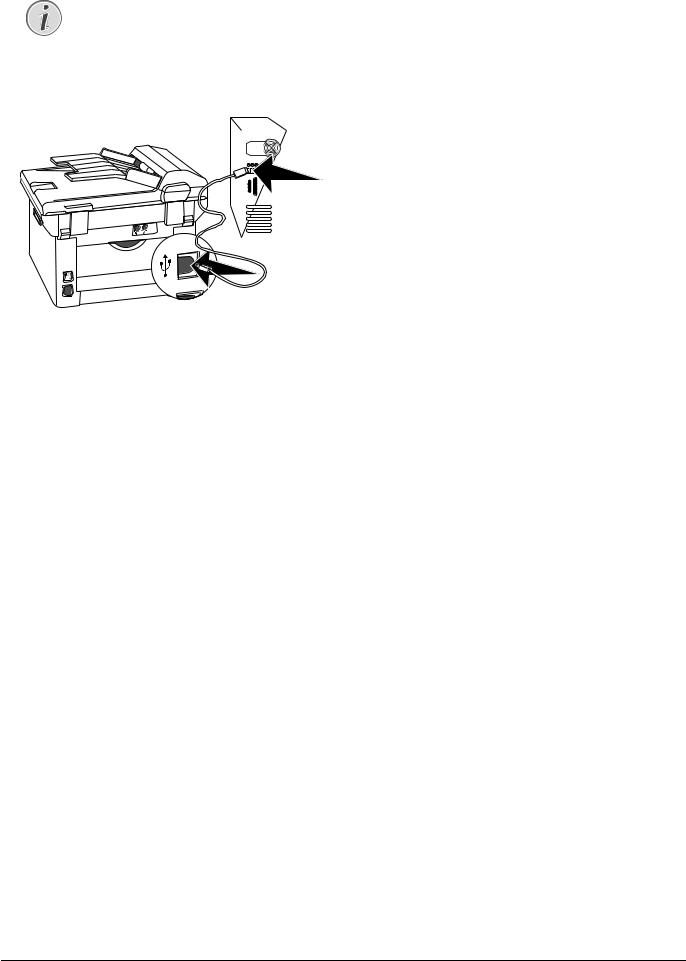
CONNECTING THE TELEPHONE CABLE
Connect the telephone cable to the device by inserting it in the socket designated with FAX/Ñ (RJ-11-
Connector). Insert the telephone plug into your PTT line socket.
CONNECTING THE MAINS
CABLE
CAUTION! EN
MAINS VOLTAGE AT THE SITE OF INSTALLATION!
Check whether the mains voltage of your device (indicated on the type label) matches the mains voltage available at the setup location.
1Insert the mains cable into the connection located on the rear side of the device. Plug the power cable into the electrical outlet.
CAUTION!
CONNECTION TO AN ISDN SYSTEM!
You can not connect your devices directly to the digital output of the ISDN system. Details for ISDN connections can be found in the instructions provided with the terminal adapter or the dial-up router.
Notice
CONNECTION TO PRIVATE AUTOMATIC
BRANCH EXCHANGE
If you connect your device as extension to a telephone system, you must set it for working as an extension (also see Chapter Telephone Lines and Additional Devices, page 64).
2Switch the device on using the on/off switch on the rear.
Initial Operation · Connecting the Telephone Cable |
15 |
INITIAL INSTALLATION
After you connect your device to the mains voltage, the device starts. During the booting process, the lights flash. Wait until the initial installation process
EN begins.
SELECTING THE LANGUAGE
1 Use [ to select the desired display language.
2 Confirm with OK.
SELECTING THE COUNTRY
CAUTION!
SETTING THE COUNTRY CORRECTLY!
You must set the country in which you are operating the device. Otherwise your device is not adapted to the telephone network. If your country is not included in the list, you must select a different setting and use the correct telephone cable for the country. Consult your retailer.
1Use [ to select the country in which you are operating the device.
2 Confirm with OK.
SET THE TIME ZONE
(Function is not supported in all countries and networks)
In countries with several time zones, you can select from preset time zones or manually enter the deviance of your time zone from UTC (see also chapter on setting the time zone, page 57). In countries with one time zone, the setting is adjusted automatically if you set the country correctly.
1Use [ to select the time zone in which you are operating the device.
2 Confirm with OK.
Notice
AUTOMATIC CHANGEOVER BETWEEN
SUMMER TIME/WINTER TIME
With setting the country and time zone, the automatic changeover between summer and winter time is switched on. The automatic changeover is switched off if you enter the deviance from UTC manually using the time zones editor
ENTERING NAME
Your name and number are added together with date, time and page number at the top edge of each fax transmission (= header).
1 Fold the protective cover of the letter keypad up
2 Enter the name using the keys (A—Z).
Notice
ENTER LETTERS
Enter capital letters by pressing and
holding +key. You can enter space using
½ .
The special characters available are located directly above the letter keypad and can be entered by pressing the õ- key and the respective letter key at the same time.
You can move the cursor using [. Use C to delete individual characters.
3 Confirm with OK.
ENTERING NUMBER
1 Enter your number.
2 Confirm with OK.
ENTERING THE DATE AND TIME
1Enter the date (two digits for each field), for example 31¦05¦25 for May 31th,
2025.
2 Enter the time, e.g. 14 00 for 2 pm. 3 Confirm with OK.
16 |
Sagemcom · MF 5571dw |
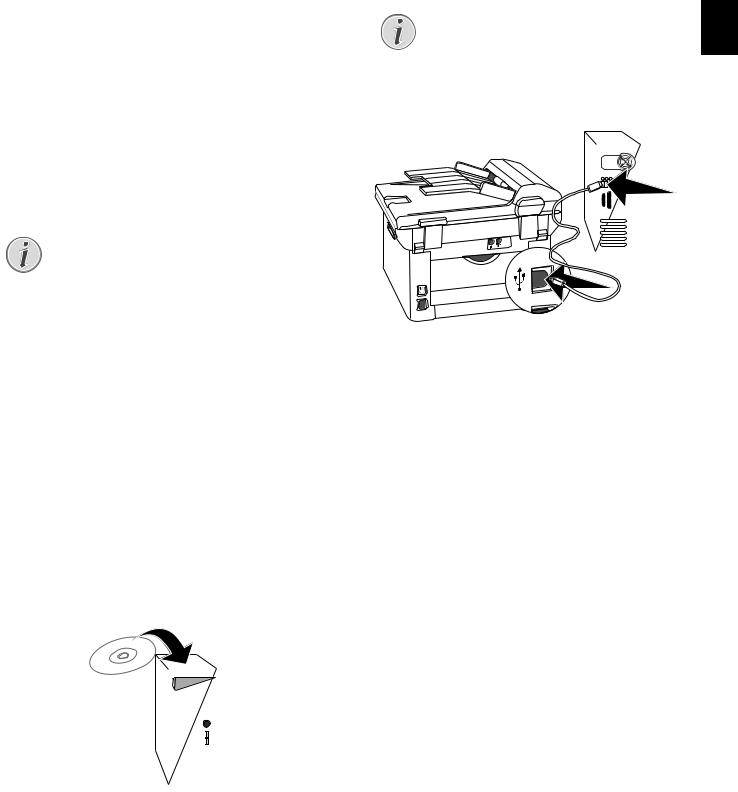
CONNECTING TO THE
COMPUTER
Using the USB cable, you can connect your device to a PC that is connected to a network. Other PCs on this network can then access the device if it is shared for use on the network. You cannot connect the device directly to a network with a USB cable, unless you have a USB print server connection.
You can connect the device to a computer and use it as a printer or scanner. You'll find the software on the supplied installation CD Companion Center SFX. In this way, you can scan and edit photos and texts, send and receive faxes and access the device's web interfaces, with which you can change many settings.
Notice
NETWORK CONNECTION
You can find information about installing your device in a network in chapter Networks (see also chapter Networks, page 51)
REQUIREMENTS
Your computer must have one of the following operating systems.
Microsoft Windows
2000 (SP¦4) · XP · Vista · Windows 7 Windows Server 2003/2008
Apple Macintosh
OS 10.4 · 10.5 · 10.6
Linux
Redhat 9.0 · Debian 5.0 · Suse 11.1 · Fedora 11 Ubuntu 9.10
CONNECTING USB CABLE
1Close all open programs and applications before beginning the installation process. Place the installation CD in the CD-ROM drive of your computer. The program will start automatically.
2Connect the device to your PC with a typical USB cable. The USB port of your device can be found on the rear side.
Notice
ONLY HIGH-SPEED CERTIFIED USB CA- |
EN |
|||||||
BLE |
|
|||||||
Use only a custom high speed certified |
|
|||||||
|
||||||||
USB cable to connect the device to your |
|
|||||||
computer. The cable should be no longer |
|
|||||||
than 1.5 metres. |
|
|||||||
|
|
|
|
|
|
|
|
|
|
|
|
|
|
|
|
|
|
|
|
|
|
|
|
|
|
|
|
|
|
|
|
|
|
|
|
|
|
|
|
|
|
|
|
|
|
|
|
|
|
|
|
|
|
|
|
|
|
|
|
|
|
|
|
|
|
|
|
|
|
|
|
|
|
|
|
|
|
|
|
|
|
|
|
|
|
|
|
Initial Operation · Connecting to the Computer |
17 |
||
4 COMPANION CENTER SFX
You can connect the device to a computer and use it as a printer or scanner. You'll find the software on EN the supplied installation CD Companion Center SFX. In this way, you can scan and edit photos and texts, send and receive faxes and access the device's web interfaces, with which you can change many set-
tings.
Notice
NETWORK CONNECTION
You can find information about installing your device in a network in chapter Networks (see also chapter Networks, page 51)
REQUIREMENTS
Your computer must have one of the following operating systems.
Microsoft Windows
2000 (SP¦4) · XP · Vista · Windows 7 Windows Server 2003/2008
Apple Macintosh
OS 10.4 · 10.5 · 10.6
Linux
Redhat 9.0 · Debian 5.0 · Suse 11.1 · Fedora 11 Ubuntu 9.10
Notice
INFORMATIONS FOR THE TECHNICAL CUS-
TOMER SERVICES
Should problems with the computer connection arise, have the following information to hand when you contact technical customer services: hardware configuration of your computer, operating system installed and security programmes used (anti-virus programmes, firewall). Then we can help you more quickly.
INSTALLING THE DRIVER AND SOFTWARE
CAUTION!
INSTALLING THE SOFTWARE FIRST!
First install the software. The device may not be connected to the PC before this. After the software installation, the PC must be restarted. Only then should you connect your PC and the device with a USB cable.
1Close all open programs and applications before beginning the installation process. Place the installation CD in the CD-ROM drive of your computer. The program will start automatically.
Notice
STARTING PROGRAM MANUALLY
If the program does not start automatically, select the CD-ROM drive in the Windows Explorer and start the program Setup.exe with a double-click.
2The Companion Center SFX window appears on the screen. Click on Install All to install the software and all drivers.
Click on Browse contents to view the files on the installation CD. Click on View user guides to access the device's instruction manual.
,QVWDOO $OO
,QVWDOO &XVWRPL]HG
8QLQVWDOO SURGXFWV
9LHZ XVHU JXLGHV
%URZVH FRQWHQWV
3Next you will be asked to accept the licensing conditions. Click on Yes.
4The software and drivers are installed. This Process May Take a Few Moments.
5At the conclusion of the install process you must restart your computer. Make your selection as to whether the computer should restart automatically or whether you would like to restart the computer yourself at a later time.
18 |
Sagemcom · MF 5571dw |
6 Only after the restart, connect the device to your |
|
||||||||||||
PC with a typical USB cable. The USB port of your |
|
||||||||||||
device can be found on the rear side. |
|
||||||||||||
Notice |
|
|
|||||||||||
EN |
|||||||||||||
|
|||||||||||||
|
|
|
ONLY HIGH-SPEED CERTIFIED USB CA- |
|
|||||||||
|
|
|
BLE |
|
|
||||||||
|
|
|
Use only a custom high speed certified |
|
|
||||||||
|
|
||||||||||||
|
|
|
USB cable to connect the device to your |
|
|||||||||
|
|
|
computer. The cable should be no longer |
|
|||||||||
|
|
|
than 1.5 metres. |
|
|||||||||
|
|
|
|
|
|
|
|
|
|
|
|
|
|
|
|
|
|
|
|
|
|
|
|
|
|
|
|
|
|
|
|
|
|
|
|
|
|
|
|
|
|
|
|
|
|
|
|
|
|
|
|
|
|
|
|
7Your device is detected as a new peripheral device and registered.
8If your operating system is Windows XP (Service Pack 2), an additional window will appear during the final installation. Select No, not this time, and click on Next.
9Under Windows XP, select Install software automatically during the final installation and click on
Next.
Companion Center SFX · Installing the Driver and Software |
19 |
5 WEB INTERFACE
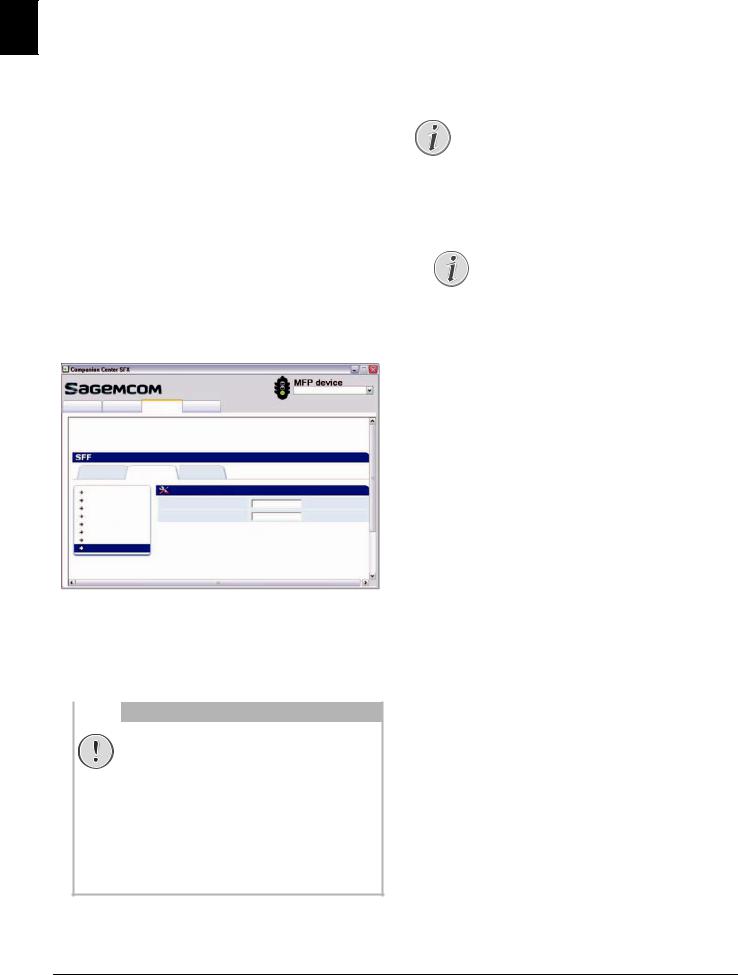
The web interface is available to you on all operating systems. You can access the web interface with the EN software Companion Center SFX or with an internet browser on your computer. The web interface shows you the current status of the device and all settings.
You can edit the device settings and the telephone book.
You can access the web interface when you connect the device directly to a computer with the USB cable or when the device is connected to a network with the LAN cable or via WLAN.
ACCESS THE WEB INTERFACE WITH AN INTERNET BROWSER
You need the current IP address of the device in order to access the web interface with an internet browser. You will find the IP address on the settings list.
Notice
PRINTS THE LIST OF SETTINGS
Press C, 80and OKto print a list of all settings of your device.
CALLING THE WEB INTERFACE
1Start the software Companion Center SFX, by clicking on the Companion Center SFX icon on your desktop or selecting Start > Programs >
Companion Center SFX > Laser SFX > Companion Center SFX in the Start Menu.
2The light in the upper-right corner shows whether or not the device is connected to the computer and is functioning properly.
3 Selecting the Settings tab.
|
|
|
|
>,3$GGUHVV@ |
6FDQ |
)D[ |
6HWWLQJV |
+HOS |
|
|
6WDWXV |
6HWWLQJV |
|
$GGUHVV ERRN |
|
,QIRUPDWLRQ 0HQX |
|
|
6HWWLQJV /RJLQ |
|
6\VWHP &RQILJ 0HQX |
8VHUQDPH |
||
|
1HWZRUN 0HQX |
|
||
|
|
|
|
|
|
:/$1 |
|
3DVVZRUG |
|
6\VWHP$GMXVW 0HQX
0DLQWHQDQFH 0HQX |
3OHDVH ORJ LQ |
)LUPZDUH 8SJUDGH |
|
/RJLQ |
|
1Start an Internet browser on a computer, which is connected to the network.
Notice
SUITABLE INTERNET BROWSER
We recommend the following Internet browser. Windows PC: Internet Explorer (Version 6.0 or above), Apple Macintosh: Safari (version 1.3 or above), Linux: Conquerer (version 3.2.1 or above).
2Enter the IP address of the device in the address bar of the browser.
3 Confirm using Return.
4The internet interface’s settings pages are protected with a password. Enter the login data:
Name: user
Password: user 5 Click on Login.
CAUTION!
CHANGING PASSWORD AND NOTING!
Change the password when you call the web interface for the first time, so that there is no unauthorised access to your device. Note down your password in a safe place. Should you forget your password, you must reset your device to factory settings, in order to be able to access it again. All personal settings will be deleted.
20 |
Sagemcom · MF 5571dw |
6 SCANNER
You can scan a document and save it onto a USB storage medium or on a network computer.
You'll find the software on the supplied installation CD Companion Center SFX. In this way, you can scan documents from your computer, send faxes, and manage the device settings via the web interface (see also the chapter Installing Driver and Software, page
18).
SPECIFICATIONS FOR DOCUMENTS
Width of Documents |
208¦–¦218¦mm |
|
|
|
|
Length of Documents |
277¦–¦600¦mm |
|
|
|
|
Paper Weight of the |
60¦-¦90¦g/m² |
|
Documents |
|
|
|
|
|
Capacity |
50 page (80¦g/m²) |
|
|
|
|
Manufacturer’s Recom- |
A4 · A5 · Letter · Legal |
|
mendation for Optimum |
(80¦g/m² |
|
Operation |
||
|
||
|
|
CAUTION!
UNSUITABLE DOCUMENTS!
Do not insert any documents into the device that ...
... are wet, have been edited with correction fluid, are soiled or have a coated surface.
…that are written on with a soft pencil, with paint, chalk or charcoal.
…originate from newspapers or magazines (printing ink).
…that are held together with office or notebook staples or with tape or glue.
…are pasted with note papers.
…are creased, crumpled or torn.
LOADING DOCUMENTS
The device is equipped with an automatic document |
EN |
feeder. Up to 50 Documents can be feed automati- |
|
cally into the machine to be scanned, faxed or copied. |
|
You can scan single documents or smaller templates |
|
using the flatbed scanner. |
|
INSERT DOCUMENTS INTO THE AUTOMATIC DOCUMENT FEEDER
1Insert the documents face up into the document feeder. The lower most document will be fed in first. You can insert up to 50 documents (80¦g/m²) at a time.
2Push the document guide inwards, so that it lies level on the documents.
PLACE DOCUMENTS ONTO THE
FLATBED SCANNER
1 Open the scanner cover.
Scanner · Loading Documents |
21 |
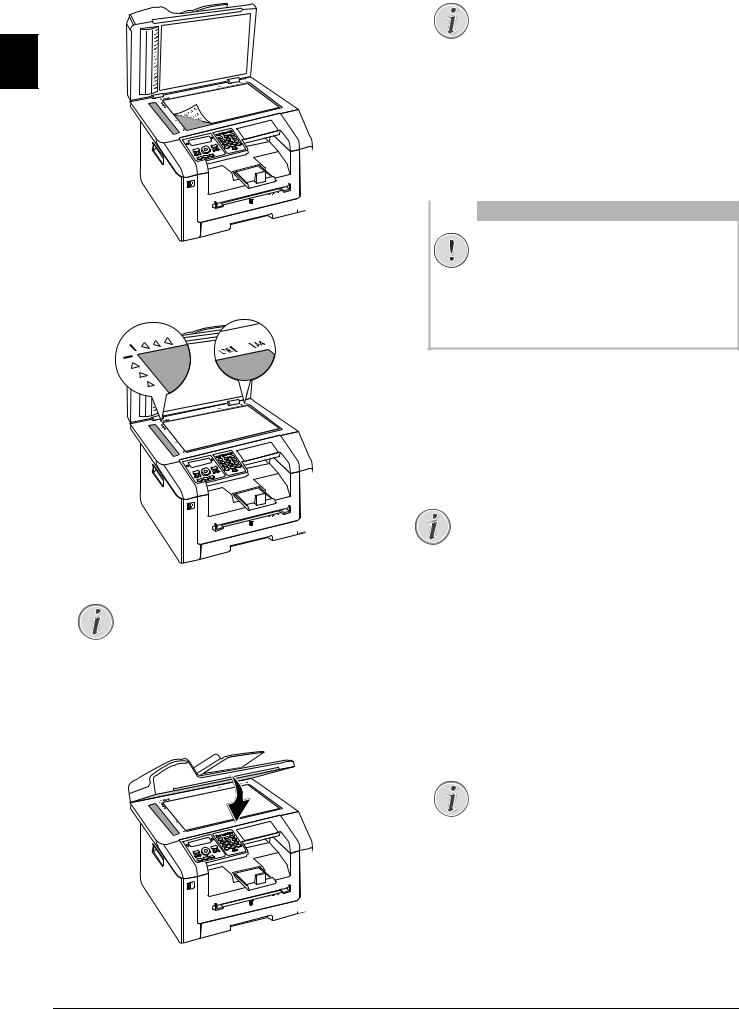
2Lay the document onto the scanner glass with the written side down.
EN
3Align the document with the rear left corner of the scanner glass (arrow marks). The markings on the scanner border for the A4 and A5 formats will help you to position the document correctly.
Notice
ENLARGE DETAIL
If you would like to copy a detail (such as a graphic) of your document, position the document so that the detail view is close to the source . Using the zoom function, you can separate the desired area from rest of the document.
4 Close the scanner cover.
Notice
ADJUST SCANNER COVER
The scanner cover is equipped with adjustable hinges, allowing you to lay even thicker documents (e.g. books) in the flatbed scanner. Carefully lift the scanner cover so that it rests as evenly as possibly.
Use clear sheets of plastic when copying three-dimensional objects (e.g. coins, flowers) to avoid damaging the scanner glass.
CAUTION!
DO NOT PRESS ON THE SCANNER COVER!
Do not press forcefully on the scanner cover when you scan thicker documents or three-dimensional items, this could damage the scanner cover and/or the scanner glass.
SCAN DOCUMENT AND SAVE TO A COMPUTER
Using this function, scan a document with your device and transfer it onto a computer which is connected directly to the device using a USB cable.
Notice
START SCANNING FROM COMPUTER
Using the Companion Suite LL software, you can call up the scan on the computer. You can also start the scanning process from any other graphics program if it is supported by the Twain Driver. Select the Twain Scanner Driver as your scanner.
MAKE SCANS USING STANDARD SETTINGS
1 Press SCAN.
2 Use [ to select SCANTO PC USB.
3 Confirm with OK.
Notice
ACCESS FUNCTION
You can also call the function by pressing C, 31 and OK.
4 Press OK.
MAKE SCANS USING USER-DEFINED SETTINGS
1 Press SCAN.
2 Use [ to select SCANTO PC USB.
3 Confirm with OK.
22 |
Sagemcom · MF 5571dw |
Notice
ACCESS FUNCTION
You can also call the function by pressing C, 31 and OK.
4 Use [ to select SETTINGS.
5 Confirm with OK.
6Select the desired resolution using f:
DRAFT—Greyscale scan with low resolution, for instance, for using on the Internet.
TEXT—Black and white scan with medium resolution for text documents
GRAY—Greyscale scan with medium resolution
PHOTO—Greyscale scan with high resolution, for instance, for photographs
7 Confirm with OK.
8 Enter a name for the file.
Notice
ENTER LETTERS
Enter capital letters by pressing and
holding +key. You can enter space using
½ .
The special characters available are located directly above the letter keypad and can be entered by pressing the õ- key and the respective letter key at the same time.
You can move the cursor using [. Use C to delete individual characters.
9 Confirm with OK.
10 Using [, select whether you would like to save the file as an image file or as a PDF file.
Notice
SELECT THE FILE FORMAT
For an image file, you can select whether you would like to save the file in TIFF or JPEG format (see also chapter on Selecting File Format, page 59).
11 Press o. The document is scanned and transferred to the computer.
12 If you want to scan a multiple page document with the flatbed scanner, insert another page and select NEXT PAGE with [NEXT PAGE .
13 Confirm with OK.
SCAN DOCUMENT AND SAVE ONTO A USB STORAGE
MEDIUM
EN
CAUTION!
COMPATIBLE USB STORAGE MEDIA!
Ensure that the power of a USB device does not exceed the permitted amp limit of the USB connection. You can only connect one high power device (USB 2.0) to each USB connection. Do not connect additional devices— such as batteries, fans, charging devices—to your machine. The device only recognises storage media which are formatted with FAT16 or FAT32. NTFS is not supported.
Notice
ANALYSING USB STORAGE MEDIUM
If a lot of documents are saved on the USB storage medium, it can take a while for the USB storage medium to be analysed. You can interrupt the process at any time, by pressing j.
You can scan documents with your device and save them as JPG-, PDF-, or TIFF-files on a connected USB storage medium.
Notice
FOLDER DESTINATION
The files will be stored in the folder
\[device name]\Scan on the USB storage medium. If this folder does not exist, then it will be created.
1 Insert the document.
2Make sure that a USB storage medium is connected to the USB host port on the front or on the backside of the device. Connect a USB storage medium as required.
Notice
SELECTION MENU FOR USB STORAGE
MEDIA
The selection menu for USB storage media appears on the display as soon as you connect a USB storage medium (USB stick, external hard drive etc.) to the USB host port on the front of the device.
Scanner · Scan Document and Save onto a USB Storage Medium |
23 |
3Using [ SCAN TO USB select from the menu or press C, 913 and OK.
Notice
ACCESS FUNCTION
EN
You can also call the function by pressing C, 32 and OK.
4 Enter a name for the file.
Notice
ENTER LETTERS
Enter capital letters by pressing and
holding +key. You can enter space using
½ .
The special characters available are located directly above the letter keypad and can be entered by pressing the õ- key and the respective letter key at the same time.
You can move the cursor using [. Use C to delete individual characters.
5 Confirm with OK.
6Using [, select whether you would like to save the file as an image file or as a PDF file.
Notice
SELECT THE FILE FORMAT
For an image file, you can select whether you would like to save the file in TIFF or JPEG format (see also chapter on Selecting File Format, page 59).
7 Confirm with OK.
8Select the desired resolution using [:
DRAFT—Greyscale scan with low resolution, for instance, for using on the Internet.
TEXT—Black and white scan with medium resolution for text documents
GRAY—Greyscale scan with medium resolution
PHOTO—Greyscale scan with high resolution, for instance, for photographs
9 Confirm with OK.
10 Set the desired contrast using [.
-/1—Reduces the contrast / typeface appears lighter
4 (Factory settings)—Optimized adaptation for all documents
+/7—Increases the contrast / typeface appears darker (for example, documents with faint print)
11 Confirm with OK.
12 Using [, select the desired level of brightness: -/1—Reproduction is lighter
4 (Factory settings)—Optimized adaptation for all documents
+/7—Reproduction is darker
13 Confirm with OK. The document is scanned and saved on the USB storage medium.
14 If you want to scan a multiple page document with the flatbed scanner, insert another page and select NEXT PAGE with [.
CAUTION!
REMOVING USB STORAGE MEDIA!
Never pull out the storage medium while the device is accessing it. This could cause data to be damaged or lost.
SCANNING DOCUMENT AND SAVING ON NETWORK COMPUTER
Using this function, scan a document with your device and transfer it onto a computer which is connected to the device via network.
Notice
START SCANNING FROM COMPUTER
Using the Companion Suite LL software, you can call up the scan on the computer. You can also start the scanning process from any other graphics program if it is supported by the Twain Driver. Select the Twain Scanner Driver as your scanner.
MAKE SCANS USING STANDARD SETTINGS
1 Press SCAN.
2 Use [ to select SCAN TO LAN.
3 Confirm with OK.
Notice
ACCESS FUNCTION
You can also call the function by pressing C, 36 and OK.
4Select the desired target computer from the list of connected network computers using [.
5 Confirm with OK.
6 Press OK.
MAKE SCANS USING USER-DEFINED SETTINGS
1 Press SCAN.
2 Use [ to select SCAN TO LAN.
3 Confirm with OK.
Notice
ACCESS FUNCTION
You can also call the function by pressing C, 36 and OK.
4Select the desired target computer from the list of connected network computers using [.
5 Confirm with OK.
24 |
Sagemcom · MF 5571dw |

6 Use [ to select SETTINGS.
7 Confirm with OK.
8Select the desired resolution using f:
DRAFT—Greyscale scan with low resolution, for instance, for using on the Internet.
TEXT—Black and white scan with medium resolution for text documents
GRAY—Greyscale scan with medium resolution
PHOTO—Greyscale scan with high resolution, for instance, for photographs
9 Confirm with OK.
10 Enter a name for the file.
Notice
ENTER LETTERS
Enter capital letters by pressing and
holding +key. You can enter space using
½ .
The special characters available are located directly above the letter keypad and can be entered by pressing the õ- key and the respective letter key at the same time.
You can move the cursor using [. Use C to delete individual characters.
11 Confirm with OK.
12 Using [, select whether you would like to save the file as an image file or as a PDF file.
Notice
SELECT THE FILE FORMAT
For an image file, you can select whether you would like to save the file in TIFF or JPEG format (see also chapter on Selecting File Format, page 59).
13 Press o. The document is scanned and transferred to the computer.
14 If you want to scan a multiple page document with the flatbed scanner, insert another page and select NEXT PAGE with [NEXT PAGE .
15 Confirm with OK.
SCANNING WITH THE COMPANION CENTER SFX
With the Companion Center SFXsoftware, you can scan documents and then edit them on the computer.
1Start the software Companion Center SFX, by clicking on the Companion Center SFX icon on your desktop or selecting Start > Programs >
Companion Center SFX > Laser SFX > Companion Center SFX in the Start Menu.
2The light in the upper-right corner shows whether or not the device is connected to the computer and is functioning properly.
3 Selecting the Scan tab.
|
|
|
|
>,3$GGUHVV@ |
|
6FDQ |
)D[ |
6HWWLQJV |
+HOS |
|
|
|
EN |
||||
|
,PDJH |
2&5 |
0DLO |
)LOH |
|
6HWWLQJV |
|
|
|
|
|
6RXUFHV |
|
|
|
|
|
$XWR |
|
|
|
|
|
0RGH |
|
|
|
|
|
&RORU |
|
|
|
|
|
5HVROXWLRQ |
|
|
|
|
|
GSL |
|
|
|
|
|
3DSHU )RUPDW |
|
|
|
|
|
$ |
|
|
|
|
|
2XWSXW )RUPDW |
|
|
|
|
|
MSHJ |
|
|
|
|
|
6DYH |
|
|
|
|
|
)LOH 1DPH |
|
|
|
|
|
,PJ |
|
|
|
|
|
6DYH ,PDJH |
|
|
|
|
|
0\ 3LFWXUHV |
|
|
|
6FDQ 3UHYLHZ |
|
!6DYH WR D IROGHU ZLWK GDWH |
|
|
|
|
|
2SHQ ZLWK |
|
|
|
|
|
4Select from the default settings for various usage profiles.
Image—Optimized settings for scanning photos.
OCR—(Optical character recognition) Reading printed text and importing it as a text document which can be edited and modified. Photos or hand-written texts are excluded from character recognition.
Mail—The scan is attached to an e-mail.
File—The scan is saved as a file.
5If you would like to change the current settings, the following functions are available:
Sources—Automatic document feeder or flat-bed scanner as scan source
Mode—Scan in the black-and-white mode (also called “barcode mode”) or in the grey tone mode.
Resolution—Select the scan resolution Paper Format—Setting the paper format
Output Format—Select the file format
6 In File Name, enter the name of the output file.
7Under Save Image, select the folder where the file is to be saved. With the option >Save to a folder with date, the file is saved in a folder with the current date.
8Activate the function Open with if you want to open the scanned file after the scanning process is complete. Select the desired program. For example, you can open an image file in an imageediting program, an OCR in a word-processing program, or an email attachment in your email program.
9Click on Scan Preview to see a preview of the scanned document.
10 Click on the button Scan in order to start the scanning process.
Scanner · Scanning with the Companion Center SFX |
25 |
7 PRINTER AND PRINTING MEDIA
Notice
EN
PRINTING FROM COMPUTER
When you install the Companion Suite LL on your computer, the device is also installed as a printer under Windows. In the print menu under Start > Settings > Printers, you will find your device listed as Laser Printer Scanner.
You can access your device from any program and use it to make black-and-white print-outs just as you would use any other printer. Simply select the Laser Printer Scanner as your printer.
SPECIFICATIONS FOR PRINT MEDIA
You can insert normal printing paper or printed documents (forms) into the paper tray. You can insert special paper formats, envelopes, slides, sheets of labels or printed documents into the manual paper feed.
PAPER TRAY
Paper Sizes |
Size A4· A5 · B5 (JIS) · |
|
Letter · Legal (13/14¦") · |
|
Exec |
|
|
Weight |
60¦–¦105¦g/m² |
|
|
Capacity |
250 sheets |
|
|
|
|
Manual Paper Feed |
|
|
|
Paper Sizes |
Width: 98¦–¦216¦mm |
|
Length: 148¦–¦356¦mm |
|
|
Weight |
60¦–¦165¦g/m² |
|
|
Capacity |
1 sheets |
|
|
CAUTION!
UNSUITABLE PAPER!
Do not insert any sheets of paper into the paper tray …
... are wet, have been edited with correction fluid, are soiled or have a coated surface.
…that are held together with office or notebook staples or with tape or glue. Use sheets of labels for use in laser printers.
…are pasted with note papers.
…are creased, crumpled or torn.
CAUTION!
FORMS FROM A LASER PRINTER!
Forms that have been printed out by a laser printer are not suitable for further printing.
INSERT PAPER INTO THE PAPER TRAY
1 Pull the paper tray out of the device.
2 Lift up the cover of the paper tray
CAUTION!
INITIAL OPERATION!
Please remove the protective cardboard from the paper tray before loading paper and replacing the paper tray into the device.
26 |
Sagemcom · MF 5571dw |
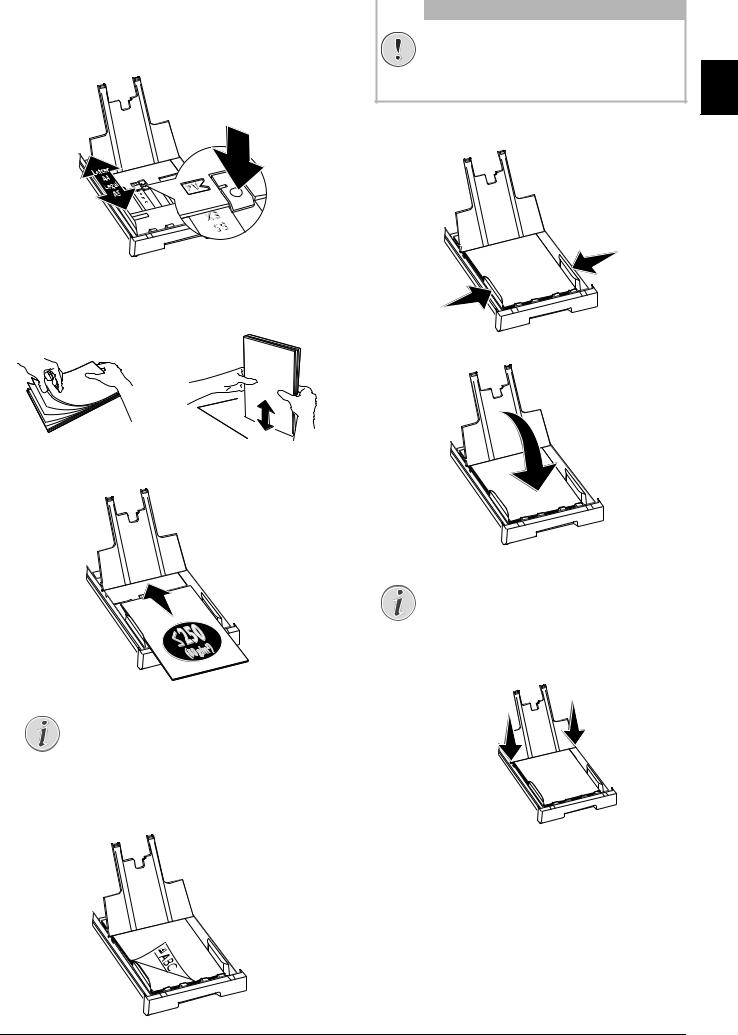
3Adjust the length of the paper tray to the printer paper. Press the lock key on the base of the paper tray. Slide the rear panel until it snaps into the suitable marking: Legal = LG, A4 = A4, A5 = A5, Letter = LE, B5 = B5.
4Separate the paper sheets by fanning them out, then align them by tapping edge of the stack lightly against a flat surface. This will prevent several sheets of paper from being drawn in all at once.
5Insert the paper into the paper tray. You can load up to 250 sheets (80¦g/m²).
CAUTION!
FORMS FROM A LASER PRINTER!
Forms that have been printed out by a
laser printer are not suitable for further EN printing.
6Enclose the paper with the two side paper guides. Be sure not to enclose it so tightly that it bends.
7 Close the paper tray cover.
Notice
LOADING PRE-PRINTED MATERIAL
If you would like to print on an input sheet (for example, forms or stationery), place the input sheet face down in the paper tray, with the top of the page towards the front.
Notice
COVER OF THE PAPER TRAY
If the cover of the paper tray has become detached, fasten the lid into the supports Ensure that the flat side of the cover (with the inscription) faces upwards.
Printer and Printing Media · Insert Paper into the Paper Tray |
27 |
 Loading...