


FACSIMILE
SAGEM PHONEFAX 320 / 325
User manual
This product is not designed for making emergency telephone calls when the power fails. Alternative arrangements should be made for access to emergency service.

GENERAL VIEW
1 |
2 |
10
 3
3
5
6
4
9 |
8 |
7 |
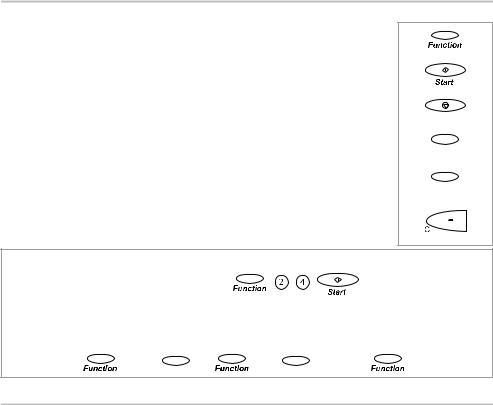
320 / 325 MODEL CONTROL PANEL
12 13 14 15 |
16 |
17 18 |
11
Fine Photo |
Tel. Fax TAD |
<< >
Mode |
Function |
Auto Answ. |
|
1 abc |
pqr 6 |
def 2 |
7 stu |
|
41 |
3 ghi |
vw 8 |
|
||
jkl 4 |
9 xyz |
|
|
||
|
5 mno |
+ - 0 |
40 |
39 |
38 |
<< >
Mode Function Auto Answ.
19 20 21 22 23
Redial |
1 |
2 |
3 |
|
|
|
|
|
Recall |
4 |
5 |
6 |
|
|
EraseOGM |
|
Fax |
7 |
8 |
9 |
|
|
|
|||
Speed |
|
|
|
|
24 |
|||
|
|
|
|
|
|
|
|
|
Dial |
|
0 |
# |
|
|
|
|
Stop |
Hold |
* |
|
|
|
|
25 |
||
C - |
|
+ |
|
|
Play |
|
Start |
|
|
|
|
|
|
|
|||
|
33 |
32 |
31 |
30 |
29 |
28 |
27 |
26 |
34
Redial
35
Recall
36
Speed
Dial
37
Hold

NOTE
This manual covers the following models:
-320 : internal telephone answering device model.
-325 : internal telephone answering device model, delivered with a cordless telephone.
1Fax access panel.
2Handset.
3Cordless telephone socket access flap.
4Cordless telephone socket.
5Console.
6Front cover.
7Telephone handset socket.
8Telephone line socket.
9Mains socket.
10Rear cover.
11LCD display panel (characters and icons).
12Fine icon: FINE resolution mode (high quality).
13Photo icon: PHOTO resolution mode (photographs).
14Error icon: appears in the event of an incident (e.g. open cover).
15On-line icon: on during transmission; flashes while connecting.
16Tel icon: on when the telephone is in use; flashes when ring is off.
17Fax icon: on when receiving a document; flashes when the fax’s memory is full.
18TAD icon: on when internal telephone answering device (TAD) is operating; flashes when there are no messages or when the TAD is full.
19Dial keypad.
20Erase key: to erase messages on the TAD.
21OGM key: to listen to or record messages on the TAD.
22Fax key: to print out faxes stored in memory.
23Fax indicator: presence of fax messages stored in memory, but not printed out.
24 (Stop) key: to stop the current operation or as a mute for the telephone.
25 (Start) key: to send a fax or activate photocopying.
26 key: used to fast forward through TAD message playback.
27Play indicator: there are messages on the TAD.
28Play key: to play back messages on the TAD.
29 key: used to skip back through TAD message play back.
30Loudspeaker indicator: hands-free telephony or speaker mode.
31+ key: loudspeaker volume up.
32

 (Loudspeaker) key: hands-free telephony or speaker mode.
33 key: loudspeaker volume down.
34Redial key: to automatically call the last numbers dialled.
35Recall key: to insert a pause in the number being dialled or as a “FLASH” key (PABX).
36Speed Dial key: to call or store an abbreviated number in the unit’s memory.
37 Hold key: to transfer a telephone call to another handset on the same line.
38< Auto answ. key: to select the answer mode, to access the next option of the menu displayed, or to shift the cursor right.
39< Function key: to access the unit’s various functions and as a confirmation key.
40< Mode key: to select the scan resolution, to access the previous option of the menu displayed or to shift the cursor left.
41Direct dial / alphanumeric keypad.
TABLE OF CONTENTS
CHAPTER 1: |
INSTALLATION................................................................................................. |
1 |
|
|
1. |
Unpacking the unit ....................................................................................................... |
1 |
|
2. |
Output paper ................................................................................................................ |
1 |
|
3. |
connections ............................................................................................................... |
1 |
|
4. |
Use.................................................................................................................................. |
2 |
CHAPTER 2: |
TELEPHONE FUNCTIONS .............................................................................. |
5 |
|
|
1. |
Directory ...................................................................................................................... |
5 |
|
2. |
Loudspeaker key ......................................................................................................... |
6 |
|
3. |
Other functions............................................................................................................. |
6 |
CHAPTER 3: |
FACSIMILE......................................................................................................... |
7 |
|
|
1. |
Inserting a document ................................................................................................... |
7 |
|
2. |
Transmitting documents.............................................................................................. |
7 |
|
3. |
Receiving faxes ............................................................................................................. |
9 |
|
4. |
Making a telephone call during a fax transmission ................................................ |
10 |
|
5. |
Queue function ........................................................................................................... |
10 |
|
6. |
Fax-back and polling.................................................................................................. |
11 |
CHAPTER 4: |
TELEPHONE ANSWERING DEVICE.......................................................... |
12 |
|
|
1. |
Activating / de-activating the TAD ........................................................................... |
12 |
|
2. |
Announcements .......................................................................................................... |
12 |
|
3. |
Messages OGM........................................................................................................... |
13 |
|
4. |
Call screening ............................................................................................................. |
13 |
|
5. |
Recording a memo...................................................................................................... |
14 |
|
6. |
Remote retrieval ......................................................................................................... |
14 |
|
7. |
Privileged access ......................................................................................................... |
15 |
CHAPTER 5: |
RECEIVE MODES ........................................................................................... |
16 |
|
|
1. |
Telephone mode.......................................................................................................... |
16 |
|
2. |
Fax/phone mode ......................................................................................................... |
16 |
|
3. |
TAD mode (*) ........................................................................................................................................... |
16 |
CHAPTER 6: |
OTHERS FUNCTIONS .................................................................................... |
17 |
|
|
1. |
Photocopying .............................................................................................................. |
17 |
|
2. |
Printing out ................................................................................................................. |
17 |
|
3. |
Remote operation from another handset on the same line..................................... |
18 |
|
4. |
Audible alarm ............................................................................................................. |
18 |
|
5. |
Ink gauge..................................................................................................................... |
18 |
|
6. |
Operation in conjunction with a cordless telephone ............................................... |
18 |
|
7. |
Distinctive ringing (for Australia only) .................................................................... |
19 |
|
8. |
Using a portable phone (depending on model) ........................................................ |
19 |
CHAPTER 7: |
APPENDICES.................................................................................................... |
20 |
|
|
1. |
Consumables replacement......................................................................................... |
20 |
|
2. |
Settings ........................................................................................................................ |
22 |
|
3. |
Transmission report codes ........................................................................................ |
22 |
|
4. |
Troubleshooting.......................................................................................................... |
23 |
|
5. |
Notice for connection to the telecommunication system......................................... |
24 |
This equipment has been approved in accordance with Council Decision 98/482/EC for pan-European single terminal connection to the public switched telephone network (PSTN).
In the event of problems, you should contact your equipment supplier.

NOTE POUR L’IMPRIMEUR : VOIR BAT

CHAPTER 1: INSTALLATION
1. |
UNPACKING THE UNIT |
|
|
Check the presence of the following items: |
|
|
‡ Machine |
‡ Telephone cable |
|
‡ Mains supply unit |
‡ Paper |
|
‡ Telephone handset |
‡ User manual |
2. |
OUTPUT PAPER |
|
You may use any standard plain paper (A4 format photocopying paper, approx. 80 g/m2). However, for
!optimal print quality results, we suggest you use the type of paper recommended by the manufacturer.
‡ Introduce the paper one sheet by one sheet.
3. CONNECTIONS |
! |
Refer to the safety warnings at the begin- |
ning of this user manual. |
||
1 |
2 |
|
2  1
1 


Connect the telephone handset cord to the appropriate connector (1) on the main unit.
Connect the plug of the telephone cable into the appropriate connector (2) on the main unit, and connect the other end to your wall telephone socket.
3 |
3 |
|
or |
|
4 |
Check if the wall socket to which you’ll con-
!nect your machine complies with directives on the label under the mains supply unit.
Connect the plug of the mains supply unit into connector (4) on the main unit. Ensure the strip (3) is facing upwards.
Connect the mains cable plug of the mains supply unit to the wall socket.
1
4. USE
When the unit is powered up for the first time, you will be prompted to set the date and time. Having entered the date and time, you may use all your unit’s basic functions. You may program your "first setups" before sending a fax.
FUNCTIONS ACCESS
The following keys are used to program your unit:
-FUNCTION ou  key
key
-START key:
-STOP key:
-> key:
-< key:
-C key:
enables you to enter FUNCTION mode or to confirm an entry or option.
used to confirm an entry or option.
enables you to exit the FUNCTION mode. Any changes which were not confirmed will be discarded.
enables you to move to the next option or to shift the cursor
right in an input field.
enables you to return to the previous option or to shift the
cursor left in an input field.
enables you to exit a function or go back up one level in the menu structure.
<
Stop
<
<
There are 2 ways to access functions:
• by invoking the appropriate function directly, e.g.: |
< |
|
(print out the listing of function codes press FUNCTION, 5, 1,  )
)
• by scrolling through the unit’s menus using the V, > and <.. keys, e.g.:
< |
< |
< |
< |
(3 times) |
|
|
|
|
FIRST SETUPS
<
ENTERING OR CHANGING THE DATE AND TIME
‡Press FUNCTION, 2, 1 and  .
.
‡Enter the date and time using the numerical keypad, then press  to confirm. For example, to enter 7 May 1999, 9:15, enter 0 7 0 5 9 9 0 9 1 5 then press
  .
.
STORING YOUR CSID
This is the number of the telephone line to which your unit is connected. This number will be printed on the header of the faxes you send.
‡Press FUNCTION, 2, 2 and 
‡Enter your CSID using the numerical keypad, then press  to confirm.
Notes: to erase the last character entered, press the < key.
You can insert spaces to make the number more legible, using the > key.
To insert a “+” sign, press the “*” key.
2
ENTERING YOUR NAME
This name will be printed on the header of the faxes you send.
You can enter any letter in the alphabet using the alphanumeric keys “ abc”, etc.
Press several times on the appropriate alphanumeric key to obtain the letter you require (e.g. for the def key, pressing the key repeatedly will scroll through characters D, E, F, 2, D, E, etc.). As soon as the appropriate character is displayed, you may proceed to select the next character by pressing another alphanumeric key or by pressing >.
‡Press FUNCTION, 2, 3 and  .
.
‡Enter your name using the alphanumeric keys, then press  to confirm.
Notes: to erase the last character entered, press the < key .
You can insert spaces by pressing the > key.
To insert a “+” or “-“ sign, press the “0” key.
TYPE OF NETWORK
Customise your unit to the particular type of network it is linked up to
-If you are linked directly to the public network (e.g. in a private home), you need not make any modifications since the unit is set to “public network” by default on leaving the factory.
-If you are not linked up to the public network (e.g. in a large company), you should set the unit to “private network”.
Proceed as follows:
‡Press FUNCTION, 2, 4 and  .
.
‡Scroll through the options by pressing the > key, then press  to confirm.
PULSE / TONE DIALLING
Your unit has been factory-programmed to operate on digital exchanges that support tone dialling.
If you are unable to connect and make a call, this may be because you are connected to an exchange that only supports pulse dialling.
‡Press FUNCTION, 2, 5 and  .
.
The current dialling mode is displayed: TONE or PULSE
‡Press the > key to select the other mode, then press  to confirm.
SETTING THE NUMBER OF RINGS BEFORE AUTOMATIC ANSWER
‡Press FUNCTION, 2, 6 and  .
.
‡Enter the new number of rings required, then press  to confirm.
SELECTING THE RINGING TONE
‡Press FUNCTION, 2, 7 and  . You will hear the current ringing tone. Use the > key to select another tone.
‡To set the volume of the ringing tone, press the + and - keys (4 possible levels).
‡When you have set the appropriate ringing tone and volume, then press  to confirm.
Note: select WITHOUT RING to eliminate the ringing tone outright; the TEL icon will flash instead.
REMOTE INQUIRY CODE
This function allows you to define the code necessary for locally or remotely accessing the vocal messages recorded or the faxes received by your machine and stored in memory.
‡To enter an inquiry code, press keys FUNCTION, 2, 8 and  .
.
‡Enter your code, then press  to confirm.
3
PREFIX
If your unit is connected to a private automatic branch exchange (PABX), you are advised to record the prefix number (generally 0) into your unit.
‡Press the FUNCTION, 8, 4 and  .
.
‡Select the WITH option using the > or < keys and press the  key to validate.
‡Enter the number used by your PABX to access the telephone network (for instance 0) followed by a / and press the  key.
key.
‡Enter if necessary the phone number length from which the prefix must be automatically added (in most cases the value is 10).
‡Press the  key to validate.
Note: Check that the telephone numbers in the directory are not programmed with the prefix.
4
 Loading...