Sagem PHOTO EASY 255 User Guide

SAGEM
PHOTO EASY 255
User guide
Livret d’utilisation
Bedienungsanleitung
Manual del usuario
Manuale dell'utente
Gebruiksaanwijzing
S

CONTENTS
1 |
WELCOME |
1 |
|
Safety instructions and recommendations |
2 |
2 |
DISCOVER YOUR PHOTO EASY 255 PRINTER |
3 |
3 |
THE USER INTERFACE |
4 |
4 |
PREPARE YOUR PHOTO EASY 255 PRINTER |
6 |
|
Connect the mains supply |
6 |
|
First ribbon installation |
7 |
|
To change the ribbon |
8 |
|
Loading paper |
9 |
5 |
TRANSFERRING YOUR IMAGES |
11 |
|
Insert a memory card |
11 |
|
Transferring photos from a photo GSM |
12 |
|
Using a camera in DPOF mode |
13 |
|
Print starting from a bluetooth peripheral (optional) |
14 |
|
Connect a PC (Personal Computer) |
15 |
|
Print from a camera (PictBrigde mode) |
17 |
6 |
PRINT YOUR PHOTOGRAPHS |
19 |
|
19 |
|
|
Create your shopping basket |
20 |
|
Zoom |
21 |
7 |
CHOOSING YOUR OWN PRINTER SETTING |
22 |
|
Formats |
22 |
|
Set the photo quality |
23 |
|
Your preferences |
24 |
8 |
REPLACEMENT OF CONSUMABLES |
25 |
9 |
MAINTENANCE |
26 |
|
Cleaning the print head |
26 |
|
Paper jam |
27 |
|
Problems |
28 |
|
Error messages |
29 |
|
Technical data |
31 |
10 |
GARANTEE |
32 |
ENGLISH
FRANÇAIS
DEUTSCH
ESPAÑOL
ITALIANO
NEDERLANDS
- I -
- II -

1 WELCOME
You have just acquired a SAGEM PHOTO EASY 255 printer, and we thank you for choosing our product. With this high quality printer you can get the most out of your digital photos. In a few simple steps you can produce photo prints identical to those from a professional developer, for your personal use or to share with friends and family.
The easy-to-follow steps in this user guide will walk you through:
ENGLISH
•Switching on your PHOTO EASY 255 printer. FRANÇAIS
•Printing photographs stored on a memory card.
•Printing photographs transferred from a GSM mobile phone, from a camera in DPOF or Pictbridge mode, or an optional Bluetooth peripheral.
•Installing the image processing software and printer driver on a PC.
•Maintenance and troubleshooting of your PHOTO EASY 255 printer. DEUTSCH
•The CD-ROM included with your kit contains an additional guide with instructions for using the image processing software and printer driver on  your PC.
ESPAÑOL
ITALIANO
NEDERLANDS
- 1 -

SAFETY INSTRUCTIONS AND RECOMMENDATIONS
•Do not install your PHOTO EASY 255 printer in a humid room (bathroom, laundry, kitchen, etc.), or within 1.50 m of a tap or water source, or outside. The printer should be operated within an ambient temperature range of 10 °C to 35 °C.
•Do not install your printer in a location where there is a noticeable amount of dust floating in the air. Such dust can degrade the print quality of your photos.
•Only the power supply provided with the printer should be used. Connect this to the mains in accordance with the installation instructions in this user guide and the information on the identification label affixed to the power supply (voltage, current, mains frequency). As a precaution, in case of danger, the mains adapters act as a disconnecting mechanism for the 230V power supply. They should be placed near the device and should be easily accessible.
•Never open the cover of the film cartridge compartment during printing. This could break the film and cause printer malfunction.
•Only use SAGEM consumables, if not you are likely to damage the equipment and invalidate the guarantee. To obtain the references of the consumables (refer to the paragraph Replacement of consumables, page 25).
•The CE marking certifies that the product meets the main requirements of the European Parliament and Council directive 1999/5/CE on telecommunications terminal equipment, regarding safety and health of users, and regarding electromagnetic interference.
The declaration of compliance can be consulted on the site www.sagem.com category "support", or can be requested at the following address:
E- Customer relations department
4 rue du petit Albi - 95800 Cergy Saint-Christophe - FRANCE
- 2 -

2 DISCOVER YOUR PHOTO EASY 255 PRINTER
Check that the following elements are present:
1PHOTO EASY 255 printer
2User manual
3CD-ROM with its applications
4Film cartridge *
5Photo paper (2 packs of 20 sheets)*
6USB cable
7Paper tray
8Power supply unit
9Mains cable
10xD card adapter
ENGLISH
FRANÇAIS
|
|
SY155 |
|
DEUTSCH |
|
|
10 |
|
|
|
|
M |
|
|
|
|
SAGE |
|
|
|
|
TOEA |
|
|
|
|
PHO |
|
|
|
9 |
2 |
Usergutidioen |
|
|
|
retdutiliesaitung |
|
|
|
|
|
Liivenungsanellusuariote |
|
|
|
|
BedManuaalldedell'utiejzning |
|
|
|
|
Manu saanw |
|
|
|
|
Gebruik |
|
|
|
|
S |
ESPAÑOL |
8 |
|
|
3 |
|
|
|
|
||
|
|
|
|
|
|
|
1 |
|
|
|
|
6 |
|
ITALIANO |
7 |
|
|
4 * |
|
|
|
|
|
|
* depending on model |
|
5 * |
|
NEDERLANDS |
|
|
|
|
|
|
|
- 3 - |
|
|

3 THE USER INTERFACE
The user interface enables you to:
•Select photos one by one or switch over to mosaic mode (6 photos displayed on screen),
•Print a photo directly,
•Activate auto improvement before printing a photo,
•Set the "Format", "Preferences" and "Image settings" parameters according to your needs,
•Select several photos and choose a different number of copies for each photo to be printed,
•Zoom onto a photo and print it.
Description of the user interface:
1.Mains lamp
2.On/Off button
3.Menu access button
4.Cancel button (C)
5.Zoom - and mosaic mode activation button
6.CRYSTAL IMAGE button (auto print quality improvement)
7.Print button
8.Confirm button (OK)
9.Zoom + button
10.Browser
- 4 -

The visual interface
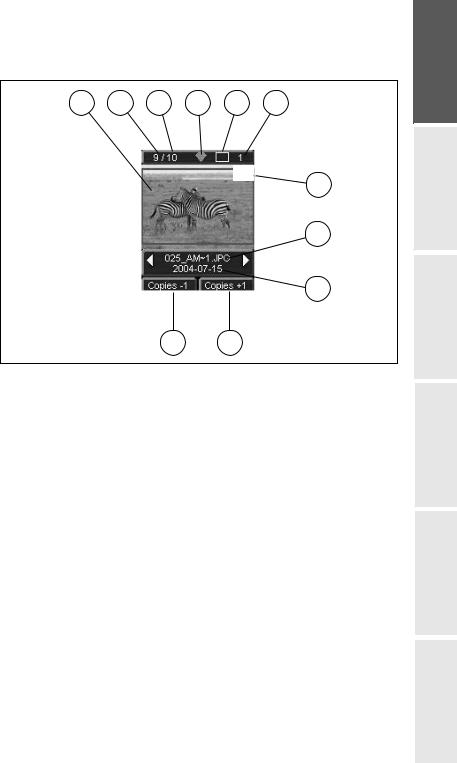
All the valid photos are displayed on the screen; use the or buttons to scroll through them:
1 2 3 4 5 6
X1
7
8
9
11 10
ENGLISH
FRANÇAIS
DEUTSCH
The following information is available on the screen:
1.Photo selected
2.Number of the photo selected
3.Total number of valid photos contained in the memory card or connected source
4.Auto improvement function icon
5.Print format
6.Number of the sheet to be printed
7.Number of copies of the photo
8.Photo filename
9.Date when the photo was taken in Year/Month/Day format
10.Add a copy,  button 11.Remove a copy,
  button
ESPAÑOL
ITALIANO
NEDERLANDS
- 5 -

4 PREPARE YOUR PHOTO EASY 255 PRINTER
CONNECT THE MAINS SUPPLY
Remark : When installing your printer near a wall or some other object, keep an open space of at least 4 inches at the back of the printer, to make sure the movement of the sheet of paper being printed is not obstructed.
Please refer to the safety instructions at the beginning of this user guide before making any connections.
Insert one end of the mains lead into the corresponding socket of the power supply.
Connect the power supply prug to the printer, pushing it in fully as shown in the illustration below.
Plug the other end of the power supply mains lead into a wall socket. Press the On/Off button  until the red light comes on.
The language selection screen appears when you switch the printer on for the first time. Use the browser's or keys to select the language
you want and press the  key to confirm.
The Sand the message "Waiting for memory card or other image source" are displayed on the screen.
- 6 -

FIRST RIBBON INSTALLATION
Remark : Use DSR400 or DSR400T consumables only. These are specially designed to provide you with optimum print rendering.
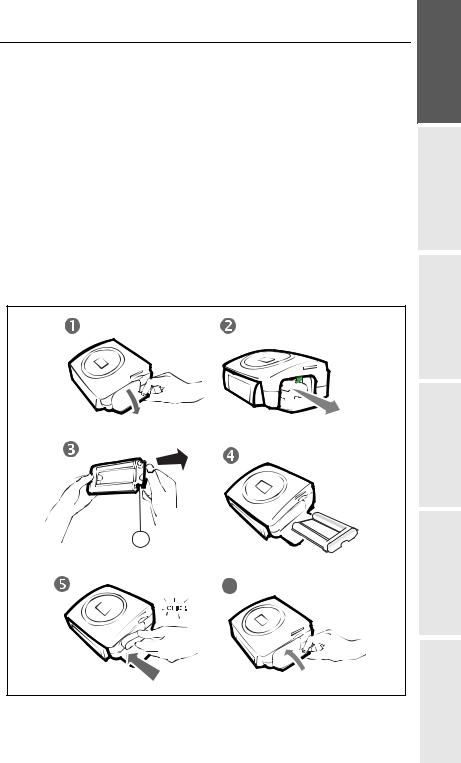
Switch on the printer. Wait 10 seconds for the printhead to lift, then:
1.Open the external flap located on the right-hand side of the printer.
2.Remove the protective foam.
3.Take the new ribbon out of its packaging and make sure that the film is stretched after removing the card (A).
4.Install the ribbon in the position shown in the illustration below.
5.Lift the locking lever and push in the film cartridge until it touches the back of the compartment the locking lever must be locked after insertion.
6.Close the external flap.
ENGLISH
FRANÇAIS
A
6
DEUTSCH
ESPAÑOL
ITALIANO
NEDERLANDS
- 7 -

TO CHANGE THE RIBBON
Remark : Use DSR400 or DSR400T consumables only. These are specially designed to provide you with optimum print rendering.
For this purpose, the printer must read the chip card delivered with each consumable kit after any new kit installation.
Switch on the printer. Wait 10 seconds for the printhead to lift, then:
1.Take the PLUG N’PRINT card delivered with the ribbon and the photo paper. Insert it in the drive located on the front panel of the printer. The PLUG N'PRINT card is recognised and read by the printer ; the following message is displayed at the end of the procedure "Transfer OK (40 or 120), Remove card".
2.Remove the PLUG N'PRINT card ; the display returns to the welcome screen.
3.Take the new ribbon out of its packaging and make sure that the film is stretched after removing the card (A).
4.Open the external flap located on the right-hand side of the printer.
5.Lift the locking lever and remove the used ink ribbon.
6.Install the ribbon in the position shown in the illustration below.
7.Lift the locking lever and push in the film cartridge until it touches the back of the compartment the locking lever must be locked after insertion.
8.Close the external flap.
A
6
7 |
8 |
- 8 -
 Loading...