


 Loading...
7(/(&20 |
,17(51(7 3+21()#;70 |
# # # # |
User’s manual |
2YHUYLHZ
,QWHUQHW 3KRQHID[Π# # |
,QWHUQHW 3KRQHI#[Π# # |
Access door to paper and document feeders
Rear cover
Front cover
Handset |
|
|
Paper tray |
|
|
|
|
|
OR |
||
|
|
|
Document feeder |
|
Rear cover |
|
Handset |
|
|
|
|
|
|
||
Control panel
Control panel
Front cover
Handset connector
Telephone line connector
,QWHUQHW 3KRQHI#[Π# # |
,QWHUQHW 3KRQHI#[Π# # |
OR
DECT kit module
connector
DECT kit module connector
PC connector
PC connector

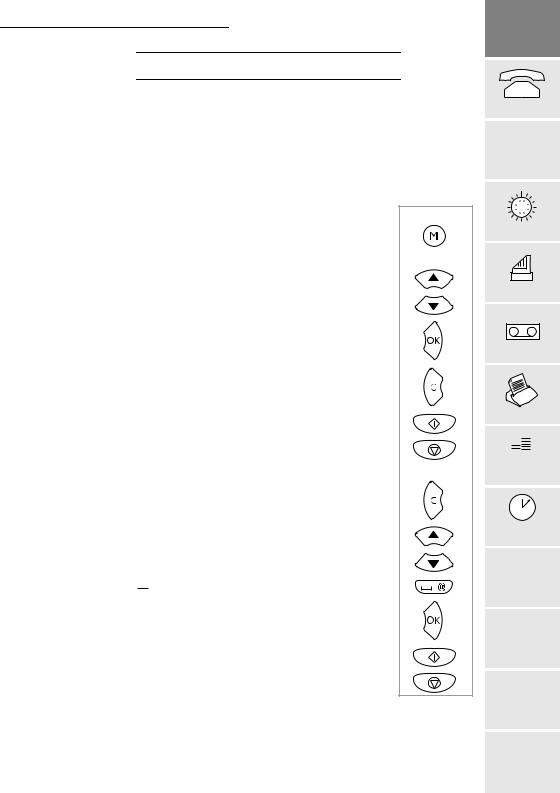
&RQWURO SDQHO
1 |
2 |
4 |
5 |
|
|
6 |
3 |
7 |
8 |
9 10 11 |
12 |
|||||||||||||
|
|
|
|
|
|
|
|
|
|
|
|
|
|
|
|
|
|
|
|
|
|
|
|
|
|
|
|
|
|
|
|
|
|
|
|
|
|
|
|
|
|
|
|
|
|
|
|
|
|
|
|
|
|
|
|
|
|
|
|
|
|
|
|
|
|
|
|
|
|
|
|
|
|
|
|
|
|
|
|
|
|
|
|
|
|
|
|
|
|
|
|
|
|
|
|
|
|
|
|
|
|
|
|
|
|
|
|
|
|
|
|
|
|
|
|
|
|
|
|
|
|
|
|
|
|
|
|
|
|
|
|
|
|
|
|
|
|
|
|
|
|
|
|
|
|
|
|
|
|
26
25 |
22 |
24 |
1 : key to print documents received in the memory
2 : key to play back messages received on the
answering machine
•blinking: presence of messages not played back
•steady: presence of played back messages
3LCD screen made of 2 lines of 16 characters and 10 icons
4Choice of fax transmission resolution
• (Fine): fine icon on
• (Photo): photo icon on
5Line icon  :
:
•on: fax communication in progress
•blinking: establishment of fax communication or phone communication in progress
6Memory status (0 to 4  )
)
7Choice of reception mode ( 

 ) :
) :
• icon (TEL): telephone in service Blinking icon: mute ring
• icon (FAX): automatic fax reception
 icon (TAD): TAD in service
8 (WEB TO PRINT) key: access to Web services
|
directory |
9 |
(DIRECTORY) key: access to directory |
10 |
key: insertion of a dialling break (/), or flash feature |
|
(PABX) |
11 |
(REDIAL) key:automatic call-back of one of the last |
10 called numbers
12Numeric keypad
13 (START) key: fax transmission, or local copy
|
|
|
|
|
|
|
|
|
|
|
|
|
|
|
|
|
|
|
|
|
|
|
|
|
|
|
|
|
|
|
|
|
|
|
|
|
|
|
|
|
|
|
|
|
|
|
|
|
|
|
|
|
|
|
|
|
|
|
|
|
|
|
|
|
|
|
|
|
|
|
|
|
|
|
|
|
|
|
|
|
|
|
|
|
|
|
|
|
|
|
|
|
|
|
|
|
|
|
|
|
|
|
|
|
23 |
|
16 |
20 |
|
15 |
|
|
14 |
13 |
|||||
|
|
|
|
|
|
|
|
|
|
|
|
|
|
|
|
21 |
|
19 |
|
|
18 |
|
|
|
|
||||
|
|
|
|
|
|
|
|
|
17 |
|
|
|
||
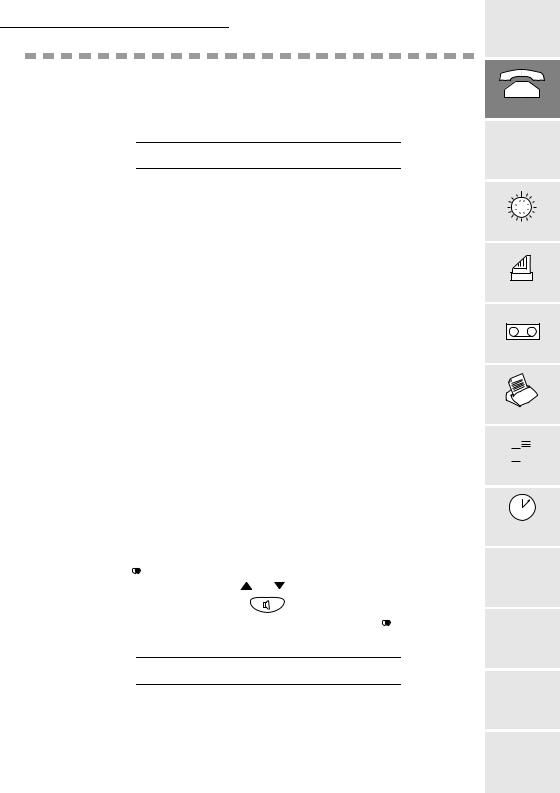
14(INTERNET) key: transmission via the Internet
15 (STOP) key: stop of the operation in progress, or
activation of the secret mode
16 |
(LOUDSPEAKER) key: hands-free mode or |
|
speaker mode |
17 |
key: move up in menus or to the left in an entry |
|
field - Volume up |
18 |
key: confirmation of the displayed selection |
19 |
(MENU) key: access to the various functions |
20 |
key: move down in menus or to the right in an |
|
entry field - Volume down |
21 |
key: return to previous displayed message or clearing of |
the last character entered in an entry field
22Alphabetic keypad
23 key: used in conjunction with any letter on the keypad to
|
|
access the symbols shown above the alphabetic |
|
|
characters |
24 |
|
key: used alone to insert a space. Used in |
|
|
conjunction with the Ctrl key to enter the @ |
|
|
character in an Internet address |
25 |
|
(shift) key:used in conjunction with any letter on the |
|
|
keypad to enter a capital letter |
26 |
|
keys: preprogrammed keys to access the |
|
|
following functions: |
|
|
: list of callers (Service Class) |
 : night mode
 : access to the print menu

Contents
&217(176
,1752'8&7,21
8QSDFNLQJ &RQQHFWLRQV
/RDGLQJ WKH SDSHU
&KRRVLQJ WKH RSHUDWLQJ PRGH 7KH PHQXV
7(/(3+21,1*
&DOOLQJ
$QVZHULQJ D FDOO )XQFWLRQV DYDLODEOH GXULQJ D FDOO
',5(&725<0(18
&UHDWLQJ D UHFRUG 0DNLQJ D FDOO IURP WKH GLUHFWRU\ (GLWLQJ D UHFRUG
'HOHWLQJ D UHFRUG 3ULQWLQJ WKH GLUHFWRU\ 6DYLQJ ORDGLQJ WKH GLUHFWRU\
6(77,1*6 0(18
'DWH 7LPH
1XPEHU 1DPH
5LQJLQJ PHORG\ DQG NH\ EHHSV 1HWZRUN
1LJKW PRGH 1XPEHU RI ULQJV IRU WKH DXWR PRGH &RUGOHVV SKRQH
3URWHFWLRQ RI \RXU PDFKLQH
)$;0(18
,QVHUWLQJ WKH GRFXPHQW LQWR WKH IHHGHU
6HQGLQJ D ID[ 5HFHLYLQJ D ID[
'XULQJ WUDQVPLVVLRQ $GYDQFHG IXQFWLRQV 2SHUDWLRQ ZLWK D FHOOSKRQH
7$' 0(18
*UHHWLQJ PHVVDJHV
6ZLWFKLQJ RQ
0HVVDJHV 5HPRWH DFFHVV
$GYDQFHG IXQFWLRQV
35,17,1* /2&$/ &23<0(18
3ULQWLQJ
/RFDO FRS\
5LEERQ JDXJH GLVSOD\
3ULQWLQJ WKH :HE VLWH GLUHFWRU\

Contents
'2&80(17 &21752/0(18
([HFXWLQJ D SHQGLQJ FRPPDQG 0RGLI\LQJ RU FRQVXOWLQJ WKH TXHXH 'HOHWLQJ D FRPPDQG IURP WKH TXHXH
3ULQW D GRFXPHQW ZDLWLQJ IRU WUDQVPLVVLRQ
3ULQWLQJ RXW WKH OLVW RI SHQGLQJ RSHUDWLRQV $'9$1&(' )81&7,2160(18
0DLOER[ 0%;
7HFKQLFDO SDUDPHWHUV
5HPRWH FRQWURO IURP DQ H[WHQVLRQ VHW
6(59,&(60(18
:HE WR SULQW VHUYLFH
)#[ΠWR )D[ VHUYLFH GHSHQGLQJ RQ PRGHO
,17(51(70(18
,QWHUQHW VXEVFULSWLRQ
7UDQVPLVVLRQ 5HFHSWLRQ RQ WKH LQWHUQHW 6HWWLQJV
237,216
'LVSOD\ 8VLQJ WKH 5 NH\ &RQQHFWLRQ WR D 3&
$33(1',;
5HSODFHPHQW RI FRQVXPDEOHV 7URXEOHVKRRWLQJ &RGHV RI WKH WUDQVPLVVLRQ UHSRUW 7HFKQLFDO VSHFLILFDWLRQV
This equipment has been approved in accordance with Council Decision 98/482/EC for pan-European single terminal connection to the public switched telephone network (PSTN). This equipment is in accordance to the following standarts: I-CTR 37, CTR 38, ETSI EG 201 121.
In the event of problems, you should contact your equipment supplier in the first instance.

Quick reference guide, menu guide
48,&. 5()(5(1&( *8,'( 0(18 *8,'(
',5(&725<0(18
3UHVV |
)XQFWLRQ FDOOHG |
)XQFWLRQ GHVFULSWLRQ |
6HH SDJH |
|
|
|
|
M 11 OK |
ADD |
Add a record into the directory |
9 |
|
|
|
|
M 12 OK |
MODIFY |
Modify a record in the directory |
10 |
|
|
|
|
M 13 OK |
CANCEL |
Delete a record from the directory |
11 |
|
|
|
|
M 14 OK |
Print the directory |
11 |
|
|
|
|
|
M 16 OK |
SAVE/LOAD |
Save/load the directory on a chip card |
|
M 161 OK |
SAVE |
Save the directory on a chip card |
11 |
M 162 OK |
LOAD |
Load the directory from a chip card |
11 |
|
|
|
|
6(77,1*6 0(18
3UHVV |
)XQFWLRQ FDOOHG |
)XQFWLRQ GHVFULSWLRQ |
6HH SDJH |
|
|
|
|
M 21 OK |
DATE/TIME |
Enter the date and time |
13 |
|
|
|
|
M 22 OK |
NUMBER/NAME |
Enter your number and name |
13 |
|
|
|
|
M 23 OK |
MELODIES/BEEPS |
Choose the ring melody and key beeps |
13 |
M 231 OK |
MELODY |
Choose the ring melody |
|
M 232 OK |
BEEPS |
Choose the key beeps |
|
M 233 OK |
ALARM |
Switch alarm On/Off |
|
|
|
|
|
M 24 OK |
NETWORK |
Set network parameters |
14 |
M 241 OK |
NETWORK TYPE |
Select network type |
|
M 242 OK |
PREFIX |
Activate the prefix |
|
|
|
|
|
M 25 OK |
NIGHT MODE |
Control the night mode |
14 |
|
|
|
|
M 26 OK |
NB OF RINGS |
Set the number of rings |
15 |
|
|
|
|
M 27 OK |
CORDLESS |
Cordless phone (depending on model) |
15 |
M 271 OK |
HANDSET REGIS |
Register handset (depending on model) |
|
M 272 OK |
HANDSET ERASE |
De-register handset (depending on model) |
|
M 273 OK |
HANDSET CODE |
Radio encryption code (depending on model) |
|
|
|
|
|
M 28 OK |
SECURITY |
Protected access |
15 |
M 281 OK |
MEM ACCESS |
Lock fax and voice messages |
|
M 282 OK |
REMOTE CODE |
Remote access code |
|
|
|
|
|

Quick reference guide, menu guide
)$;0(18
3UHVV |
)XQFWLRQ FDOOHG |
)XQFWLRQ GHVFULSWLRQ |
6HH SDJH |
|
|
|
|
|
|
M 31 OK |
FCT TRANSM |
Delayed transmission and broadcasting |
18 |
|
|
|
|
|
|
M 32 OK |
POLLING ACTV |
Perform an active polling |
21 |
|
|
|
|
|
|
M 33 OK |
POLLING PASS |
Perform a passive polling |
21 |
|
|
|
|
|
|
M 34 OK |
SEND REPORT |
Print choice of transmission reports |
19 |
|
|
|
|
|
|
M 35 OK |
TX FROM MEM |
Transmission from the memory or document |
19 |
|
feeder |
||||
|
|
|
||
M 36 OK |
RX TO MEM |
Reception of documents into the memory or on |
20 |
|
paper |
||||
|
|
|
||
M 39 OK |
GSM TRANSM |
Transmission from a GSM device |
22 |
|
|
|
|
|
7$' 0(18
3UHVV |
)XQFWLRQ FDOOHG |
)XQFWLRQ GHVFULSWLRQ |
6HH SDJH |
|
|
|
|
M 41 OK |
OGM RECORD |
Record the outgoing greeting message |
23 |
|
|
|
|
M 42 OK |
OGM PLAYING |
Play back the outgoing greeting message |
23 |
|
|
|
|
M 43 OK |
MEMO |
Record a message (memo) |
24 |
|
|
|
|
M 44 OK |
DELETE MSG |
Delete the voice messages |
25 |
|
|
|
|
M 45 OK |
TYPE |
Select the type of TAD |
24 |
|
|
|
|
M 46 OK |
FILTERING |
Select the call filtering feature |
26 |
|
|
|
|
M 47 OK |
PRIVIL ACCES |
Select the privileged access mode |
26 |
|
|
|
|
M 48 OK |
PRIVIL CODE |
Select the privileged access code |
26 |
|
|
|
|
35,17,1* /2&$/ &23<0(18
3UHVV |
)XQFWLRQ FDOOHG |
)XQFWLRQ GHVFULSWLRQ |
6HH SDJH |
|
|
|
|
M 51 OK |
GUIDE |
Print the menus |
29 |
|
|
|
|
M 52 OK |
LOGS |
Print the Tx and Rx logs |
29 |
|
|
|
|
M 53 OK |
DIRECTORY |
Print the directory |
29 |
|
|
|
|
M 54 OK |
SETTINGS |
Print the setting list |
29 |
|
|
|
|
M 55 OK |
SEND REPORT |
Print the last communication report |
29 |
|
|
|
|
M 56 OK |
LOCAL COPY |
Choose the number of copies |
29 |
|
|
|
|
M 57 OK |
RIBBON GAUGE |
Display the ribbon gauge status |
30 |
|
|
|
|
M 58 OK |
INTERNET SERVICE |
Print the Web site directory |
30 |
|
|
|
|
'2&80(17 &21752/0(18
3UHVV |
)XQFWLRQ FDOOHG |
)XQFWLRQ GHVFULSWLRQ |
6HH SDJH |
|
|
|
|
M 61 OK |
PERFORM |
Perform a pending command |
31 |
|
|
|
|
M 62 OK |
MODIFY |
Modify a pending command |
31 |
|
|
|
|
M 63 OK |
CANCEL |
Cancel a pending command |
31 |
|
|
|
|
M 64 OK |
PRINTING DOC |
Print a pending document |
31 |
|
|
|
|
M 65 OK |
PRINT LIST |
Print the command list |
32 |
|
|
|
|

Quick reference guide, menu guide
$'9$1&(' )81&7,2160(18
3UHVV |
)XQFWLRQ FDOOHG |
)XQFWLRQ GHVFULSWLRQ |
6HH SDJH |
|
|
|
|
M 71 OK |
MAILBOX |
Mailbox functions |
|
M 711 OK |
CREATE |
Create a mailbox |
33 |
M 712 OK |
CANCEL |
Cancel mailboxes |
33 |
M 713 OK |
TX MAILBOX |
Transmission to a mailbox |
34 |
M 714 OK |
MBX POLLING |
Poll a mailbox |
34 |
|
|
|
|
M 79 OK |
TECHNICAL |
Modification of the technical parameters |
35 |
|
|
|
|
6(59,&(60(18
3UHVV |
)XQFWLRQ FDOOHG |
)XQFWLRQ GHVFULSWLRQ |
6HH SDJH |
|
|
|
|
|
|
M 81 OK |
WEB TO PRINT |
Print Web pages |
|
|
M 811 OK |
MY LOG |
Select Web sites for my log |
37 |
|
M 812 OK |
UPDATE |
Automatic update of the WEB directory |
37 |
|
M 813 OK |
ADD |
Add a record into the directory |
38 |
|
M 814 OK |
MODIFY |
Modify a name in the WEB directory |
39 |
|
M 815 OK |
CANCEL |
Delete a name from the WEB directory |
39 |
|
M 816 OK |
Print the WEB directory |
37 |
||
|
|
|
|
|
M 82 OK |
F@X™ TO FAX |
Transmission to a fax machine via the Internet + |
39 |
|
Translation of the attachments |
||||
|
|
|
||
M 83 OK |
CARD CODE |
Register the Services card |
39 |
|
|
|
|
|
,17(51(70(18
3UHVV |
)XQFWLRQ FDOOHG |
)XQFWLRQ GHVFULSWLRQ |
6HH SDJH |
|
|
|
|
|
|
M 91 OK |
PROVIDER |
Choose the access provider |
42 |
|
|
|
|
|
|
M 92 OK |
IMMED ACCESS |
Immediate connection to the Internet access |
43 |
|
provider |
||||
|
|
|
||
M 93 OK |
SEND E-MAIL |
Send a message from the keypad |
44 |
|
|
|
|
|
|
M 94 OK |
SEND V-MAIL |
Send a voice mail |
44 |
|
|
|
|
|
|
M 95 OK |
SETTINGS |
|
|
|
M 951 OK |
CONNECTION |
Choose the type of connection |
45 |
|
M 952 OK |
TRANSMISSION |
Print the Internet parameters |
46 |
|
M 953 OK |
SERVERS |
Internet server addresses |
46 |
|
M 954 OK |
Choose the type of transmission |
45 |
||
|
|
|
|
|
M 96 OK |
MAIL SWITCH |
Sort the received mails: choose the type of |
46 |
|
reception |
||||
|
|
|
||
M 98 OK |
REROUTING |
Reroute fax and voice messages |
47 |
|
M 981 OK |
ON |
Switch on the rerouting function |
|
|
M 982 OK |
OFF |
Switch off the rerouting function |
|
|
M 983 OK |
SETTINGS |
Set rerouting parameters |
|
|
|
|
|
|
|
M 99 OK |
SUBSCRIPTION |
|
|
|
M 991 OK |
REGISTERING |
Send subscription form |
42 |
|
M 992 OK |
NEW ADDR |
Enter the new e-mail address |
42 |
|
|
|
|
|

Quick reference guide, menu guide

NOTE POUR
L’IMPRIMEUR : Insérer ici
les consignes de sécurité
Réf : 23226033-4 (voir spécification technique du LU :
23260056-2)
Introduction
,1752'8&7,21
The devices in the Internet Phonef@x™ range are both versatile and powerful communication tools. You can use them to phone and fax documents, but also to send faxes that addresses will receive as e-mail, or else to print out pages from an Internet site the address of whom you know . Moreover, even if you do not have a personal computer, anyone can send you e-mail which you will receive and print out directly on your fax machine.
Introduction
Telephoning
 1
1
Directory
|
|
Cordless handset |
|
|
Fax transmission |
|
("Cordless Telephone kit" |
Printer ("PC |
|
and reception |
TAD |
necessary) |
Interface kit" necessary) |
|
Fax reception through message service fax converted into an e-mail
2
Settings
3
Fax
4
eb W
|
Printed fax message transmission |
TAD |
pag |
(e-mail converted into a fax) |
|
|
es |
|
Fax transmission and |
|
reception on the Internet |
Prin ting |
|
,QWHUQHW 3KRQHI#[ΠIHDWXUHV
Because you can use this new generation of fax machines to send your faxes via the Internet, you will benefit from reduced rates since you will be charged only for a local call for all the calls you make (please refer to the section entitled INTERNET (MENU 9) on page 41).
The installation of your machine and the operation of all of its functions and features require a telephone socket and a mains socket near the machine. Internet connections require Internet access (or subscription).
813$&.,1*
Check for the following items when unpacking your machine:
•Main unit,
•Power cord,
•Telephone handset,
•Telephone line cord,
•Paper,
•Paper holder (*),
•DECT kit (cordless phone, charger and base station) (**).
An ink ribbon and its gauge card are pre-installed in the machine. You will have to replace them when they are worn (please refer to § Replacement of consumables on page 51).
5
Printing
 6
6
Doc control
7
Advanced functions
Services 8
@ 9
Internet
Options
|
|
|
|
|
(*) |
Models with a fixed paper tray (100 sheets). |
|
Appendices |
|
(**) |
Depending on model. |
1 |
||
|
||||
|
|
|
||
|
|
|
|
Introduction
&211(&7,216
Caution - Please refer to the Safety Instructions at the beginning of this User’s manual.
1 |
1 |
2 |
3 |
3 |
|
4 |
|
+Turn your machine upside down.
+Insert the plug (1) of the power cord into the connector (2) of the main unit.
+Run the power cord (3) into the groove (4).
+Replace your machine the right way round.
 6
6 

 5
5 

+ Connect the telephone handset cord to the + Connect the telephone line cord plug to the appropriate connector (5) on the main unit. appropriate connector (6) on the main unit, and connect the other end to the wall telephone
socket.
+ Connect the power plug to the wall mains socket.
/2$',1* 7+( 3$3(5
You may use any standard plain paper (A4 format photocopying paper, approx. 80 g/m²). However, for optimal print quality results, we suggest you use the type of paper recommended by the manufacturer (please refer to the last page of this User's manual).
To avoid malfunctions and get optimal print quality, you should observe the following basic instructions:
•use perfectly new paper without folds or rolled edges,
•do not reload the paper tray while printing is in progress,
•always remove all the pages left in the tray before reloading paper.
2
Introduction
02'(/6 :,7+ $ ),;(' 3$3(5 75$<
2 |
1 |
|
|
2 |
|
3 |
3 |
4 |
|
+ Snap the paper holder (1) in the two slots (2) |
+ Prepare a stack of plain paper (100 sheets |
provided at the top of the sheet feeder. |
maximum) |
+ Open the feeder cover (3) |
+ Place the paper stack into the feeder (4). |
|
+ Close the feeder cover (3). |
02'(/6 :,7+ $ 5(029($%/( 3$3(5 75$<
|
3 |
1 |
|
2 |
|
+ To open the cover (1), use notch (2) on the |
+ Lift the paper support bracket (3). |
side. |
|
|
+ Prepare a stack of paper (30 sheets max.). |
4 |
+ Insert it between the paper guides (4 and 5). |
|
+ Press the clip (6) to insert the paper in the fax |
|
machine’s paper store. |
5 |
+ Adjust the left paper guide (4) to the width of |
the paper. |
|
7 |
|
|
Caution - Lift the support bracket to facilitate |
6 |
printout stacking. |
|
Introduction
Telephoning
 1
1
Directory
2
Settings
3
Fax
4
TAD
5
Printing
 6
6
Doc control
7
Advanced functions
Services 8
@ 9
Internet
Options
Appendices
3

Introduction
&+226,1* 7+( 23(5$7,1* 02'(
Your Internet Phonef@x™ machine has three distinct operating modes, which are described below:
•automatic mode with TAD: your machine answers all calls and records incoming messages,
•automatic mode without TAD: your machine sorts incoming calls before presenting them to you,
•manual mode: your fax machine never answers any calls automatically.
In each of these three modes, you may pick up the handset at any time:
•when receiving a fax call, you can switch your fax machine to the fax reception mode by pressing the
 key,
key,
•when receiving a voice call, talk with the caller as you would on the phone.
+Press the 

 key once or repeatedly depending on the required reception mode: the icons corresponding to each mode are blanked (function off) or displayed (function on), as shown in the
following three sections.


 $8720$7,& 02'( :,7+ 7$'
Your unit works like a telephone answering device combined with a fax machine. Select that mode when you go out or if you do not want to lose any fax or voice calls.
When your machine rings, it answers after a couple of rings and plays the greeting message you have recorded on your TAD:
•if the call is a fax call, it automatically switches to the fax reception mode,
•if the call is a voice call, the caller will be able to leave a message on your TAD.
You can set the number of rings before your machine automatically answers (please refer to § Number of rings for the auto mode on page 15).

 $8720$7,& 02'( :,7+287 7$'
Your machine automatically sorts the calls before presenting them to you. Select that mode if you receive many faxes and you do not want to be disturbed by their reception.
When it receives a call, your machine automatically answers without ringing(*), then it emits a waiting signal, and:
•if the call is a fax call, it switches to the fax reception mode,
•if the call is a voice call, it rings (warning ring) for 30 seconds(**) and the caller can hear a ringing tone. you can then pick up and talk. Otherwise, the caller will be able to leave a message on your TAD, which will answer after 30 seconds and play the greeting message.
 0$18$/ 02'(
Your machine mainly works like a telephone set: select that mode if you usually do not receive any faxes.
In that mode, your machine never answers automatically (except after 10 rings if remote interrogation is enabled. In that case, it will play the greeting message).
(*)All other telephone sets in your installation, if any, will ring normally.
(**) |
All other telephone sets in your installation, if any, will not ring. |
|
4
Introduction
7+( 0(186
$&&(66,1* 7+( 0(186
As described in the next sections, your machine features many functions accessible through the menus, which allow you to set and modify them: recording a directory of numbers, memorising received or sent faxes, setting the number of rings, etc.
As can be seen in the menu guide, all functions are numbered in a main menu (e.g.1. Directory), from which you can access the various settings for the selected function (e.g. 1.1 Add, 1.2 Modify or 1.3 Delete a directory record).
0DLQ PHQX DFFHVV WR IXQFWLRQV
+ Press the M key.
6XE PHQXV DFFHVV WR IXQFWLRQ VHWWLQJV
+ Press the  key to select the previous menu line.
+ Press the  key to select the next menu line.
+ Press the OK key to confirm and go on to the next menu.
+ Press the C (ECM) key to return to the previous menu.
+ Press the  (START) key to confirm and exit from the main menu.
+ Press the  (STOP) key to exit from the current menu.
0RYLQJ LQVLGH D GDWD HQWU\ ILHOG
+Press the C key to delete the last character.
+Hold the C key down to delete all the characters entered.
+ Press the  key to move the cursor to the left within a data entry field
+ Press the  key to move the cursor to the right within a data entry field
+ Press the  key to insert a space.
+ Press the OK key to confirm entry and go on to the next menu item.
+ Press the  (START) key to confirm entry and exit from the current menu.
+ Press the  key to cancel entry and return to the initial value.
Introduction
Telephoning
 1
1
Directory
2
Settings
3
Fax
4
TAD
5
Printing
 6
6
Doc control
7
Advanced functions
Services 8
@ 9
Internet
Options
Appendices
5

Introduction
35,17,1* 7+( 0(18 *8,'(
To print the menus and thus get an overview of menus, proceed as follows:
+
+
Insert paper.
Press the M, 5, 1 and OK keys or the F3 and OK keys.
The menus are classified in their order of function number (please refer to the section entitled QUICK REFERENCE GUIDE, MENU GUIDE). The functions are classified in their order of appearance in this manual. Tabs are provided for quick access to the required information.
6
Telephoning
7(/(3+21,1*
Although it features advanced functions, your Internet PhoneF@x™ machine is also a telephone set providing a whole range of user-friendly functions.
&$//,1*
&$//,1* 86,1* 7+( +$1'6(7
You can also dial the number before picking up the handset. In that case, you can correct any dialling error by means of the C key.
You can use the  and
and  keys to adjust the volume.
&$//,1* 86,1* 7+(  .(<
.(<
/RXGVSHDNHU OLVWHQLQJ
+Dial your party's number. This is displayed on the screen.
+Pick up the handset, the machine dials automatically.
+When your party answers, press the  key to activate loudspeaker listening.
+You can use the  and
and  keys to adjust the volume.
+Press the  key again to de-activate loudspeaker listening.
+DQGV IUHH PRGH RQ KRRN OLVWHQLQJ
+Dial your party's number.
+Press the  key: the machine dials automatically.
+You can use the  and
and  keys to adjust the volume..
At any time, you can pick up the handset and continue the call (in which case the speaker and
microphone are automatically disabled).
&$//,1* 86,1* 7+( ',5(&725<
Your machine can store phone numbers in a directory. To know the applicable procedure, please refer to
the section entitled DIRECTORY (MENU 1) on page 9.
5(',$//,1* 21( 2) 7+( /$67 7(1 180%(56 &$//('
+ Press the |
(REDIAL) key. |
|
|
|
+ Select the required number using the |
and |
keys . |
|
|
+ To call the number displayed press the |
|
key or pick up your handset. |
||
At any time, you can delete the REDIAL number by pressing the C, |
(REDIAL) and OK |
|||
keys. |
|
|
|
|
$16:(5,1* $ &$//
When someone calls you, your phone rings and the LINE  icon blinks. Pick up your handset (or press the
  ) key) and speak. To end the call, hang up the handset (or press the
  key).
key).
Introduction
Telephoning
 1
1
Directory
2
Settings
3
Fax
4
TAD
5
Printing
 6
6
Doc control
7
Advanced functions
Services 8
@ 9
Internet
Options
Appendices
7

Telephoning
)81&7,216 $9$,/$%/( '85,1* $ &$//
.12:,1* 7+( '85$7,21 2) 7+( &$//
Ten seconds after dialling, a counter displays the approximate duration of the call. $&7,9$7,1* /28'63($.(5 /,67(1,1*
During the call, press the  key. This will activate the loudspeaker, enabling another person to listen to
the conversation.
6:,7&+,1* )520 /28'63($.(5 /,67(1,1* 72 +$1'6 )5(( 02'(
+Hold down the  key.
key.
+Hang up the handset.
+ Release the  key. Conversation then goes on in the hands-free mode. $&7,9$7,1* 7+( 6(&5(7 02'(
During a call, if you want your party not to hear you for a while, press the  key. Press that key again to resume
your conversation.
5(&25',1* $ &$//
During a handset call, you can record the conversation.
+Press the M and  keys: recording starts.
+To stop recording, press .
5(5287,1* $ &$//
To reroute a call to another set (connected to the same telephone line):
+Press the M and  keys.
keys.
+Hang up the handset.
+Go to the other set, pick up and continue the call.
You should hang up the handset within 4 seconds. You have about 25 ìseconds to pick up the other handset.
6:,7&+ 72 )$; 5(&(37,21 02'(
If you pick up a secondary handset or take the line from a cordless phone and you cannot hear anyone speaking, you can switch your machine remotely to fax reception mode by typing # then 7 (please refer to the section entitled FAX (MENU 3) on page 17).
8
Directory (Menu 1)
',5(&725<0(18
The directory is a file in which you can store phone and fax numbers, especially those of the parties you call most frequently. So, instead of dialling a phone or fax number or entering an e-mail address each time you want to communicate with one of your parties, you have only to select their names from the directory. Using the data you have stored, your Internet Phonef@x™ machine will dial automatically for you.
The records stored in the directory are classified in alphabetical order.
&5($7,1* $ 5(&25'
To fill in the directory, enter each party's phone number and name in a record. To create a new record and add it to the directory:
+ PRESS THE M, 1, 1, OK KEYS
You can cancel the process at any time by pressing  .
.
<285 3$57< 6 1$0(
+Enter your party's name.
+Press the OK key to confirm.
You can move in the data entry field using the  or
or  key, delete the last character entered by briefly pressing the C key, delete all the characters entered by holding down the C key.
3+21( $1' )$; 180%(56
+Then, enter your party's phone and/or fax number.
+Press the OK key to confirm.
If your fax machine is in the premises of a company, it may be connected to a private automatic branch exchange (PABX). Some of these telephone exchanges require the insertion of a dialling prefix (e.g. 0). All numbers should be stored in the directory without that prefix. You can program the prefix automatically for all numbers (please refer to § Prefix on page 14). Some telephone exchanges also require the insertion of a post-dial delay. If such is the case, press the R key in order to insert the post-dial delay (the character / is inserted in the number displayed).
,17(51(7 $''5(66
+ Then, enter your party's e-mail address, if any, and press OK to confirm.
or
+ press the OK key if your party does not have an e-mail address.
To enter the character @, press the  and
and  keys at the same time. To enter the dot, press the
  key.
key.
92,&( 0(02
The voice memo is a mini message that you record and associate to the party stored in the record. You will hear the voice memo each time you call them or they call you. For instance, if you select "Robert Smith" and record "It's Robert" as a voice memo, you will hear "It's Robert" each time he calls you and each time you call him. The voice memo thus informs you on your party's identity before you answer the call.
+ Enable or disable this function using the  or
or  key:
key:
• WITHOUT MEMO: no memo is associated to the record. Press OK to confirm.
Introduction
Telephoning
 1
1
Directory
2
Settings
3
Fax
4
TAD
5
Printing
 6
6
Doc control
7
Advanced functions
Services 8
@ 9
Internet
Options
Appendices
9
Directory (Menu 1)
•VOX MEMO: enables you to record a memo associated to the party: press OK to confirm, pick up the handset, record your memo and hang up.
Caution - The voice memo is always enabled for outgoing calls (only in the case of hands-free calls). To enable the voice memo feature for incoming calls, you should first subscribe to the Display Caller service.
0$.,1* $ &$// )520 7+( ',5(&725<
Once you have stored all your parties' numbers and names in the directory, you can select one of them (to phone
or send a fax or an e-mail) using either their name or abbreviated number as explained below.
6(/(&7,21 %< 1$0(
+Type in the first letters of your party's name or press the  key: names are classified in alphabetical order.
+If several names begin with the same letters, you can refine the search by entering extra letters or using the  and
and  keys.
keys.
Then you can:
•pick up the handset or press  to call them,
or
• place a document in the document feeder and press  to fax the document,
or
• place a document in the document feeder and press @ to send them an e-mail.
6(/(&7,21 %< $%%5(9,$7(' 180%(5
Your fax machine has automatically associated a 2-digit abbreviated number to each newly created record: 00 for the 1st record, 04 for the 5th record, and so on.
+Press the  , key to dial your party's abbreviated number. Then you can:
• pick up the handset or press  to call them,
or
• place a document in the document feeder and press  to fax the document,
or
• place a document in the document feeder and press @ to send them an e-mail.
If you do not remember which abbreviated number corresponds to such or such record, you can print out the directory for a copy of all the information it contains (please refer to § Printing the directory on page 11).
(',7,1* $ 5(&25'
+ PRESS M, 1, 2, OK
+To select a record:
• type in the first letters of the required name
or
• use the  and
and  keys to select the required name.
+Press the OK key.
10
Loading...