


MF9500
30000113481-01
Operation Manual for facsimile
S
INTRODUCTION
Thank you for purchasing this product. This manual only explains the facsimile functions of the product. For information on loading paper, replacing toner cartridges, clearing paper jams, handling peripheral units, and other printer-related information, please refer to your "Operation manual (for printer operation and general information)".
Additional manuals have been provided for copy and network scanner features. Please refer to these as necessary. This manual assumes that several options have been installed.
NOTE
In this manual, American spellings are used.
TO USE THIS PRODUCT CORRECTLYASAFACSIMILE
Several points must be kept in mind when using this product as a facsimile.
Please note the following:
■ Settings and programming
Information about settings and programming that are required before the fax functionality can be used is located in "Points to Check and Programming after Installation" on page 1-2 of this manual. Please read this section and perform the required settings and programming.
■ Battery disposal
THIS PRODUCT CONTAINS A LITHIUM PRIMARY MEMORY BACK-UP BATTERY THAT MUST BE DISPOSED OF PROPERLY. PLEASE CONTACT YOUR LOCAL SAGEM DEALER OR AUTHORIZED SERVICE REPRESENTATIVE FOR ASSISTANCE IN DISPOSING OF THIS BATTERY.
•When the battery dies, settings and programmed information will be lost. Be sure to keep a written record of the settings and programmed information. (Refer to page 6-14.)
•The life of the lithium battery is approximately 5 years if the main switch and fax power switch are kept continually off.
■Other information
•If a thunderstorm occurs, we recommend that you unplug the power cord from the power outlet. Information will be retained in memory even if the power cord is unplugged.
•Keep the fax power switch turned on. (Page 0- 7 of "Operation manual (for printer operation and general information)".)
TEL
LINE
Fax functions cannot be used when the power is turned off.
0 - 1

TABLE OF CONTENTS
|
Page |
INTRODUCTION ................................................... |
0-1 |
TO USE THIS PRODUCT CORRECTLY |
|
AS A FACSIMILE ................................................... |
0-1 |
IMPORTANT SAFETY INFORMATION ................. |
0-4 |
NOTICE FOR USERS IN AUSTRALIA AND |
|
NEW ZEALAND..................................................... |
0-4 |
CHAPTER 1
BEFORE USING THE FAX FEATURE
LINE CONNECTION ............................................. |
1-2 |
POINTS TO CHECK AND PROGRAMMING |
|
AFTER INSTALLATION ......................................... |
1-2 |
A LOOK AT THE OPERATION PANEL .................. |
1-3 |
●FAX MODE (CONDITION SETTING SCREEN) .. |
1-4 |
ORIGINALS ........................................................... |
1-6 |
●ORIGINALS THAT CAN BE FAXED ................ |
1-6 |
LOADING A DOCUMENT ..................................... |
1-7 |
●USING THE AUTO DOCUMENT FEEDER ..... |
1-7 |
●USING THE DOCUMENT GLASS .................. |
1-7 |
CHECKING THE SIZE OF A LOADED ORIGINAL .... |
1-8 |
●MANUALLY SETTING THE SCANNING SIZE ... |
1-8 |
SELECTING RESOLUTION |
|
AND EXPOSURE SETTINGS ............................... |
1-9 |
●SELECTING THE RESOLUTION .................... |
1-9 |
●SELECTING THE EXPOSURE ..................... |
1-10 |
CONVENIENT DIALING METHODS ................... |
1-11 |
CHAPTER 2
BASIC OPERATIONS
SENDING A FAX ................................................... |
2-2 |
●BASIC PROCEDURE FOR SENDING FAXES .... |
2-2 |
●TRANSMISSION BY AUTO-DIALING ............. |
2-5 |
●TRANSMITTING A TWO-SIDED DOCUMENT ..... |
2-5 |
PRIORITY TRANSMISSION OF A STORED JOB .... |
2-6 |
CANCELING A FAX TRANSMISSION ................... |
2-6 |
RECEIVING FAXES .............................................. |
2-7 |
●RECEIVING A FAX ......................................... |
2-7 |
CHAPTER 3
USINGCONVENIENTFUNCTIONS1
ADVANCED TRANSMISSION METHODS
|
Page |
SENDING THE SAME DOCUMENT |
|
TO MULTIPLE DESTINATIONS IN A SINGLE OPERATION |
|
(BROADCAST TRANSMISSION) ......................... |
3-2 |
●USING BROADCAST TRANSMISSION .......... |
3-3 |
AUTOMATIC TRANSMISSION AT A SPECIFIED TIME |
|
(TIMER TRANSMISSION) ..................................... |
3-4 |
●SETTING UP A TIMER TRANSMISSION ....... |
3-4 |
TRANSMISSION AND RECEPTION USING |
|
THE POLLING FUNCTION ................................... |
3-5 |
●USING THE POLLING FUNCTION ................. |
3-6 |
●USING POLLING MEMORY ........................... |
3-7 |
OWN NUMBER SENDING .................................... |
3-9 |
FAXING A DIVIDED ORIGINAL |
|
(DUAL PAGE SCAN) ........................................... |
3-10 |
PROGRAMMING FREQUENTLYUSED OPERATIONS .... |
3-11 |
●USING A PROGRAM .................................... |
3-11 |
TRANSFERRING RECEIVED FAXES |
|
TO ANOTHER MACHINE |
|
WHEN PRINTING IS NOT POSSIBLE ................ |
3-12 |
●USING THE TRANSFER FUNCTION ........... |
3-12 |
CHAPTER 4
USINGCONVENIENTFUNCTIONS2
TRANSMISSION USING F-CODES
TRANSMISSION BETWEEN MACHINES |
|
SUPPORTING F-CODES ...................................... |
4-2 |
●MEMORY BOXES AND |
|
SUB-ADDRESSES/PASSCODES |
|
REQUIRED FOR F-CODE TRANSMISSION .. |
4-2 |
●ENTERING A SUB-ADDRESS AND PASSCODE |
|
FOR A MEMORY BOX IN THE OTHER MACHINE ..... |
4-3 |
●CREATING A MEMORY BOX |
|
FOR F-CODE TRANSMISSION ...................... |
4-3 |
F-CODE POLLING MEMORY ............................... |
4-4 |
●USING F-CODE POLLING MEMORY ............. |
4-4 |
●PROCEDURE FOR F-CODE POLLING.......... |
4-5 |
0 - 2

TABLE OF CONTENTS
|
Page |
F-CODE CONFIDENTIAL TRANSMISSION .......... |
4-6 |
●F-CODE CONFIDENTIAL TRANSMISSION ... |
4-6 |
●PRINTING A DOCUMENT RECEIVED |
|
TO AN F-CODE CONFIDENTIAL |
|
MEMORY BOX ................................................ |
4-7 |
F-CODE RELAY BROADCAST TRANSMISSION ...... |
4-8 |
●USING THE F-CODE RELAY |
|
BROADCAST FUNCTION |
|
(your machine is the relay machine) ................ |
4-9 |
●USING THE F-CODE RELAY |
|
REQUEST FUNCTION |
|
(your machine requests a relay broadcast) ..... |
4-9 |
CHAPTER 5
USINGCONVENIENTFUNCTIONS3
CONVENIENT METHODS OF USE
CONNECTING AN EXTENSION PHONE ............. |
5-2 |
●CONNECTING AN EXTENSION PHONE ....... |
5-2 |
●SENDING A FAX AFTER TALKING ON THE |
|
PHONE (MANUAL TRANSMISSION) ............. |
5-2 |
●USING AN EXTENSION PHONE |
|
TO RECEIVE A FAX ........................................ |
5-3 |
●RECEIVING A FAX AFTER TALKING |
|
(MANUAL RECEPTION) ................................. |
5-4 |
CHAPTER 6
PROGRAMMING
PROGRAMMING................................................... |
6-2 |
STORING, EDITING, AND DELETING |
|
AUTO DIAL KEYS AND PROGRAMS ................... |
6-2 |
●STORING ONE-TOUCH DIAL KEYS .............. |
6-3 |
●EDITING AND DELETING ONE-TOUCH KEYS ...... |
6-5 |
●PROGRAMMING A GROUP KEY ................... |
6-6 |
●EDITING AND DELETING GROUP KEYS ...... |
6-7 |
●STORING A PROGRAM ................................. |
6-8 |
●EDITING AND DELETING PROGRAMS ........ |
6-8 |
STORING A GROUP INDEX ................................. |
6-9 |
|
Page |
|
|
PROGRAMMING, EDITING, AND DELETING |
|
|
|
F-CODE MEMORY BOXES |
6-10 |
|
|
1 |
|||
●PROGRAMMING AN F-CODE MEMORY BOX ..... |
6-10 |
||
●SETTING FOR F-CODE POLLING MEMORY |
|
||
BOXES (NUMBER OF TRANSMISSIONS) |
6-11 |
|
|
|
|||
●SETTINGFORF-CODECONFIDENTIALTRANSMISSION |
|
|
|
MEMORY BOXES (PRINT PIN.) |
6-12 |
|
|
2 |
|||
●SETTING FOR F-CODE RELAY BROADCAST |
|
||
MEMORYBOXES (END RECEIVING MACHINES) ... |
6-13 |
||
●EDITING AND DELETING A MEMORY BOX .... |
6-13 |
|
|
|
|||
PRINTING PROGRAMMED INFORMATION....... |
6-14 |
|
|
ENTERING CHARACTERS |
6-15 |
|
|
3 |
|||
CHAPTER 7 |
|
||
|
|
||
TROUBLESHOOTING |
|
|
|
WHEN A TRANSACTION REPORT IS PRINTED |
7-2 |
4 |
|
|
|||
VIEWING THE COMMUNICATION |
|
|
|
...............................................ACTIVITY REPORT |
7-3 |
|
|
WHEN AN ALARM SOUNDS |
|
|
|
|
5 |
||
AND A WARNING MESSAGE IS DISPLAYED ...... |
7-3 |
||
PROBLEMS AND SOLUTIONS ............................ |
7-4 |
||
CHAPTER 8 |
|
|
|
|
6 |
||
KEY OPERATOR PROGRAMS |
|||
KEY OPERATOR PROGRAMS |
8-2 |
|
|
|
|||
●KEY OPERATOR PROGRAM LIST ................. |
8-2 |
|
|
...●USING THE KEY OPERATOR PROGRAMS |
8-2 |
7 |
|
●SETTING PROGRAMS ................................... |
8-3 |
||
●PRINTING OUT SETTINGS.......................... |
8-10 |
||
CHAPTER 9 |
|
|
|
|
8 |
||
APPENDIX |
|
||
.................................................SPECIFICATIONS |
9-2 |
|
|
|
|
|
|
|
|
9 |
|
|
|
|
|
0 - 3

IMPORTANT SAFETY INFORMATION
•If any of your telephone equipment is not operating properly, you should immediately remove it from your telephone line, as it may cause harm to the telephone network.
•The AC power outlet shall be installed near the equipment and shall be easily accessible.
•Never install telephone wiring during a lightning storm.
•Never install telephone jacks in wet locations unless the jack is specifically designed for wet locations.
•Never touch uninsulated telephone wires or terminals unless the telephone line has been disconnected at the network interface.
•Use caution when installing or modifying telephone lines.
•Avoid using a telephone (other than a cordless type) during an electrical storm. There may be a remote risk of electric shock from lightning.
•Do not use a telephone to report a gas leak in the vicinity of the leak.
•Do not install or use the machine near water, or when you are wet. Take care not to spill any liquids on the machine.
NOTICE FOR USERS IN AUSTRALIA AND NEW ZEALAND
Your fax machine and the telephone system
WARNING NOTICE:
NO calls can be made to or from this fax during a mains power failure.
•This is a Class A product. In a domestic environment this product may cause radio interference in which case the user may be required to take adequate measures.
WARNING
Australian Communications Authority (ACA) regulations state that no unauthorized changes or modifications to this equipment are permitted.
Note: Complies with the following standards,
ACA TS001-1997, AS/NZS 3260
ACA TS002-1997, NZ TELECOM and AS/NZS 3548.
These limits are designed to provide reasonable protection against interference in an installation. This equipment generates, uses and can radiate radio frequency energy and, if not installed and used in accordance with the instructions, may cause interference. However, there is no guarantee that interference will not occur in a particular installation.
If this equipment does cause interference to radio or television reception, which can be determined by turning the equipment off and on, the user is encouraged to try to correct the interference by one or more of the following measures:
•Reorient or relocate the receiving antenna.
•Increase the separation between the equipment and the receiver.
•Connect the equipment to an outlet on a different circuit to that which the receiver is connected.
•Consult the dealer or an experienced radio/TV technician for help.
The Ringer Equivalence Number (REN) for this equipment is written on the A-Tick label.
Important safety information
In Australia, installing or modifying telephone lines should only be done by an ACA licensed serviceman. In New Zealand, installing or modifying telephone lines should be done in accordance with Telecom wiring practices.
0 - 4

CHAPTER 1
BEFORE USING THE FAX
FEATURE
This chapter contains basic information about using the fax features of this product. Please read this chapter before using the fax features.
|
Page |
LINE CONNECTION .............................................................................. |
1-2 |
POINTS TO CHECK AND PROGRAMMING AFTER INSTALLATION ....... |
1-2 |
A LOOK AT THE OPERATION PANEL ................................................. |
1-3 |
●FAX MODE (CONDITION SETTING SCREEN) ............................. |
1-4 |
ORIGINALS ............................................................................................ |
1-6 |
●ORIGINALS THAT CAN BE FAXED .............................................. |
1-6 |
LOADING A DOCUMENT ...................................................................... |
1-7 |
●USING THE AUTO DOCUMENT FEEDER .................................... |
1-7 |
●USING THE DOCUMENT GLASS ................................................. |
1-7 |
CHECKING THE SIZE OF A LOADED ORIGINAL ................................ |
1-8 |
●MANUALLY SETTING THE SCANNING SIZE ............................... |
1-8 |
SELECTING RESOLUTION AND EXPOSURE SETTINGS .................. |
1-9 |
●SELECTING THE RESOLUTION ................................................... |
1-9 |
●SELECTING THE EXPOSURE ...................................................... |
1-10 |
CONVENIENT DIALING METHODS ..................................................... |
1-11 |
1 - 1
LINE CONNECTION
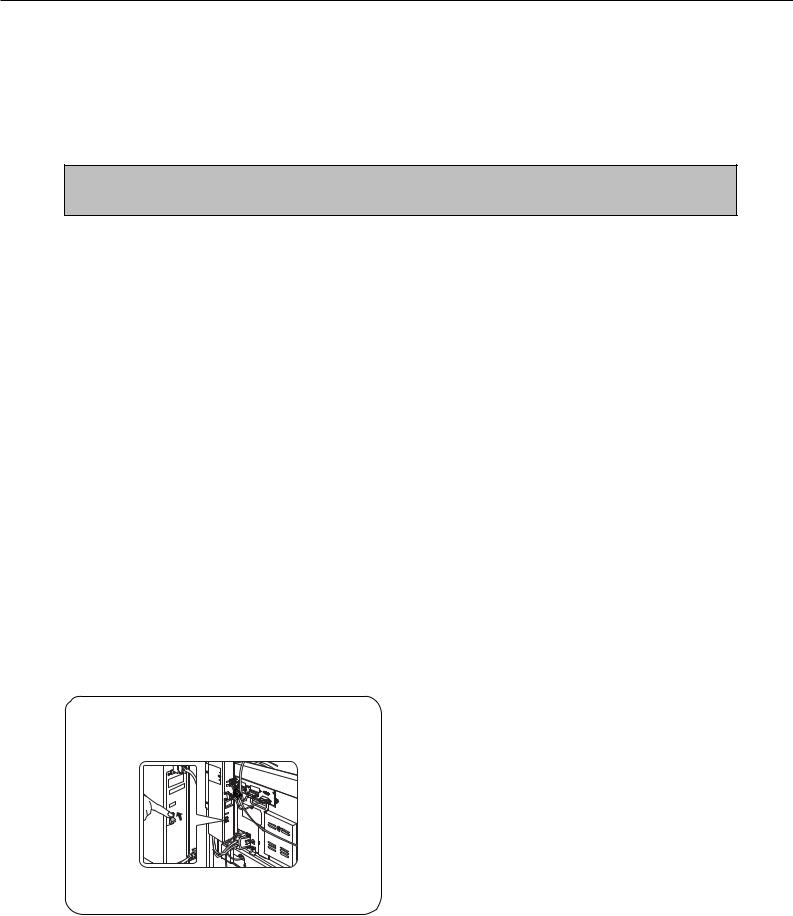
Use the telephone cable supplied with the facsimile expansion kit to connect the machine to a telephone line.
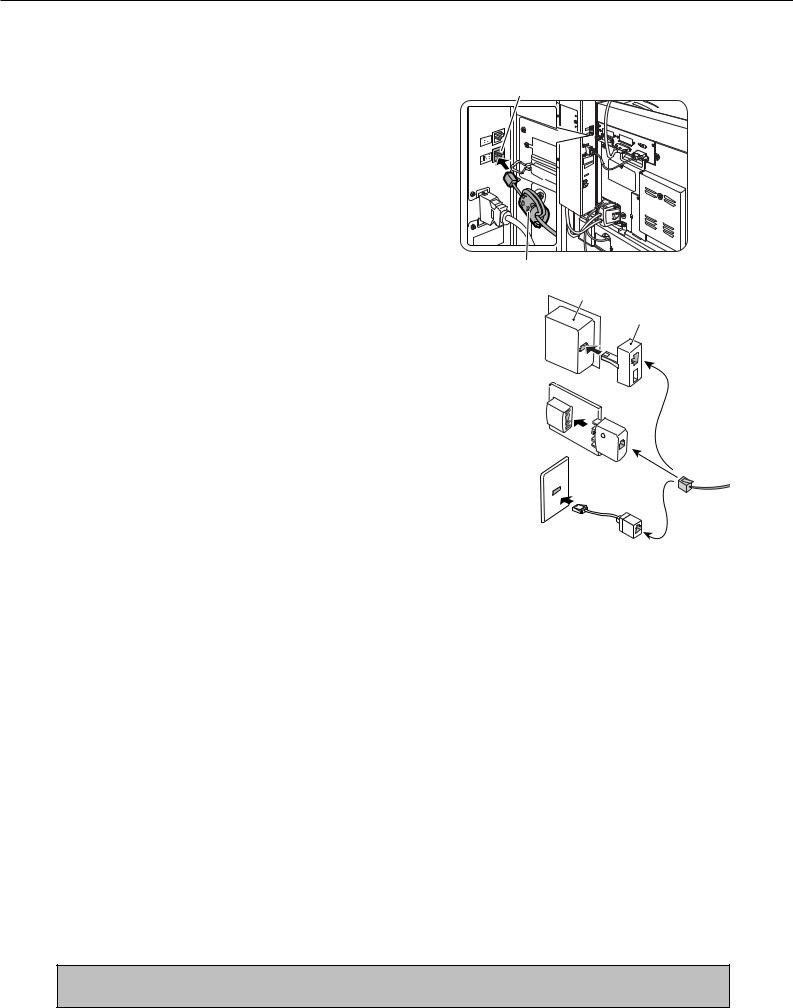
Connect the cable so that the connector nearest to the noise suppression core is inserted into the socket located of the expansion kit box. Insert the other end into the telephone line socket.
Line connector
TEL
LINE
In some countries, an adapter is required to connect the telephone line cable to the wall telephone socket, as shown in the illustration.
|
Core |
For United |
Wall socket |
Kingdom |
Adapter |
|
For Australia
For New Zealand
POINTS TO CHECK AND PROGRAMMING AFTER INSTALLATION
After installing the unit and before using it as a fax machine, check the following points and program the required information.
■ Make sure the fax power switch is turned on
In addition to the main power switch, the rear of the unit also has a power switch for fax functionality. If this power switch is not turned on, you will not be able to use the unit as a fax machine. Please keep the fax power switch turned on at all times.
■ Make sure the correct date and time have been set
Make sure the correct date and time have been programmed in the unit (refer to page 3-8 of "Operation manual (for printer operation and general information)"). If the date and time are wrong, please correct them.
It is important to set the correct date and time because they are used for such features as Timer Transmission (page 3-6).
■ Program the sender's name and sender's number
Refer to page 8-4 to program the name and fax number of the user of this product using the key operator program. The programmed name and number are printed at the top of each transmitted fax page. The sender's number is also used as an identification number when you use the Polling function to request transmission from another fax machine (refer to page 3-6).
NOTE
You can check your programmed name and number by printing out the Sender List. (Refer to page 8-10.)
1 - 2
A LOOK AT THE OPERATION PANEL
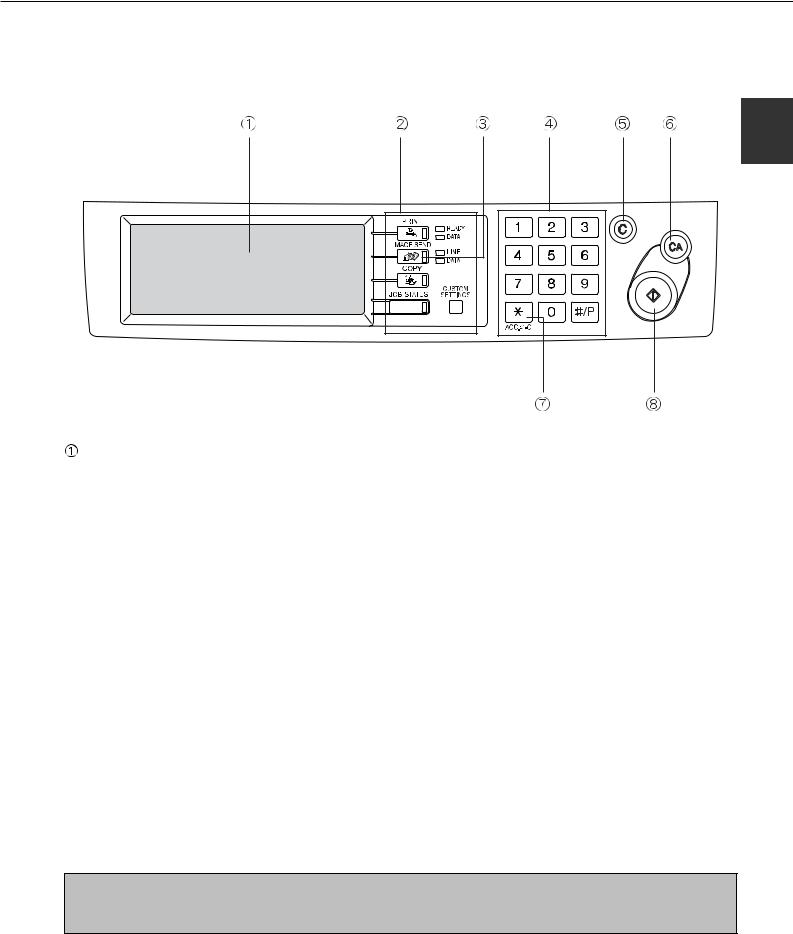
Operation panel keys used for fax and keys displayed on the touch panel are explained here.
1
Touch panel (following page)
The machine status, messages and touch keys are displayed on the panel. The display will change to show the status of print, copy, network scaner or fax according to which of those modes is selected.
 Mode select keys (page 2-2)
Use to select the basic modes of the product.
 IMAGE SEND key
Press to select fax mode and display the basic screen of fax mode.
 Numeric keys
Use to enter fax numbers, sub-addresses, passcodes, and numerical settings.
 C key (clear key)
Use to clear a mistake when entering fax numbers, sub-addresses, passcodes, and numerical settings. One digit is cleared each time you press the key.
When an original is being scanned, this key can also be used to cancel scanning.
 CA key
Use to cancel a transmission or programming operation. When the key is pressed, the operation is canceled and you return to the initial screen (next page).
When sending a fax, this key is also used to cancel an image setting, paper size setting, or special function.

 key (page 5-4)
This is used to produce tone signals when you are on a pulse dial line.
 Start key (page 2-3)
Press to begin scanning an original for fax transmission.
NOTE
For information on the parts of the unit that are used for faxing, refer to page 3 of "Operation manual (for copier)". For parts that are used for both faxing and printing, refer to page 1-4 of "Operation manual (for printer operation and general information)".
1 - 3
A LOOK AT THE OPERATION PANEL
FAX MODE (CONDITION SETTING SCREEN)
The condition setting screen of fax mode is displayed by pressing the IMAGE SEND key while the print mode, copy mode, or job status screen appears in the touch panel. In the explanations that follow, it is assumed that the initial screen that appears after pressing the IMAGE SEND key is the condition setting screen (shown below). If you have set the display to show the address directory (following page) when the IMAGE SEND key is pressed, touch the CONDITION SETTINGS key in the address directory to display the condition setting screen.
The key operator program can be used to set the display to show either the condition setting screen (shown below) or the address directory screen (following page) when the IMAGE SEND key is pressed (refer to page 8-3).
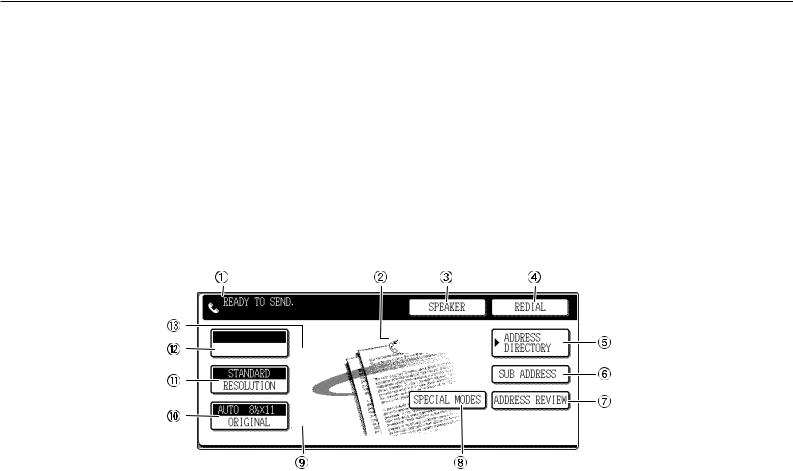
■ Condition setting screen
The display is initially set (factory setting) to show the following condition setting screen as the initial screen.
|
READY TO SEND. |
|
|
|
|
|
|
|
||
|
|
|
SPEAKER |
|
|
REDIAL |
||||
|
|
|
|
|
|
|
|
|||
|
|
|
|
|
FAX MEMORY:100% |
|
|
|
||
|
AUTO |
|
|
|
ADDRESS |
|
||||
|
|
|
|
AUTO RECEPTION |
|
DIRECTORY |
|
|||
|
EXPOSURE |
|
|
|
|
|||||
|
|
|
|
|
|
|
|
|
|
|
|
STANDARD |
|
|
|
|
|
|
SUB ADDRESS |
||
|
|
|
|
|
|
|
|
|
|
|
|
RESOLUTION |
|
|
|
|
|
|
|
|
|
|
|
|
|
|
|
|
|
|
|
|
|
|
|
|
|
|
|
|
|
|
|
|
|
|
|
|
|
SPECIAL MODES |
|
ADDRESS REVIEW |
||
|
AUTO |
|
|
|
|
|
|
|
|
|
|
|
|
|
|
|
|
|
|
|
|
|
ORIGINAL |
|
|
|
|
|
|
|
|
|
 Message display
Messages appear here to indicate the current status of the machine. When the machine is ready to send, an icon  appears to the left.
 Memory and reception mode display
This shows the amount of fax memory that is free and the currently selected reception mode.
 SPEAKER key (page 1-11)
This key is used for dialing with the speaker. During dialing it changes into the PAUSE key, and after pressing the SUB ADDRESS key it changes into the SPACE key.
 REDIAL key (page 1-11)
Touch this key to redial the most recently dialed number.After dialing, this key changes into the NEXT ADDRESS key.
 ADDRESS DIRECTORY key (page 2-5)
This displays the Address Directory screen (next page). Touch this key when you want to use an autodial number (one-touch dialing or group dialing).
 SUB ADDRESS key (page 4-3)
Touch this key to enter a sub-address or passcode.
 ADDRESS REVIEW key
When performing a broadcast transmission, touch this key to check your selected destinations. Your selected destinations will appear as a list, and the list can be edited.
 SPECIAL MODES key
Touch this key to select one of the following special functions:
• Timer transmission (page 3-4) • Polling (page 3-6)
•Dual page scan (page 3-10) • Program (page 3-11)
•Memory box (page 3-7)
 Two-sided scanning icon display (pages 2-5)
Icons appear here when you touch the ORIGINAL key and select two-sided scanning. The icons can be touched to open function selection screens.
 ORIGINAL key (page 1-8)
Touch this key when you wish to manually set the size of the original to be scanned or scan both sides of the original.
 RESOLUTION key (page 1-9)
Touch this key to change the resolution setting for the original to be scanned. The selected resolution setting will be highlighted above the key. The initial factory setting is STANDARD.
 EXPOSURE key (page 1-10)
Touch this key to change the exposure setting for the original to be scanned. The selected exposure setting will be highlighted above the key. The initial factory setting is AUTO.
 Special function icon display (page 1-15 of "Operation manual (for printer operation and general information)")
When a special function such as polling or dual page scan is selected, a special function icon appears here.
1 - 4
A LOOK AT THE OPERATION PANEL
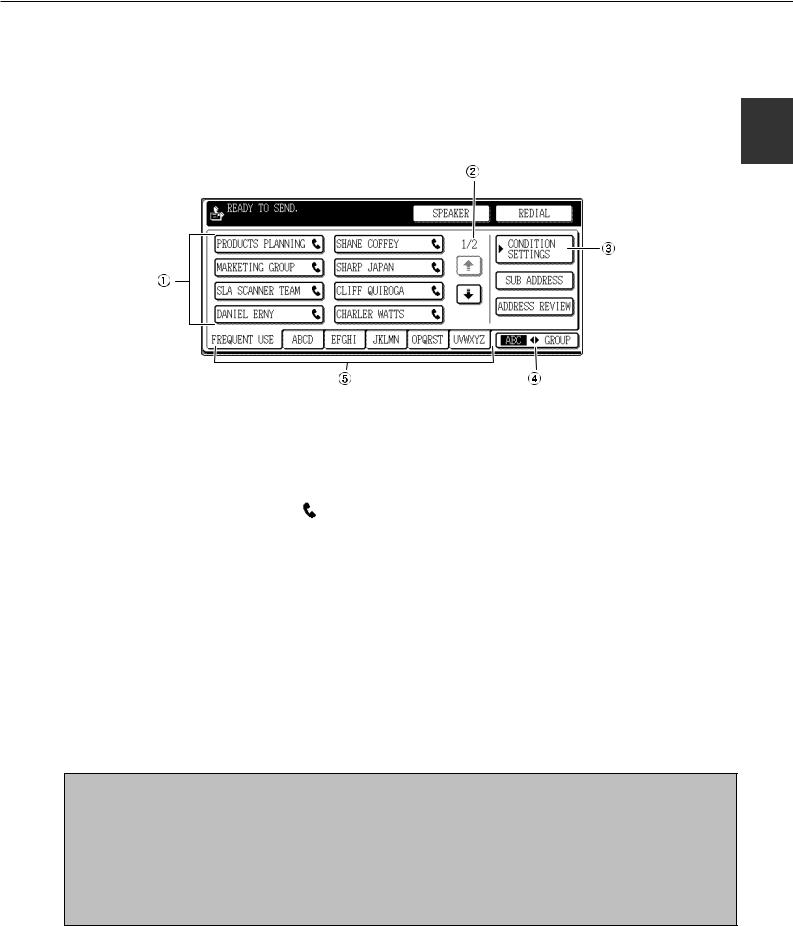
■ Address directory screen (alphabetically ordered)
If you have set the initial screen to the address directory screen using the key operator program, the initial screen |
1 |
|
will appear as follows. |
||
|
|
|
READY TO SEND. |
|
|
|
|
|
|
|
|
|
|
|
|
|
|
|
|
|
|
|
|
|||
|
|
|
|
|
|
|
|
|
|
SPEAKER |
|
|
|
|
|
REDIAL |
|
||||||||
|
|
|
|
|
|
|
|
|
|
|
|
|
|
|
|
|
|
|
|
||||||
|
|
|
|
|
|
|
|
|
|
|
|
|
|
|
|
|
|
|
|
|
|
|
|
|
|
|
A |
|
|
|
|
|
B |
|
|
|
|
|
|
|
|
|
|
|
|
|
CONDITION |
|
|||
|
|
|
|
|
|
|
|
|
|
|
|
|
|
|
|
|
|
|
|
|
|
SETTINGS |
|
||
|
C |
|
|
|
|
|
D |
|
|
|
|
|
|
|
|
|
|
|
|
|
|
|
|
|
|
|
|
|
|
|
|
|
|
|
|
|
|
|
|
|
|
|
|
|
|
|
|
|
|||
|
|
|
|
|
|
|
|
|
|
|
|
|
|
|
|
|
|
|
|
|
SUB ADDRESS |
||||
|
|
|
|
|
|
|
|
|
|
|
|
|
|
|
|
|
|
|
|
|
|||||
|
E |
|
|
|
|
|
F |
|
|
|
|
|
|
|
|
|
|
|
|
|
|
|
|
|
|
|
|
|
|
|
|
|
|
|
|
|
|
|
|
|
|
|
|
|
|
|
|
|
|||
|
|
|
|
|
|
|
|
|
|
|
|
|
|
|
|
|
|
|
|
|
|
|
|
|
|
|
|
|
|
|
|
|
|
|
|
|
|
|
|
|
|
|
|
|
ADDRESS REVIEW |
||||||
|
G |
|
|
|
|
|
H |
|
|
|
|
|
|
|
|
|
|
||||||||
|
|
|
|
|
|
|
|
|
|
|
|
|
|
|
|
|
|
|
|
|
|
|
|||
|
|
|
|
|
|
|
|
|
|
|
|
|
|
|
|
|
|
|
|
|
|
|
|
|
|
FREQUENT USE |
|
ABCD |
|
EFGHI |
|
JKLMN |
|
OPQRST |
|
UVWXYZ |
|
|
|
|
|
|
|
|
|||||||
|
|
|
|
|
|
|
|
ABC |
|
GROUP |
|||||||||||||||
 One-touch key display
This shows the one-touch keys that have been stored on the selected "index card". The key type is indicated by the icon at the right. One-touch keys in which a fax number is stored are indicated by a " " icon. The display is initially set to show 8 keys. This can be changed to 6 or 12 using the key operator program. (Refer to page 8-3.)
 Display switching keys
In cases where the one-touch keys cannot all be displayed on one screen, this shows how many screens are left. Touch the " " "
" " " keys to move through the screens.
 CONDITION SETTINGS key
This displays the condition setting screen (previous page), which is used to set various conditions.
 ABC
ABC  GROUP key
Touch this key to switch between the alphabetical index and the group index.
 Index keys
One-touch key destinations are stored on each of these index cards (alphabetical index or group index). Touch an index key to display the card.
Group indexes make it possible to store one-touch keys by group with an assigned name for easy reference. This is done with the custom settings (refer to pages 6-3 and 6-9). Frequently used one-touch key destinations can be stored on the FREQUENT USE card for convenient access.
NOTES
•The screen showed above is the alphabetical address directory. If desired, the initial screen can be set to the group address directory (refer to page 8-3).
•If the Network Scanner option has been installed, one-touch keys in which a destination other than a fax number is stored are indicated by the following icons:
 : Scan to E-mail destination
 : Scan to FTP destination
 : Scan to Desktop destination
1 - 5
ORIGINALS
ORIGINALS THAT CAN BE FAXED
■ Original sizes
|
Minimum original size |
Maximum original size |
|
Using the auto document feeder |
8-1/2" (width)x5-1/2" (length) |
11" (width)x31-1/2"* (length) |
|
(297mm (width)x800mm* (length)) |
|||
(A5: 210mm (width)x148mm (length)) |
|||
|
*Long documents can be loaded |
||
|
5-1/2" (width)x8-1/2" (length) |
|
|
|
11" (width)x17" (length) |
||
Using the document glass |
(A5R: 148mm (width)x210mm (length)) |
||
|
(297mm (width)x431.8mm (length)) |
||
|
|
NOTE
Originals that are not a standard size (5-1/2"x8-1/2", 8-1/2"x11", 8-1/2"x11"R, 8-1/2"x14", 11"x17", A5, B5, B5R, A4, A4R, B4, A3) can also be faxed.
■ Scanning area of original
Note that the edges of an original cannot be scanned. |
|
|
|
Far edge |
||||
|
|
|
|
|
|
|
|
|
Area that cannot be scanned: 0.2" (5mm) or less at top edge and |
Top edge |
|
|
|
|
|
|
Bottom edge |
|
|
|
|
|
|
|||
0.2" (5mm) or less at bottom edge |
|
|
|
|
|
|
||
|
|
|
|
|
|
|
|
|
: Near edge + far edge = 0.2" (5mm) |
|
|
|
|
|
|
|
|
or less |
|
|
|
Near |
|
edge |
|
|
|
|
|
|
|
||||
|
|
|
|
Area that cannot be scanned |
||||
■ Automatic reduction of faxed document
If the size (width) of the faxed document is greater than the receiving machine's paper size, the size will be automatically reduced.
Faxed document width |
Receiving machine's paper width |
Reduced size |
Ratio (Area ratio) |
||
11"x17" (A3) |
8-1/2"x14" (B4) |
8-1/2"x14" |
(B4) |
1 : |
0.64 (1 : 0.78) |
11"x17" (A3) |
8-1/2"x11" (A4) |
8-1/2"x11"R |
(A4R) |
1 |
: 0.5 (1 : 0.5) |
8-1/2"x14" (B4) |
8-1/2"x11" (A4) |
8-1/2"x11"R |
(A4R) |
1 : |
0.78 (1 : 0.64) |
|
|
|
|
|
|
A document can also be faxed without reducing its size. In this case, the left and right edges will not be transmitted. (Refer to page 8-6.)
1 - 6
LOADING A DOCUMENT
A document can be loaded in the auto document feeder or on the document glass. Multiple-page documents and long documents can be loaded in the auto document feeder. Single-sheet documents and bound documents that cannot be loaded in the auto document feeder can be loaded on the document glass.
USING THE AUTO DOCUMENT FEEDER |
1 |
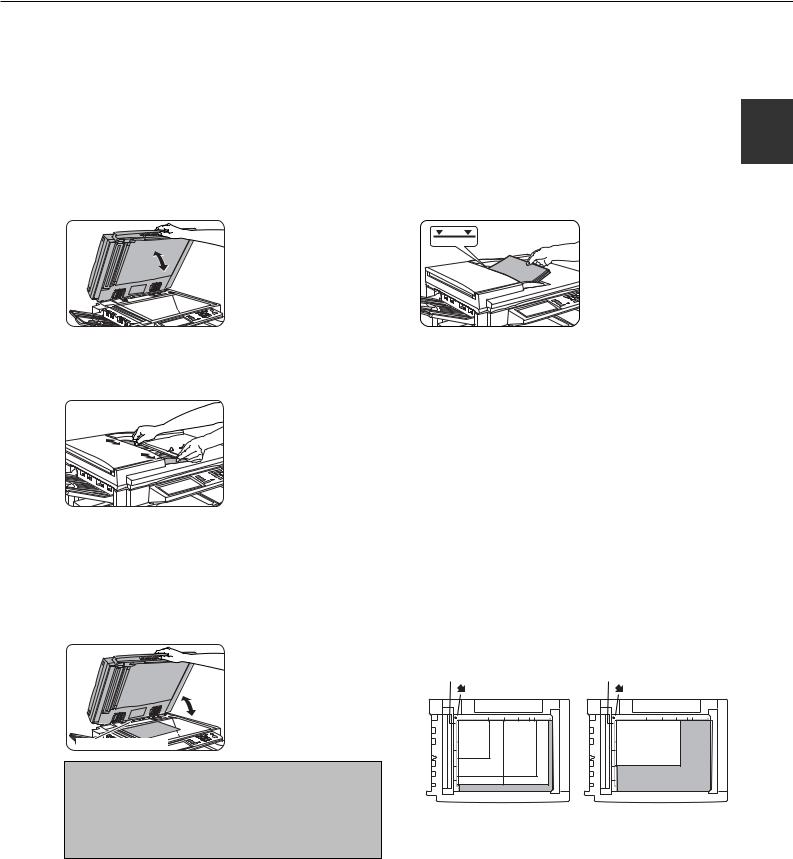
1 Lift the document glass cover and make sure a document is not placed on the document glass. Gently close the cover.
3 Align the edges of the document pages and then insert the stack in the document feeder so that the first page is face down.
Insert the stack into the auto document feeder until it stops. The stack should not be higher than the indicator line (maximum 50 pages, or 30 pages for 8-1/2"x14" (B4) or larger documents).
2 Adjust the document guides on the auto document feeder to the width of the document.
USING THE DOCUMENT GLASS
1 Open the document glass cover, and place the document face down on the document glass. Gently close the cover.
Regardless of the size of the original, place the original in the far left corner of the document glass. (Align the upper left-hand corner of the original with the tip of the  mark.)
Document glass scale |
Document glass scale |
mark |
mark |
Original size detector
NOTE
Do not place any objects under the original size detector plate. Closing the document glass cover with an object underneath may damage the original size detector plate and prevent correct detection of the document size.
51/2 x 81/2
or A5
81/2 x11R or A4R
81/2 x14 or B4
81/2 x11 or A4 11x17 or A3
1 - 7

CHECKING THE SIZE OF A LOADED ORIGINAL
If the loaded original is a standard size*, the size will be detected (automatic original detection) |
|
|
and displayed in the ORIGINAL key. Make sure that the size has been correctly detected. If |
|
|
STANDARD |
||
you have loaded a non-standard size original or wish to change the scanning size, you can |
RESOLUTION |
|
follow the steps below to manually set the original scanning size. |
|
|
|
AUTO |
A4 |
|
|
|
|
ORIGINAL |
|
NOTE
*Standard sizes that can be detected are as follows:
5-1/2"x8-1/2", 8-1/2"x11", 8-1/2"x11"R, 8-1/2"x14", 11"x17", A5, B5, B5R, A4, A4R, B4, A3. If a non-standard size original is loaded (including special sizes), the closest standard size may be displayed, or the original size may not appear at all.
MANUALLY SETTING THE SCANNING SIZE
If you load an original that is not a standard size (such as an AB size), or if the size is not detected correctly, you must touch the ORIGINAL key and set the original size manually. Perform the following steps after loading the document in the automatic document feeder or on the document glass.
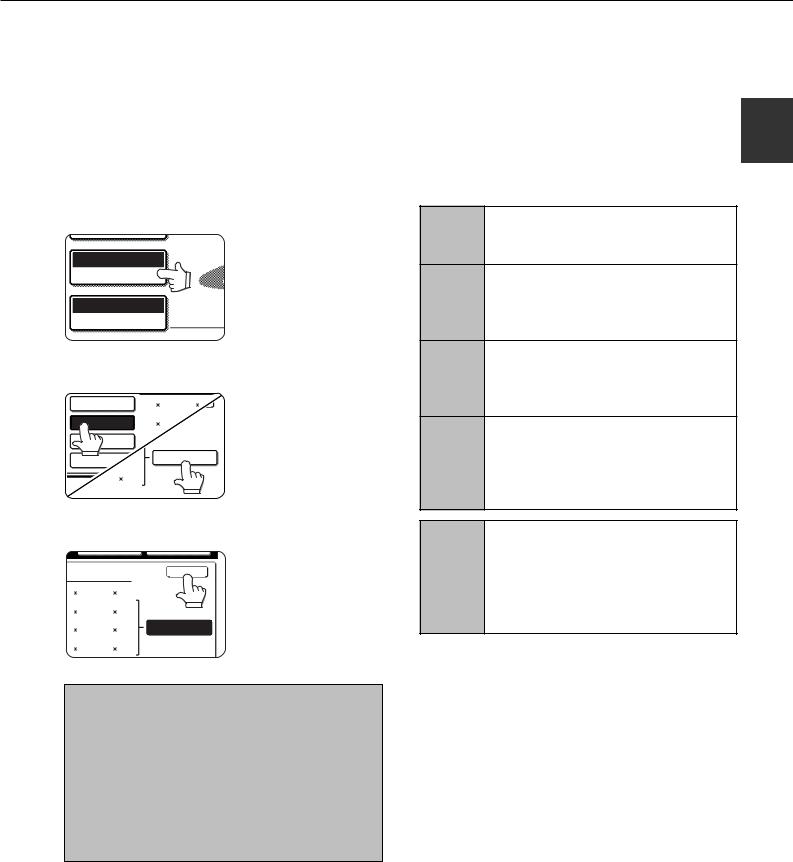
1 Touch the ORIGINAL key.
STANDARD
RESOLUTION
AUTO A4
ORIGINAL
If you wish to select an INCH size, touch the AB INCH key and then touch the desired original size key.
INCH is highlighted and
|
|
|
|
|
|
|
|
|
SPEAKER |
|
|
REDIAL |
INCH size |
keys |
are |
|||||||
|
|
|
|
|
|
|
|
|
|
|
|
|
|
|
|
|
|
|
||||
|
|
|
ORIGINAL SIZE |
|
|
|
|
|
|
|
displayed. To return to the |
|||||||||||
|
|
OK |
|
|
||||||||||||||||||
|
|
|
|
|
|
|
|
|
|
|
|
|
|
|
||||||||
|
AUTO |
|
|
|
MANUAL |
|
|
|
|
|
|
|||||||||||
|
|
|
|
|
|
|
|
|
|
|
|
|
|
|
|
|
|
|
AB |
palette, |
touch |
the |
|
|
|
|
|
|
|
|
|
|
|
|
|
|
|
|
|
|
|
||||
|
51/2 X81/2 |
|
51/2 X81/2 R |
|
|
|
|
|
OK |
|
|
|||||||||||
|
|
|
|
|
|
|
|
|
|
|
|
|
|
|
|
|
AB |
INCH key once again. |
||||
|
|
|
|
|
|
|
|
|
|
|
|
|
|
|
|
|
|
|
||||
|
|
|
|
|
|
|
|
|
|
|
|
|
|
|
|
|
|
|
||||
|
81/2 |
|
|
|
2 X11R |
|
|
|
|
AB |
|
|||||||||||
|
|
|
|
|
|
|
|
|
|
|
|
|
|
|
|
|
|
|
|
|
|
|
|
81/2 |
|
|
|
11X17 |
|
|
|
INCH |
|
|
|
|
|
||||||||
2 Touch the MANUAL key.
ORIGINAL SIZE
The sizes that can be selected are displayed.
O MANUAL
IDED |
2 |
KLET |
TABLET |
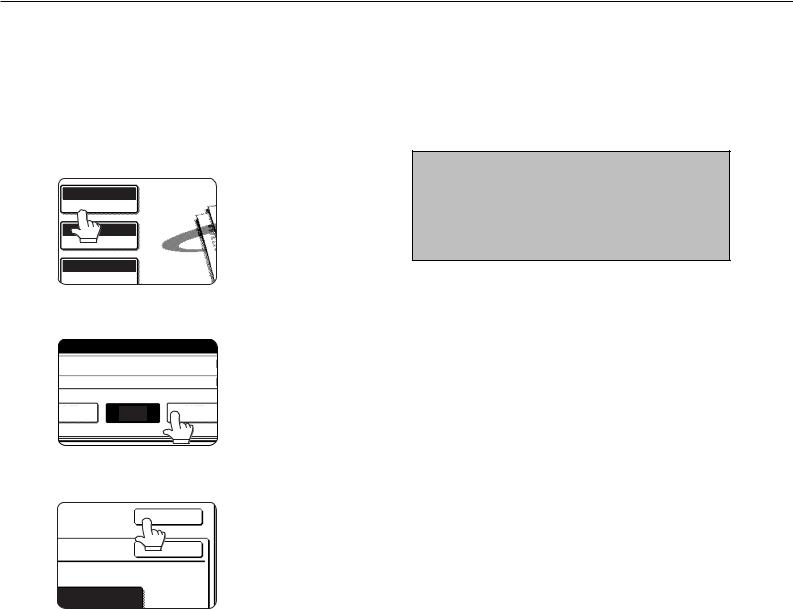
3 Touch the desired original size key.
|
|
|
|
|
|
|
|
|
|
|
|
|
|
|
|
|
|
|
|
AUTO is no longer |
|
|
|
|
|
|
SPEAKER |
|
|
|
REDIAL |
highlighted. MANUAL and |
|||||||||
|
|
|
|
|
|
|
|
|
|
|
|
|
|
|
|
|
|
|
|
|
|
|
ORIGINAL SIZE |
|
|
|
|
|
|
|
|
|
the original size key you |
||||||||
|
|
|
OK |
|
|
|||||||||||||||
|
|
|
|
|
|
|
|
|
|
|
|
|
|
|||||||
AUTO |
|
|
|
MANUAL |
|
|
|
|
|
|
|
|
|
|
||||||
|
|
|
|
|
|
|
|
|
|
|
|
|
|
|
|
|
|
|
|
touched are highlighted. |
A5 |
|
B5R |
|
|
|
B4 |
|
|
|
|
OK |
|
|
|||||||
|
|
|
|
|
|
|
|
|
|
|
|
|
|
|
|
|
|
|
||
A5R |
|
A4 |
|
|
|
A3 |
|
|
|
|
AB |
|
|
|||||||
|
|
|
|
|
|
|
|
|
|
|
|
|
|
|
||||||
|
|
|
|
|
|
|
|
LONG SIZE |
|
|
|
|
|
|
|
|||||
B5 |
|
A4R |
|
|
|
INCH |
|
|
||||||||||||
|
|
|
|
|
|
|
|
|
|
|
|
|
|
|
|
|
|
|
|
|
4 Touch the outer OK key.
|
|
|
|
|
|
|
|
You will return to the initial |
KER |
|
|
|
|
REDIAL |
|||
|
|
|
|
screen. (Pressing the inner |
||||
|
|
|
|
|
|
|
|
|
|
|
|
|
|
|
|
|
OK key in the step above |
|
|
|
|
|
|
|
|
|
|
|
|
|
|
|
|
|
returns you to step 2.) |
|
|
|
|
|
|
|
|
|
L |
|
81/2X11 |
|
|
||||
|
|
|
|
|
|
|
|
|
OK
5 The selected size appears in the top half of the ORIGINAL key.
STANDARD
RESOLUTION
81/2X11
ORIGINAL
NOTE
You can return to automatic detection by pressing the CA key.
■ If you loaded a long original
If you loaded a long (up to 31.5" (800mm)) original in the auto document feeder, touch the LONG SIZE key in step 3 above.
B4 OK
A3 AB
LONG SIZE 
 INCH
INCH
NOTE
When a long original is loaded, you cannot use the automatic two-sided scanning function.
1 - 8
SELECTING RESOLUTION AND EXPOSURE SETTINGS
After loading an original, you can adjust the resolution and exposure settings to match the condition of the original-for example, if it has small or faint characters, or if it is a photo. After loading the original in fax mode, adjust the settings as explained below.
SELECTING THE RESOLUTION |
1 |
The initial resolution setting is STANDARD. To change the setting, follow these steps:
■ Change the resolution.
1 Touch the RESOLUTION key.
STANDARD
RESOLUTION
AUTO A4
ORIGINAL
2 Touch the desired resolution key.
( The selected key is
STANDARD |
200 200 |
200 100 |
highlighted. If you selected |
|
FINE |
300 300 |
200 200 |
||
FINE, SUPER FINE, or |
||||
|
|
|
||
FINE |
400 400 |
200 400 |
ULTRA FINE, you can also |
|
|
||||
ULTRA FINE |
600 600 |
400 400 |
touch the HALF TONE key |
|
|
||||
600 400 400 |
|
|
to select halftone. |
3 Touch the OK key.
MAIL/FTP INTERNET |
|
You will return to the initial |
||||
OK |
screen. |
|||||
|
|
FAX |
||||
|
|
|
|
|
||
00 |
200 |
200 |
100 |
(dpi) |
|
|
|
|
|||||
00 |
300 |
200 |
200 |
|
|
|
00 |
400 |
200 |
400 |
HALF TONE |
|
|
|
|
|||||
00 |
600 |
400 |
400 |
|
|
|
NOTES
•The initial factory resolution setting is Standard. If desired, you can change the initial setting to a different setting using the key operator program. (Refer to page 8-3.)
•When using the automatic document feeder, the resolution setting cannot be changed once scanning has begun.
•Even if you send a document using Fine, Super fine, or Ultra fine resolution, some receiving fax machines may not be able to print the document at the same resolution.
■ Resolution settings
Touch this key if your original consists of Standard normal-sized characters (like those in
this manual).
Touch this key if your original has small Fine characters or diagrams. The original will be scanned at twice the resolution of the
Standard setting.
Touch this key if your original has intri-
Super fine cate pictures or diagrams. A higher-qual- ity image will be produced than with the
Fine setting.
Touch this key if your original has intricate pictures or diagrams. This setting Ultra fine gives the best image quality. However, transmission will take longer than with
the other settings.
Touch this key if your original is a photograph or has gradations of color (such as Half tone a color original). This setting will produce a clearer image than Fine, Super fine, or Ultra fine used alone. Half tone cannot be selected if Standard has been selected.
1 - 9
SELECTING RESOLUTION AND EXPOSURE SETTINGS
SELECTING THE EXPOSURE
The initial exposure setting is AUTO. To change the setting, follow these steps:
■ Change the exposure.
1 Touch the EXPOSURE key.
AUTO
EXPOSURE
AUTO
ORIGINAL
NOTE
When using the document glass to scan pages an original, the exposure setting can be changed each time you change pages. When using the automatic document feeder, the exposure setting cannot be changed once scanning has begun.
2 Touch the desired exposure key.
The selected key is highlighted.
DARK LIGHT
ORIGINAL |
AUTO |
|
3 Touch the outer OK key.
You will return to the initial
OK |
screen. |
|
|
OK |
|
■ Exposure settings
Dark |
Select this setting if your original consists |
Original |
mostly of dark characters. |
Auto |
This setting automatically adjusts the ex- |
posure for light and dark parts of the origi- |
|
|
nal. |
Light |
Select this setting if your original consists |
Original |
mostly of faint characters. |
|
|
LIGHT
1 - 1 0
CONVENIENT DIALING METHODS
This product includes an auto-dialing feature to make dialing easier. By programming frequently dialed numbers, you can call and send documents to these locations by means of a simple dialing operation (refer to page 2-5). There are two types of auto-dialing: one-touch dialing and group dialing. To program auto-dial numbers, refer to pages 6-3, 6-6.
● One-touch dialing |
|
|
|
|
|
|
|
|
|
|
|
|
|
|
|
|
|
|
|
|
|
|
|
|
|
|
|
|
|
|
|
|
|
|
|||
|
|
No.001:SAGEM SA |
|
|
|
|
|
|
|
|
|
|
|
|
|
|
|
|
|
|
|
|
|
|
|
||||||||||||
|
|
|
0666211221 |
|
|
|
|
|
|
|
|
|
|
|
|
|
|
|
|
|
|
|
|
|
|
|
|
|
|
|
|
|
|
||||
Simply press a one-touch key and then press the Start |
|
|
|
|
|
|
|
|
|
|
|
|
|
|
|
|
|
|
|
|
|
|
|
|
|
1 |
|||||||||||
|
|
|
|
|
|
|
|
|
|
|
|
|
|
|
|
|
|
|
|
|
|
|
|
|
|
|
|
|
|
|
|
|
|
||||
|
|
SAGEM SA |
|
|
|
|
|
|
|
|
|
CORPO.TPS |
|
|
|
|
|
||||||||||||||||||||
key to dial the programmed location. A name of up to 36 |
|
|
|
|
|
|
|
|
|
|
|
|
|
|
|
|
|
|
|
|
|
||||||||||||||||
|
|
|
|
|
|
|
|
|
|
|
|
|
|
|
|
|
|
|
|
|
|
|
|
|
|
|
|
|
|
|
|
|
|
|
|
|
|
|
|
|
|
|
|
|
|
|
|
|
|
|
|
|
|
|
|
|
|
|
|
|
|
|
|
|
|
|
|
|
|
|
|
|
|
|
|
|
|
SAGEM |
|
|
|
|
|
|
|
|
|
|
|
|
|
|
|
|
|
|
|
|
|
|
|
|
|
|
|
|
|||||||
characters can be programmed for the location (a maximum |
|
|
|
|
|
|
|
|
|
|
|
|
|
|
|
|
|
|
|
|
|
|
|
|
|
|
|
|
|
|
|||||||
|
|
|
|
|
|
|
|
|
|
|
|
|
|
|
|
|
|
|
|
|
|
|
|
|
|
|
|
|
|
|
|
|
|
|
|
|
|
of 18 characters are displayed). When using F-code |
|
|
|
|
|
|
|
|
|
|
|
|
|
|
|
|
|
|
|
|
|
|
|
|
|
|
|
|
|
|
|
|
|
|
|
|
|
transmission, a sub-address and passcode can also be |
|
|
|
|
|
|
|
|
|
|
|
|
|
|
|
|
|
|
|
|
|
|
|
|
|
|
|
|
|
|
|
|
|
|
|
||
|
FREQUENT USE |
|
|
|
ABCD |
|
|
|
EFGHI |
|
|
|
JKLMN |
|
|
|
OPQRS |
|
|||||||||||||||||||
programmed (refer to page 4-2). |
Touch the ADDRESS DIRECTORY key in the initial |
||||||||||||||||||||||||||||||||||||
|
|||||||||||||||||||||||||||||||||||||
|
screen to display the above screen. |
||||||||||||||||||||||||||||||||||||
|
|
|
|
|
|
|
|
|
|
|
|
|
|
|
|
|
|
|
|
|
|
|
|
|
|
|
|
|
|
|
|
|
|
|
|
|
|
● Group dialing |
|
|
|
|
|
|
|
|
|
|
|
|
|
|
|
|
|
|
|
|
|
|
|
|
|
|
|
|
|
|
|
|
|
|
|
|
|
|
|
No.005:SAGEM |
|
|
|
|
|
|
|
|
|
|
|
|
|
|
|
|
|
|
|
|
|
|
|
|
|
|
|
|
|||||||
Multiple one-touch dial locations can be programmed into |
|
|
GROUP:025 |
|
|
|
|
|
|
|
|
|
|
|
|
|
|
|
|
|
|
|
|
|
|
|
|
|
|
|
|
||||||
|
|
|
|
|
|
|
|
|
|
|
|
|
|
|
|
|
|
|
|
|
|
|
|
|
|
|
|
|
|
|
|
|
|
|
|
|
|
|
SAGEM SA |
|
|
|
|
|
|
|
|
CORPO.TPS |
|
|
|
|
|
|
|
|
|
|
|||||||||||||||||
a single one-touch key. This is convenient for successively |
|
|
|
|
|
|
|
|
|
|
|
|
|
|
|
|
|
|
|
||||||||||||||||||
|
|
|
|
|
|
|
|
|
|
|
|
|
|
|
|
|
|
|
|
|
|
|
|
|
|
|
|
|
|
|
|
|
|
|
|
|
|
|
SAGEM |
|
|
|
|
|
|
|
|
|
|
|
|
|
|
|
|
|
|
|
|
|
|
|
|
|
|
|
|
||||||||
sending a document to multiple locations. |
|
|
|
|
|
|
|
|
|
|
|
|
|
|
|
|
|
|
|
|
|
|
|
|
|
|
|
|
|
||||||||
|
|
|
|
|
|
|
|
|
|
|
|
|
|
|
|
|
|
|
|
|
|
|
|
|
|
|
|
|
|
|
|
|
|
|
|
|
|
• Full fax numbers entered with the numeric keys cannot |
|
|
|
|
|
|
|
|
|
|
|
|
|
|
|
|
|
|
|
|
|
|
|
|
|
|
|
|
|
|
|
|
|
|
|
|
|
be stored in a group dial key. First program the number in |
|
|
|
|
|
|
|
|
|
|
|
|
|
|
|
|
|
|
|
|
|
|
|
|
|
||||||||||||
|
FERQUENT USE |
|
|
|
|
ABCD |
|
EFGHI |
|
|
JKLMN |
|
|
|
OPQRST |
|
|||||||||||||||||||||
a one-touch key and then store it in a group dial key. |
Touch the ADDRESS DIRECTORY key in the initial |
||||||||||||||||||||||||||||||||||||
|
|||||||||||||||||||||||||||||||||||||
|
screen to display the above screen. |
||||||||||||||||||||||||||||||||||||
|
|
|
|
|
|
|
|
|
|
|
|
|
|
|
|
|
|
|
|
|
|
|
|
|
|
|
|
|
|
|
|
|
|
|
|
|
|
● Redialing |
|
|
|
|
|
|
|
|
|
|
|
|
|
|
|
|
|
|
|
|
|
|
|
|
|
|
|
|
|
|
|
|
|
|
|
|
|
The machine keeps the last fax or voice number dialed |
|
AKER |
|
|
|
|
|
|
|
|
|
|
REDIAL |
|
|
|
|
|
|
|
|
|
|
||||||||||||||
with the numeric keys in memory. You can redial the last |
|
|
|
|
|
|
|
|
|
|
|
|
|
|
|
|
|
|
|
|
|
|
|
|
|
|
|
|
|
|
|
|
|
|
|
|
|
number dialed by simply pressing the REDIAL key. |
|
Y:100% |
|
|
|
|
|
|
|
|
|
|
|
|
|
|
|
|
|
|
|
|
|
|
|
|
|
|
|
|
|
||||||
|
|
|
|
|
|
|
|
|
|
|
|
|
|
|
|
|
|
|
|
|
|
|
|
|
|
|
|
|
|||||||||
• If numeric keys were pressed during a phone |
|
EPTION |
|
|
|
|
|
|
DIRECTORY |
|
|
|
|
|
|
|
|
|
|
||||||||||||||||||
conversation, the REDIAL key may not dial the correct |
|
|
|
|
|
|
|
|
|
|
|
|
|
|
|
|
|
|
|
|
|
|
|
|
|
|
|
|
|
|
|
|
|
|
|
|
|
number. |
|
|
|
|
|
|
|
|
|
|
|
|
SUB ADDRESS |
|
|
||||||||||||||||||||||
|
|
|
|
|
|
|
|
|
|
|
|
|
|
|
|
|
|
||||||||||||||||||||
|
|
|
|
|
|
|
|
|
|
|
|
|
|
|
|
|
|
|
|
|
|
|
|
|
|
|
|
|
|
|
|
|
|
|
|
|
|
● On-hook dialing |
|
|
|
|
|
|
|
|
|
|
|
|
|
|
|
|
|
|
|
|
|
|
|
|
|
|
|
|
|
|
|
|
|
|
|
|
|
This feature allows you to dial without lifting an extension |
|
|
|
|
|
|
|
|
|
|
|
|
|
|
|
|
|
|
|
|
|
|
|
|
|
|
|
|
|
|
|
|
|
|
|
|
|
|
|
|
SPEAKER |
|
|
|
|
|
|
|
|
|
|
RE |
|
|
|||||||||||||||||||||
phone connected to the machine. Press the SPEAKER |
|
|
|
|
|
|
|
|
|
|
|
||||||||||||||||||||||||||
|
|
|
|
|
|
|
|
|
|
|
|
|
|
|
|
|
|
|
|
|
|
|
|
|
|
|
|
|
|
|
|
|
|
|
|
|
|
key, listen for the dial tone through the speaker, and then |
|
|
FAX MEMORY: |
|
|
|
|
|
|
|
|
|
|
||||||||||||||||||||||||
|
|
|
|
ADDR |
|
|
|||||||||||||||||||||||||||||||
dial. |
|
|
|
|
|
|
|||||||||||||||||||||||||||||||
|
|
AUTO RECEPTION |
|
|
|
||||||||||||||||||||||||||||||||
|
|
|
|
DIRE |
|
||||||||||||||||||||||||||||||||
• To speak with another person, you must lift the extension |
|
|
|
|
|
|
|
|
|
|
|
|
|
|
|
|
|
|
|
|
|
|
|
|
|
|
|
|
|
|
|
|
|
|
|
|
|
|
|
|
|
|
|
|
|
|
|
|
|
|
|
|
|
|
|
|
|
|
|
|
|
|
|
|
|
|
|
|
|
|
|
|
|
|
|
phone connected to the machine when they answer. |
|
|
|
|
|
|
|
|
|
|
|
|
|
|
|
|
|
|
|
|
|
|
|
|
|
|
|
|
|||||||||
|
|
|
|
|
|
|
|
|
|
|
|
|
|
|
|
|
|
|
|
|
|
|
|
|
|
|
SUB |
|
|||||||||
•Faxes must be sent manually when using on-hook dialing. (Refer to page 5-2.)
•On-hook dialing is not possible using a one-touch key that includes a sub-address and passcode, or a group dial key.
NOTES
•A total of 500 one-touch dial and group dial keys can be programmed. (Refer to page 6-2.)
•Programmed one-touch keys and group dial keys are stored on "index cards". A key can be accessed by touching its card. (Refer to page 1-5.)
•To prevent calling or sending a fax to a wrong number, look carefully at the touch panel and make sure you program the correct number when programming an auto-dial number. You can also check programmed numbers by printing out an address list or group list after programming (refer to page 6-14).
1 - 1 1

CHAPTER 2
BASIC OPERATIONS
This chapter explains basic operations such as sending faxes.
|
Page |
SENDING A FAX ................................................................................... |
2-2 |
●BASIC PROCEDURE FOR SENDING FAXES .............................. |
2-2 |
●TRANSMISSION BY AUTO-DIALING ............................................ |
2-5 |
●TRANSMITTING A TWO-SIDED DOCUMENT .............................. |
2-5 |
PRIORITY TRANSMISSION OF A STORED JOB ................................ |
2-6 |
CANCELING A FAX TRANSMISSION .................................................. |
2-6 |
RECEIVING FAXES ............................................................................... |
2-7 |
●RECEIVING A FAX ......................................................................... |
2-7 |
2 - 1
SENDING A FAX
BASIC PROCEDURE FOR SENDING FAXES
1 Make sure the machine is in fax mode.
When the IMAGE SEND key light is on, the machine is in fax mode. If the light is not on, press the IMAGE SEND key.
2 Load the original.
Refer to the following pages:
•Using the auto document feeder: Page 1-7
•Using the document glass: Page 1-7
If you are using the document glass to send multiple pages, load the first page first.
NOTE
You cannot load documents in both the auto document feeder and on the document glass and send them in a single fax transmission. If documents are loaded in both the auto document feeder and on the document glass, only the document in the auto document feeder will be scanned and transmitted.
3 Check the original size.
STANDARD
RESOLUTION
AUTO A4
ORIGINAL
If you loaded a nonstandard size document or the document size was not correctly detected, touch the ORIGINAL key and set the document size. (Refer to page 1-8.)
4 If needed, adjust the resolution setting. (Refer to page 1-9.)
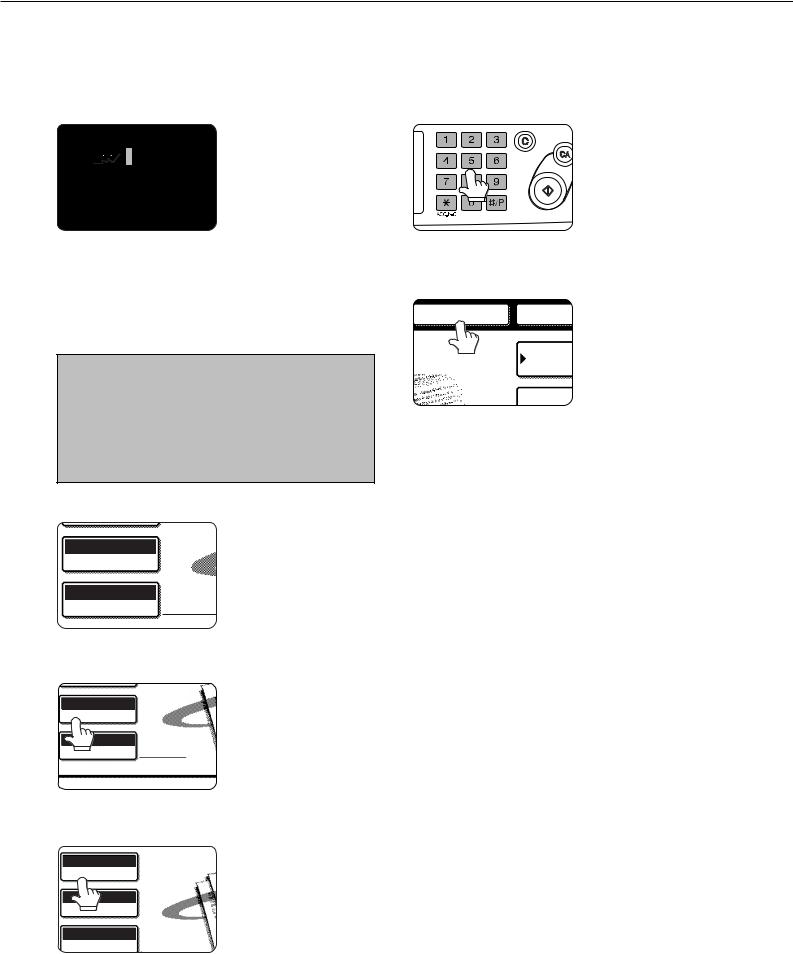
6 Dial the fax number.
Entering a pause.
PAUSE NEXT AD
MEMORY:100% |
ADDRES |
|
O RECEPTION |
||
DIRECT |
||
|
||
|
SUB ADD |
The number that you entered appears in the message display. If it is not correct, press the C key and re-enter the number. You can also use the REDIAL key (page 1-11) or an autodial number (2-5).
If you need to insert a pause between digits to access an outside line or dial an international number, touch the PAUSE key in the upper right-hand corner of the screen.
Each time you touch the PAUSE key, a hyphen ("-") appears and a 2-second pause* is inserted.
After entering a number, you can also touch the PAUSE key to enter a hyphen, and then enter another number using the numeric keys or a one-touch key. This connects the numbers together (Chain dialing).
*The duration of each pause can be changed with the key operator program. (Refer to page 8-4.)
STANDARD
RESOLUTION
A4
ORIGINAL
5 If needed, adjust the exposure setting. (Refer to page 1-10.)
AUTO
EXPOSURE
RESOLUTION
AUTO
ORIGINAL
2 - 2
SENDING A FAX
Using the auto document feeder |
Using the document glass |
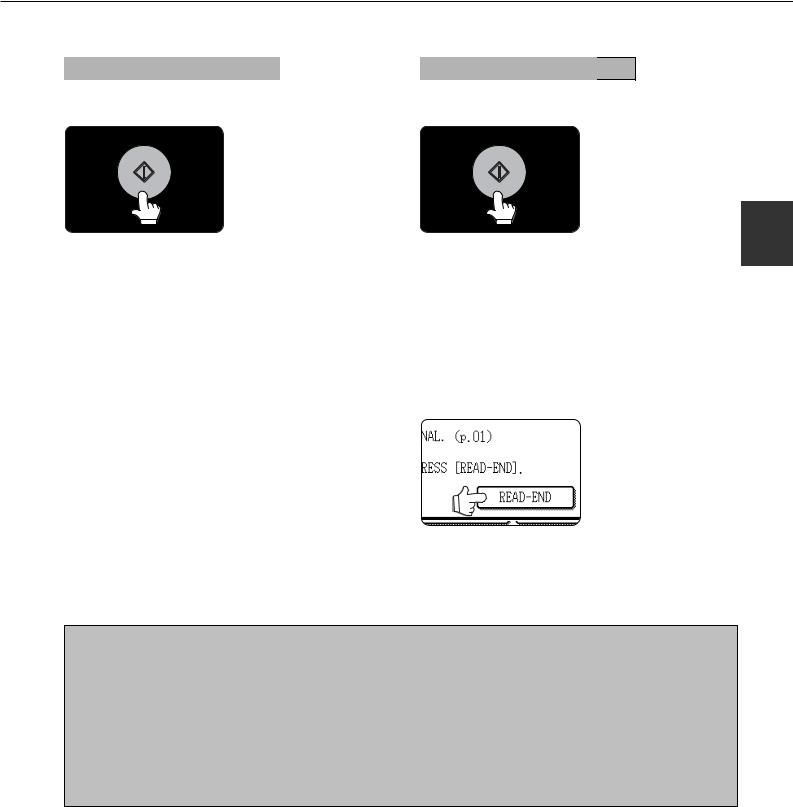
7 Press the START key. |
7 Press the START key. |
Scanning begins.
If a job is not in progress and the telephone line is not being used, the destination is called after
the first page is scanned. Transmission takes place as the document pages are being scanned.
(This is called "Quick on-line"-refer to the following page.) If there is a previously stored job or a job is in progress, or if the line is being used, all pages of the document are scanned into memory and stored as a transmission job. (This is called memory transmission: the destination is automatically called and the document transmitted after previously stored jobs are completed.)
If scanning is completed normally, the machine makes a beep sound to inform you that the transmission job is stored and JOB STORED appears in the message display.
The original is scanned and the READ-END key appears.
2
8 If you have another page to scan, change pages and then press the START key.
Repeat this sequence until all pages have been scanned. You can change the resolution and exposure settings as needed for each page (refer to pages 1-9 and 1-10). If no action is taken for one minute, scanning automatically ends and the transmission job is stored.
9 After the final page is scanned, touch the READEND key.
|
|
The machine makes a beep |
|
L. |
(Pg.No. 3) |
sound to inform you that the |
|
SS [READ-END]. |
transmission job is stored |
||
and JOB STORED appears |
|||
|
|
||
|
|
in the message display. |
|
|
READ-END |
||
|
(The destination is |
||
|
|
||
|
|
automatically called and the |
|
|
|
document transmitted after |
|
previously stored jobs are completed.)
Open the document glass cover and remove the document.
NOTES
•Canceling transmission
To cancel transmission while SCANNING ORIGINAL... appears in the display or before the READ-END key is pressed, press the C key or the CA key. To cancel a transmission job that is already stored, press the JOB STATUS key and cancel the job as explained on page 2-6.
•If the machine makes two beeps during or at the end of transmission and an error message appears in the message display, refer to page 7-3 to fix the problem.
•If the power is turned off or a power failure occurs while a document is being scanned in the auto document feeder, the machine will stop and a document jam will occur. After power is restored, remove the document as explained on page 29 of "Operation manual (for copier)".
2 - 3
SENDING A FAX
■ Quick On-line
When you use the auto document feeder to send a multi-page document and there are no previously stored jobs waiting or in progress (and the line is not being used), the machine dials the destination after the first page is scanned and begins transmitting scanned pages while the remaining pages are being scanned. This transmission method is called Quick On-line. The messages SCANNING ORIGINAL and SENDING both appear until scanning of the final page is completed.
If the receiving party is busy, the transmission will switch to a memory transmission. (Refer to the following section, "Storing transmission jobs (memory transmission)".)
NOTES
•The machine is initially set (factory setting) to perform Quick On-line transmission. If desired, you can turn off this function with the key operator program (refer to page 8-7).
•When a document is transmitted using the following methods, the job will be stored in memory (Quick On-line transmission will not be performed):
• Sending from the document glass • Broadcast transmission (page 3-2) • Timer transmission (page 3-4)
•F-code transmission (Chapter 4)
■Storing transmission jobs (memory transmission)
When a document is sent from the document glass, or when the telephone line is in use, the document is scanned into memory and then automatically transmitted after previously stored transmission jobs are completed. This means that transmission jobs can be stored in memory by performing a transmission operation while the machine is occupied with another transmission/reception operation. This is called memory transmission, and up to 50 jobs can be stored in memory at once, including the job currently being executed. After transmission, the scanned document data is cleared from memory.
NOTES
•You can check transmission jobs stored in memory in the job status screen. (Refer to page 1-14 of "Operation manual (for printer operation and general information)".)
•If the memory becomes full while a document is being scanned, a message will appear in the display. You can cancel the transmission by touching the CANCEL key, or send only the pages already scanned by touching the SEND key. The page that was being scanned when the memory became full will be cleared from memory. If the memory becomes full while scanning the first page of a document, the transmission job is automatically canceled.
•The number of jobs that can be stored will depend on the number of pages in each job and the transmission conditions. The number of storable jobs will increase if the optional expansion memory (8 MB) is installed.
■ If the receiving party is busy
If the receiving party is busy, the transmission is temporarily canceled and then automatically re-attempted after a brief interval (two attempts are made at an interval of 3 minutes*). If you do not want the machine to re-attempt the transmission, cancel the job in the job status screen. (Refer to page 2-6.)
*This setting can be changed with the key operator program (page 8-7).
■ If a transmission error occurs
The machine is initially set to not re-attempt transmission if transmission does not end normally due to a line error or other reason, or if the other machine does not begin reception within 45 seconds after the connection is established. If desired, you can use the key operator program to set the machine to automatically re-attempt transmissions when a transmission error occurs (page 8-7). The machine also supports error correction mode (ECM), and is initially set to automatically resend any parts of a document that were distorted due to noise on the line or other reasons (page 8-5).
■ Image rotation
The machine is initially set to rotate a vertically-placed document 90° so that it is oriented horizontally before transmission (8-1/2"x11" (A4) originals are rotated to 8-1/2"x11"R (A4R) and 5-1/2"x8-1/2"R (B5R or A5R) originals are rotated to 5-1/2"x8-1/2" (B5 or A5)). 8-1/2"x11"R (A4R) originals and 5-1/2"x8-1/2" (B5) originals are not rotated. If desired, you can turn this function off with the key operator program as explained on page 8-6.
NOTE
When using the document glass, be sure to orient 5-1/2"x8-1/2" (A5) originals vertically. If oriented horizontally (5-1/2"x8-1/2" (A5) orientation), the original size will be detected as 8-1/2"x11" (A4), and you will need to touch the ORIGINAL key and set the original size to 5-1/2"x8-1/2"R or A5R (by touching the 5-1/2"x8-1/2"R (A5R) key). (Refer to page 1-8.)
2 - 4

SENDING A FAX
TRANSMISSION BY AUTO-DIALING
To send a document by auto-dialing (one-touch dialing or group dialing) instead of entering a full fax number with the numeric keys, follow the steps below. To use an auto-dial destination, you must first program the full fax number and name of the destination. Refer to page 1-11 for information on auto-dialing and pages 6-3, 6-6 for information on programming auto-dial destinations.
1 Perform steps 1 through 5 of "Basic Procedure for Sending Faxes" (page 2-2).
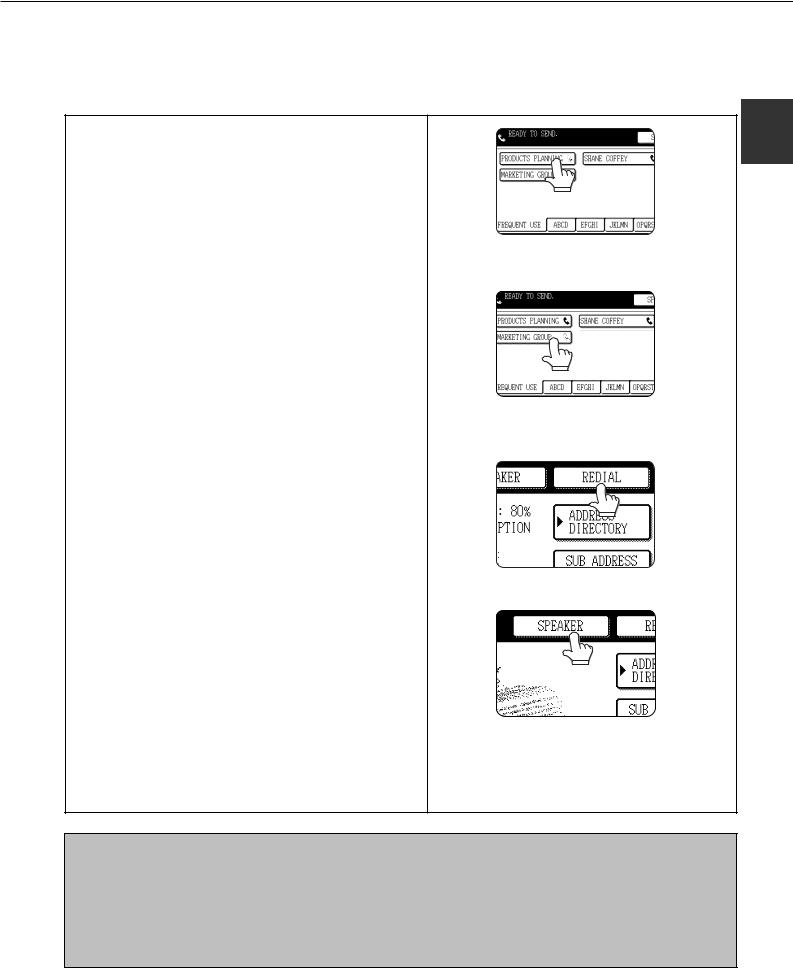
2 Touch the ADDRESS DIRECTORY key.
AKER |
REDIAL |
The address directory |
|
screen appears. |
|||
|
|
||
Y:100% |
ADDRESS |
|
|
EPTION |
DIRECTORY |
|
|
|
|
||
|
SUB ADDRESS |
|
3 Touch the one-touch key for the desired destination.
READY TO SEND. |
|
|
S |
|
|
|
|
|
|
SAGEM SA |
|
T.P.S. |
|
|
SAGEM |
|
|
|
|
FREQUENT USE |
ABCD |
EFGHI |
JKLMN |
OPQRS |
Refer to page 1-5 for information on using the 2 address directory screen.
The key you touched is highlighted. If you touch the wrong key, touch the key again to cancel the selection. The key display will return to normal.
4 Continue from step 7 of "Basic Procedure for Sending Faxes" (page 2-3).
TRANSMITTING A TWO-SIDED DOCUMENT
A two-sided document can be automatically transmitted using the auto document feeder. Follow the steps below to automatically send a two-sided document.
1 Make sure the machine is in fax mode and then load the document in the auto document feeder (page 1-7).
2 Touch the ORIGINAL key.
|
|
When you touch the |
|
STANDARD |
ORIGINAL key, check the |
||
original size displayed in the |
|||
RESOLUTION |
|||
key. |
|||
|
|
||
AUTO |
A4 |
|
|
ORIGINAL |
|
||
3 Touch the 2-SIDED BOOKLET key or the 2- SIDED TABLET key as appropriate for the original you loaded.
|
|
|
|
|
|
|
|
|
|
|
If necessary, touch the |
|
|
|
|
|
|
|
|
SPEAKER |
|
||
|
|
|
|
|
|
|
|
|
MANUAL key and set the |
||
|
|
|
|
|
|
|
|
|
|
|
|
|
|
|
|
original size. (Page 1-8) |
|||||||
|
|
ORIGINAL SIZE |
|
|
|||||||
|
|
|
|
||||||||
|
AUTO |
|
|
|
|
MANUAL |
|
|
|
||
|
|
|
|
|
|
|
|
|
|||
|
2-SIDED |
|
|
|
2-SIDED |
|
|
||||
|
BOOKLET |
|
|
|
TABLET |
|
|
||||
4 Touch the OK key.
|
|
|
|
|
You will return to the initial |
KER |
|
REDIAL |
|||
|
screen. |
||||
|
|
|
|
|
|
|
|
|
|
|
|
|
|
|
|
|
|
L
A two-sided original icon appears next to the ORIGINAL key. (Example: The icon that appears when the 2-SIDED BOOKLET key is touched.)
STANDARD
RESOLUTION
AUTO A4
ORIGINAL
5 Continue from step 4 of "Basic Procedure for Sending Faxes" (pages 2-2 to 2-3)
NOTES |
Booklet |
Tablet |
•Booklets and tablets
Two-sided originals that are bound at the side are booklets, and two-sided originals
that are bound at the top are tablets.
• Two-sided scanning turns off after the document is stored in memory. Pressing the CA key will also cancel two-sided scanning.
2 - 5
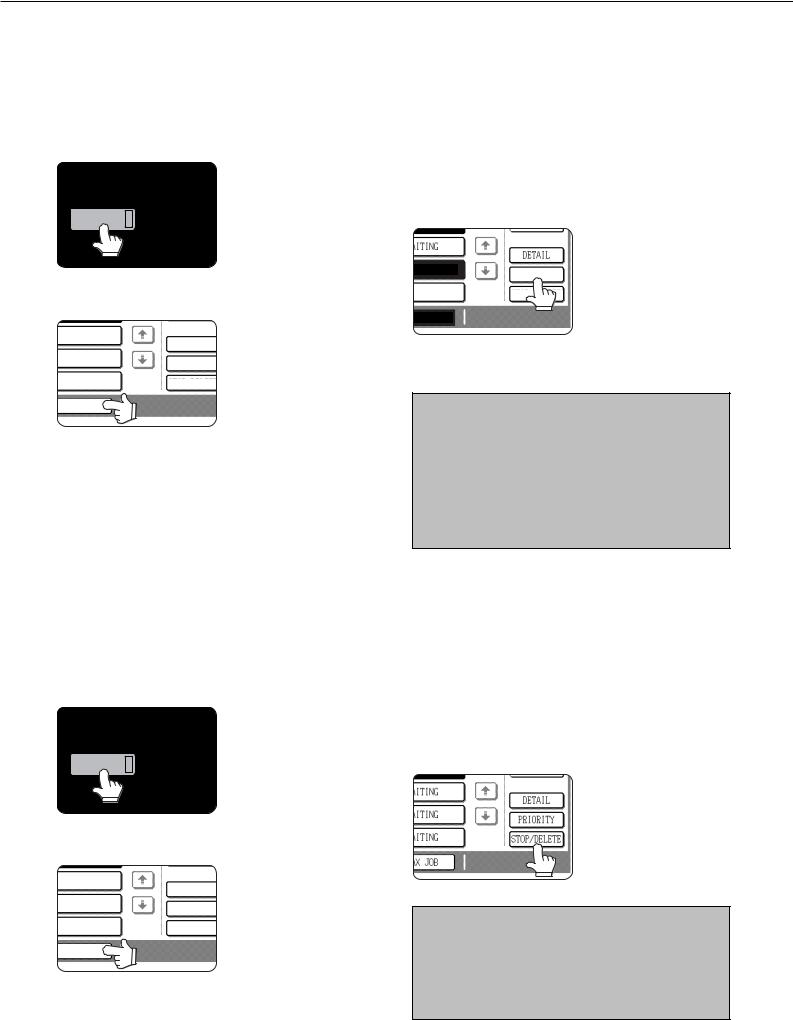
PRIORITY TRANSMISSION OF A STORED JOB
If you have an urgent transmission job and multiple transmission jobs have already been stored, you can give priority to the urgent job so that it will be transmitted immediately after the job currently being executed. This is done from the job status screen. For details on using the job status screen, refer to page 1-14 of "Operation manual (for printer operation and general information)".
1 Press the JOB STATUS key.
3 Touch the job key of the transmission job to which you wish to give priority.
The touched key is highlighted.
4 Touch the PRIORITY key.
2 Touch the FAX JOB key.
WAITING
DETAIL
WAITING
PRIORITY
WAITING |
STOP/DELETE |
|
FAX JOB
|
|
|
The selected job moves up |
AITING |
|
|
to the next position after the |
|
|
job currently being |
|
AITING |
|
|
|
|
|
executed.
AITING
AX JOB
When the current job is completed, execution begins of the job selected in step 3.
NOTES
If the job currently being executed is a broadcast transmission (page 3-2) or a serial polling operation (3-5), the priority job will be executed after the call to the current destination is completed. When the priority job is completed, the remaining broadcast or polling destinations are called. However, if the priority job is also a broadcast transmission or serial polling operation, the job is begun after the current broadcast or serial polling job is completed.
CANCELING A FAX TRANSMISSION
You can cancel a transmission job that is in progress or has been stored. Cancellation is done from the fax job status screen. (Printing of a received fax cannot be canceled.)
1 Press the JOB STATUS key.
2 Touch the FAX JOB key.
WAITING
DETAIL
WAITING
PRIORITY
WAITING |
STOP/DELETE |
|
FAX JOB
3 Touch the job key of the transmission job you wish to cancel.
The touched key is highlighted.
4 Touch the STOP/DELETE key.
|
|
|
|
|
|
A message appears to |
AITING |
|
|
|
|
|
confirm the cancellation. |
|
|
|
|
|
Touch the YES key to delete |
|
|
|
|
|
|
|
|
AITING |
|
|
|
|
|
|
|
|
|
PRIORITY |
|||
|
|
|
|
|
the selected job key and |
|
|
|
|
|
|
|
|
AITING |
|
|
|
|
|
cancel the transmission. |
|
|
|
STOP/DELETE |
|
||
|
|
|
|
|
||
|
|
|
|
|
|
|
|
|
|
|
|
||
|
|
|
|
|
|
|
AX JOB |
|
|
|
|
|
|
NOTES
•If you do not wish to cancel the transmission, touch the NO key.
•You can verify a canceled transmission job in the transaction report. (Refer to page 7-2.)
"CANCEL" will appear in the Type/Note column.
2 - 6

RECEIVING FAXES
When another fax machine sends a fax to your machine, your machine will ring*, automatically receive the fax, and begin printing (automatic reception).
NOTES
•You can store a transmission job while fax reception is in progress (refer to page 2-4).
•If an extension phone is connected to the machine, you can answer using the extension phone and then begin fax reception (manual reception). This allows you to use the line for both voice calls and faxes. (Refer to page 5-4.)
•To receive faxes, sufficient paper must be loaded in the paper tray. Refer to pages 1-16 to 1-24 of "Operation manual (for
printer operation and general information)" to load appropriate paper. Incoming faxes will be automatically adjusted to the orientation of the printing paper, so there is no need to load both horizontally and vertically oriented paper. 2 However, if you receive a fax that is smaller than 8-1/2"x11" (A4) size, the paper size used to print the fax will depend on how
the original was oriented (vertically or horizontally) in the sending fax machine.
RECEIVING A FAX
The machine will ring* and reception will |
2 |
Reception ends. |
1 automatically begin. |
When reception ends, the |
|
|
|
|
NOTE |
|
machine makes a "beep" |
|
sound. |
|
• If the fax is being sent manually and you have connected |
|
|
|
The output tray for the |
|
an extension phone to the machine, you can lift the phone |
|
|
|
printed fax varies depending |
|
before reception begins to talk with the other person. |
|
|
|
on the output unit installed |
|
|
|
|
|
|
on the machine. |
*Number of rings
The machine has been set to ring twice before beginning automatic reception. You can use the key operator program to change the number of rings to any number from 0 to 15. (Refer to page 8-8.)
If the number of rings is set to 0, the machine will receive faxes without ringing.
NOTES
•If the machine has multiple output trays, the key operator program can be used to change the output tray for fax reception (page 8-8).
•If desired, you can set the machine to output a blank sheet of paper after printing the last page of each received fax job. This will help you distinguish where one reception ends and another begins.
■ If received data cannot be printed
If the machine runs out of paper or toner, or a paper jam occurs, print and copy jobs that are in progress will be held in memory until printing becomes possible. The jobs are automatically printed when printing capability is restored. When received data is held in memory, the DATA light next to the IMAGE SEND key blinks.
You can also use the transfer function to have another fax machine print the received data (refer to page 3-12).
NOTE
If the machine makes a double beep sound during reception or at the end of reception and an error message appears in the display, clear the error as explained on page 7-3.
2 - 7
 Loading...