


251310522_myX-1_Couv_en.qxd 25/09/03 14:20 Page 1
ENGLISH
*251310522*
SAGEM SA
Mobile Phones Division
Tel. +33 1 40 70 88 44 - Fax +33 1 40 70 66 40 - www.sagem.com
Le Ponant de Paris - 27, rue Leblanc - 75512 PARIS CEDEX 15 - FRANCE SAGEM SA - Société anonyme à directoire et conseil de surveillance capital : 33 300 000 € - 562 082 909 RCS PARIS

Compatibility of your SIM card
Your phone is compatible with SIM 3V cards only.
MYX-1_EN-00.pmd |
1 |
You have just bought a mobile phone and we congratulate you on your choice.
Your phone will allow you to use different international networks (GSM 900 MHz and DCS 1800 MHz) depending on the roaming agreements between the operators.
We would like to remind you that this phone is approved to European standards.
To get the most out of using your phone, we recommend that you read this manual carefully and keep it handy for future reference if needed.
WARNING
According to the configuration of the networks and associated subscriptions, certain functions may not be available (usually indicated by *).
Make sure your SIM card is compatible with your phone. If an incompatible SIM card is inserted, a message will be displayed when switching on your phone. For further information, contact your Operator.
The SAGEM logo and trademark are the property of SAGEM SA.
AT is a registered trademark of Hayes Microcomputer products Inc.
Hayes is a registered trademark of Hayes Microcomputer Products Inc.
T9™ Text Input is a registered trademark of ©Tegic Communications Inc.
T9 is licensed under one or more of the following U.S. Patents: 5,818,437, 5,953,541, 5,187,480, 5,945,928, 6,011,554 and additional patents are pending worldwide.
1
23/09/2003, 16:29

 Conformance Document
SAGEM SA declare under its sole responsibility that the product Dual Band GSM/DCS Type A2003 conforms to the requirements of the following EEC directives:
EEC Directive |
1999/5/CE |
Safety |
EN 60950: 2000 |
EMC |
EN 301 489-1 |
|
EN 301 489-7 |
Low voltage |
|
directive |
73/23/CEE |
Network |
3GPP TS 51.010-1 v5.3.0 selected |
|
with GCF-CC v3.10.0 included |
|
Requirements GT01 v 4.7.0 |
|
TBR 19 Edition 5 |
|
TBR 20 Edition 3 |
|
TBR 31 Edition 2 |
|
TBR 32 Edition 2 |
|
EN 301 419-1 |
|
EN 301 511 |
Health |
EN 50360 |
|
EN 50361 |
2
MYX-1_EN-00.pmd |
2 |
23/09/2003, 16:29 |

Functions at a glance
Switch on
Press  .
.
Call
Dial the number then press .
.
Answer
Press .
.
Hang up
Press  .
.
Switch off
Press  (long press).
Hands-free
To communicate, press .
.
Lock and unlock the keyboard from the standby screen
Press then OK.
Redial last number
Press  twice.
Make a call from a number stored in the directory
By name: enter the first letter of the name, press  , scroll down the list to find your correspondent, then press
  to call.
By location in the directory: enter the location number then press to call.
3
MYX-1_EN-00.pmd |
3 |
23/09/2003, 16:29 |

Menus at a glance
Enter using  or
or  Navigate using
  and
and 
Validate using OK
Quit or return to the previous menu using C
According to the model of your phone, to the configuration of the networks and associated subscriptions, certain functions may not be available (indicated by *).
Depending on the model, the phone menus will appear as listed below:
Services
Directory
Directory menu
Sort by location
Create record Call groups
Available memory
Personal numbers Quit
Text messages
Write new...
Call services
Call forwarding
View last numbers Duration and cost of calls (*)
Display numbers
Double call Automatic redial
Blacklist
Voice mail number Local information (*)
4
Ringing and beeps
Volume and choice of music
Call groups
Personalised ringing tone Vibrate (*)
Silent mode
Beeps
Controls
Customization
Select language
Automatic response Network selection
Setting time/date
Display contrast Currency converter
Security
Keyboard locking PIN number
PIN number 2 (*)
Phone code Confidentiality messages
Operator password (*)
Limit incoming calls (*) Limit outgoing calls (*)
Pre-set directory (*)
Costs (*)
Accessories
Calculator
Alarm
Timer
Car kit (*)
Data parameters
Games
MYX-1_EN-00.pmd |
4 |
23/09/2003, 16:29 |

Glossary
Outgoing call |
A call made from your phone. |
Incoming call |
A call received by your phone. |
SIM card |
The card containing your subscription and access rights to services. The |
|
detachable part is the “micro-SIM”. |
PIN |
The personal code linked to your SIM card. |
PIN2 |
The second personal code linked to your SIM card to access certain |
|
functions (*). |
Phone code |
The phone code is a secret code intended to protect the phone in case of theft. |
IMEI |
The identification number of your phone. |
SMS or EMS |
Short Message Service or Extended Message Service: sending and receipt of |
|
text messages, icons, animated screen savers and melodies. |
Service provider |
Company which manages the network subscription. |
or operator |
|
5
MYX-1_EN-00.pmd |
5 |
23/09/2003, 16:29 |

Contents
Presentation of the phone ............................. |
8 |
Function keys ................................................ |
9 |
Alphanumeric keyboard ................................. |
9 |
Key 1 ........................................................... |
10 |
Key ........................................................... |
10 |
Display ......................................................... |
10 |
Exchanging the front and back panel ........... |
11 |
Getting started .............................................. |
12 |
Information on the SIM card ......................... |
12 |
Installing the SIM card and the battery.......... |
13 |
Charging the battery..................................... |
14 |
Switching on/switching off, starting up .......... |
15 |
Setting Time and Date ................................. |
15 |
Searching for a network ............................... |
16 |
Switching off ................................................ |
17 |
Recommendation ........................................ |
17 |
Menu access ............................................... |
17 |
Deleting characters ...................................... |
17 |
Initial communication - Hands-free mode .. |
18 |
Making a call ................................................ |
18 |
Receiving a call ........................................... |
18 |
Volume control ............................................. |
18 |
Hands-free mode (*) .................................... |
19 |
Ending a call ................................................ |
19 |
Directory ....................................................... |
20 |
Directory display .......................................... |
20 |
Storing a number ......................................... |
20 |
Deleting a number ....................................... |
21 |
Call groups .................................................. |
21 |
Sorting ......................................................... |
23 |
Sending a short message to a stored |
|
number ........................................................ |
23 |
Directory memory space .............................. |
24 |
6 |
|
Displaying personal numbers ....................... |
24 |
Making a call with a stored number .............. |
24 |
Messages ...................................................... |
25 |
Receiving a message .................................. |
25 |
Editing a message using Easy |
|
Message T9™ ............................................. |
31 |
Options for messages in the list ................... |
35 |
Calls............................................................... |
36 |
Forwarding calls ........................................... |
36 |
Viewing the list of the last numbers used ...... |
37 |
Monitoring the duration and cost of calls (*) .. |
37 |
Displaying the numbers................................ |
38 |
Authorising double call ................................. |
39 |
Configuring automatic redial ......................... |
39 |
Blacklist ....................................................... |
40 |
Voice mail number ....................................... |
40 |
Local information distribution ........................ |
40 |
Replacing the international prefix ................. |
40 |
Placing calls on hold .................................... |
41 |
Multi-conferencing (*) ................................... |
41 |
Ringing tones ............................................... |
43 |
Selecting the volume and the type |
|
of ringing tone .............................................. |
43 |
Call groups .................................................. |
43 |
Personalising the ringing tone ...................... |
44 |
Setting the vibrator (*) .................................. |
45 |
Selecting silent mode ................................... |
45 |
Setting the beeps ......................................... |
45 |
Deleting DTMF tones ................................... |
46 |
MYX-1_EN-00.pmd |
6 |
23/09/2003, 16:29 |

Contents |
|
Settings ......................................................... |
47 |
Customizing your phone .............................. |
47 |
Selecting the display language ..................... |
49 |
Select the type of response .......................... |
50 |
Selecting the network ................................... |
50 |
Setting the time and date ............................. |
51 |
Controlling screen contrast........................... |
52 |
Converting currencies .................................. |
52 |
Security ......................................................... |
53 |
Locking the keyboard ................................... |
53 |
Changing the PIN number............................ |
53 |
Changing the PIN2 number (*) ..................... |
54 |
Changing the phone code ............................ |
54 |
Changing the operator password (*) ............. |
55 |
Limiting incoming calls (*) ............................ |
55 |
Limiting outgoing calls (*) ............................. |
56 |
Setting up the pre-set directory (*) ................ |
56 |
Charge checking (*) ..................................... |
57 |
Confidentiality messages ............................. |
57 |
Accessories .................................................. |
58 |
Calculator .................................................... |
58 |
Setting the alarm .......................................... |
58 |
Setting the timer ........................................... |
59 |
Configuring your phone with a car kit ............ |
59 |
Data parameters .......................................... |
60 |
WAP (depending on model) ......................... |
61 |
The WAP menus ......................................... |
61 |
Configuration of parameters ......................... |
62 |
Connection .................................................. |
63 |
Downloading objects .................................... |
63 |
Disconnection .............................................. |
64 |
Exit from the WAP function .......................... |
64 |
Icons ............................................................ |
64 |
Games ........................................................... |
65 |
Available accessories ................................... |
66 |
Available accessories .................................. |
66 |
Upkeep ........................................................ |
66 |
Battery ......................................................... |
66 |
Maintenance menu ...................................... |
66 |
Recommendations ....................................... |
67 |
Technical Characteristics ............................ |
71 |
Troubleshooting ........................................... |
73 |
7
MYX-1_EN-00.pmd |
7 |
23/09/2003, 16:29 |
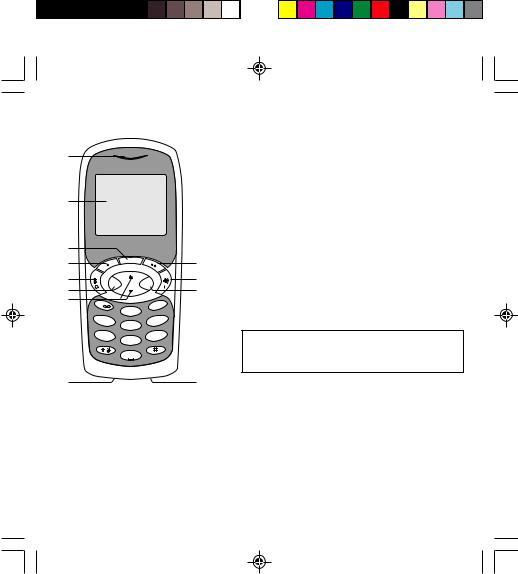
Presentation of the phone
1
2
4 |
s |
|
||
my X-1 |
|
|
||
3 |
|
|
|
5 |
7 |
C |
|
OK |
8 |
9 |
|
10 |
||
|
|
|
||
6 |
1 |
|
3 def |
|
|
|
|
||
|
2 |
abc |
|
|
|
4 ghi |
|
6 mno |
|
|
5 |
jkl |
|
|
|
7 pqrs |
|
9 wxyz |
|
|
8 |
tuv |
|
|
|
0 |
+ |
|
|
12 |
|
|
|
11 |
8
1 - Ear phone/Speaker
2 - High definition graphics screen
3 - Programmable lefthand key
4 - Central key
5 - Programmable righthand key
6 - Scrolling arrows
7 - Stop/End call
8 - Operate/Call - Activation of hands-free
9 - Cancel
10 - Validate
11 - Battery charging and accessories socket
12 - Microphone
WARNING!
During a call, mind you do not obstruct the microphone with your hand.
MYX-1_EN-01present.pmd |
8 |
23/09/2003, 16:29 |

Presentation of the phone
Function keys
Switch off – Reject a call – Hang up
Switch on – Call a number – Receive a call – Handsfree mode (*)
CShort press: Return to the previous menu – Delete a character
Long press: Exit menu mode – Complete deletion of the entry
OK Validate
- Programmable keys for direct access to the functions that you have selected (depending on model)
-Volume control during conversation (lefthand key  : lower, righthand key
  : louder)
-Contextual action
@Mobile Internet access key (depending on model)
 and
and  Entry and scrolling through the menus.
Alphanumeric keyboard
Made up of 12 keys: 0 to 9, and #.
To obtain a number or letter, hold down the relevant key until the desired number or letter appears.
Letters with accents are obtained by a long press on after entering the letter with no accent.
Punctuation marks and special symbols are obtained by a long press on the # key.
9
MYX-1_EN-01present.pmd |
9 |
23/09/2003, 16:29 |
Presentation of the phone
Key 1
A long press on key 1 allows you to access the voicemail service (depending on model).
Key
A long press on key allows you to activate or deactivate the silent mode.
Display
The high definition graphics screen enables you to read messages easily. Various icons inform you about the status of functions.
Battery charge indicator (black if charged, clear if discharged)
Received signal strength indicator (maximum strength:
5 bars)
The R letter indicates if the network found does not correspond to the subscription
If  flashes, the phone is searching for a network
Hands-free loudspeaker
Call in progress
Permanent call forwarding
Silent mode
Receipt of messages and presence of messages not read.
Flashing: message memory full.
Voice messages present.
10
MYX-1_EN-01present.pmd |
10 |
23/09/2003, 16:29 |

Presentation of the phone
The three keys located under the screen are allocated to actions described at the bottom of the screen just above the key, each time it is necessary.
For example:
Validate Pressing the righthand key  validates the current function.
1
2
3
Exchanging the front and back panel
Switch off the phone.
1 Turn it over and slide the back catch upwards.
2 Take off the back cover starting at the bottom. Take out the central section and the keypad.
3 Position the keypad in the new front cover making sure that no dust gets in, then follow with the central section.
4 Replace the back cover, clicking in first the upper part then the lower and pushing the back catch downwards into the locked position.
4
11
MYX-1_EN-01present.pmd |
11 |
25/09/2003, 12:51 |

Getting started
SIM card
This card must be handled and stored with care in order to avoid excessive stresses or scratches that would damage it. If your
SIM card is lost, contact your Operator or
Service Provider immediately.
Note: Do not leave you SIM card within the reach of small children.
12
Information on the SIM card
To use your phone, you have a small card called a SIM card. In addition to all of the information necessary for the network, this card contains other information that you can modify:
•secret codes (PIN and PIN2 - Personal Identification
Number)
•directory
•mini-messages
•functioning of specific services.
Your phone is compatible with the different SIM cards provided by the Operators.
It is compatible with SIM/WIM cards (cards which contain in addition the WIM module (Wireless Identity Module) which allows secured WAP communications).
MYX-1_EN-02Getting started.pmd |
12 |
23/09/2003, 16:29 |

Getting started
1
2
3
4
5 |
6 |
MYX-1_EN-02Getting started.pmd |
13 |
Installing the SIM card and the battery
Switch off your phone and disconnect the charger.
The SIM card is inserted beneath the phone’s battery.
1 Turn your phone over and slide the backcatch up.
2 Take off the back cover, starting from the bottom.
3 Take out the battery.
4 Slide the card along the base beneath the retaining plate, with the gold coloured sections facing towards the phone and the cut-off corner lined up to match the drawing on the phone.
5 Place the battery by first inserting the upper section into the opening.
6 Replace the back cover, clicking in first the upper part then the lower and pushing the backcatch downwards into the locked position.
13
23/09/2003, 16:30

Getting started
|
|
1 |
|
|
|
|
|
|
|
|
4 |
ghi |
|
|
|
|
|
|
|
7 |
|
|
2 |
|
|
|
|
|
|
p |
|
|
abc |
|
|
|
|
||
|
|
5 |
|
|
|
|
|
||
|
qrs |
|
jkl |
|
|
|
3 |
def |
|
|
|
8 |
tuv |
|
|
6 |
m |
|
|
|
0 |
|
|
|
no |
|
|||
|
+ |
|
|
9 w |
xyz |
|
|
||
|
|
|
|
|
|
|
Warning
There is a risk of explosion if the battery is incorrectly replaced or disposed of in fire.
Do not short-circuit.
The battery does not contain any components that can be changed by you.
Do not attempt to open the battery case.
Only use the correct chargers and batteries as shown in the manufacturer’s catalogue.
Spent batteries must be collected at the appropriate sites.
You are advised to remove the battery if you intend to leave your phone unused for a long period.
14
MYX-1_EN-02Getting started.pmd |
14 |
Charging the battery
Your phone is powered by a rechargeable battery. A new battery must be charged for at least 4 hours before it is used for the first time. It will reach its nominal capacity after several usage cycles.
When your battery has run down, the phone displays it and cuts out.
To recharge your battery:
Connect the charger to a wall outlet.
Connect the end of the charging cable to the bottom of your phone.
The phone will start charging. The battery charging indicator indicates the charge.
Charging stops by itself.
Unplug the cable.
It is possible that during charging, the battery may heat up slightly; this is normal.
23/09/2003, 16:30

Getting started
Control of the PIN code
If your phone displays SIM absent, press  (long press) to switch off your phone and check that your SIM card is correctly positioned.
Warning
If the wrong PIN code is entered three times in a row, the card will be locked. To unlock your card:
-enter **05*
-enter the PUK code (Personal Unlocking Key) provided by your
Network Operator and validate,
-enter your PIN code and validate,
-enter your PIN code again and validate.
After 5 or 10 times (depending on SIM card type), the SIM card will be permanently locked. Contact your
Operator or your Service Provider to obtain a new card.
The same procedure (entering 052) applies when the PIN-2 code is blocked
(PUK 2 code).
Switching on/switching off, starting up
To switch on your phone:
Press  to switch on your phone.
If access to the SIM card is protected by a secret code, the phone will ask you to enter your PIN code.
PIN code
This is the personal code for your SIM card. You may be asked to enter this code when the instruction: Pin number? appears after you switch on your phone.
Enter the code of between 4 and 8 digits given to you by your operator. These digits will not be displayed on the screen for security reasons.
Press # or OK or on righthand key  to validate.
PIN2 code (*)
If one was given to you by your Operator, a second PIN code provides secure access to certain functions.
Setting Time and Date
The first time the phone is used, the time and date will need to be set.
If the battery has completely run down or been taken out, you will be asked to validate the time and date.
15
MYX-1_EN-02Getting started.pmd |
15 |
23/09/2003, 16:30 |
Getting started
Network indicator
The indicator of the level of network signal received enables you to visualise the quality of reception. If it shows less than three bars, look for better reception to make your call in good conditions.
16
MYX-1_EN-02Getting started.pmd |
16 |
Setting the time
Set the time either by typing it in or by using the scrolling arrows to alter the numbers already displayed.
Setting the date
Set the date either by typing it in numerically or by using the scrolling arrows to alter the display.
When the time and date are correct, validate with the OK key.
Searching for a network
The phone then searches for a network on which it can communicate:
If it finds one, the name of the network appears on the screen.
You are ready to make or receive a call.
If the R letter and a network name are displayed, calls can be made.
If the R letter is displayed without any network name, only emergency services will be accessible (police, ambulance, fire brigade).
If the  flashes, the phone will keep searching. No network is available.
23/09/2003, 16:30

Getting started
Direct access to menus
To directly access a menu, press  then enter the number of the selected menu.
Switching off
Hold down the  key until the end message is displayed.
Release the key. The phone switches off.
Recommendation
Your phone is equipped with an integrated antenna. For the best reception, try not to cover the top part of the phone with your hand.
Menu access
The menu functions permit you to verify or modify the various functions of your phone to adapt it to your needs.
Press the scrolling arrows  or
or  to access the menus.
Scroll through the menus using the scrolling arrows then press OK to access the selected menu.
Each time you want to validate an action, press OK.
To abandon an action, press C.
To exit the menu mode, press and hold C.
Deleting characters
You can cancel an entry error:
Press quickly on C to delete the last character.
17
MYX-1_EN-02Getting started.pmd |
17 |
23/09/2003, 16:30 |

Initial communication - Hands-free mode
International call
Press 0 (long press) to display + then dial the country code without waiting for a tone, then the number you require.
Emergency services
Depending on the operator, you can contact the emergency services with or without a SIM card or when the keyboard is locked. It is sufficient to be in a zone served by a network.
To call the international emergency service, dial 112 then press  .
.
Other emergency service numbers may exist, depending on the country.
Making a call
The network is displayed.
Dial the number.
Press .
.
During the call,  flashes on the screen, and tones may signal the establishment of a connection.
When the person you have called answers, speak.
Receiving a call
When you receive a call:
Press  then speak.
The caller’s number is displayed when it is presented to the network.
All incoming and outgoing call numbers are registered in the list of the last calls.
Volume control
Increase or decrease the volume during a conversation by pressing the lefthand ( ) or righthand (
 ) key.
18
MYX-1_EN-03comm.pmd |
18 |
23/09/2003, 16:30 |

Initial communication - Hands-free mode
The “Hands-free” mode enables you to follow a conversation with several people and be free to move, for example, to take notes during your conversation.
Warning
Before putting the phone to your ear, check the volume control settings as well as the selected listening method, especially if using integrated hands free mode, which could cause ear damage if used incorrectly.
Hands-free mode (not available on all models)
During a call, you can transfer from handset mode to hands-free mode simply by pressing one key and the reverse.
Press .
.
The screen displays  for handset mode and
  for “hands-free” mode.
Ending a call
Press  .
.
The end of call message appears on the screen.
19
MYX-1_EN-03comm.pmd |
19 |
23/09/2003, 16:30 |
Directory
The quantity of phone numbers stored in the SIM card directory varies depending on the capacity of the card.
Your Operator or your Service Provider can provide you with this information.
It is advisable to store numbers in their international format (+, country code, and number). You can verify the contents of a record and modify it by selecting the required name.
When sorting by location, pressing on the key launches a search for the first available location; pressing on # returns to the start of the list.
20
MYX-1_EN-04Directory.pmd |
20 |
Directory display
You can store the telephone numbers that you call regularly:
-in the SIM card,
-in the phone itself.
Different icons will inform you of the directory location where the number is stored when you search for it:
SIM card directory
Your phone’s directory
SIM card pre-set directory.
Storing a number
In the Directory menu, select Create record. Validate by pressing OK.
Enter the name (the number of accepted characters depends on the SIM card used). Validate.
Enter the number including the area code, if necessary
(up to 20 characters). Validate.
You can enter spaces in the number (displayed as commas “,”) by pressing (long press) on or #. The figures entered after a space are processed in a DTMF sequence (usable after a number).
If necessary, select the call group to which you want to assign this number.
Depending on the available space, you can select the storage location of the number entered: SIM card or phone itself.
23/09/2003, 16:30

Directory
Deleting a number
To delete the contents of a directory location, select the name using the scrolling arrows. Validate by pressing
OK. Select Delete, then validate.
Call groups
You are also able to classify contacts recorded in the directory into Call Groups.
To each of these groups you attribute certain characteristics (icon, ringing tone, vibrator, etc.).
Creating a group
Groups are defined by default in your phone.
In order to look up their characteristics, display a list of the groups - Directory/Directory menu/Call groups menu.
Using the scrolling arrows, choose a group and press OK. You are then able to look up or alter its characteristics or to erase the group.
To create a new group:
Go into Directory/Directory menu/Call groups. Choose Create group.
Enter a name and validate.
Choose an icon using the scrolling arrows and validate.
Choose a ring tone, then choose a vibrator mode, and validate.
21
MYX-1_EN-04Directory.pmd |
21 |
23/09/2003, 16:30 |

Directory
If call groups are not enabled, you cannot attach correspondents to groups.
22
MYX-1_EN-04Directory.pmd |
22 |
The selection of a call group is made when entering a number into the directory, or when modifying a number you have already saved.
Activate the Call Groups function
If you want the characteristics of the groups to apply to each call:
Go into Directory/Directory menu/Call groups. Choose Activate groups.
Tick the box and validate.
The calls received from contacts who do not belong to a Call group use the parameters provided in the
Ringing and beeps menu.
Available memory
To ascertain the number of groups which can still be created:
Go into Directory/Directory menu/Call groups/ Group menu.
Choose Available memory.
The first number shows the number of groups which can still be created, and the second shows the maximum number of groups.
Looking up a group
Select the group to be looked up and press OK.
Choose See group. The screen presents the name, the icon, and the choice of vibrator mode of the group.
If there are contacts attached to this group, press the righthand key  to view the list of these ones.
23/09/2003, 16:30

Directory
Modifying a group
Select the group to be modified, and press OK.
Choose Modify.
Carry out the wanted modifications.
Validate by OK.
Deleting a group
Select the group to be deleted, and press OK.
Choose Delete.
Confirm by OK.
Sorting
Directory menu enables you to sort the stored numbers by name or location; for the latter, the free locations are indicated in the list.
Sending a short message to a stored number
Select the recipient scrolling using the scrolling arrows and validate using OK. Select Send message and validate using OK.
Compose your text message.
Press OK. Select Send and validate using OK. The recipient number is displayed.
Send your message using the righthand key  .
.
23
MYX-1_EN-04Directory.pmd |
23 |
23/09/2003, 16:30 |
 Loading...