


r®
Owner’s Manual
CAUTION
RISK OF ELECTRIC SHOCK
DO NOT OPEN
ATTENTION: RISQUE DE CHOC ELECTRIQUE NE PAS OUVRIR
CAUTION: TO REDUCE THE RISK OF ELECTRIC SHOCK,
DO NOT REMOVE COVER (OR BACK).
NO USER-SERVICEABLE PARTS INSIDE.
REFER SERVICING TO QUALIFIED SERVICE PERSONNEL.
The lightning flash with arrowhead symbol, within an equilateral triangle, is intended to alert the user to the presence of uninsulated “dangerous voltage” within the product’s enclosure that may be of sufficient magnitude to constitute a risk of electric shock to persons.
The exclamation point within an equilateral triangle is intended to alert the user to the presence of important operating and maintenance (servicing) instructions in the literature accompanying the product.
INSTRUCTIONS PERTAINING TO A RISK OF FIRE, ELECTRIC SHOCK, OR INJURY TO PERSONS.
IMPORTANT SAFETY INSTRUCTIONS SAVE THESE INSTRUCTIONS
WARNING - When using electric products, basic precautions should always be followed, including the following:
1.Read these instructions.
2.Keep these instructions.
3.Heed all warnings.
4.Follow all instructions.
5.Do not use this apparatus near water.
6.Clean only with a dry cloth.
7.Do not block any of the ventilation openings. Install in accordance with the manufacturers instructions.
8.Do not install near any heat sources such as radiators, heat registers, stoves, or other apparatus (including amplifiers) that produce heat.
9.Do not defeat the safety purpose of the polarized or grounding-type plug. A polarized plug has two blades with one wider than the other. A grounding type plug has two blades and a third grounding prong. The wide blade or the third prong are provided for your safety. When the provided plug does not fit into your outlet, consult an electrician for replacement of the obsolete outlet.
10.Protect the power cord from being walked on or pinched particularly at plugs, convenience receptacles, and the point where they exit from the apparatus.
11.Only use attachments/accessories specified by the manufacturer.
12.Never use with a cart, stand, tripod, bracket, or table except as specified by the manufacturer, or sold with the apparatus. When a cart is used, use caution when moving the cart/apparatus combination to avoid injury from tip-over.
13.Unplug this apparatus during lightning storms or when unused for long periods of time.
14.Refer all servicing to qualified service personnel. Servicing is required when the apparatus has been damaged in any way, such as power-supply cord or plug is damaged, liquid has been spilled or objects have fallen into the apparatus, the apparatus has been exposed to rain or moisture, does not operate normally, or has been dropped.
For the U.K.
IMPORTANT: THE WIRES IN THIS MAINS LEAD ARE COLOURED IN ACCORDANCE WITH THE FOLLOWING CODE.
BLUE: NEUTRAL
BROWN: LIVE
As the colours of the wires in the mains lead of this apparatus may not correspond with the coloured markings identifying the terminals in your plug, proceed as follows:
The wire which is coloured BLUE must be connected to the terminal which is marked with the letter N or coloured BLACK. The wire which is coloured BROWN must be connected to the terminal which is marked with the letter L or coloured RED. Under no circumstances must either of the above wires be connected to the earth terminal of a three pin plug.

r
Owner’s Manual
Thank you for choosing a Roland DisCover 5 Realtime Orchestrator, the perfect Standard MIDI File player for performing musicians with a professional Vocal Harmonizer function. The DisCover 5 allows you to play back Standard MIDI Files on SmartMedia™ card or floppy disk, and to change their orchestration in realtime, while you also have the flexibility to jump to four locations within every song, which allows you, for instance, to repeat any part of a song time and again.
The DisCover 5’s Vocal Harmonizer is equally flexible: it can add harmonies to your singing based on the chords used by the songs you are playing back. You can also use it for gender transformations of your voice, for correcting not- so-perfect singing, and for a number of professional effects.
To get the most out of the DisCover 5 and to ensure many years of trouble-free service, we urge you to read through this Owner’s Manual thoroughly.
To avoid confusion, let’s agree to use the word “button” for all keys on the front panel, and use “key” only when referring to the DisCover 5’s keyboard.
To save space (and time), let us agree to use the word “song” when referring to Standard MIDI Files.
Before using this instrument, carefully read the sections entitled “Important Safety Instructions” and “Important notes”. They provide important information concerning the proper operation of the DisCover 5. Be sure to keep this manual in a safe place for future reference.
Copyright © 2002 ROLAND EUROPE. All rights reserved. No part of this publication may be reproduced in any form without the written permission of Roland Europe s.p.a.


 Features
Features
The ease of Standard MIDI Files
Based on a thorough analysis of how most performing musicians work, Roland found that Standard MIDI Files were the most popular accompaniment (even on arranger-based keyboards), and so decided to design an instrument that takes mere playback one giant leap further.
The DisCover 5 is not just another Standard MIDI File player with a keyboard: it’s a MIDI File wizard that allows you to do all kinds of things to song material you purchase or download from the Internet.
The DisCover 5 accepts 8MB, 16MB, 32MB, 64MB, and 128MB SmartMedia™ cards. You should therefore be able to build yourself a vast repertoire in no time.
Flexible song playback
Simply by selecting another “Cover” preset (of which there are 72), you can change the orchestration of the songs you are playing back, so as to transform, say, the original country version into a Viennese ballroom rendition.
It is also possible to just change the character of the drum or bass parts, if you feel your songs will sound better that way.
Of course, you can also program everything yourself so as to add your hallmark to pre-recorded material. The good news is that all changes can be carried out on the DisCover 5 itself. You do not need to resort to an external sequencer or software program.
Song Chain function and quick location of the songs you need
|
Thanks to the DisCover 5’s Chain function, you can |
|
|
program play lists for your performances. The advan- |
|
|
tage of such song chains is that you won’t have to |
|
|
look for the desired songs on stage. |
|
|
But make no mistake: in the DisCover 5’s case, not |
|
|
having to look for the next song to be played back is |
|
|
only designed to help you avoid choosing the wrong |
|
|
song, which can happen quite easily, as you may |
|
|
know. Realtime selection of Standard MIDI Files is |
|
|
indeed lightning-fast (courtesy of the Song Finder) |
|
|
and convenient (Play & Search function). |
|
|
Furthermore, you can already prepare the next song |
|
|
while the current one is still running (NEXT SONG |
|
r |
function). |
|
And finally, you can also link one song to each User |
||
|
||
|
Program, so that the desired song will be loaded sim- |
|
|
ply by recalling that User Program. |
|
|
Professional Vocal Harmonizer |
|
|
Another highlight of the DisCover 5 is its Vocal Har- |
|
|
monizer that adds automatic harmonies to your |
|
|
singing, while there are also several modes for trans- |
|
|
forming your (or someone else’s) voice. |
This implies, of course, that you can connect an optional (Roland DR-10 or DR-20) microphone to the DisCover 5. Other signal sources (synthesizers, etc.) can also be connected.
The signals generated by your singing and/or the Vocal Harmonizer can either be added to the signals of the OUTPUT sockets, or transmitted directly to one or two mixer channels (or additional amplifiers) via the dedicated VOCAL HARMONIZER OUTPUT sockets.
Dedicated effects sections
The DisCover 5 has dedicated (and completely separate) effects processors for the song and Keyboard parts, on the one hand, and the microphone and Vocal Harmonizer signals on the other.
These include: Reverb, Chorus, Delay, Compressor, Gate, and 2-band parametric equalizer.
Three Keyboard parts
Of course, you can also play on the DisCover 5’s keyboard. To this end, your Realtime Orchestrator contain an Upper, Lower, and M.Drums part. Upper and Lower can be played together (“layered”) or via separate keyboard areas (“Split”), whose split point is adjustable.
Intuitive user interface
The large touch screen keeps you posted about the DisCover 5’s status and allows you to set almost all functions by touching the on-screen fields.
The DisCover 5’s panel layout is just as intuitive and very cooperative indeed: it works hand-in-hand with the touch screen.
D-Beam controller
The DisCover 5 has the acclaimed D-Beam Controller* for intuitive song playback control and additional DJlike effects via movements over an invisible beam of infrared light. And, of course, the BENDER/MODULATION lever is also there, as are sockets for optional footswitches and an expression pedal.
(* D Beam technology licensed from Interactive Light, Inc.)
Excellent sound source
The DisCover 5 comes with a 64-voice polyphonic sound source with 1,422 instrument sounds and 44 Drum Sets that cover everything from incredibly realistic acoustic instruments to cooking Techno sounds. Never before has an electronic instrument produced such true-to-life instrument and drum sounds that include subtle tonal changes and all the “noises” associated with acoustic instruments (scraping for guitar sounds, resonance for drum sounds, etc.).
The DisCover 5 supports GS-, General MIDI2-, and XG-format MIDI files.
2

128 User Programs
User Programs are memories where you can save your own panel settings. These include the currently selected song, Tones (sounds), tempo, as well as a lot of other parameters. At the press of a maximum of three buttons, you can thus completely reconfigure your instrument.
For even more flexibility, User Program settings stored on SmartMedia™ card can be loaded directly, so that the number of “pre-sets” available on stage is almost unlimited.
Owner’s Manual
…and so much more
Listing all of the DisCover 5’s advantages and functions would take another ten pages, while you must be dying to put it through its paces. That is why we would like to ask you to read this manual from cover to cover. You’ll find that the DisCover 5 is quite unlike any other instrument you know.
Have fun!
3


 Using the unit safely
Used for instructions intended to alert the user to the risk of death or severe injury should the unit be used improperly.
Used for instructions intended to alert the user to the risk of injury or material damage should the unit be used improperly.
* Material damage refers to damage or other adverse effects caused with respect to the home and all its furnishings, as well to domestic animals or pets.
•Before using this instrument, make sure to read the instructions below, and the Owner’s Manual.
....................................................................................................................................
• Do not open or perform any internal modifications on the unit.
....................................................................................................................................
•Do not attempt to repair the DisCover 5, or replace parts within it (except when this manual provides specific instructions directing you to do so). Refer all servicing to your retailer, the nearest Roland Service Center, or an authorized Roland distributor, as listed on the “Information” page.
....................................................................................................................................
• Never use or store the DisCover 5 in places that are:
• Subject to temperature extremes (e.g., direct sunlight in an enclosed vehicle, near a heating duct, on top of heat-generating equipment); or are
• Damp (e.g., baths, washrooms, on wet floors); or are
•Humid; or are
•Exposed to rain; or are
•Dusty; or are
•Subject to high levels of vibration.
....................................................................................................................................
•This unit should be used only with a rack or stand that is recommended by Roland.
....................................................................................................................................
r |
• Make sure you always have the unit placed in such a way |
|
that it is level and sure to remain stable. Never place it on |
||
|
||
|
stands that could wobble, or on inclined surfaces. |
|
|
.................................................................................................................................... |
|
|
• The instrument should only be connected to a power |
|
|
supply of the type described in the operating instruc- |
|
|
tions, or as marked on the DisCover 5. |
|
|
.................................................................................................................................... |
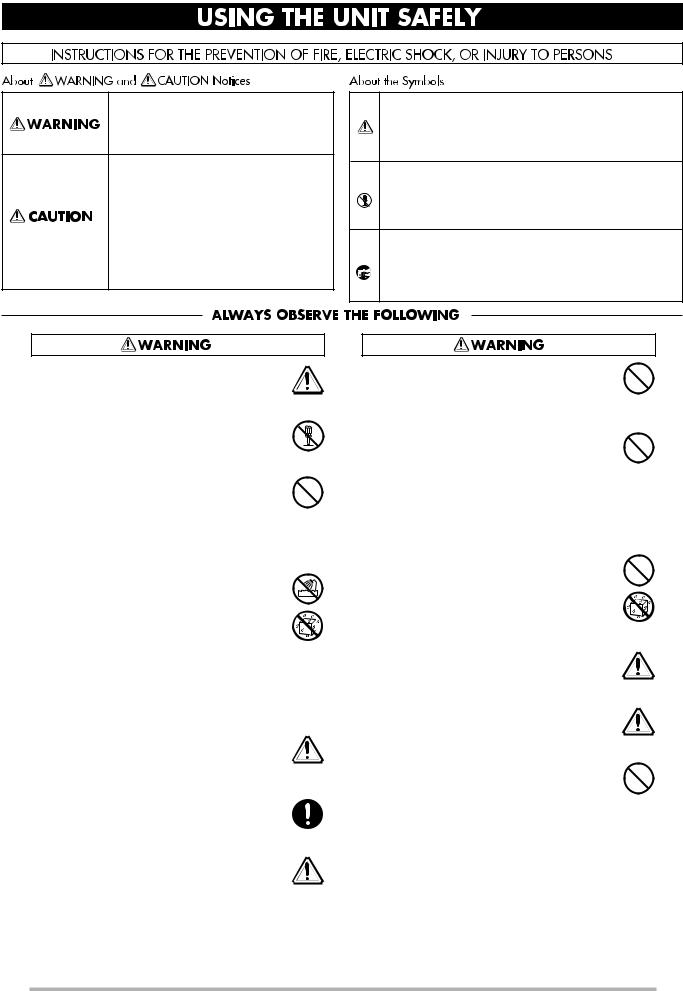
The symbol alerts the user to important instructions or warnings.The specific meaning of the symbol is determined by the design contained within the triangle. In the case of the symbol at left, it is used for general cautions, warnings, or alerts to danger.
The  symbol alerts the user to items that must never be carried out (are forbidden). The specific thing that must not be done is indicated by the design contained within the circle. In the case of the symbol at left, it means that the unit must never be disassembled.
The ● symbol alerts the user to things that must be carried out. The specific thing that must be done is indicated by the design contained within the circle. In the case of the symbol at left, it means that the powercord plug must be unplugged from the outlet.
•Do not excessively twist or bend the power cord, nor place heavy objects on it. Doing so can damage the cord, producing severed elements and short circuits. Damaged cords are fire and shock hazards!
...................................................................................................................................
•This instrument, either alone or in combination with an amplifier and headphones or speakers, may be capable of producing sound levels that could cause permanent hearing loss. Do not operate for a long period of time at a high volume level, or at a level that is uncomfortable. If you experience any hearing loss or ringing in the ears, you should immediately stop using the unit, and consult an audiologist.
...................................................................................................................................
•Do not allow any objects (e.g., flammable material, coins, pins); or liquids of any kind (water, soft drinks, etc.) to penetrate the unit.
...................................................................................................................................
•In households with small children, an adult should provide supervision until the child is capable of following all rules essential for the safe operation of the DisCover 5.
...................................................................................................................................
•Protect the unit from strong impact. (Do not drop it!)
...................................................................................................................................
•Do not force the DisCover 5’s power cord to share an outlet with an unreasonable number of other devices. Be especially careful when using extension cords—the total power used by all devices you have connected to the extension cord’s outlet must never exceed the power rating (watts/amperes) for the extension cord. Excessive loads can cause the insulation on the cord to heat up and eventually melt through.
...................................................................................................................................
4

Owner’s Manual
•Before using the DisCover 5 in a foreign country, consult with your retailer, the nearest Roland Service Center, or an authorized Roland distributor, as listed on the “Information” page.
....................................................................................................................................
•The DisCover 5 should be located so that its location or position does not interfere with its proper ventilation.
....................................................................................................................................
•This unit for use only with Roland keyboard stand KS-12. Use with other stands is capable of resulting in instability causing possible injury.
....................................................................................................................................
• Always grasp only the plug on the power-supply cord
when plugging into, or unplugging from, an outlet or this unit.
....................................................................................................................................
•Try to prevent cords and cables from becoming entangled. Also, all cords and cables should be placed out of the reach of children.
....................................................................................................................................
•Never climb on top of, nor place heavy objects on the unit.
....................................................................................................................................
• Never handle the power cord or its plugs with wet hands
when plugging into, or unplugging from, an outlet or this unit.
....................................................................................................................................
•If you need to move the instrument, take note of the precautions listed below. Make sure to have a firm grip, to protect yourself from injury and the instrument from damage.
•Disconnect the power cord.
•Disconnect all cords coming from external devices.
•Remove the music stand.
....................................................................................................................................
•Before cleaning the unit, turn off the power and unplug
the power cord from the outlet.
....................................................................................................................................
• Whenever you suspect the possibility of lightning in your area, disconnect the power cord from the outlet.
....................................................................................................................................
•Should you remove screws, make sure to put them in a safe place out of children’s reach, so there is no chance of them being swallowed accidentally.
....................................................................................................................................
5


 Important notes
1. Important notes
r
In addition to the items listed under “Using the unit safely” (p. 4), please read and observe the following:
Power supply
•Do not use this instrument on the same power circuit with any device that will generate line noise (such as an electric motor or variable lighting system).
•Before connecting the DisCover 5 to other devices, turn off the power to all units. This will help prevent malfunctions and/or damage to speakers or other devices.
Placement
•Using the DisCover 5 near power amplifiers (or other equipment containing large power transformers) may induce hum. To alleviate the problem, change the orientation of this instrument or move it further away from the source of interference.
•This instrument may interfere with radio and television reception. Do not use it in the vicinity of such receivers.
•Observe the following when using the unit’s floppy disk drive. For further details, refer to “Before using floppy disks (handling the floppy disk drive)”.
•Do not place the unit near devices that produce a strong magnetic field (e.g., loudspeakers).
•Install the DisCover 5 on a solid, level surface.
•Do not move the unit or subject it to vibration while the drive is operating.
•Do not expose the DisCover 5 to direct sunlight, place it near devices that radiate heat, leave it inside an enclosed vehicle, or otherwise subject it to temperature extremes. Excessive heat can deform or discolor the instrument.
•To avoid possible breakdown, do not use the unit in a wet area, such as an area exposed to rain or other moisture.
•Do not allow objects to remain on top of the keyboard. This can be the cause of malfunction, such as keys ceasing to produce sound.
Maintenance
•For everyday cleaning wipe the DisCover 5 with a soft, dry cloth or one that has been slightly dampened with water. To remove stubborn dirt, use a mild, non-abrasive detergent. Afterwards, be sure to wipe the instrument thoroughly with a soft, dry cloth.
•Never use benzene, thinner, alcohol or solvents of any kind, to avoid the possibility of discoloration and/or deformation.
Repairs and data
•Please be aware that all data contained in the instrument’s memory may be lost when it is sent for repairs. In certain cases (such as when circuitry related to memory itself is out of order), we regret that it may not be possible to restore the data. Roland assumes no liability concerning such loss of data.
•To avoid disturbing your neighbors, try to keep the instrument’s volume at reasonable levels. You may prefer to use headphones, so you do not need to be concerned about those around you (especially late at night).
•When you need to transport the instrument, package it in the box (including padding) that it came in. Otherwise, you will need to use equivalent packaging materials, or a flightcase.
•Use only the specified expression pedal (EV-5, EV-7; sold separately). By connecting any other expression pedals, you risk causing malfunction and/or damage to the DisCover 5.
About the touch screen
•Wipe off stains on the touch screen using ethanol, but do not allow the ethanol to soak into the joint of the upper fume and the bottom glass, for it may otherwise cause peeling or malfunction. Do not use organic solvents or detergents other than ethyl alcohol (ethanol).
Before using floppy disks (handling the floppy disk drive)
•Install the unit on a solid, level surface in an area free from vibration. If the unit must be installed at an angle, be sure the installation does not exceed the permissible range: upward, 2°; downward, 18°.
•Avoid using the DisCover 5 immediately after it has been moved to a location with a level of humidity that is greatly different than its former location. Rapid changes in the environment can cause condensation to form inside the drive, which will adversely affect the operation of the drive and/or damage floppy disks. When the unit has been moved, allow it to become accustomed to the new environment (allow a few hours) before operating it.
•To insert a disk, push it gently but firmly into the drive—it will click into place. To remove a disk, press the EJECT button firmly. Do not use excessive force to remove a disk which is lodged in the drive.
•Never attempt to remove a floppy disk from the drive while the drive is operating (the indicator is lit); damage could result to both the disk and the drive.
•Remove any disk from the drive before powering up or down.
•To prevent damage to the disk drive’s heads, always try to hold the floppy disk in a level position (not tilted in any direction) while inserting it into the drive. Push it in firmly, but gently. Never use excessive force.
•To avoid the risk of malfunction and/or damage, insert only floppy disks into the disk drive. Never insert any other type of disk. Avoid getting paper clips, coins, or any other foreign objects inside the drive.
Additional precautions
•Please be aware that the memory contents can be irretrievably lost as a result of a malfunction, or the improper operation of the instrument.
•Use a reasonable amount of care when using the instrument’s buttons, other controls, and jacks/connectors. Rough handling can lead to malfunctions.
•Never strike or apply strong pressure to the display.
•When connecting/disconnecting cables, grasp the connector itself—never pull on the cable. This way you will avoid causing shorts, or damage to the cable’s internal elements.
•A small amount of heat will radiate from the instrument during normal operation. This is perfectly normal.
Handling floppy disks
•Floppy disks contain a plastic disk with a thin magnetic coating. Microscopic precision is required to enable storage of large amounts of data on such a small surface area. To preserve their integrity, please observe the following when handling floppy disks:
•Never touch the magnetic medium inside the disk.
•Do not use or store floppy disks in dirty or dusty areas.
•Do not subject floppy disks to temperature extremes (e.g., direct sunlight in an enclosed vehicle). Recommended temperature range: 10°~50°C (50°~122°F).
•Do not expose floppy disks to strong magnetic fields, such as those generated by loudspeakers.
6
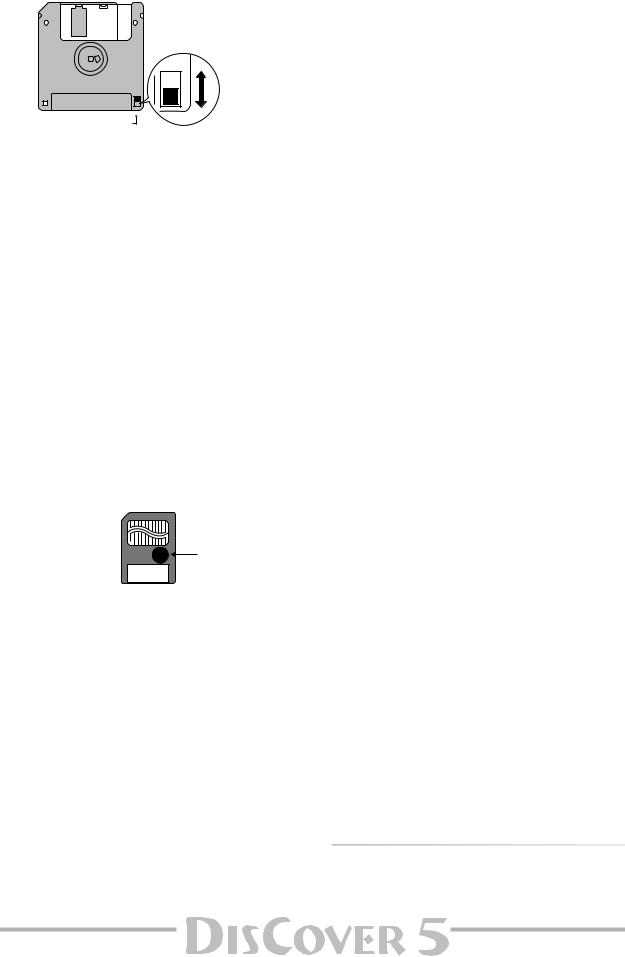
•Floppy disks have a “WRITE” tab which can protect the disk from accidental erasure. It is recommended that the tab be kept in the PROTECT position, and moved to the WRITE position only when you wish to write new data onto the disk.
Rear side of the disk
WRITE
(you can save data to the disk)
Protect tab
PROTECT
(you cannot save data)
•Disks containing important performance data for this instrument should always be locked (have their write protect tab slid to the PROTECT position) before you insert them into the drive of another instrument.
•The identification label should be firmly affixed to the disk. If the label comes loose while the disk is in the drive, it may be difficult to remove the disk.
•Put the disk back into its case for storage.
Before using a SmartMedia™ card
•Only SmartMedia cards formatted on the DisCover 5 can be used.
•Be sure to insert the memory card all the way into the slot.
•Do not touch the contacts of the memory card, or allow them to become soiled.
•Never remove the memory card or turn off the power while an operation –such as reading or writing data, or formatting– is being performed on the memory card. Never remove or connect the card while the DisCover 5 is on. Doing so can destroy the data on the memory card and/or render the memory card itself unusable.
•If you affix the write-protect label to the write-protect area of the memory card, you will not be able to format the card or write data to it. If you wish to format the card or write data to it, do so without the label affixed. For details on the write-protect sticker, refer to the owner’s manual for your memory card.
•If you attempt to format a card or write data to it when the writeprotect label is affixed, an error message will appear. In that case, either insert another card or remove the write-protect label.
•At power-on, do not remove/insert a SmartMedia card while the DisCover 5 is updating its internal data (wait until the messages “Song database checking…” and “User Program database checking…” have disappeared).
•Make sure that the memory card is oriented correctly, and push it all the way into the slot. The gold contacts must face downward.
•Never turn on the power when a memory card is inserted partway into the slot. Doing so will damage the data in internal memory.
Memory cards usable with the DisCover 5
•The DisCover 5 can use commercially available Smart Media memory cards. You can purchase such cards at a computer shop or digital camera dealer.
•Memory cards you purchase must meet the following conditions.
•Power supply voltage: 3.3 V
•Capacity: 4, 8, 16, 32, 64, 128MB
•The DisCover 5 cannot use SmartMedia of types other than the above.
Owner’s Manual
Liability and copyright
•Should data contained and stored on the SmartMedia card be lost, it is unfortunately impossible to restore them. Roland Europe S.p.A. assumes no liability concerning such loss of data.
•Unauthorized recording, distribution, sale, lending, public performance, broadcasting, or the like in whole or in part, of a work (musical composition, video, broadcast, public performance, or the like) whose copyright is held by a third party is prohibited by law.
•Do not use this unit for purposes that could infringe on a copyright held by a third party. Roland assumes no responsibility whatsoever with regard to any infringements of third-party copyrights arising through your use of this unit.
•SmartMedia is a trademark of Toshiba Corp.
•All product names mentioned in this document are trademarks or registered trademarks of their respective owners.
•DisCover 5 IT. PAT. PEND.
7

 Contents
Features. . . . . . . . . . . . . . . . . . . . . . . . . . . . . . . . . . . . . . . 2
1. Important notes . . . . . . . . . . . . . . . . . . . . . . . . . . . . . 6
2. Panel descriptions . . . . . . . . . . . . . . . . . . . . . . . . . . . 9
3. Touring your DisCover 5 . . . . . . . . . . . . . . . . . . . . . 12
Connections. . . . . . . . . . . . . . . . . . . . . . . . . . . . . . . . . . . 12 Switching the DisCover 5 on/off . . . . . . . . . . . . . . . . . 13 Interactive demo of the DisCover 5. . . . . . . . . . . . . . . 15 Overview . . . . . . . . . . . . . . . . . . . . . . . . . . . . . . . . . . . . . 15 Playing back songs . . . . . . . . . . . . . . . . . . . . . . . . . . . . . 16
Quick location of the song you need. . . . . . . . . . . . . . . . . 16 Starting playback . . . . . . . . . . . . . . . . . . . . . . . . . . . . . . . . . 17 Other practical playback functions . . . . . . . . . . . . . . . . . . 17
Modifying songs in realtime. . . . . . . . . . . . . . . . . . . . . 19
Using the Cover function . . . . . . . . . . . . . . . . . . . . . . . . . . 19 Minus One . . . . . . . . . . . . . . . . . . . . . . . . . . . . . . . . . . . . . . . 19
Vocal Harmonizer function. . . . . . . . . . . . . . . . . . . . . . 21
Adding harmonies to your singing . . . . . . . . . . . . . . . . . . 22 Who specifies the harmonies? . . . . . . . . . . . . . . . . . . . . . . 23 Not convinced so far? . . . . . . . . . . . . . . . . . . . . . . . . . . . . . 24 Voice-FX . . . . . . . . . . . . . . . . . . . . . . . . . . . . . . . . . . . . . . . . . 25 Auto Tune. . . . . . . . . . . . . . . . . . . . . . . . . . . . . . . . . . . . . . . . 25 Using the Vocoder . . . . . . . . . . . . . . . . . . . . . . . . . . . . . . . . 26 Talk . . . . . . . . . . . . . . . . . . . . . . . . . . . . . . . . . . . . . . . . . . . . . 27
Automatic transposition (Singer Key) . . . . . . . . . . . . . 28 Displaying Lyrics and chord information . . . . . . . . . . 29 Using the Keyboard parts . . . . . . . . . . . . . . . . . . . . . . . 31
Splitting the keyboard . . . . . . . . . . . . . . . . . . . . . . . . . . . . . 32 Drumming on the keyboard . . . . . . . . . . . . . . . . . . . . . . . . 32 Choosing other Tones (or Drum Sets) . . . . . . . . . . . . . . . . 33
Using the D Beam Controller . . . . . . . . . . . . . . . . . . . . 37
4. Using the performance functions . . . . . . . . . . . . . 38
Pitch Bend and Modulation . . . . . . . . . . . . . . . . . . . . . 38 Transposition . . . . . . . . . . . . . . . . . . . . . . . . . . . . . . . . . . 38
Setting the transposition interval via the display . . . . . . 39
Keyboard Touch (velocity sensitivity) . . . . . . . . . . . . . 39 Master Tune. . . . . . . . . . . . . . . . . . . . . . . . . . . . . . . . . . . 40 D Beam functions. . . . . . . . . . . . . . . . . . . . . . . . . . . . . . 41 Using optional footswitches. . . . . . . . . . . . . . . . . . . . . 43 Scale Tuning . . . . . . . . . . . . . . . . . . . . . . . . . . . . . . . . . . 45
|
5. Before you start editing (Menu). . . . . . . . . . . . . . . |
47 |
|
r |
6. Working with the Mixer & using effects . . . . . . . . |
49 |
|
Mixing Keyboard parts |
49 |
||
|
|||
|
More refined Mixer settings . . . . . . . . . . . . . . . . . . . . . . . . |
50 |
|
|
Editing the Keyboard (and song) effects processors . . . . |
50 |
|
|
Using the multi-effects processor (Multi-FX) . . . . . . |
52 |
|
|
Selecting another Multi-FX type . . . . . . . . . . . . . . . . . . . . |
52 |
|
|
Linking Multi-FX type selection to the Upper part |
|
|
|
(Upper M-FX) . . . . . . . . . . . . . . . . . . . . . . . . . . . . . . . . . . . . |
54 |
|
|
Voice and Vocal Harmonizer part mixing. . . . . . . . . . |
54 |
|
|
Reverb, Delay, and Chorus effects . . . . . . . . . . . . . . . . . . . |
55 |
|
|
7. Editing the Keyboard & Vocal Harmonizer parts . 59 |
||
|
Editing the Keyboard parts (Sound Edit) . . . . . . . . . . |
59 |
|
|
8 |
|
|
Editing the Vocal Harmonizer parts . . . . . . . . . . . . . . 61
Procedure for selecting these pages . . . . . . . . . . . . . . . . . 61 Singer settings . . . . . . . . . . . . . . . . . . . . . . . . . . . . . . . . . . . . 61 Voice-FX settings. . . . . . . . . . . . . . . . . . . . . . . . . . . . . . . . . . 62 Auto Tune settings . . . . . . . . . . . . . . . . . . . . . . . . . . . . . . . . 63 Vocoder settings . . . . . . . . . . . . . . . . . . . . . . . . . . . . . . . . . . 64 Small settings. . . . . . . . . . . . . . . . . . . . . . . . . . . . . . . . . . . . . 65 Ensemble settings . . . . . . . . . . . . . . . . . . . . . . . . . . . . . . . . . 67
8. More refined song functions . . . . . . . . . . . . . . . . . 68
Using the Fade-In/Out function . . . . . . . . . . . . . . . . . 68 Programming MARK JUMP locations . . . . . . . . . . . . . 69 Working with the Song Finder. . . . . . . . . . . . . . . . . . . 70
Locating files with the Song Finder . . . . . . . . . . . . . . . . . . 71 Editing the Song Finder information . . . . . . . . . . . . . . . . . 72
Song Chain function . . . . . . . . . . . . . . . . . . . . . . . . . . . 76
Programming Song Chains . . . . . . . . . . . . . . . . . . . . . . . . . 76 Editing Chains . . . . . . . . . . . . . . . . . . . . . . . . . . . . . . . . . . . . 77 Using Song Chains . . . . . . . . . . . . . . . . . . . . . . . . . . . . . . . . 78 Managing Song Chains . . . . . . . . . . . . . . . . . . . . . . . . . . . . 79
9. Working with User Programs. . . . . . . . . . . . . . . . . 80
Writing your settings to a User Program. . . . . . . . . . 80 Selecting User Programs. . . . . . . . . . . . . . . . . . . . . . . . 81
Using the numeric buttons and/or the display . . . . . . . . 81 Selecting User Programs with [DOWN] [UP] . . . . . . . . . . . 82 Finder: selecting User Programs on SmartMedia card . . 82 Selectively loading User Program settings
(User Program Hold) . . . . . . . . . . . . . . . . . . . . . . . . . . . . . . 83
Automatic functions for User Programs . . . . . . . . . . 84
Linking a MIDI Set to a User Program . . . . . . . . . . . . . . . . 85 Startup User Program. . . . . . . . . . . . . . . . . . . . . . . . . . . . . . 85
10. Song Makeup Tools. . . . . . . . . . . . . . . . . . . . . . . . . 86
Instrument: selecting different sounds . . . . . . . . . . . 86 Volume: part balance . . . . . . . . . . . . . . . . . . . . . . . . . . 87 Reverb and Chorus: effect balance . . . . . . . . . . . . . . . 88 Palette: in-depth song editing. . . . . . . . . . . . . . . . . . . 90
11. Editing Lyrics . . . . . . . . . . . . . . . . . . . . . . . . . . . . . . 96
Adding Lyrics to a song. . . . . . . . . . . . . . . . . . . . . . . . . 96 ‘Utility’ functions for Edit Lyrics . . . . . . . . . . . . . . . . . 98
12. MIDI . . . . . . . . . . . . . . . . . . . . . . . . . . . . . . . . . . . . . 99
The how-to’s . . . . . . . . . . . . . . . . . . . . . . . . . . . . . . . . . . 99 Editing MIDI parameters. . . . . . . . . . . . . . . . . . . . . . . 101
Editing the System parameters. . . . . . . . . . . . . . . . . . . . .102
MIDI Sets . . . . . . . . . . . . . . . . . . . . . . . . . . . . . . . . . . . . 103
13. Disk/Media functions . . . . . . . . . . . . . . . . . . . . . . 105
The how-to’s . . . . . . . . . . . . . . . . . . . . . . . . . . . . . . . . . 105 Load (from disk or SmartMedia) . . . . . . . . . . . . . . . . 106 Save (to disk or SmartMedia) . . . . . . . . . . . . . . . . . . . 106 Delete . . . . . . . . . . . . . . . . . . . . . . . . . . . . . . . . . . . . . . . 108 Disk/Media Utility functions. . . . . . . . . . . . . . . . . . . . 108
Format. . . . . . . . . . . . . . . . . . . . . . . . . . . . . . . . . . . . . . . . . .108 Copy functions. . . . . . . . . . . . . . . . . . . . . . . . . . . . . . . . . . .109
14. Specifications . . . . . . . . . . . . . . . . . . . . . . . . . . . . 114
MIDI Implementation Chart. . . . . . . . . . . . . . . . . . . . 115
Index. . . . . . . . . . . . . . . . . . . . . . . . . . . . . . . . . . . . . . . 116
 2. Panel descriptions
ABENDER/MODULATION lever
By performing left/right movements, you can bend your solo notes down (left) or up (right). Press this lever towards the rear of the DisCover 5 to add modulation (usually vibrato) to the notes you are playing.
BMASTER section
[VOLUME] knob: Use this knob to set the global volume of your DisCover 5.
[BALANCE] knob: This knob allows you to set the volume balance between the notes you play on the keyboard (KEYBOARD) and the song parts (SONG). Turn it towards the right if you think your solo is too soft.
CD Beam controller
This controller allows you to influence the timbre of the notes you play, to control song playback, and to create some unique effects. All you need to do is move your hand up/down or left/right above the two “eyes”. The buttons allow you to assign the desired function to the D Beam Controller. See p. 37.
DPLAYER section
[CHAIN] button: Press this button to access the Chain display where you can select a song chain to be played back, edit existing chains, program new ones, etc.
When this button lights, [|√], [º], [‰], [®/ª] are used to control playback of the current song.
[NEXT≈SONG] button: Press this button to select the next song you want to use, while the current one is still running. If the [CHAIN] button lights, this button allows you to select the next song of the selected chain.
[MINUS≈ONE] button: Press this button to switch off the part you want to play (or sing) yourself. The part to be muted is selectable (page 19).
[|√], [º], [‰], [®/ª]: These buttons allow you to return to the beginning of the current song, “rewind” or fastfoward in one-measure steps, and to start and stop playback of the selected song.
BEAT indicator: this indicator flashes at the speed of the currently-set tempo (the tempo value also appears in the display).
ETRANSPOSE section
These buttons allow you to transpose the DisCover 5 up ([ ]) or down ([ƒ]) in semitone steps. You can also specify which parts are to be transposed (page 38).
If neither button lights, no manual transposition is used.
FFADE OUT/IN button
This button allows you to start playback with an automatic fade-in of the music. If you press it during playback, the volume will gradually decrease (fade-out).
Y
Owner’s Manual
A |
B |
|
|
C |
|
F |
|
|
|
G |
|
D |
|
H |
E |
|
|
L |
K |
J |
I |
M
Q |
P |
O |
N |
S |
|
|
R |
V |
|
T |
|
U
X |
W |
9

r


 Panel descriptions
GMARK JUMP buttons [1], [2], [3], [4]
These buttons allow you to jump to one of four stored locations inside the currently selected song. The 132 songs on the supplied SmartMedia™ card already contain such locations for the verse ([1]), chorus ([2]), bridge ([3]) and ending ([4]). You can edit these, and also program the desired locations for songs that do not yet contain them.
HUSER PROGRAM buttons
These buttons allow you to select the previous ([DOWN]) or next ([UP]) User Program. User Programs are registration memories. By pressing these buttons simultaneously, you revert to the settings that were in effect before recalling the current User Program (“Cancel”).
ISONG/RHYTHM FINDER button
Press this button to quickly locate the desired Standard MIDI File on the inserted SmartMedia™ card or floppy disk. See page 70.
JLYRICS & CHORD button
Press this button if you want the lyrics contained in the songs to appear in the display. At the same time, the chords of the notes played by the song parts will also be displayed. This, however, is information that is “extracted” (derived) in realtime by the DisCover 5.
KSINGER KEY
This button provides access to a page where you can set and/or select the range to which the tonality of the songs should be adapted (page 28).
LDISK/MEDIA button
Press this button if you wish to save/load data from a floppy disk or SmartMedia™ card. You will also find data management functions here, like deleting files, formatting floppies or cards, etc. (page 105).
MSONG MAKEUP TOOLS buttons
These buttons allow you to modify the settings of the current song. See page 86.
The [COVER] button is especially interesting, because it provides access to pre-programmed templates that allow you to quickly modify a song’s character. See page 19.
NTONE FINDER button
Press this button to search for a suitable sound (“Tone”) for your live playing using the Upper and/or Lower Keyboard parts.
OMIXER/EFFECT button
This button provides access to the display pages where you can set the volume balance and effects of the DisCover 5 parts.
PMENU button
Press this button to call up a menu that provides access to more in-depth DisCover 5 functions you may wish to set from time to time.
QEXIT button
Press this button to return to the previously selected display page, or the DisCover 5’s main page.
RVALUE dial
This dial can be used to set the tempo or the value in the parameter field that is currently highlighted.
SPREV & NEXT buttons
The [PREV] and [NEXT] buttons are used to select the previous or next value field on the current display page (if available).
TKEYBOARD PART section
This section contains all buttons that are related to the music you can play on the DisCover 5’s keyboard (i.e. the “Keyboard parts”).
Press the [SPLIT] button to separate the keyboard into two halves. The left half is then assigned to the Lower part, and the right to the Upper part (page 32).
The [M.DRUMS] button is used to activate a part that allows you play drum and percussion solos via the keyboard (page 32).
The [LOWER] and [UPPER] buttons are used to switch the Keyboards parts of the same name on and off. Though you can play them simultaneously (if the [SPLIT] button doesn’t light), these parts cannot be combined with the M.DRUMS part.
UVOCAL HARMONIZER section
The buttons and knobs in this section are used to set the Vocal Harmonizer function, the microphone level and the effects applied to the signals received via the Vocal Harmonizer MIC INPUT socket.
VTONE/USER PROGRAM section
These buttons allow you to select sounds (“Tones”) for the Keyboard parts, or to recall the desired User Program (registration memory).
WUSER PROGRAM HOLD buttons
These buttons are used for ignoring the TONE and/or VOCAL HARMONIZER settings of subsequently loaded User Programs. If a button lights, the DisCover 5 will recall all User Program settings except the ones filtered by the active button.
XSmartMedia™ slot
This is where you need to insert the supplied or other SmartMedia cards. The DisCover 5 comes with a 64MB card packed with Standard MIDI Files and other useful settings. You can, however, also use 4, 8, 16, 32, 64 and 128MB cards.
YDisk drive
This is where you insert floppy disks with Standard MIDI Files you may already own. The drive accepts 2DD (720k) and 2HD (1.44MB) floppy disks.
For your convenience, and to take advantage of the DisCover 5’s powerful FINDER functions, we recommend copying all Standard MIDI Files to SmartMedia card.
10

Owner’s Manual
r
A B C D E F G H
AHOLD FOOTSWITCH socket
An optional DP-2, DP-6, or BOSS FS-5U footswitch connected to this socket can be used for holding the Upper-part notes. This function is also referred to as “Sustain” or “Damper”.
BFOOT SWITCH socket
An optional DP-2, DP-6, or BOSS FS-5U footswitch connected to this socket can be used for various purposes: its function is programmable (page 43).
CFOOT PEDAL socket
An optional EV-5 or EV-7 expression pedal connected to this jack can be used for controlling the volume of the DisCover 5’s Keyboard parts.
DMIDI THRU/OUT/IN sockets
These sockets allow you to connect the DisCover 5 to external MIDI devices for a variety of applications: receiving song data in realtime from an external sequencer, transmitting your playing (and the data of the song you are playing back) to an external sequencer, using the DisCover 5 as master keyboard in your MIDI setup, etc.
Note: The MIDI functions can be accessed via the DisCover 5’s Menu (page 99). Frequently used MIDI settings can be written and recalled as “MIDI Sets”.
EGAIN switch
If you connect a microphone to the MIC INPUT socket, set this switch to “MIC”. If you wish to try out the Vocal Harmonizer function for other signals (guitar, external synthesizers & modules, CDs, MDs, etc.), set this switch to “LINE”.
Note: For the “LINE” setting to work with electric guitars or basses, you need to connect such instruments to an effects pedal or rack effect (in bypass mode), and connect the effect’s output to the MIC INPUT socket.
FMIC INPUT socket
This is where you need to connect an optional microphone (like a Roland DR-10 or DR-20) or other external signal source you wish to process using the DisCover 5’s Vocal Harmonizer facility. See also “GAIN switch” above for setting the input sensitivity.
Note: The MIC INPUT socket is mono.
I J K L
GVocal Harmonizer OUTPUT R & L sockets
If connected to a mixing console, amplifier, etc., these sockets transmit the signal received via the MIC INPUT socket and processed with the DisCover 5’s Vocal Harmonizer facility. If no jacks are connected here, the Vocal Harmonizer signals will be transmitted via the OUTPUT sockets (see below).
HVIDEO OUTPUT socket
Connect this socket to the appropriate socket of your TV or monitor. In that case, the lyrics of songs that contain such information, and the note information extracted in realtime (page 29) will be displayed on screen even if the [LYRICS&CHORD] button does not light (in which case the lyrics and chords no longer appear in the DisCover 5’s display).
Note: The signal format (PAL or NTSC) can be set via a MENU function.
IOUTPUT R & L/MONO sockets
These sockets need to be connected to an external amplifier, mixing consoles, etc. Depending on whether you are also using the Vocal Harmonizer OUTPUT sockets (see above), the present sockets either transmit only the music generated by Song and Keyboard parts, or both the tone generator’s and Vocal Harmonizer’s signals.
Note: If you can/want to use only one channel on your external amplifier, connect the L/MONO socket to its input. For optimum sound quality, we recommend working in stereo, though.
JLCD CONTRAST knob
Use this knob to set the contrast when you are having problems reading what is written on the display. The LCD may take some time to warm up. That is why you may have to change the contrast several times after powering on.
KPOWER ON button
Press this button to switch the DisCover 5 on and off.
LAC socket
This is where you need to connect the supplied power cord.
11


 Touring your DisCover 5
 3. Touring your DisCover 5
You must be dying to try out your new DisCover 5 to see what it is capable of. We’ll get to that in a minute. But first we need to connect it.
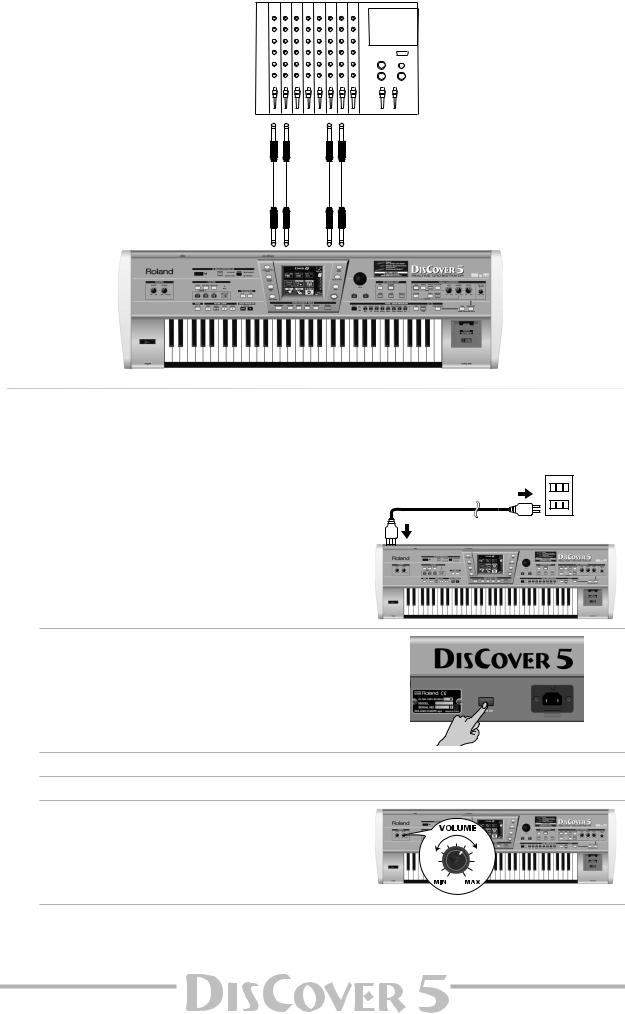
Connections
The DisCover 5 does not contain internal speakers. You therefore have to connect it to an external amplifier (Roland’s KC series, for example), or use optional headphones (Roland RH-25 or RH-50, for example).
Be sure to switch off both the DisCover 5 and the external devices you want to connect before making or breaking audio and/or MIDI connections. If you do not have access to the sound system of the venue where you are performing, ask the local engineer to set the volume to the minimum level.
Dynamic microphone (select “MIC”)
Other signal source (select “LINE”)
[Microphone: DR-10 or DR-20]
*Connect the microphone using an unbalanced mono 1/4” jack.
Keyboard amplifier, |
Keyboard amplifier, active speakers |
active speakers, etc. |
—OPTIONAL— |
Expression pedal
(EV-5, EV-7)
Connect to suitable wall outlet
Roland
|
|
Vocal Harmonizer |
FOOT |
FOOT |
HOLD |
AC |
OUTPUT R, L/MONO |
OUTPUT R, L, |
MIC INPUT PEDAL |
SWITCH |
FOOTSW. |
r
Footswitch (DP-2, DP-6, or BOSS FS-5U)
Stereo headphones |
Footswitch |
(RH-25 or RH-50) |
(DP-2, DP-6, or BOSS FS-5U) |
Note: Try to use dynamic microphones whenever possible. You can also connect a condenser microphone, however, provided you use a DI box (with power supply). Connect the microphone using an unbalanced mono 1/4” jack.
Note: Except for the power cable, all other items shown above are optional. See your Roland dealer for details.
Note: There is no absolute need to connect the Vocal Harmonizer OUTPUT sockets. If you don’t, your singing and the Harmonizer effects will be transmitted via the main OUTPUT sockets. (Only if you don’t connect anything to the Vocal Harmonizer OUTPUT sockets.) If you use these connectors, the Vocal Harmonizer signals are no longer transmitted to the headphones.
You can also connect the DisCover 5 to a mixing console, of course (see below).
12
Owner’s Manual
|
Vocal Harmonizer |
OUTPUT R, L/MONO |
OUTPUT R, L |
Switching the DisCover 5 on/off
After connecting the DisCover 5 to the other devices, proceed as follows:
Switching on the DisCover 5
(1) Insert the included power cable into the AC inlet and then plug it into an electrical outlet.
(2)Press the DisCover 5’s [POWER≈ON] button located on the rear panel to switch it on.
(3)If you connected the DisCover 5 to a mixing console, switch it on now.
(4)Switch on the amplifier, your active speakers, or the keyboard amplifier(s).
(5)Use the [VOLUME] knob to set the DisCover 5’s out-
put volume.
13


 Touring your DisCover 5
Setting the display contrast
The information in the LCD display may be difficult to view after turning on your DisCover 5 or after extended use. Your viewing angle or the current lighting conditions can also affect the appearance of the display.
In such cases, use the [LCD≈CONTRAST] knob located on the rear panel to adjust the contrast of the display.
Switching off the DisCover 5
(6)Switch off all external devices.
(7)Use the DisCover 5’s [POWER≈ON] button to switch it off.
LCD Mode
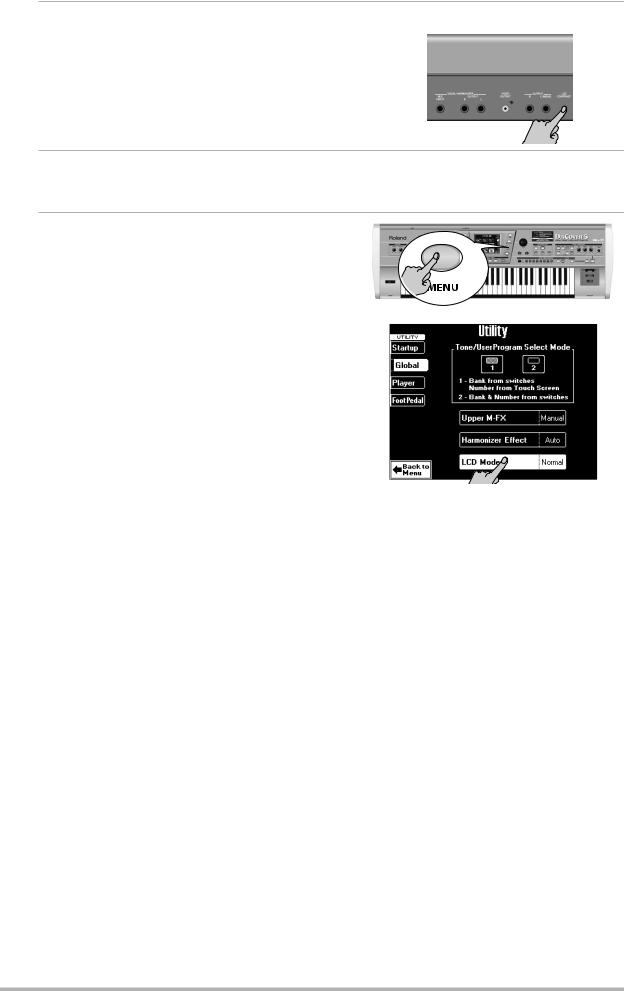
You can decide to have the information displayed white-on-blue (Normal) or blue–on-white (Invert). Choose whichever is more convenient for you:
(1)Press the [MENU] button.
(2)On the display page that appears now, press the
[UTILITY] field.
(3)Press the [Global] field in the left corner.
(4)Press the [LCD≈Mode] field.
(5)Use the [VALUE] dial to select “Invert” (blue-on- white) or “Normal” (white-on-blue).
(6)Press the [EXIT] button to return to the main page.
r
14

Owner’s Manual
Interactive demo of the DisCover 5
Your DisCover 5 contains an interactive demo that introduces all of its highlights. It might be a good idea to try it out now. The demo is self-explanatory, so we’ll just show you how to start and stop it.
(1) Simultaneously press the [CHAIN] and |
(2) |
Press the field that provides access to the |
[NEXT≈SONG] buttons. |
|
desired demo function. |
|
|
There are 5 demo songs that are played back in |
|
|
a loop. If necessary, you can jump to the pre- |
|
|
ceding or following demo song by pressing the |
|
|
[PREV] or [NEXT] button. |
|
(3) |
To stop the demo and leave the DisCover 5’s |
|
|
Demo function, press the [EXIT] button. |
The display now looks as follows:
(4) If you can barely hear the music, set the [VOLUME] knob (far left, MASTER section) to a higher level.
Overview
Your DisCover 5 is a very user-friendly instrument indeed, but it is also extremely powerful. As we have to start somewhere (which may not be what you want to do first), here’s an overview of where to find what for your first exploration of the DisCover 5:
What do you want to do first?
• Playing back songs → p. 16
• Modifying songs in realtime → p. 19
•Vocal Harmonizer function → p. 21
•Automatic transposition (Singer Key) → p. 28
•Displaying Lyrics and chord information → p. 29
•Using the Keyboard parts → p. 31
•Using the D Beam Controller → p. 37
Other aspects will be covered later in this manual.
15


 Touring your DisCover 5
r
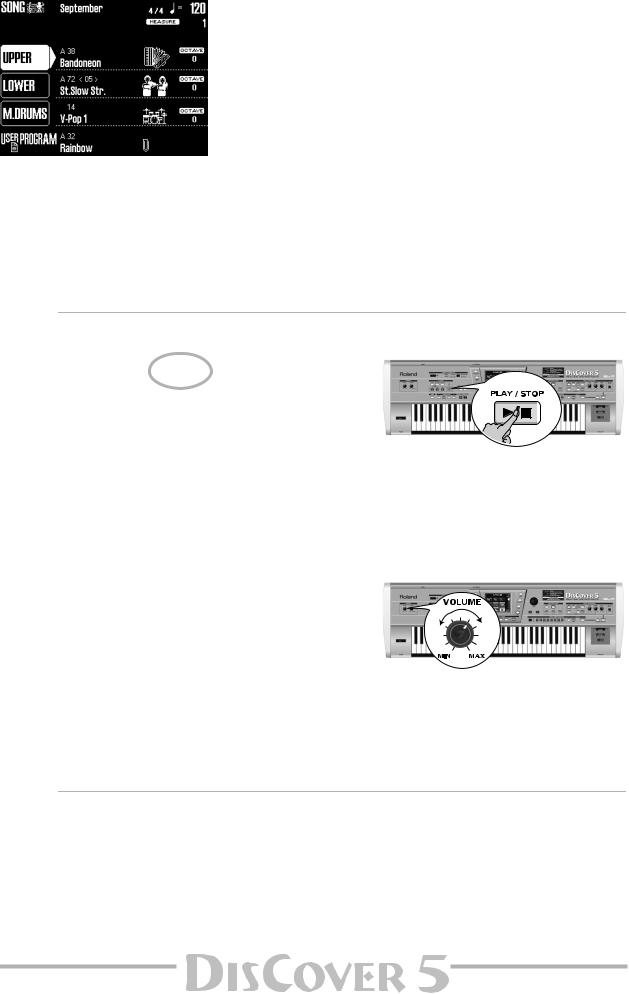
Playing back songs
Your DisCover 5 is a novel Standard MIDI File player with all kinds of functions for “customizing” the songs you play back via easy-to-use routines. Let us first look at the playback functions proper.
(1)Connect the DisCover 5 to your sound system.
If you prefer to use headphones, connect them to the PHONES socket to the left of the keyboard.
(2)Insert the supplied SmartMedia™ card into the card slot.
(3)Switch on the amp (if available) and the DisCover 5.
You can press [®÷ª] at this stage to start playback of the first song on the card. (If no card is inserted, while a floppy disk is in the drive, the DisCover 5 selects the first song on disk.) To select the song yourself, proceed as follows:
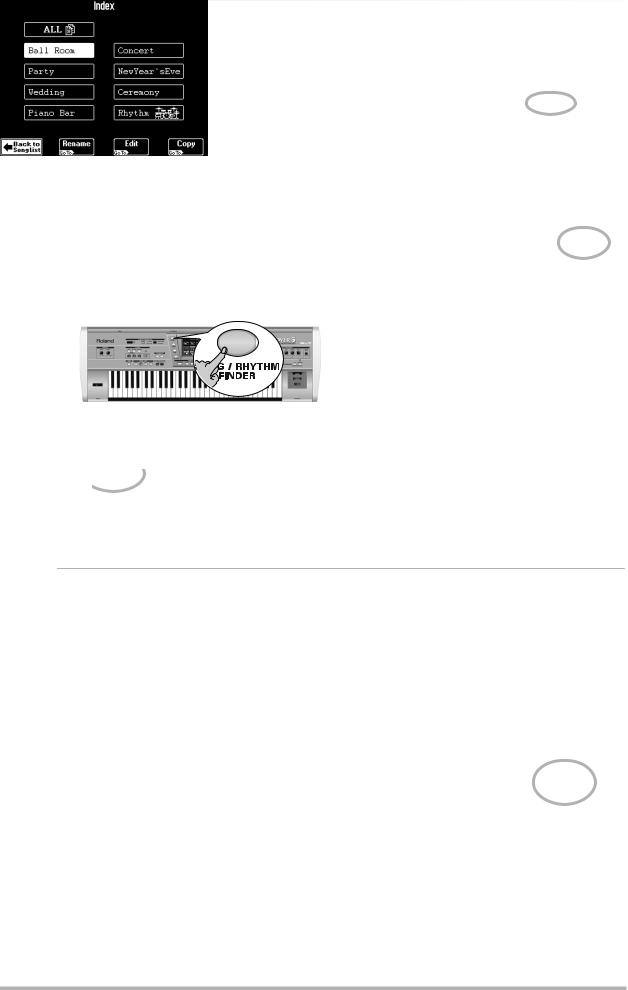
(4)Press the [SONG/RHYTHM≈FINDER] button.
You can also press the [SONG] field in the upper left corner of the display (if available) to select songs.
The display changes to:
(5)If it isn’t already highlighted, press the [SMART≈MEDIA] field in the upper right corner.
The display shows a list of 6 songs (Standard MIDI Files) on the SmartMedia card.
If you prefer to listen to one of your own songs on floppy disk, insert it into the drive and press the [FLOPPY] field.
(6)If the name of the song you want to listen to is already displayed, press its line.
In our example, “Birdland” has been selected.
(7)To display the next 6 songs, press the [˚] field in the lower right corner.
You can press this field as many times as necessary (or until it is no longer displayed).
To return to a previous group of 6 songs, press [ø].
Quick location of the song you need
There are several ways to quickly locate the song you are after:
• Press the [Author] or [Genre] field under step (4) |
The display now returns to the page shown |
to sort the song files according to artist names |
under step (4) above. This time, however, only |
(Author) or kind of music (Genre). |
the songs belonging to the selected Index are |
Continue with step (5) to select the song you |
displayed. |
want to listen to. |
Continue with step (5) to select the song you |
• Press the [Index] field in the upper left corner. |
want to listen to. |
|
• If you only know the melody of the desired |
|
song, press the [Finder] field under step (4). |
Press one of the displayed field names to narrow down your search to songs that belong to the selected category (“Index”).
Note: Press the [ALL] field to display all songs on the
SmartMedia card.
16
• Press the [Play&Search] field.
•As indicated in the display, play the main theme on the keyboard. You can play in any key, and the rhythm doesn’t have to be perfect either (this function just looks for intervals).
•If you played a wrong note, press
[Delete≈LastNote].
Owner’s Manual
•To enter the entire line again, press [∫≈Reset] to erase the previously entered notes, then play the phrase again.
•After entering the melody, press the [SEARCH] field.
The display now returns to step (4) on page 16 and shows the names of the songs that contain the melody you played. If no songs were found, the following message appears, and all songs are once again displayed:
•Press the field of the song you want to play back.
Starting playback
(8) To return to the main page, press [EXIT].
The “main page” is the DisCover 5’s display page that provides a maximum of relevant information and allows you to select (and change) items you may need during normal operation. It also displays the name of the selected song, the tempo, and the current measure.
Note: The player can muster up to 76,000 events. If the message “Too many events” is displayed, the selected song contains more than that number and cannot be played back.
Note: When playing back large SMFs at a very high tempo, playback may suddenly stop and the message “Song Scanning” may appear. This can be solved by reducing the playback tempo so that the DisCover 5 has enough time to process all MIDI data contained in the song.
(9) Press the [®÷ª] button.
Playback of the selected song starts.
(10)If necessary, use the [VALUE] dial to change the tempo.
To reset the song tempo, press the tempo field in the display.
(11)Use the [VOLUME] knob to set the DisCover 5’s output volume.
You can also play to the music. If necessary, use the [BALANCE] knob to set the desired balance.
Other practical playback functions
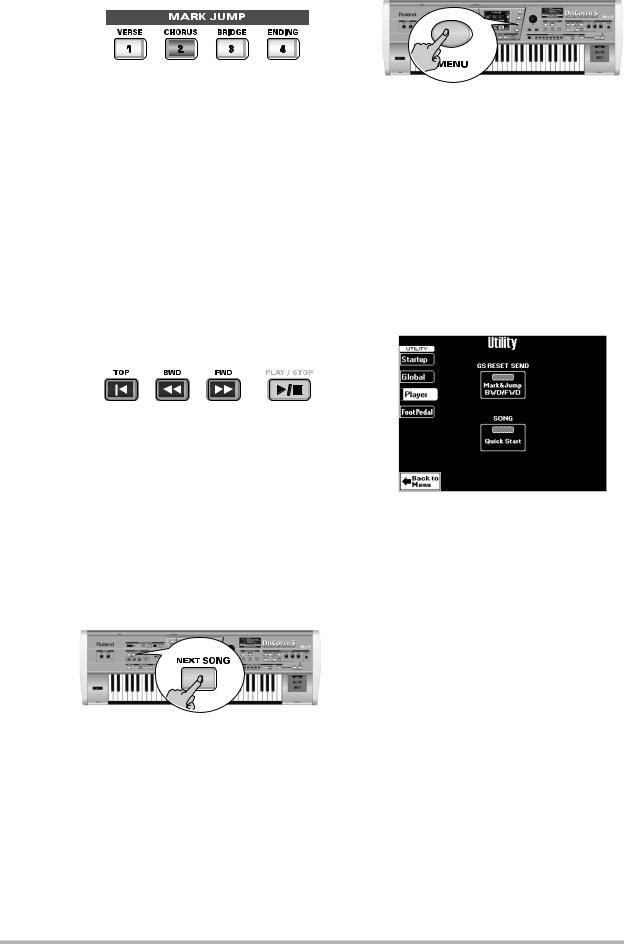
●MARK JUMP
Songs on the supplied SmartMedia card contain four locations (“markers”) you can jump to right away. For songs that do not yet contain them, you can program these markers yourself. You can also edit the locations of existing markers (page 69).
Use the MARK JUMP [1]~[4] buttons (below the [®÷ª] button) to select the position you want to jump to without stopping or delaying playback.
17


 Touring your DisCover 5
Such changes occur at the end of the current measure, which makes more musical sense than jumping when you’re halfway into a measure.
The labels (VERSE, CHORUS, BRIDGE, ENDING) refer to the locations you jump to by pressing the corresponding button. Obviously, these labels may be meaningless for markers you programmed or edited yourself.
There are four such MARK memories.
The advantage of these markers is that you can return to the chorus, for example, if you notice that the audience wants the song to last a little longer than originally planned. Markers also allow you to change the song structure in realtime (by starting with the bridge, for example).
Note: These buttons may also come in handy for the songs of the [Rhythm] index. See page 70.
●Reset, rewind, fast-forward
You can also use the following buttons to jump to different song locations.
[|√] TOP: Allows you to return to the beginning of the current song.
[º] BWD: allows you to rewind one measure at a time.
[‰] FWD: allows you to fast-forward one measure at a time.
These buttons are available both during playback and while playback is stopped.
●Next Song
While the current song is still running, you can already select the next one to be played back:
• Press the [NEXT≈SONG] button.
|
• Select the desired song using the Song Finder |
|
|
(page 16). |
|
r |
• As soon as the current song finishes, the next |
|
one starts. You can now select another song. |
||
|
||
|
• Press the [NEXT≈SONG] button again to switch |
|
|
off this function. |
|
|
Note: Your DisCover 5 also provides a Chain function |
|
|
for programming play lists of several songs (page 76). |
●Player (GS Reset Send and Quick Start)
(1)Press the [MENU] button.
The display changes to:
(2)Press the [UTILITY] field. If the [Player] field in the left corner is not displayed in white, press it.
(3)Switch the [GS≈RESET≈SEND] field to specify whether (on) or not (off) SysEx messages contained in the song you play back are updated while you fast-forward/rewind or use the MARK JUMP buttons.
(4)Use the [Quick≈Start] field to quickly jump to
the first note of the selected song.
This function temporarily sets the tempo to = 250 – to race through empty measures at the beginning of the song file (which may contain important settings), thus avoiding that the newly selected song begins with two measures of “nothing” (which can be terribly long when you’re in front of an audience). As soon as the DisCover 5 reaches the first note, the tempo returns to the programmed value.
18
Owner’s Manual
Modifying songs in realtime
Let us now look at some functions for customizing the songs you play back.
Using the Cover function
The COVER function provides “masks” that change the instrumentation of the selected song. Simply by selecting another preset, you can cause a Viennese waltz to be played back by a heavy metal band, etc. Even though the arrangement (rhythm, riffs) does not change, the songs’ character can be modified beyond recognition.
(1) Press the [COVER] button. |
Press the [DRUM] field if only the drum and |
|
|
percussion instruments should change. |
|
|
Press the [BASS] field if you’re happy with |
|
|
everything but the bass line’s sound. |
|
|
(3) Press one of the six fields in the lower half of |
|
|
the display to select another preset. |
|
|
After selecting a preset, you can press |
|
The display now looks more or less as follows: |
[Original≈Sounds] (page 1) to return to the origi- |
|
nal orchestration. |
||
|
||
|
(4) If none of the displayed presets appeal to |
|
|
you, use the PAGE [1]~[5] fields at the right to |
|
|
jump to another page with more presets. |
|
|
(5) Try out various presets to see how (fast) this |
|
|
concept works. |
|
|
(6) If you like the new version better than the |
|
|
original one, you can press the [SAVE] field to |
|
|
save the song to SmartMedia card or floppy |
|
|
with this information (page 107). |
|
(2) Select the parts whose instrumentation you |
Note: The COVER information is part of the data only |
|
the DisCover 5 understands. You can still play back the |
||
want to change: |
newly saved version of this song on another sequencer |
|
Press the [ALL] field if all instruments should be |
or SMF player, but the COVER information will be |
|
replaced. |
ignored. |
|
|
|
There are at least two applications for this function:
•it allows you to play the muted parts yourself, on the keyboard;
•it allows you to sing without doubling by the song (which may sound odd).
(1)Press and hold the [MINUS≈ONE] button.
The display changes to:
(2)Press one of the three “preset” fields to mute the corresponding song parts:
Press [MELODY] to mute the melody (you will notice that the [4] field also lights).
Press the [ACCOMP] field to mute everything but the melody, bass, and drums.
Press the [DRUM&BASS] field to mute the bass and drum parts.
Note: Even the “preset” fields can be used simultaneously. And the part fields [1]~[16] can be added, too.
(3)To mute other parts “ad lib” (i.e. without taking advantage of the presets):
•Press the [USER] field. This mutes all parts except [4] (the melody).
•Switch on all parts you want to hear by pressing the [1]~[3] and [5]~[16] fields. Indicator icons of parts you need must be white (the others blue).
19


 Touring your DisCover 5
•To save this customized “Minus” setting in the DisCover 5’s internal memory, press [Customize]. The display now respond with:
(4)Press the [EXIT] button to return to the main page.
Your last preset selection (MELODY~USER) will be used until you select another preset or until you switch off your DisCover 5.
(5)Press [MINUS≈ONE] again to switch this func-
tion off.
Note: You can also switch the Minus One function on/ off using an optional footswitch (page 43).
r
20
Owner’s Manual
Vocal Harmonizer function
The Vocal Harmonizer is another major highlight of your DisCover 5. In fact, it doesn’t just produce harmonies: it can also transform your voice in various ways. More importantly, its sound quality surpasses by far anything you may already have tried.
Setting up
Here’s what you need to do to take advantage of the Vocal Harmonizer function:
(1)Switch off your amp and the DisCover 5 (in that order).
(2)Connect a dynamic microphone to the MIC INPUT jack on the DisCover 5’s rear panel.
(6)Press the [SINGER] button (it must light) and switch off the [VOCODER], [SMALL] or [ENSEMBLE] button.
Set to “MIC”
Examples: Roland DR-10 or DR-20
(3)Set the [GAIN] switch to “MIC”.
You can also connect the (mono) output of other instruments, a CD player, etc.
In that case, you need to set [GAIN] to “LINE”.
Set to “LINE”
L/MONO
Synthesizer, CD/MD player, etc.
(4)Set the [MIC≈GAIN] knob on the front panel to “MIN”.
Note: If you like, you can connect the Vocal Harmonizer OUTPUT sockets to another amp (or additional mixer channels).
(5)Switch on the DisCover 5 and your amp (in that order).
(7)Sing into the microphone and gradually increase the [MIC≈GAIN] setting.
Set it to the highest possible value, taking care to avoid that the OVER indicator lights. It would be best to sing at the level you will be using during your performances.
(8)If your singing is inaudible in the speakers connected to the amp (or the headphones), turn the [VOICE] knob towards the right
(towards “MAX”).
Note: If a howling sound (a.k.a. “feedback”) is produced, your microphone may be pointed at a speaker. Try to orient it differently, or slightly reduce the [VOICE] setting.
(9)Use the [EFFECTS] knob to set the balance between your original singing and the effects
that are added to your voice.
Note: You can start song playback and sing to it. See “Playing back songs” (p. 16) and “Minus One” (p. 19) for details.
® Compressor, Gate, and effects
Your DisCover 5 provides a Compressor effect you might want to set up now. The Compressor reduces volume peaks and thus “levels out” differences in the microphone signal.
The Gate effect, on the other hand can be used to avoid that background noises cause the Vocal Harmonizer, etc., to start working even though you are not singing.
These two effects are located immediately behind the MIC INPUT socket and thus applied to the microphone signal before it is processed by the Vocal Harmonizer section.
(10) Press the [MIXER/EFFECT] button.
21


 Touring your DisCover 5
The display changes to:
(11) Press the [Vocal≈Effect] field.
Note: Since you pressed the [SINGER] button in step (6) above, the left-most column is called “SINGER” here. It may also be called “TALK”, “VOICE-FX”, or “AUTO TUNE”. Though that is of little importance for what we are about to do, it proves that your DisCover 5 is in fact a very clever instrument helps you save time.
(12)If you need the Compressor, press the [Compressor] field, so that its indicator icon is highlighted.
(13)If you also want to use the Gate, press the [GATE] field (its indicator icon must be highlighted).
(14)Use the [PREV] and [NEXT] buttons to select the parameter you wish to edit, and set the desired value with the [VALUE] dial.
Parameter fields can also be selected by pressing them.
It is very important that you keep singing while setting the following parameters.
Sustain Level: Use this parameter to specify how fast the compressor stops working once the microphone level drops below the Compressor’s threshold. This should be set in such a way as to avoid unpleasant level jumps between notes. Set it in combination with the following parameter to obtain the best possible result.
Output Level: The Compressor reduces the dynamics (level differences) of your singing. This parameter serves two purposes: it allows you to specify how strongly your voice should be compressed, and –as you increase the value– it raises the compressor’s output volume to make up for the lower resulting level.
Note: The value “0” means that the Compressor is not working.
Threshold: This parameter allows you to set the level the microphone signal must have in order to be audible. Softer signals will be muted (suppressed) by the Gate.
(15)Press the [Vocal≈HARMONIZER] field to jump to a page where you can select different presets, etc. (see below).
(16)Press the [EXIT] button to return to the main page.
r
Adding harmonies to your singing
Now that your microphone is up and running, let’s look at the Harmonizer effect proper.
The DisCover 5 provides two harmony types: “Small” |
(5) To try out different harmonizations, press |
|
(1 or 2 additional voices) and “Ensemble” (3 or 4 |
and hold the [SMALL] button. |
|
additional voices). |
The display changes to: |
|
(1) |
Connect your microphone, press the [SINGER] |
|
|
button, set the desired [VOICE] level, and… |
|
(2) |
…press the [SMALL] button (it must light). |
|
(3) Sing a few notes and listen to the harmonies
produced. (6) Press the [Male], [Female] or [Mix] field to
(4) If the harmonies are too soft, turn the
change the “GENDER” (voice type) of the har-
[HARMONY] knob towards the right (towards
monies produced.
“MAX”).
[Mix] adds both a male and a female voice.
22
Owner’s Manual
This also changes the available preset options in |
The display changes to: |
the center of the display. If, on the above page, |
|
you press [Mix] for example, the display changes |
|
to: |
|
(7)Press one of the preset fields ([Walkin’Vox], for example) to select a different harmony type.
(8)Now press the [ENSEMBLE] button and sing again.
This sounds more like a choir, don’t you agree?
(9)Press and hold the [ENSEMBLE] button.
You already know what the [Male], [Female], and [Mix] fields are for. The 10 preset fields in the middle allow you to select different “voicings” and voice characters for your choir.
(10)To sing again without automatic harmonies, press the [SMALL] or [ENSEMBLE] button again
(so that neither of them lights).
Note: Obviously, you do not have to use a song as backing: you can also play the accompaniment yourself. See page 31 and below.
Who specifies the harmonies?
Now that you know what the Vocal Harmonizer does, let us briefly look at how it does that.
You may have noticed the [Harmony≈Assign] |
Use the [VALUE] dial to select another setting. |
field in the lower left corner of the above dis- |
The possibilities are: |
play pages.
Its current (default) setting is “Auto”. This means that, during song playback, the note information contained in the song data will be used for specifying the pitches of the harmony notes (“Auto Harmony”).
Note: If the song you are playing back contains a “Harmony track”, the harmonies will be based on those notes. In all other cases, the harmonies are generated in realtime.
Keyboard |
Only notes played on the keyboard will |
(all) |
be used for specifying harmony pitches. |
|
|
Keyboard |
Only notes played to the left of the split |
Left |
point (page 32) will be used for specify- |
|
ing harmony pitches. |
|
|
Keyboard |
Only notes played to the right of the |
Right |
split point (page 32) will be used for |
|
specifying harmony pitches. |
|
|
Song |
The note information contained in the |
|
song you are playing back is used. |
|
|
If you stop song playback and play chords on the keyboard, the note information thus generated is used for the harmony pitches.
23


 Touring your DisCover 5
Not convinced so far?
Just in case you are a little bit disappointed by the Vocal Harmonizer function, here are some tips (and a bonus):
●Use it with song backing |
(4) Press the [Edit] field. |
|
The Harmonizer sounds most convincing when |
|
|
used during song playback. Please bear in mind |
|
|
that transforming your voice in realtime |
|
|
requires quite a few calculations and that the |
|
|
human voice is one of the most difficult “signal |
|
|
sources” to recreate with varying pitches. The |
|
|
Vocal Harmonizer was fine-tuned to blend in |
|
|
with Standard MIDI File playback, and that’s |
|
|
when it sounds most “real”. Try it out, it works! |
|
|
●Check the following (Gender Voice Input) |
|
|
(1) Press and hold the [SINGER] button. |
(5) Use the [PREV] and [NEXT] buttons to select |
|
The display changes to: |
the parameter you wish to edit, and set the |
|
|
desired value with the [VALUE] dial. |
|
|
Parameter fields can also be selected by press- |
|
|
ing them. |
|
|
The [Vibrato] indicator icon must be blue for the |
|
|
effect to be noticeable. |
|
|
Here’s what the parameters mean: |
|
|
Rate: Sets the speed of the vibrato effect. |
|
|
Depth: Allows you to set the vibrato intensity. |
|
|
Vibrato is an effect that changes (“modulates”) |
|
(2) Press the [Male] field if you’re a man, or the |
the pitch. The higher the Depth value, the more |
|
outspoken these periodic pitch changes will be. |
||
[Female] field if you’re a woman. |
||
Rise Time: Allows you to set a swell for the |
||
This is an important clue for the Vocal Harmo- |
||
vibrato effect. This parameter specifies how |
||
nizer. After selecting the correct setting, you |
||
long it takes before the Depth value is reached |
||
may find that the harmonies sound better. |
||
– once the Delay Time is up. |
||
And just in case, you wanted to sound like a |
||
Delay Time: Allows you to set a delay between |
||
somewhat worn-out opera singer… |
||
(3) Press the [Vibrato] field (indicator icon must |
the moment you start singing and the moment |
|
the vibrato effect kicks in. |
||
“light”). |
||
(6) Press [EXIT] to leave this page (or |
||
Sing a few notes and note the vibrato. If the |
||
effect is not strong enough… |
[Back≈to≈Singer] to try out the other “Gender” |
|
|
settings). |
r
24
Owner’s Manual
Voice-FX
Ever wondered what your voice would sound like if you were a woman (for men), man (for women), robot or something else…? You’re about to find out:
(1) Press the [VOICE-FX] button.
(2)Sing into the microphone and listen to yourself. (You may have to switch off the [SMALL] or [ENSEMBLE] button if it lights to hear how this function works.)
Auto Tune
Here’s another interesting effect that can either be used as gimmick or to ensure that even the flattest of renditions suddenly sounds in tune. Of course, the voice will sound somewhat “artificial”, because the emphasis is on tuning here. However, even if you just speak the words of a song, it will be sung just the same.
(1) Press the [AUTO≈TUNE] button.
(2)Start song playback and say something into the microphone (don’t sing).
Sounds like a very popular effect, doesn’t it?
(3)Press and hold the [AUTO≈TUNE] button.
The display changes to:
Let us begin with the most important parameter: the notes that will be used by the Auto Tune. That is what you specify via the Auto Tune Assign fields.
(4)Set the Track value to select a song part.
The “4” setting usually corresponds to the melody part, and is thus the most likely candidate, but feel free to select “1”~”3” or “5”~”16” to use another part as melody.
Note: Selecting “Left” and/or “Right” will set the Track parameter to “Off”.
Use the Octave parameter to shift the pitch of the Auto Tune notes up to 2 octaves up or down.
(5)Press the [Vibrato] field to add some “wobble” to the Auto Tune sound.
This vibrato effect is not linked to the Voice-FX vibrato, and can thus be set separately (see below).
(6)For more refined control over the Auto Tune voice, press the [Edit] field:
Though they are not linked to their namesakes on the Voice-FX Edit page, most parameters on this page will look familiar. Therefore, please see above for the explanations of Gender and
Vibrato Rate, Depth, Rise Time, and Delay Time.
25


 Touring your DisCover 5
(7)Use the [PREV] and [NEXT] buttons to select the parameter you wish to edit, and set the desired value with the [VALUE] dial.
Parameter fields can also be selected by pressing them.
(8)Press the [Portamento] field to switch on this effect.
“Portamento” means that the pitch doesn’t change in clearly defined steps: it produces glides from one note to the next.
[Portamento Time= 0] “Rough” pitch changes in semitone steps (normal)
r
[Portamento Time= 1~127] Pitch glides from one note to the next
Use the Portamento Time parameter to specify the speed at which those glides are carried out (0~127). The higher the value, the slower the transitions.
Note: To keep your settings, you must write them to a
User Program.
(9) Press [EXIT] to leave this page (or [Back≈to≈A-Tune] to modify other Auto Tune settings).
Using the Vocoder
A Vocoder is an effect that combines spoken words with sounds, thus creating the impression that the instrument that produces the sounds can talk. As this relies on complex filtering effects, the character of the sound used as “carrier” can change dramatically.
(1) Press the [VOCODER] button (it must light).
This switches off the [SMALL] or [ENSEMBLE] button if it was on, because the Vocoder cannot be used simultaneously with the Harmonizer function proper.
(2)Stop song playback if it is running.
The Vocoder can also use a song part, but for this demonstration, we’ll use the keyboard, because doing so will make you understand
how the Vocoder works.
(3) Play a chord on the keyboard, hold those notes, and talk into the microphone.
For obvious reasons, the Vocoder only works if you (a) talk or sing, and (b) if there is a “musical sound” that can be processed.
Play various chords and listen to how that affects the signal generated by the Vocoder.
Note: The Vocoder can produce four voices at once. Playing more than four notes simultaneously is thus unnecessary.
Note: The Vocoder can be used alongside [SINGER],
[VOICE–FX] or [AUTO≈TUNE].
26
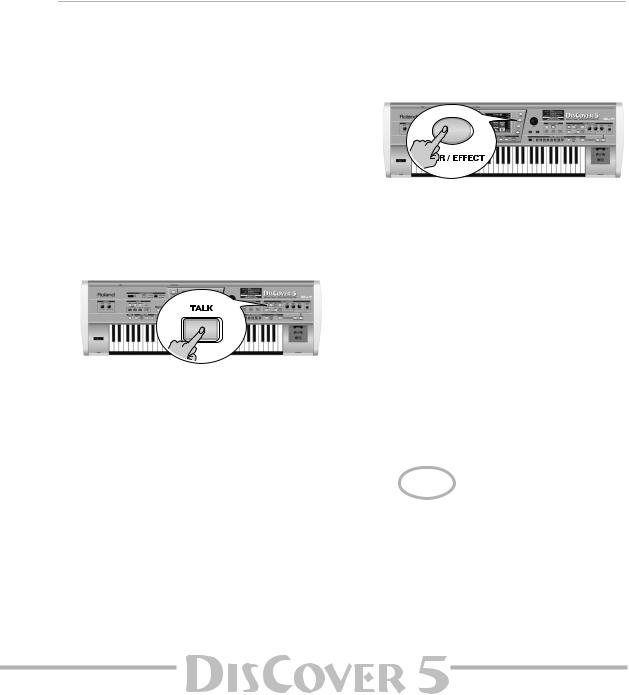
Owner’s Manual
The 8 fields in the middle (e.g. [Opera], [My≈Voice], etc.) specify the voice character. These presets are based on the parameters you can change on the Edit Part 1~4 page (which you don’t need if you are happy with one of the presets).
(5)Set the desired “Track” value with the [VALUE] dial.
The Vocoder Assign section’s current (default) setting is “Auto”. This means that song files indicated as “With MIDI Harmony for Your Vocal Harmony Processor” (with harmony note information on track 5) automatically switch on the Vocoder. If you like, you can still add additional chord information by playing on the keyboard. In Small or Ensemble mode, the pitch of your singing also influences the voicing of the harmony notes. This is not the case when you use the Vocoder.
If you stop song playback and then play a chord on the keyboard, the note information thus generated is used.
Set the Track value to select a song part (“1”~ ”16”). As the melody is usually monophonic (1 note at a time), “4” may not be the best possible setting. Try to select a track with several notes.
If you want to play the melody yourself, press the [Left] or [Right] field (or both) and play the desired notes, while you speak (or sing) into the microphone.
Note: See page 64 for the [Edit] parameters.
Note: To keep your settings, you must write them to a User Program.
(6)Press [EXIT] or [Back≈to≈Vocoder] to leave this page.
Talk
The Talk function is meant for announcements between songs: it switches off any other Vocal Harmonizer effect (Voice-FX, Auto Tune, Singer, Vocoder, Small/Ensemble) that may be on. Furthermore, it mutes the Vocal Harmonizer’s effects processors (Reverb, Chorus, Delay, etc.) – or adds a pinch of Reverb and/or Delay if you like.
That way, your voice has its normal sound when you wish or need to address your audience. And here too, the professionalism of your DisCover 5 shows, because the Talk function can be set in such a way that the music (song) is turned softer, but not muted altogether.
HINT !! You could combine this with the Chain function (page 76) and insert a short “announcement tune” between the actual songs, so that your announcements are easily recognizable. Of course, you could also play the tune yourself.
(1)Press the [TALK] button and speak into the microphone.
All Vocal Harmonizer transformations are now muted. This includes the [VOCODER], [SMALL], and [ENSEMBLE] buttons.
(2)After your announcement, press the [TALK] button again (to return to the previous “singer” settings) and sing to the next song.
Here’s what you need to do to change the level of the background music, and the amount of Reverb and/or Delay that is added to your speaking voice.
Note: See page 54 for an in-depth discussion of the effects settings.
(3) Press the [MIXER/EFFECT] button.
The display changes to:
(4) Press the [Vocal≈Effect] field.
Note: Press the [Vocal≈HARMONIZER] field to jump to a page where you can select different presets, etc. (see p. 22).
27
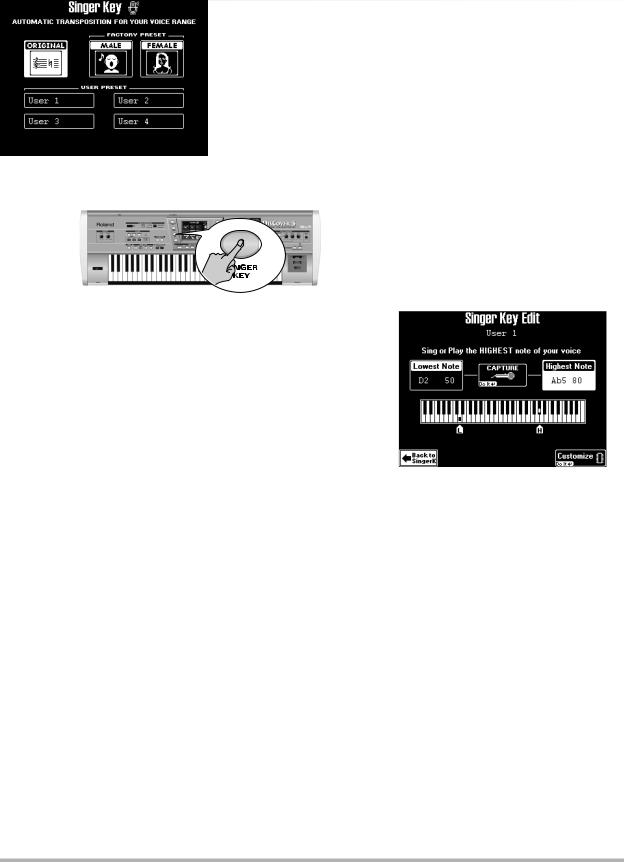


 Touring your DisCover 5
(5)Use the [PREV] and [NEXT] buttons to select the Music Mute field and set the desired value with the [VALUE] dial.
The smaller the value, the softer the song’s and Keyboard parts’ volume will be. Select “0” if you do not want the music to be any softer than it already is.
The Reverb Send and Delay Send fields allow you to add some Reverb and/or Delay to your voice. While some Reverb (values between “10” and “40”, for example) could be useful, Delay should probably only be used as “effect”, because it tends to blur your announcements.
Automatic transposition (Singer Key)
Here’s yet another revolutionary function of your DisCover 5: based on information you select or input, it can change the key of all songs you play back in realtime, thus allowing you (or a guest singer) to sing all songs in a comfortable range. This function is called “Singer Key”.
(1) |
For the sake of clarity, first select a song (see |
(7) Press one of the USER PRESET fields, and then |
|
|
p. 16) and press [®÷ª] to start playback. |
[Edit]. |
|
|
Pay attention to the song’s key. |
|
|
(2) |
Press [®÷ª] again to stop playback, and [|√] to |
|
|
|
return to the beginning. |
|
|
(3) |
Press the [SINGER≈KEY] button to switch on |
|
|
|
this function. |
|
|
|
|
|
|
|
|
|
|
The display changes to:
The display changes to:
r
This page contains three presets: [ORIGINAL] means that the songs are not transposed, while [MALE] and [FEMALE] adapt the song’s key to the “typical” range of a male or female voice.
(4)Press the [MALE] or [FEMALE] field (depending on whether you’re a man or a woman).
(5)Press the [®÷ª] button to start playback.
The song may now be playing in a different key. If it is not, the melody falls within the “typical” range you have just selected.
Note: This automatic transposition only works if track/ MIDI channel “4” of the songs you play back contains the melody part.
(6)Press [®÷ª] again to stop playback, and [|√] to return to the beginning.
That may still have been too high or too low for comfort… So here comes the best part:
Note: The [Edit] field only appears after pressing one of the USER PRESET fields. The latter are four memories where you can store your own range settings.
(8)Press the [Highest≈Note] field (if it is not already selected).
(9)Sing the highest note you can muster effortlessly (you can sing it several times).
If you connected a microphone, a [CAPTURE] field appears. Press this field to confirm the note you want the DisCover 5 to recognize. (This field does not appear if you enter the pitch via the keyboard.)
The DisCover 5 recognizes the pitch and displays the name of the corresponding note.
(If you have no microphone handy, you can also play this note on the keyboard.)
(10)Press the [Lowest≈Note] field and repeat step (9), taking care to sing your lowest possible note.
(11)Press [Customize] to store these settings if you wish to use them at a later stage.
28
 Loading...