


Owner’s Manual
Bedienungsanleitung
Guide d’utilisation
Manuale dell'utente
Manual del usuario
Manual do proprietário
Gebruikershandleiding
Thank you, and congratulations on your choice of the Roland MICRO CUBE RX Amplifier.
Before using this unit, carefully read the sections entitled: “USING THE UNIT SAFELY” and “IMPORTANT NOTES” (p. 2; p. 4).
These sections provide important information concerning the proper operation of the unit. Additionally, in order to feel assured that you have gained
a good grasp of every feature provided by your new unit, Owner’s manual should be read in its entirety. The manual should be saved and kept on hand as a convenient reference.
Main Features
A compact, high-performance guitar amplifier ideal for practicing at home
Equipped with four newly developed 10-cm (4-inch) speakers, this compact 5-watt stereo power amp (2.5 watt + 2.5 watt) delivers a powerful guitar sound.
Dual power operation with alkaline batteries (6 x AA) or AC adaptor (p. 5)
Dual power operation allows the amplifier to be used anywhere.
An 8-type COSM amp modeling function that reproduces sounds such as the Roland JC-120 (p. 6)
The amp is equipped with modeling for six types of popular guitar amps, including the JC-120, in addtion to an original amp, ACOUSTIC. Combined with the three-band equalizer, enables finely textured sound creation. Can also be used as a simple PA system using the MIC.
COSM (Composite Object Sound Modeling) is proprietary Roland modeling technology, which analyzes the way in which sound is affected by elements such as electronic circuitry, structure, and materials, and combines these elements to reconstruct the desired sound.
Equipped with the same spacially synthesized chorus as the JC-120 (p. 7)
The amp is equipped with an EFX function that allows you to use four types of effects. In addition to a spacially synthesized chorus that reproduces the soothing breadth of the JC-120's chorus, EFX also delivers FLANGER, PHASER and TREMOLO effects. The amp is also equipped with
separate basic DELAY/REVERB effects.
RHYTHM GUIDE function makes practical rhythm training easy (p. 9)
Contains preset rhythms from 11 genres (33 patterns) such as ROCK, JAZZ, LATIN and METRONOME. The optional footswitch allows you to operate the START/STOP and TAP TEMPO controls with your feet while playing.
Tuner function that also supports flat tuning (p. 9)
The amp is equipped with a tuner function that also makes flat tuning possible.
AUX IN allows stereo playback (p. 8)
You can connect a CD/MP3 player to the AUX IN jack and play the music in stereo.
Stereo headphone output supported (p. 8)
The amplifier has a stereo PHONES jack that can also be used as a REC OUT jack.
Copyright © 2008 ROLAND CORPORATION All rights reserved.
No part of this publication may be reproduced in any form without the written permission of ROLAND CORPORATION.
Español Italiano Français Deutsch English
Nederlands Português
Used for instructions intended to alert the user to the risk of death or severe injury should the unit be used improperly.
Used for instructions intended to alert the user to the risk of injury or material damage should the unit be used improperly.
* Material damage refers to damage or other adverse effects caused with respect to the home and all its furnishings, as well to domestic animals or pets.
The symbol alerts the user to important instructions or warnings.The specific meaning of the symbol is determined by the design contained within the triangle. In the case of the symbol at left, it is used for general cautions, warnings, or alerts to danger.
The  symbol alerts the user to items that must never be carried out (are forbidden). The specific thing that must not be done is indicated by the design contained within the circle. In the case of the symbol at left, it means that the unit must never be disassembled.
The ● symbol alerts the user to things that must be carried out. The specific thing that must be done is indicated by the design contained within the circle. In the case of the symbol at left, it means that the powercord plug must be unplugged from the outlet.
•Do not attempt to repair the unit, or replace parts within it (except when this manual provides specific instructions
directing you to do so). Refer all servicing to your retailer, the nearest Roland Service Center, or an authorized Roland distributor, as listed on the “Information” page.
........................................................................
• Never use or store the unit in places that are:
• Subject to temperature
extremes (e.g., direct 
 sunlight in an enclosed
  vehicle, near a heating duct, on top of heat-generating equipment);
or are
•Damp (e.g., baths, washrooms, on wet floors); or are
•Humid; or are
•Exposed to rain; or are
•Dusty; or are
•Subject to high levels of vibration.
........................................................................
•Make sure you always have the unit placed so it is level and sure to remain stable.
Never place it on stands that could wobble, or on inclined surfaces.
........................................................................
•Be sure to use only the AC adaptor supplied with the unit. Also, make sure the line
voltage at the installation matches the input voltage specified on the AC adaptor’s body. Other AC adaptors may use a different polarity, or be designed for a different voltage,
so their use could result in damage, malfunction, or electric shock.
........................................................................
•Use only the attached powersupply cord. Also, the supplied power cord must not be used with any other device.
........................................................................
•Do not excessively twist or bend the power cord, nor place heavy objects on it. Doing so can damage the cord,
producing severed elements and short circuits. Damaged cords are fire and shock hazards!
........................................................................
•This unit, either alone or in combination with an amplifier and headphones or speakers,
may be capable of producing sound levels that could cause permanent hearing loss. Do not operate for a long period of time at a high volume level, or at a level that is uncomfortable.
If you experience any hearing loss or ringing in the ears, you should immediately stop using the unit, and consult an audiologist.
........................................................................
•Do not allow any objects (e.g., flammable material, coins, pins); or liquids of any
kind (water, soft drinks, etc.) to penetrate the unit.
........................................................................
•Immediately turn the power off, remove the AC adaptor from the outlet, and request
servicing by your retailer, the nearest Roland Service Center, or an authorized Roland distributor, as listed on the “Information” page when:
•The AC adaptor, the power-supply cord, or the plug has been damaged; or
•If smoke or unusual odor occurs
•Objects have fallen into, or liquid has been spilled onto the unit; or
•The unit has been exposed to rain (or otherwise has become wet); or
•The unit does not appear to operate normally or exhibits a marked change in performance.
........................................................................
•In households with small children, an adult should provide supervision until the
child is capable of following all the rules essential for the safe operation of the unit.
........................................................................
•Protect the unit from strong impact.
(Do not drop it!)
........................................................................
2
•Do not force the unit’s powersupply cord to share an outlet with an unreasonable number
of other devices. Be especially careful when using extension cords—the total power used by all devices you have connected to the extension cord’s outlet must never exceed the power rating (watts/amperes) for the extension cord. Excessive loads can cause the insulation on the cord to heat up and eventually melt through.
........................................................................
•Before using the unit in a foreign country, consult
with your retailer, the nearest Roland Service Center, or an authorized Roland distributor, as listed on the “Information” page.
........................................................................
•Batteries must never be recharged, heated, taken apart, or thrown into fire or water.
........................................................................
• Never expose batteries to excessive heat such as sunshine, fire or the like.
........................................................................
•The unit and the AC adaptor should be located so their location or position does not
interfere with their proper ventilation.
........................................................................
•Always grasp only the plug on the AC adaptor cord when plugging into, or unplugging from, an outlet or this unit.
........................................................................
•At regular intervals, you should unplug the AC adaptor and clean it by using a dry cloth to wipe all dust and other
accumulations away from its prongs. Also, disconnect the power plug from the power outlet whenever the unit is to remain unused for an extended period of time. Any accumulation of dust between the power plug and the power outlet can result in poor insulation and lead to fire.
........................................................................
•Try to prevent cords and cables from becoming entangled. Also, all cords and
cables should be placed so they are out of the reach of children.
........................................................................
•Never climb on top of, nor place heavy objects on the unit.
........................................................................
• Never handle the AC adaptor or its plugs with wet hands when plugging into, or unplugging from, an outlet or this unit.
........................................................................
•Before moving the unit, disconnect the AC adaptor and all cords coming from external devices.
........................................................................
•Before cleaning the unit, turn off the power and unplug the AC adaptor from the outlet (p. 5).
........................................................................
•Whenever you suspect the possibility of lightning in your area, disconnect the AC adaptor from the outlet.
........................................................................
•If used improperly, batteries may explode or leak and
cause damage or injury. In the interest of safety, please read and observe the following precautions (p. 5).
•Carefully follow the instal-
lation instructions for batteries, and make sure you observe the correct polarity.
•Avoid using new batteries together with used ones. In addition, avoid mixing different types of batteries.
•Remove the batteries whenever the unit is to remain unused for an extended period of time.
•If a battery has leaked, use a soft piece of cloth or paper towel to wipe all remnants of the discharge from the battery compartment. Then install new batteries. To avoid inflammation of the skin, make sure that none of the battery discharge gets onto your hands or skin. Exercise the utmost caution so that none of the discharge gets near your eyes. Immediately rinse the affected area with running water if any of the discharge has entered the eyes.
•Never keep batteries together with
metallic objects such as ballpoint pens, necklaces, hairpins, etc.
........................................................................
•Used batteries must be disposed of in compliance with whatever regulations for
their safe disposal that may be observed in the region in which you live.
........................................................................
•Should you remove the grounding terminal screw, keep it in a safe place out of
children’s reach, so there is no chance
of it being swallowed accidentally.
........................................................................
•Do not remove the speaker grille and speaker by any means. Speaker not user replaceable. Shock hazardous voltages and currents are present inside the enclosure.
3

 IMPORTANT NOTES
Power Supply: Use of Batteries
•Do not connect this unit to same electrical outlet that is being used by an electrical appliance that is controlled by an inverter (such as a refrigerator, washing machine, microwave oven, or air conditioner), or that contains
a motor. Depending on the way in which the electrical appliance is used, power supply noise may cause this unit to malfunction or may produce audible noise. If it is not practical to use a separate electrical outlet, connect
a power supply noise filter between this unit and the electrical outlet.
•The AC adaptor will begin to generate heat after long hours of consecutive use. This is normal, and is not
a cause for concern.
•The use of an AC adaptor is recommended as the unit’s power consumption is relatively high. Should you prefer to use batteries, please use the alkaline type.
•When installing or replacing batteries, always turn off the power on this unit and disconnect any other devices you may have connected. This way, you can prevent malfunction and/or damage to speakers or other devices.
•Before connecting this unit to other devices, turn off the power to all units. This will help prevent malfunctions and/or damage to speakers or other devices.
Placement
•Using the unit near power amplifiers (or other equipment containing large power transformers) may induce hum. To alleviate the problem, change the orientation of this unit; or move it farther away from the source of interference.
•This device may interfere with radio and television reception. Do not use this device in the vicinity of such receivers.
•Noise may be produced if wireless communications devices, such as cell phones, are operated in the vicinity of this unit. Such noise could occur when receiving or initiating a call, or while conversing. Should you experience such problems, you should relocate such wireless devices so they are at a greater distance from this unit, or switch them off.
•Do not expose the unit to direct sunlight, place it near devices that radiate heat, leave it inside an enclosed vehicle, or otherwise subject it to temperature extremes. Also, do not allow lighting devices that normally are used while their light source is very close to the unit (such as
a piano light), or powerful spotlights to shine upon the same area of the unit for extended periods of time. Excessive heat can deform or discolor the unit.
•When moved from one location to another where the temperature and/or humidity is very different, water droplets (condensation) may form inside the unit. Damage or malfunction may result if you attempt to use the unit in this condition. Therefore, before using the unit, you must allow it to stand for several hours, until the condensation has completely evaporated.
•Do not allow rubber, vinyl, or similar materials to remain on the unit for long periods of time. Such objects can discolor or otherwise harmfully affect the finish.
•Do not paste stickers, decals, or the like to this instrument. Peeling such matter off the instrument may damage the exterior finish.
•Depending on the material and temperature of the surface on which you place the unit, its rubber feet may discolor or mar the surface.
You can place a piece of felt or cloth under the rubber feet to prevent this from happening. If you do so, please make sure that the unit will not slip or move accidentally.
Maintenance
•For everyday cleaning wipe the unit with a soft, dry cloth or one that has been slightly dampened with water.
To remove stubborn dirt, use a cloth impregnated with a mild, non-abrasive detergent. Afterwards, be sure
to wipe the unit thoroughly with a soft, dry cloth.
•Never use benzine, thinners, alcohol or solvents of any kind, to avoid the possibility of discoloration and/or deformation.
Additional Precautions
•Use a reasonable amount of care when using the unit’s buttons, sliders, or other controls; and when using its jacks and connectors. Rough handling can lead to malfunctions.
•When connecting/disconnecting all cables, grasp the connector itself—never pull on the cable. This way you will avoid causing shorts, or damage to the cable’s internal elements.
•To avoid disturbing your neighbors, try to keep the unit’s volume at reasonable levels. You may prefer to use headphones, so you do not need to be concerned about those around you (especially when it is late at night).
•When you need to transport the unit, package it in the box (including padding) that it came in, if possible. Otherwise, you will need to use equivalent packaging materials.
•Some connection cables contain resistors. Do not use cables that incorporate resistors for connecting to this unit. The use of such cables can cause the sound level to be extremely low, or impossible to hear. For information on cable specifications, contact the manufacturer of the cable.
4

 Power Supply
Inserting Batteries
Remove the lid of the battery compartment and insert 6 AA batteries, making sure that they are correctly oriented.
* To avoid malfunction and/or damage to speakers or other
devices, always turn off the power on this unit and
disconnect any other devices when installing or replacing batteries.
*When closing the lid of the battery compartment, first insert the catches on the lid into the matching cavities, then push the lid down firmly until you hear a click.
Using Batteries
Please note the following points.
•If there are batteries in the unit while an AC adaptor is being used, normal operation will continue should the supply of current
be interrupted (power outage or power cord disconnection).
•Use only alkaline batteries (LR6). You cannot use any other type of battery.
•Battery Life
Used continuously at maximum power: approx. 13 hours
(These figures will vary depending on the actual conditions of use)
•When operating on battery power only, the unit's power indicator (p. 6) will become dim when battery power gets too low. Replace the batteries as soon as possible.
•Sounds may distort easily or may cut off when played at high volume as the battery power begins to fade, but this is normal and does not indicate a malfunction. Either replace the batteries or use the AC adaptor included with the unit.
Connecting the AC Adaptor
1.Insert the DC plug of the supplied AC adaptor into the unit's AC adaptor jack.
By anchoring the AC adaptor cord using the cord hook, as shown in the illustration, you can prevent situations such as the adaptor becoming unplugged or unreasonable pressure being exerted on the AC adaptor jack.
*To avoid faulty operation or damage to the
speakers, you should disconnect the unit from other devices and switch off its power when connecting the AC adaptor.
2.Connect the supplied power cord to the AC adaptor, and plug it into an AC outlet.
AC Adaptor
Power Cord
AC Outlet
Indicator
Place the AC adaptor so the side with the indicator (see illustration) faces upwards.
* The indicator will light when you plug the AC adaptor into an AC outlet.
Using the Unit With the AC Adaptor |
|
||
Please note the following points. |
|
||
• |
Although the unit can operate on batteries alone, connecting the AC |
|
|
|
adaptor to the unit while it has batteries inserted ensures that power |
|
|
|
is supplied from the AC adaptor, reducing battery consumption. |
English |
|
• |
Use only the AC adaptor included with the MICRO CUBE RX. |
||
|
|||
|
Use of other AC adaptors may damage the amp or result in other problems. |
|
|
Switching the Power On |
|
||
and Off |
|
||
Once the connections have been completed, turn on power to your various |
Deutsch |
||
1. |
Make sure that all volume controls on the MICRO CUBE RX |
||
devices in the order specified. By turning on devices in the wrong order, you |
|
||
risk causing malfunction and/or damage to speakers and other devices. |
|
||
|
and connected devices are set to 0. |
|
|
2. |
Turn on all the devices connected to the MICRO CUBE RX's INPUT |
|
|
|
jack and AUX IN jack. |
|
|
3. |
Turn on the MICRO CUBE RX. |
|
|
4. |
Adjust the volume levels for the devices. |
Français |
|
5. |
Before switching off the power, lower the volume on each |
||
|
|||
|
of the devices in your system, and then turn off the devices |
|
|
|
in the reverse of the order followed when switching them on. |
|
|
|
NOTE |
|
|
|
Due to a circuitry protection feature, this unit requires a few moments |
|
|
|
after power up before it is ready for normal operation. To avoid |
|
|
|
sudden, high-volume sound, always make sure to have the volume |
Italiano |
|
|
Even with the volume all the way down, you may still hear some |
||
|
level turned down before switching on power. |
|
|
|
NOTE |
|
|
|
sound when the power is switched on and off, but this is normal, |
|
|
|
and does not indicate a malfunction. |
|
|
Attaching the Strap |
Español |
||
illustration. |
|||
Attach the supplied strap to |
|
||
the strap pin as shown in the |
|
||
|
NOTE |
|
|
|
Attach the strap securely so that it does not easily become |
Português |
|
|
detached. If the strap is loose, and you use it that way when |
||
|
|
||
|
carrying the MICRO CUBE RX, the amp could be dropped, |
|
|
|
possibly resulting in damage or injury. |
|
|
|
NOTE |
|
|
|
Use only the provided strap. The included strap is meant for |
|
|
|
exclusive use with the MICRO CUBE RX. Do not use this strap |
|
|
|
for other products. |
Nederlands |
|
|
to become detached; or, if the motion is repeated enough, may |
||
|
NOTE |
|
|
|
Do not spin or swing the MICRO CUBE RX while holding it by |
|
|
|
the strap. This is extremely dangerous, as it may cause the strap |
|
|
|
even break the strap. |
|
|
5

 Panel Descriptions
Control Panel
Guitar
Dynamic Mic
Standard
Mono Cable
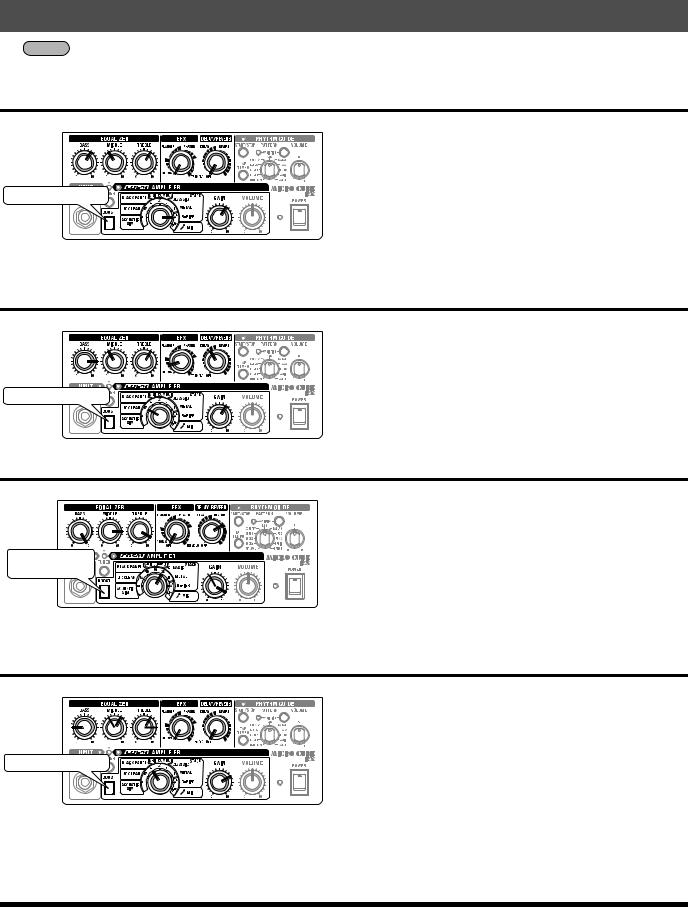
1.INPUT Jack
Connect your guitar or microphone here.
2.BOOST Button
Press the BOOST button to change the amp tone. The effects that you can create vary according to the amp type.
3.TUNER
In addition to manual tuning, in which strings are specified, you can also use it as a chromatic tuner.
It also supports flat tuning.
→ Using the Tuner Function (p. 9)
4.AMP TYPE Knob
You can select from eight COSM amp types. When the TUNER function is on, you can specify a string (note name).
* The product names mentioned in this document are trademarks or registered trademarks of their respective owners, and are not related to Roland Corporation. In this manual, these names are used because it is the most practical way of describing the sounds that are simulated using COSM technology.
ACOUSTIC SIM
This is an original amp type that includes an acoustic simulator. Turns the sounds from your electric guitar into a clear, refined acoustic guitar sound.
Using this type together with a single coil pickup provides optimum sound quality. Slightly turning down the equalizer's BASS and MIDDLE settings is effective if you are using a humbucking pickup.
JC CLEAN
This is a model of Roland's famous JC-120 Jazz Chorus guitar amplifier. The ultra-clean, ultra-flat sound offers a smooth feel. This becomes more effective when used in combination with an effects device.
BLACK PANEL
This is modeled on the classic Fender Twin Reverb amplifier. It can be used in a wide variety of musical styles, from country to blues, jazz, and rock. It exhibits rich lows and a bright high end.
BRIT COMBO
This is modeled on the VOX AC-30TB. This is the rock amplifier that created the Liverpool sound of the '60s. It can produce a broad range of sounds, from clean to overdrive.
CLASSIC STACK
This is modeled on the sound and response of a Marshall JMP1987. Used extensively in hard rock during the 1970s, this is truly the perfect amp for the "top rock" guitar sound.
METAL STACK
This is modeled on the PEAVEY EVH5150. This is a high-gain amp type, so even at low volumes, you can still get heavy distortion and sustain.
R-FIER STACK
This is modeled on the MESA/Boogie Rectifier. This super-high-gain amp is capable of producing slash metal, grunge, and a wide range of other lead sounds.
MIC
Select this when a microphone is connected.
*Please note the following points when using a microphone.
•Feedback could be produced depending on the location of microphones relative to the unit. This can be remedied by:
1.Changing the orientation of the microphone(s).
2.Relocating microphone(s) at a greater distance from the unit.
3.Lowering volume levels.
•The sound will be distorted if you turn the GAIN knob up too high. Set the GAIN knob to as high a value as possible before the sound distorts to get the best signal-to-noise ratio.
•Use a dynamic microphone. You cannot use a condenser microphone or a plug-in powered microphone that requires a power supply.
6

5.GAIN Knob
Adjusts the input level. Adjust the input level to suit the signal level of musical instruments connected to the INPUT jack.
TIP
Using a high GAIN setting allows you to get an overdrive sound.
TIP
Set the GAIN knob to as high a value as possible before the sound distorts to get the clearest sound.
6.VOLUME Knob
Adjusts the volume of the guitar (microphone).
7.Power Indicator
This indicator lights when the unit is turned on.
* When operating on battery power only, the unit's indicator will become dim during play when battery power gets too low. Replace the batteries as soon as possible.
8.POWER Switch
Turns the power on and off.
→ Switching the Power On and Off (p. 5)
9.EQUALIZER
This is a three-band equalizer. It allow you to adjust the tone of the guitar.
BASS Knob
Adjusts the tone quality of the lower range.
MIDDLE Knob
Adjusts the tone quality of the midrange.
TREBLE Knob
Adjusts the tone quality of the upper range.
10.EFX (Effects) Knob
Turn this knob to CHORUS, FLANGER, PHASER, or TREMOLO to select the corresponding effect. Turn the knob to adjust the amount of effect applied.
CHORUS (spacially synthesized chorus)
This uses the same spacially synthesized chorus as the JC-120 to deliver a broad sound.
* The chorus effects are designed so 


 they exhibit the greatest effectiveness when you use the unit's built-in speakers. Effectiveness may differ when REC OUT/ PHONE are used instead of the built-in speakers.
FLANGER
This creates a flanging effect that creates
a sort of spinning sensation with the sound.
Panel Descriptions
PHASER |
|
|
This effect adds a variable phase-shifted |
|
|
signal to the direct sound, giving |
|
|
the sound a swirling character. |
English |
|
TREMOLO |
||
|
||
Tremolo is an effect that creates a cyclic |
|
|
change in volume. |
|
|
* Graduations for CHORUS, FLANGER, |
|
|
PHASER and TREMOLO on the panel |
Deutsch |
|
Turn this knob to DELAY or REVERB to switch to that effect. |
||
are for reference. Be sure to check the sound as you adjust the effects. |
|
|
11. DELAY/REVERB Knob |
|
|
You can also adjust the amount of effect applied by turning |
|
|
the knob to the desired position. |
|
|
DELAY |
|
|
Turn the knob to adjust the delay effect. |
Français |
|
|
||
REVERB |
|
|
Turn the knob to adjust the reverb effect. |
|
|
* Graduations for DELAY and REVERB |
Italiano |
|
|
||
on the panel are for reference. Be sure to |
|
|
check the sound as you adjust the effects. |
|
|
12. RHYTHM GUIDE |
|
|
The unit is equipped with drum/percussion-based rhythm patterns |
|
|
that are useful for solo practicing. In addition to practicing with your |
Español |
|
PATTERN Knob |
||
desired beat, you can also use it as a metronome. |
|
|
→ Using the RHYTHM GUIDE (p. 9) |
|
|
Selects the genre of rhythm pattern. |
|
|
START/STOP Button |
|
|
Starts/stops the RHYTHM GUIDE. When you start the RHYTHM |
|
|
GUIDE, its indicator flashes in tempo with the music. |
Português |
|
TAP TEMPO Button |
||
|
||
Sets the tempo of the RHYTHM GUIDE. Tap this button two or more times |
|
|
at the desired tempo and the RHYTHM GUIDE will play at that tempo. |
|
|
VARIATION Button |
|
|
Selects the variation of the rhythm pattern. Each genre contains three |
|
|
types of rhythm variations. Pressing the VARIATION button cycles you |
|
|
through the available variations; the VARIATION indicator will be unlit, |
Nederlands |
|
will light green, or will light red to indicate the change in variation. |
||
|
||
VOLUME Knob |
|
|
Adjusts the volume of the RHYTHM GUIDE. |
|
7

Panel Descriptions
Rear Panel
Set the switches as shown below.
B A
|
|
|
|
|
|
|
|
|
|
|
|
|
|
|
|
|
|
|
|
|
|
|
|
|
|
|
|
|
|
|
|
|
|
|
|
|
|
|
|
|
|
|
|
|
|
|
|
|
|
|
|
|
|
|
|
|
|
|
|
Start/Stop |
|
|
|
|
Tap Tempo |
|
||||||||
|
|
|
|
|
|
|
|
|
|
|
|
|
|
|
Mixer |
Stereo Headphones |
Recorder |
Digital
Audio
Player
 Stereo Cable
|
Stereo Mini Cable |
White (L ch) |
Red (R ch) |
|
PCS-31 |
BOSS FS-6 |
|
|
|
|
PCS-31 |
Set the polarity |
|
|
switch as shown below. |
White |
Red |
|
||
BOSS FS-5U
Start/Stop |
Tap Tempo |
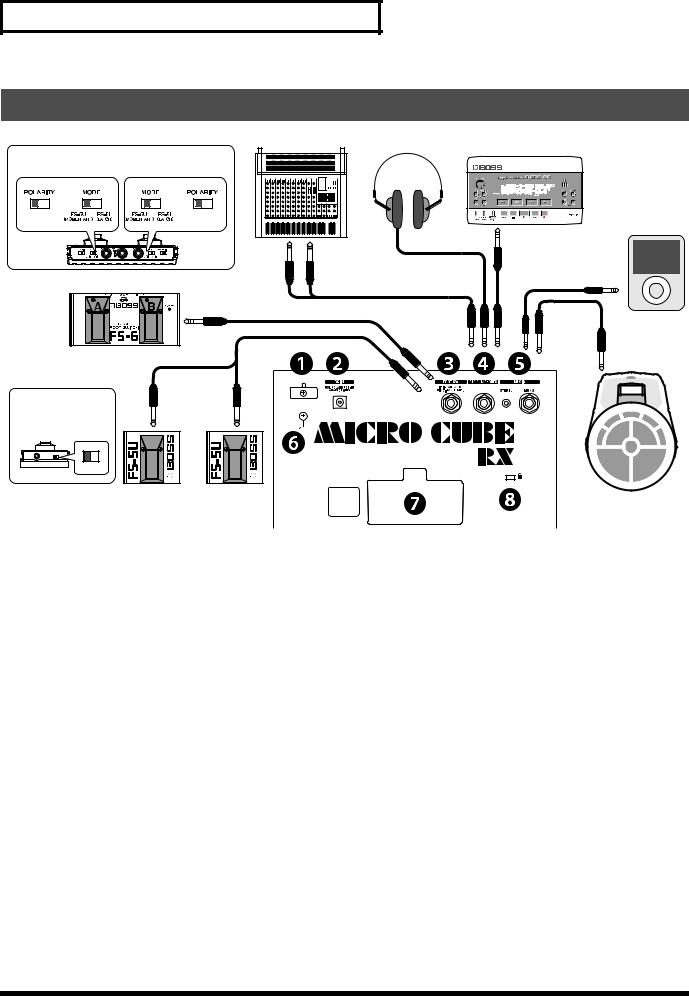
1.Cord Hook
Hook the AC adaptor cord here.
→Connecting the AC Adaptor (p. 5)
2.AC Adaptor Jack
Connect the included AC adaptor to this jack.
Use only the AC adaptor included with the MICRO CUBE RX. Use of other AC adaptors may damage the amp or result in other problems.
→Connecting the AC Adaptor (p. 5)
3.FOOT SW (Footswitch) Jack
If you connect a footswitch (the optional BOSS FS-5U or FS-6), you can operate the RHYTHM GUIDE function (START/STOP and TAP TEMPO).
4.REC OUT/PHONES Jack
Connect stereo headphones or a recording device to this jack. It supports stereo output.
* No sound is played through the unit's speaker while the REC OUT/PHONES jack is in use.
5.AUX IN Jack
You can connect devices such as a CD player, digital audio player or electronic musical instrument, and have it play along with your guitar. Offers two types of jacks for external input; a mono 1/4" phone jack and a stereo-mini jack. Use the appropriate cable (optional) for the device that you are connecting.
* Determine the volume level by adjusting the volume control of the connected device.
Standard
Mono Cable
Electronic Musical
Instruments, etc.
6.Ground Terminal
Depending on the circumstances of a particular setup, you may experience a discomforting sensation, or perceive that the surface feels gritty to the touch when you touch this device, microphones connected to it, or the metal portions of other objects, such as guitars. This is due to an infinitesimal electrical charge, which is absolutely harmless. However, if you are concerned about this, connect the ground terminal with an external ground. When the unit is grounded, a slight hum may occur, depending on the particulars of your installation. If you are unsure of the connection method, contact the nearest Roland Service Center, or an authorized Roland distributor, as listed on the "Information" page.
Unsuitable places for connection
•Water pipes (may result in electrical shock)
•Gas pipes (may result in fire or explosion)
•Telephone-line ground or lightning rod (may be dangerous in the event of lightning)
7.Battery Compartment
Insert 6 AA batteries. Use only alkaline batteries (LR6). You cannot use any other type of battery.
→ Inserting Batteries (p. 5)
8.Security Slot ( )
)
You can connect commercially available anti-theft security cables and other security devices to the unit. http://www.kensington.com/
8

 Useful Functions
Using the Tuner Function
The MICRO CUBE RX is equipped with a tuner function. In addition to manual tuning, you can also use it as a chromatic tuner.
*Use manual tuning when the strings are substantially out of tune (such as after changing strings).
Manual Tuning
1.Press the TUNER button.
The unit enters Tuner mode, and the TUNER button lights. When the unit is in Tuner mode, no sound is played through the speakers
or the REC OUT/PHONES jack.
2.Use the AMP TYPE
knob to select the string that you want to tune.
|
|
|
|
|
|
|
|
|
|
|
|
|
|
|
|
|
|
|
|
|
|
|
|
|
|
|
|
|
|
|
|
|
|
|
|
|
|
|
|
|
|
|
|
|
|
|
|
|
|
|
|
|
|
|
|
|
|
|
|
|
|
|
|
|
|
|
|
|
|
|
|
Knob |
String (Note Name) |
||||||||||
Position |
|
|
|
|
|
|
|
|
|
|
|
|
|
|
|
|
|
|
|
|
|
|
|
6E |
Open sixth string (E) |
||||||||||
5A |
Open fifth string (A) |
||||||||||
4D |
Open fourth string (D) |
||||||||||
3G |
Open third string (G) |
||||||||||
2B |
Open second string (B) |
||||||||||
1E |
Open first string (E) |
||||||||||
Ab |
Open fifth string (semitone down) (Ab) |
||||||||||
Abb |
Open fifth string (whole tone down) (G) |
||||||||||
3.Play a single note on the open string that you want to tune.
Tune the string until the green indicator lights.
|
Flat |
|
|
|
|
|
|
Pitch |
|
|
|
|
|
|
|
Sharp |
|
|
|
is correct |
|
|
|
|
|
|
|
||||||
|
|
|
|
|
|
|
|
|
|
|
|
|
|
|
||
|
|
|
|
|
|
|
|
|
|
|
|
|
|
|
|
|
|
|
|
|
|
|
|
|
|
|
|
|
|
|
|
|
|
|
|
|
|
|
|
|
|
|
|
|
|
|
|
|
|
|
|
|
|
|
|
|
|
|
|
|
|
|
|
|
|
|
|
|
|
|
|
|
|
|
|
|
|
|
|
|
|
|
|
|
Lights red |
Lights green |
Lights red |
*The red indicator flashes if the pitch is substantially out of tune.
4.When you have finished tuning, press the TUNER button once again.
*The reference pitch is A=440 Hz. This cannot be changed.
Chromatic Tuning |
|
|
|
||
If you press the TUNER button for one second or more, you can also use |
|
||||
the unit as a "chromatic tuner", which automatically determines the closest |
|
||||
note name to the one played. |
|
|
English |
||
As with manual tuning, chromatic tuning allows you to play a single note on |
|||||
|
|||||
the string that you want to tune. Tune the string until the green indicator lights. |
|
||||
Using the RHYTHM GUIDE |
|
||||
The MICRO CUBE RX is equipped with drum/percussion-based rhythm |
|
||||
patterns that are useful for solo practicing. In addition to practicing with |
|
||||
your desired beat, you can also use it as a metronome. |
|
Deutsch |
|||
|
|
|
|
||
1. Select the rhythm genre using the PATTERN knob. |
|
Français |
|||
|
|
||||
METRONOME |
ROCK1 |
ROCK2 |
BLUES |
|
|
COUNTRY |
R&B |
BALLAD |
JAZZ |
|
|
FUNK |
LATIN |
DANCE |
|
|
|
2. Press the START/STOP button to start the RHYTHM GUIDE. |
|
||||
When the RHYTHM GUIDE is started, the RHYTHM GUIDE indicator |
Italiano |
||||
VOLUME knob. |
|
|
|
||
lights. |
|
|
|
|
|
3. Adjust the RHYTHM GUIDE volume using the RHYTHM GUIDE |
|
||||
4. Select a rhythm variation by pressing the VARIATION button. |
|
||||
Each genre contains three types of rhythm variations. Pressing |
|
||||
the VARIATION button cycles you through the available variations; |
|
||||
the VARIATION indicator will be unlit, will light green, or will light |
Español |
||||
red to indicate the change in variation. |
|
|
|||
|
|
|
|||
5. Adjust the variation to the tempo that you want to play to. |
|
||||
Press the TAP TEMPO button two or more times at the desired tempo |
|
||||
to get the RHYTHM GUIDE to play at that tempo. |
|
|
|||
|
|
|
|
Português |
|
|
|
|
|
Nederlands |
|
9

Sample Settings
MEMO
Adjust the VOLUME knob to an appropriate volume level.
Alternative Metal
BOOST Switch: OFF
Space Clean
BOOST Switch: OFF
The perfect sound for heavy, sharp riffs.
Select the high-gain R-FIER amp, then use the equalizer to boost the low and high ends.
Used with a humbucking pickup in the rear position, it results in an extreme distortion effect.
Plus, you can add a long delay to use this as a lead sound with great sustain.
Adding a short delay produces a doubling sound like that from two performers playing the same phrases simultaneously.
This is a transparent sound using spacial effects.
Select the JC CLEAN amp, modeled on the Roland JC-120, then add chorus and long delay.
Using this setting with a guitar equipped with single coil pickups makes beautiful sounding arpeggios and chord strumming.
Depending on the phrase being played, it can be effective to set the delay sound's delay time slightly slower than the phrase's tempo.
Classic Rock
BOOST Switch:
OFF
This is a 70s-style rock sound.
Turning up the gain produces a powerful rock sound in all riffs and solos.
A powerful low end is a characteristic of the sound emitted by the surfaces of the cabinet, so you can turn up the equalizer knobs, especially the BASS knob, to produce a sound with great punch.
Turning down the GAIN knob is also a perfect way to get a sharp crunch sound.
Tube Crunch
|
This is a sound that complements blues music. |
|
Turn down the BASS knob a little and turn up the GAIN knob to obtain |
|
a smooth crunch sound. |
|
This is due to sound boosted by the equalizer being distorted by the GAIN knob. |
BOOST Switch: OFF |
You can also obtain a sharp crunch sound by further boosting the high |
|
end or lowering the midrange. |
10
 Stromversorgung
Einlegen der Batterien
Nehmen Sie den Deckel des Batteriefachs ab und setzen Sie 6 AABatterien ein. Achten Sie dabei auf die richtige Polung.
*Um Fehlfunktionen und/oder Schäden an Lautsprechern oder anderen Geräten zu vermeiden, schalten Sie immer
dieses Gerät aus und trennen Sie die Verbindung zu anderen Geräten, bevor Sie Batterien einlegen oder ersetzen.
*Führen Sie, wenn Sie den Batteriefachdeckel schließen, als erstes die Zapfen am Deckel in die entsprechenden Aussparungen ein,
und drücken Sie dann den Deckel fest zu, bis sie ihn einrasten hören.
Batteriebetrieb
Beachten Sie bitte die folgenden Punkte:
•Wenn der Netzadapter verwendet wird, sich aber Batterien im Gerät befinden, wird im Fall einer Unterbrechung der Stromversorgung (durch Stromausfall oder Abziehen des Netzkabels) der normale Betrieb fortgesetzt.
•Verwenden Sie ausschließlich Alkali-Batterien (LR6). Andere Batterietypen können nicht verwendet werden.
•Lebensdauer der Batterien
Bei Dauerbetrieb mit maximaler Leistung: etwa 13 Stunden (Diese Werte variieren je nach den tatsächlichen Betriebsbedingungen.)
•Bei ausschließlichem Batteriebetrieb wird die Spannungsanzeige (S. 12) des Geräts während des Spielens zunehmend dunkler, sobald die Batteriespannung zu sehr absinkt. Ersetzen Sie
die Batterien so bald wie möglich.
•Die Sounds verzerren früher oder werden abgeschnitten, wenn Sie bei abnehmender Batteriespannung mit hoher Lautstärke spielen. Dies ist jedoch normal und nicht als Fehlfunktion zu werten. Ersetzen Sie entweder die Batterien oder verwenden Sie den mitgelieferten Netzadapter.
Anschließen des Netzadapters
1.Stecken Sie den Stecker des mitgelieferten Netzadapters
in die Netzadapterbuchse des Geräts.
Indem Sie den Netzadapter wie in der Abbildung gezeigt mit Hilfe der Kabelklemme festhaken, können Sie vermeiden, dass sich der Adapterstecker aus der Buchse löst oder übermäßiger Druck auf die Adapterbuchse ausgeübt wird.
*Um Betriebsfehler oder Schäden an den Lautsprechern zu vermeiden, sollten Sie das Gerät von anderen Geräten trennen
und es ausschalten, wenn Sie den Netzadapter anschließen.
2.Schließen Sie das mitgelieferte Stromkabel an den Netzadapter an, und stecken Sie dessen Stecker in eine Netzsteckdose.
Netzadapter
Stromkabel
Netzsteckdose
Anzeige
Platzieren Sie den Netzadapter so, dass die Seite mit der Anzeige (siehe Abbildung) nach oben weist.
*Die Anzeige leuchtet, sobald Sie den Netzadapter in eine funktionierende Netzsteckdose einstecken.
Verwendung des Geräts mit dem Netzadapter
Beachten Sie bitte die folgenden Punkte:
•Das Gerät kann zwar allein mit Batterien betrieben werden, doch durch Anschließen des Netzadapters bei eingelegten Batterien wird sichergestellt, dass das Gerät über den Netzadapter mit Spannung versorgt wird, was den Batterieverbrauch verringert.
•Verwenden Sie ausschließlich den mit dem MICRO CUBE RX mitgelieferten Netzadapter.
Die Verwendung anderer Netzadapter kann den Verstärker beschädigen oder andere Probleme verursachen.
Einund Ausschalten
Sobald Sie alle Anschlüsse vorgenommen haben, schalten Sie alle beteiligten Geräte in der angegebenen Reihenfolge ein. Wenn Sie die Geräte in der falschen Reihenfolge einschalten, kann es zu Fehlfunktionen und/oder Schäden an Lautsprechern oder anderen Geräten kommen.
1.Achten Sie darauf, dass alle Lautstärkeregler am MICRO CUBE RX und an angeschlossenen Geräten auf 0 eingestellt sind.
2.Schalten Sie alle Geräte ein, die an der INPUTund der AUXI-IN-Buchse des MICRO CUBE RX angeschlossen sind.
3.Schalten Sie den MICRO CUBE RX ein.
4.Stellen Sie die Lautstärken der Geräte ein.
5.Regeln Sie vor dem Ausschalten die Lautstärken aller Geräte in Ihrem System herunter, und schalten Sie dann die
Geräte in umgekehrter Reihenfolge aus.
HINWEIS
Aufgrund einer Schaltungsschutzfunktion dauert es nach dem Einschalten einen Moment, bis dieses Gerät für den normalen Betrieb bereit ist.
Um plötzliche, laute Impulse zu vermeiden, achten Sie immer darauf, die Lautstärke herunterzuregeln, bevor Sie das Gerät einschalten.
HINWEIS
Auch bei vollständig heruntergeregelter Lautstärke hören Sie beim Einund Ausschalten möglicherweise ein Geräusch, aber das ist normal und stellt keine Fehlfunktion dar.
Anbringen des Tragegurts
Befestigen Sie den mitgelieferten Tragegurt wie in der Abbildung gezeigt am Gurtstift.
HINWEIS
Befestigen Sie den Gurt so, dass er sich nicht versehentlich lösen kann. Falls der Gurt locker ist, während Sie den MICRO CUBE RX am Gurt tragen, könnte der Verstärker zu Boden fallen,
was Schäden oder Verletzungen verursachen kann.
HINWEIS
Verwenden Sie nur den mitgelieferten Gurt. Der mitgelieferte Gurt ist ausschließlich zur Verwendung mit dem MICRO CUBE RX
vorgesehen. Verwenden Sie diesen Gurt nicht für andere Produkte.
HINWEIS
Machen Sie keine Drehoder Schwingbewegungen mit dem MICRO CUBE RX, während Sie ihn am Gurt halten. Dies ist äußerst gefährlich, da sich dadurch der Gurt lösen oder, wenn die Bewegung zu oft wiederholt wird, sogar reißen kann.
Español Italiano Français Deutsch English
Nederlands Português
11

 Beschreibungen zum Bedienfeld
Bedienfeld
Gitarre
Dynamisches Mikrofon
Standard-
Mono-Kabel
1.Buchse INPUT (Eingang)
Schließen Sie hier Ihre Gitarre oder Ihr Mikrofon an.
2.Taste BOOST (Frequenzverstärkung)
Drücken Sie die BOOST-Taste, um den Klang des Verstärkers zu ändern. Welche Effekte Sie erzeugen können, hängt vom Verstärkertyp ab.
3.TUNER (Stimmfunktion)
Zusätzlich zum manuellen Stimmen, wo die Tonhöhe der Saiten angegeben wird, können Sie diese Funktion auch als chromatisches Stimmgerät nutzen.
Sie unterstützt auch Flat Tuning (alle Saiten einen Halbton tiefer).
→ Verwendung der Tuner-Funktion (S. 15)
4.Typ-Regler
Sie können aus acht COSM-Verstärkertypen auswählen. Bei eingeschalteter TUNER-Funktion können Sie eine Saite (einen Notennamen) angeben.
* Die in diesem Dokument erwähnten Produktbezeichnungen sind Warenzeichen oder eingetragene Warenzeichen der jeweiligen Eigentümer und haben nichts mit der Roland Corporation zu tun. In dieser Anleitung werden diese Bezeichnungen in einer Weise verwendet, die geeignet ist, die mit der COSM-Technologie simulierten Sounds zu beschreiben.
ACOUSTIC SIM
Dies ist ein spezieller Verstärkertyp mit Akustiksimulator. Wandelt die Sounds Ihrer E-Gitarre in den verfeinerten, klaren Klang einer akustischen Gitarre um.
In Kombination mit einem Single-Coil-Tonabnehmer sorgt dieser Verstärkertyp für optimale Klangqualität. Bei Verwendung eines Humbucker-Tonabnehmers ist es sinnvoll, den unteren (BASS) und den mittleren Frequenzbereich (MIDDLE) herunterzuregeln.
JC CLEAN
Dies ist ein Modell des berühmten Gitarrenverstärkers Jazz Chorus JC-120 von Roland. Der ultra-cleane, ebenmäßige Sound bietet einen weichen Klang. Dies wird um so deutlicher, wenn er in Kombination mit der Effekt-Sektion dieses Cube Amps eingesetzt wird.
BLACK PANEL
Dies ist ein Modell des klassischen Verstärkers Fender Twin Reverb. Er wird in vielen verschiedenen Musikstilrichtungen verwendet, von Country und Blues bis Jazz und Rock. Er bietet voll klingende Bässe und klare Höhen.
BRIT COMBO
Dies ist ein Modell eines VOX AC-30TB. Dies ist der RockmusikAmp, der den Liverpool-Sound der 60er mitgestaltet hat. Er kann viele verschiedene Sounds hervorbringen, von Clean bis Overdrive.
CLASSIC STACK
Dies ist ein Modell auf Grundlage des Sounds und des Verhaltens eines Marshall JMP1987. Dieser im Hardrock der 1970er viel genutzte Verstärker liefert einen perfekten „Top Rock“-Gitarrensound.
METAL STACK
Dies ist ein Modell des PEAVEY EVH5150. Dies ist ein Verstärkertyp mit hohem Gain, so dass Sie selbst bei niedriger Lautstärke eine starke Verzerrung und lange Ausklingzeit erhalten können.
R-FIER STACK
Dies ist ein Modell des MESA/Boogie Rectifier. Dieser Amp mit äußerst hohem Gain kann Slash-Metal-, Grungeund viele andere Lead-Sounds erzeugen.
MIC
Wählen Sie diesen Typ, wenn ein Mikrofon angeschlossen ist.
*Bitte beachten Sie, wenn Sie ein Mikrofon verwenden, die folgenden Punkte.
•Je nach dem Aufstellort von Mikrofonen im Verhältnis zum Gerät könnten Rückkopplungen erzeugt werden. Dies lässt sich lösen durch:
1.Ändern der Ausrichtung des Mikrofons bzw. der Mikrofone.
2.Aufstellung des Mikrofons bzw. der Mikrofone in größerem Abstand vom Gerät.
3.Verringern der Lautstärke(n).
•Wenn Sie den GAIN-Regler zu hoch einstellen, wird der Klang verzerrt. Stellen Sie den GAIN-Regler auf einen so hohen Wert wie möglich ein, bevor eine Verzerrung eintritt, um das beste Signal-Rausch-Verhältnis zu erhalten.
•Verwenden Sie ein dynamisches Mikrofon. Sie können kein Kondensatormikrofon oder ein aktives Mikrofon verwenden, das eine Stromversorgung benötigt.
12

5.Regler GAIN (Verstärkung)
Stellt den Eingangspegel ein. Stellen Sie den Eingangspegel passend zum Signalpegel der an der INPUT-Buchse angeschlossenen Musikinstrumente an.
TIPP
Mit einer hohen GAIN-Einstellung können Sie einen übersteuerten Sound erzielen.
TIPP
Stellen Sie den GAIN-Regler auf einen so hohen Wert wie möglich ein, bevor die Soundverzerrung einsetzt, um einen möglichst klaren Sound zu erhalten.
6.Regler VOLUME (Lautstärke)
Reguliert die Lautstärke der Gitarre (des Mikrofons).
7.Netzanzeige
Diese Anzeige leuchtet, wenn das Gerät eingeschaltet ist. * Bei ausschließlichem Batteriebetrieb wird die Anzeige
zunehmend dunkler, sobald die Batteriespannung zu sehr absinkt. Ersetzen Sie die Batterien so bald wie möglich.
8.Netzschalter POWER
Schaltet das Gerät ein und aus.
→ Einund Ausschalten (S. 11)
9.EQUALIZER (Klangregelung)
Dies ist ein 3-Band-Equalizer. Sie können die Klangfarbe der Gitarre mit drei Reglern einstellen.
Regler BASS (Bässe)
Regelt den Pegel des unteren Frequenzbereichs. Regler MIDDLE (Mitten)
Regelt den Pegel des mittleren Frequenzbereichs. Regler TREBLE (Höhen)
Regelt den Pegel des oberen Frequenzbereichs.
10.Regler EFX (Effekte)
Drehen Sie diesen Regler auf Chorus, Flanger, Phaser oder Tremolo, um den entsprechenden Effekt auszuwählen. Drehen Sie den Regler, um den Effektanteil einzustellen.
CHORUS (räumlich erzeugter Chorus-Effekt)
Hier wird der gleiche räumliche ChorusEffekt verwendet wie beim JC-120, um einen breiten Sound zu erzeugen.Beim räumlich erzeugten Chorus, einer nur in Stereo verfügbaren Methode, wird der Effekt erzeugt, indem der Klang vom
rechten Lautsprecher (von dem der Effektklang ausgegeben wird) und der Klang vom linken Lautsprecher (der den direkten Klang ausgibt) genommen und dann im Raum selbst gemischt werden. Dadurch entsteht eine größere seitliche Streuung, als wenn die Klänge elektronisch gemischt werden, was einen natürlicheren Eindruck von Breite hervorruft.
*Die Chorus-Effekte sind so konzipiert, dass sie die größte Wirkung zeigen, wenn Sie die eingebauten Lautsprecher des Geräts verwenden. Die Wirkung kann abweichen, wenn REC OUT/PHONE anstelle der eingebauten Lautsprecher verwendet werden.
FLANGER
Dies erzeugt den Flanging-Effekt, der
den Eindruck eines sich drehenden Klangs bewirkt.
Beschreibungen zum Bedienfeld
PHASER |
|
|
Dieser Effekt fügt dem direkten Klang ein |
|
|
variabel phasenverschobenes Signal |
|
|
hinzu, wodurch der Sound einen |
|
|
wirbelnden Charakter erhält. |
English |
|
TREMOLO |
||
|
||
Tremolo ist ein Effekt, der eine zyklische |
|
|
Lautstärkeänderung erzeugt. |
|
|
* AblesenDie Markierung für die |
|
|
Effektstärke ist ein Näherungswert. |
Deutsch |
|
Richten Sie sich beim Einstellen des Effektes nach dem von Ihnen |
||
|
||
gewünschten Klangergebnis. |
|
|
11. Regler DELAY/REVERB (Hall/Echo) |
|
|
Stellen Sie diesen Regler auf DELAY oder REVERB, um auf den |
|
|
betreffenden Effekt zu schalten. Außerdem können Sie die Intensität |
|
|
des angewendeten Effekts einstellen, indem Sie den Regler in die |
|
|
gewünschte Stellung bringen. |
|
|
DELAY |
Français |
|
Drehen Sie den Regler, um den |
||
|
||
Verzögerungseffekt einzustellen. |
|
|
REVERB |
|
|
Drehen Sie den Regler, um den Halleffekt |
Italiano |
|
einzustellen. |
||
|
||
* Die Einteilungen auf dem Bedienfeld für |
|
|
DELAY und REVERB dienen zum Ablesen. |
|
|
Hören Sie beim Einstellen der Effekte vor |
|
|
allem auf den Klang. |
|
|
12. RHYTHM GUIDE |
Español |
|
Das Gerät ist mit Rhythmus-Patterns auf Drum/Percussion-Basis |
||
|
||
ausgestattet, die nützlich sind, wenn man allein üben möchte. |
|
|
Zusätzlich zum Üben mit Ihrem gewünschten Groove können Sie |
|
|
ihn auch als Metronom nutzen. |
|
|
→ Verwendung des RHYTHM GUIDE (S. 15) |
|
|
Regler PATTERN |
|
|
Wählt das Genre des Rhythmus-Patterns aus. |
|
|
Taste START/STOP |
Português |
|
Startet/stoppt den RHYTHM GUIDE. Wenn Sie den RHYTHM GUIDE |
||
|
||
starten, blinkt seine Anzeige synchron zur Musik. |
|
|
Taste TAP TEMPO |
|
|
Stellt das Tempo für den RHYTHM GUIDE ein. Tippen Sie zwei oder |
|
|
mehrere Male im gewünschten Tempo auf diese Taste, und der |
|
|
RHYTHM GUIDE spielt im entsprechenden Tempo. |
|
|
Taste VARIATION |
|
|
Wählt die Variation des Rhythmus-Patterns aus. Jedes Genre enthält |
Nederlands |
|
Regler VOLUME (Lautstärke) |
||
drei Typen von Rhythmusvariationen. Wenn Sie die VARIATION-Taste |
|
|
drücken, durchläuft das Gerät die verfügbaren Variationen; die |
|
|
VARIATION-Anzeige ist entweder unbeleuchtet, grün oder rot, um den |
|
|
Wechsel der Variationen anzuzeigen. |
|
|
Reguliert die Lautstärke des RHYTHM GUIDE. |
|
13
Beschreibungen zum Bedienfeld
Rückseite |
|
|
|
|
|
Stellen Sie die Schalter wie nachstehend gezeigt ein. |
|
Mischpult |
Stereokopfhörer |
Aufnahmeeinheit (Rekorder) |
|
|
|
|
|
||
B |
A |
|
|
|
|
|
|
|
|
|
Digitaler |
|
|
|
|
|
Audioplayer |
|
|
|
|
|
Stereo-Kabel |
|
|
Weiß |
Rot (rechter Kanal) |
Stereo-Mini-Kabel |
|
START/STOP |
TAP TEMPO |
|
|||
(linker Kanal) |
|
PCS-31 |
|
||
|
|
|
|
||
BOSS FS-6 |
|
||
|
PCS-31 |
|
|
Stellen Sie den |
|
|
|
Polaritätsschalter wie |
Weiß |
Rot |
|
nachstehend gezeigt ein. |
|||
|
|
||
|
BOSS FS-5U |
|
|
|
START/STOP |
TAP TEMPO |
|
1.Kabelklemme
Haken Sie hier das Netzkabel ein.
→Anschließen des Netzadapters (S. 11)
2.Netzadapterbuchse
Schließen Sie hier den mitgelieferten Netzadapter an. Verwenden Sie ausschließlich den mit dem MICRO CUBE RX
gelieferten Netzadapter. Die Verwendung anderer Netzadapter kann den Verstärker beschädigen oder andere Probleme verursachen.
→Anschließen des Netzadapters (S. 11)
3.Buchse FOOT SW (Fußtaster)
Wenn Sie einen Fußtaster anschließen (den als Zubehör erhältlichen BOSS FS-5U oder FS-6), können Sie mit ihm die RHYTHM-GUIDE- Funktion steuern (START/STOP und TAP TEMPO).
4.Buchse REC OUT/PHONES (Aufnahme/Kopfhörer)
Schließen Sie an dieser Buchse einen Stereokopfhörer oder ein Aufnahmegerät an. Sie unterstützt die Stereoausgabe.
* Es erfolgt keine Tonausgabe aus dem Lautsprecher des Geräts, so lange die Buchse REC OUT/PHONES belegt ist.
5.Buchse AUX IN
Sie können Geräte wie einen CD-Player, ein digitales Wiedergabegerät oder ein elektronisches Musikinstrument anschließen und mit Ihrer Gitarre dazu spielen.
Hier können zwei Arten von Steckern angeschlossen werden: ein 6,3-mm-Mono-Klinkenstecker und ein Miniklinken-Stecker. Verwenden Sie ein für das anzuschließende Gerät geeignetes Kabel (als Zubehör erhältlich).
Standard-
Mono-Kabel
Elektronische
Musikinstrumente usw.
*Stellen Sie die Lautstärke am Lautstärkeregler des angeschlossenen Audiogerätes ein.
6.Erdungsanschluss
Je nach den Umständen von Aufstellung und Anschluss kann es vorkommen, dass Sie beim Berühren von Metalloberflächen dieses Geräts oder angeschlossener Mikrofone oder Gitarren ein etwas unangenehmes „Stromgefühl“ wahrnehmen. Dies entsteht durch eine minimale elektrische Ladung, die vollkommen harmlos ist. Falls es Sie trotzdem beunruhigt, verbinden Sie den Erdungsanschluss mit einer externen Masse. Wenn das Gerät geerdet ist, kann je nach den Umständen von Aufstellung und Anschluss ein leichtes Brummen auftreten. Wenn Sie sich bezüglich der Anschlussmethode nicht sicher sind, wenden Sie sich an ein Roland Service Center in Ihrer Nähe oder an einen der autorisierten Roland-Vertriebspartner, die auf der Seite „Information“ aufgelistet sind.
Nicht für den Anschluss geeignete Stellen
• Wasserleitungen (kann einen elektrischen Schlag zur Folge haben)
• Gasleitungen (kann zu einem Brand oder einer Explosion führen)
• Masseleiter von Telefonleitungen oder Blitzableiter (kann bei Blitzschlag eine Gefahr darstellen)
7.Batteriefach
Setzen Sie 6 AA-Batterien ein. Verwenden Sie ausschließlich AlkaliBatterien (LR6). Andere Batterietypen können nicht verwendet werden.
→ Einlegen der Batterien (S. 11)
8.Sicherheitsschacht ( )
)
Sie können im Handel erhältliche Diebstahlsicherungskabel
sowie andere Sicherheitsvorrichtungen an das Gerät anschließen. http://www.kensington.com/
14

 Nützliche Funktionen
Verwendung der TunerFunktion
Der MICRO CUBE RX ist mit einer Tuner-Funktion ausgestattet. Zusätzlich zum manuellen Stimmen können Sie sie auch als chromatisches Stimmgerät nutzen.
*Stimmen Sie das Instrument manuell, wenn die Saiten stark verstimmt sind (zum Beispiel nach dem Aufziehen neuer Saiten).
Manuelles Stimmen
1.Drücken Sie die TUNER-Taste.
Das Gerät wechselt in den Tuner-Modus, und die TUNER-Taste leuchtet. Wenn das Gerät im Tuner-Modus ist, erfolgt keine Tonausgabe aus den Lautsprechern oder der Buchse REC OUT/ PHONES.
2.Wählen Sie mit dem
Typ-Regler die zu stimmende Saite aus.
|
|
|
|
|
|
|
|
|
|
|
|
|
|
|
|
|
|
|
|
|
|
|
|
|
|
|
|
|
|
|
|
|
|
|
|
|
|
|
|
|
|
|
|
|
|
|
|
|
|
|
|
|
|
|
|
|
|
|
|
|
|
|
|
|
|
|
|
|
|
|
|
Regler- |
Saite (Notenname) |
||||||||||
stellung |
|
|
|
|
|
|
|
|
|
|
|
|
|
|
|
|
|
|
|
|
|
|
|
6E |
Offene sechste Saite (E) |
||||||||||
5A |
Offene fünfte Saite (A) |
||||||||||
4D |
Offene vierte Saite (D) |
||||||||||
3G |
Offene dritte Saite (G) |
||||||||||
2B |
Offene zweite Saite (deutsche Tonbezeichnung: H) |
||||||||||
1E |
Offene erste Saite (E) |
||||||||||
Ab |
Offene fünfte Saite (ein Halbton tiefer) (Ab) |
||||||||||
Abb |
Offene fünfte Saite (ein Ganzton tiefer) (G) |
||||||||||
3.Spielen Sie eine einzelne Note auf der offenen Saite, die Sie stimmen möchten.
Stimmen Sie die Saite, bis die grüne Anzeige aufleuchtet.
Zu tief |
|
|
|
|
|
Richtige |
|
|
|
|
|
|
|
Zu hoch |
||
|
|
Tonhöhe |
|
|
|
|
|
|
|
|||||||
|
|
|
|
|
|
|
|
|
|
|
|
|
|
|
||
|
|
|
|
|
|
|
|
|
|
|
|
|
|
|
|
|
|
|
|
|
|
|
|
|
|
|
|
|
|
|
|
|
|
|
|
|
|
|
|
|
|
|
|
|
|
|
|
|
|
|
|
|
|
|
|
|
|
|
|
|
|
|
|
|
|
|
|
|
|
|
|
|
|
|
|
|
|
|
|
|
|
|
|
|
Leuchtet rot |
Leuchtet grün |
Leuchtet rot |
*Die rote Anzeige leuchtet, wenn die Saite stark verstimmt ist.
4.Wenn Sie mit dem Stimmen fertig sind, drücken Sie noch einmal die TUNER-Taste.
*Die Bezugstonhöhe ist A = 440 Hz. Dies kann nicht geändert werden.
Chromatisches Stimmen |
|
|
|||
Wenn Sie die TUNER-Taste eine Sekunde lang oder länger drücken, |
|
||||
können Sie das Gerät auch als ein „chromatisches Stimmgerät“ |
|
||||
verwenden, das automatisch die Note bestimmt, die der gespielten am |
|
||||
nächsten ist. |
|
|
|
English |
|
Wie beim manuellen Stimmen können Sie beim chromatischen Stimmen auf |
|||||
|
|||||
der zu stimmenden Saite eine einzelne Note spielen. Stimmen Sie die Saite, |
|
||||
bis die grüne Anzeige aufleuchtet. |
|
|
|
||
Verwendung des RHYTHM |
|
||||
GUIDE |
|
|
|
Deutsch |
|
Der MICRO CUBE RX ist mit Rhythmus-Patterns mit Schlagzeug/ |
|||||
|
|||||
Percussion ausgestattet, die nützlich sind, wenn man allein üben möchte. |
|
||||
Zusätzlich zum Üben mit Ihrem gewünschten Groove können Sie ihn auch |
|
||||
als Metronom nutzen. |
|
|
|
|
|
|
|
|
|
Français |
|
1. Wählen Sie mit dem PATTERN-Regler das Rhythmus-Genre aus. |
|
||||
METRONOME |
ROCK1 |
ROCK2 |
BLUES |
|
|
COUNTRY |
R&B |
BALLAD |
JAZZ |
Italiano |
|
FUNK |
LATIN |
DANCE |
|
||
|
|
||||
2. Drücken Sie die START/STOP-Taste, um den RHYTHM GUIDE zu |
|
||||
starten. |
|
|
|
|
|
Wenn der RHYTHM GUIDE gestartet wurde, leuchtet die RHYTHM- |
|
||||
GUIDE-Anzeige. |
|
|
|
|
|
3. Stellen Sie mit dem Regler RHYTHM GUIDE VOLUME die |
Español |
||||
Jedes Genre enthält drei Typen von Rhythmusvariationen. Wenn Sie |
|||||
Lautstärke für den RHYTHM GUIDE ein. |
|
|
|||
4. Wählen Sie mit der VARIATION-Taste eine Rhythmusvariation aus. |
|
||||
die VARIATION-Taste drücken, durchläuft das Gerät die verfügbaren |
|
||||
Variationen; die VARIATION-Anzeige ist entweder unbeleuchtet, grün |
|
||||
oder rot, um den Wechsel der Variationen anzuzeigen. |
|
Português |
|||
5. Stellen Sie die Variation auf das Tempo ein, zu dem Sie spielen |
|||||
|
|||||
möchten. |
|
|
|
|
|
Drücken Sie zwei oder mehrere Male im gewünschten Tempo die |
|
||||
TAP-TEMPO-Taste, damit der RHYTHM GUIDE in dem betreffenden |
|
||||
Tempo spielt. |
|
|
|
|
|
|
|
|
|
Nederlands |
|
15
Mustereinstellungen
NOTIZ
Stellen Sie den VOLUME-Regler auf einen geeigneten Lautstärkepegel ein.
Alternative Metal
BOOST-Schalter: OFF
Space Clean
BOOST-Schalter: OFF
Der perfekte Sound für metallische Heavy-Riffs.
Wählen Sie den Verstärker R-FIER mit seinem hohen Gain, und erhöhen Sie dann mit dem Equalizer die tiefen und die hohen Frequenzen.
Bei gleichzeitiger Verwendung eines Humbucker in hinterer Position ergibt dies einen extremen Verzerrungseffekt.
Außerdem können Sie ein langes Delay hinzufügen, um diesen Klang als Lead-Sound mit hervorragendem Sustain zu verwenden.
Mit einem kurzen Delay erzeugen Sie einen gedoppelten Sound, so als würden zwei Gitarristen gleichzeitig die gleiche Phrase spielen.
Dies ist ein transparenter Sound mit räumlichen Effekten.
Wählen Sie den Verstärker JC CLEAN, ein Modell des Roland JC-120, und fügen Sie dann Chorus und ein langes Delay hinzu.
Diese Einstellung zusammen mit einer Gitarre mit Single Coils ergibt schön klingende Arpeggien und Akkordschläge.
Je nach der gespielten Phrase kann es effektiv sein, die Verzögerungszeit des Delay-Sounds etwas langsamer einzustellen als das Tempo der Phrase.
Classic Rock
BOOST-Schalter:
OFF
Tube Crunch
BOOST-Schalter: OFF
Dies ist ein Rock-Sound im Stil der 70er Jahre.
Mit hoch eingestelltem Gain sorgt er bei allen Riffs und Soli für einen kraftvollen Rock-Sound.
Ein kraftvoller unterer Frequenzbereich zeichnet beim Original-Verstärker den von den Gehäuseoberflächen abgegebenen Sound aus. Sie können also die Equalizer-Regler hochdrehen, vor allem den BASS-Regler, um einen Sound mit sattem Punch zu erzeugen.
Mit heruntergeregeltem GAIN kann man außerdem hervorragend einen scharfen Crunch-Sound erzeugen.
Dieser Sound bietet eine gute Unterstützung für Blues.
Drehen Sie den BASS-Regler ein wenig herunter und den GAIN-Regler hoch, um einen geschmeidigen Crunch-Sound zu erzielen.
Dieser entsteht dadurch, dass der vom Equalizer selektiv verstärkte Sound durch den GAIN-Regler verzerrt wird.
Außerdem können Sie einen scharfen Crunch-Sound erzielen, indem Sie die hohen Frequenzen anheben oder die mittleren absenken.
16
 Loading...