


Color CAMM PRO PC-60
APPLICATION SOFTWARE GUIDE
CONTENTS
 Setting & Functions of Windows Driver
 How to Print from Adobe Illurstrator 7.01 (Basic Operation)
 How to Print from CorelDRAW 7 (Basic Operation)
 How to Print Tile Page from Illustrator 7.01 (Advanced Operation)
 How to Print Tile Page from CorelDRAW 7 (Advanced Operation)
 How to Print Tile Page from Illustrator 8.0
 Special Color (Red, Blue and White)
  What to do if . . . .

SETTINGS & FUNCTIONS OF WINDOWS DRIVER
Roland ColorCAMM PC-60 Properties (Size)
1
4
2
3 |
5 |
1 Sheet Size
Size of the sheet which will be loaded on the PC-60 can be selected.
Sheet Size |
Width x Length (mm) |
Printing Area (mm) |
|
A4 |
210 x 297 |
173.3 x 176.1 |
|
A3 |
297 x 420 |
260.0 x 298.0 |
|
ANSI A |
215.9 x 279.4 |
178.8 x 157.1 |
|
ANSI B |
279.4 x 431.8 |
243.8 x 308.8 |
|
12inch x 33inch |
304.8 x 838.2 |
268.2 x 715.2 |
|
16inch x 33inch |
406.4 x 838.2 |
368.4 x 715.2 |
|
24inch x 33inch |
609.6 x 838.2 |
571.6 x 715.2 |
|
User Size |
50.8 x 128.0 ( MIN ) |
12.8 x 5.0 |
|
|
609.6 x 1386.5 ( 600dpi, MAX ) |
571.6 x 1263.5 |
|
|
609.6 x 2773.0 ( 300dpi, MAX ) |
571.6 x 2650.0 |
|
|
609.6 x 5546.0 ( 150dpi, MAX ) |
571.6 x 5423.0 |
|
Sometimes, it is impossible to print in a full length depending on the software you use.
Software |
Resolution |
Length ( Max ) |
|
Illustrator7 |
600dpi |
692.5mm |
|
|
300dpi |
1385mm |
|
|
150dpi |
2770mm |
|
CorelDRAW7 |
600dpi |
1263.5mm |
|
|
300dpi |
2650mm |
|
|
150dpi |
3276.7mm |
|
2 User Size
 55mm
55mm
Size of the sheet can be entered manually by selecting the [User Size]. Unit can be selected from [Millimeters] and [Inches].
[Width] is for setting the size of the carriage moving direction and [Length] is for the
size of the media feeding direction.
 68mm
68mm
When media size is entered, [Plot Size] (= printing area - media size which has the
margin removed.) will be indicated at the right size.
21mm 17mm
The range which can be entered as [User Size] is 50.8mm ~ 609.6mm for [Width] and 128mm ~ 1386.5mm for [Length] with a resolution of 600dpi. Range which can be entered for [Length] changes with the resolution being selected. 2773.0mm for 300dpi and 5546.0mm for 150dpi.
3 Resolution
Resolution for the Windows Driver to generae printing data can be selected. Time for the computer to process the data can be shortened by selecting lower resolution. If the speed is more importantn printing quality, please select the lower resolution.
dpi stands for dots per inch and describes the number of dots which can be printed in 1 inch (25.4mm). Generally, the higher the resolution is, the better the printing quality will be.
4 Rotate
Direction of the image to be printed on the media can be changed. This function is used when printing a wide image or depending on how the media is loaded on the PC-60.
When using [Rotate] function with CorelDRAW 7 and Illustrator 7.01, correct sheet size can not be reflected to the application side or specific characters can not be printed.
It is recommended to rotate the image at the application software side when the printing image is more than the width of PC-60 (Plot Size 571.6mm), instead of using the [ROTATE] function in the Windows Driver.
5 Version of Window Driver
Version and copyright will be displayed. This application guide explains the contents of Windows Driver ver.1.9 and above. If you would like to have the latest version, please download it from our web site http://www.rolanddga.com/
Roland ColorCAMM PC-60 Properties (Size)
1
2
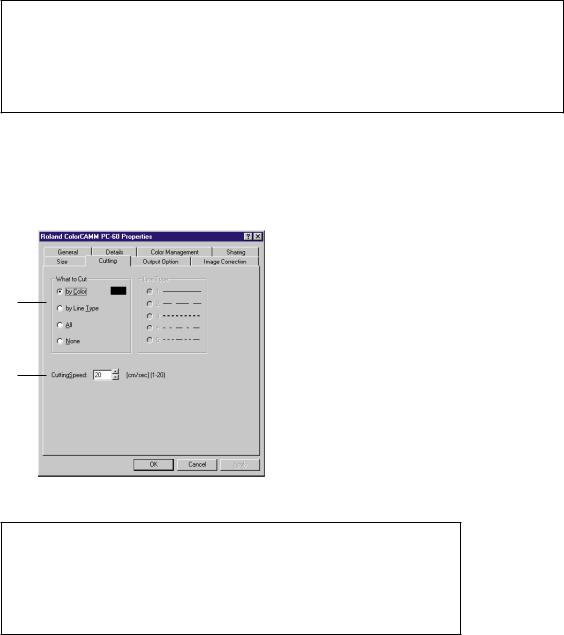
Cuttinglinecanbeselectedandcuttingspeedcanbeset.
Bitmapdatawillbeprintedinsteadofbeingcut. Pleasecreatethecuttinglineinvectordata.
How to make vector data with each application software.
• CorelDRAW 7
Select the line width to be minimum 0.001mm from the outline pen tool.
• Illustrator 7.01
Select the line width to be 0pt.
* Bitmap data and Vector data
Bitmap data is a type of file which describes the image (characters and figures) in dots. It is also called raster data. Generlly, , the paint type application software describes images in bitmap data. Vector data is a type of file which describes the image (characters and figures) as line. Generall, the draw type application software describes images in vector data.
1 How to select cutting
• By Color
Only the vector data pointed out by specific color can be cut.
Similar colors won’t be cut. Only colors matched with the numbers selected in R, G and B will be cut. Other colors will be printed.
When using CorelDRAW 7 or Illustrator 7.01 for cutting, match the color with the color you used for creating the vector data (mimum line width) in the application software side in this menu.
• By Line Type
Cutting line can be selected by distinguishing the line type of vector data.
Only the lines on the application software side which match the line type selected at the Window Driver side will be cut. Other vector data will be printed.
Line type can be selected from 5 lines.
• All
All the vector data will be cut. Only the bitmap data will be printed.
• None
All data, either the vector or the bitmap, will be printed.
2 Cutting Speed
Speed for cutting can be set. Cutting speed should be changed depending on the type of media and the cutting pressure. If the cutting speed is too fast, there will be some portions remaining uncut. If the cutting speed is too slow, it takes more time for completing the cutting. Determine the best cutting speed.
If there are portions remaining uncut, descrease the cutting speed or increase the cutting pressure. If the knife cuts through the backing, decrease the cutting pressure.

Roland ColorCAMM PC-60 Properties (Output Option)
1 |
|
|
|
3 |
|
|
|
|
|||
2 |
|
|
|||
|
|||||
|
|
|
|
4 |
|
|
|
|
|
||
|
|
|
|||
1 Output Data
• When only selecting [Printing]
Only the printing data will be sent to PC-60. Cutting line set in the Cutting Tab won’t be sent.
• When only selecting [Cutting]
Only the cutting data will be sent to PC-60. Other data won’t be sent.
• When selecting both [Printing] and [Cutting]
All data, whether printing or cutting data, will be sent to PC-60.
• When selecting [FormFeed]
New origin will be set automatically after finishing printing and cutting by feeding out the sheet when selecting [FormFeed].
Feed rate is the same as the length of the Plot Area set in Size Tab.
Sheet Size |
Feeding Rate |
A4 |
174mm |
A3 |
297mm |
ANSI A |
156.4mm |
ANSI B |
308.8mm |
12inch x 33inch |
715.2mm |
16inch x 33inch |
715.2mm |
24inch x 33inch |
715.2mm |
User Size |
Length of Printing Area |
When [FormFeed] is selected while selecting Piece as sheet type, PC-60 will indicate to set the new sheet after receiving new data. PC-60 will not continue printing until the new sheet is being set.

2 Process
PC-60 prints in full color using the process color. Do not select any of them when printing in Special Color.
• Y.M.C.K
PC-60 will print in order of Yellow --> Magenta --> Cyan --> Black. Printing result should be better by selecting this option when printing image with red and green with resin ribbon.
When selecting this option, please do not install any other ribbon cartridges than Cyan, Magenta, Yellow and Black.
• C.M.Y.K
PC-60 will print in order of Cyan --> Magenta --> Yellow --> Black. Select this option when using wax ribbon. And also, printing result should be better by selecting this option when printing image with blue and gray with resin ribbon.
When selecting this option, please do not install any other ribbon cartridges than Cyan, Magenta, Yellow and Black.
• Y.M.C
PC-60 will print in order of Yellow --> Magenta --> Cyan. Black will be expressed by overlapping the 3 colors. It is enable when [PhotoColor] in UCR is selected.
• C.M.Y
PC-60 will print in order of Cyan --> Magenta --> Yellow. Black will be expressed by overlapping the 3 colors. It is enable when [PhotoColor] in UCR is selected.
How to check the color difference with each printing method.
Impression of the printing results change depending on how the color is composed, combination of colors, position and density. To check the printing result in each printing method (Y.M.C.K or C.M.Y.K and Y.M.C or C.M.Y), please try the several settings.
• Gray Scale
When selecting Gray Scale, data will be created in gray scale by expressing luminance of colors in gradation. Color data will be removed.
By using this function, Special Colors can be used instead of Black.
Select the Special Color liked to be used. Only 1 color can be selected. If the Special Color is not selected, PC60 will print in Black.
• BackPrint
Left and right side of the image will be reversed and printing order in colors will also be reversed. This function should be used to show the printing image from the back side of the sheet by printing it on the transparent sheet. When selecting this function, Gold and Silver can not be used.
3 Special
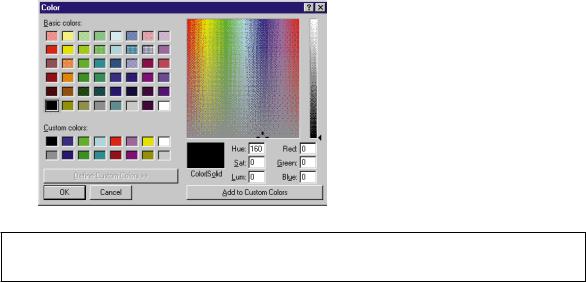
PC-60 will print the specific color of the image with Special Color. Set the color of the image to have relation with the ink ribbon. For example, it will be possible to print the green color in the image with gold color, or yellow color in the image with white color. When selecting Special Color, dialog box for setting the colors will be displayed.
The color of the image set perfectly with RGB in this dialog box will be printed using the Special Color. Make sure to install the ribbon cartridge selected with Special Color.

4 UCR
• PhotoColor
Select this function when printing photo realistic image. When printing Black, it adjusts the ratio of the black printed with a combination of Magenta, Cyan and Yellow and the Black ribbon.
• SpotColor
Select this function when printing Poster Images and Illustrations. Black and gray will be printed only with Black ribbon.
• Trapping
This function will be enable when selecting Spot Color. When selecting this function PC-60 will print Magenta and Cyan under the Black to adjust the height difference in colors to prevent the white spots from appearing.
Roland ColorCAMM PC-60 Properties (Image Correction)
1
1 Correction Value
• Brightness
Brightness of the image can be adjusted. Image will be brighter when the value is increased. Default is 0.
• Contrast
Contrast of the image can be adjusted. Contrast will be stronger when the value is increased. Default is 0.
• Gamma
Gamma of the image can be adjusted. Default is 1.0.
• Default
All the correction will be set back to the default.
• Image/Graph
Affection of the image correction can be displayed either by image or graph.
Please perform the color correction either from the Windows Driver or application software. When performing it on both sides, you might not have the color you like even you correct it for many times because the standard of color will be missed.
There are more than million colors which human eye can recognize.
The color which human eye can recognize can be expressed in Color Monitor (RGB) or Process Color (CMYK). The color expressed in Color Monitor doesn’t match perfectly with the color expressed in Process Color. There are some colors which can be expressed only in Color Monitor or Process Color.
Therefore, there are some colors displayed in Color Monitor which can not be printed in CMYK.
Based on the fact that the expression of color is different, it is necessary to select the suitable color in the application side.
 Loading...