


Operator’s Manual
RM1015SPS
Telescoping Electric
Chain Saw/Pole Saw
TABLE OF CONTENTS |
|
Service Information................................................................................................................................. |
1 |
Safety Information.................................................................................................................................. |
1 |
Chain Saw Terms and Definitions........................................................................................................... |
7 |
Know Your Unit....................................................................................................................................... |
3 |
Assembly Instructions............................................................................................................................ |
3 |
Starting and Stopping Instructions......................................................................................................... |
4 |
Operating Instructions............................................................................................................................ |
4 |
Maintenance and Repair instructions..................................................................................................... |
5 |
Troubleshooting...................................................................................................................................... |
7 |
Cleaning and Storage............................................................................................................................. |
7 |
Repair Service........................................................................................................................................ |
7 |
Repair Service........................................................................................................................................ |
7 |
Warranty................................................................................................................................................. |
8 |
All information, illustrations and specifications in this manual are based on the latest product information available at the time of printing. We reserve the right to make changes at any time without notice.
Copyright© 2011 MTD SOUTHWEST INC, All Rights Reserved.
• SAVE THESE INSTRUCTIONS •
SERVICE INFORMATION
DO NOT RETURN THIS UNIT TO THE RETAILER. PROOF OF PURCHASE WILL BE REQUIRED FOR WARRANTY SERVICE.
For assistance regarding the assembly, controls, operation or maintenance of the unit, please call the Customer Support Department: 1-866-206-2707 (U.S.) or 1-877-696-5533 (Canada)
Additional information about the unit can be found on our web site: www.remingtonpowertools.com
Please call the Customer Support Department for replacement parts. When servicing, use only identical replacement parts.
SAFETY INFORMATION
• SAFETY ALERT SYMBOLS •
Safety alert symbols are used to draw your attention to possible dangers. These symbols, and their explanations, deserve your careful attention and understanding. The safety warnings do not by themselves eliminate any danger. The instructions or warnings they give are not substitutes for proper accident prevention measures. These safety instructions are not meant to cover every
possible condition that may occur. If questions arise, please call the Customer Support Department at 1-866-206-2707 (U.S.) or 1-877-696-5533 (Canada).
SYMBOL |
MEANING |
|
|
|
DANGER:Signals an EXTREME hazard. Failure to obey a safety |
|
DANGER signal WILL result in serious injury or death to yourself or to others. |
|
|
|
WARNING:Signals a SERIOUS hazard. Failure to obey a safety |
|
WARNING signal CAN result in serious injury to yourself or to others. |
|
|
|
CAUTION:Signals a MODERATE hazard. Failure to obey a safety |
|
CAUTION signal MAY result in property damage or injury to yourself or to others. |
|
|
IMPORTANT! Signals special mechanical information.
NOTE: Signals additional important general information.
769-07211 P00
SAFETY INFORMATION
• READ ALL THE INSTRUCTIONS BEFORE
YOU USE THE CHAIN SAW •
• IMPORTANT SAFETY INSTRUCTIONS •
WARNING:When using the electric chain saw there are basic safety precautions that should always be followed to reduce the risk of fire, electric shock and personal bodily injury. These safety precautions are listed below and should be read before you use the chain saw or telescoping pole saw.
WARNING:Make sure that you read and understand all the Safety Information Instructions before you attempt to assemble, operate or maintain the unit. Improper use of this chain saw can cause severe injury or death. This can be caused by fire, electric shock, bodily contact with the moving chain or falling wood.
WARNING:Please read the entire operator’s manual carefully before attempting to assemble, operate or maintain the unit. Follow all safety instructions. Failure to do so can result in property damage or serious injury to yourself and/or others.
CALIFORNIA PROPOSITION 65
WARNING:Battery posts, terminals and certain finished components contain lead, lead compounds and chemicals known to the State of California to cause cancer and birth defects or other reproductive harm. Wash hands after handling.
SAFETY BASICS
•Be thoroughly familiar with the controls and the proper use of the unit. Know how to stop the unit and disengage the controls quickly.
•Stay alert! Do not operate the unit when tired, ill or under the influence of alcohol, drugs or medication.
•Never allow children to operate the unit. Never allow adults to operate the unit without proper instruction.
•Do not allow the unit to be used as a toy.
•Make sure that all guards and safety attachments are properly installed before operating the unit.
•Keep these instructions. Refer to them often and use them to instruct other users. If loaning someone this unit, also loan them these instructions.
PRELIMINARY SAFETY PRECAUTIONS
•DO NOT rely exclusively upon the safety devices built into the unit.
•Keep bystanders, especially children and pets, at least 50 feet (15 m) away. If anyone enters the work area, stop the unit!
•Keep the work area clean. Cluttered areas invite injuries. Do not start cutting until the work area is clear and free from obstructions, there is secure footing and a planned retreat path from falling branches.
•Always wear appropriate eye and ear protection when operating this unit. Wear safety goggles, or safety glasses with side shields, that are marked as meeting ANSI Z87.1-1989 standards. Failure to do so could result in serious eye injury caused by thrown or falling objects. If the operation is dusty, wear a face mask or dust mask. When operating the unit over the head, use a hardhat or other type of safety helmet.
•Dress appropriately, wear heavy, snug-fitting clothes (long pants and a long sleeve shirt), non-slip protective gloves and steel-toed safety boots. Do not wear loose clothing, jewelry, short pants, sandals or go barefoot. Secure hair above shoulder level to prevent entanglement in moving parts.
•Only use the unit in daylight or good artificial light.
•Only use the unit for the purpose intended.
DANGER:Kickback may occur when the nose or tip of the guide bar touches an object, or when the wood closes in and pinches the saw chain in the cut. In some cases, tip contact may cause a lightening-fast reverse action, kicking the guide bar rapidly back towards the operator. Pinching the saw chain along the top of the guide bar may push the guide bar rapidly back towards the operator. Either of these reactions may cause a loss of control over the saw, which could result in serious injury to the user. Contact with foreign objects within the wood can also induce a loss of chain saw control.
•Rotational Kickback can happen when the upper tip of the guide bar contacts an object while the chain is moving (Fig. 1 ). This can cause the chain to dig into the object and momentarily stop moving. The guide bar is then kicked up and back toward the operator in a lightning-fast reverse reaction.
•Pinch Kickback can happen when the wood on either side of a cut closes in and pinches the moving saw chain along the top of the guide bar. This can cause the chain to instantly stop. The chain force is then reversed, causing the saw to move in the opposite direction, sending the saw straight back toward the operator.
•Pull-In can happen when the moving chain on the bottom of the guide bar hits a foreign object inside the wood. This can cause the chain to suddenly stop. The saw is then pulled forward and away from the operator, which could potentially result in the loss of control of the saw.
KICKBACK SAFETY PRECAUTIONS
•DO NOT over reach.
•DO NOT make cuts with the tip of the guide bar.
•DO NOT let the tip of the guide bar contact any object, such as a log, branch, ground or other obstruction. Remove or avoid any obstructions that might impact the tip of the guide bar while cutting.
•DO NOT cut more than one branch at a time.
Front 
Handle
Rear
Handle
To avoid Kickback: Use both hands to grip Chain Saw while saw is running. Use a firm grip
with thumbs and fingers wrapped around Front and Rear Handles.
Do not allow the Guide Bar Nose to touch anything while the chain saw is moving!
Stand alongside and not directly behind your cutting work.
KIckback Danger! -
Only cut one log at a time. Never try cutting through 2 logs or branches at the same time.
Guide
Bar
Kickback Danger!
Do not allow the
Guide Bar Nose to Guide Bar Nose touch anything while
the chain saw is moving!
Kickback Danger! - Do not bury the Guide Bar Nose into the wood.
Do not try to plunge cut or bore into the wood using the Guide Bar Nose.
Fig. 1 Proper Use of The Chain Saw to avoid Kickback
11/11

SAFETY INFORMATION
•DO NOT twist the saw when removing the guide bar from an undercut.
•Never start the saw when the guide bar is inside an existing cut. Be extremely careful when reentering a cut.
•Grip the unit firmly with both hands when the motor is running. Keep the right hand on the handle and the left hand on the pole shaft at a position that provides adequate support. Use a firm grip with thumbs and fingers encircling the handle and pole shaft. Stand slightly to the left of the
unit to avoid being in the direct line of the saw chain. Follow all instructions in the Operating Instructions section.
•Keep proper footing and balance at all times.
•When starting the unit, always allow the motor to achieve full speed before beginning a cut. Fully squeeze the switch trigger and maintain a steady cutting speed. Slower speeds increase the chance of kickback. Keep the saw housing pressed firmly against the wood.
•Watch for shifting logs, branches, or other objects that might pinch, or fall onto, the chain while cutting.
•Use only original manufacturer replacement parts and accessories, which are designed specifically to enhance the performance and maximize the safe operation of the product. Failure to do so may cause poor performance and possible injury. Use only the chain and guide bar supplied with this product.
•Be sure to secure the unit while transporting.
•Always use the scabbard on the bar and chain during transportation and storage.
•When not in use, store the unit in a locked-up and dry, or high and dry, place to prevent unauthorized use or damage. Keep out of the reach of children.
•Keep the handle and grip dry, clean and free from debris, oil and grease. Clean the unit after each use. Never douse or squirt the unit with water or any other liquid. Do not use solvents or strong detergents.
•If dropped in water, do not use the unit.
•If using wedges, only use wedges made of plastic or wood. Do not use metal to hold a cut open.
•Follow the manufacturer’s sharpening and maintenance instructions for the saw chain.
•Use only replacement bars and chains specified by the manufacturer or the equivalent.
•Use devices, such as low-kickback chains, guide bar nose guards, chain brakes and special guide bars, which reduce the risks associated with kickback. There are no other replacement components for achieving kickback protection in accordance with CSA Z62.3.
•Low-kickback saw chain is chain that has met the kickback performance requirements of ANSI B175.1-1991 and is in accordance with CSA Z62.3. Do not use other replacement chain unless it has met these requirements for the specific model. As saw chains are sharpened, some of the low kickback qualities are lost and extra caution should be used. This product has no serviceable parts except the guide bar and chain. However, when they are beyond repair you can order
replacements using these part numbers: 10” Guide Bar 795-00112 Chain 713-04088
OTHER SAFETY PRECAUTIONS
•DO NOT operate the unit with one hand! Serious injury to the operator, helpers or bystanders may result from one-handed operation. This unit is intended for two-handed use.
•DO NOT handle the unit with wet hands.
•DO NOT operate a pole saw in a tree or on a ladder unless specifically trained to do so.
•DO NOT expose the unit to rain. Do not use the unit in damp or wet locations or conditions.
•DO NOT operate the unit on wet surfaces.
•DO NOT use the unit in the presence of flammable liquids or gases.
•DO NOT operate a unit that is damaged, improperly adjusted or not completely and securely assembled. Be sure that the unit stops when the trigger is released. Do not use the unit if the switch does not turn the unit on and off properly or if the switch lock does not work.
•DO NOT attempt operations beyond the operator’s capacity or experience.
•DO NOT cut near electrical cables or power lines.
•DO NOT force the pole saw, especially near the end of a cut. It will do a better, safer job when used at the intended rate.
•To reduce the risk of electric shock, avoid body contact with grounded conductors, such as metal pipes or wire fences.
•To reduce the risk of electrical shock, this unit has a polarized plug (one blade is wider than the other) and will require the use of a polarized extension cord. The power cord plug will fit into
a polarized extension cord only one way. If the plug does not fit fully into the extension cord, reverse the plug. If the plug still does not fit, obtain another polarized extension cord. A polarized extension cord will require the use of a polarized wall outlet. This plug will fit into the polarized wall outlet only one way. If the plug does not fit fully into the wall outlet, reverse the plug. If the plug still does not fit, contact a qualified electrician to install the proper wall outlet.
•Keep all body parts away from the saw chain when the motor is operating. Before starting the saw, make sure the saw chain is not contacting anything.
•Always stop the motor when operation is delayed, before setting down the unit or when walking from one location to another. Make sure the chain comes to a complete stop.
•To avoid accidental starting, never carry the unit with fingers on the switch trigger.
•Always carry the pole saw with your fingers off the switch trigger and the guide bar and saw chain sheathed in the scabbard and positioned to the rear.
•Always make sure the lock-off button is in the locked or OFF position.
•Cut wood only. Do not use the pole saw for purposes for which it was not intended.
•When cutting a limb that is under tension, be alert for spring back, which may cause the operator to be struck when the tension of the wood fibers is released.
•Use extreme caution when cutting small-sized brush and saplings, as slender material may catch the saw chain and be whipped toward the operator or pull the operator off balance.
•This unit is intended for infrequent use by homeowners, cottagers and campers, and for general applications such as limbing, pruning, etc. It is not intended for prolonged use. If the intended use involves prolonged periods of operation, this may cause circulatory problems in the user’s hands due to vibration. It may be appropriate to use a saw having an anti-vibration feature.
MAINTENANCE AND STORAGE SAFETY
•DO NOT perform maintenance procedures other than those described in this manual. Do not attempt to repair; there are no user serviceable parts inside.
•Follow all maintenance instructions in this manual.
•Before inspecting, servicing, cleaning, storing, transporting or replacing any parts on the unit:
1.Make sure all moving parts have stopped.
2.Allow the unit to cool.
3.Make sure the lock-off button is in the locked or OFF position.
•Never remove, modify or make inoperative any safety device furnished with the unit.
•For safer, more effective performance, make sure the bar and chain are properly cleaned, lubricated, tightened and sharpened. Check the bar and chain at frequent intervals for proper adjustment.
•Frequently inspect the unit for damage. Before further use, any damaged part should be carefully checked to determine that it will operate properly and perform its intended function. Check for alignment of moving parts, binding of moving parts, breakage of parts and any other conditions that may affect its operation. Damaged parts should be properly repaired or replaced.
• SAFETY AND INTERNATIONAL SYMBOLS •
This operator’s manual describes safety and international symbols and pictographs that may appear on this product. Read the operator’s manual for complete safety, assembly, operating, maintenance and repair information.
SYMBOL |
MEANING |
• SAFETY ALERT SYMBOL
Indicates danger, warning or caution. May be used in conjunction with other symbols or pictographs. yourself or to others.
• READ OPERATOR’S MANUAL
WARNING:Read the operator’s manual(s) and follow all warnings and safety instructions. Failure to do so can result in serious injury to the operator and/or bystanders.
• READ OPERATOR’S MANUAL
WARNING:Thrown objects and loud noise can cause severe eye injury and hearing loss. Wear eye protection meeting ANSI Z87.1-1989 standards and ear protection when operating this unit. Wear head protection when operating this unit; falling objects can cause severe head injury. Use a full face shield when needed.
• KEEP BYSTANDERS AWAY
WARNING:Keep all bystanders, especially children and pets, at least 50 feet (15 m) from the operating area. If anyone enters the work area, stop the unit!
• POWER LINES CAN CAUSE SEVERE INJURY
WARNING:Do not operate this unit near power lines. Contact with a power line may cause serious injury or damage to the unit. Maintain a clearance of at least 50 feet (15 m) between the pole saw (including any branches it is contacting) and any electrical line.
• WEAR SAFETY GLOVES
Wear non-slip, heavy-duty protective gloves when handling the unit.
• WEAR SAFETY FOOTWEAR
Wear non-slip safety footwear when using this equipment.
• USE BOTH HANDS
Always use both hands while operating the pole saw. Never use only one hand to operate the unit.
• KICKBACK WARNING
Contact of the guide bar tip with any object should be avoided. Tip contact may cause the guide bar to move suddenly upward and backward, which may cause serious injury.
• DO NOT USE IN THE RAIN
WARNING:Avoid dangerous environments. Never operate your unit in the rain, or in damp or wet conditions. Moisture is a shock hazard.
CHAIN SAW TERMS AND DEFINITIONS
Bucking The process of cutting a felled tree or log into smaller lengths.
Cam Levered Collet The two collets are loosened to allow the inner pole to be extended to reach higher tree limbs. The collets are tightened to hold the pole in position.
Felling The process of cutting down a tree.
Felling Back Cut The final cut when felling a tree. Make this cut on the opposite side of the tree from the notching cut.
Front Handle This is located at the front of the chain saw body.
Front Hand Guard This is the shield between the front handle and the guide bar. It protects your left hand while using the chain saw.
Guide Bar The metal bar that extends from the chain saw body. The guide bar supports and guides the chain as it rotates.
Guide Bar Nose The tip or end of the guide bar.
Inner Pole The moveable section of tubing to which the chain saw is attached.
Kickback Quick backward and upward motion of the guide bar. Kickback may occur when the tip of the guide bar touches an object while the chain is moving. When this happens the guide bar will kick up and back towards the operator.
Limbing The process of cutting limbs from a felled tree.
Low-Kickback Chain Chain that reduces the chance of kickback as required by ANSI B175.1. Normal Cutting Position Stance used while making bucking and felling cuts.
Notching Cut Notch cut in tree that directs fall of tree. Oiler Control System for oiling guide bar and chain. Outer Pole Retains the movable inner pole.
Power Head Chain saw without the chain and guide bar attached.
Pushback (Kickback, Pinch) Rapid push back of chain saw. Push back may occur if the chain along the top of the guide bar is pinched, caught or makes contact with a foreign object.
Rear Handle Handle located at the rear of the chain saw body.
Reduced Kickback Guide Bar Guide bar that reduces the chance of kickback.
Replacement Chain Chain that complies with ANSI B175.1 when used with a specific saw. It may not meet ANSI requirements when used with other saws.
Saw Chain (Chain) The loop of chain holding the cutting teeth for cutting wood. The motor drives the chain as the the guide bar supports it.
Spiked Bumper (Spike) Pointed teeth at the front end of the saw body beside the guide bar. When felling or bucking a tree, keep the spiked bumper in contact with the wood as it helps to maintain the position of the saw.
Sprocket Toothed wheel that drives the chain.
Switch Device that completes or interrupts the electrical circuit of the chain saw motor.
Switch Linkage This device connects the switch to the trigger. It moves the switch when you squeeze the trigger.
Trigger Switch Lockout Device that reduces the risk of accidentally starting the chain saw.
Trigger Device that turns the chain saw on and off. Squeezing the trigger turns it on and releasing it turns the chain saw off.
Trimming (Pruning) Process of cutting limbs from a living tree.
Undercut An upward cut from underside of the log or limb. This is done while in normal cutting position and cutting with the top of the guide bar.
2

KNOW YOUR UNIT
Electric Power
Cord (Internal)
Locking
Notch
Locking
Groove
Outer Pole
Electric Power Cord (connects to Extension Cord)
APPLICATIONS
This unit may be used for the purposes listed below:
•Cutting small limbs.
•General tree pruning.
Clamping Levers (to adjust length of Pole)
Pole Bracket (attaches Pole to Chainsaw)
Front Hand Guard |
Guide Bar Nose |
Electric Power Plug (connects to Pole)
Front Handle |
Guide Bar |
|
|
Rear |
Saw Chain |
Handle |
|
Sprocket
Cover
Scabbard
Rear Hand
Guard
Oil Level
Sight Hole
Oil Cap/Squeeze Bulb
Handle |
|
Trigger Lockout |
Trigger |
|
Switch |
|
|
|
Lockout |
|
Spike |
|
Electric Power |
Motor Housing |
|
Receptacle |
|
|
(connects to |
Trigger |
Trigger |
Chainsaw) |
|
|
Switch |
|
|
|
Fig. 2 Remington RM1015SPS Telescoping Pole Assembly
Cam Levered
Collet
To adjust length of
Outer Pole - loosen Cam
Levered Collet and slide
Inner Pole forward
Inner
Pole
To adjust length of
Outer Pole - loosen Cam
Levered Collet and slide
Inner Pole forward
Outer Pole
Outer Pole
Locking
Groove
Fig. 3 Remington RM1015SPS Chainsaw (Right and Left Sides)
Cam Levered |
Pole Bracket holds Trigger |
Collet |
in the “ON” position |
|
Clamping Bolt |
|
Pole Bracket |
Inner
Pole
Rear Handle
Locking
Notch
Push firmly to ensure the Locking Notch sits fully inside the Locking Groove
Chainsaw
|
Lock Washer |
|
|
Handle |
|
Clamping |
Bracket |
|
Knob |
||
Bolt |
Tighten Knob 1 1/2 to 2 turns after it makes contact with Handle Bracket
Fig. 4B Assembly Instructions for connecting Telescoping Pole Assembly to Chain Saw
Fig. 4A Assembly Instructions for Remington RM1015SPS Pole Saw
Fig. 5 Assembled View of Remington RM1015SPS Pole Saw
ASSEMBLY INSTRUCTIONS
WARNING: Make sure the unit is disconnected from the power source before assembling, disassembling or adjusting any components.
WARNING: The cutting edges on the chain are very sharp so always wear protective gloves when handling it.
WARNING: Always unplug the Chain saw from the power source before adjusting the chain tension.
This unit requires assembly.
UNPACKING
•Carefully remove the product and any accessories from the box.
•Inspect the product carefully to make sure no breakage or damage occurred during shipping.
•Do not discard the packing material until you have carefully inspected and satisfactorily operated the product.
POLE SAW ASSEMBLY
The Remington Telescoping Pole Saw consists of a chain saw attached to a telescoping pole assembly with the following items:
•Handle Bracket (1)
•Knob (1)
•.250” Lock Washer (1)
If any parts are damaged or missing, please call 1-866-206-2707 (U.S.) or 1-877-696-5533 (Canada) for assistance.
Before operating either the Chain Saw or the Pole Saw, make certain that you read and understand
all important safety information. Your Remington Telescoping Pole Saw is designed as a dual purpose product. This means that when it is not attached to the Telescoping Pole Assembly, the electric Chain Saw can be used for pruning jobs near ground level. However, If you want to trim or prune taller trees the Chain Saw must be securely attached to the Telescoping Pole Assembly. Here is a safe and simple assembly process to follow:
1. Unfold the Telescoping Pole Assembly so that it lays flat as shown (Fig. 4A).
NOTE: DO NOT connect the pole saw to the power supply until it has been completely assembled.
2.Align both ends of the Telescoping Pole Assembly so that the Locking Notch can be inserted into the Locking Groove (Fig. 4B). The Pole Assembly is designed to be permanently fixed and can not to be disassembled later on.
3.Push firmly so that the Locking Notch sits fully inside the Locking Groove.
4.Set the Chain Saw flat on a table alongside the Pole Bracket.
5.Align the Pole Bracket inside the Rear Handle of the Chain Saw as shown. (Fig. 4B)
6.Gently press the Pole Bracket into this gap while holding the Trigger Lockout Switch. Make sure that the Pole Bracket sits securely beneath the Trigger. This is to make sure the Trigger is set to the “On” position when everything else is fully assembled.
7.Slide the Handle Bracket on to the Clamping Bolt as shown. (Fig. 4B)
8.Thread the Lock Washer and Knob onto the Clamping Bolt.
9.Turn and tighten the Knob one or two times to make full contact with the Handle Bracket. This fully secures the Telescoping Pole Assembly to the Chain Saw.
10.Insert Chain Saw Power Cord into the Pole Receptacle as shown. (Fig. 5)
SAFETY FEATURES
LOW KICKBACK SAW CHAIN helps significantly reduce kickback or the intensity of kickback, due to its specially designed depth gauges and guard links.
3
STARTING AND STOPPING INSTRUCTIONS |
|
OPERATING INSTRUCTIONS |
|
|
|
The Remington RM1015SPS Pole Saw is safe and easy to use. However, there are a few simple steps that must be taken before it can be connected to the electric power supply and switched on.
First of all, the proper extension cord must be used to supply sufficient power to the chainsaw. Only use extension cords that are marked for outdoor use. The cords must be marked with the suffix W or W-A. For example, SJTW-A or SJTW.
The cord must also be heavy enough to carry the current needed to power the chainsaw. An undersized cord will cause the voltage to drop. This means that the chainsaw will lose power and may overheat causing potential damage to the motor. To ensure you have the proper extension cord follow the cord size requirements listed in Fig. 6.
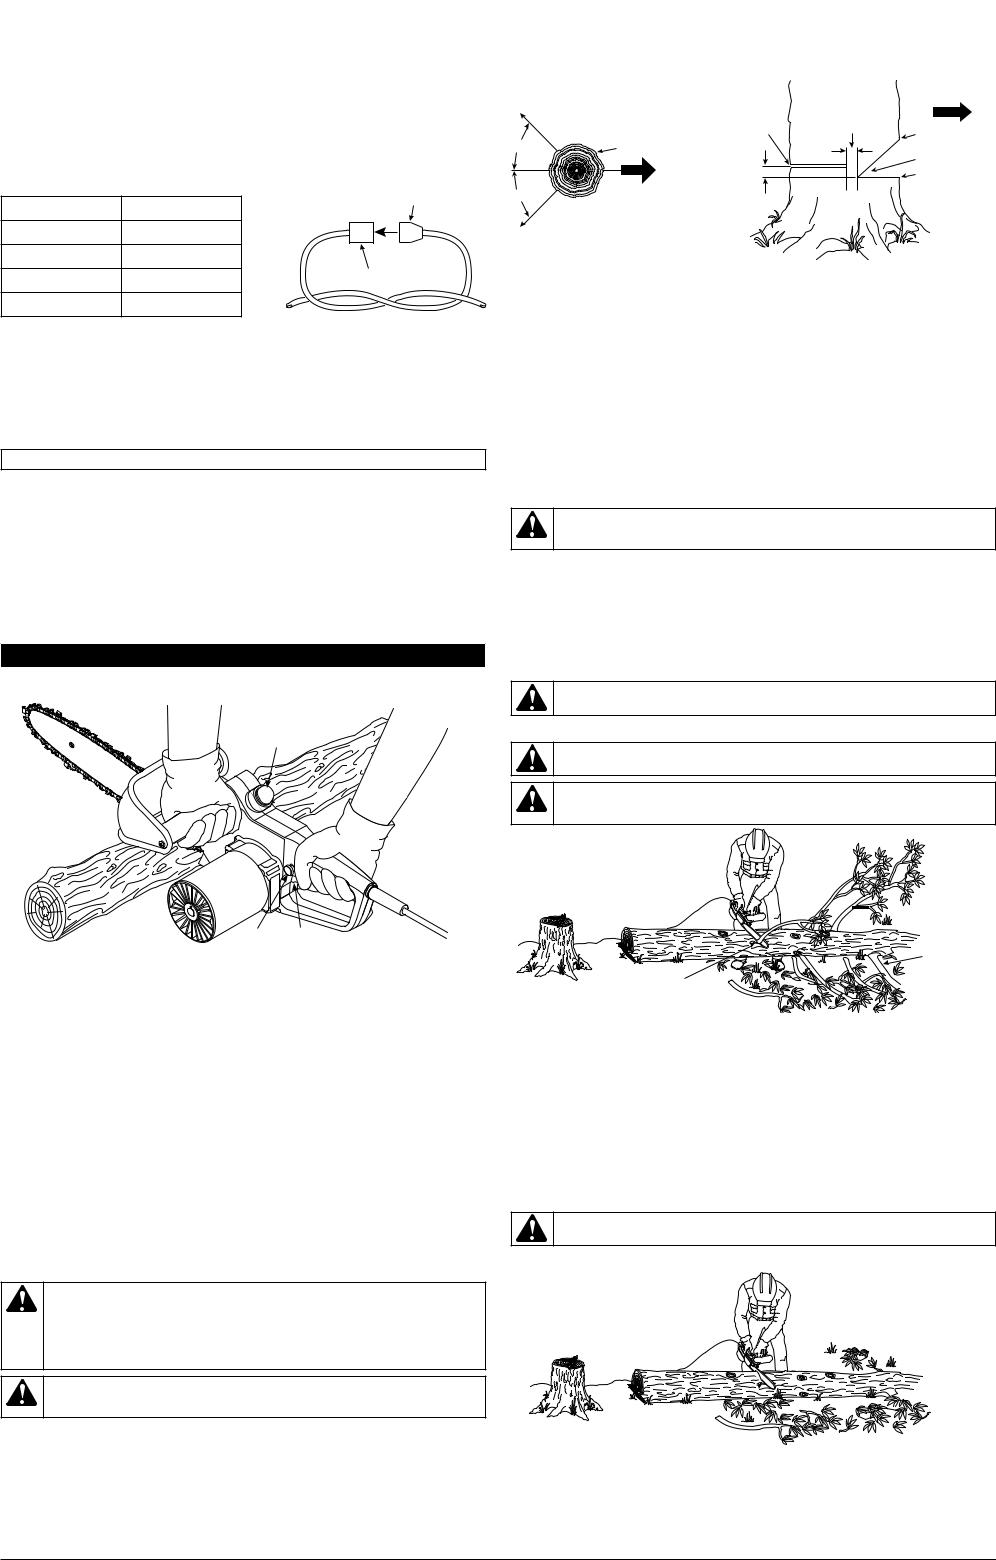
While using the chainsaw it is very important to keep the power cord away from the cutting area. Make sure that the cord does not catch on any branches or logs. Inspect the cord often and replace it if it is damaged. The power cord may also come undone when you are using the chainsaw. To prevent this you can make a safety knot with the two cords as shown in Fig. 7
Cord Length |
AWG Cord Size |
Chain Saw Power Cord |
|
||
25 feet |
16 AWG |
|
50 feet |
16 AWG |
|
100 feet |
16 AWG |
Extension Cord |
|
||
150 feet |
14 AWG |
|
Fig. 6 Correct Length and Strength of Power Extension Cords (left) Fig. 7 Power Cord Safety Knot (right)
IMPORTANT: FILL THE BAR LUBE RESERVOIR BEFORE STARTING THE CHAINSAW
It is necessary, for the safe and efficient use of the Chainsaw, that sufficient lubrication is applied before and during its operation. However, for safety reasons, the Remington RM1015SPS Chainsaw comes from the factory with the Bar Lube Reservoir empty of oil. To fill this reservoir follow these instructions:
1.Remove the Oil Cap/Squeeze Bulb.
2.Fill the Oil Tank (Bar Lube Reservoir) with SAE#30 motor oil.
NOTE: For temperatures below 30°F, use SAE#10 oil. For temperatures above 75°F, use SAE#40 oil.
IMPORTANT: Do not use “bar and chain” oil, as it is too thick and may not oil properly.
3.Replace the Oil Cap at once and tighten firmly to make a good seal. This will minimize any oil seepage from the tank.
4.Wipe off any excess oil.
NOTE: It is normal for oil to seep through when chain saw is not in use To prevent seepage empty the oil tank after every use.
IMPORTANT: OIL THE CHAINSAW BEFORE STARTING IT
Before using the chainsaw always check the oil level. Do this by looking through the Oil Level Sight Hole on the left side of the chainsaw. It’s also advisable to check the oil level as you continue cutting and oil the chain before each new cut. However, do not attempt to oil the chain while the chainsaw is operating. To oil the chain simply press the rubber squeeze bulb. This will feed oil on to the guide bar and saw chain.
OPERATING INSTRUCTIONS
CUTTING WITH THE CHAIN SAW
Before making a cut, oil the chain by pressing the squeeze bulb
When starting a cut, place the moving chainsaw against the wood
Trigger Trigger
Lockout Switch
Switch
Fig. 8 Safe Procedure for Cutting a Log with the Chain saw
Firmly grip the front handle with your left hand and with your thumb underneath it
Firmly grip the rear handle with your right hand
1.Connect the chain saw plug to an extension cord connected to the electric power supply.
2.Make sure that the section of log to be cut is not lying on the ground. This is very important for your safety as it will keep the chain from biting into the ground as it cuts through the log. Touching the ground with a moving chain will dull and damage the cutting teeth and may injure you.
3.Securely grip both handles of the chain saw with your thumbs and fingers. Use a firm grip with your left hand on the front handle with your thumb underneath. Use your right hand to firmly grip the rear handle (Fig. 8).
4.Make sure that your footing is firm and stand with your feet apart and your weight evenly balanced.
5.When you are ready to make a cut, press the trigger lockout switch in with your right thumb while also squeezing the trigger with your right hand fingers (Fig. 8). This will immediately switch the power of the chain saw on. Releasing the trigger switches it off.
6.Make sure the chain saw is running at full speed before starting a cut.
7.When starting a cut, place the moving chain saw against the wood (Fig. 8). Hold the chain saw firmly in place while cutting through the log. This will help to prevent a possible bouncing or skating, sideways movement of the log.
8.Guide the chain saw by applying light pressure as you cut. Do not force the saw as the motor may overload and burn out. It will do the job better and safer at the rate for which it was intended.
9.Remove the saw from the cut while the saw is still running at full speed. Stop the saw by releasing the trigger. Make sure that the chain has completely stopped before setting it down.
10.Practice using the chain saw until you can maintain a steady, even cutting rate.
FELLING A TREE (CUTTING DOWN A TREE)
WARNING: Avoid kickback. Kickback can result in sever injury or death. See Kickback on Fig. 1 to avoid risk of kickback.
Do not fell a tree without ample skill or expert help.
When felling a tree keep all children, animals and bystanders away from area.
If two or more persons perform bucking and felling operations at the same time provide ample distance between operations. Provide a distance of at least twice the height the tree being felled.
WARNING: Be very aware of your surroundings when felling a tree. Do not endanger any person, strike utility lines or cause any property damage. Contact the utility company at once If a tree strikes a utility line.
Felling is the process of cutting down a tree. Before you do so, make sure that your footing is firm and stand with your feet apart and your weight balanced evenly. To fell a tree follow these directions:
BEFORE FELLING A TREE
1.Before felling a tree it is advisable to inspect it. Make sure there are no dead limbs or branches as these may fall on you as you work. Study the natural lean of the tree, the location of larger branches and notice the wind direction. All these factors can help you to judge which way
the tree will fall.
2.Clear a work area around the tree.
3.Before felling the tree it is advisable to plan and clear a retreat path. Make the retreat path in the opposite direction of tree fall and at a 45° angle (Fig. 9).
4.Remove dirt, stones, loose bark, nails, staples and wire from any tree where you intend to make
felling cuts. This is to prevent any adverse contact between the chain saw teeth and any foreign matter.
5. Stay on the uphill side when felling a tree on a slope. The tree could roll or slide downhill after falling.
|
|
|
|
Direction of Fall |
|
Retreat |
3nd Cut - |
|
|
|
Felling |
|
Hinge |
|
|
Path |
|
||
|
|
Back Cut |
|
2nd Cut - |
45° |
Tree |
|
2" |
Upper Notch Cut |
|
Felling Notch |
|||
|
|
|
|
|
|
|
|
|
1st Cut - |
45° |
Direction |
|
|
Lower Notch Cut |
2" |
|
|
||
of Fall |
|
|
||
|
|
|
||
|
Retreat |
|
|
|
|
Path |
|
|
|
Fig. 9 Retreat Path from Falling Tree (left) Fig. 10 Cutting Sequence for Felling a Tree (right)
CUTTING SEQUENCE FOR FELLING A TREE - FELLING NOTCH
A properly placed felling notch will determine in which direction the tree will fall. Therefore, decide where you want the tree to land and place the felling notch on that side of the tree. To create a felling notch follow these directions:
1.Hold the chain saw so that the guide bar is horizontal and cut the lower notch as low to the ground as possible. Make this cut 1/3 the diameter of the tree trunk (Fig. 9).
NOTE: Always make this horizontal cut first. This is because when you make it the second cut the tree trunk can pinch the chain saw or the guide bar and cause machine damage or personal injury. Pinching is the term used when a chain saw becomes jammed while cutting into a log
2.Start the upper notch and make this cut the same distance above as it is deep. Example: the horizontal lower notch cut is 8” deep. Therefore, measure 8” above and cut downward at an angle of 45°. Continue this cut until it meets the horizontal cut (Fig. 10).
3.After you remove the wedge from the tree trunk a felling notch is created (Fig. 10).
CUTTING SEQUENCE FOR FELLING A TREE - FELLING BACK CUT
1.On the opposite side of the tree trunk begin making the felling back cut 2” higher than the first horizontal cut (Fig. 10).
2.As you continue to cut into the trunk the tree should begin to fall towards the felling notch.
WARNING: Do not cut all the way through the tree. Leave about 2” of the trunk diameter uncut directly behind the felling notch (Fig. 10). This uncut portion acts as a hinge and this keeps the tree from twisting and falling in the wrong direction.
3.As the tree begins to fall quickly do the following:
Remove the chain saw from inside the felling back cut and switch the chain saw off by releasing the trigger.
Put the chain saw down on the ground and exit the area along the retreat path.
NOTE: Wedges can be used to help you fell a tree safely and efficiently. For example, a wedge inserted into the felling cut can control the direction of the tree’s fall. A chain saw, trapped in a tree trunk that settled back, can be released by wedging open the cut. However, never use wedges made of steel as this could cause kickback and damage to the chain saw. Only use wedges made of wood, plastic or aluminum.
WARNING: Be alert for any limbs that may fall from overhead. Watch your footing when you exit the work area.
LIMBING A TREE - How to safely and efficiently remove the branches from a fallen tree
WARNING: Avoid kickback. Kickback can result in severe injury or death. See Kickback Fig. 1 to avoid risk of kickback.
WARNING: Use extreme caution when cutting a limb that is under tension. Be alert for wood that may spring back at you. This could happen during or after a cut is made and the limb could spring back, strike you and may cause severe injury or death.
Limbing is the process |
|
|
of removing the branches |
Make sure |
|
from a fallen tree |
||
|
your footing |
|
|
is firm |
|
Remove each |
|
|
limb with |
|
|
one cut |
|
|
|
Do not remove |
|
|
any limbs that |
|
To avoid pinching |
are supporting |
|
a larger limb |
||
start the cut on |
||
above them |
||
freely hanging limbs |
||
|
||
Fig. 11 Limbing the Branches from a Fallen Tree |
||
Limbing is the process of removing the branches from a fallen tree.
Before you start cutting with the chain saw, make sure that your footing is firm and stand with your feet apart and your weight balanced evenly. To safely and efficiently limb a tree follow these directions:
Do not remove any limbs that are supporting a larger limb above them. Doing so may cause the tree to shift its weight and fall towards you. Remove each limb with one cut (Fig. 11).
It is advised that you clear away the cut limbs to maintain a safe work area.
Make sure you start the cut where the limb will not pinch the saw during cutting. To avoid pinching, start the cut on freely hanging limbs.
On a limb under tension start the cut from underneath it.
If pinching occurs, immediately switch off the chain saw, lift the limb away and remove the chain saw.
BUCKING A LOG - How to safely and efficiently cut a felled tree into smaller sections
WARNING: Avoid kickback. Kickback can result in severe injury or death. See Kickback Fig. 1 to avoid risk of kickback.
How to Buck a Log when its Entire Length is Resting on the Ground
Bucking a log is the |
Do not allow the |
process of cutting |
moving chainsaw |
a felled log into |
to touch the |
smaller sections |
ground as this |
|
will dull the blade |
When cutting through  a log maintain control
by reducing pressure near the end of the cut
Make sure |
|
your footing |
Do not relax your grip |
is firm |
on the chainsaw |
|
handles |
Fig. 12 Bucking a Log when its Entire Length is Resting on the Ground
Bucking a log is the process of cutting up a felled tree into smaller sections.
Before you start cutting with the chain saw, make sure that your footing is firm and stand with your feet apart and your weight evenly balanced. To safely and efficiently buck a log follow these directions:
When ever possible raise the log or tree section off the ground. Do this by using limbs, logs, chocks, etc. When cutting through a log maintain control by reducing pressure near the end of the cut. Do not
4

OPERATING INSTRUCTIONS
allow the moving chain saw to touch the ground
When cutting through the log maintain control by reducing the cutting pressure as you near the end of a cut. Do not relax your grip on the chain saw handles. Do not allow the moving chain saw to touch the ground as this will dull the blade. Cut the log downwards from the top surface (Fig. 12).
After cutting through the log switch off the chain saw by releasing the trigger switch and remove the chain saw.
1.To extend the pole, loosen and turn the cam levered collet to its upright position (Fig. 16).
2.Slide the pole to the desired length.
3.To lock and secure the pole in place, return the cam levered collet to its flat position.
NOTE: For your own safety, it’s best to extend the pole to the minimum length required to reach the limb that is being cut. Otherwise you may lose your balance and the pole saw may fall.
How to Buck a Log when it is Supported on One End
WARNING: If the log is on a slope make sure that it will not roll by securing it. Do this by driving wooden stakes around the downhill side of the log. When cutting with the chain saw always stand on the uphill side in case the log rolls during or after cutting.
Never try cutting through two logs at the same time as this could increase the risk of kickback.
Never hold a log with your hand, leg or foot while cutting the log with the chain saw. Never allow another person to hold the log while you are cutting it.
Before moving from one work area to another always turn off and unplug the chain saw.
To extend the pole, |
|
loosen and turn the |
|
cam levered collet |
Slide the pole to |
to its upright position |
|
|
the desired length |
To lock and secure the pole in place, return the cam levered collet to its flat position
Use the top of the guide bar to make the first cut on the underside of the log
Fig. 16 How to Adjust the Length of the Pole Saw
Make the second cut
directly above the first CUTTING WITH THE POLE SAW and cut downwards to
meet the first cut
Doing this will keep the log from pinching the guide bar and chain
Fig. 13 Bucking a Log when it is Supported on One End
Use the top of the guide bar to make the first cut on the underside of the log (Fig. 13). Make this cut about 1/3 of the thickness of the log. Doing this will keep this section from splintering when completely cut.
Make the second cut directly above the first and cut downwards to meet the first cut. Doing this will keep the log from pinching the guide bar and chain.
How to Buck a Log when it is Supported on Both Ends
Never stand directly under the limb you are trimming. Always position yourself out of the path of falling debris. Do not use the pole saw to cut limbs that are larger in diameter than the length of the guide bar.
Never stand on a ladder or other type of unstable support. Always use both hands
to operate the pole saw.
Use the bottom of the guide bar to make the first cut on the topside of the log
Make the second cut directly below the first and cut downwards to meet the first cut
Doing this will keep the log from pinching the guide bar and chain
Fig. 14 Bucking a Log when it is Supported on Both Ends
Use the bottom of the guide bar to make the first cut on the topside of the log (Fig. 14).
Make this cut about 1/3 of the thickness of the log. Doing this will keep this section from splintering when completely cut.
Make the second cut directly below the first and cut upwards to meet the first cut. Doing this will keep the log from pinching the guide bar and chain.
CUTTING WITH THE POLE SAW
TRIMMING A TREE - How to safely and efficiently prune the branches of a living tree
WARNING: Avoid kickback. Kickback can result in severe injury or death. See Kickback Fig. 1 to avoid risk of kickback.
WARNING: Do not operate the pole saw if you are in the following situations: If you are standing or sitting in a tree.
If you are standing on a ladder or on any unstable surface. If you are in any awkward position whatsoever.
Operating the pole saw in any of these situations may cause you to lose control and result in severe injury or death.


 WARNING: When using the pole saw do not extend your arms above your shoulders.
CAUTION: It’s advisable for your own safety, to seek professional help if you face pruning conditions that are beyond your ability.
4th Cut - |
2nd Cut - |
Final Stub |
Pruning Cut |
Cut |
(to avoid pinching) |
6" 
2" to 4"
1st Cut -
Pruning Undercut (to avoid splintering)
3rd Cut - Stub Undercut
(to avoid splintering)
Fig. 15 Cutting Sequence for Pruning a Tree Limb
Trimming a tree is the process of pruning or removing the overgrown limbs on a living tree. Before you start cutting with the pole saw, make sure that your footing is firm and stand with your feet apart and your weight evenly balanced. To safely and efficiently trim a tree limb follow these directions:
1.Use the top of the guide bar to make the first cut on the underside of the limb. This cut should be about 6” from the tree trunk and about 1/3 of the thickness of the limb (Fig. 15).
2.Move 2” to 4” farther out on the limb and use the bottom of the guide bar to make the second cut on the topside of the limb. Continue cutting until the limb is completely off the tree (Fig. 15).
3.Use the top of the guide bar to make the third cut on the underside of the limb stump. This should be made as close as possible to the tree trunk and about 1/3 of the thickness of the limb stump (Fig. 15).
4.Use the bottom of the guide bar to make the fourth and final cut. Make this cut directly above the last and downwards through the limb stump (Fig. 15).
POLE SAW INFORMATION - ADJUSTING POLE LENGTH (RM1015SPS)
The Remington RM1015SPS Pole Saw has a telescoping pole assembly that will extend from 57” (fully retracted) to 96” (fully extended). Two cam levered collets, in their flat position, are used to clamp and hold the pole securely at any extended length. To do this follow these directions:
When you are ready to make a cut, press the trigger lockout switch in with your right thumb while also squeezing the trigger with your right hand fingers.
This will immediately switch the power of the pole saw on. Releasing the trigger switches it off.
Make sure the pole saw is running at full speed before starting a cut.
Always keep other persons away from cutting end of the pole saw and at a safe distance from
the work area.
Fig. 17 How to Use the Pole Saw to Safely Prune a Tree Limb
1.Connect the pole saw power plug to the power extension cord. Insert the power extension cord plug into the main power outlet.
2.Firmly grip the pole saw with both hands in the designated areas shown in Fig. 17. Use a firm grip and wrap your thumbs and fingers around the pole saw handle and the pole.
3.Position yourself near the tree limb that you wish to cut. Make sure that your footing is firm and stand with your feet apart and your weight evenly balanced.
4.When you are ready to make a cut, press the trigger lockout switch in with your right thumb while also squeezing the trigger with your right hand fingers (Fig. 17). This will immediately switch the power of the pole saw on. Releasing the trigger switches it off.
5.Make sure the pole saw is running at full speed before starting a cut.
6.When starting a cut, place the moving pole saw against the tree limb (Fig. 17). Hold the pole saw firmly in place while cutting through the limb. This will help to prevent a possible bouncing or skating, sideways movement of the log.
7.Guide the pole saw by applying light pressure as you cut. Do not force the pole saw as the motor may overload and burn out. It will do the job better and safer at the rate for which it was intended.
8.Remove the pole saw from the cut while it is still running at full speed. Stop the pole saw by releasing the trigger. Make sure that the chain has completely stopped before setting it down.
5

MAINTENANCE AND REPAIR INSTRUCTIONS
SAW CHAIN TENSION ADJUSTMENT
WARNING: Before you adjust the saw chain tension always unplug it from the main power outlet. Otherwise severe injury or death may occur from electrical shock. Bodily injury may also occur from accidental contact with the moving chain.
WARNING: The cutting edges on the chain saw are very sharp so always wear protective gloves when handling the chain.
WARNING: Always maintain the correct chain saw tension because a loose chain will increase the risk of dangerous kickback. A loose chain may also jump out of its guide bar groove and may seriously injure you. This may also result in rapid wear and tear of the chain, guide bar and sprocket.
NOTE: For pre-assembled chain saw models, the saw chain is correctly set at the factory. However, a new chain will stretch after using it. It’s recommended that you check the new chain after the first few minutes of operation. First of all, allow the chain to cool down and follow the steps below to correctly readjust the saw chain tension:
1.Before adjusting the chain first make sure that the two guide bar nuts are only fiinger tight (Fig. 18). Also make sure that the adjusting block is seated in the oval adjusting hole on the guide bar (Fig. 18).
2.Use a flat head screw driver and turn the adjusting screw clockwise (Fig. 18).
NOTE: There should be no gap between the links of the chain and the bottom of the guide bar. (See Fig. 18)
Filing |
30° Guide |
|
Mark |


 Filing
Guide
 5/32”
5/32”
Round
File
Clamp the Guide Bar in a vise to hold the chain saw steady but do not clamp the chain.
Depth Gauge (left side
of chain)
Top Plate of Cutter (left side of chain)
Depth Gauge |
Filing |
|
Direction |
||
(right side |
|
|
of chain) |
|
|
Top Plate of Cutter |
File from inside towards |
|
the outside of the the Cutter |
||
(right side of chain) |
||
until it is sharp. Only file in |
||
|
||
|
this one direction. Two or |
|
|
three strokes with the file |
|
|
should be enough to |
|
|
sharpen each cutter. |
Fig. 20 File and File Guide Placement on the Chain
3.Wearing protective gloves, move the chain around guide bar by hand. The chain should move freely. If it doesn’t, loosen the chain by turning the adjusting screw counterclockwise.
4.After the chain tension is corrected, tighten the two guide bar nuts firmly. If this is not done the guide bar will move and loosen the chain tension. This will increase the risk of kickback and may also damage the saw.
The Adjusting Plate is located directly behind |
Motor Housing |
the Guide Bar. Turn the Adjusting Screw to |
|
move the Guide Bar along. This tightens or |
|
loosens the tension of the Saw Chain. |
Adjusting Plate |
|
|
|
Adjusting Screw |
Guide Bar |
(when turned, |
|
moves the |
|
Adjusting Block) |
|
Adjusting Block (this |
Chain |
grips and moves the |
|
Guide Bar along) |
|
|
Sprocket Support |
|
||
|
Close up view showing where the Adjusting Plate, Block and |
||||
|
Screw are located behind the Guide Bar (The Saw Chain, |
||||
|
Guide Bar, Saw Chain and Nuts removed for clarity) |
||||
|
Guide Bar |
Saw Chain |
Guide Bar |
Saw Chain |
|
Before adjusting Saw |
|
|
|
|
|
Chain tension, make |
|
|
|
|
|
sure that the Guide Bar |
|
|
|
|
|
Nuts are only finger tight |
|
|
Correct Tension: Saw Chain slides on |
||
to allow the Guide Bar |
Incorrect Tension: Too much space |
||||
and along underside of Guide Bar |
|||||
to move along. |
between underside of Guide Bar |
||||
|
|
||||
and Saw Chain
Fig. 18 Use the Adjusting Screw to correct
CLEANING AND MAINTENANCE
NOTICE: These are instructions for servicing your chain saw. Any servicing that is not mentioned here should be done by an authorized service center.
HOW TO KEEP YOUR CHAIN SAW CLEAN
WARNING: Before you service the chain saw always unplug it from the main power outlet. Otherwise severe injury or death may occur from electrical shock. Bodily injury may also occur from accidental contact with the moving chain.
WARNING: The cutting edges on the chain saw are very sharp so always wear protective gloves when handling the chain.
WARNING: Whenever you clean the chain saw body make sure that: DO NOT submerge the chain saw in any liquids.
DO NOT use products that contain ammonia, chlorine or abrasives.
DO NOT use chlorinated cleaning solvents, carbon tetrachloride, kerosene or gasoline.
Keep the chain saw body clean by wiping with a soft cloth dampened with a mild soap and water mixture.
HOW TO TAKE CARE OF THE GUIDE BAR
Uneven wear on the guide bar causes most chain saw cutting problems. Incorrect sharpening of the chain cutter and incorrect depth gauge settings often cause this. When the guide bar wears unevenly it widens the guide bar groove. This may then cause the chain to clatter and for rivets to pop out. As a result the chain saw will not cut straight. If this happens, it is advisable to replace the guide bar.
Inspect the guide bar before sharpening the chain. A worn or damaged chain is unsafe.
Normal Guide Bar Maintenance
Items Needed to Sharpen Chain Saw Cutter Teeth
These tools can be purchased from your local dealer, hardware store or chain saw supply outlet.
•5/32” Round File
•Depth gauge tool
•File guide
•Vise
•Medium sized flat file
1.Adjust the chain to set the proper tension (see saw Chain Tension Adjustment section).
2.Clamp the guide bar in a vise to hold the chain saw steady.
NOTE: Do not clamp the chain.
3.Press the 5/32” round file, attached to file guide, into groove between the top plate and the depth gauge on the chain. The file guide should rest on both the top plate and depth gauge (Fig. 20).
NOTE: File the midpoint of the guide bar.
4.Hold the file at guide level. Make sure that the 30° mark on the file guide is parallel to the center of the guide bar (Fig. 20). This will ensure that you file the cutters at a 30° angle.
5.File from inside towards the outside of the cutter until it is sharp. Only file in this one direction (Fig. 20).
NOTE: Two or three strokes with the file should be enough to sharpen each cutter.
6.After each cutter is sharpened, move the chain forward to sharpen the next cutter. File all the cutters on one side of the chain.
7.Move to other side of chain and repeat the process of sharpening the remaining cutters.
How to Reset the Depth Gauge Clearance on the Chain Saw
|
|
Top Plate |
.025” |
The cutter depth |
|
Depth Gauge |
of Cutter |
||
|
|
|
gauge clearance is |
|
|
|
|
|
|
Flat File |
|
|
|
reduced as cutters |
|
|
|
are sharpened. |
|
|
|
|
|
|
|
|
|
|
So after every second |
Depth |
|
Front corner of |
|
or third sharpening it |
Gauge |
|
|
is necessary to reset |
|
Depth |
Depth Gauge |
|
||
Tool |
|
the depth gauges. |
||
Gauge |
|
|
||
|
|
|
|
Slot
Fig. 21 Use a Flat File to reset the Depth Gauge Clearance
The cutter depth gauge clearance is reduced as cutters are sharpened. So after every second or third sharpening it is necessary to reset the depth gauges.
1.Place the depth gauge tool (.025”) firmly across the top of two cutters. Make sure that the depth gauge enters the slot inside the depth gauge tool (Fig. 21).
2.Use the medium sized flat file and file depth gauge level with the depth gauge tool.
3.Remove the depth gauge tool. Use the flat file to round off the front corner of the cutter depth gauge (Fig. 21).
After several hand filings, it is recommended that you take your chain saw to an authorized service center or sharpening service. They will machine sharpen it to insure accurate and even filing.
Guide Bar Groove |
Remove any Burrs |
|
|
Flat |
with a Flat File |
|
File |
|
|
|
Guide Bar |
Guide |
|
Groove |
|
|
|
Bar |
|
|
|
|
Guide |
|
|
Bar |
Guide Bar with |
Guide Bar with |
Guide Bar |
Normal Wear |
Uneven Wear |
with Burr |
Remove any debris from Guide Bar Groove with a putty knife or wire
Clean Oil Slots after each day of use
Guide
Bar
Fig. 19 Cross Section View of Guide Bar Groove showing Normal and Uneven Wear
1.Remove the guide bar from the chain saw (Fig. 19).
2.Use a putty knife or wire to remove any sawdust from inside the guide bar groove (Fig. 19)
3.Clean oil slots after each day of use.
4.Use a flat file to remove any burrs from the sides of the guide bar and to make the edges square.
It is recommended that you replace the guide bar whenever the following happens:
•When the guide bar is bent or cracked.
•When the inside of the groove of the guide bar is badly worn.
NOTE: When replacing the guide bar, see the Safety Information section for the correct part numbers.
HOW TO KEEP YOUR CHAIN SAW SHARP
WARNING: Before you service the chain saw always unplug it from the main power outlet. Otherwise severe injury or death may occur from electrical shock. Bodily injury may also occur from accidental contact with the moving chain.
WARNING: The cutting edges on the chain saw are very sharp so always wear protective gloves when handling the chain.
Keep the chain saw sharp as it will cut faster and more safely. A dull chain will cause undue wear and tear on the sprocket, guide bar, chain and motor. You will know that the chain has become dull when you experience the following:
•It takes more effort to cut and have to force the chain saw into the wood.
•Only saw dust is created with few large chips
6

TROUBLESHOOTING
NOTICE: For additional help and information you can visit www.remingtonpowertools.com
WARNING: Before you service the chain saw always unplug it from the main power outlet. Otherwise severe injury or death may occur from electrical shock. Bodily injury may also occur from accidental contact with the moving chain.
OBSERVED FAULT |
|
POSSIBLE CAUSE |
|
REMEDY |
|
|
|
||
Chain saw runs but it does not cut. |
Chain may be assembled backwards on guide bar. |
See Chain Saw Assembly instructions, pages 3 and 6. |
||
|
|
|
||
Chain saw does not cut unless heavily forced. Cutting |
Chain is dull. |
See sharpening saw chain, page 6. |
||
produces only sawdust with few large chips. |
|
|
|
|
|
|
|
||
Chain saw runs slow. Chain saw stalls easily. |
Low power supply voltage. |
Extension cord wire size too small. See extension cords page 4. |
||
|
|
|
|
|
Motor of chain saw does not run when you squeeze trigger. |
1. |
Trigger lock-out not pressed in to release trigger. |
1. |
Press in trigger lock out before squeezing trigger. |
|
2. |
Extension cord connections loose. |
2. |
Check cord connections. |
|
3. |
Open line fuse or circuit-breaker. |
3. |
Check line fuse or circuit breaker. |
|
4. |
Worn-out motor brushes. |
4. |
See authorized service centre. |
|
5. |
Open wiring circuit on saw. |
5. |
See authorized service centre. |
|
|
|
||
Motor of chain saw runs, but the chain does not move. |
Drive sprocket failure. |
Remove and inspect drive sprocket for damage. |
||
|
|
|
|
|
Chain does not get oil. |
1. |
Clogged oil slot in guide bar. |
1. |
Remove guide bar and clean oil slot. |
|
2. |
Oil is too thick. |
2. |
Use correct weight of oil. See filling oil tank page 6. |
|
|
|
|
|
Chain comes off guide bar. |
1. |
Chain is loose. |
1. |
Tighten chain. See saw chain tension adjustment page 6. |
|
2. |
Guide bar and chain not assembled correctly. |
2. |
See chain saw assembly pages 3 and 6. |
|
|
|
||
Chain saw smokes. |
Saw damaged. Do not use saw. |
See authorized service centre. |
||
|
|
|
||
Chain saw leaks oil. |
It is normal for oil to seep when the saw is not in use. |
Note: empty oil tank when not in use. |
||
|
|
|
|
|
CLEANING AND STORAGE
If you intend to store the chain saw and pole assembly for more than 30 days, it is recommended to follow these steps:
1.Drain the oil tank after each use.
2.Remove and clean the guide bar and chain. Clean the guide bar and chain by soaking in a petroleum based solvent or a mild soap and water mixture.
3.Dry the guide bar and chain.
4.Place the chain in container filled with oil to prevent it rusting.
5.Wipe a thin coating of oil over the surface of the guide bar.
6.Wipe off the outside of the chain saw body and the pole assembly. Do this with a soft cloth dampened with a mild soap and water mixture.
7.Store the chain saw up high, in a dry, locked place that is out of the reach of children.
Replacing Saw Chain
Replace the chain when the cutters are too worn to sharpen or when the chain breaks. Only use the replacement chain that is noted in this manual. Always include a new drive sprocket when replacing the chain. This will maintain proper driving of chain.
NOTE: For the correct part number information see the Safety Information section.
|
SPECIFICATIONS* |
|
|
Type.............................................................................................................................................. |
Electric |
Motor................................................................................................................................. |
120 AC 8 Amp |
Motor Speed................................................................................................................. |
5900 - 6300 RPM |
Guide Bar Length................................................................................................................................ |
10” |
Guide Bar Type................................................................................................................... |
Non-roller Tip |
Chain Pitch......................................................................................................................................... |
3/8” |
Bar Lube Reservoir Capacity........................................................................................................... |
1.4 oz |
Weight............................................................................................................................................. |
9.2 lbs |
*All specifications are based on the latest product information available at the time of printing. We reserve the right to make changes at any time without notice.
REPAIR SERVICE
WARNING: Use only the replacement parts and accessories that are described in this manual. Use of any other parts or accessories could damage the chain saw or injure the operator.
For service, please call the Customer Service Department to obtain a list of authorized service dealers near you. Service on this unit, both within and after the warranty period, should only be performed by an authoried and approved service dealer.
Call 1-866-206-2707 (in Canada call 1-877-696-5533 or visit www.remingtonpowertools.com
Replacing Parts and Accessories
For original replacement parts and accessories call 1-866-206-2707 (in Canada call 1-877-696-5533). Or visit www.remingtonpowertools.com
7

Manuel de l’utilisateur
RM1015SPS
Tronçonneuse/tronçonneuse sur perche télescopique électrique
TABLE DES MATIÈRES |
|
Informations sur l’entretien et le service après-vente............................................................................. |
1 |
Informations sur la sécurité.................................................................................................................... |
1 |
Familiarisez-vous avec votre appareil.................................................................................................... |
3 |
Instructions d'assemblage..................................................................................................................... |
3 |
Instructions de démarrage et d’arrêt...................................................................................................... |
4 |
Instructions d’utilisation.......................................................................................................................... |
4 |
Entretien et réparations.......................................................................................................................... |
5 |
Résolution des problèmes...................................................................................................................... |
7 |
Nettoyage et rangement......................................................................................................................... |
7 |
Service de réparation............................................................................................................................. |
7 |
Glossaire et définitions des termes relatifs aux tronçonneuses............................................................. |
7 |
Garantie................................................................................................................................................ |
24 |
Toutes les informations, illustrations et spécifications contenues dans ce manuel sont basées sur les informations disponibles sur le produit les plus récentes au moment de la publication. Nous nous réservons le droit d’apporter des modifications à tout moment sans avis préalable.
Copyright© 2011 MTD SOUTHWEST INC, Tous droits réservés.
• CONSERVEZ CES INSTRUCTIONS •
INFORMATIONS SUR L’ENTRETIEN ET LE SERVICE APRÈS-VENTE
NE RAMENEZ PAS CET APPAREIL CHEZ LE DÉTAILLANT. UNE PREUVE D’ACHAT SERA EXIGÉE POUR TOUTE PRISE EN CHARGE DANS LE CADRE DE LA GARANTIE.
Si vous éprouvez des difficultés à assembler ce produit ou si vous avez des questions sur les commandes, l'utilisation ou l'entretien de cet appareil, veuillez contacter le service à la clientèle :
1 866 206-2707 (É.-U.) ou 1 877 696-5533 (Canada)
Des informations supplémentaires sur le produit sont disponibles sur notre site web : www.remingtonpowertools.com
Veuillez appeler le service à la clientèle pour obtenir des pièces de rechange. Utilisez uniquement des pièces de rechange identiques pour les réparations.
INFORMATIONS SUR LA SÉCURITÉ
• SYMBOLES D’ALERTE DE SÉCURITÉ •
L’objectif des symboles d’alerte de sécurité est d’attirer votre attention sur les dangers possibles. Ces symboles et leurs explications méritent toute votre attention et votre compréhension. À eux seuls, les avertissements de sécurité n’éliminent aucun danger. Les consignes ou avertissements de sécurité ne remplacent pas les mesures appropriées de prévention des accidents. Ces consignes de sécurité ne sauraient couvrir toutes les éventualités susceptibles de se produire. Si vous avez des questions, veuillez appeler le service à la clientèle au 1 866 206-2707 (É.-U.) ou
1 877 696-5533 (Canada).
SYMBOLE |
SIGNIFICATION |
|
|
DANGER :Signale un risque EXTRÊME. Le non respect d’une consigne |
|
de sécurité relative |
à un signal de DANGER entraînera des blessures graves voire |
mortelles pour vous-même ou pour les autres. |
|
AVERTISSEMENT :Signale un risque GRAVE. Le non |
|
respect d’un AVERTISSEMENT de sécurité PEUT entraîner des blessures graves pour |
|
vous-même ou pour les autres. |
|
ATTENTION :Signale un risque MOYEN. Le non-respect d’une consigne de signal d’ATTENTION PEUTentraîner des dégâts matériels ou des blessures pour vous-même ou pour les autres.
IMPORTANT ! Signale une information technique spécifique.
REMARQUE : Signale une information générale importante supplémentaire.
769-07211 P00
INFORMATIONS SUR LA SÉCURITÉ
• VEUILLEZ LIRE TOUTES LES INSTRUCTIONS AVANT D'UTILISER LA TRONÇONNEUSE •
• CONSIGNES DE SÉCURITÉ
IMPORTANTES •
AVERTISSEMENT :Lors de l'utilisation d'une tronçonneuse électrique, des précautions de sécurité de base doivent toujours être respectées afin de réduire les risques d'incendie, de choc électrique et de blessures graves. Ces précautions de sécurité sont présentées ci-dessous et doivent être lues avant toute utilisation de la tronçonneuse ou de la tronçonneuse sur perche.
AVERTISSEMENT :Assurez-vous d'avoir lu et compris toutes les consignes de sécurité avant de tenter d'assembler, d'utiliser ou d'entretenir cet appareil. Une mauvaise utilisation de la tronçonneuse peut causer des blessures graves voire mortelles suite à un incendie, un choc électrique, un contact corporel avec la chaîne en mouvement ou la chute d'un gros morceau de bois.
AVERTISSEMENT :Veuillez lire ce manuel de l’utilisateur attentivement et dans sa totalité avant d’essayer d'assembler, d’utiliser ou d’entretenir l’appareil. Respectez toutes les consignes de sécurité. Le non respect de ces consignes peut entraîner des dégâts matériels ou des blessures graves pour vous-même et/ou pour les autres.
PROPOSITION 65 DE L’ÉTAT DE CALIFORNIE
AVERTISSEMENT :Les cosses et bornes de batterie et certains composants finis contiennent du plomb, des composés du plomb et des produits chimiques considérés par l'état de Californie comme pouvant provoquer des cancers, des malformations congénitales ou d'autres effets nocifs sur la reproduction. Lavez-vous les mains après utilisation.
PRÉCAUTIONS DE SÉCURITÉ DE BASE
•Familiarisez-vous complètement avec les commandes et la marche à suivre pour une utilisation correcte de cet appareil. Apprenez à rapidement couper le moteur de l’appareil et mettre les commandes en position neutre.
•Restez vigilant! N’utilisez pas cet appareil lorsque vous êtes fatigué, malade, ou sous l’influence de l’alcool, de drogues, ou de médicaments.
•Ne laissez jamais les enfants utiliser cet appareil. Ne laissez jamais des adultes utiliser cet appareil sans qu’ils aient reçu une formation appropriée.
•Ne permettez PAS l'utilisation de l'appareil comme un jouet.
•Assurez-vous que toutes les protections et tous les dispositifs de sécurité ont été correctement installés avant d’utiliser l’appareil.
•Conservez ces instructions. Consultez-les fréquemment et utilisez-les pour donner des consignes aux autres utilisateurs. Si vous prêtez cet appareil à quelqu’un, prêtez-lui également ces instructions.
PRÉCAUTIONS DE SÉCURITÉ AVANT L’UTILISATION
•NE vous fiez PAS exclusivement aux protections de sécurité incorporées dans l’appareil.
•Faites reculer les personnes se trouvant à proximité, en particulier les enfants et les animaux familiers, d’au moins 15 m (50 pieds). Si quelqu’un pénètre dans la zone de travail, arrêtez l’appareil!
•Gardez la zone de travail propre et dégagée. Les zones encombrées favorisent les accidents. Ne commencez pas à couper avant d’avoir nettoyé la zone de travail de tout débris, d’avoir une position parfaitement stable, et d'avoir préparé une voie de retraite en cas de chute de branches.
•Portez toujours des protections oculaires et auditives adéquates lorsque vous utilisez cet appareil. Portez des lunettes de sécurité ou des lunettes de protection avec écrans latéraux qui sont conformes aux normes ANSI Z87.1-1989. Le non-port de ces protections peut entraîner de graves lésions oculaires suite à la projection ou la chute d’objets. Si la tâche est poussiéreuse, portez
un masque de protection du visage ou anti-poussière. Lorsque vous utilisez l'appareil au delà de votre tête, portez un casque de sécurité.
•Habillez-vous de manière adéquate, portez des vêtements épais et près du corps (pantalon et chemise à manches longues), des gants de protection et des bottes de travail à embout renforcé en acier antidérapants. Ne portez pas de vêtements amples, de bijoux, pantalons courts, sandales et ne marchez pas les pieds nus. Attachez-vous les cheveux au dessus du niveau des épaules pour éviter qu’ils ne se prennent dans les parties en mouvement de l’appareil.
•Utilisez l’appareil uniquement à la lumière du jour ou sous un éclairage artificiel satisfaisant.
•N’utilisez pas cet appareil pour des fonctions pour lesquelles il n’a pas été conçu.
DANGER :Un rebond peut se produire lorsque le nez ou l'extrémité du guide-chaîne touche un objet, ou lorsque le bois se referme et coince la chaîne dans la coupe. Dans certains cas, un contact avec l'extrémité de l’outil peut causer un rebond extrêmement rapide, qui retourne le guide-chaîne instantanément vers l'utilisateur. Si la chaîne coupante se coince le long de la partie supérieure du guide-chaîne, celui-ci risque de se retourner rapidement vers l'utilisateur. L’une et l’autre de ces réactions peuvent provoquer une perte de contrôle de la tronçonneuse, ce qui peut entraîner des blessures graves pour l'utilisateur. Un contact avec un objet étranger dans le bois peut également provoquer une perte de contrôle de la tronçonneuse.
Poignée avant
|
Risque de rebond! - |
|
Coupez seulement une |
|
bille à la fois. |
|
N'essayez jamais de |
Poignée |
couper à travers 2 billes ou |
arrière |
branches en même temps. |
Servez-vous des deux mains pour tenir la tronçonneuse lorsqu'elle fonctionne. Tenez-la d'une prise ferme avec les pouces et les doigts enroulés autour des poignées avant et arrière. Ne laissez pas le nez du guide-chaîne toucher quoi que ce soit pendant que la chaîne coupante est en mouvement. Tenez sur le côté et non directement derrière la coupe.
Guidechaîne
|
Risque de rebond! |
|
|
Ne permettez pas au |
|
|
nez du guide-chaîne |
|
|
de toucher un objet |
Nez du |
|
quel qu'il soit pendant |
Guide-Chaîne |
Risque de rebond! - |
que la chaîne coupante |
|
est en mouvement. |
|
|
Coupez seulement une bille à la fois. |
|
|
N'essayez jamais de couper à travers 2 billes ou |
|
|
branches en même temps. |
|
|
Fig. 1 Utilisation correcte de la tronçonneuse pour éviter les rebonds
11/11
 Loading...