


Taste | Innovation | Technology
Customer Care Guide
Single Serve Brewer
MOZARTTM
(4 to12 oz)

Welcome Coffee Lovers!
IMPORTANT SAFEGUARDS FOR SAFE OPERATION AND USE
As with all electrical appliances, when using your brewer, basic safety precautions should always be followed:
1.Read and understand all instructions before using.
2.Close supervision is necessary when any appliance is used by or around children.
3.To protect against fire, electric shock and/or injury, DO NOT immerse cord, plug, or the brewer unit in water or any other liquid. Do not allow cord to hang over the edge of the table or counter-top, or touch a hot surface.
4.For best operation, plug the brewer into its own electrical outlet on a dedicated circuit to prevent flickering of lights, blowing of fuses or tripping of the circuit breaker.
5.Always keep the brewer in its upright position to avoid damaging your brewer.
6.To avoid the risk of injury from extremely hot water, do not open the brewer’s UPPER JAW while brewing is in process.
7.Keep the WATER RESERVOIR LID on the WATER RESERVOIR at all times, unless removing to fill with water or clean.
8.Do not operate any appliance with a damaged cord or plug, or after the appliance malfunctions or has been dropped or damaged in any manner.
9.Do not overfill the water reservoir.
10.Use only water in this appliance. Do not put any other liquids or foods in the water reservoir except as instructed in the CLEANING INSTRUCTIONS section of this guide.
11.Do not touch hot surfaces.
12.To avoid the risk of injury, do not put your fingers inside the brewer’s LOWER JAW area. This area contains a sharp needle for puncturing the K-Style Cup and could cause you injury if touched.
13.Turn off and unplug the brewer before cleaning or maintenance. Always allow the brewer to cool completely before putting on or taking off parts or before cleaning.
14.Do not use harsh cleaners, steel wool pads, or other abrasive materials or cleaners on the brewer. These type products may damage/scratch the appliance’s surfaces.
15.Do not use outdoors.
16.This appliance is for household use only; do not use the brewer for other than its intended use/purpose.
Taste | Innovation | Technology TM

GARANTIES IMPORTANTES POUR LA SÉCURITÉ DU FONCTIONNEMENT ET DE L’UTILISATION
Comme avec tous les appareils électriques, lorsque vous utilisez votre brewer, les précautions de sécurité de base doivent toujours être suivies:
1.Lire et comprendre toutes les instructions avant utilisation.
2.Une surveillance attentive est nécessaire lorsqu’un appareil est utilisé par ou autour des enfants.
3.Pour protéger contre les risques d’incendie, de choc électrique et/ou de blessure, NE PAS immerger le cordon, la prise ou le brasseur unité dans l’eau ou dans tout autre liquide. Ne laissez pas de cordon pendre de la table ou du comptoir-top, ou touchez une surface chaude.
4.Pour un meilleur fonctionnement, branchez le brasseur dans sa propre prise de courant sur un circuit dédié afin d’éviter les scintillements des feux, soufflant de fusibles ou le déclenchement du disjoncteur.
5.Toujours garder le brasseur dans sa position verticale pour éviter d’endommager votre Brewer.
6.Afin d’éviter les risques de blessure de extrêmement l’eau chaude, ne pas ouvrir le brasseur de mâchoire supérieure tandis que votre café est en cours de traitement.
7.Maintenir le couvercle du réservoir d’eau sur le réservoir d’eau à tout moment, sauf retrait de remplir avec de l’eau ou de le nettoyer.
8.Ne pas faire fonctionner un appareil avec une prise ou un cordon d’alimentation endommagé, ou si l’appareil ne fonctionne pas correctement ou est tombé ou a été endommagé de quelque manière que ce soit.
9.Ne pas trop remplir le réservoir d’eau.
10.Utiliser uniquement de l’eau dans l’appareil. Ne pas mettre d’autres liquides ou d’aliments dans le réservoir d’eau, sauf comme indiqué dans les INSTRUCTIONS DE NETTOYAGE section de ce guide.
11.Ne touchez pas les surfaces chaudes.
12.Pour éviter les risques de blessures, ne pas mettre vos doigts à l’intérieur du brasseur de mâchoire inférieure. Cette zone contient une forte aiguille pour transpercer le k-style cup et pourrait vous blesser si vous les touchez.
13.Éteignez et débranchez le brasseur avant le nettoyage ou l’entretien. Toujours laisser le brasseur de refroidir complètement avant de mettre le ou le décollage pièces ou avant de le nettoyer.
14.Ne pas utiliser les produits agressifs, laine d’acier, plaquettes ou d’autres matériaux abrasifs ou nettoyants sur le brasseur. Ces produits peuvent endommager/scratch l’appareil de surfaces.
15.Ne pas utiliser à l’extérieur.
16.Cet appareil est destiné uniquement à un usage domestique; ne pas utiliser le brasseur
pour utilisation autre que son usage/objet. |
1 |
|

Taste | Innovation | TechnologyTM
LET’S GET STARTED!
Unpacking and preparing your iCoffee Single Serve Brewer.
Before you can make your first cup of your favorite beverage, you need to get the brewer ready to be used:
1.Remove all packing tape, packaging, and stickers from the brewer and wipe clean with a soft water-dampened cloth.
2.Plug the brewer into a grounded outlet.
3.Place a large cup or mug (10 oz. minimum) on the DRIP TRAY directly below the JAW area.
4.Remove the WATER RESERVOIR LID from the WATER RESERVOIR, set aside. Remove the WATER RESERVOIR from the brewer by pulling it straight up from its base.
5.Wash the WATER RESERVOIR & LID with warm soapy water, rinse well and dry with a soft cloth.
6.Fill the WATER RESERVOIR container with water (tap, bottled or filtered) to the “Max Fill Line” and then return it back to its base, on the brewer, along with its lid.
7.Press the POWER BUTTON. At this point, the water from the WATER RESERVOIR will automatically be pumped into the Brewer’s INTERNAL TANK and the water heating process will begin. This process will take several minutes.
8.Once the water is heated the LCD Screen will read “READY”.
9.Press the “OPEN” ICON  the UPPER JAW will automatically raise, at this point merely press it back down to its original position to close.
10.Turn the DIAL-A-BREW knob until 10 oz is displayed on the LCD Screen, make sure your mug is in place on the DRIP TRAY and press the “Dial-A-Brew “ knob.
11.The brewer will run the heated water through its components and dispense hot water into your cup. When the cycle is complete, merely discard the dispensed water from your cup.
2
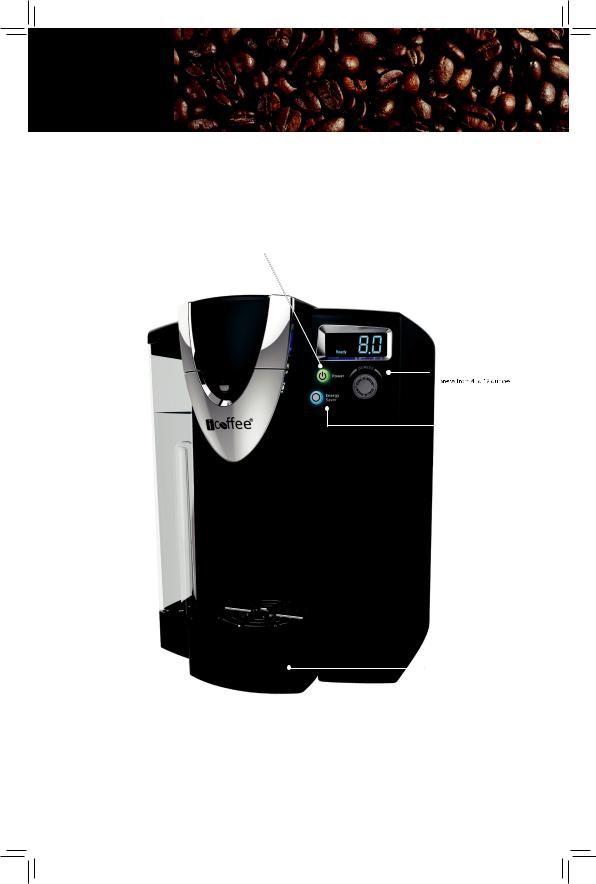
Power Button
Dial-A-Brew™ Knob
Energy Saver Button
Removable 75 oz.
Water Reservoir 
Removable Drip Tray
3
 Loading...