


PDC 2070
Digital Camera
User Guide
www.polaroid-digital.com

Product Overview
1. |
Flash |
|
|
2. |
Lens |
1 |
|
3. |
Self-timer LED |
||
|
4.USB port
5.Viewfinder
2
3
1. |
Status LED |
1 |
|
2. |
Viewfinder |
|
|
3. |
LCD screen |
2 |
|
4. |
Menu/OK button |
|
|
5. |
Up button |
3 |
|
6. |
Down button |
||
|
|||
7. |
SMC slot |
|
|
8. |
Power button |
4 |
|
9. |
Capture/Playback selector |
|
|
|
|
5 |
5
4
9
8
7
6
2 |
Polaroid PDC 2070 Digital Camera User Guide |
www.polaroid-digital.com
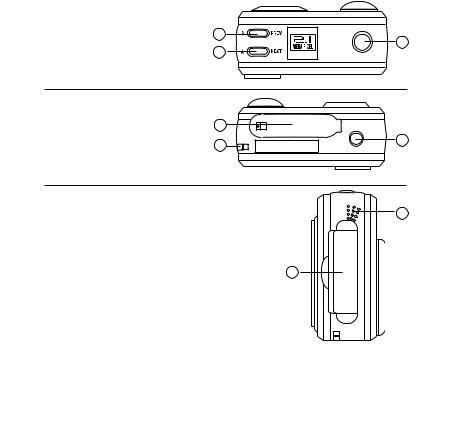
1. |
Flash/Previous button |
2. |
Quality/Next button |
3. |
Shutter button |
|
1 |
|
3 |
|
2 |
1. |
Battery compartment |
|
|
2. |
Hand strap holder |
1 |
|
3. |
Tripod mount |
|
3 |
|
|
2 |
|
|
|
|
1. |
SMC slot |
2 |
|
2. |
Microphone |
||
|
|||
|
|
1 |
Polaroid PDC 2070 Digital Camera User Guide |
3 |
www.polaroid-digital.com

|
Table of Contents |
|
1 Getting Started ........................................................................... |
6 |
|
|
• What can I do with my Camera?............................................... |
6 |
|
• What can I do with my Digital Pictures? .................................... |
6 |
|
• What can I do with my Video Clips?.......................................... |
7 |
|
• Camera Package Contents ....................................................... |
7 |
|
• Attaching the Hand Strap ........................................................ |
8 |
|
• Installing the Batteries............................................................. |
8 |
|
• Turning the Camera On and Off................................................ |
9 |
|
• Checking the Battery Level ...................................................... |
9 |
|
• Automatic Power Off Saves Battery........................................ |
10 |
2 Camera Setting......................................................................... |
11 |
|
|
• Checking Camera Status........................................................ |
11 |
|
• Setting the Display Language ................................................. |
12 |
|
• Setting Date and Time........................................................... |
13 |
3 Taking Pictures ......................................................................... |
14 |
|
|
• Taking a Picture.................................................................... |
14 |
|
• Setting the Picture Quality ..................................................... |
14 |
|
• Setting the Picture Size ......................................................... |
15 |
|
• Setting the Flash Mode.......................................................... |
16 |
|
• Zoom in and out................................................................... |
16 |
|
• Setting Self-timer.................................................................. |
17 |
|
• Setting the Date Stamp ......................................................... |
18 |
|
• Setting the Exposure Compensation ....................................... |
19 |
|
• Setting the White Balance...................................................... |
20 |
|
• Setting Sharpness................................................................. |
21 |
|
• Setting Frequency................................................................. |
22 |
|
• Reviewing the Pictures .......................................................... |
22 |
|
• Zooming the Displayed Picture ............................................... |
22 |
|
• Rotate the Displayed Picture ................................................. |
23 |
|
• Protecting the Pictures from Deletion ...................................... |
24 |
|
• Delete One Picture................................................................ |
25 |
4 |
Polaroid PDC 2070 Digital Camera User Guide |
|
www.polaroid-digital.com

4 Recording Audio and Video Clips................................................. |
26 |
• Recording Audio Clips .......................................................... |
26 |
• Recording Video Clips ........................................................... |
27 |
• Playback Video Clips on LCD Screen....................................... |
27 |
• Protecting Audio Clip(s) and Video Clip(s) ................................ |
28 |
• Deleting One Audio Clip and Video Clip ................................... |
30 |
• Using the SMC (SmartMedia™ Card)........................................ |
32 |
• Formatting Memory............................................................... |
33 |
5 Installing the Software into a Computer ....................................... |
34 |
• Installing the Software .......................................................... |
34 |
• Software included with Your Camera ...................................... |
36 |
• Computer System Requirements............................................. |
38 |
6 Transferring Pictures, Audio and Video Clips To Your Computer...... |
39 |
• Before Transferring Pictures ................................................... |
39 |
• Connecting to Your Computer ................................................ |
39 |
• Transferring and Viewing the Pictures and Video Clips to PC...... |
40 |
• Transferring and Viewing the Pictures and Video Clips to MAC... |
40 |
7 Using the Camera as a Web Cam ................................................ |
41 |
• Setting up NetMeeting........................................................... |
41 |
• Start NetMeeting.................................................................. |
42 |
8 Troubleshooting Problems........................................................... |
43 |
• Troubleshooting ................................................................... |
43 |
9 Getting Help ............................................................................. |
45 |
• Polaroid-digital Online Services ............................................... |
45 |
• ArcSoft Software Help .......................................................... |
45 |
10 Appendix................................................................................ |
46 |
• Technical Specifications ........................................................ |
46 |
• Capacity of SMC card ........................................................... |
48 |
• Using Your Batteries ............................................................. |
49 |
• Tips, Your Safety & Maintenance............................................ |
50 |
• Uninstalling the Camera Driver (PC only).................................. |
50 |
• Regulatory Information .......................................................... |
51 |
Polaroid PDC 2070 Digital Camera User Guide |
5 |
www.polaroid-digital.com

|
1 Getting Started |
• What can I do with my Camera? |
|
Capture |
Enjoy point & shoot operation. Store |
|
pictures, audio clips and video clips to the |
|
internal memory or a SMC. |
Set Up |
Select various camera and video recording |
|
settings. |
Communicate |
Use the camera as a web camera. |
• What can I do with my Digital Pictures?
View |
View pictures on the LCD screen or on |
|
a computer using the Arcsoft® software |
|
supplied. |
Save |
Save pictures to the computer memory by |
|
Mass Storage interface. |
Communicate |
Send the pictures over the Internet to |
|
family and friends. |
6 |
Polaroid PDC 2070 Digital Camera User Guide |
www.polaroid-digital.com

• What can I do with my Audio Clips and Video Clips?
Playback |
Playback audio clips and video clips on |
|
a computer using the Windows® Media |
|
Player or other Media software supplied. |
Save |
Save audio clips and video clips to the |
|
computer memory by Mass Storage |
|
interface. |
Communicate |
Send the audio clips and video clips over |
|
the Internet to family and friends. |
• Camera Package Contents
|
Digital Imaging Products |
|
201 Burlington Road |
|
Bedford, MA 01730-1434 |
PDC 2070 |
Registration Card |
QuickStartGuide |
|
The CD-ROM includes Polaroid PDC 2070 Camera (PC) ArcSoft Software Suite (PC & Mac) MicroSoft NetMeeting (PC) Adobe Acrobat Reader (PC & Mac) User Guide in PDF format
Quick Guide
Hand Strap
USB Cable
4 x AAA Alkaline
Pouch Batteries
Polaroid PDC 2070 Digital Camera User Guide |
7 |
www.polaroid-digital.com

• Attaching the Hand Strap
• Installing the Batteries
4 x AAA Alkaline batteries are supplied with the product. For more guidelines on battery usage, please see Using your batteries.
1.To open the battery door, slide the button on it.
2.Insert the batteries as shown, ensuring you follow the +/- signs correctly.
3.To close the battery door, slide the button and press the battery door back to position and then release the button.
8 |
Polaroid PDC 2070 Digital Camera User Guide |
www.polaroid-digital.com
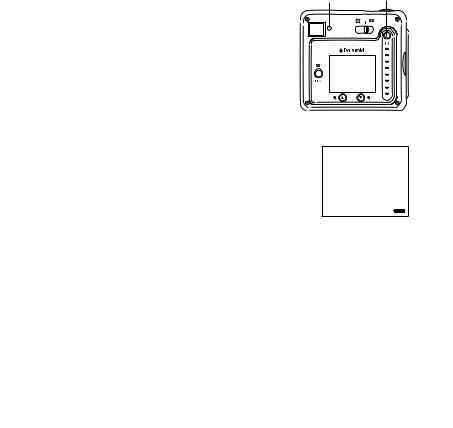
• Turning the Camera On and Off |
Status LED |
Power button |
To turn on the camera, fully press and hold the Power button until the Status LED turns green. When LCD screen comes on, the Status LED will be off. Press and hold the Power button again, “Good Bye” will show on the LCD screen and the camera will be off.
• Checking the Battery Level
Check the battery power level before taking pictures.
1.Turn on the camera.
2.Check the power status level that appears on the camera LCD screen.
 Batteries have adequate power.
 Batteries need to be replaced.
Polaroid PDC 2070 Digital Camera User Guide |
9 |
www.polaroid-digital.com

• Automatic Power Off Saves Battery
Your camera is designed to switch off automatically after 60 seconds (default setting) of inactivity. You can change the Auto Power Off setting by the following steps:
Turn on the camera, set the Mode selector to Capture mode (the Status LED blinks once).
Press |
Press |
Or set the Mode selector to Playback mode. |
Press |
|
|
||
|
|
|
|
|
|
|
|
|
Press 
Press |
Press |
10 |
Polaroid PDC 2070 Digital Camera User Guide |
www.polaroid-digital.com
2 Camera Setting
• Checking Camera Status
Turn on the camera, view the camera LCD screen to check which camera settings are active. If feature icon is not displayed, that particular feature is not activated.
Picture Quality |
|
Camera Status |
|
|
Other Features |
|
|
|
|
|
|
|
|
High |
|
SMC Card inserted |
|
Self-Timer On |
||
Quality |
|
|
|
|
|
|
|
|
|
|
|
|
|
Low |
|
Pictures can be taken |
A |
Auto Flash Mode |
||
|
|
|
|
|||
Quality |
|
Still Picture |
|
|
Flash Mode On |
|
|
|
|
|
|||
|
|
|
|
|
|
|
1600 X 1200 |
ONF |
Lock file |
|
|
|
|
Image size |
|
Unlock file |
|
|
Flash Mode Off |
|
1280 X 960 |
OFFF |
|
|
|
||
|
|
|
|
|
Video Mode |
|
Image size |
|
Full |
|
Low |
|
|
|
|
|
|
|||
|
|
|
|
|
||
640 X 480 |
|
|
|
|
|
Audio Mode |
|
|
|
|
|
||
Image size |
|
|
|
|
|
|
|
|
|
|
|
|
|
|
|
|
|
|
|
|
NOTE:
Some settings will remain even after the camera is turned off, e.g. Image Quality/Image Size/Flash Mode/Auto off/Date and time/Date stamp/
Frequency/Display Language settings.
Polaroid PDC 2070 Digital Camera User Guide |
11 |
www.polaroid-digital.com
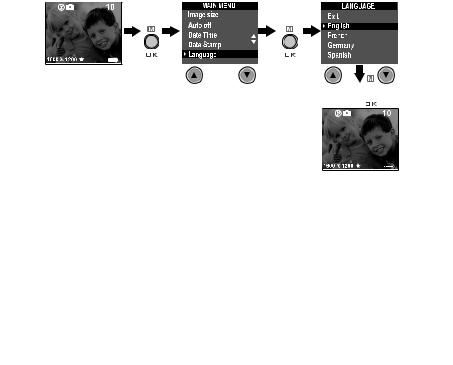
• Setting the Display Language
Under this setting, you can select the language you prefer for the LCD screen.
Turn on the camera, set the Mode selector to Capture mode (the Status LED blinks once).
Press |
Press |
Press 
12 |
Polaroid PDC 2070 Digital Camera User Guide |
www.polaroid-digital.com
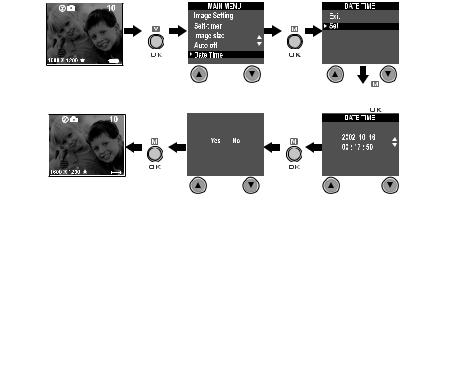
• Setting Date and Time
Turn on the camera, set the Mode selector to Capture mode (the Status LED blinks once). Use Previous or Next button to select a field, such as year, month, day, hour, minute, second. Use the Up or Down buttons to adjust the value in the field. Press the OK button after all fields are set.
Press |
Press |
Press 
Press |
Press |
Press Previous or Next button to shift to the item
Polaroid PDC 2070 Digital Camera User Guide |
13 |
www.polaroid-digital.com

3 Taking Pictures
• Taking a Picture
1.Turn on the camera.
2.Set the Mode selector to Capture mode (the Status LED blinks once).
3.Frame your subject using the LCD screen.
4.Press the Shutter button to take a picture. Hold the camera steady. Status LED will be on and a beep will sound when the picture has been taken.
• Setting the Picture Quality
Shutter button
A digital picture’s quality depends on both its resolution and the JPEG file compression that the camera applies when you take the picture. Resolution refers to the number of pixel in a digital picture. Higher resolution and less compression makes better quality which occupies more memory space. Smaller size pictures and normal quality are easier to email while larger size and fine quality are better for printing.
1.Turn on the camera.
2.Set the Mode selector to Capture mode (the Status LED blinks once).
3. Press the Quality button will alter the picture quality setting.
 Fine - high resolution: 1600 X 1200 pixel (without compression). High quality for printing photo at 4’’ X 5’’.
Normal -normal resolution: 1600 X 1200 pixel (4:1 compression). Efficient for email or posting to web.
14 |
Polaroid PDC 2070 Digital Camera User Guide |
www.polaroid-digital.com
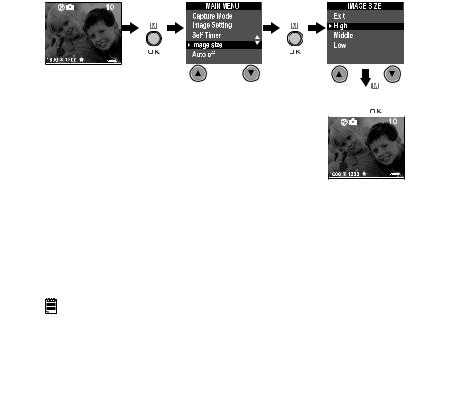
• Setting the Picture Size
Turn on the camera, set the Mode selector to Capture mode (the Status LED blinks once).
Press |
Press |
Press 
Here are the approximate number of pictures you can expect the camera to hold at each setting based on 8MB internal memory. You can expand memory with SMC, please refer to Capacity of SMC Card.
High Resolution: |
1600 |
X 1200 |
Fine: 8 pictures |
High Resolution: |
1600 |
X 1200 |
Normal: 20 pictures |
Medium Resolution: |
1280 |
X 960 |
Fine: 14 pictures |
Medium Resolution: |
1280 |
X 960 |
Normal: 30 pictures |
Low Resolution: |
640 X 480 |
Fine: 51 pictures |
|
Low Resolution: |
640 X 480 |
Normal: 116 pictures |
|
NOTE:
Scene complexity affects a picture’s file size. For example, a picture of trees in autumn has a larger file size than a picture of blue sky at the same resolution and quality setting. Therefore, the number of pictures you can store on a memory card may vary. The number of pictures on the LCD screen
is for reference only.
Polaroid PDC 2070 Digital Camera User Guide |
15 |
www.polaroid-digital.com

• Setting the Flash Mode
The Flash Range is approximately 3.2 feet to 6.5 feet (1 to 2 metres).
1.Turn on the camera.
2.Set the Mode selector to Capture mode (the Status LED blinks once).
3. Press Flash button to cycle through the flash mode until the one you want is shown on the LCD screen.
Flash mode on, the flash fires for every picture. Use this setting indoors in low light.
Flash mode off, the flash does not fire. Use this setting for outdoor pictures or where flash is prohibited or may be distracting. Also use when shooting toward a reflective surface, such as a window or mirror. If you do not have enough light when using this setting, your pictures will be too dark.
 A Auto Flash mode, the flash fires automatically as needed. Use this setting to take most pictures.
Please note that when flash mode is selected, the Status LED turns green and blinks until the flash finishes charging, then the Status LED will be on until pressing Shutter button to take a picture.
• Zoom in and out
Your camera is designed to have 3X digital Zoom. This feature lets you “zoom” in on the central area of a photo and photograph only the enlarged portion of the picture. Digital zoom applies to only one photo at a time. To Zoom in and out the picture, press Down/Up button.
NOTE:
This feature is available in Capture and Playback mode.
16 |
Polaroid PDC 2070 Digital Camera User Guide |
www.polaroid-digital.com
 Loading...