


PDC 2300Z Digital Camera
Creative Kit
User's Guide
Rev. 1, June 10, 2002

PDC 2300Z User Manual Addendum
PDC 2300Z cameras whose serial number ends with the letter “D” contain additional features not documented in the User Manual packed with the camera. This addendum highlights the added features.
Suppport for DPOF-based Photo Printing
1Turn the camera on.
2Set the camera controldial to PLAY mode and display the desired photo on the color LCD, as described in the camera manual.
3Press the MENU button to display the PLAY menu.
4Use the camera’s zoom control to highlight DPOF Settings. Press the OK button.
5Quantity is highlighted. Press the OK button.
6Use the camera’s zoom control to display the number of prionts that you want to make. (The default is 1.) Press the OK button.
7Use the camera’s zoom control to highlight Print Size. Press the OK button.
8Use the camera’s zoom control to display the print size:
•Printer Dependent (default; uses the printer’s current settings)
•3 x 5 inch
•4 x 6 inch
•5 x 7 inch
•8 x 10 inch
9Press the OK button.
10Use the camera’s zoom control to highlight Enable and press the OK button to “tag” the photo for DPOF printing.
11Press the Menu button to redisplay the photo on the color LCD and press the
LCD button to display the photoinformation. A yellow printer icon appears at the upper-left corner of photos tagged for printing.
Note: To remove the DPOF tag from a photo, redisplay the photo on the color LCD, highlight Disable in the DPOF Settings menu, and press the OK button.
12Press the Menu button to return to the photo display.
13Repeat steps 2 through 12 for each photo you want to print.
14When you’re ready to print, turn the camera off, remove the CompactFlash card,
and insert it into the DPOF-enabled printer. For information about using the memory card with a DPOF-enabled printer, see your printer’s user manual or the printer’s onling help.
Note: To quickly tag a photo for DPOF printing without using the above procedure:
1Display the desired photo in PLAY mode, as described in the camera manual.
2Press the LCD button to display the photo information.
3Press the OK button to turn DPOF printing for the photo on or off. When DPOF printing is on, a yellow printer icon  appears at the upper-left corner of the photo. When you tag a photo using this method, the print size defaults to Printer Selectable and the number of prints defaults to 1.

PDC 2300Z User Manual Addendum (page 2)
Save Settings Feature
A Save Settings menu line item allows the user to save the EV and White Balance settings. The original model camera would not save these settings changes when the camera power was turned off.
Saving White Balance or EV settings
1Turn on the power.
2Move the mode dial to the Record position.
3Push the Menu button on the back of the camera.
4Scroll to the White Balance or EV selection and push the OK button.
5Select a new setting and push the OK button.
6Scroll to the Save Settings choice in the Record menu and push the OK button.
7You will see an Are you sure? message.
•Selecting Yes will save the White Balance or EV settings when the camera is turned off. This also saves White Balance and EV settings when the camera batteries are removed.
•Selecting No will not save the new settings when the camera is turned off. No will also restore White Balance and EV settings to default (White Balance = Auto,
EV = 0) when camera is turned off.
Flash works when White Balance setting is changed
Note: This is an undocumented feature. It is not mentioned in the literature or help files included with the camera. In the previous camera model you were unable to use the flash when a non-auto White Balance was selected. The updated camera allows the flash to fire with any White Balance setting.

Table of Contents
Introduction . . . . . . . . . . . . . . . . . . . . . . . . . . . . . . . . . . . . . . 1 The Polaroid PDC 2300Z Digital Camera Creative Kit . . . . 2 Camera Features . . . . . . . . . . . . . . . . . . . . . . . . . . . . . . . . . . . 3 Power Supply . . . . . . . . . . . . . . . . . . . . . . . . . . . . . . . . . . . . . . 5 Memory Card . . . . . . . . . . . . . . . . . . . . . . . . . . . . . . . . . . . . . 8 Attaching the Wrist Strap . . . . . . . . . . . . . . . . . . . . . . . . . . . 10 Using the Camera . . . . . . . . . . . . . . . . . . . . . . . . . . . . . . . . . 10
Turning on the camera power . . . . . . . . . . . . . . . . . . . . 10 Using the Status LCD . . . . . . . . . . . . . . . . . . . . . . . . . . . 11 Using the LCD . . . . . . . . . . . . . . . . . . . . . . . . . . . . . . . . . 15 Using the Zoom control . . . . . . . . . . . . . . . . . . . . . . . . . 16 Using the zoom features . . . . . . . . . . . . . . . . . . . . . . . . . 16 Using the camera modes and menus . . . . . . . . . . . . . . . 17
Taking Photos . . . . . . . . . . . . . . . . . . . . . . . . . . . . . . . . . . . . 20 Setting the self-timer . . . . . . . . . . . . . . . . . . . . . . . . . . . . 22 Changing the LCD brightness . . . . . . . . . . . . . . . . . . . . 23 Adjusting the white balance . . . . . . . . . . . . . . . . . . . . . . 24 Adjusting the exposure compensation . . . . . . . . . . . . . 25
Reviewing Your Photos . . . . . . . . . . . . . . . . . . . . . . . . . . . . . 25 Protecting Your Photos . . . . . . . . . . . . . . . . . . . . . . . . . . . . . 32 Deleting Photos . . . . . . . . . . . . . . . . . . . . . . . . . . . . . . . . . . . 33 Changing the Camera Settings . . . . . . . . . . . . . . . . . . . . . . . 34 Installing Polaroid PhotoMAX Pro Software . . . . . . . . . . . 40 Transferring Photos to Your Computer . . . . . . . . . . . . . . . . 41 Using PhotoMAX Pro with the Internet . . . . . . . . . . . . . . . 46 Troubleshooting . . . . . . . . . . . . . . . . . . . . . . . . . . . . . . . . . . 51 FCC Notice . . . . . . . . . . . . . . . . . . . . . . . . . . . . . . . . . . . . . . . 55 Camera Precautions . . . . . . . . . . . . . . . . . . . . . . . . . . . . . . . 56 Battery Handling . . . . . . . . . . . . . . . . . . . . . . . . . . . . . . . . . . 57 Contacting Polaroid . . . . . . . . . . . . . . . . . . . . . . . . . . . . . . . 57 Internet Support . . . . . . . . . . . . . . . . . . . . . . . . . . . . . . . . . . 57 Warranties . . . . . . . . . . . . . . . . . . . . . . . . . . . . . . . . . . . . . . . 58
i

Introduction
Thank you for purchasing the Polaroid PhotoMAX
PDC 2300Z Digital Camera Creative Kit. This kit contains everything you need to enter the world of digital imaging. After taking photos, you will find it easy to transfer them to your computer, edit and correct your images—even display them on a TV!
Once the photos are on your computer, use the Polaroid PhotoMAX Pro Software to change them in many creative ways, include them in e-mails, print them, or find other great ways to use them.
Polaroid digital cameras and Polaroid PhotoMAX Pro Software are easy to use, and are designed to work together to produce high-quality results. Use your imagination. Have fun!
This user’s guide covers basic camera features, startup, installation procedures, and how to take photos and transfer them to your computer. For detailed information about the features and operation of your camera, see the online
Polaroid PhotoMAX Pro User’s Guide. The online user’s guide is included on the Polaroid PhotoMAX Pro Software CD-ROM and is installed automatically with the software.
Please fill out and mail in your registration card!
1

The Polaroid PhotoMAX PDC 2300Z
Digital Camera Creative Kit
Your Polaroid PhotoMAX PDC 2300Z Digital Camera Creative Kit contains everything you need to take digital photos and transfer them to your computer.
|
a a |
c |
dd |
|
|
|
b |
|
f |
g |
e |
h |
j |
i |
k |
aPolaroid PDC 2300Z Digital Camera
b8 MB CompactFlash memory card (inside camera)
cCamera case
dWrist strap
eFour AA batteries
fPolaroid PhotoMAX Pro Software CD-ROM
gUser’s Guide
hAC power adapter
iCamera-to-TV connector (video cable)
jCamera-to-computer RS-232C serial cable
kCamera-to-computer USB cable
2Polaroid PhotoMAX PDC 2300Z User’s Guide

Camera Features
Top view
b
g
a
h
c d e f
aMode knob (page 17)
bStatus LCD (page 11)
cResolution/Quality selection button (page 11 and page 12)
dMacro mode enable button (page 11 and page 14)
eSelf-timer enable button (page 11 and page 14)
fFlash mode button (page 11 and page 13)
gShutter button (page 20)
hZoom control/menu select (page 16 and page 17)
3

Rear view
bd
a
e f g
c
aPower on-off switch (page 10)
b Power/status indicator LED (page 5)
cLCD (page 15)
d Optical viewfinder (page 20)
eLCD on/off button (page 15)
fMenu display button (page 15)
gOK/menu selection/2x digital zoom button (see page 15, page 16, and page 17)
4Polaroid PhotoMAX PDC 2300Z User’s Guide

Power Supply
You can operate the Polaroid PDC 2300Z Digital Camera on battery power or with the AC adapter.
To conserve battery life, the camera shuts itself off after 1, 2, or 3 minutes of inactivity; if there is no activity for 2 minutes after that, the camera lens retracts. To activate the camera again, use the power switch. For more information, see “Turning on the camera power” on page 10.
Note: For information on setting the number of minutes of inactivity, see “Setting the automatic power-off delay” on page 39.
The battery status indicator on the Status LCD indicates how much energy remains in the batteries. The indicator displays different icons for different levels of charge:
Battery is fully charged.
Battery is half-charged.
Battery is in a low charge state.
Battery is empty—replace the batteries immediately.
The following battery types may be used with the
Polaroid PDC 2300Z Digital Camera:
•High-capacity super alkaline or lithium AA disposable
•NiMH or NiCad rechargeable
Use the AC adapter whenever possible to extend the life of your batteries. It is also a good idea to keep a set of extra batteries handy, especially on a trip when it may not be possible to find replacement batteries easily.
Note: Whenever you remove or replace the batteries, most of the camera settings reset to their defaults.
Note: For more information on the Status LCD, see “Using the Status LCD” on page 11.
5
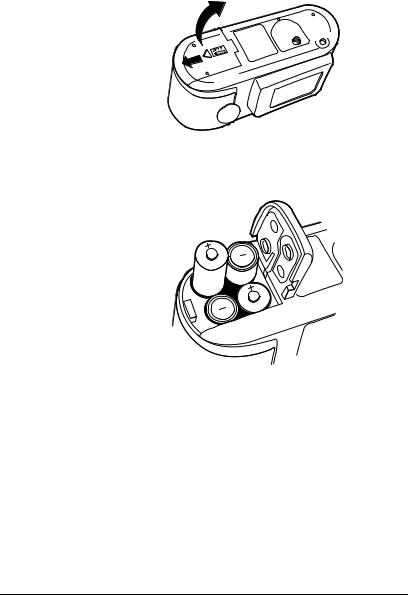
Loading batteries
1Open the battery compartment cover on the bottom of the camera by pressing down on the battery compartment cover and lifting it as shown.
2Insert four AA-size batteries.
Make sure the + and – terminals are oriented correctly as shown inside the battery compartment. Do not mix old and new batteries, or batteries of different types.
3Close the battery compartment cover securely.
6Polaroid PhotoMAX PDC 2300Z User’s Guide
Connecting the AC adapter
Here are some important notes for using the AC adapter with your camera:
•Only use the AC adapter that came with your camera. Using a different AC adapter may damage your camera.
•Turn the camera power off before connecting or disconnecting the AC adapter.
•Grasp the plug, not the cord, when you unplug the adapter from an outlet. Avoid bending, pulling, or twisting the AC adapter cord. Do not try to lengthen the cord by splicing it with another wire.
•Replace a damaged power cord with a new one (to avoid electrical shock).
Note: The AC adapter may become warm to the touch after extended periods of use. This is no cause for alarm.
Note: If you are using rechargeable batteries, using the AC adapter will not recharge them. For more information on how to recharge the batteries, see the instructions provided by the battery manufacturer.
1Connect one end of the AC adapter (a) to the AC power adapter connector on the camera.
a
2Connect the other end of the AC adapter to an electrical outlet.
7
Memory Card
The photos you take with your PDC 2300Z Digital Camera are stored on a removable 8 MB Type I CompactFlash memory card (included in the kit and pre-installed).
The PDC 2300Z Digital Camera supports all Type I CompactFlash memory cards, and is not limited by MB size.
Caution: Do not insert or remove the memory card while the power is on. Doing so may damage the memory card.
Note: You must insert the memory card before turning on the camera. If the memory card is not installed, the camera beeps quickly but does not turn on.
Note: You may want to format the memory card if it has become corrupt, if you want to clear the card of all protected and unprotected photos, or if you want to reset the image numbers. For more information, see page 31, page 32, or page 37.
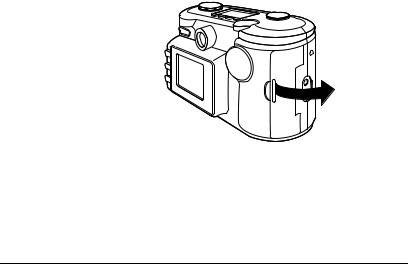
Inserting the memory card
1Make sure the camera power is off (lens is retracted and closed).
2Open the memory compartment on the side of the camera as shown:
8Polaroid PhotoMAX PDC 2300Z User’s Guide
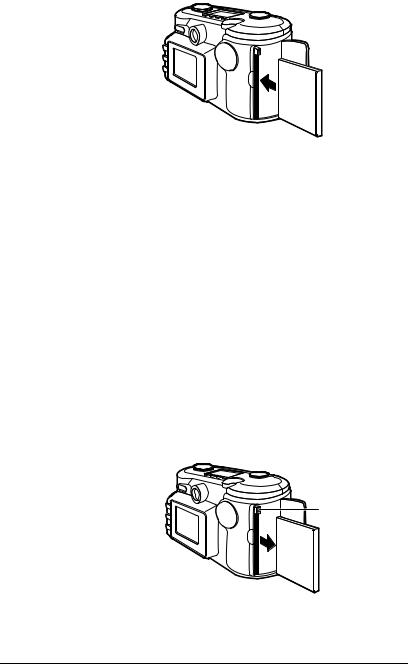
3Insert the memory card into the slot.
Push the card carefully, but firmly, into the slot. The card fits completely into the slot in only one way. When it is inserted correctly, the eject button above the card pops out.
Note: If the card does not seem to fit correctly, do not force it. Turn over and retry.
4Close the memory compartment cover.
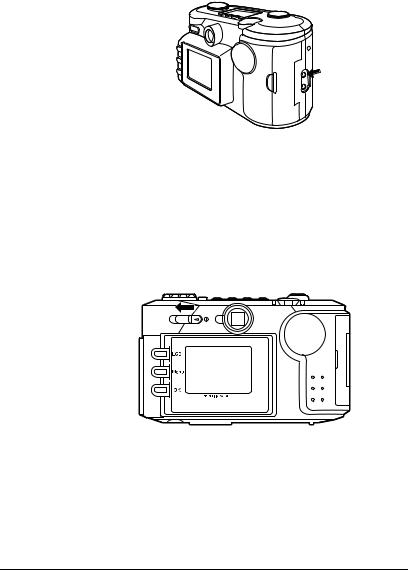
Removing the memory card
1Make sure the camera power is off (lens is retracted and closed).
2Open the memory compartment on the side of the camera.
3Push the card-eject button (a) in the slot just above the memory card.
4Grasp the edge of the memory card and pull it out.
a
5Close the memory compartment cover.
9
Attaching the Wrist Strap
To attach the wrist strap to the body of the camera, insert one end of the wrist strap into the top hole (a) on the memory card compartment side of the camera. Push the loop out through the bottom hole (b). Pull the wide end of the wrist strap through this loop to secure the strap.
a  b
b
Using the Camera
You must insert the memory card before you turn on the camera. For information about the memory card, see page 8.
Turning on the camera power
1Turn on the camera power by sliding the power switch to the left (as shown) and then letting go of the switch.
10 |
Polaroid PhotoMAX PDC 2300Z User’s Guide |

Using the Status LCD
After the camera turns on, icons appear on the Status LCD. Icons may display differently or not at all, depending on which mode the camera is in.
c
a |
|
|
|
|
d |
|
|
|
|
b
e
g f
aPhoto resolution (RECORD and PLAY)—see page 12.
b Photo quality (RECORD and PLAY)—see page 12.
cBattery status (all modes)—see page 5.
dPhotos remaining or photo number (depends on mode: RECORD or PLAY)—see page 12.
eFlash status (RECORD)—see page 13.
fSelf-timer indicator (RECORD)—see page 14.
gMacro mode indicator (RECORD)—see page 14.
11

Pixel resolution and photo quality
Pressing the Resolution/Quality button (top of camera) cycles through the settings for pixel resolution and quality.
•The resolution setting—indicated by 1792 x 1200 or 896 x 600—refers to the number of pixels in a digital photo. The higher the pixel resolution, the more pixels that are contained in your photo. A higher pixel resolution takes up more space on the memory card, but produces a higher quality digital image when printed.
•The quality setting—indicated by the number of stars— refers to the type of image compression you want to use for each resolution setting. The lower the compression, the better the quality. An image with lower compression takes up more space on the memory card, but produces a higher quality digital image when printed.
|
Icons |
Resolution & Quality |
# Photos per |
|||
|
|
|
|
|
|
8 MB Card |
|
|
|
|
|
|
|
|
1792 x 1200 |
1792 x 1200 pixel |
|
|||
|
|
|
|
|
resolution |
|
|
|
|
|
|
Low compression (best |
7 |
|
|
|
|
|
||
|
|
|
|
|
quality) |
|
|
|
|
|
|
Medium compression |
14 |
|
|
|
|
|
||
|
|
|
|
|
High compression |
29 |
|
|
|
|
|
||
|
|
|
|
|
(minimum file size) |
|
|
|
|
|
|
|
|
|
896 x 600 |
896 x 600 pixel resolution |
|
|||
|
|
|
|
|
Low compression (best |
29 |
|
|
|
|
|
||
|
|
|
|
|
quality) |
|
|
|
|
|
|
Medium compression |
58 |
|
|
|
|
|
||
|
|
|
|
|
High compression |
116 |
|
|
|
|
|
||
|
|
|
|
|
(minimum file size) |
|
|
|
|
|
|
|
|
12 |
Polaroid PhotoMAX PDC 2300Z User’s Guide |

Flash
Pressing the Flash mode button on the Status LCD lets you cycle through the different types of camera flash. The default is Auto Flash. The flash range is 1.6 to 10 ft (0.5 – 3 m).
Icon |
Flash setting |
||||||
|
|
|
|
|
|
|
|
|
|
|
|
|
|
|
Auto Flash: |
|
|
|
|
|
|
|
• The flash fires automatically when |
|
|
|
|
|
|
|
|
|
|
|
|
|
|
|
needed. |
|
|
|
|
|
|
|
• The autoexposure sensor in the |
|
|
|
|
|
|
|
|
|
|
|
|
|
|
|
camera determines when the flash is |
|
|
|
|
|
|
|
necessary. |
|
|
|
|
|
|
|
|
|
|
|
|
|
|
|
Fill Flash: |
|
|
|
|
|
|
|
• The flash fires for every photo. |
|
|
|
|
|
|
|
• Use to fill in and soften strong |
|
|
|
|
|
|
|
shadows when there is a light behind |
|
|
|
|
|
|
|
the subject or illuminating the subject |
|
|
|
|
|
|
|
from the side. |
|
|
|
|
|
|
|
• Use on cloudy days. |
|
|
|
|
|
|
|
|
|
|
|
|
|
|
|
No flash: |
|
|
|
|
|
|
|
• The flash does not fire. |
|
|
|
|
|
|
|
|
|
|
|
|
|
|
|
• Use in places where flash is prohibited |
|
|
|
|
|
|
|
or may be distracting. |
|
|
|
|
|
|
|
|
|
|
|
|
|
|
|
• Use when shooting toward a reflective |
|
|
|
|
|
|
|
background, such as a window or a |
|
|
|
|
|
|
|
mirror. |
|
|
|
|
|
|
|
|
|
|
|
|
|
|
|
Red Eye Reduction: |
|
|
|
|
|
|
|
• The flash fires automatically when |
|
|
|
|
|
|
|
needed. |
|
|
|
|
|
|
|
• Each flash is preceded by a preflash to |
|
|
|
|
|
|
|
reduce red-eye effect. |
|
|
|
|
|
|
|
|
13

Macro lens
Pressing the Macro enable button on the top of the camera turns the Macro (close-up) lens on or off. Use the Macro lens for subjects 1.5 to 18 in. (3.8 to 46 cm) from the camera. For more information, see “Taking Photos” on page 20.
Note: When using the Macro lens, make sure the zoom lens is set all the way to Wide Angle; otherwise, the camera may not focus properly.
|
Icon |
Macro Setting |
|
|
|
|
|
|
|
|
Subjects 1.5 to 18 in. (3.8 to 46 cm) |
|
|
|
|
|
|
|
from the camera. |
|
|
|
|
|
|
|
|
Self-timer
Pressing the Self-timer button on the top of the camera turns the camera self-timer on or off. The self-timer applies to the next picture you take; you can set the self-timer for each photo you want to delay. For more information, see “Setting the self-timer” on page 22.
Note: After you take a photo with the self-timer, it resets; you must set the self-timer each time you take a timed photo.
Icon |
Self-timer Setting |
|
Delays the camera shutter 10 seconds |
|
when you press the shutter button. |
14 |
Polaroid PhotoMAX PDC 2300Z User’s Guide |

Using the LCD
You can use the LCD on the back of the camera as a viewfinder for taking photos, to review the photos you have taken, and to view and change camera menus.
•Press the LCD button to toggle the LCD on and off in RECORD mode, or to cycle through three different ways of viewing photos in PLAY mode (photo with or without data displayed, and thumbnails). For more information, see “Taking Photos” on page 20 or “Reviewing Your Photos” on page 25.
•Press the Menu button while in the RECORD, PLAY, or ERASE modes to change options for taking, reviewing, and erasing photos. For more information, see “Using the camera modes and menus” on page 17.
•Press the OK button to select highlighted options when using the camera menus . When using the LCD as a viewfinder for taking photos, press the OK button to turn 2x digital zoom on or off . For more information, see “Using 2x digital zoom” on page 16 or “Using the camera modes and menus” on page 17.
15

Using the Zoom control
Use the Zoom control on the top of the camera to zoom the lens between Wide Angle and Telephoto, scroll through and change camera menus, and cycle through photos or photo thumbnails.
Using the zoom features
There are two ways to zoom in or out when taking a photo:
•Optical zoom: Use the Zoom control to zoom in or out when taking a photo using either the optical viewfinder or the LCD.
•2x digital zoom: Press the OK button to zoom in and out on the LCD when taking a photo using the LCD.
Using the Zoom control to zoom (optical zoom)
Rotate the Zoom control left or right to zoom in and out from Wide Angle to Telephoto when taking photos in RECORD mode.
Icons on the Zoom control indicate which direction to rotate for Wide Angle or Telephoto:
a |
b |
aZoom out (toward Wide Angle lens)
bZoom in (toward Telephoto lens)
Using 2x digital zoom
When using the LCD as a viewfinder for taking your photos, press the OK button once to zoom in digitally. The message 2x D Zoom displays on the LCD. Once you have enabled 2x digital zoom, press the OK button again to disable it.
Note: 2x digital zoom automatically reduces the pixel resolution of the photo to 896 x 600, and the Status LCD changes to reflect this.
16 |
Polaroid PhotoMAX PDC 2300Z User’s Guide |
 Loading...