


10” Under-the-Cabinet LCD TV with DVD Player
FDM-1015
User’s Manual
20060302

Important Safety Instructions
CAUTION: TO REDUCE THE RISK OF ELECTRIC SHOCK, DO NOT REMOVE COVER (OR BACK). NO USE-SERVICEABLE PARTS INSIDE. REFER SERVICING TO QUALIFIED SERVICE PERSONNEL.
The lightning flash with arrowhead symbol, within an equilateral triangle, is intended to alert the user to the presence of un-insulated “dangerous voltage” within the product’s enclosure that may be of sufficient magnitude to constitute a risk of electric shock to persons.
The exclamation point within an equilateral triangle is intended to alert the user to the presence of important operating and maintenance (servicing) instructions in the literature accompanying the appliance.
WARNING: TO REDUCE THE RISK OF FIRE OR ELECTRIC SHOCK, DO NOT EXPOSE THIS APPLIANCE TO RAIN OF MOISTURE.
CAUTION: Laser radiation when open. Do not stare into beam.
POWER SUPPLY:
Connect the supplied adapter to the side of the DVD player in the slot marked “Power In”. Plug the two-prong end of the power cord to an AC100-240V outlet. If you have difficulty inserting the plug, turn it over and reinsert it, if the unit will not be used for a long time, disconnect the plug from the outlet.
NOTE:
Before plugging the power cord into an AC outlet, make sure that all the connections have been made.
CAUTION: These servicing instructions are for use by qualified service personnel only. To reduce the risk of electric shock, do not perform any servicing other than that contained in the operating instructions unless you are qualified to do so.
Refer to service manual for servicing instructions.
- 2 -

Important Safety Instructions
1)Read these instructions.
2)Keep these instructions.
3)Heed all warnings.
4)Follow all instructions.
5)Do not use near water.
6)Clean only with dry cloth.
7)Do not block any ventilation openings. Maintain well ventilated conditions around the product, Do not put product on bed, sofa or anything that blocks ventilation. Install in accordance with the manufacturer’s instructions.
8)Do not install near any heat sources such as radiators, heat registers, stoves, or other apparatus (including amplifiers) that produce heat.
9)Do not defeat the safety purpose of the polarized or grounding-type plug. A polarized plug has two blades with one wider than the other. A grounding type plug has two blades and a third grounding prong. The wide blade or the third prong is provided for your safety. If the provided plug does not fit into your outlet, consult an electrician for replacement of the obsolete outlet.
10)Protect the power cord from being walked on or pinched particularly at plugs, convenience receptacles, and the point where they exit from the apparatus.
11)Only use attachments/accessories specified by the manufacturer.
12)Use only with the cart, stand, tripod, bracket, or table specified by the manufacturer, or sold with the apparatus. When a cart is used, use caution when moving the cart/apparatus combination to avoid injury from tip-over.
13)Unplug this apparatus during lightning storms or when unused for long periods of time.
14)Refer all servicing to qualified service personnel. Servicing is required when the apparatus has been damaged in any way, such as power-supply cord or plug is damaged, liquid has been spilled or objects have fallen into the apparatus, the apparatus has been exposed to rain or moisture, does not operate normally, or has been dropped.
15)Apparatus shall not be exposed to dripping or splashing and no objects filled with liquids, such as vases, shall be placed on the apparatus.
Note: Do not touch the color TFT LCD screen by hand directly.
- 3 -

Important Safety Instructions
CAUTION: USE OF ANY CONTROLS, ADJUSTMENTS, OR PROCEDURES OTHER THAN THOSE SPECIFIED HEREIN MAY RESULT IN HAZARDOUS RADIATION EXPOSURE.
Region code information
DVD players and discs are coded by region. If the region number described on the
DVD disc does not correspond to the region number of this product, this product
cannot play the disc. The region code of this unit is 1.
IMPORTANT FOR LASER PRODUCTS
1.CLASS 1 LASER PRODUCT
2.DANGER: Visible laser radiation when open and interlock failed or defeated. Avoid direct exposure to beam.
3.CAUTION: Do not open the top cover. There are no user serviceable parts inside the unit. Leave all servicing to qualified service personnel.
- 4 -

FCC Notice
NOTE: This equipment has been tested and found to comply with the limits for a Class B digital device, pursuant to part 15 of the FCC Rules. These limits are designed to provide reasonable protection against harmful interference in a residential installation. This equipment generates, uses, and can radiate radio frequency energy and, if not installed and used in accordance with the instructions, may cause harmful interference to radio communications. However, there is no guarantee that interference will not occur in a particular installation. If this equipment does cause harmful interference to radio or television reception, which can be determined by turning the equipment off and on, the user is encouraged to try to correct the interference by one or more of the following measures:
--Reorient or relocate the receiving antenna.
--Increase the separation between the equipment and receiver.
--Connect the equipment into an outlet on a circuit different from that to which the receiver is connected.
--Consult the dealer or an experienced radio/TV technician for help.
- 5 -
Table of Contents |
|
Important Safety Instruction---------------------------------------------------------------------- |
2 |
FCC Notice---------------------------------------------------------------------------------------------- |
3 |
Table of Contents------------------------------------------------------------------------------------- |
6 |
Characteristic Features ---------------------------------------------------------------------------- |
7 |
Disc Information -------------------------------------------------------------------------------------- |
8 |
Front Panel --------------------------------------------------------------------------------------------- |
9 |
Rear Panel and Display Panel-------------------------------------------------------------------- |
11 |
Remote Control --------------------------------------------------------------------------------------- |
12 |
Preparation ------------------------------------------------------------------------------------------- |
12 |
Using the Remote Control------------------------------------------------------------------------- |
12 |
System Connections -------------------------------------------------------------------------------- |
16 |
Connecting To External AV Signal Source ----------------------------------------------------- |
16 |
Connecting To TV Signal Input Source--------------------------------------------------------- |
16 |
Connecting To the Antenna -------------------------------------------------------------------------------- |
17 |
Connecting To the Power Adapter ------------------------------------------------------------------------ |
18 |
Radio Function------------------------------------------------------------------------------------------ |
19 |
TV Function -------------------------------------------------------------------------------------------- |
20 |
AV Function -------------------------------------------------------------------------------------------- |
24 |
Play Operation ---------------------------------------------------------------------------------------- |
25 |
Playback Functions --------------------------------------------------------------------------------- |
27 |
System Setup ----------------------------------------------------------------------------------------- |
29 |
DVD Setup ----------------------------------------------------------------------------------------------- |
29 |
LCD Setup ----------------------------------------------------------------------------------------------- |
30 |
Installing the Unit in Kitchen---------------------------------------------------------------------- |
31 |
Troubleshooting -------------------------------------------------------------------------------------- |
33 |
Specifications ----------------------------------------------------------------------------------------- |
34 |
- 6 -

Characteristic Features
This product incorporates DVD player, LCD display, TV receiver and radio function in one system. It is designed for convenient use in the kitchen. Please refer to page 30 for the installation instructions.
Multiple Mode
•DVD
•TV
•Radio
•External Audio & Video Input mode
High Quality Property
Video Screen
Supports normal screen (4:3) and wide screen (16:9) aspect ratios.
AV Input
External Audio, Video input can be connected to most external AV sources.
LCD (Liquid Crystal Display) Screen
Color video screen designed with LCD technology clearly shows video data.
Amplifier Function
Built-in 2x5w stereo amplifier with left and right speakers.
Switching Power Adapter
Automatically adapts to the voltage required.
Special Functions
Supports Multi-language.
Advanced Playing Function
Compatibility
Plays: DVD, CD and JPEG discs.
On-Screen Display
Displays your choice of English, Spanish, or French.
Fast Search Function
Multi-speed, fast forward, fast reverse, slow play and repeat playback.
Zoom Function
Allows the viewer to enlarge or reduce the picture.
Search By Time
Search for a certain time on a disc.
TV Functions
•Receive TV signal clearly.
•Search for TV channels automatically.
•Automatically memorize the channels.
Radio Functions
•Receive AM/FM signal clearly.
•Search for radio stations automatically.
•Store radio stations easily.
•Search for radio stations in high or low frequency range.
- 7 -
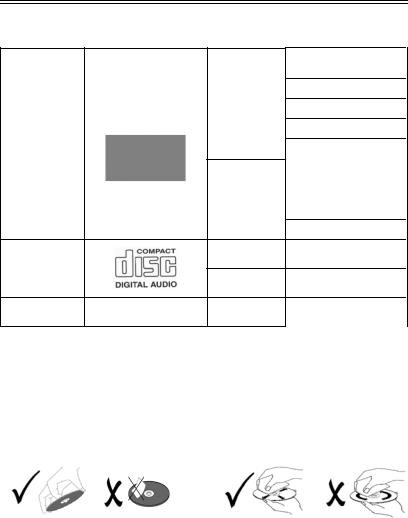
Disc Information
Disc Formats Supported By This Player
DISC LOGO |
DIAMETER |
|
|
|
12cm |
DVD
8cm
12cm
CD
8cm
JPEG |
12cm |
PLAYBACK TIME/ PLAYABLE SIDES
133 min (SS-SL)
242 min (SS-DL)
266 min (DS-SL)
484 min (DS-DL)
41 min (SS-SL)
75 min (SS-DL)
82 min (DS-SL)
150 min (DS-DL)
74 min
20 min
The disc maker specifies the operation of some DVD discs. Please refer to the instruction manual with the disc.
Care of Discs
Do not touch the playing surface of the disc.
Do not stick paper or labels on the disc.
Cleaning of Discs
If a disc has fingerprints or dust on it, lightly wipe the disc with soft cloth from the center of the disc outward.
Storage of Discs
Do not expose discs to direct sunlight or excessive temperatures.
Never use record cleaning sprays, or any other solvents to clean your discs.
- 8 -

Front Panel
Front Panel Drawing
1.POWER Button
Press to enter or exit the STANDBY mode.
2.Disc Tray
Used to load disc.
3.EJECT Button
Press to open or close the disc tray.
4. (PLAY/PAUSE) Button
Press to start or pause playback under DVD mode.
5.(STOP) Button
Press to stop playback under DVD mode.
6.Button
Under DVD mode, press once to go to beginning of the current track/chapter. Press twice to go to the previous track/chapter.
7.Button
Press to go to the next track under DVD mode.
8.(SEEK – )Button
Under radio mode, press once to fine tune frequency backward. Press for about 1.5 seconds to search radio stations backward automatically. Under DVD mode, press it to activate fast backward playback.
- 9 -

Front Panel
9.(SEEK +) Button
Under radio mode, press once to fine tune frequency forward. Press for about 1.5 seconds to search radio stations forward automatically.
Under DVD mode, press it to activate fast forward playback.
10. Remote Sensor
Receives remote control signal for operation.
11. SOURCE Button
Press to shift among DVD, TV, AV, FM and AM mode.
12. MUTE Button
Press to turn the speaker output on or off. The corresponding information will be displayed on the display panel.
13. SET Button
Press to enter or exit from the timer setup menu. Press to memorize the station under AM/FM status.
14. Display Panel
Displays the time, status, radio frequency and radio station number. When adjusting volume, the VOL and volume level will be displayed on the display panel for several seconds.
15. ▼/CH– Button
Press to select items in the setup menu. Press to select channels or radio stations backward under TV or radio mode.
Press to adjust the value downward when setting the time on the display panel.
16. ▲/CH+ Button
Press to select items in the setup menu. Press to select channels or radio stations forward under TV or radio mode.
Press to adjust the value upward when setting the time on the display panel.
17. ◄/VOL– Button
Press to select items in the setup menu. Press to decrease the volume.
Press to decrease the value in the picture setup menu.
18. ► VOL+ Button
Press to select items in the setup menu. Press to increase the volume.
Press to increase the value in the picture setup menu.
19. TIME/ ENT Button
Press to set the time when the time is displayed on the display panel. Use the
, buttons to select the editing position of hour or minute, use the , buttons to adjust the value of the hour or minute upward and downward. Under FM/AM status, press it once to display the time. Press it twice to set the time.
Press to confirm the time or selections in setup menu.
20. TV/LCD SETUP Button
Press to enter the LCD setup menu.
21. LCD Screen
Presents a high resolution picture.
- 10 -
Rear Panel and display panel
Rear Panel Drawing
1.ANT INPUT jack
Connected to external antenna to receive the TV program in TV mode.
2.FM 75Ωcoaxial antenna jack
3.AM antenna jack
Display Panel Drawing
1.FM radio status indicator
2.AM radio status indicator AM time indicator
3.PM time indicator
4.Hour or character indicators
5.Minute or character indicators
4.Left/Right AUDIO input jack
Connection for audio input.
5.VIDEO input jack
Connection for video input.
6.Direct current 12V input jack
6.Character indicators
7.FM frequency unit of MHz indicator
8.AM frequency unit of KHz indicator
-11 -
 Loading...