


ID CARD
Table of contents
 Loading...
ID Card Maker version 4 1

2 ID Card Maker version 4

ID Card Maker version 4 i
Contents
CHAPTER 1 Introduction 3
What is ID Card Maker? 3
Minimum Requirements 5
What’s On the CD 6
What’s New In Version 4 7
Year 2000 Compliance 11
CHAPTER 2 Installation 13
CHAPTER 3 Setting Up IDCM (Tools Form) 17
User Accounts 21
User Permissions and Passwords 21
Configuring IDCM 27
Preferences 28
IDServer Setup 41

Contents
ii ID Card Maker version 4
Capture Devices 45
Printers 52
Encoding 56
Database Management 59
Database Options 60
Database Tables and Forms 60
Modifying Tables and Forms 61
Edit Field Definitions Window 64
Database Management window 72
Attaching to Another Database 79
Added Security with Field Definition files 81
Importing 83
Importing 83
Advanced Import 85
Exporting 95
Exporting the Entire Database 95
Badge Design 97
Menu Commands 98
Badge Objects 104
Using the “Insert Image” Command 120
Bar Encoding 121
Magnetic and Smart Chip Encoding 125
Reports 129
Search Criteria 131
Fields to Show in Report 132
Data History 135
Add-ins 139
Image Export 140
Selected Export 141
Repairing and Compacting 145
CHAPTER 4 Search Form 147
Searching for Records 149

ID Card Maker version 4 iii
Contents
CHAPTER 5 Creating Badges (Personal Data Form) 155
Create and Edit 158
Capture 158
Printing 161
Batch Printing 164
History 167
Appendix A Navigating ID Card Maker 171
Appendix B Graphic File Formats 175
Appendix C Hardware Setup 177
PDC 2150 Camera 177
Signature Tablet 177
Fingerprint Capture Device 178
Appendix D SQL and Boolean Operators 179
Appendix E IIF Statements 183
Appendix F Input Masks & Field Formatting 187
Input Masks 187
Field Formatting 190
Appendix G Best Practices 193
INDEX 197

Contents
iv ID Card Maker version 4

ID Card Maker version 4 1
ID Card Maker
Polaroid Corporation
Commercial ID Systems & Solutions
4650 Executive Blvd.
Ft. Wayne, Indiana 46808

2 ID Card Maker version 4
Information in this document is subject to change without notice. No part of this document
may be reproduced or transmitted in any form or by any means, electronic or mechanical,
for any purpose, without the express written permission of Polaroid.
ID Card Maker™ is a registered trademark of Polaroid Corporation.
Copyright © 1994-2004 ImageWare Systems, Inc. All Rights Reserved.
IDServer™ is a registered trademark of ImageWare Systems, Inc.
Microsoft, MS, MS-DOS, Microsoft Access, Windows, Windows NT 2000, Windows 98
and Windows XP are registered trademarks of Microsoft Corporation.
TrueType™ is a registered trademark of Apple Corporation.
FlashBus™ is a registered trademark of Integral Technologies, Inc.
SecurCode™ is a registered trademark of CMI.
2D Superscript™ is a registered trademark of Datastrip Corporation.

ID Card Maker version 4 3
CHAPTER 1 Introduction
What is ID Card Maker?
Welcome to ID Card Maker, the world’s leading software for the creation of digital
photo ID badges! ID Card Maker combines database, badge design, image capture,
point-and-click hardware setup, and badge printing all from within one user-
friendly interface.
ID Card Maker comes in three versions: Level I, Level II, Level III. The difference
between them is the absence or presence of "features”, which add functionality to
ID Card Maker versions. Level I is the lowest and level III is the version with the
most features.
The features are controlled by the "security key" or "dongle" that comes with your
software. The dongle plugs into the printer port on your computer, and a USB ver-
sion is also available. The software will not work without it. The keys are clearly
marked "Level I", "Level II", and "Level III".
As you read this manual, you may see screenshots or read about features of ID Card
Maker that are different from what you see on your own monitor. That is because
you are running a different level key with features that are not present. We have
tried to indicate clearly through use of icons in the margins of this manual which
application features are associated with which "levels." ”

Introduction
4 ID Card Maker version 4
Here is a brief description of what this software package has to offer:
Database
• Based on Microsoft Access 2000, ID Card Maker can store up to 100,000,000
records
• Attach to ODBC databases
• Personal information is entered in standard text fields using Windows’ “point and
click” interface
• User-definable database fields
• Perform searches for single records or groups of records
• Create completely customized reports of your data
• Import and export data to and from another database file
• “Repair and compact” utilities included for database integrity
• User accounts and passwords for database security
• More...
Badge Design
• Design badges in a “What You See Is What You Get” (WYSIWYG) window
• Badges are printed exactly the way they appear in the design window
• A “Toolbar” for quick access to commonly used commands
• Image “ghosting” and “see through”
• Unlimited badge designs
• Export card layouts
• PDF417 2D bar code
• Datastrip Superscript 2D bar code
• Single- or double-sided badge design
• Rotation of text, images, bar codes, and badge
• Up to 300% ZOOM in the design window
• Create Rosters with text, photos, headers and footers
• More...

ID Card Maker version 4 5
Minimum Requirements
Image Capture and Display
• Capture portraits, fingerprints, and/or signatures
• Import images
• Images are immediately available for preview and printing
• Images accessible to other applications
• Up to 30 images per record, and use all images in badges and rosters
Hardware Setup
• Use any TWAIN or Video for Windows input device
• Use any PVC card or Sheet printer, which uses a Windows printer driver
• Point and click configuration of hardware options
Badge Printing
• Print badges at the click of a button
• One-at-a-time or Batch printing
• Sheet printing
Optional add-on modules
• Expert Image Export (export select images)
• Expert Data Export (export data from select fields and for selected records)
Minimum Requirements
Please verify that your computer meets the following requirements before installing ID
Card Maker:
Operating System: You must be running Windows 98/2000/XP, or NT 4.0 (does not
support USB).

Introduction
6 ID Card Maker version 4
CPU (central processing unit): You must have a Pentium-level CPU running at
400 MHz or higher (for 2000/XP Operating Systems).
RAM (random access memory): You must have a minimum of 128 megabytes of
RAM. Best results are obtained with 256 megabytes or more.
Hard Disk Space: You must have up to 90 megabytes of free hard disk space depend-
ing on which installation options you choose.
• ID Card Maker requires approximately 45 megabytes of disk space. In addition,
extra disk space is required to store individuals’ images. Typically, a single portrait
is 10K-12K. Therefore, if you have 500 individuals, you will need an additional
5,000K-6,000K of disk space—or 5-6 megabytes—to store their portraits. Storing
fingerprint and signature images requires additional disk space.
• ID Card Maker uses a “runtime” version of Microsoft Access 2000 as its database
engine. If you do not already have the “runtime” version of Access, the installation
wizard will install this 43 megabyte application. Backup your database regularly.
• ID Card Maker on-line User Manual (in PDF format) requires approximately 2
megabytes of disk space.
Video Capture Card: While some cameras connect to your computer through a serial
or Universal Serial Bus (USB) port, others require you to install a separate video capture
card. Consult your camera’s documentation.
CD ROM: ID Card Maker only installs from a CD. Your PC must have a CD ROM drive.
Keyboard and Mouse
What’s On the CD
The ID Card Maker CD contains:
• The ID Card Maker application and Access Runtime files. Installing this applica-
tion will copy all the files needed to run our photo ID badging system.
• On-line User Manual. This manual has been converted to a Portable Document File
(PDF). Once installed onto your computer, you can read the “electronic” version of
this manual. If you do not have Adobe’s free Acrobat Reader, you may also install
this from the CD.

ID Card Maker version 4 7
What’s New In Version 4
• The ID Card Maker What’s New document.
When you run ID Card Maker’s Setup Wizard on the CD, you will be presented with the
option to install any or all of these components.
What’s New In Version 4
Security
History Included On Every Version. When given permission to view badge history, all
levels of users can now see when badges were issued and badge status. Users can also
view and print all badge history.
When viewing data history or record events, customers can now view and print out the
date an event occurred, the workstation that was used, who the operator was, the operation
he/she performed and a description of the operation.
Viewing Image History. In the IDServer setup window there is a box that allows the user
to enter, between 0 and 9, the number of old history images to keep. Users can then view
them on the personal data form by right clicking a displayed image that has a history.
Installing Wasp Barcode Fonts. Wasp barcode fonts can now be installed and are auto-
matically activated after the initial install.
Wasp Codabar/Mod 10 for Barcode Encoding. In the barcode properties of IDLayout,
the Wasp Codabar/Mod 10 is added to the dropdown encoding selection.
Mod 10 Check Digit for Barcode Encoding. In the barcode properties of IDLayout, the
Mod 10 check digit is added to the dropdown encoding selection.
Database
Keyless Demo. IDCM demos are now available without a key. Once installed, users can
run IDCM in a keyless demo mode. In demo mode, all badges will have a watermark with
the word "demo" written across them.

Introduction
8 ID Card Maker version 4
Text Data Now allowed In Importing. Users can now import/export from both .csv and
.txt extension files.
Default Database. IDCM now has an updated simple default database that allows users to
quickly install a working application with sample layouts, enrollment fields and reports.
Sample Databases and Card Layouts. There are now multiple application-specific and
vertical application sample databases and card layouts available. These files are located in
a separate folder on the CD and are not automatically installed with the application.
Modifying Database Structure over the Network. When creating a new database over
the network, an error 'file in use' would appear. This happened only over the network and
it is now fixed.
IDNumber in Advanced Imports. Previously, advanced import into SQL or other
ODBC databases required an IDNumber whereas the equivalent MS Access did not. This
restriction has been removed and the import automatically assigns the appropriate values
for the IDNumber.
IDServer Box. The IDServer box no longer will pop up in front of the User Interface win-
dow.
IDSetup Changed in IDServer. IDSetup.exe has been changed to fix the problems cre-
ated when a directory or database name contained spaces.
Messages Changed To Be More User Friendly. The language in the database manage-
ment form is less technical, making it easier to understand and more user-friendly.
Imaging
Automatically Display Images. The 'automatically display images' check box is now
enabled for level I and II users, giving small to medium businesses the option to display
the images they acquired.
Select Different Images. Users can now select different image sources on the fly to speed
the enrollment process. Simply hold down the 'Alt' key and simultaneously select the pri-
mary image source on the capture instance form. This will enable the user to switch to
get-from-file without having to go through the IDServer setup.

ID Card Maker version 4 9
What’s New In Version 4
Direct Interface with Polaroid 2150 Digital and Logitech QuickCam Cameras. This
feature allows the camera to be controlled via the software, enabling the user to speed
enrollment, while saving time and money.
Polaroid Olympus Camera Capture Interface. A DDIShell.exe capture interface was
written specifically to work with IDCM. This capture interface is automatically installed
and ready to use with the Polaroid Olympus camera.
Flashpoint Capture Routines. A flashpoint capture routine now allow images up to 640
x 480 to be captured and provides a greater range for panning. This allows the frame grab-
ber camera to move the interface to all sections of the captured image for better selection.
Flashbus90 Interface. The flashbus90 interface allows the frame grabber camera to be
mounted on its side to capture an image 480 wide x 640 tall instead, enabling a higher res-
olution portrait picture. This also allows greater vertical panning instead of the horizontal
default.
Crop Current Image Interface . When acquiring an image in IDServer there is now a
"crop current image" interface window that allows the captured image to be cropped and
enhanced.
Cropping Mode When Capturing Image. Each time an image is captured, the image
cropping box will open to modify that image. This feature was previously set to 'auto-
matic' which would bypass the cropping window if the image had the correct aspect ratio.
The cropping box will no longer be bypassed; it will always open.
Image Capture of Small Image. If an acquired image's natural size is less than half the
height of the screen, the cropping window will zoom the image 2 to 1 or 3 to 1 if neces-
sary.
Rotate Image in Cropping Window. When acquiring an image via TWAIN, Video for
Windows, direct scan or 'get from file', there are now two buttons in the cropping window
that allow rotation of the image either clockwise or counter clockwise.
Reducing Resolution in Cropping Window. When acquiring an image, cropping will
also reduce the resolution to avoid creating an image with a higher resolution than
requested in IDSetup.
Newly Supported Image Files in IDServer. When acquiring images in 'get from file',
PIC and PCT image files are now supported.

Introduction
10 ID Card Maker version 4
Badge Layout
Barcode Field In IDLayout. When selecting a barcode in IDLayout, an 'IDLayout-New
badge Object' window opens. Inside this window is a dropdown box called 'Name of Data-
base Field containing the Barcode Text'. The 'Barcode' option has been added back to the
dropdown box as a field selection.
Test Print In IDLayout. When creating new card formats or modifying existing ones,
users may test print card layouts. This enables users to ensure that the background, text,
and image boxes are accurately placed.
Solid Box feature In IDLayout. The solid box feature can be added behind an existing
object or text on a card design and will wrap itself around the object or design like a pic-
ture frame. Or, the box can be created first so the added text will automatically adjust to
fit inside the box. This feature is now available on all levels of IDCM.
New Apply Button in IDLayout. The image and text dialog boxes in IDLayout now
have an 'apply' button to allow the customer to save changes without the dialog box clos-
ing.
IDLayout Expression Builder. When selecting a new image or text badge object in
IDLayout, there is a dropdown box that allows users to select name of the database field
containing the image or text file name. If selecting the equal sign (=), a button with an
arrow appears on the right hand side of the box. This will open an edit expression window.
When adding expression editing options to the expression box located at the top of the
window, the expression builder used to fail to display in this box using Windows XP. The
expression box has now been modified and will display under all windows platforms.
More Seamless Software Installation
Software Installation. To make it easier for users to install IDCM, there is now an auto-
matic install of the Access 2000 runtime and USB hardware key driver.
Camera/Printer/Settings Defaults On Setup. When IDCM is being installed, the cus-
tomer can select a printer and/or camera configuration.
Install Process For USB Key. The option to use a USB key instead of a parallel key is
now integrated with the install process.

ID Card Maker version 4 11
Year 2000 Compliance
New Default Install Path. The default install path has now been changed from C:\ITC to
C:\IDCM for new installations.
Other Features
IDCM Includes Education Functionality. Education level I functionality is now in
IDCM level II. Education level II is now in IDCM level III.
Shortcut From Personal Data Form. When right clicking on the back button in the per-
sonal data form, a short cut window opens. This window allows users to go directly to and
from the IDLayout screen, IDSetup window or the configuration form. Previously, if the
database had been recently modified and the shortcut to IDLayout was selected, the field
list was not updated. This has now been fixed to reflect the current field list.
Release Notes Available. Polaroid Commercial ID Systems will place updated release
notes on the Polaroid-ID.com website when available to help end users better understand
new and existing features.
Compatibility List. A compatibility list for all databases and drivers that have been tested
with IDCM v4.02M is available.
Larger Control Window. Since the trend is toward longer field names, the control win-
dow has been stretched from 1 to 2 inches long.
IUpdated Topaz Driver. There is now an updated driver, SigPlus.exe, in the installation
process for the Topaz signature pad. The previous driver TopazSetup.exe is now obsolete.
Updated Acrobat Reader. Acrobat version 5 will be installed if there are no applications
associated with the .pdf extension.
Updated Rainbow Driver. The install process now includes an updated version for the
Rainbow Key USB driver (version 4.51).
Year 2000 Compliance
ID Card Maker is Year 2000 compliant, but only if the following setting has been made:
Introduction
12 ID Card Maker version 4
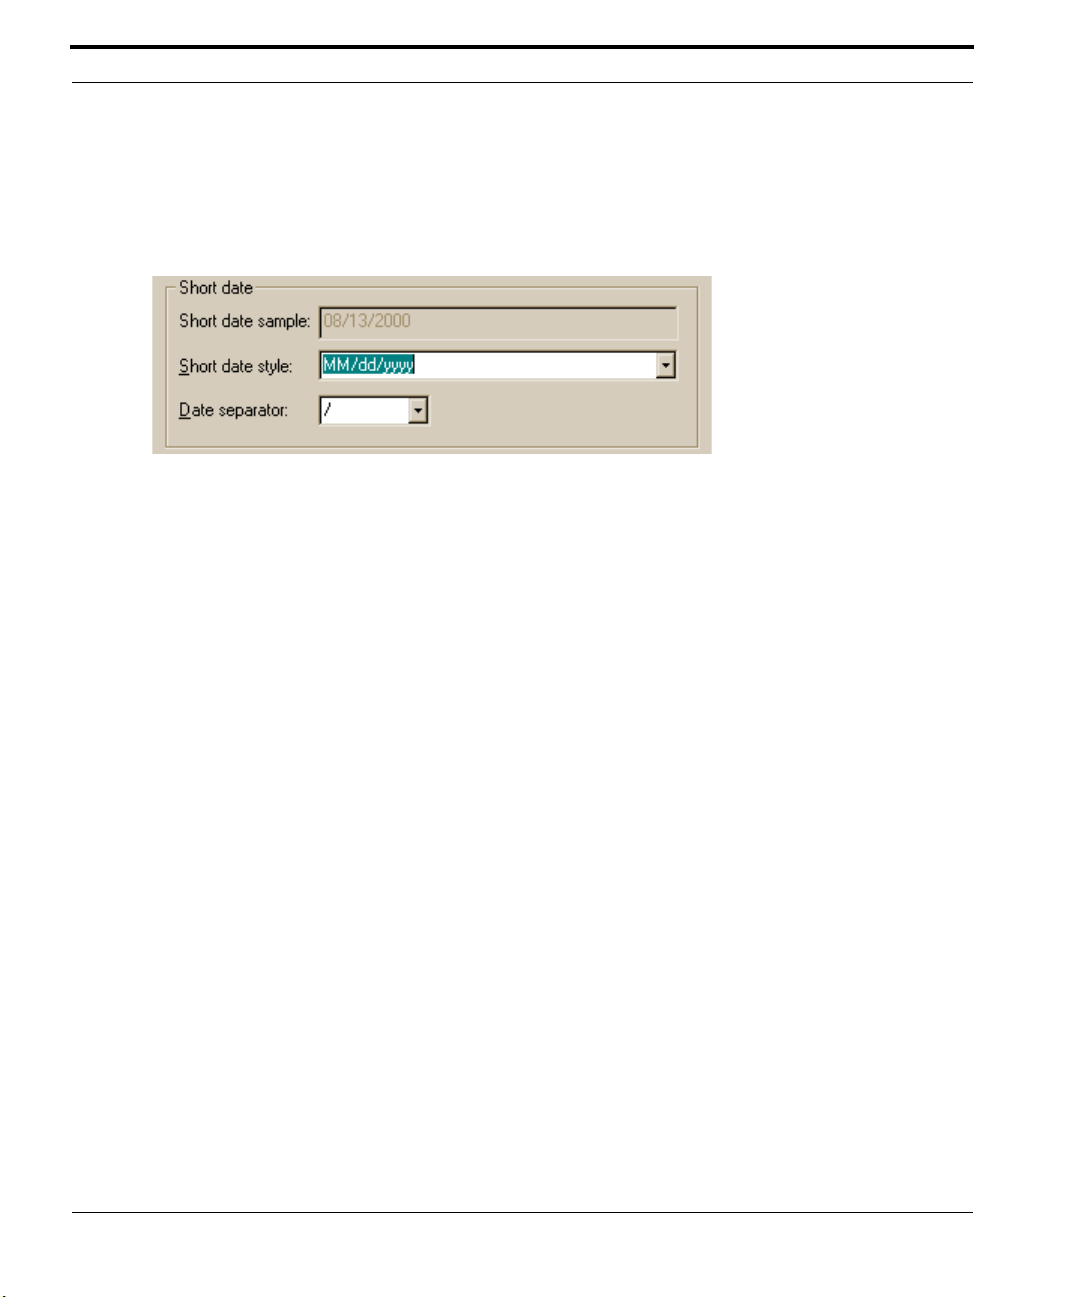
Go to Windows Control Panel folder (StartSettingsControl Panel) and double-click
Regional Settings. Click the Date tab. Select MM/dd/yyyy for the Short date style. You
must now use four-digit year dates in all ID Card Maker date fields.

ID Card Maker version 4 13
CHAPTER 2 Installation
ID Card Maker uses a “wizard” to guide you through the steps for installing the
software. Note: If you intend to install ID Card Maker in a networked environment,
each computer must “map” the shared network drive onto which certain files must
be copied before installation. (Your Network Administrator must create a network
directory which will contain the database and image files, and assign full Read,
Write, and Delete privileges to it. Though the Administrator may name this direc-
tory anything, for simplicity’s sake, we suggest you name it “IDCM”.)
To “map” the drive, perform these steps:
1. Double-click the “Network Neighborhood” icon on your desktop. All available
network resources are displayed.
2. Double-click the workstation/file server where your Network Administrator
created the shared directory, then right click on the folder representing the hard
disk.
3. Choose “Map Network Drive” from the pop-out menu. Allow Windows to
assign a drive letter, and ensure that “Reconnect at logon” is checked.
Note to Windows NT, 2000, and XP users: Before you install ID Card Maker, you
must log on to Windows with full Administrator privileges. If you do not log on with
Administrator privileges, required software keys will not be written to Windows’
registry and ID Card Maker will not operate properly.
Installation
14 ID Card Maker version 4
To install ID Card Maker, perform these steps:
1. Insert the ID Card Maker CD in your CD ROM drive. If “auto insert notification” is
enabled in the Device Manager tab of your System control panel, ID Card Maker’s
installation wizard will automatically begin. If the installation wizard does not begin
automatically, open Windows Explorer and browse the ID Card Maker CD. Double-
click on the file named “Setup.exe.”
2. Follow the on screen prompts.
3. You will be prompted to select a “Network” check box if you wish to install ID Card
Maker in a networked environment. If you check that option, enter the drive letter and
path to the directory your network administrator created earlier.
4. A Select Printer dialog box appears. Select from the options. If your printer will not be
connected to LPT1, select the option None of the above. Click Next.
5. A Select Camera dialog box appears. The default is PDC2150. Click Next.
6. Repeat steps 1-3 at every workstation on which you will run ID Card Maker. At subse-
quent workstations, the setup wizard will detect that the ID Card Maker database has
already been installed on the network drive. You will be prompted to overwrite the
database. Click “No” at that prompt—do not overwrite the database. Proceed as usual.
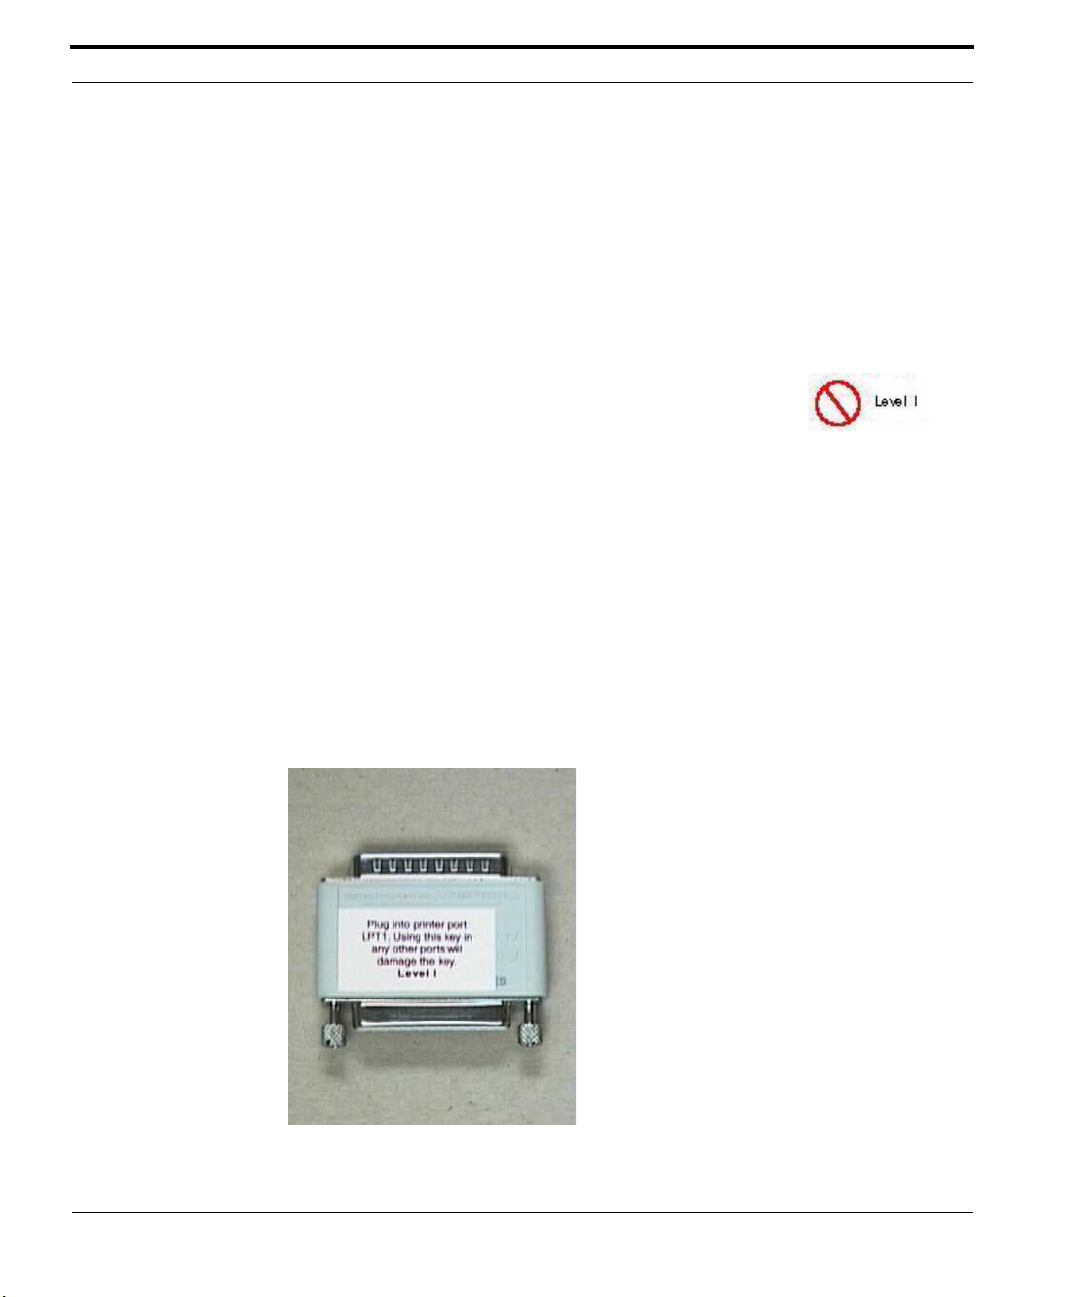
7. You received a “security key” with your software - either a USB key or a parallel port
key. Follow the installation instructions below for your specific key:
• USB - Attach a USB key to any available USB port on each computer running ID Card
Maker.
• Parallel Port - Attach a parallel port key to the LPT1 parallel printer port for each
computer running ID Card Maker.

ID Card Maker version 4 15
If your printer is currently connected to your computer's LPT1 port, unplug the
printer’s cable and attach the security key in its place. The security key has a female
connector at one end and a male connector at the other. It will only attach to your com-
puter one way. The printer’s cable may now be reattached to the back of the security
key. (Note: ID Card Maker also may not work if your printer is plugged into the secu-
rity key and the printer’s power is OFF. Either attach your printer to another parallel
port, or always keep your printer’s power ON when using the ID Card Maker soft-
ware.)
Note: Each “security key” has a unique serial number. After you install ID Card
Maker, the serial number of the key can be displayed by pulling down the H
ELP menu
in any application window and selecting A
BOUT.)
The setup wizard will create a program folder and program icons for ID Card Maker in the
Programs section of Windows’ S
TART button.
While you are now ready to begin using ID Card Maker, it will not be optimized for use
until you have set some program preferences and instructed the program to use your spe-
cific cameras and printers. Therefore, first-time users should carefully read the next chap-
ter, “Tools,” before continuing.
Note: When you launch ID Card Maker, you are presented with an initial Logon window.
The User Name and Password fields are disabled; a short message in the body of the
Logon window explains that “logon” is disabled until a user account with “System
Administrative” privileges is created. See “User Accounts” on page 21.

Installation
16 ID Card Maker version 4
ID Card Maker version 4 17
CHAPTER 3 Setting Up IDCM (Tools
Form)
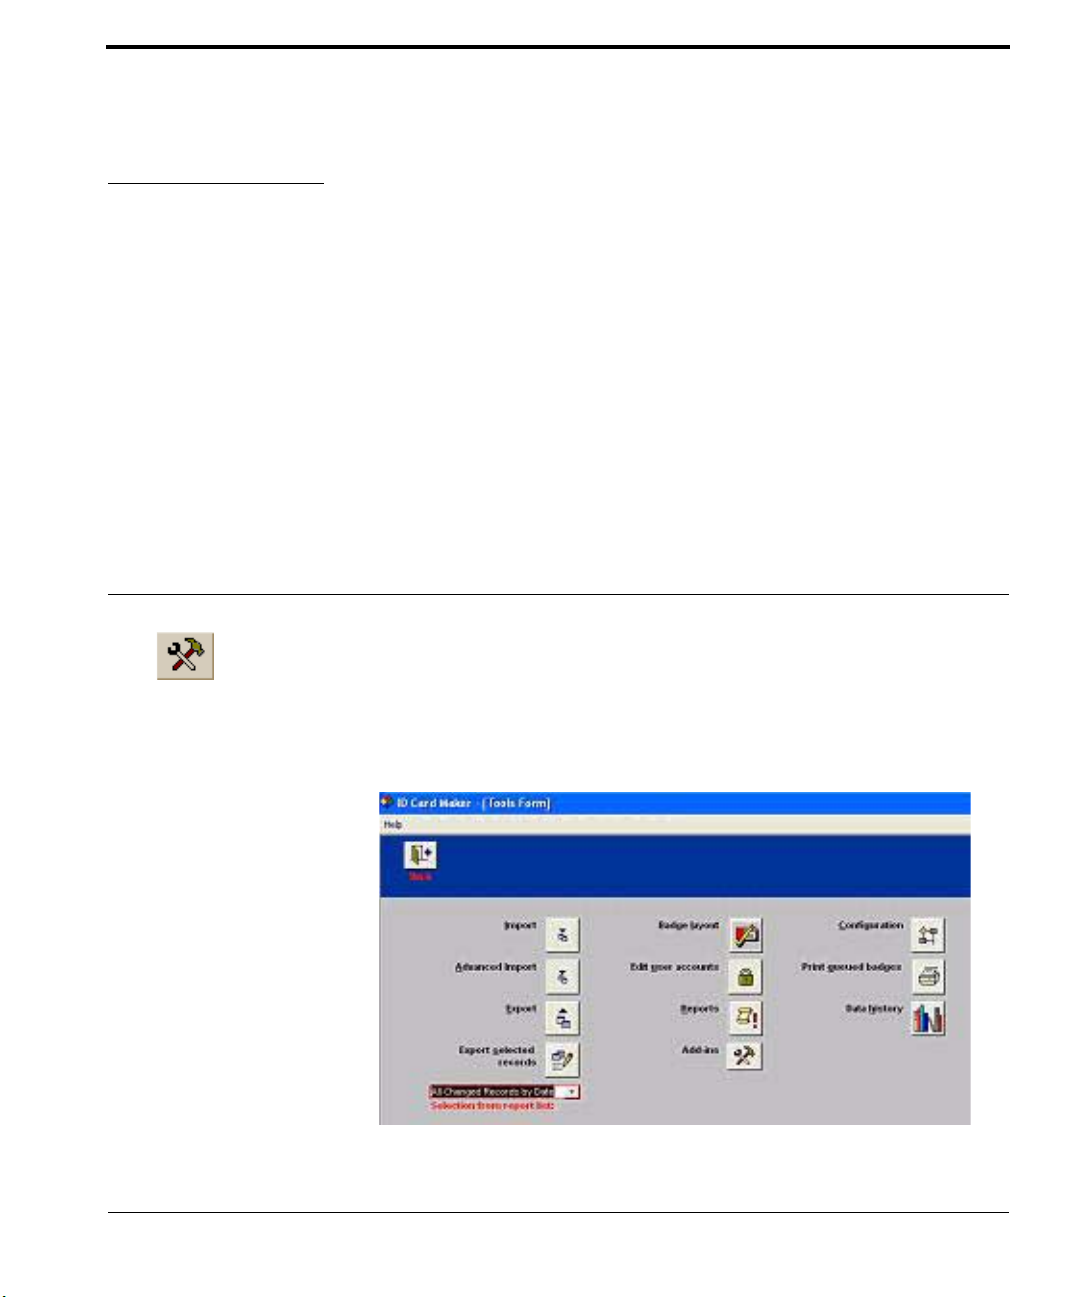
You arrive at the Tools window by clicking TOOLS in the Search window.
The Tools window is where ID Card Maker’s “tools” are located, e.g., importing
and exporting databases, designing badge layouts, setting application preferences,
etc. The following window appears allowing access to different application func-
tions:
Tools Window
Setting Up IDCM (Tools Form)
18 ID Card Maker version 4
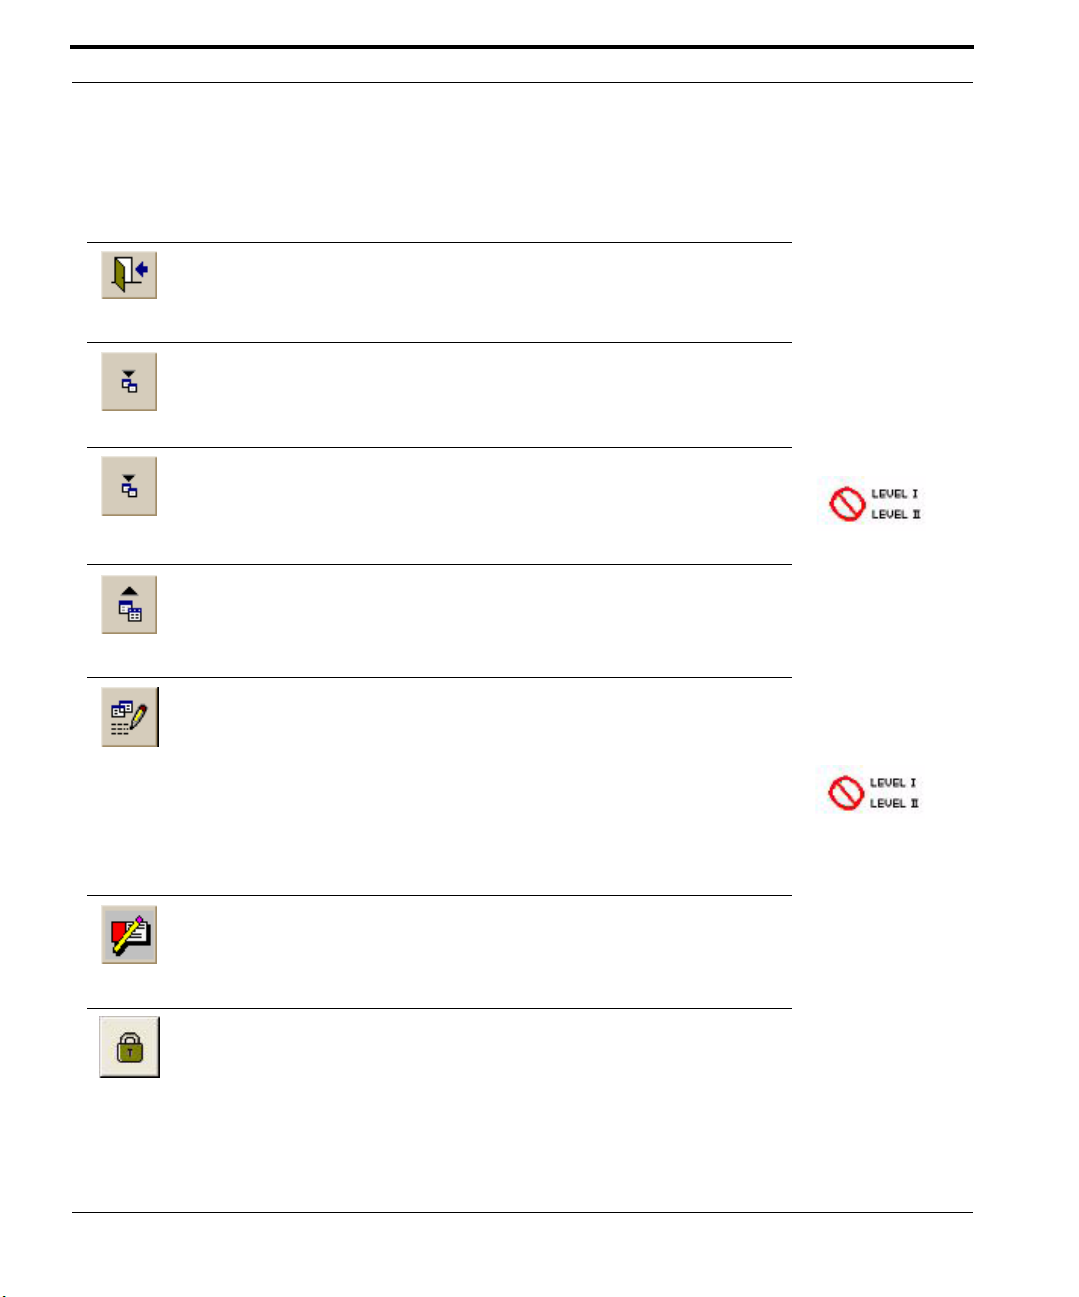
BACK
Returns you to ID Card Maker’s “home” page.
IMPORT
Opens a standard Windows Open dialog to navigate to a text file
containing data exported from another database. ID Card Maker
will import all the data. (See “Importing” on page 83.)
ADVANCED IMPORT
Takes you to an Advanced Import window in which you have a
variety of options for importing or updating data in your database.
You may import from either a text file or directly from a Microsoft
Access database. Text and/or Images. (See “Advanced Import” on
page 85.)
EXPORT
Will export the entire database (text only) to a comma-delimited
ASCII text file. (See “Exporting” on page 95.)
EXPORT SELECTED
RECORDS
Allows you to export a specified set of records to a comma delim-
ited ASCII text file. The
EXPORT DELIMITED TEXT file button is
disabled until you tell ID Card Maker which records you want to
export. Use the
SELECTION FROM REPORT LIST BUTTON immedi-
ately below to do this.
Selection specification is a “pick list” displaying the names of your
Reports. (See “Exporting a Group of Records” on page 96.) Select-
ing a Report from this list will use its query to specify which
records will be exported.
BADGE LAYOUT
Opens a “badge design” window in which you may create your ID
badges in a graphical window. (See “Badge Design” on page 97.)
EDIT USER ACCOUNTS
Takes you to a User Permission window in which you create “user
accounts”—user names, passwords, and application privileges.
(See “User Accounts” on page 21.)
ID Card Maker version 4 19
Though you may access and use any of the tools at any time, you will want to visit several
areas first in order to optimize ID Card Maker for your personal use:
• User Permissions (to create “user accounts” and set application “permissions”)
• Configuration (to set program preferences)
• ID Server Setup (for camera and printer setup)
• Database Management (to modify database fields)
• IDLayout (to design badges)
The chapter sections which follow will describe each of these program areas.
R
EPORTS
Takes you to a Reports window in which you may create, edit, and
print reports. (See “Reports” on page 129.)
CONFIGURATION
Takes you to a Configuration window where you may configure
your application options. (See “Configuring IDCM” on page 27.)
PRINT QUEUED
BADGES
Will immediately print the contents of the “print queue.” (If you
selected “Batch print” and “Always queue” in the Printer Options
Dialog of ID Server Setup, clicking a record’s
PRINT button sends
the badge to the print queue instead of to the card printer. See
“Printers” on page 52.)
DATA HISTORY
Takes you to a Data History window where you may view a log of
record and application events. (See “Data History” on page 135.)
ADD-INS
Opens a selection window allowing you to launch custom “mini-
applications” which add functionality to ID Card Maker. (Add-ins
may be present in the higher versions of our software, and may be
purchased and installed separately for the lower versions.)

Setting Up IDCM (Tools Form)
20 ID Card Maker version 4
ID Card Maker version 4 21
Section 3.1 User Accounts
You arrive at the User Permissions window by clicking TOOLSEDIT USER ACCOUNTS.
User Permissions and Passwords
Through its use of a secure logon, ID Card Maker allows you to have control over who is able
to access the ID Card Maker application. This prevents unauthorized users from creating, edit-
ing or printing badges and reports. The following is intended for those few individuals who
will have permission to create “user accounts.”
A record is created in a hidden table for each authorized “user” of ID Card Maker; a “user
name,” initial “password,” and “access options” are entered into each record. Only someone
with permission to access specific application functions (e.g., create, delete, print, etc.) is
allowed to use them. The application administrator may assign an initial password for each
user, but users may change their passwords at any time thereafter. Though the application
administrator can never “read” a user’s password (passwords always appear as asterisks), he or
she may over-write or delete a user’s password at any time, or delete the “user account”
(record) entirely, thereby denying that individual access to the application.
When you log on to ID Card Maker for the first time, the User Name and Password fields in
the Logon window are disabled, indicating that a “System Administrator” has not yet been cre-
ated. To “secure” the application, that is, force the initial Logon window to require user names
and passwords, at least one user account with “System administrator” privileges must be cre-
ated (see below). If all “user accounts” with “System administrator” permission are deleted,
the logon window will stop forcing the use of user names and passwords. This is a visible
22 ID Card Maker version 4
reminder that at least one “user account” must be created which has over-all access to the
database.
Create a User Account
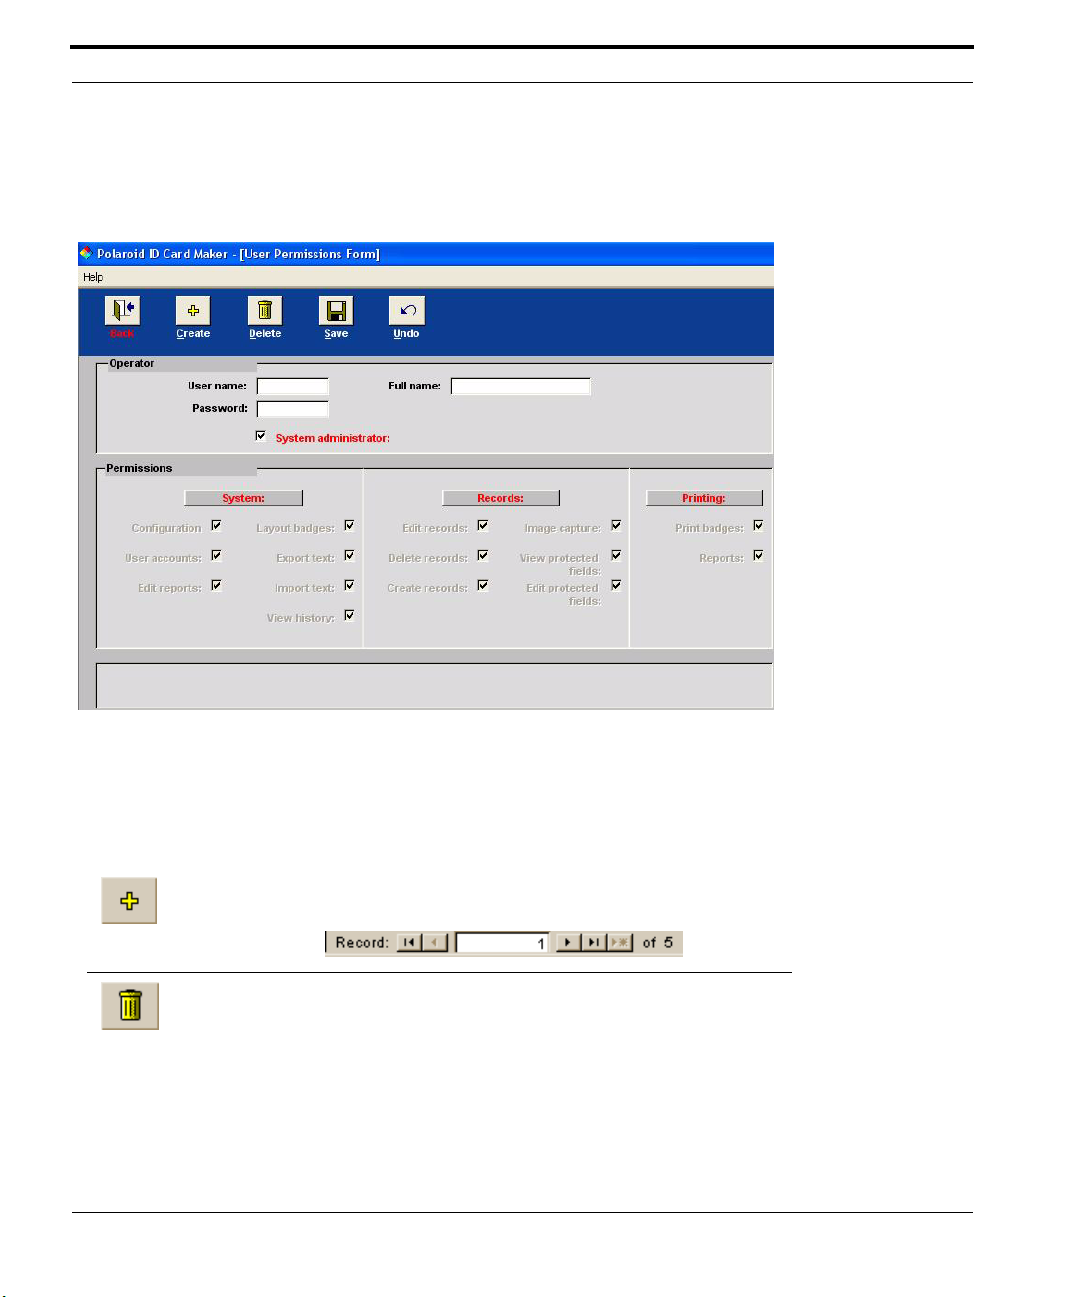
The first time you click the EDIT USER ACCOUNTS button, an empty User Permissions win-
dow appears. C
REATE, DELETE, SAVE, and UNDO buttons are located at the top.
C
REATE
Creates a new “user account.” Each “user account” is denoted by a
“record number” at the bottom left of the User permissions window.
D
ELETE
Deletes the current “user account.”
ID Card Maker version 4 23
User Permissions and Passwords
Click the CREATE button to create a record for yourself. An “Operator” box in this window
contains text fields. Enter a “user name” up to 8 characters in the User Name field. This is
the name you will enter when you logon to ID Card Maker. Enter a descriptive name for
the user in the Full Name field (e.g., first and last names, or employee ID, etc.), up to 50
characters long. Enter a password, up to 15 characters, in the Password field. Passwords
may be alphanumeric and are case sensitive!
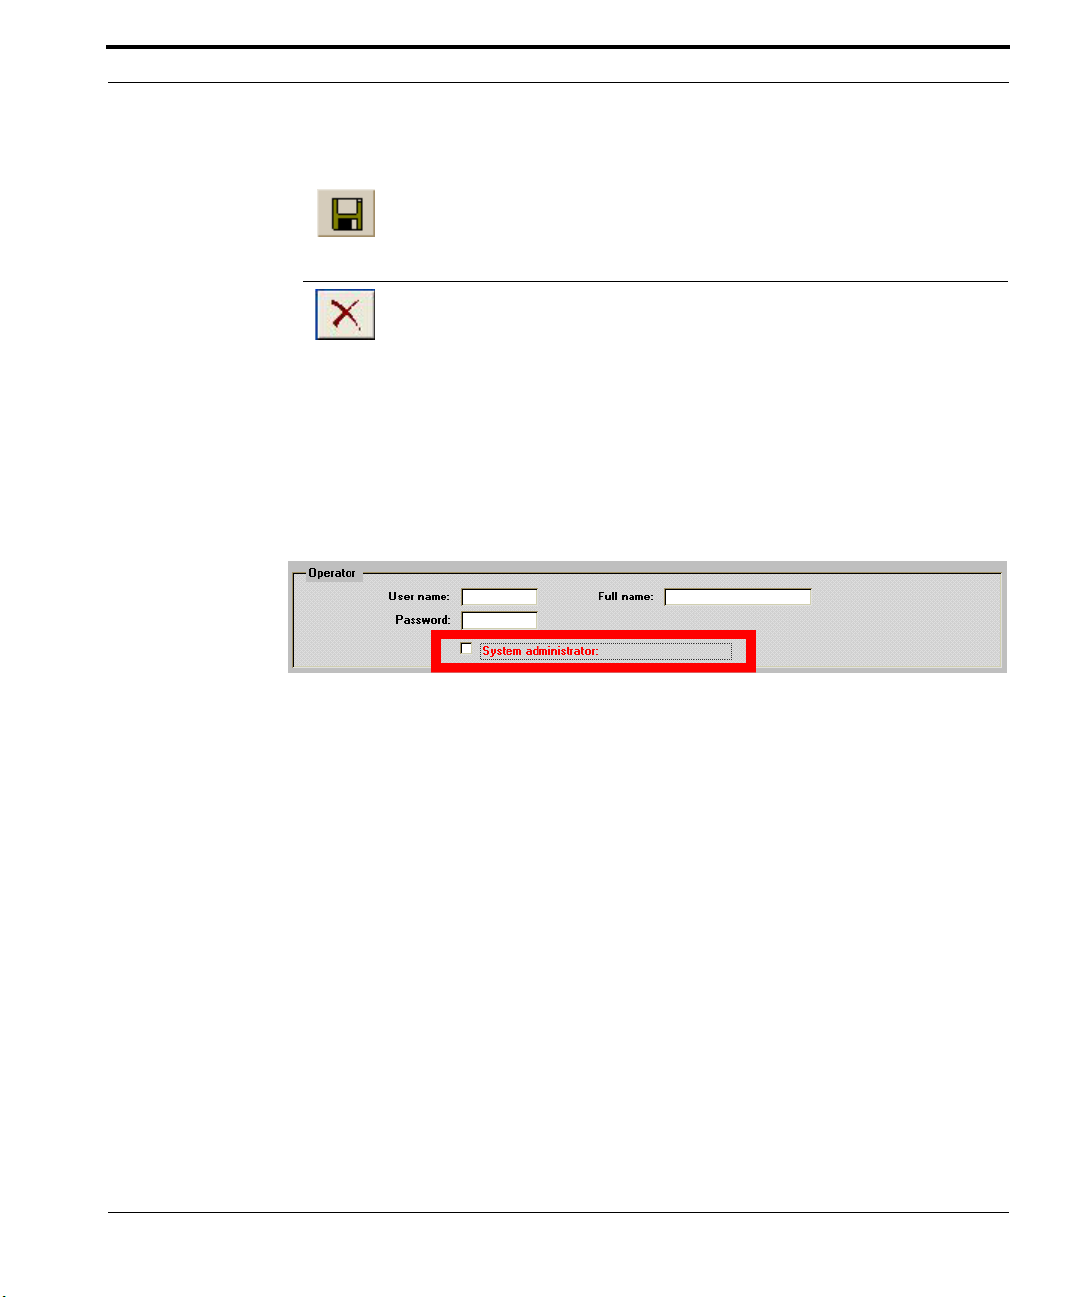
There is a “System administrator” check box labeled in red. At least one person must have
this option checked. It forces the use of User Names and Passwords at the initial Logon
window. Until a System Administrator for ID Card Maker is assigned, anyone may launch
ID Card Maker to create records and print badges. Important! Only someone with System
Administration permission is able to access the Database Management portion of ID Card
Maker. Database Management is where the System Administrator may modify database
fields, and create, copy or attach to Microsoft Access or ODBC databases. (See “Data-
base Management” on page 59.)
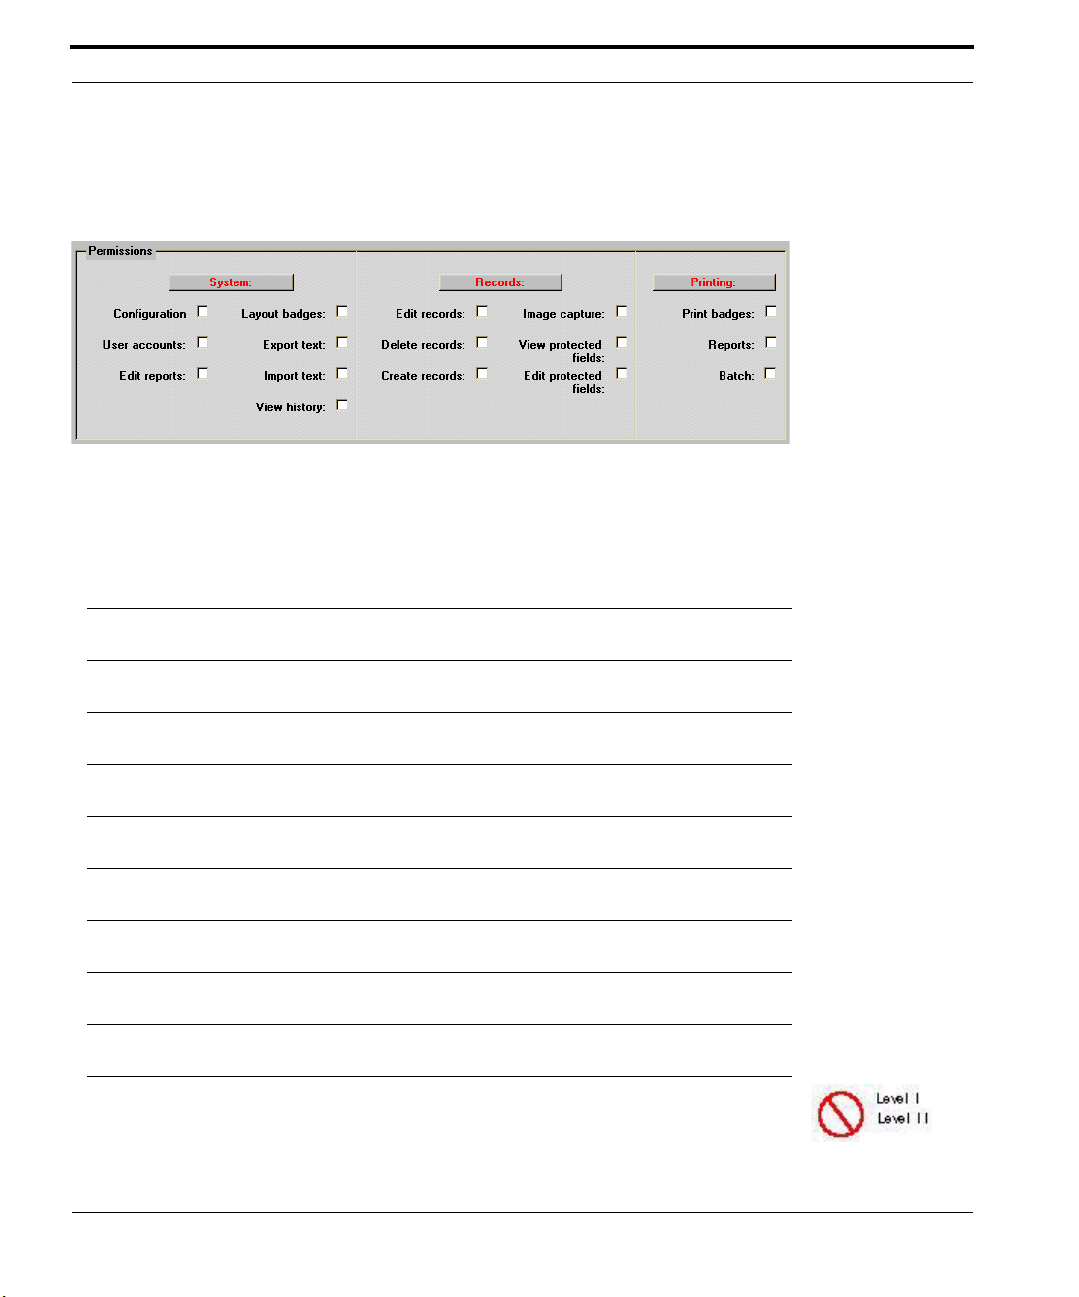
Below “Operator” is a “Permissions” box. This section contains check boxes to enable or
disable access to application functions. A function is enabled for a user when its box is
S
AVE
When a “user account” has been created or edited, the SAVE button
saves the changes.
U
NDO
This button undoes the actions taken since the last “save” in a “user
account.”
24 ID Card Maker version 4
checked. (Click the SYSTEM, RECORD, or PRINT buttons to enable or disable all the options
below them.)
The individual permissions are:
Configuration This permission allows you to use all the tools in the Configuration
window (e.g., Program Preferences, Database management, ID
Server Setup, etc.).
User accounts This permission allows the user to create, edit and delete user
accounts.
Edit reports This permission allows users to create and edit the queries upon
which reports are based.
Layout badges This permission allows the user to open and use the IDLayout
badge design utility.
Export text This permission allows users to export data in the ID Card Maker
database to an export text file.
Import text This permission allows users to import data from another database
into the ID Card Maker database.
View history This permission allows users to view the Badge History, Record
History and Program History if they were enabled.
Edit records This permission allows users to edit data in the ID Card Maker
database.
Delete records This permission allows users to delete records and their images in
the ID Card Maker database.
Create records This permission allows users to create records in the ID Card
Maker database.
Edit protected fields If you marked specific database fields as “protected,” only some-
one with this permission may edit them. The fields are otherwise
un-editable. (See “Edit Field Definitions Window” on page 64.)
Loading...