


 Loading...

Table of contents
Quick Scanning Guide |
iii |
1 Installation |
|
System requirements |
1-2 |
Installing the software |
1-3 |
Technical Support |
1-4 |
Registration card |
1-4 |
2 Scanning |
|
Starting up the software |
2-1 |
Inserting originals for scanning |
2-2 |
Choosing initial settings |
2-3 |
Making a preview scan |
2-5 |
Adjusting settings based on the preview |
2-7 |
Making a final scan |
2-11 |
The Scan to Disk option |
2-11 |
i

3 Advanced scanning settings |
|
When to use advanced features |
3-2 |
Image adjustment: the basics |
3-2 |
Automated features |
3-6 |
Exposure adjustment |
3-8 |
Setting a white, black and gray point |
3-9 |
Adjusting brightness, contrast, and midtone (gamma) |
3-11 |
Adjusting the tonescale curve |
3-13 |
Adjusting color saturation |
3-14 |
Adjusting sharpness |
3-15 |
Saving and reusing your settings |
3-17 |
Plug-in preferences |
3-18 |
4 Troubleshooting |
|
Tips on correcting images |
4-3 |
Hardware and software problems |
4-7 |
Polaroid Offices and Service Centers |
4-9 |
Appendix A: Glossary |
A-1 |
License Agreements |
L-1 |
Index |
I-1 |
ii
|
|
Quick Scanning Guide |
See page |
|
Use this guide as a quick reference for scanning. |
– – |
1 |
Connect your scanner to your computer (see your scanner |
|
|
hardware manual). Turn on the scanner, then your computer. |
1-3 |
2 |
Install the SprintScan software, then restart your computer as |
|
|
instructed. |
2-1 |
3 |
Open your Adobe Photoshop or compatible application. |
2-1 |
4 |
Open the SprintScan plug-in by choosing File, Acquire. |
2-2 |
5 |
Insert your original. Place a mounted slide in the top access |
|
|
slot, or place an unmounted slide or filmstrip negative into the |
|
|
filmstrip carrier and insert the carrier into the side access slot |
|
|
from the right. |
2-3 |
6 |
Choose a film type from the Film pop-up menu. |
2-3 |
7 |
Choose Color or Grayscale from the Type pop-up menu. |
2-4 |
8 |
If necessary, change orientation to match your original by |
|
|
choosing Portrait, Landscape or SuperSlide from the View |
|
|
pop-up menu. |
2-5 |
9 |
Click the Preview button. Your original will be moved down |
|
|
in front of the lens, then raised again after preview. A preview |
|
|
image will appear in the image area of the plug-in. |
2-7 |
10 Click the rotation icon to rotate the preview image in 90º |
|
|
|
increments, if necessary. |
2-7 |
11 Change the area of interest, if desired, with the cropping tool |
|
|
|
on the Preview window. (Click the Cropping button if it is not |
|
|
already selected.) |
2-9 |
12 Click the Auto Exposure button if you want the plug-in to |
|
|
|
make automatic adjustments to the image. |
2-4 |
13 Choose the output resolution you want from the Resolution |
|
|
|
pop-up menu. |
2-11 |
14 Click the Scan button. The original is lowered into the scan- |
|
|
|
ner again. All the settings you have specified apply to the final |
|
|
scan. The scanned image then appears in your imaging |
|
|
application. |
Quick Scanning Guide |
iii |

1 Installation
The SprintScan 35 software for Macintosh is an Adobe Photoshop plug-in module that automatically transfers final scans into Adobe Photoshop or other compatible software, or saves final scans directly to disk.
First, connect your scanner to your computer as described in your scanner hardware manual. Then, install the SprintScan 35 software as described in this chapter.
The software features real-time sharpening options, and tone and color correction. Recent improvements to the software include:
•Automatic maximum sizing of the preview window
•Simplified, efficient scanning features
•Adjustable tone curve control
•Auto highlight, shadow and contrast
•Gray balance correction
•Enhanced user interface controls, such as one-click controls
•Support for the SprintScan 35 Plus scanner
1-1

System requirements
Minimum |
• A Macintosh II family, Quadra family, PowerPC or |
|
Powerbook computer (use appropriate Powerbook SCSI |
|
cable as required) |
|
• System 7.01 or later |
|
• 12 MB of RAM |
|
• A 256 (8-bit) color monitor |
|
• Adobe Photoshop v3.0.4 or later, or Adobe Photoshop plug- |
|
in-compliant software |
Recommended |
• A PowerPC computer |
|
• System 7.53 or later |
|
• 32 MB of RAM |
|
• A 24-bit color monitor |
|
• Adobe Photoshop v3.0.4 or later |
SprintScan plug-in |
The SprintScan plug-in requires: |
|
• Free disk space: Three times the image size |
|
• 4 MB of RAM in addition to the requirements of the |
|
application |
|
Note: Application memory is the amount of memory avail- |
|
able for the application after the system has started. The |
|
imaging application should have enough memory (combined |
|
RAM and hard disk memory) to allow for about three times |
|
the maximum image size you plan on scanning. This means |
|
you should have the minimum memory plus enough memory |
|
for the maximum scan size. Note that the maximum scan size |
|
depends on the images and resolutions you want to scan. For |
|
example, scanning a 35mm slide at 500 dpi resolution |
|
requires about 1.2 MB of memory. Scanning the same slide at |
|
1950 dpi requires 18 MB of memory, and at 2700 dpi, about |
|
32 MB of memory, which means utilizing the hard disk. |
|
If you do not have the minimum required configuration for |
|
using the SprintScan 35, contact the dealer from whom you |
|
purchased your computer system. |
1-2

Installing the software
Before you install |
|
A folder for Plug-ins must be on your system for the installa- |
|
|
tion of the plug-in module. This folder should have been |
|
|
included when you installed the Adobe Photoshop or compat- |
|
|
ible application. If you do not have a Plug-ins folder on your |
|
|
system, see the user guide to your application. Note: The |
|
|
SprintScan Plug-in requires 4MB of RAM beyond the normal |
|
|
application requirements. To accommodate the plug-in, you |
|
|
may need to increase the amount of RAM allocated to your |
|
|
application. |
Upgrade customers |
|
If you are upgrading from a previous version of SprintScan |
|
|
35, do a full install as described below, not a Custom install. |
|
|
As part of the installation, the new install program will move |
|
|
your old SprintScan 35 Preferences Folder to the trash. |
Installation |
1 |
Insert the SprintScan installation disk into a floppy drive. |
|
2 |
Open the disk, if its contents are not already visible. |
|
3 |
Be sure to read any Read Me First file included on the disk. The |
|
|
Read Me First file contains important late-breaking product |
|
|
information that may affect installation and use. |
|
4 |
Double-click the Installer icon to open the Installer program. |
|
|
Note: If you are using a PowerBook 5300 computer, click the |
|
|
Installer icon “for PowerBook 5300 owners” to install a ver- |
|
|
sion of SprintScan 35 that is designed to avoid problems with |
|
|
older versions of that computer. |
|
5 |
Click Continue on the Polaroid screen. |
|
6 |
Click the Install button to install the full program, even if you |
|
|
are upgrading from a previous version. To reinstall selected |
|
|
parts of the software, click Custom and make your selection. |
|
7 |
The system will prompt you to select your Plug-ins folder. |
|
|
Double-click to open folders until the folder containing Plug- |
|
|
ins is selected. For example, in Adobe Photoshop, open the |
|
|
Plug-ins folder and highlight the Acquire/Export folder. |
|
8 |
When installation is complete, click Restart. If you have |
|
|
upgraded from a previous version, empty the trash. To startup |
|
|
the SprintScan 35 software, see page 2-1. |
Installation |
1-3 |

Technical Support
|
Before you call, have ready the following information: |
|
• The model of your computer, including the kind of processor, |
|
and the amount of RAM you have |
|
• The model and serial number of your SprintScan 35 (located |
|
on the bottom or rear panel of the scanner) |
|
• A list of other devices attached to your system, such as CD- |
|
ROM drives, printers, external hard disks, and other SCSI |
|
devices |
|
• A list of any special cards and drivers that you are using, |
|
along with any system extensions (see the Extensions folder in |
|
the System folder) |
|
• Other applications you are using |
|
• A description of the problem and the wording of any error |
|
messages on your screen when the problem occurs |
Run a system diagnostic |
We recommend you run a system diagnostic utility to provide |
|
detailed information about your system before you call. |
Call us |
You may call Polaroid toll-free from within the U.S.A. at |
|
1-800-432-5355, or fax the information about your problem |
|
to 1-617-386-9688, Monday through Friday, 8 A.M. to |
|
8 P.M. Eastern Time. We offer a variety of Customer Support |
|
Services; call us for details and applicable fees. You may also |
|
write to Electronic Imaging Technical Support, Polaroid |
|
Corporation, 565 Technology Square 3B, Cambridge, MA |
|
02139. In Canada, call toll-free at 1-800-268-6970. Outside |
|
North America, contact the Polaroid office nearest you (see |
|
pages 4-9–4-10). |
Internet support |
Technical Support is also available over the Internet. Connect |
|
to our web site at: http://www.polaroid.com |
Registration card
Be sure to fill out and mail your registration card. As a registered owner, you’ll receive information about software updates and about the availability of new scanning products from Polaroid.
1-4

2 Scanning
Starting up the software
The SprintScan 35 system uses a Photoshop-type plug-in module, which you installed in Chapter 1, to capture image data. You must open your application to access the plug-in.
1Turn on your scanner, then your computer.
2Open Adobe Photoshop (or a compatible application).
3Choose Acquire from the File menu.
4Choose SprintScan 35.
The SprintScan 35 windows will appear.
2-1
Inserting originals for scanning
The scanner can accept 35mm slide transparencies without removal from the mounts. You can also scan unmounted slides and 35mm filmstrips using the filmstrip carrier included in the accessory kit. See the instructions provided with your scanner for inserting a slide or filmstrip. Remember that the filmstrip carrier moves in one direction, from right to left. If you go past the image you want, remove the carrier all the way from the left side and then insert it again from the right.
When you choose either the Preview or Scan commands, the SprintScan scanner automatically moves the slide down for scanning and then returns it to the start position when scanning has been completed.
With your original in the scanner and the SprintScan 35 window visible on your screen, choose some basic settings (see the next section). Then preview the image and make adjustments if necessary before your final scan.
2-2
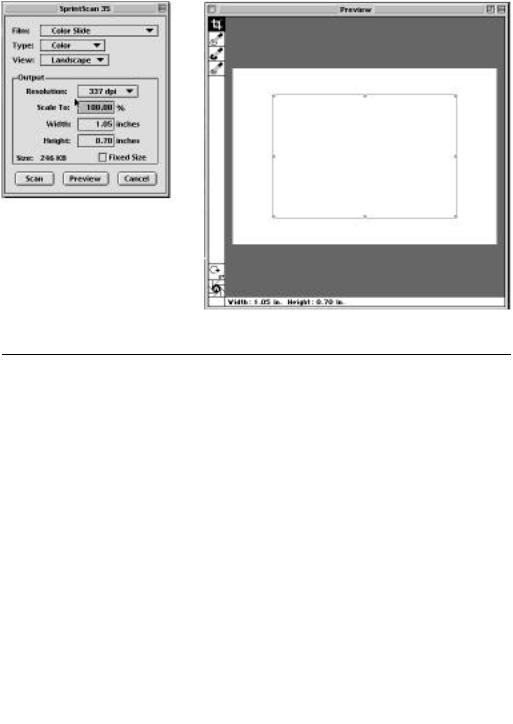
Choosing initial settings
|
The SprintScan plug-in provides you with files containing pre- |
|
determined settings for popular film types, both negatives and |
|
positives, to produce an accurate and satisfactory scan. You |
|
also choose whether you want your image scanned in color or |
|
grayscale, and the resolution for the final scan. |
Film |
The film type files provide basic settings that should give satis- |
|
factory results for most popular slide transparencies and film |
|
negatives. The generic default files can be used if your film |
|
doesn’t appear in the list. |
|
Note: If you do not see film types other than the defaults— |
|
Color Slide, Color Negative, and Black & White Slide—then |
|
the film type files have not been installed correctly in the |
|
Preferences folder. Reinstall the Preferences folder using the |
|
Custom install option (see page 1-3). |
|
To choose a film type: |
|
• Open the Film pop-up menu and choose the name of the film |
|
you are using. The name of the current film type appears as |
|
the selected pop-up menu item. |
Type |
Your choice of image type depends on what sort of reproduc- |
|
tion you want to make from an original: color or grayscale. |
|
To choose an image type: |
|
• Open the Type pop-up menu and choose color or grayscale. |
Scanning |
2-3 |

View |
You may choose portrait or landscape orientation, or the |
|
SuperSlide format (36x36mm). In portrait orientation, height |
|
is greater than width; in landscape orientation, width is |
|
greater. The default is landscape orientation. |
|
• To change orientation, open the View pop-up menu and |
|
choose Portrait or Landscape. The image area in the plug-in |
|
dialog box will change accordingly. |
|
Note: If you want to change the film type, image type, or ori- |
|
entation after making a preview scan, you’ll need to make a |
|
new preview scan. |
|
Note about the SuperSlide format: Be sure you do not use |
|
the SuperSlide format with traditional slides. If you do, |
|
SprintScan 35 scans the area equivalent to the SuperSlide for- |
|
mat. This results in part of the slide mount appearing in the |
|
Preview window. This affects any corrections you make to the |
|
slide. |
Output resolution |
You can scan an original at a number of output resolutions, |
|
ranging from 144 to 2700 dpi. The pop-up Resolution menu |
|
lists the native resolutions, those that give you the best results. |
|
Non-native resolutions may be selected by choosing Other |
|
and typing the resolution you want. |
|
The resolution you choose applies only to the final scan. |
|
Preview scans do not reflect output resolution, but instead use |
|
the resolution appropriate for the screen. To choose an output |
|
resolution: |
|
• Open the Resolution pop-up menu in the Output box and |
|
choose the resolution value you want, or choose Other to type |
|
a value. |
|
The final scan size takes into account the output resolution, |
|
the scale factor, and whether only native resolutions can be |
|
used, as set in the Preferences dialog box. (See Chapter 3 for |
|
information on preferences). |
2-4

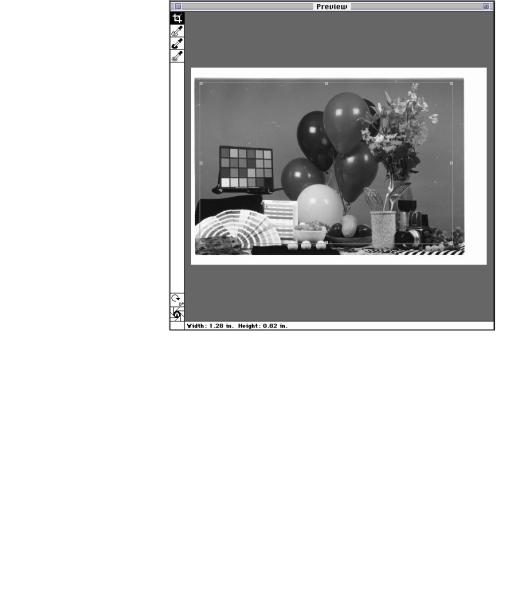
Making a preview scan
A preview, sometimes called a prescan, is an image scanned at low resolution and stored in the scanner’s internal memory buffer, which has a 1 MB capacity. The preview image also appears in the image area of the SprintScan 35 window. Working with the preview image, you can select an area of interest using the cropping controls, and you can also change the resolution of the image for the final scan.
The plug-in controls also allow adjustments to the preview image’s tone, color, and sharpness without requiring you to re-scan the original (these advanced settings are discussed in Chapter 3). When everything is the way you want it, you then choose Scan to capture the data and transfer it to your application.
To make a preview image:
1Position the original in the scanner and choose initial settings.
Insert the film upside down with the emulsion side facing the back of the scanner. (See the hardware manual for more information.)
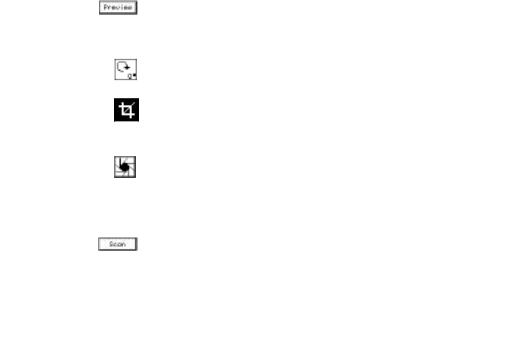
2Click the Preview button in the SprintScan 35 window.
The original is drawn into the scanner and the image is scanned for the preview. While the scanner is working, the ready light will be off.
Scanning takes only a short time. After the preview scan is completed, the original returns to the start position, the ready light glows steadily, and the preview image appears in the preview window, as shown in the following figure.
Scanning |
2-5 |
Maximized Preview |
The SprintScan 35 software lets you get the most of your |
|
computer’s display by making its preview window as large as |
|
possible. It detects the size of your display and automatically |
|
scales the preview window to the largest display possible. If |
|
you normally use two monitors, you can use your second |
|
monitor as your preview window. |
2-6
Adjusting settings based on the preview
|
|
Working with the preview image, you can adjust the image’s |
|
|
|
exposure, area of interest, designate the size of output and |
|
|
|
scaling, if desired, and change the resolution for your output |
|
|
|
scan. (You can change other image characteristics as well, |
|
|
|
such as the tone, color, and sharpening, and see the result |
|
|
|
almost instantly—see Chapter 3 for details.) |
|
Preview rotation |
|
The SprintScan 35 software has a rotation icon that lets you |
|
|
|
rotate the preview image in increments of 90º clockwise. The |
|
|
|
rotation is retained by the software when you perform the final |
|
|
|
scan. This saves you time because you don’t have to rotate |
|
|
|
the image in your image processing application. |
|
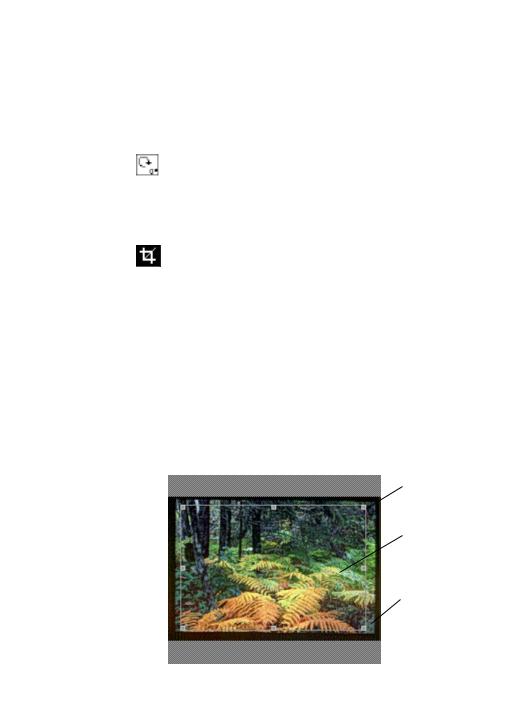
Cropping the area |
|
The part of an image that you want to capture is termed the |
|
of interest |
|
area of interest. Use the selection rectangle in the image area |
|
|
|
to center on the area of interest and to omit the unwanted |
|
|
|
parts of the image from the final scan. (If you are not sure |
|
|
|
how you will want the final image cropped, scan the entire |
|
|
|
image area and crop it later using the tools in your applica- |
|
|
|
tion.) To adjust the area of interest: |
|
|
1 Click the cropping tool, if it is not already selected. |
||
|
2 Move the pointer into the image area. The pointer changes |
||
|
|
shape depending on its placement. |
|
|
3 Change the rectangle’s shape, drag it around, or create a new |
||
|
|
rectangle. |
|
|
|
|
Drag the handles |
|
|
|
|
|
|
|
with the arrow to |
|
|
|
change the shape and |
|
|
|
size of the rectangle. |
|
|
|
Drag inside the rec- |
|
|
|
tangle with the grab- |
|
|
|
ber hand to move the |
|
|
|
rectangle. |
|
|
|
Drag from outside the |
|
|
|
rectangle with the |
|
|
|
crosshair to make a |
|
|
|
new rectangle, replac- |
|
|
|
ing the current one. |
|
|
|
|
Scanning |
2-7 |
When you change the area of interest, the width and height values in the status bar below the image area and in the boxes inside the Output box change accordingly. These two sets of values are the same if the percent shown in the Scale To box is 100%. The values in the status bar below the image always indicate the size of the rectangle in the image area.
Constraining the aspect ratio
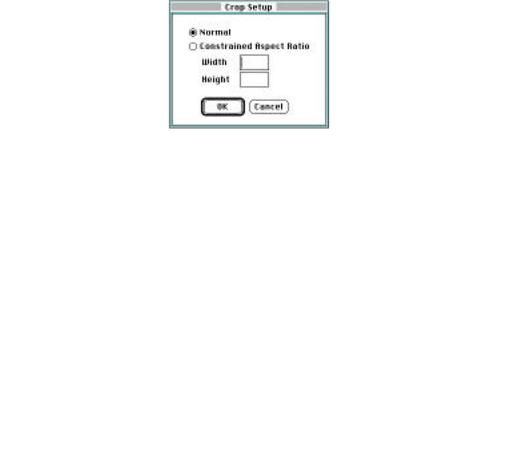
You can constrain the cropping tool to the width and height ratio of your choosing. When constrained, the selection rectangle is kept to the proportions between width and height that you have set. To constrain the tool:
1Double-click the Cropping tool. The Crop Setup dialog box appears.
2Click the Constrained Aspect Ratio button to select it.
3Enter the ratio you want between width and height. Note that the numbers you enter are not units of measure, but an expression of the width versus the height. For example, the value 3 for width and 2 for height means that regardless of the actual size of the area of interest, the width-to-height ratio is 3:2.
4Click OK. Now when you drag the selection rectangle, the aspect ratio will be maintained. The actual values in units of measure at a particular resolution value can be viewed in the Output box.
Opening the dialog box again and selecting Normal returns the controls to their unconstrained state.
2-8

Auto Exposure |
If the button has no A in the middle of the shutter graphic, |
|
click the button to readjust the brightness and contrast of the |
|
image. The software estimates the best contrast and brightness |
|
values for your original. This feature can often give you excel- |
|
lent output results without your having to manipulate settings |
|
yourself. |
|
Note: If the button has an A in the middle, the option has |
|
been turned on for every scan as a default in the Preferences |
|
dialog box; see pages 3-18–3-19. Auto Exposure has already |
|
been applied to your image. |
Setting output size |
The Width and Height values in the Output box reflect the |
and scaling |
output size of the area of interest at a particular scale value. |
|
To change the Width and Height values manually: |
|
• Select the value in the Width (or Height) box and type a new |
|
value. |
|
The scaling value in the Scale To box changes accordingly. |
|
Notice also that the value in the Height (or Width) box is also |
|
adjusted. The adjustment of the scaling and the other dimen- |
|
sional parameter is necessary to maintain the proportions of |
|
the area of interest within the selection rectangle. |
|
You can change the units of measurement by choosing |
|
Preferences from the Edit menu. Your choice of units may |
|
depend on your final output. Pixels is the unit most often used |
|
for screen display, and inches for printed output. |
Scanning |
2-9 |

Fixed size |
If Constrained Aspect Ratio is selected in the Crop Setup dia- |
|
log box, the Fixed Size checkbox is available for selection. |
|
When Fixed Size is selected, the output width and height mea- |
|
surements, as you have entered them, are kept constant, as |
|
well as the aspect ratio between them being constrained. The |
|
Scale To value changes to reflect the scaling required to give |
|
the fixed width and height values. This feature can be useful if |
|
you want to fit an image into an existing space. |
|
You can also change the scaling value manually. For instance, |
|
you might want an enlargement of your area of interest. To |
|
change scaling: |
|
• Select the value in the Scale To box and type a new value. The |
|
values in the Width and Height output boxes change accord- |
|
ingly. The proportions of your designated area of interest are |
|
retained. |
Changing Resolution |
You can change the resolution for a final scan before or after |
|
making a preview scan. |
|
• To change the output resolution, select a new value from the |
|
Resolution pop-up menu. |
|
Changing the resolution will not cause any visible change on |
|
the screen. The change is reflected in the final scan output. |
Size |
The SprintScan 35 software can display the file size of the final |
|
image in megabytes, MB, or kilobytes, KB. Click on the file |
|
size in the main window to toggle between MB and KB. If the |
|
file is less than 1 MB, SprintScan 35 displays it in KB. |
2-10
Loading...